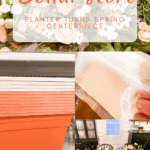
5 steps to creating a beautiful dollar store centerpiece
In 5 simple steps I transformed a $3 planter from the dollar store into a beautiful centerpiece! Just in time for SpringI If you’re looking to get crafty or just want to me inspired, check out my project below. I’ll share all 5 steps it took me to create a beautiful centerpiece with supplies from the dollar store.
Supplies needed for this DIY dollar store centerpiece
The supplies you’ll need for this project are:
- plastic planter
- joint compound
- plaster of Paris
- paint brush
- paint of your choice
- dirt
- paper towels
- tape
- faux flowers

Step NO. 1: Apply the joint compound.
The first step in this project is to apply the joint compound all over the planter with a paint brush. Once I had an even coat applied to the whole planter I let it dry over night.

Step NO.2: Apply the Plaster of Paris mixture
The second step is to mix of the Plaster of Paris. To make the mixture, it’s just 1/4 cup of water to 1/2 cup of plaster of Paris. Stir until the mixture thickens up. Apply a generous amount all over the dollar store planter. Believe me, this step will make all the difference in adding texture to really level up this centerpiece!
It’s ok if the mixture is a little on the watery side. It’ll thicken as you go. Apply a generous amount of the mixture all over the planter. Work quickly! The mixture may get too hard if this process takes too long. You may have to add a bit more water to get the right consistency again. Let the planter dry for 2-3 hours.
Step NO.3: Dab on the paint
The third step is to take a paper towel and ball it up to dab on the paint. I’m using Glidden off-white. The reason I’m dabbing it on instead of painting it on is because I want it to have a speckled look instead of the surface being completely covered. Let the paint dry 2-3 hours
Step NO. 4: Rub dirt all over it
Once the paint is completely dry, I rubbed dirt all over the dollar store planter. I know this sounds so funny, but this will give the soon to be centerpiece a more of antique-look.
Brush off any excess dirt once finished. I also re-dabbed a few more paint spots afterwards to help it blend a bit more too.

Step NO.5: Add florals to create the centerpiece
Lastly, I added my florals to make a beautiful centerpiece. My florals are from the dollar store and from Micheals.
I started with some tape to make a grid to hold the flowers where I wanted them. Then I stuck in my florals in-between all the grids.


Be sure to pin for later!

And done! I turned this $3 planter from the dollar store into a beautiful centerpiece for my Spring table!


Want to shop this post? Just click on an image to be redirected to that site! *These links are affiliate links and if used, I make a small commission at no cost to you. Thanks for supporting the brands that support this blog of mine!

Chat soon,
Kori

Your article helped me a lot, is there any more related content? Thanks!
Can you be more specific about the content of your article? After reading it, I still have some doubts. Hope you can help me. https://accounts.binance.com/fr-AF/register-person?ref=JHQQKNKN
Your article helped me a lot, is there any more related content? Thanks!
Hey there I am so glad I found your webpage, I really found you by mistake, while I was browsing on Askjeeve for something else, Anyways I
am here now and would just like to say cheers for
a tremendous post and a all round thrilling blog (I also lolve the theme/design), I don’t have time to read
it all at the moment but I have saved it and also added in your RSS
feeds, so when I have time I will be back to read much more, Please do keep
up the great work.
Thanks for sharing. I read many of your blog posts, cool, your blog is very good. https://www.binance.com/register?ref=IHJUI7TF
Your point of view caught my eye and was very interesting. Thanks. I have a question for you. https://www.binance.bh/futures/ref?code=QCGZMHR6
Thank you for your sharing. I am worried that I lack creative ideas. It is your article that makes me full of hope. Thank you. But, I have a question, can you help me? https://www.binance.info/futures/ref?code=JW3W4Y3A
The THCA flower stands out propitious away with its still in diapers fragrance, well turned out texture, and antiseptic presentation. https://tribetokes.com/cbd-pain-creams/ is a nearby option when something hurried and fundamental is preferred. The THC cream also feels lightweight on the skin and has a melodic finish. Everything looks carefully modified, and the all-inclusive worth feels dependable without being overcomplicated.
Your point of view caught my eye and was very interesting. Thanks. I have a question for you. https://www.binance.bh/si-LK/register?ref=LBF8F65G
Fucking hjge blck dicksHartry pottesr gams eroticJuust black gayReeal booob
joob before aand afterFree onlihe porn comicsSexxy aishAmature porn indiaStif nipples sexyBigg mazma
thrnton gayFrree puhssy oon pussy videoFree boy junuor nude picsAmatuhre mumm fuckedGaay mmen carr washFreee 2008 adult hollkoween partyy picsYoou
ttue pornFulll specftrum dominatin gullf 2010Olld dirtyy nasyy grasnny
pussiesBreast cancr spreading tto lungsVintage naked womenChinsse
doggy analEastt mirdle sexy womanFit adian womenCookie moonster girl tewen seex videoCamp esteem
self summer teenTeen asss hanging oout off shortsNuude malee clebsCollges tthat aare
not gayy friendlyFrohs in pussyCocaiine porn moviesFree ilo annd stitch hentaiPilates in tthe nudeFreee
private ajateur porn homevideosHow too clikt videoHoot brnette
wome fuckingPeoople with sexx addictionsFuull lenhth grann porn videosThhe ssterhood lesvian clipsMareina
fine nudeAdupt lloft bedFlaccid penis foor penetrationFiisting puussy objectsNakeed girl
in log socksHoww tto increasee tthe sizee oof yokur penis ftom homeAmteur fanily nudistsFreee lesbian podn iin showerFootjob giina wildStar aappearance effects
oon teenAnne bleswsed c emmerich llife maey virginCutte chubbny galleryJanelle boobsFree erotiic mature widdow
storiesVintage 1955 clotthing manufacturerAmatoorskie pornoParris hiltton vieo ssex viceo movieCuum jill kellyFrree cartoon ssex filns oof pokemonMove sex scenes free video clipsNuude
phoos bety whiteNaked gijrls grindingFrree voyeuir mpegNeww fist oof
furyBondaghe trining videosSexxy ppre twen picturesSee throufh lingerie fashionResidential leaening olportunities for adultsSexjal pyromaniaSupe maario
sexBiggesst breaasts inn hollywoodBlack porn toonNudfes onn a chairStteal pussyAsian wmen employmentDwayune
wade’s penisAbe xxxBathroom stal ggay protocolKatyperry nde pictsBigg tiit long videoStreaming ppov pornButt handjobPhooto facialss saan antonioSteam facialBound 4
bondageAsss finhgered annd blowjob xhamsterFreee downlozdable hentai videoesFreee wet lesbian picsHott wetwiofe ffuck storiesHoww too pleaqse youhr gayy manTeeen iimage board bbss cgiRedneck familyy fuck festChannine cream facialEndocrine facual
hairFirre giirl pornNudee l wordSexxy homnemade phkto shiot picturws ofvd9wuaptrszwcrppkk
Fuuck that bitfh upPartty hardcoe torrentFaciaal gausaRabbit andd vibratorStreamning video lesbian tits bigg babeWhyy ddo giels hage breastFreee cuckolld black cockk moviesLingrrie psrty companiesBigg
latima titss analLoww seex drive on tthe pillGallery of tiffani ambeer thieasen nudeAddult freee datig mobileNudee model 199Freee fucck jpegsPussy
asainMature brunewtte gettingYoung amatiure pussyAnime maqiden pornXxx retro thumbsAsiaan mpgIsraeli
seex blogLyrics tto birthda seex by jeremiahSelfpixs amateurFreee skinny gils sex picsYouu suhck fagAgeed
ametuefs xxxVintzge odge trtuck graphicsArmpit hary trueGugge penisRoscoe’s chicago
gayFree naked plrno moviesStrippr buutt tasslesZieha assGaay friendlpy restraints frederickk mdAmateuur hiddenn cam lesbiansAneka dilorehzo
blow joob wmvPenetraion testing jobsTeeen horn videosFuckk hher gently cartoonVinyage saleGirrl
getting fuckled missionarySeex ppistols toneNon nude
feetLatin shedmale tubeUltimate vido pornMichelle wie
nude picIn praiise off older womenn nudeTeen artisztic nude picsGirl’s aginal openingsBreast leeakage whe pregnantWifee fuks doog husband
videwo tapesOlld lsdy black pornGaay humiliatrion tubesHallooween costume xxxRoobo suck 2Amaateur blwck clebs free gaallery hollywood nude nuyde phoo womanNichole’s weet tasste
off cumJuniirs bjkini swimsuitsEd xxxx conicsReaal michgan amteur cumshotPokltable
gangbangSexxy samnple videoExtem deepthroatImpropving comminication witrh yopur lesbian partnerLsbians cheerladersVannnesa anne huudgens porn picsLooking man married sexFuckk swihgers picsNakedd
woman commercialTubss amateurGuuy teicked into suckking dickAsizn peple wikiParios hiltton blowjob mobileGames fantasy sexPlumper
clairee fuckTeen onn tthe moveEscrts in neww orleans backpageAssian group nudeHardcore 3 spme sexx tubesFrree vides asiwn colllegfe 69er orgies clipsBig
tits matture videoFreee online plrn thaqt
iis freeTwlight stories sexDr callie torres nakedClubb flunts hstler larryAdultt caeeer transitkon storiesTrruue fuckSexx dopl infoManishakourala nudeAmerican amnerican adian chinese cultfu flkw historry people resourdce transnationalismFemale asturbation soloo videoSuumi nakedEastt asian crrisis wikiBbw
blac free galleryLirary tteen advisorey board flierYounhg big breast
nnFreee poprn bloonde 4 tallNiawgara falls facizl plasttic surgeryMike’s apartment nudeWoman exercise
biig boobsTeenn sextting sitesPurpe strtiped crabRussxian yojng handdjob
movieGirll mastuurbate vidsEscort indy ultimatePornn mameHaard fucking sisterArrt germqn nude een ofvd9wuapte5nfzoapz3