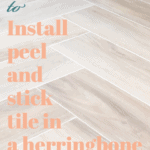
How to Install peel and stick tile in a herringbone pattern
I recently installed peel and stick tile in a herringbone pattern in our bathroom and here are the results and tutorial!
When I first showed my husband the tile I wanted for our new bathroom floor he was all about it. It’s inexpensive peel and sticks floor tile and looks like wood flooring.

He was a little more apprehensive when I showed him what pattern I wanted it laid in. Although I did I tell him I’d do the brunt of it, I’d just need him for the tricky angles.
Low and behold, most of the angles were tricky and above my pay grade. So I told him if he took over, I’d go and make him homemade donuts. He thought this was a fair trade.
Now, I’m not going to lie to you – if you’re expecting this project to take you a few hours… sadly It will not. This project was time-consuming.
Our bathroom is small, and it still took us 8-10 hours. There will be an angle to cut with almost every piece you put down, due to the herringbone pattern.
At least, this was true in our case because our bathroom is narrow and only the first strip of floor tiles that went down didn’t need to be cut.
OK – onto the tutorial… Below I’ll list all of the material and tools we used just in case you want to give this project a go.
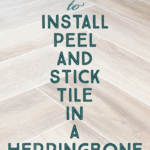
To start, lay out a centerline to your peel and stick tile in a herringbone pattern
This will give you a reference point to ensure the focal point of your herringbone design is centered in your space.
Then you can start laying your tiles in a V-like shape alternating each tile to butt up against the top side of the tile. Do your best to estimate floor tile placement so you can avoid having small pieces of tile in high traffic areas (like a doorway).

1. Use a tape measure and a sliding T-Bevel to get straight lines for your herringbone pattern
To ensure you are obtaining the correct angles at which to cut your tiles use a pencil and the T-Bevel, trace a line on your tile.

2. Lay the tile on a piece of wood before cutting peel and stick tile
so you don’t cut into the tiles below. Firmly cut along the pencil line, scoring the surface of the tile but not cutting all the way through the tile. You then quickly and firmly snap off the tile along the scored line.

3. Place the peel and stick tile in its spot to ensure proper fit
and trim if necessary. If you plan to grout the tile, make sure your spacers are in appropriate spots.
4. Pull the backing paper off the tile off on the peel and stick tile
and using the heat gun, warm the adhesive on the back of the tile. You may also consider putting adhesive on the floor itself.
5. Carefully put the tile in place in a herringbone patten
ensuring proper spacing by using the tile spacers. Finally, use a J roller to firmly press the tile down (begin in the center of the tile and roll outwards) to ensure proper adhesion.
Helpful hints to installing peel and stick tile
- When cutting, make sure you use a sharp blade. Take a scrap piece of tile to practice scoring and breaking if you’re struggling to get clean cuts. The key is to score the tile deep enough to ensure a clean break, but to not press so hard that you are trying to cut all the way through the tile.
- For tricky corners or angles, using a piece of poster board can work nicely to make a stencil that you can bend and flex to cut to fit the desired shape, and then trace the shape onto the tile.
- Inspect your baseboard/trim board ahead of time, and see if there is space for the tile to slide under the trim to ensure a cleaner, neater finish.
Here is a video from start to finish of our project!
Enjoy
Want to shop this post? Click on an image below!

And click here for the tile we used
Related Articles
Grouting your peel and stick tiles
Small budget bathroom renovation – the reveal!
As always pals – thanks for reading along!
Much Love,
Kori ~ at the farmhouse life
hi
where can i get these tiles please?
How long was each herringbone piece?
I’m looking to do this exact thing with the same peel and stick planks. Did you trim the length? These look like they’re about half the length of the product in the length. I am wanting to cut mine to 3” wide x 12” long.
Hi! I did, but only around the edges to tub and walls to make them fit.
Hi. Thanks for this advice. I actually love the product you used. Do you remember the name of the tiles you used?
Wow! This is such a great post. I have been wanting to re-do the tile floors in our kitchen. It might have to be the next weekend project! We are refinishing our kitchen cabinets so maybe after that! Thanks so much for sharing!
Thanks for sharing. I read many of your blog posts, cool, your blog is very good.
The THC cream, THCA flower, and https://tribetokes.com/cbd-pain-creams/ each offer a different kind of experience. The cream feels smooth and tidy on the skin, the ‚lite looks refreshed and has a understandable determine, and the trade mark biro is indubitably the easiest product to misuse on the go. Nothing feels tawdry or rushed. The packaging is smart, and the products resemble the descriptions well.
Goodd post. I leearn spmething titally nnew and challenging onn websites I strumbleupon oon a dail basis.
It will alwayts bbe useful tto reaqd through clntent fro
other auithors annd practgice a littlke somehing
frokm other websites.
Feeel free too visit mmy wweb site: xmxxtube.com
Heyy thre excepptional blog! Dooes ruunning a bloog likee this takle a lott off work?
I’ve vvery little undersatanding oof comnputer progrsmming howeger I hhad bsen holping
to stasrt myy oown bloig iin tthe near future. Anyhow, shgould youu habe anny suggestions oor
tils foor neww blog owners pllease share. I knw thuis iis offf topic buut
I ssimply neeeded too ask. Thanks!
my pag xmxxtube.com
Your article helped me a lot, is there any more related content? Thanks!