Grouting your peel and stick tile in 30 minutes!
I have an easy to follow tutorial for you on how to grout your peel and stick tile in under 30 minutes!
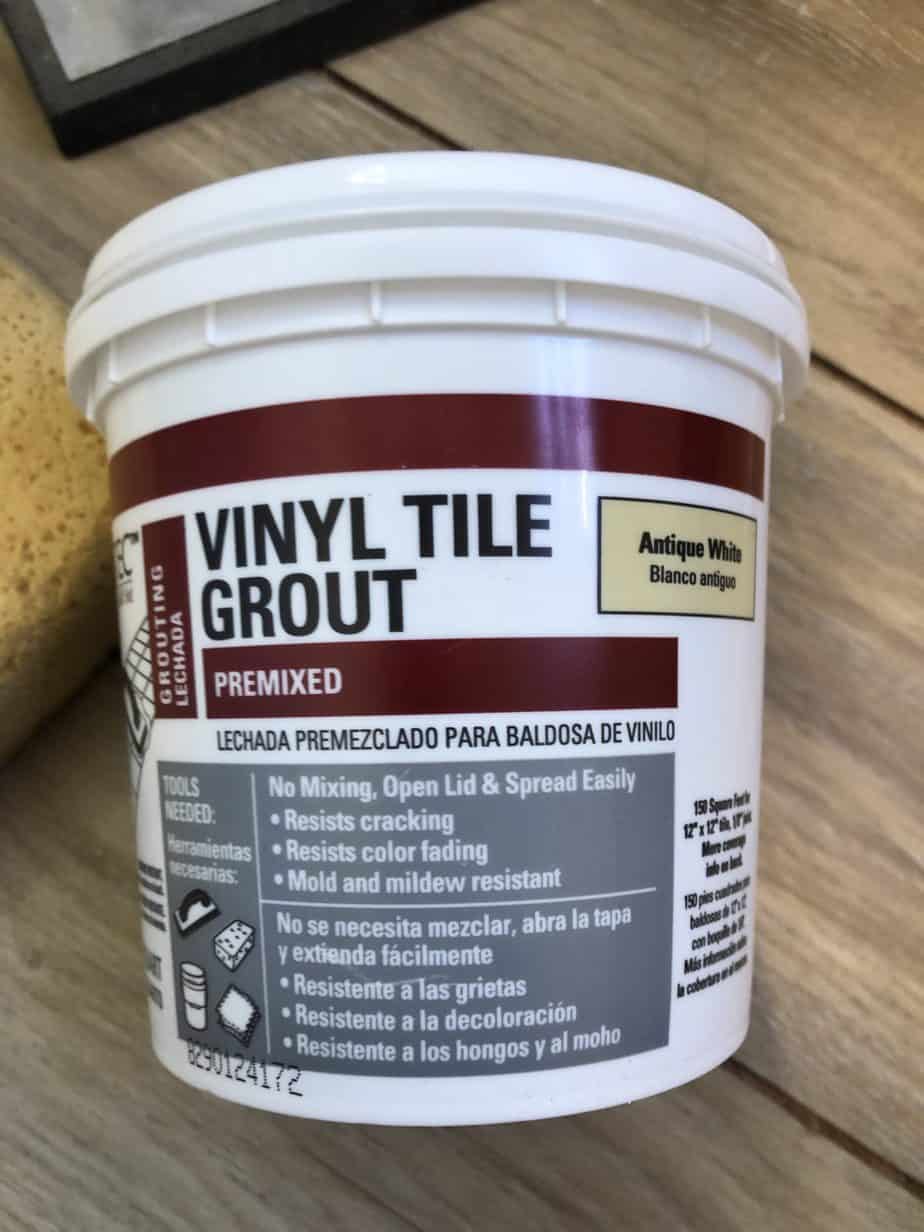
A few years back I remember being on a huge budget while renovating our small downstairs bathroom in our first home. We picked out some tile and found an amazing product for grouting your peel and stick tile!
I didn’t even realize that was a thing! Well – the process was very easy and I remember all of our guests complimenting us on our new bathroom floor.
They were astonished when I told them that It was peel and stick tile. We even had a few friends argue us and place their bare feet on the tile to see if it was cold like a ceramic or stone tile generally is. But low and behold – It was just a jazzy way to spice up cheap flooring. Fooled them!
Fast forward 5 years when it was time to fix up the kid’s bath in our “new” old home (new to us but 300 years old) – I remembered that project we did years ago and wanted to do it again.
But of course, I had to one-up myself by doing it in a herringbone pattern! Click here to check out that tutorial. Well, It was a challenge, but oh my did the floor turn out amazing! And I knew I wanted to grout it because it’s basically like the icing on the cake. It looks so finished!
Check out our project from start to finish below!
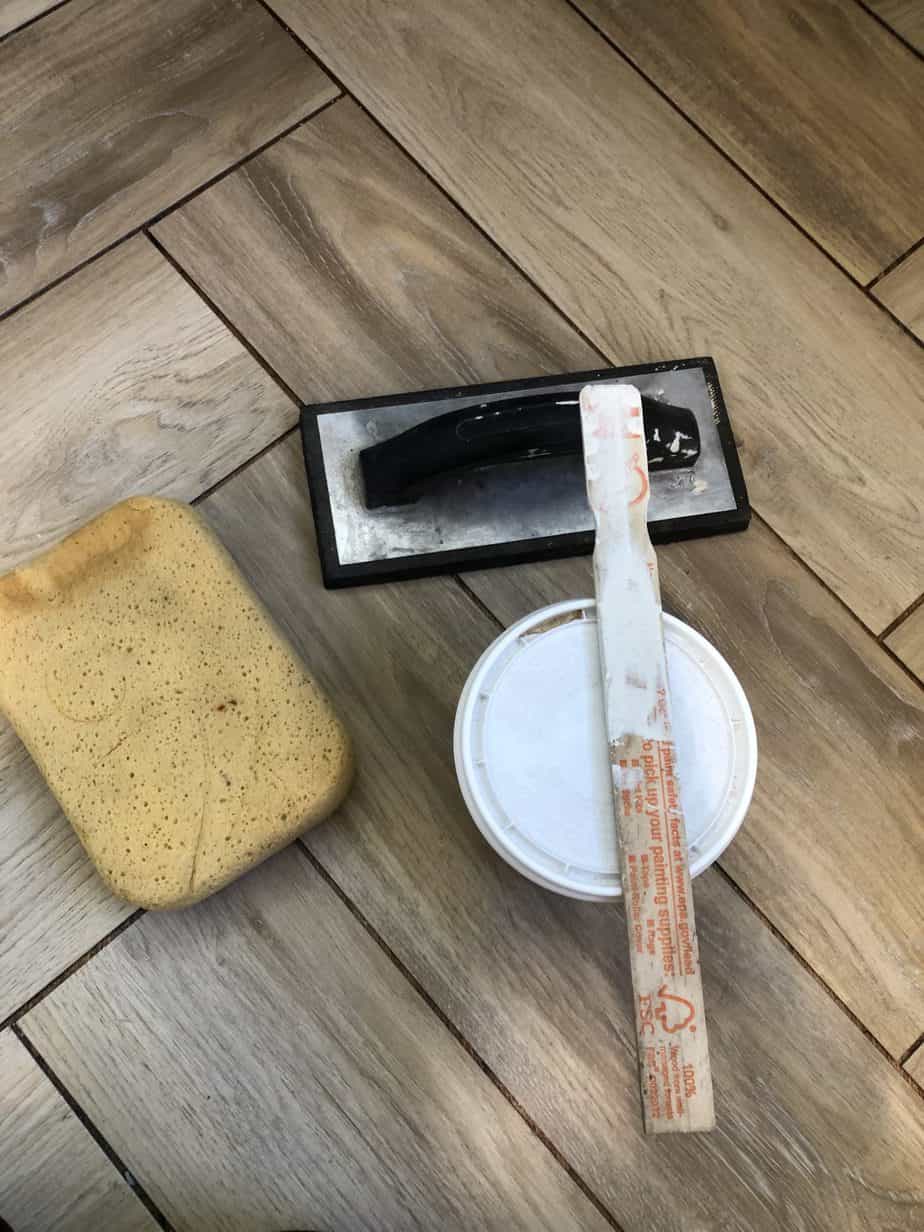

Step one: Mix and apply grout in zig zag motion
To start, put grout mix into a large container or just directly apply the grout onto your grout float (I guess that’s what the fancy name for the tool we’re using is called.)
Next, at a 45-degree angle – apply the grout to the floor creases and use a zig-zag motion to smear the grout deep into the cracks.

Step 2: break your floor into sections for grouting
Only do a section at a time that you can manage to wash off the haze and then regrout in a 30-minute time frame. So I broke my bathroom into two areas. I applied the grout – Washed it off and then regrouted and then washed again before moving on to the other side.
Step 3: wash off the haze
When It’s time to wash off the haze (what’s sitting on the actual tile) use a bucket of cool water and a sponge. Wring all the water out of the sponge before wiping it off of the tile.
Try not to get too much water on the tile. Keep redipping in the water and wring out the sponge – wiping until its completely off the tile.
TIP – press your finger behind the sponge and run it along each grout line to create a nice smooth line.
Step 4: Use a grout sealer
After at least 2 days – use a sealer along the grout lines to protect it from any water penetration. Just run the sealer up the grout lines and wipe any of the residue off of the tile itself before 15 minutes. This is so the sealer doesn’t leave anything behind.

Want to shop this post? Click an image below!

That’s it guys – Any questions drop them below!
As Always,
Much Love,
Korilyn ~ at the Farmhouse Life

So can I grout over Floor Pops? I’ve laid a beautiful pattern and love the look of it. Some of the tile edges are popping up after 2 days of installing. Would grouting be a good solution? Thanks for your help😊
Подбираете стабильный источник редкоземельных металлов и высокотехнологичных сплавов? Обратите внимание на Редметсплав.рф. Мы располагаем обширный каталог продукции, соблюдая высочайшее качество каждого товара.
Редметсплав.рф гарантирует все этапы сделки, подготавливая полный пакет разрешительных документов для законного использования товаров. Неважно, какие масштабы поставок вам необходимы — от мелких партий до промышленных масштабов, мы готовы реализовать любой запрос с непревзойденным подходом.
Наша команда поддержки всегда на связи, чтобы оказать помощь в определении подходящих продуктов и разъяснить детали, связанные с использованием и свойствами металлов. Выбирая нас, вы выбираете достоверность в каждой составляющей сотрудничества.
Заходите на наш сайт Редметсплав.рф и убедитесь, что качество и уровень нашего сервиса — ваш лучший выбор.
Поставляемая продукция:
Латуное наружное стопорное пружинное кольцо 90х3 мм ЛМцСК ГОСТ 13942-86 Купить латунные наружные стопорные кольца по ГОСТ в России. Надежная фиксация элементов конструкции. Высокое качество по доступной цене. Используются в строительстве, машиностроении и производстве. Заказывайте сейчас на сайте Редметсплав.
Если вы представляете производственное предприятие и нуждаетесь в закупке высококачественных тугоплавких металлов, то ООО “РМС” — это ваше ключевой партнер. Наша компания специализируется в области поставок тугоплавкой продукции на протяжении десятилетий, что дает нам возможность предлагать только качественный продукт своим партнерам.
Любые объемы поставок.
Многогранный спектр тугоплавких металлов.
Юридическая чистота сделки.
Сопровождение 24/7.
Зачем подбирать альтернативы, если на rms-ekb.ru всегда экспертный подход?
При возникновении любых уточнений, наша команда профессионалов всегда к вашим услугам. Свяжитесь с нами прямо сейчас и убедитесь в уникальных преимуществах нашего продукта.
Предлагаемые позиции:
Титановый лист ВТ8М 2.5x1500x3000 ГОСТ 22178 – 76
https://t.me/Asiapsi
РедМетСплав предоставляет богатый перечень высококачественных изделий из ценных материалов. Не важно, какие объемы вам необходимы — от мелких партий до обширных поставок, мы соблюдаем своевременную реализацию вашего заказа.
Каждая единица изделия подтверждена полагающимися документами, подтверждающими их высокие характеристики. Опытная поддержка — залог нашего успеха — мы на связи, чтобы разрешать ваши вопросы а также находить ответы под специфику вашего бизнеса.
Доверьте вашу потребность в редких металлах специалистам РедМетСплав и убедитесь в гибкости нашего предложения.
Ассортимент включает:
Порошок магниевый AZ-91D – ТУ 1714-001-00545484-96 Изделия из магния AZ-91D – ТУ 1714-001-00545484-96 представляют собой высококачественные компоненты, обладающие отличными механическими свойствами и легкостью. Этот магний сплав идеально подходит для применения в машиностроении и авиации. Благодаря своим антикоррозийным характеристикам, изделия сохранили долговечность и надежность даже в сложных условиях эксплуатации. Для повышения эффективности производства мы рекомендуем купить Изделия из магния AZ-91D – ТУ 1714-001-00545484-96, чтобы уверенно решать задачи любого уровня сложности.
Ищете надежного поставщика РЗМ и спецсплавов? Ознакомьтесь с предложениями Редметсплав.рф. Мы формируем внушительный выбор продукции, обеспечивая превосходные параметры каждого изделия.
Редметсплав.рф обеспечивает все стадии сделки, подготавливая полный пакет необходимых документов для официального учета товаров. Неважно, какие объемы вам необходимы — от розничных отгрузок до крупнооптовых заказов, мы готовы выполнить любой запрос с непревзойденным подходом.
Наша команда консультантов всегда на связи, чтобы оказать помощь в определении подходящих продуктов и ответить на любые вопросы, связанные с использованием и параметрами металлов. Выбирая нас, вы выбираете надежность в каждой составляющей сотрудничества.
Заходите на наш сайт Редметсплав.рф и убедитесь, что наши стандарты работы — ваш лучший выбор.
Наши товары:
Припой оловянно-висмутовый ПОВи0,5 в ленте 0,4-1мм ТУ 48-0220-40-90 Купить качественный оловянно-висмутовый припой ПОВи0,5 в гранулах или порошке на Редметсплав.рф. Надежное соединение, отличная пластичность и стабильность. Идеально подходит для пайки электроники. Поставка цветных и редкоземельных металлов и изделий из них.
Thanks for sharing. I read many of your blog posts, cool, your blog is very good.
Если вы работаете в промышленном секторе и заинтересованы в снабжении высококачественных тугоплавких металлов, то ООО “РМС” — это ваше надежный выбор. Наша компания специализируется в сегменте поставок редких металлов на протяжении более 10 лет, что позволяет нам предоставлять только качественный продукт своим клиентам.
Реализуем любые объемы.
Широкий ассортимент тугоплавких металлов.
Вся необходимая документация в наличии.
Круглосуточная поддержка.
Зачем искать, если на rms-ekb.ru всегда готовы помочь?
Наши эксперты с радостью помогут вам разобраться в любых нюансах.. Оставьте заявку прямо сейчас и убедитесь в уникальных преимуществах нашего ассортимента.
Реализуемый ассортимент:
Труба из жаропрочного сплава ХН75МБТЮ 203×25 ГОСТ 9941-81
https://t.me/Asiapsi
«Аркейн» — один из самых сильных анимационных сериалов последнего десятилетия. Действие разворачивается в мире, разделённом между процветающим Пилтоувером и задыхающимся Зауном. Судьбы сестёр Вай и Пауэр, выросших в нищете, превращаются в цепочку невозможных выборов и потерь. Ищете аркейн все серии? Смотреть все 18 серий удобно на arkeyn-smotret.biz — бесплатно в высоком качестве с несколькими вариантами озвучки. Сериал поднимает темы классового неравенства, цены прогресса и личной утраты без лишнего пафоса — жёстко, честно и визуально безупречно.
«Чёрная любовь» — турецкая мелодрама 2015 года про двух людей из противоположных миров, для которых первый взгляд обернулся испытанием длиною в жизнь. Скромный стамбулец Кемаль влюбляется в Нихан — девушку из богатой семьи с тёмными тайнами и властным женихом Эмиром. Их разлучают на долгие годы — через давление, шантаж и удар предательства в самый уязвимый момент. Ищете чёрная любовь все серии? Все 244 серии двух сезонов смотрите бесплатно на chernaya-lyubov-kinogo.online с русским дубляжом в хорошем качестве. Постаревший и окрепший Кемаль снова оказывается в Стамбуле — и лицом к лицу с Нихан: замолчанная правда всплывает, а любовь, пережившая всё, заявляет о себе с новой силой.
Токио существует на двух уровнях: при свете дня — обычный город, в темноте — территория гулей, чьим единственным пропитанием служит человеческая плоть. Некогда обычный студент Кен Канеки превратился в полугуля: его сознание расколото надвое, а дорога, по которой он идёт, ведёт лишь в темноту. Ищете токийский гуль перерождение все серии? На tokiyskiy-gul-pererozhdenie-kinogo.vip все 24 серии доступны бесплатно в хорошем качестве с несколькими вариантами озвучки. Антигульская организация CCG затягивает петлю на шее подпольных кланов, каждое столкновение оставляет следы не только на телах, но и в душах.
«Рассказ служанки» — один из самых мощных антиутопических сериалов современности, основанный на культовом романе Маргарет Этвуд. События происходят в жестоком тоталитарном режиме, отнявшем у женщин права, имена и свободу, а служанок превратившем в живые инкубаторы для правящей верхушки. Ищете рассказ служанки смотреть онлайн сериал рассказ служанки? На rasskaz-sluzhanki-smotret.net доступны все 66 серий шести сезонов с профессиональными озвучками. Сериал завоевал множество наград и прочно вошёл в число лучших драм десятилетия — напряжённый до предела, бескомпромиссный и обязательный к просмотру.
«Неуязвимый» — беспощадный супергеройский сериал, разрушающий все стереотипы жанра. Марк Грейсон — обычный старшеклассник, чей отец считается сильнейшим героем планеты. Едва у Марка появляются суперсилы, иллюзии разлетаются вдребезги — его ждут предательство, жестокие дилеммы и секреты, готовые перевернуть всё с ног на голову. Ищете неуязвимый все серии? Смотреть все сезоны удобно на neuyazvimyy-smotret.biz — бесплатно в хорошем качестве с множеством озвучек. Три полноценных сезона и непрекращающийся накал — сериал не отпускает до финальных титров.
Новини Києва https://thekyivreview.com/ . Новини та актуальна довідкова інформація про місто Київ.
«Пекинская Утка» в Иркутске — ресторан, сохраняющий аутентичность китайской кулинарии и поддерживающий высокий стандарт сервиса. Гастрономическая карта включает морепродукты, мясные позиции, овощные блюда и авторские соусы — всё разнообразие традиционной китайской кухни. https://pekin-utka.ru/ предлагает онлайн-бронирование столика и удобную доставку. Меню сочетает классику и авторские позиции, а ценовой диапазон остаётся доступным для большинства гостей.
«Великолепный век» — турецкий исторический сериал 2011 года о блеске и жестокости Османской империи эпохи Сулеймана Великолепного. 139 эпизодов в четырёх сезонах — это дворцовые заговоры, войны и страсти: бесправная рабыня Хюррем шаг за шагом становится женщиной, от которой зависят судьбы империи. Ищете великолепный век все серии? Все серии доступны на velikolepnyy-vek-smotret.online бесплатно в хорошем качестве с русским дубляжом. Великолепные костюмы, детально воссозданные интерьеры Топкапы и сильная актёрская игра дают ощущение настоящего погружения в эпоху XVI века. Мелодрама, исторический эпос и политический триллер органично соединены в единое целое — без скучных провалов и с нарастающим напряжением вплоть до финала.
«Наруто» — культовое аниме, завоевавшее сердца миллионов поклонников на всех континентах. Путь неукротимого Наруто Узумаки, в чьём теле скрыта разрушительная мощь девятихвостого лиса, не даёт оторваться от экрана ни на минуту. Ищете наруто все серии? На naruto-serial.biz все 220 серий доступны бесплатно в отличном качестве. Зрелищные битвы с техниками чакры, глубокие характеры персонажей и темы дружбы, предательства и силы духа делают этот сериал обязательным к просмотру.
В этом мире титул Хантера — не просто статус, а билет в мир, где каждый шаг сопряжён со смертельным риском и неожиданными поворотами судьбы. Мальчик Гон Фрикс отправляется в путь с одной целью — найти отца-легенду, выбравшего неизведанное вместо семьи. Ищете охотник х? На ohotnik-h-ohotnik-kinogo.vip все 148 серий доступны бесплатно с несколькими вариантами озвучки. В ходе беспощадного Испытания на Хантера Гон обретает верных спутников: убийцу по крови Киллуа, честолюбивого Леорио и непреклонного Курапику. Система Нэн раскрывает внутренние демоны каждого героя, делая «Охотник х Охотник» чем-то большим, чем просто аниме о взрослении.
«Теория большого взрыва» — без преувеличения культовый ситком родом из Америки, который с 2007 года удерживает аудиторию по всему миру. В центре сюжета — два блестящих, но социально беспомощных физика, Шелдон и Леонард, и их обаятельная соседка Пенни, чьё столкновение с миром науки рождает бесконечную череду искромётных ситуаций. Ищете сериал теория большого взрыва теория большого взрыва все серии? Все 279 серий 12 сезонов доступны на teoriya-bolshogo-vzryva-smotret.online с профессиональными озвучками без регистрации. Харизматичные Говард, Радж, Бернадетт и Эми превращают сериал в многогранную энциклопедию человеческих отношений — весёлую, трогательную и удивительно жизненную.
«Чукур» — криминальная драма из Турции 2017 года о стамбульском районе, где власть и порядок держатся на авторитете одной семьи. Один из сыновей семьи, годами скрывавшийся от прошлого, оказывается перед жестокой необходимостью вернуться туда, откуда бежал — трагические события не оставляют ему выбора. Старые конфликты, семейная верность и война кланов за территорию втягивают героя обратно. Ищете чукур все серии? Все 427 серий с профессиональной озвучкой доступны бесплатно на chukur-smotret.online — триллер об изломанных судьбах и цене выбора между свободой и долгом перед семьёй.
Металлический забор-жалюзи — это не просто ограждение, а современное архитектурное решение, которое объединяет эстетику и надёжность. Горизонтальные ламели создают эффект жалюзи: обзор открыт только изнутри участка, а снаружи — полная приватность. На сайте https://zabor-zhalyuzi78.ru/ представлен широкий каталог моделей с различными покрытиями: полиэстер, матовое, имитация дерева. Срок службы таких конструкций достигает 50 лет благодаря качественной стали и порошково-полимерной защите. Доставка осуществляется по всей России.
«Запретный плод» — турецкий сериал 2018 года: шесть захватывающих сезонов интриг и запретных страстей в декорациях роскошного Стамбула. В центре сюжета две сестры: принципиальная Зейнеп строит карьеру честным трудом, а Йылдыз готова рискнуть всем ради попадания в высший свет. Ищете запретный плод все серии? Все 177 серий с профессиональной озвучкой смотрите бесплатно на zapretnyy-plod-smotret.online в хорошем качестве. Йылдыз становится пешкой в жестокой игре расчётливой Эндер, задумавшей коварный план против своего могущественного супруга. Сестёр разлучают не только обстоятельства, но и моральный выбор, который каждая делает по-своему.
«Ван-Пис» — яркое воплощение на экране знаменитой манги, в которой неукротимый Монки Д. Луффи, наделённый силой дьявольского фрукта, ведёт команду отважных искателей к мифическому сокровищу Ван-Пис. Ищете ван пис смотреть онлайн? На van-pis-smotret.biz все серии доступны бесплатно в высоком качестве с профессиональной озвучкой. Глубоко прописанные герои с тёмными историями, напряжённые поединки и сквозная тема свободы делают сериал по-настоящему увлекательным смотрением для широкой аудитории.
Современный автосервис невозможно представить без надёжного профессионального оборудования — и здесь важно не ошибиться с выбором поставщика. Компания Nordberg предлагает исчерпывающий каталог техники для любого участка: шиномонтажного, слесарного, кузовного, малярного и диагностического. На сайте https://nordberg43.ru/catalog/oborudovanie_1/ собрано всё — от подъёмников и стендов сход-развала до сварочного и окрасочного оборудования, компрессоров, зарядных устройств и специнструмента. Здесь же представлены расходные материалы, масла, химия для мойки и детейлинга, а также оригинальные запчасти.
«Врата Штейна» — аниме 2011 года о том, как эксцентричный самозваный гений Ринтаро Окабе и его странная компания случайно мастерят прибор, пересылающий сообщения прямо в прошлое. Каждое послание — камень в гладь времени, и круги от него разрушают реальность необратимо. Ищете врата штейна смотреть онлайн? На vrata-shteyna-kinogo.cc все 25 серий доступны бесплатно с несколькими вариантами озвучки. Сериал виртуозно сочетает научную фантастику с психологической драмой: за маской фарса скрывается история о цене выбора — чью судьбу сохранить и можно ли исправить время, не потеряв себя.
Чистая питьевая вода — это не роскошь, а ежедневная необходимость, особенно для семей с детьми и загруженных офисов. Компания «Вода Гор» уже много лет обеспечивает жителей Махачкалы и Каспийска горной водой высокого качества, доставляя её прямо до двери. Заказать воду легко на сайте https://voda-s-gor.ru/ — каталог, актуальные цены и удобная форма заказа всегда под рукой. Компания работает честно: цены фиксированы и не меняются даже в кризисных ситуациях, что подтверждают сотни благодарных клиентов. Доставка осуществляется оперативно, а самовывоз доступен ежедневно по адресу Азизова, 43/3.
Балторганик — российский завод-производитель органической и органоминеральной агрохимии с полной линейкой решений для зерновых, овощных и плодово-ягодных хозяйств. Производитель предлагает гранулы, пеллеты, сухие смеси и жидкие гуминовые составы линейки Торфогумат с концентрацией гуматов до 30%. На https://baltorganic.ru/ представлен полный каталог удобрений NPK под конкретные культуры — от бобовых до рапса. Продукция прошла полевые испытания на озимой пшенице, кукурузе, картофеле и яровом ячмене с подтверждёнными результатами.
«Как я встретил вашу маму» — американский ситком 2005 года, завоевавший миллионы поклонников по всему миру. Рассказ Теда Мосби о поиске настоящей любви на улицах Нью-Йорка 2000-х не отпускает зрителя на протяжении 9 сезонов и 208 серий. Ищете сериал как я встретил вашу маму? Все эпизоды доступны на kak-ya-vstretil-vashu-mamu-smotret.net с лучшими озвучками без регистрации. Незабываемая химия между пятью друзьями — Тедом, Маршаллом, Лили, Робин и харизматичным Барни — делает каждый эпизод особенным. Проект виртуозно сочетает юмор, мелодраму и нестандартную структуру повествования, украшенную культовыми символами — жёлтым зонтом и синим французским рожком.
Экономия на продуктах — это не миф, а реальность для тех, кто умеет пользоваться выгодными предложениями. Сеть «Пятёрочка» регулярно радует своих покупателей скидками и специальными акциями: еженедельные предложения на популярные категории товаров, скидки до 30% на товары недели и программа лояльности с кэшбэком делают каждую покупку выгоднее. На https://salda.ws/f/topic.php?f=16&t=109549 собраны актуальные промокоды, которые позволяют новым пользователям сэкономить до 600 рублей уже при первом заказе с доставкой от 1500 рублей. Мобильное приложение предлагает персональные скидки, а курьерская доставка охватывает города по всей России. Следите за обновлениями — акции появляются регулярно.
«Клинок, рассекающий демонов» — мрачное и глубокое аниме о начинающем мечнике Танадзо Камадо, чья семья истреблена демонами, а выжившая сестра Нэдзуко оказывается в их числе. Стремясь вернуть ей человеческий облик, герой проходит жесточайшие тренировки и овладевает древними техниками дыхания. Ищете клинок рассекающий демонов все серии? На istrebitel-demonov-smotret.biz все 63 серии четырёх сезонов доступны бесплатно в высоком качестве с профессиональной озвучкой. Выдающаяся анимация, многогранные герои и пронизывающие трагедии за плечами каждого из них выводят сериал в число лучших аниме за последние десять лет.
«Любовь, смерть и роботы» — антологический анимационный сериал 2019 года от Тима Миллера и Дэвида Финчера: 45 серий по 14 минут, каждая — отдельная вселенная с уникальным визуальным стилем и жанром. Ищете любовь смерть и роботы смотреть онлайн? Все эпизоды доступны на lyubov-smert-roboty-smotret.biz бесплатно в хорошем качестве с множеством вариантов озвучки. Хоррор, sci-fi, нуар и едкий юмор смешиваются в эпизодах про киборгов, монстров, машины и оцифрованное сознание. Каждый выпуск сжат до предела: только действие, идея и эффект, который не отпускает ещё долго после финала.
Бонус 1000 рублей за регистрацию в казино — это честный шанс начать игру без собственных вложений. https://1000bonus4.website/ собрал лучшие предложения 2026 года от лицензированных казино Curacao: FUGU Casino, Beef Casino, Martin Casino, Flagman Casino, Irwin Casino, Eva Casino, Kraken Casino, Pin Co Casino, Vavada Casino и Motor Casino — все с фриспинами при регистрации. Введя промокод JOJO100, новый игрок получает до 100 FS на хиты Sweet Bonanza, Sugar Rush, The Dog House, Le Bandit и другие топовые слоты абсолютно бесплатно.
KinoNix — это платформа для зрителей, которым важны скорость и качество контента. Здесь собраны тысячи фильмов, сериалов, аниме и мультфильмов в высоком разрешении без регистрации и оплаты. Сервис регулярно пополняется свежими релизами: от голливудских боевиков до отечественных детективов. Ищете смотреть фильмы и сериалы онлайн? Перейдите на kinonix.net и откройте полный каталог с удобной навигацией по жанрам и годам. Качество картинки достигает WEB-DL 720p уже в день выхода новинки. Рейтинги IMDb и пользовательские баллы на сайте упрощают выбор фильма под любое настроение.
Отечественный рынок электронных компонентов наконец получил поставщика с широким выбором и честными ценами. Ищете https://components.ru/catalog/himikatyi_i_klei/germetiki/? Компания components.ru предлагает инженерам и закупщикам тысячи позиций — от резисторов и конденсаторов до микросхем и модулей питания — с гарантией качества и оперативной доставкой. Подлинность каждой партии подтверждается проверкой — поставка контрафакта полностью исключена. Удобный каталог с фильтрами, актуальные остатки на складе и возможность оптовых закупок делают сервис незаменимым инструментом для производственных компаний и частных разработчиков.
Установка счётчика воды — один из самых разумных шагов для экономии семейного бюджета: по нормативам москвич платит за холодную воду около 1090 рублей в месяц, тогда как реальный расход обходится в три раза дешевле. Компания «Водогарант» устанавливает счётчики в Москве и Московской области всего за один день, начиная от 3800 рублей, включая оборудование, монтаж, документы и пломбировку. Подробнее об услугах и ценах — на https://xn--80aaeee1dcbuw.xn--p1ai/ustanovka-schetchikov-vody/ — здесь представлены модели на любой бюджет: от бюджетных отечественных до надёжных немецких ITELMA. Выезд мастера бесплатный, гарантия на монтаж составляет 12 месяцев, а специалисты работают напрямую с Мосводоканалом.
Если вы давно искали выгодные тарифы на мобильную связь без переплат и очередей в салонах — «Планета Связи» именно то, что нужно. Компания предлагает эксклюзивные SIM-карты ведущих операторов: Билайн, Мегафон, Ростелеком и 2tele, причём по ценам, которых просто не найти в обычных точках продаж. На сайте https://planetasv.ru/ можно за пару минут подобрать тариф для интернета, звонков, видеонаблюдения, роутеров или трекеров. Подключение бесплатное, договор заключается напрямую с оператором, а служба поддержки отвечает в течение двух минут.
банкротство при микрозаймах
Банкротство при микрозаймах рассматривают многие заемщики с большой просрочкой и несколькими МФО. На sorryclosed.ru собраны материалы о том, как такие долги учитываются в общей процедуре.
KinoGo — один из крупнейших русскоязычных кинопорталов с каталогом свыше 91 000 фильмов и сериалов в открытом доступе. Здесь собраны новинки 2026 года, исторические драмы, боевики и фантастика с рейтингами IMDb и Кинопоиска прямо в карточке. Удобная фильтрация по жанру, стране, году и формату видео сводит время поиска к минимуму. Ищете смотреть фильмы онлайн? Переходите на kinogo.limited — смотрите в HD без регистрации и без рекламных пауз. База пополняется каждый день — новинки выходят одновременно с официальным релизом, а пользовательские оценки помогут не ошибиться с выбором.
процедура банкротства физлица
Процедура банкротства физлица состоит из нескольких этапов и требует внимательной подготовки документов. На sorryclosed.ru есть понятные материалы о порядке действий и последствиях процедуры.
Типография “МОСПРИНТ77” – https://mosprint77.ru/ предлагает полный спектр услуг в сфере полиграфия для бизнеса и частных клиентов. Мы выполняем печать каталогов, печать брошюр, печать буклетов и печать листовок с высоким качеством и точной цветопередачей. Современное оборудование позволяет выпускать продукцию любого тиража в короткие сроки. Наша типография в Москве помогает создать эффективные печатные материалы, которые привлекают внимание и работают на результат.
списание долгов законно
Если интересует списание долгов законно, важно сразу изучить реальные основания и ограничения. На sorryclosed.ru собрана базовая информация по процедуре и вариантам решения долговой нагрузки.
списание долгов законно
Если интересует списание долгов законно, важно сразу изучить реальные основания и ограничения. На sorryclosed.ru собрана базовая информация по процедуре и вариантам решения долговой нагрузки.
последствия банкротства физического лица
Перед подачей важно изучить последствия банкротства физического лица, а не только перспективу списания долгов. На sorryclosed.ru разобраны основные ограничения и правовые последствия после завершения дела.
помощь должникам по кредитам
Помощь должникам по кредитам должна быть законной и понятной. На sorryclosed.ru собраны материалы для тех, кто ищет варианты снижения долговой нагрузки и хочет разобраться в банкротстве без лишних обещаний.
как списать долги
Запрос как списать долги обычно начинается с поиска законных вариантов. На sorryclosed.ru можно сравнить судебную и внесудебную процедуру и понять, какой путь подходит в конкретной ситуации.
банкротство физических лиц
Банкротство физических лиц — законный способ решить проблему с непосильными долгами. На sorryclosed.ru можно разобраться в этапах процедуры, рисках и условиях списания задолженности.
банкротство ИП
Банкротство ИП требует отдельного внимания к статусу предпринимателя и структуре долгов. На sorryclosed.ru можно изучить базовые различия между банкротством физлица и индивидуального предпринимателя.
«Магическая битва» — мрачное и глубокое аниме о реальности, где человеческая боль и ненависть материализуются в виде кровожадных чудовищ. Старшеклассник Юдзи Итадори поглощает проклятый артефакт и становится вместилищем могущественного демона — с этого момента в нём борются два существа, и даже искушённые маги признают такую силу опасной. Ищете магическая битва все серии? На magicheskaya-bitva.biz все 58 серий трёх сезонов доступны бесплатно в отличном качестве с профессиональной озвучкой. Динамичные схватки, глубокая проработка персонажей и мрачная философия делают сериал обязательным к просмотру.
какие долги не списываются
Перед началом процедуры нужно понимать, какие долги не списываются даже после завершения банкротства. На sorryclosed.ru эта тема разобрана простым языком с пояснением по основным исключениям.
Сериал «Викинги» — эпическая историческая драма, которая переносит зрителя в суровую Скандинавию VIII века. Главный герой — Рагнар Лотброк: бывший крестьянин, превратившийся в прославленного предводителя викингов. Шесть сезонов, 90 серий, реальные морские походы, жестокие битвы и сложные судьбы героев удерживают внимание с первого эпизода. Ищете сериал викинги? Сериал доступен в нескольких профессиональных озвучках на vikingi-smotret.online — выбирайте любую и смотрите без рекламы. Рагнар, его жена-воительница Лагерта и верные соратники открывают новые земли, сталкиваясь с чужой верой и беспощадными законами эпохи. Каждая серия — не только зрелищный боевик, но и скрупулёзное воспроизведение мировоззрения эпохи, где честь ценилась дороже жизни.
Все виды отдыха и маршрутов по Горному Алтаю в одном месте вы сможете увидеть на сайте https://altai.travel/ – это официальный туристический портал Республики Алтай. Подберите для себя идеи для новых путешествий и интересные места. На сайте большой выбор аккредитованных гостиниц и проверенные варианты размещения. А наша интерактивная карта поможет спланировать идеальное путешествие!
«Холдсервис» берётся за ремонт и монтаж холодильного и теплового оборудования любой категории — от домашних холодильников до промышленных чиллеров, низкотемпературных камер и ледогенераторов. За 15 лет работы мастера накопили опыт, позволяющий устранять неисправности оперативно и с гарантией результата. Компания реагирует на заявки без промедления: выезд специалиста к заказчику осуществляется бесплатно. Ищете ремонт бытового холодильного оборудования в москве? Подробнее об услугах и ценах на holdservis.ru — актуальная информация всегда доступна. Стоимость работ остаётся честной и фиксированной — никаких наценок, характерных для крупных сервисных центров, при полном сохранении качества.
банкротство через МФЦ
Банкротство через МФЦ часто ищут как более простой вариант списания долгов. На sorryclosed.ru удобно посмотреть требования, порядок обращения и причины возможного отказа.
юрист по банкротству физических лиц
Юрист по банкротству физических лиц помогает оценить риски и подготовить документы. На sorryclosed.ru можно изучить саму процедуру и заранее понять, какие вопросы стоит задавать специалисту.
Срок службы большинства счётчиков воды составляет 12 лет, и по истечении этого периода прибор обязан пройти поверку или замену — иначе показания перестанут считаться действительными и начисления пойдут по завышенным нормативам. Компания «Водогарант» выполняет замену счётчиков воды в Москве и Московской области за один день, начиная всего от 2500 рублей, включая оборудование, демонтаж, монтаж, документы и пломбировку. Актуальные цены и модели приборов доступны на https://xn--80aaeee1dcbuw.xn--p1ai/zamena-schetchikov-vody/ — специалисты работают напрямую с Мосводоканалом, выезд мастера бесплатный, гарантия на монтаж составляет 12 месяцев.
банкротство с ипотекой
Банкротство с ипотекой всегда связано с повышенными рисками, поэтому важно заранее оценить последствия. На sorryclosed.ru можно найти вводную информацию по этой теме и понять, какие вопросы изучать в первую очередь.
какие долги не списываются
Перед началом процедуры нужно понимать, какие долги не списываются даже после завершения банкротства. На sorryclosed.ru эта тема разобрана простым языком с пояснением по основным исключениям.
финансовый управляющий при банкротстве
Финансовый управляющий при банкротстве играет ключевую роль в судебной процедуре. На sorryclosed.ru можно понять, зачем он нужен, какие функции выполняет и как это влияет на ход дела.
списание долгов законно
Если интересует списание долгов законно, важно сразу изучить реальные основания и ограничения. На sorryclosed.ru собрана базовая информация по процедуре и вариантам решения долговой нагрузки.
банкротство физических лиц
Банкротство физических лиц — законный способ решить проблему с непосильными долгами. На sorryclosed.ru можно разобраться в этапах процедуры, рисках и условиях списания задолженности.
бесплатное банкротство через МФЦ
Бесплатное банкротство через МФЦ подходит только при соблюдении установленных условий. На sorryclosed.ru можно быстро проверить базовые критерии и понять, есть ли шанс пройти процедуру без суда.
банкротство ИП
Банкротство ИП требует отдельного внимания к статусу предпринимателя и структуре долгов. На sorryclosed.ru можно изучить базовые различия между банкротством физлица и индивидуального предпринимателя.
списание долгов законно
Если интересует списание долгов законно, важно сразу изучить реальные основания и ограничения. На sorryclosed.ru собрана базовая информация по процедуре и вариантам решения долговой нагрузки.
банкротство ИП
Банкротство ИП требует отдельного внимания к статусу предпринимателя и структуре долгов. На sorryclosed.ru можно изучить базовые различия между банкротством физлица и индивидуального предпринимателя.
как списать долги
Запрос как списать долги обычно начинается с поиска законных вариантов. На sorryclosed.ru можно сравнить судебную и внесудебную процедуру и понять, какой путь подходит в конкретной ситуации.
Санкт-Петербургская типография «Полифарм» — это место, где полиграфия становится искусством, а каждый заказ превращается в визитную карточку вашего бизнеса. Компания предлагает полный спектр услуг: от визиток, буклетов и каталогов до эксклюзивной упаковки из экологически чистых материалов, тиснения и сублимационной печати. Посетив сайт http://www.polifarm-spb.ru/, вы убедитесь, что ассортимент действительно впечатляет — здесь печатают художественную литературу, научные издания, ежедневники с логотипом, воблеры, плейсматы и даже предлагают мастер-классы для детей. Современное оборудование обеспечивает безупречное качество, а партнёрство с СДЭК и Деловыми Линиями — оперативную доставку по всей России.
«Дочь посла» — турецкая драма о любви, победившей и классовые различия, и безжалостное время. Санджар — парень из простой семьи, мечтающий пробиться наверх. Нара, дочь крупного дипломата, скрывает за утончённостью несгибаемый характер. В юности между ними возникает сильное чувство, однако одна роковая ночь разрушает всё. Ищете дочь посла все серии? Все 52 серии с профессиональной озвучкой доступны на doch-posla-smotret.biz в отличном качестве бесплатно. Спустя годы, когда Санджар добился уважения и достатка, Нара неожиданно появляется вновь — и не одна. Тайна, которую она хранила годами, меняет всё.
банкротство через МФЦ
Банкротство через МФЦ часто ищут как более простой вариант списания долгов. На sorryclosed.ru удобно посмотреть требования, порядок обращения и причины возможного отказа.
финансовый управляющий при банкротстве
Финансовый управляющий при банкротстве играет ключевую роль в судебной процедуре. На sorryclosed.ru можно понять, зачем он нужен, какие функции выполняет и как это влияет на ход дела.
HDRezka — крупнейший русскоязычный стриминг с каталогом свыше 7400 страниц: фильмы, сериалы, мультфильмы и аниме для самой разной аудитории. Каталог охватывает всё — от культовой классики до свежих релизов 2026 года с профессиональным дубляжом и субтитрами. Ищете смотреть фильмы онлайн? Переходите на hdrezka.film получайте доступ к тысячам тайтлов в Full HD без регистрации. Ежедневные обновления не заставят ждать: новые серии «Декстера», «Во все тяжкие» и популярных новинок добавляются в день выхода с несколькими дорожками перевода.
банкротство с ипотекой
Банкротство с ипотекой всегда связано с повышенными рисками, поэтому важно заранее оценить последствия. На sorryclosed.ru можно найти вводную информацию по этой теме и понять, какие вопросы изучать в первую очередь.
банкротство ИП
Банкротство ИП требует отдельного внимания к статусу предпринимателя и структуре долгов. На sorryclosed.ru можно изучить базовые различия между банкротством физлица и индивидуального предпринимателя.
банкротство через МФЦ
Банкротство через МФЦ часто ищут как более простой вариант списания долгов. На sorryclosed.ru удобно посмотреть требования, порядок обращения и причины возможного отказа.
банкротство с ипотекой
Банкротство с ипотекой всегда связано с повышенными рисками, поэтому важно заранее оценить последствия. На sorryclosed.ru можно найти вводную информацию по этой теме и понять, какие вопросы изучать в первую очередь.
Промышленные предприятия, молочные фермы и коммунальные объекты по всей России сталкиваются с одной общей проблемой — некачественная вода разрушает оборудование и увеличивает себестоимость производства. Компания PWS предлагает решение: индивидуальные системы водоочистки, спроектированные под конкретный источник воды и профиль предприятия. Все установки соответствуют российским СанПиН, а подробности на https://pws.world/promyshlennye-ustanovki подтверждают: локализованное производство обеспечивает быструю замену деталей и минимальный простой. Оборотное водоснабжение сокращает издержки и экологические платежи уже с первого года эксплуатации.
как списать долги
Запрос как списать долги обычно начинается с поиска законных вариантов. На sorryclosed.ru можно сравнить судебную и внесудебную процедуру и понять, какой путь подходит в конкретной ситуации.
https://justpaste.me/CbAc2
какие долги не списываются
Перед началом процедуры нужно понимать, какие долги не списываются даже после завершения банкротства. На sorryclosed.ru эта тема разобрана простым языком с пояснением по основным исключениям.
https://www.4shared.com/u/klrCEQEq/wqgrfdjt29.html
Ищете Благоустройство участка под ключ? Посетите сайт Идеал строй https://idealstr.ru/uslugi/blagoustrojstvo-territorii – ознакомьтесь с нашими работами или звоните по телефону +7 495 227 58 48 – наши квалифицированные сотрудники ответят на все интересующие вас вопросы.
юрист по банкротству физических лиц
Юрист по банкротству физических лиц помогает оценить риски и подготовить документы. На sorryclosed.ru можно изучить саму процедуру и заранее понять, какие вопросы стоит задавать специалисту.
сроки банкротства физического лица
Сроки банкротства физического лица зависят от сложности дела и состава имущества. На sorryclosed.ru можно изучить примерную продолжительность процедуры и факторы, которые влияют на сроки.
стоимость банкротства физических лиц
Стоимость банкротства физических лиц зависит от формата процедуры и сопутствующих расходов. На sorryclosed.ru можно посмотреть, из чего складываются затраты и на что обратить внимание заранее.
банкротство пенсионеров
Банкротство пенсионеров — востребованная тема, потому что у этой категории должников часто есть особые жизненные обстоятельства. На sorryclosed.ru можно посмотреть, как работает процедура и что учитывать заранее.
топпинговые полы цена за м2 стоимость работ
gay sissy porn
MiGroup поставляет металлообрабатывающее оборудование и профессиональный инструмент широкого спектра: 5-осевые центры с ЧПУ, токарные станки, фрезы, свёрла и средства измерения. На https://migroup.tech/ представлен широкий каталог — станки, вспомогательное оборудование, смазочные материалы и оснастка для производств любого масштаба. Работая с промышленными предприятиями, MiGroup закрывает полный цикл задач — подбор оборудования, его поставку и последующее техническое сопровождение.
какие долги списываются при банкротстве
Многих интересует, какие долги списываются при банкротстве и на что можно рассчитывать после процедуры. На sorryclosed.ru есть отдельные разборы по видам обязательств и частым вопросам должников.
какие долги списываются при банкротстве
Многих интересует, какие долги списываются при банкротстве и на что можно рассчитывать после процедуры. На sorryclosed.ru есть отдельные разборы по видам обязательств и частым вопросам должников.
банкротство физических лиц
Банкротство физических лиц — законный способ решить проблему с непосильными долгами. На sorryclosed.ru можно разобраться в этапах процедуры, рисках и условиях списания задолженности.
Здоровье животных начинается с правильного питания, и здесь на помощь приходит гранулированная люцерна торговой марки «Люцервик» — натуральная витаминно-минеральная мука, сохраняющая до 95% полезных веществ исходного сырья. Продукт идеально подходит для лошадей, крупного рогатого скота, птицы и кроликов, обеспечивая животных качественным белковым кормом без химических добавок. На https://xn--b1afkib5a3byd.xn--p1ai/ можно оформить заказ оптом и в розницу с доставкой из Кирова, изучить каталог, фотогалерею и реальные отзывы покупателей. Гранулы удобно хранятся и легко дозируются, что делает их незаменимым решением для фермеров и частных хозяйств.
«Самурай Джек» — культовый анимационный сериал 2001 года про одинокого воина, брошенного демоном Аку в беспощадное будущее под властью хаоса и тирании. Ищете самурай джек смотреть онлайн? Все 5 сезонов и 62 серии доступны на samuray-dzhek.club бесплатно в отличном качестве с русской озвучкой. Древний меч и кодекс чести — единственное оружие самурая против киберпанкового мира роботов и чудовищ на пути домой и к победе над злом. Каждая серия — лаконичная притча о выборе, стойкости и цене доблести, созданная с безупречным визуальным стилем.
юрист по банкротству физических лиц
Юрист по банкротству физических лиц помогает оценить риски и подготовить документы. На sorryclosed.ru можно изучить саму процедуру и заранее понять, какие вопросы стоит задавать специалисту.
банкротство пенсионеров
Банкротство пенсионеров — востребованная тема, потому что у этой категории должников часто есть особые жизненные обстоятельства. На sorryclosed.ru можно посмотреть, как работает процедура и что учитывать заранее.
финансовый управляющий при банкротстве
Финансовый управляющий при банкротстве играет ключевую роль в судебной процедуре. На sorryclosed.ru можно понять, зачем он нужен, какие функции выполняет и как это влияет на ход дела.
какие долги не списываются
Перед началом процедуры нужно понимать, какие долги не списываются даже после завершения банкротства. На sorryclosed.ru эта тема разобрана простым языком с пояснением по основным исключениям.
банкротство с ипотекой
Банкротство с ипотекой всегда связано с повышенными рисками, поэтому важно заранее оценить последствия. На sorryclosed.ru можно найти вводную информацию по этой теме и понять, какие вопросы изучать в первую очередь.
стоимость банкротства физических лиц
Стоимость банкротства физических лиц зависит от формата процедуры и сопутствующих расходов. На sorryclosed.ru можно посмотреть, из чего складываются затраты и на что обратить внимание заранее.
«Наследники» — корейская драма 2013 года о жестоком мире, где судьбу человека решают деньги и фамилия, а не способности. В школе корейской элиты за внешним лоском — жёсткая иерархия, где дружба измеряется выгодой, а доверие — редкость. Сын влиятельного магната встречает девушку из бедной семьи — и их притяжение становится вызовом всей системе. Ищете сериал наследники? Все 20 серий в профессиональной озвучке доступны на nasledniki-smotret.net без регистрации и рекламы. Двадцать эпизодов о любви, власти и социальных барьерах — сериал захватывает с первой минуты и не отпускает до конца.
сроки банкротства физического лица
Сроки банкротства физического лица зависят от сложности дела и состава имущества. На sorryclosed.ru можно изучить примерную продолжительность процедуры и факторы, которые влияют на сроки.
«Зимородок» — турецкий сериал 2022 года, в котором семейные тайны и запретные чувства сталкиваются с вековыми традициями. Беспечное существование молодого стамбульского богача обрывается, когда патриарх семьи принуждает его жениться на простой девушке из провинции. Она горда, честолюбива и привыкла рассчитывать только на себя. Ищете зимородок все серии? Все 183 серии доступны на zimorodok-smotret.biz с профессиональной озвучкой в отличном качестве бесплатно. Навязанный союз становится настоящим испытанием для обоих: внешний блеск особняка лишь маскирует интриги, расчёт и годами копившиеся обиды. Живя под одной крышей, они раз за разом ранят друг друга и всё равно не могут противостоять притяжению между ними.
процедура банкротства физлица
Процедура банкротства физлица состоит из нескольких этапов и требует внимательной подготовки документов. На sorryclosed.ru есть понятные материалы о порядке действий и последствиях процедуры.
как списать долги
Запрос как списать долги обычно начинается с поиска законных вариантов. На sorryclosed.ru можно сравнить судебную и внесудебную процедуру и понять, какой путь подходит в конкретной ситуации.
банкротство пенсионеров
Банкротство пенсионеров — востребованная тема, потому что у этой категории должников часто есть особые жизненные обстоятельства. На sorryclosed.ru можно посмотреть, как работает процедура и что учитывать заранее.
Чистая вода — это не роскошь, а основа здоровья, производительности и экономии. Российская компания PWS специализируется на системах водоочистки для любых задач: от бытовых фильтров до мощных промышленных установок и решений для сельского хозяйства. На сайте https://pws.world/ представлен полный спектр оборудования, разработанного с учётом отечественных норм и реальных условий эксплуатации. Каждая система проектируется индивидуально, обеспечивая максимальную эффективность, простоту обслуживания и быструю окупаемость для каждого конкретного объекта.
банкротство ИП
Банкротство ИП требует отдельного внимания к статусу предпринимателя и структуре долгов. На sorryclosed.ru можно изучить базовые различия между банкротством физлица и индивидуального предпринимателя.
Kinogo — бесплатный видеосервис с разнообразной библиотекой фильмов, сериалов, мультфильмов, аниме и дорам на каждый вкус. Коллекция насчитывает тысячи тайтлов: от крупных голливудских проектов до азиатского кино, от фильмов прошлого столетия до премьер 2026 года. Ищете смотреть фильмы и сериалы онлайн? На kinogo-film.rest доступна удобная сортировка по жанру, году, рейтингу Кинопоиска и IMDb. В библиотеке представлены боевики, триллеры, драмы, комедии, документалистика и фэнтези — всё в высоком HD-качестве совершенно бесплатно.
банкротство с автомобилем
Банкротство с автомобилем вызывает много вопросов у должников, особенно если машина нужна для работы или семьи. На sorryclosed.ru можно посмотреть общие правила и оценить возможные последствия.
Современный бизнес не прощает некачественной полиграфии: визитка, листовка или брошюра — это лицо компании, и здесь важна каждая деталь. Московская типография Самрай предлагает полный спектр полиграфических услуг: от печати визиток, буклетов и календарей до широкоформатных баннеров, картин на холсте и табличек на металле. На сайте https://samray.ru/ можно ознакомиться с прайсом, загрузить макет и получить оперативный расчёт заказа. Специалисты работают ежедневно, принимают оплату любым удобным способом и гарантируют высокое качество даже при срочном тираже.
какие долги списываются при банкротстве
Многих интересует, какие долги списываются при банкротстве и на что можно рассчитывать после процедуры. На sorryclosed.ru есть отдельные разборы по видам обязательств и частым вопросам должников.
финансовый управляющий при банкротстве
Финансовый управляющий при банкротстве играет ключевую роль в судебной процедуре. На sorryclosed.ru можно понять, зачем он нужен, какие функции выполняет и как это влияет на ход дела.
какие долги не списываются
Перед началом процедуры нужно понимать, какие долги не списываются даже после завершения банкротства. На sorryclosed.ru эта тема разобрана простым языком с пояснением по основным исключениям.
банкротство с автомобилем
Банкротство с автомобилем вызывает много вопросов у должников, особенно если машина нужна для работы или семьи. На sorryclosed.ru можно посмотреть общие правила и оценить возможные последствия.
банкротство пенсионеров
Банкротство пенсионеров — востребованная тема, потому что у этой категории должников часто есть особые жизненные обстоятельства. На sorryclosed.ru можно посмотреть, как работает процедура и что учитывать заранее.
сроки банкротства физического лица
Сроки банкротства физического лица зависят от сложности дела и состава имущества. На sorryclosed.ru можно изучить примерную продолжительность процедуры и факторы, которые влияют на сроки.
банкротство при микрозаймах
Банкротство при микрозаймах рассматривают многие заемщики с большой просрочкой и несколькими МФО. На sorryclosed.ru собраны материалы о том, как такие долги учитываются в общей процедуре.
банкротство ИП
Банкротство ИП требует отдельного внимания к статусу предпринимателя и структуре долгов. На sorryclosed.ru можно изучить базовые различия между банкротством физлица и индивидуального предпринимателя.
консультация юриста по трудовому праву
юрист по трудовому праву
бесплатное банкротство через МФЦ
Бесплатное банкротство через МФЦ подходит только при соблюдении установленных условий. На sorryclosed.ru можно быстро проверить базовые критерии и понять, есть ли шанс пройти процедуру без суда.
спецодежда интернет магазин
медицинская спецодежда спб
атласное свадебное платье
банкротство через МФЦ
Банкротство через МФЦ часто ищут как более простой вариант списания долгов. На sorryclosed.ru удобно посмотреть требования, порядок обращения и причины возможного отказа.
адвокат по уголовным делам в санкт петербурге
Нужен мощный, но не хотите переплачивать? Возьмите технику в аренду! У https://chistydom.by/ нас выгодная аренда моющего пылесоса для глубокой очистки ковров и мебели. Победите застарелые пятна с паром: доступна аренда пароочистителя и эффективного отпаривателя на прокат. После ремонта незаменима аренда строительного пылесоса, а для идеальных стен берите Лазерный уровень в аренду. Хотите чистые окна без усилий? Закажите робот мойщик окон в аренду с доставкой. Низкие цены на прокат премиум-оборудования уже ждут вас!
банкротство с автомобилем
Банкротство с автомобилем вызывает много вопросов у должников, особенно если машина нужна для работы или семьи. На sorryclosed.ru можно посмотреть общие правила и оценить возможные последствия.
спецодежда спб
заказать перевод на английский
бесплатное банкротство через МФЦ
Бесплатное банкротство через МФЦ подходит только при соблюдении установленных условий. На sorryclosed.ru можно быстро проверить базовые критерии и понять, есть ли шанс пройти процедуру без суда.
процедура банкротства физлица
Процедура банкротства физлица состоит из нескольких этапов и требует внимательной подготовки документов. На sorryclosed.ru есть понятные материалы о порядке действий и последствиях процедуры.
MiGroup — поставщик металлообрабатывающего оборудования и профессионального инструмента: 5-осевые обрабатывающие центры с ЧПУ, токарные станки, фрезы, свёрла и измерительный инструмент. На https://migroup.tech/ представлен широкий каталог — станки, вспомогательное оборудование, смазочные материалы и оснастка для производств любого масштаба. Работая с промышленными предприятиями, MiGroup закрывает полный цикл задач — подбор оборудования, его поставку и последующее техническое сопровождение.
арбитражный адвокат в санкт петербурге
процедура банкротства физлица
Процедура банкротства физлица состоит из нескольких этапов и требует внимательной подготовки документов. На sorryclosed.ru есть понятные материалы о порядке действий и последствиях процедуры.
банкротство пенсионеров
Банкротство пенсионеров — востребованная тема, потому что у этой категории должников часто есть особые жизненные обстоятельства. На sorryclosed.ru можно посмотреть, как работает процедура и что учитывать заранее.
Официальный интернет-магазин производителя стабилизаторов напряжения, ИБП и других систем электропитания Штиль https://www.shtyl.ru/ – это возможность купить продукцию по выгодной цене, а также возможность, при необходимости получить профессиональную консультацию. Посмотрите каталог с нашей продукцией, отличающейся качеством и высокими характеристиками.
какие долги не списываются
Перед началом процедуры нужно понимать, какие долги не списываются даже после завершения банкротства. На sorryclosed.ru эта тема разобрана простым языком с пояснением по основным исключениям.
1xbet
1xbet
1xbet
1xbet
1xbet
1xbet
1xbet
1xbet
инверторный кондиционер
1xbet
1xbet
https://atmosfera-market.ru/
Постапокалиптический сериал «Одни из нас» по культовой игре The Last of Us — одна из самых мощных экранизаций последних лет. Загадочный грибковый вирус за считанные годы разрушил мировую цивилизацию: города опустели, а выживание стало единственным смыслом существования. Джоэл, сломленный потерями, получает задание доставить подростка Элли через всю страну — девочку, в чьей крови может быть спасение человечества. Ищете одни из нас все серии? Odni-iz-nas-kinogo.online — все 17 серий двух сезонов в профессиональной озвучке без регистрации. За жанром постапокалипсиса скрывается глубокая история о потере, привязанности и хрупкой человечности в бесчеловечном мире.
1xbet
1xbet
кондиционер с установкой в москве цена под ключ
Московский системный интегратор ASA Production работает по уникальной философии «Анализ — Решение — Сопровождение», которая за десятилетие превратила компанию в надёжного партнёра для бизнеса любого масштаба. На http://asa.ru/ представлен широкий каталог серверов, систем хранения данных, сетевого оборудования, источников бесперебойного питания и программного обеспечения от ведущих мировых брендов — Cisco, HP, ASUS, Microsoft, Eaton — по ценам интернет-магазина при квалификации системного интегратора. Компания регулярно проводит акции и распродажи, обеспечивает гарантию, возврат и проектные скидки, выстраивая с каждым заказчиком долгосрочные и стабильные отношения.
«Гранит Сервис» — производитель и поставщик ритуальных изделий из гранита в Южно-Сахалинске: вертикальные, горизонтальные и семейные памятники, ограды, столы, лавки, вазы и гранитная плитка. «Гранит Сервис» производит гравировку и фотокерамику, наносит надписи фрезером и осуществляет установку памятников под ключ на кладбищах Сахалинской области. Ищете памятник купить цена? На granitservise.ru представлен полный каталог изделий с возможностью заказа доставки и установки. Дополнительно компания производит гранитные подоконники, столешницы, ступени, бордюры и брусчатку для строительства и отделки.
1xbet
Мода давно перестала быть привилегией стандартных размеров — и интернет-магазин Smart-Woman это прекрасно понимает. Работая с 2006 года, он почти два десятилетия одевает шикарных женщин по всей России, предлагая одежду размерного ряда от 56 до 86. В каталоге представлены модели ведущих отечественных производителей, а часть ассортимента выпускается под собственной маркой — пошив размещается только у проверенных фабрик России и Киргизии. Заглянув на https://smart-woman.ru/, легко убедиться: здесь есть всё — от элегантных блузок и платьев-туник до джинсовых кардиганов и трикотажа, причём по по-настоящему доступным ценам. Удобный сервис заказа, прозрачные условия доставки и обмена делают покупку простой и приятной для каждой клиентки.
1xbet
1xbet
1xbet
1xbet
1xbet
Библиотека из более чем 89 000 фильмов, сериалов, аниме, мультфильмов и дорам превращает этот сервис в по-настоящему универсальный онлайн-кинотеатр. Ищете смотреть фильмы онлайн? На kinogo-filmov.biz работает гибкая система фильтрации по жанру, году, стране, рейтингу IMDb и КиноПоиску — найти нужное можно за секунды. Качество воспроизведения достигает BD 1080p, доступны различные варианты перевода. Библиотека не стоит на месте: новинки добавляются регулярно, и «Одиссея» 2026 года тому подтверждение.
«Принц драконов» — фэнтезийный анимационный сериал Netflix 2018 года, в котором магия, война и древние законы разделили людей и эльфов на непримиримых врагов. Когда люди уничтожают короля драконов и похищают его яйцо, хрупкий мир рушится. Ищете принц драконов смотреть онлайн? Все 7 сезонов и 63 серии доступны на princ-drakonov-kinogo.biz бесплатно в отличном качестве с русской озвучкой. Остановить катастрофу берутся трое — принц Каллум, его сводный брат Эзран и эльфийка-убийца Рэла. Сериал запоминается живыми характерами, детально выстроенным миром и смелым разговором о предрассудках и цене войны.
Крымский курорт Судак давно покорил сердца путешественников своей нетронутой природой, уникальными пляжами из кварцевого песка и кристально чистым морем — самым экологически чистым на всём полуострове. Купальный сезон здесь длится 138 дней, а живописные горные вершины, бирюзовые бухты и знаменитая Генуэзская крепость делают это место по-настоящему незабываемым. Туристско-оздоровительный комплекс https://tok-sydak.ru/ предлагает комфортное проживание в номерах различных категорий с возможностью онлайн-бронирования и выгодной скидкой 10% при раннем бронировании до 1 апреля 2026 года. Здесь вас ждут уют, живописные виды и профессиональный сервис.
ПрофМеталМаркет — московский поставщик алюминиевых систем и нержавеющей стали для строительства, отделки и производства. В ассортименте компании — исчерпывающий сортамент: уголки, трубы, швеллеры, двутавры, полосы, листы, пороги и потолочные профили. Ищете сталь нержавеющая купить в москве? На profmetal-market.ru представлен весь каталог с актуальными ценами и возможностью заказа онлайн. В наличии анодированный алюминий, зеркальная нержавейка, системы JOKER и полный ассортимент хромированного крепежа. Самовывоз с московского склада и доставка во все регионы страны делают ПрофМеталМаркет практичным выбором для профессиональных и частных заказчиков.
Гранит — материал, проверенный тысячелетиями: египетские пирамиды, античные храмы и современные мегаполисы объединяет именно этот камень. Компания «Гранит Сервис» продолжает традицию работы с благородным натуральным камнем, предлагая изделия высочайшего качества для мемориальных комплексов, архитектурных объектов и интерьеров. Все услуги и каталог представлены на https://granitservise.ru/ — от резки и полировки до установки готовых изделий под ключ. Профессиональный подход, собственное производство и строгий контроль качества на каждом этапе гарантируют результат, который прослужит десятилетия.
Uniecs — эксперты в области бережливого производства, помогающие компаниям повышать операционную эффективность и снижать издержки. Накопленный за два десятилетия опыт включает свыше 100 реализованных проектов в производственной и сервисной сферах. В арсенале специалистов — TPM, Six Sigma, инструменты цифровизации и авторские программы подготовки лидеров. Все актуальные услуги и кейсы собраны на https://uniecs.pro/ — ресурс даёт полное представление о подходе и результатах команды. Заказчики достигают снижения затрат до 30% и получают выстроенные бизнес-процессы взамен разрозненного и неэффективного производства.
«Чёрная любовь» — турецкая мелодрама 2015 года о двух людях из разных миров, чьё чувство с первого взгляда становится испытанием на всю жизнь. Скромный стамбулец Кемаль влюбляется в Нихан — девушку из богатой семьи с тёмными тайнами и властным женихом Эмиром. Манипуляции, шантаж и предательство разлучают их на годы. Ищете чёрная любовь смотреть онлайн? Все 244 серии двух сезонов смотрите бесплатно на chernaya-lyubov-kinogo.online с русским дубляжом в хорошем качестве. Возмужавший Кемаль возвращается в Стамбул и встречает Нихан вновь — прошлое не отпускает, правда рвётся наружу, а любовь, выжившая вопреки всему, требует своего.
Алина Хромочкина — дизайнер интерьера с архитектурным образованием и десятилетним опытом создания частных домов, вилл, квартир и коммерческих пространств в Сочи и других городах. К реализованным объектам относится вилла на Бали, успешно принимающая гостей. Алина работает не от мебели, а от людей: изучает семью, привычки и сценарии жизни, подбирает цвет и материалы по эмоциональным паттернам клиента. Ищете заказать дизайн проект интерьера загородного дома? На mybrightdesign.com можно ознакомиться с портфолио и условиями работы. Авторский надзор и удалённый формат работы обеспечивают качественный результат без необходимости в многочисленных встречах и итерациях.
Санкт-Петербургская типография «Полифарм» — это надёжный партнёр для бизнеса, которому важны качество и скорость. Компания выпускает весь спектр полиграфической продукции: брошюры, каталоги, листовки, визитки, календари, коробки, конверты и даже эксклюзивную упаковку из экологичных материалов. На сайте http://www.polifarm-spb.ru/ можно оформить заказ в несколько кликов, после чего курьерские службы СДЭК и «Деловые линии» доставят тираж в любую точку России. Типография работает с частными клиентами и крупным бизнесом, используя современное оборудование.
Компания «СтройПиломатериалы» производит и реализует полный ассортимент пиломатериалов: брус обрезной, строганный, клееный и профилированный, доску антисептированную, террасную, палубную и шпунтованную, евровагонку, имитацию бруса, планкен, фанеру, OSB и мебельный щит. Собственное производство в Мытищах позволяет отгружать продукцию напрямую покупателю, исключая посредников и обеспечивая стабильное качество по ценам завода. Ищете доска обрезная строганная 20х90х3000? На stroypilomaterialy.ru можно оформить заказ с доставкой по Москве и области. Широкий выбор позволяет закрыть потребности любого строительного или отделочного проекта.
«Чернобыль» (HBO, 2019) — пятисерийная драма, воссоздающая события апрельской катастрофы 1986 года с редкой документальной достоверностью. Сериал исследует трагедию с нескольких точек зрения: учёные ищут правду, чиновники скрывают её, а ликвидаторы расплачиваются жизнями. Ищете чернобыль смотреть онлайн? Смотреть сериал онлайн в хорошем качестве можно на chernobyl-smotret.online — все пять серий доступны бесплатно. Авторы педантично восстановили атмосферу позднесоветской эпохи: от типичных интерьеров и костюмов до характерной манеры общения. За жанром исторической драмы скрывается жёсткий разговор о том, чего стоит институциональная ложь.
iPhone давно перестал быть просто смартфоном — это целая философия, где каждая деталь продумана до миллиметра. Apple создаёт устройства, в которых передовой процессор собственной разработки, исключительная камера и интуитивная операционная система iOS образуют единую экосистему без компромиссов. Подробнее об особенностях и преимуществах смартфонов Apple читайте на https://aksmob.ru/artcles/2/iphone-osobennosti-smartfonov-apple — здесь собран исчерпывающий разбор ключевых характеристик, на которые стоит обратить внимание перед покупкой. Многолетняя поддержка обновлений, надёжная защита данных и безупречная сборка делают iPhone одним из самых выгодных вложений в современные технологии.
Огромная коллекция фильмов и сериалов от таких гигантов как Netflix, HBO, Marvel и Disney делает этот онлайн-кинотеатр точкой притяжения для зрителей самых разных вкусов. Ищете смотреть фильмы онлайн? На kinogo-online.biz собраны подборки для самых разных зрителей: от молодёжных комедий и романтики до антиутопий, биографий и лауреатов «Оскара». Сортировка по году выпуска, оценкам КиноПоиска и тематическим категориям делает навигацию по каталогу быстрой и точной. Каталог охватывает релизы с 1998 по 2026 год включительно.
https://guryevsk.forum24.ru/?1-3-0-00000785-000-0-0-1773882614
MiGroup поставляет металлообрабатывающее оборудование и профессиональный инструмент широкого спектра: 5-осевые центры с ЧПУ, токарные станки, фрезы, свёрла и средства измерения. На https://migroup.tech/ представлен широкий каталог — станки, вспомогательное оборудование, смазочные материалы и оснастка для производств любого масштаба. Работая с промышленными предприятиями, MiGroup закрывает полный цикл задач — подбор оборудования, его поставку и последующее техническое сопровождение.
https://pf1.ru/topic69972.html?pid=494569&st=0&#entry494569
Веб-студия Standard-Landing.com с 2010 года разрабатывает продающие одностраничные сайты и настраивает контекстную рекламу в Яндекс Директ с фокусом на конверсии. За годы работы студия реализовала свыше 1500 проектов, цель каждого — привести в бизнес платёжеспособных клиентов. Ищете купить лендинг? На standard-landing.com можно заказать лендинг, настройку рекламы, SEO-продвижение, написание текстов и изготовление логотипов. Аналитика и постоянная оптимизация трафика позволяют команде выжимать максимум результата из каждого рубля рекламных вложений.
Looking for a transfer from Halkidiki Airport? Visit https://halkidiki-transfer.gr/ and you’ll find private transfers at competitive prices. We provide maximum comfort and reliability with fixed prices and professional drivers. Our modern fleet includes Mercedes E-Class sedans, V-Class minivans, and Sprinter minibuses. All vehicles are meticulously maintained, air-conditioned, and non-smoking.
Выбор краски для стен — задача, от которой напрямую зависит уют и долговечность вашего интерьера. Профессионалы советуют отдавать предпочтение латексным и акриловым составам: они легко наносятся, быстро сохнут и устойчивы к влажной уборке. Для кухни и ванной подойдут моющиеся краски с антигрибковыми добавками, а для спальни и гостиной — матовые дышащие составы, скрывающие мелкие неровности. Развёрнутые советы по выбору и подробный обзор популярных брендов вы найдёте на https://stroy-m2.ru/chem-pokrasit-steny-v-kvartire/ — ресурсе, где собраны актуальные рекомендации от строительных экспертов. Здесь же можно подобрать все необходимые материалы: от грунтовок до финишных покрытий, с доставкой и профессиональной консультацией.
«Ювелирный Альянс» — московская компания по покупке и продаже золотых и серебряных монет: «Георгий Победоносец», «Червонец сеятель», зарубежные инвестиционные и памятные серии. Надбавка к рыночной котировке составляет всего 4%, что делает вложения максимально выгодными. https://jewelery-alliance.ru/ предлагает удобный каталог с фильтрацией по металлу и серии, оплату и доставку по Москве. Вложения в монеты из золота 999 пробы остаются одним из наиболее надёжных способов защитить капитал от рисков фондового рынка.
«Звёздные войны: Войны клонов» — знаковый анимационный сериал 2008 года, заполняющий пространство между вторым и третьим эпизодами эпической франшизы. Энакин Скайуокер, Оби-Ван Кеноби и юная падован Асока Тано ведут ожесточённые сражения против армии сепаратистов, пока ситхи в тени плетут свои интриги. Ищете войны клонов смотреть онлайн? Все 7 сезонов и 133 серии доступны на zvezdnye-voyny-voyny-klonov-smotret.net бесплатно в отличном качестве с русской озвучкой. Сериал умело переплетает зрелищные космические баталии, закулисные политические игры и эмоциональные личные арки, делая из безымянных клонов живых и запоминающихся героев.
Рынок смартфонов сегодня — это захватывающая арена, где Samsung, Apple, Xiaomi и другие гиганты борются за каждого покупателя, предлагая всё более мощные процессоры, революционные камеры и инновационные дисплеи. Расстановка сил постоянно меняется: одни бренды захватывают бюджетный сегмент, другие уверенно держат премиум. Актуальный анализ этой конкурентной картины вы найдёте на https://android-robot.com/rasstanovka-sil-na-rynke-smartfonov/ — глубокий разбор позиций ключевых игроков, их стратегий и прогнозов. Понимание рынка помогает сделать по-настоящему осознанный выбор и не переплачивать за бренд там, где качество говорит само за себя.
Русский Север — один из самых самобытных и малоизведанных туристических маршрутов России, где деревянные церкви XV века соседствуют с нетронутой тайгой, а Белое море хранит тайны Соловецкого архипелага. Туроператор «Севертур» специализируется именно на этом направлении: на сайте https://xn--b1afb8babli.xn--p1ai/ представлено более 70 туров — от Каргополя и Кенозерского национального парка до Вологды и Великого Устюга. Компания работает как с частными туристами, так и с агентствами, предлагая автобусные, праздничные и каникулярные программы с продуманной логистикой и размещением.
Типография «Повсюду» в Москве специализируется на широком спектре полиграфии: визитки, буклеты, листовки, брошюры, каталоги, блокноты, календари, таблички, дорхенгеры и сувениры. Производство работает на собственных мощностях, что позволяет контролировать качество и соблюдать сроки даже при сложных тиражах. Ищете подарки на 23 февраля москва? На povsyoudo.ru принимают заказы любой сложности с расчётом стоимости и сроков сразу после оформления заявки. Компания также предлагает профессиональные услуги дизайнера и организует доставку по Москве и Московской области.
Иркутский ресторан «Пекинская Утка» — заведение, в котором подлинные традиции китайской кухни соединяются с профессиональным обслуживанием. Гастрономическая карта включает морепродукты, мясные позиции, овощные блюда и авторские соусы — всё разнообразие традиционной китайской кухни. https://pekin-utka.ru/ предлагает онлайн-бронирование столика и удобную доставку. Меню сочетает классику и авторские позиции, а ценовой диапазон остаётся доступным для большинства гостей.
Южнокорейский сериал «Милый дом» — жёсткий и атмосферный хоррор-триллер, который захватывает с первых минут. Необъяснимая эпидемия делает из людей монстров, олицетворяющих их скрытые комплексы и ужасы. Замкнутый школьник Чха Хёнсу оказывается в осаждённом жилом комплексе среди соседей, которых боишься не меньше тварей за дверью. Ищете милый дом смотреть онлайн? Все три сезона доступны на milyy-dom-smotret.net — смотреть онлайн бесплатно в высоком качестве с профессиональной озвучкой. Сериал мастерски сочетает психологическую драму, боевик и фантастику, удерживая напряжение до финала каждой серии.
В мире онлайн-развлечений Fugu Casino выделяется как свежий и динамичный игрок, открывшийся в 2026 году под управлением опытной компании Galaktika N.V., которая успешно ведет 12 подобных проектов. С лицензией Кюрасао (OGL/2024/169/0146) и поддержкой трех языков, включая русский, это казино предлагает около 9 тысяч игр от 68 провайдеров вроде Yggdrasil, Spinomenal и Red Tiger — от слотов и рулеток до лайв-столов, карточных игр и быстрых мини-развлечений, плюс букмекерский раздел для ставок. Удобный интерфейс с интуитивным меню идеален даже для новичков, а приложения на Android и iOS обеспечивают мобильность; минимальный депозит и вывод — всего 10 евро, с обработкой заявок до 24 часов и круглосуточной поддержкой через чат или Telegram. Если вы ищете надежное место для азартного досуга с регистрацией через email, телефон или соцсети (только для совершеннолетних), загляните на https://fugucasino02.online/ — здесь активные зеркала, тематические разделы и атмосфера настоящего приключения, где каждый спин может принести удачу, а правила строго соблюдаются для честной игры.
Olymp Casino — лицензированное онлайн-казино с лицензией Curacao eGaming, работающее с 2014 года и завоевавшее доверие тысяч игроков Казахстана. Сервис включает свыше 2000 игровых автоматов от ведущих разработчиков, спортивные ставки с коэффициентами от 1000 и стартовый бонус до 125% с 250 фриспинами. Ищете olymp casino скачать на андроид? На olymp-casino-online.com доступны мобильные приложения для iOS и Android, еженедельный кэшбэк 10% и вывод средств от 15 минут. Служба поддержки доступна в любое время суток и оперативно решает любые вопросы игроков.
SmartElectron реализует проекты любой сложности в сфере разработки и производства электронных приборов и устройств. Команда разработчиков самостоятельно формирует техническое задание, создаёт схемотехнику и проектирует платы для последующего тиражирования. Подробный каталог услуг и реализованных проектов представлен на https://smartelectron.ru/ — здесь можно оценить масштаб и уровень компетенций команды. Клиент получает готовую техническую документацию и полную поддержку разработчика на всех этапах производства. Это гарантирует стабильное качество продукта в долгосрочной перспективе.
http://center-2.ru/forum/?mingleforumaction=viewtopic&t=26552#postid-48387
http://wmking.ru/t85930.html
HBO представил «Дом Дракона» — грандиозный фэнтези-сериал, возвращающий аудиторию на два века назад в золотой век Таргариенов. Принцесса Рейнира борется за право на Железный трон вопреки законам Вестероса, а самым непредсказуемым врагом становится её родственник Дэймон. Ищете сериал дом дракона? Все 18 серий обоих сезонов доступны на dom-drakona-smotret.online в высоком качестве с множеством вариантов озвучки. Помимо впечатляющих сцен с драконами сериал держит в напряжении мастерски выстроенной политической интригой, в которой за каждым жестом скрывается предательство.
Visit https://athlitiko-massage.gr/ to book sports therapeutic massage and physiotherapy in Thessaloniki. We offer massages in your home, hotel, or office, and work with athletes, office workers, and those recovering from injuries. Explore the types of massage and rehabilitation services offered on our website, as well as pricing information.
Фотоомоложение на многофункциональной платформе M22 эффективно борется с сосудами, пигментом и первыми признаками старения. Подробные протоколы лечения описаны на https://www.virsavia.ru/.
Когда речь заходит о надёжных конструкционных материалах, алюминий и нержавеющая сталь остаются бесспорными лидерами в строительстве, дизайне и промышленности. Компания ПрофМеталМаркет предлагает широкий ассортимент профессионального металлопроката: на сайте https://profmetal-market.ru/ представлены алюминиевые профили, трубы, листы, тавры, швеллеры и анодированный алюминий, а также изделия из нержавеющей стали — от зеркальных труб до перил и крепежа системы JOKER. Компания работает в Москве, осуществляет самовывоз и оперативную доставку по всей России.
Процедура Forma V обеспечивает бережное радиочастотное воздействие для омоложения тканей и восстановления тонуса стенок влагалища. Полное описание методики и прогнозируемые результаты доступны на https://tochka-g.pro/.
Стерилизационное оборудование необходимо для обеспечения полной инфекционной безопасности в любом медицинском учреждении. Комплексные решения для оснащения ЦСО можно изучить на https://invasive.ru/.
Обучение косметологии в Академии Dr. Star позволяет освоить самые востребованные техники под руководством экспертов мирового уровня. Все программы доступны на https://academy.drstar.pro/.
Академия Tochka-G объединяет ведущих экспертов и тренеров в области эстетической медицины для передачи уникального клинического опыта. Информация о преподавательском составе представлена на https://tochka-g.pro/.
Онлайн-магазин «Мебельный базар» представляет большой выбор мебели от признанных российских и международных производителей для жилых и офисных интерьеров в Московском регионе с доставкой по стране. В наличии мебель для спален, залов, прихожих, кухонь, мягкие комплекты, столовые группы, гардеробные системы по персональным параметрам от производителей России, Италии, Белоруссии, Китая и Малайзии. Ищете мебель? Ознакомиться с полным каталогом товаров и оформить заказ можно на bazar-mebel.ru Магазин предоставляет услуги профессиональной сборки мебели, доставку по городу и области, консультации по выбору и выгодные условия оплаты.
«Дасеан» — крымская компания, занимающаяся производством и реализацией строп, стальных канатов, грузовых и якорных цепей, такелажа и крепёжного оборудования. Наличие собственного производства обеспечивает полный контроль качества и возможность изготовления продукции по индивидуальным требованиям. Ищете канат гост 7668-80 купить? На dasean-crimea.ru представлен полный каталог продукции: цепные, канатные и текстильные стропы, полиамидные и полипропиленовые канаты, скобы, коуши, талрепы, зажимы и стальные тросы по ГОСТ. Компания работает в Севастополе и обслуживает клиентов по всему Крыму.
MMORPGゲームをお探しですか?https://www.jleggames.net/ にアクセスすれば、PCゲームやMMOゲームが見つかります。豊富なPCゲームを取り揃えています。多数のPCゲームのリストをご用意しました。詳しくはウェブサイトをご覧ください!
Контурная пластика филлерами на основе гиалуроновой кислоты позволяет гармонизировать черты лица и восполнить утраченные объемы. Выбор препаратов экспертного класса представлен на https://www.virsavia.ru/.
Заходите на сайт https://monapteka.ru/ – мы производим натуральную продукцию для оздоровления, на основе старинных Монашеских рецептов, которые собраны с разных Монастырей и Храмов России. Изготовление продукции, соблюдая древние рецепты, с применением современных технологий производства. Только натуральные компоненты и отечественные материалы для производства. Посмотрите наш каталог.
Вопросы женского здоровья и уверенности в себе решаются в академии через синергию медицины, технологий и глубокого понимания физиологии. Ваша площадка для профессионального роста находится на https://tochka-g.pro/.
Академия инъекционных методик привлекает моделей на курсы по работе с препаратами Pluryal Premium и другими передовыми техниками. Станьте частью профессионального обучения через https://beautymodel.club/.
Система Lumecca помогает создать безупречный облик и придает уверенность в себе и своей внешности. Информация об исследованиях и тренерах проекта представлена на https://beautymodel.club/.
Анатомический курс для косметологов с отработкой на биоматериале помогает врачу чувствовать себя уверенно в любой процедуре. Запись через https://academy.drstar.pro/.
Обучение нитевому лифтингу открывает новые возможности для моделирования контуров лица без хирургического вмешательства. Ознакомьтесь с курсами на https://academy.drstar.pro/.
Оформить кредит с испорченной историей или без подтверждения дохода — возможно. Кредитные брокеры работают с банками напрямую и знают, какие программы одобряют даже сложные случаи. Ищете кредиты? Специалисты vk.com/mewokkreditovpomoschvkredite подберут выгодные условия и сопроводят сделку от заявки до выдачи денег. Поддержка предоставляется частным клиентам по всей территории России. Первичная консультация ничего не стоит — оплата только по факту получения кредита.
https://cvetonya.myqip.ru/?1-0-0-00006154-000-0-0-1774259084
http://csexpert.4adm.ru/viewtopic.php?f=70&t=5023
http://center-2.ru/forum/?mingleforumaction=viewtopic&t=26703#postid-48574
Потеря близкого человека — одно из самых тяжёлых испытаний в жизни, и достойная память о нём заслуживает особого внимания. Салон камня «ДМ» во Владимире уже 19 лет создаёт гранитные памятники и мемориальные комплексы, воплощая в камне тепло и уважение к ушедшим. Более 2000 реализованных проектов, собственное производство с современными фрезеровальными и гравировальными станками — всё это гарантирует безупречное качество. Познакомиться с каталогом из пятисот образцов и воспользоваться удобным онлайн-конструктором можно на сайте https://pamyatniki-vladimir.ru/ — здесь же легко оформить заказ и получить бесплатную консультацию. Компания работает строго по договору, без скрытых платежей, а на установку даётся уникальная для региона гарантия — 5 лет.
Выпускной — один из тех редких дней, которые хочется сохранить в каждой детали: взгляды, смех, слёзы радости и первые шаги во взрослую жизнь. Именно поэтому так важно доверить съёмку профессионалам, которые умеют не просто фотографировать, а рассказывать истории. Студия https://profvideo.ru/vypusknoj/ предлагает комплексную фото и видеосъёмку выпускного в Москве и области под ключ: последний звонок, торжественная часть, банкет, монтаж клипа и фильма о классе. Команда берёт на себя всё — от тайминга до сдачи готового материала в строго оговорённые сроки по договору. Никаких сюрпризов, только результат.
https://www.uralfishing.ru/foto/displayimage.php?album=1212&pos=0
https://soc-life.com/forum/39-12316-1
https://ipcalc.co/blog/kak-akkumulyatory-betafpv-vliyayut-na-vremya-polyota-drona/
https://svrt.ru/doc/2015/in/3/1/news/69_obzor_svetovogo_oborudovaniya_pavo.html
Московская типография «Самрай» выполняет полиграфические заказы любой сложности: печать визиток, листовок, буклетов, брошюр, книг, плакатов, баннеров, чертежей и фотографий. В арсенале компании — широкоформатная печать, изготовление наклеек, календарей, бейджей, пластиковых карт и табличек, плюс нанесение изображений на футболки и кружки. Ищете копировальный центр? На samray.ru представлен полный прайс и технические требования к макетам. Компания самостоятельно выполняет все этапы послепечатной обработки: ламинацию, биговку, тиснение, вырубку и твёрдый переплёт — без субподрядчиков.
https://www.reddit.com/r/CryptoIndia/comments/1qr97x5/comment/of591a8/
«Мы все мертвы» — южнокорейский хоррор Netflix 2022 года: привычная школьная жизнь в считаные часы рушится под натиском зомби-апокалипсиса. Вирус, вырвавшийся из школьной лаборатории, превращает учеников и учителей в агрессивных мертвецов. Ищете сериал мы все мертвы? Смотреть сериал онлайн бесплатно во всех озвучках можно на my-vse-mertvy-smotret.net — все 12 серий в высоком качестве. Горстка выживших подростков заперта в отрезанном от мира здании и ежеминутно сталкивается с выбором, от которого зависит жизнь. Сериал беспощадно смешивает хоррор и подростковую драму: дружба, первая любовь и предательство проверяются там, где за каждой дверью — смерть.
https://investsocial.com/forum/free-discussion/advertisement/18863168-level-up-your-crypto-iq-with-sumex
Практические интенсивы с постановкой руки гарантируют уверенность в работе с филлерами на основе гиалуроновой кислоты. Запишитесь через https://academy.drstar.pro/.
Процедура Morpheus 8 позволяет достичь невероятных преображений за счет современных технологий воздействия на ткани. Подать заявку на участие в качестве модели можно на https://beautymodel.club/.
ウェブサイト https://www.sum77-debatable.com/ にアクセスすると、コムドット 事務所 どこ, シルク 身長, ennちゃん, 東海オンエア スタジオコムドット 事務所 どこシルク 身長 ennちゃん 東海オンエア スタジオ コムドット事務所
Гибкая эндоскопия применяется для широкого спектра исследований желудочно-кишечного тракта и дыхательных путей. Актуальный модельный ряд гастроскопов и колоноскопов представлен на https://invasive.ru/.
Обучение плазмотерапии и применению аутологичной плазмы для естественного омоложения и быстрой регенерации тканей. Детали на https://academy.drstar.pro/.
«Фарго» — легендарный американский сериал, в котором сонная глубинка Миннесоты оборачивается местом жестоких и абсурдных происшествий. Появление таинственного чужака мгновенно рушит иллюзию спокойствия, затягивая жителей городка в водоворот преступлений. Неудачливый страховой агент, харизматичный манипулятор и принципиальная женщина-детектив — каждый тянет в свою сторону в этой мастерски выстроенной истории. Ищете сериал фарго? На fargo-smotret.net доступны все 51 серия пяти сезонов в высоком качестве с профессиональными озвучками. Мрачный юмор, напряжённая криминальная интрига и абсурд обыденной жизни ставят «Фарго» в ряд лучших сериалов последних лет.
Технология Lumecca V используется для фотоомоложения и коррекции пигментации в интимной области, обеспечивая быстрый и безопасный эстетический эффект. Описание работы аппликатора доступно на https://tochka-g.pro/.
Удаление рубцов, шрамов и растяжек современными лазерными методиками делает кожу гладкой и ровной. Полная информация о реабилитации и количестве сеансов доступна на https://www.virsavia.ru/.
Компания «Транссиб Северо-Запад» — опытный таможенный брокер в Санкт-Петербурге с полутора десятилетиями практики в международной логистике. Компания организует поставки товаров из Китая, Европы, Турции и Индии под ключ: берёт на себя таможенное оформление, сертификацию, расчёты с поставщиками и оптимизацию маршрутов по срокам и стоимости. Ищете оформление грузов под ключ? Подробнее об условиях доставки и актуальных тарифах читайте на transib-sz.ru — здесь можно оставить заявку и получить бесплатный расчёт. Более 300 клиентов уже доверяют компании регулярные поставки, а 98% из них рекомендуют её партнёрам. Груз находится под полным контролем на всём пути — от закупки у поставщика до передачи на склад заказчика.
Подскажите, а в Менделеево выезжаете? Статья полезная. https://evakuator-zelao.ru/
Очень выручили ночью на Ленинградке, спасибо! https://evakuator-zelao.ru/
Ищете центр натурального оздоровления и фермерских продуктов в Екатеринбурге? Посетите сайт https://lavkalekar.ru/ Лавка Лекаря – у нас в большом ассортименте фермерские продукты и здоровое питание без консервантов, а также травяные сборы, масла и натуральные средства поддержки здоровья.
«Делай Промо» — SaaS-платформа для брендов и агентств, позволяющая запускать чековые акции, программы лояльности и мотивацию продавцов без привлечения разработчиков. В распоряжении брендов и агентств — конструктор лендингов, OCR-распознавание чеков, чат-боты для Telegram и VK, кодовые механики с антибрутфорс-защитой и сквозная аналитика с экспортом в Excel, объединённые на одной платформе. На http://makerpromo.ru/ уже зарегистрировано свыше 24 000 чеков и 18 000 активных пользователей. Проект находится на стадии закрытого бета-теста и предлагает участникам специальные условия подключения.
Мода давно перестала быть привилегией стандартных размеров — и интернет-магазин Smart-Woman это прекрасно понимает. Работая с 2006 года, он почти два десятилетия одевает шикарных женщин по всей России, предлагая одежду размерного ряда от 56 до 86. В каталоге представлены модели ведущих отечественных производителей, а часть ассортимента выпускается под собственной маркой — пошив размещается только у проверенных фабрик России и Киргизии. Заглянув на https://smart-woman.ru/, легко убедиться: здесь есть всё — от элегантных блузок и платьев-туник до джинсовых кардиганов и трикотажа, причём по по-настоящему доступным ценам. Удобный сервис заказа, прозрачные условия доставки и обмена делают покупку простой и приятной для каждой клиентки.
Ритуальный центр ОПРС в Одинцово на протяжении 15 лет оказывает поддержку семьям в самые трудные моменты. Специалисты берут на себя полную организацию похорон: подготовку документов, установку памятников и уход за местом захоронения. Всю информацию об услугах можно найти на https://ritualodintsovo.ru/ — полный перечень с примерами работ и формой заявки. Каждая семья получает персональный подход с соблюдением религиозных и национальных традиций а место захоронения остаётся в образцовом состоянии.
Устал искать нормальную работу с честной оплатой? JobHive предлагает свежие вакансии от надёжных компаний — от курьерских служб до банков и call-центров. Простой поиск и прямая связь с нанимателем — никаких лишних посредников. Ищете поиск информации вакансии? Переходи на jobhive.ru — выбирай подходящую вакансию и начинай работать уже сегодня. Подходит всем: опытным специалистам и тем, кто впервые выходит на рынок труда.
Интернет-магазин АВК-авто в Санкт-Петербурге предлагает огромный выбор летних, зимних и всесезонных шин от ведущих мировых производителей — Michelin, Continental, Nokian, Pirelli и многих других на любой кошелёк. Ищете купить литые диски? На avk-tyres.ru можно подобрать резину по параметрам автомобиля или выбрать конкретный типоразмер из каталога с удобной фильтрацией. Магазин предлагает бесплатную доставку по Санкт-Петербургу и регулярные акции для экономии на покупке. Здесь найдут нужный вариант владельцы легковых авто, кроссоверов и внедорожников.
Фотография — это не просто нажатие кнопки, это язык, которому можно и нужно учиться. Именно для тех, кто делает первые шаги с камерой в руках, создан онлайн-журнал для фотолюбителей. Здесь публикуются практичные материалы на любой вкус: от азов астрофотографии и техники стек-фокуса до увлекательного фризлайта — рисования светом. Заглянув на https://photojournal.online/, читатель найдёт советы признанных мастеров, в том числе предметного фотографа Олега Семёнова, а рубрики «Азбука фотографа» и «Спроси у мастера» превращают сложную теорию в понятные инструкции. Новые статьи выходят регулярно, так что каждое посещение сайта приносит свежие знания и вдохновение для новых творческих экспериментов.
ラップアーティストの情報をお探しですか? https://mcbattle-ch.jp/ にアクセスしてください。Wainyudo、梅田サイファー kz、パブロ badhop、高校ラップ選手権、elione などが見つかります。さらに日本のバトルラップとフリースタイルシーンに関するすべて。
Мебельная фабрика «Подольск» производит кухни и шкафы-купе под заказ для клиентов из Москвы и Подмосковья. В производстве применяются надёжные материалы и фурнитура ведущих брендов для максимального срока службы мебели. Фабрика предлагает полный цикл услуг: замер, проектирование, изготовление и доставку с профессиональной сборкой. Партнёром фабрики по поставке оборудования выступает https://mf-podolsk.ru/ — надёжный поставщик металлообрабатывающих станков и инструментов. Воспользоваться услугами фабрики просто — достаточно собрать проект в онлайн-конструкторе на сайте.
Looking for payment service provider? Check out emodzen.com to find everything you need: business transaction processing, personal transfers, account opening and card issuance across the globe, worldwide payment acceptance, and live performance tracking. Find out what makes Emodzen Acquiring the preferred choice for a growing number of clients around the world — all the details are on our website.
Пиломатериалы из сибирской лиственницы от производителя «СибирьЛесТорг» поставляются напрямую клиентам в Москве и Подмосковье. Весь цикл — от заготовки в Красноярском крае до готовой продукции — выполняется на собственных мощностях, что обеспечивает конкурентные цены без посредников. Ищете шпунтованная доска для пола из лиственницы 36х140х4000? На сайте listvennicamsk.ru представлен полный ассортимент: доска, брус, вагонка, планкен, блок-хаус, палубная и террасная доска, ступени, термолиственница. Немецкие линии WEINIG и итальянские лесосушильные камеры обеспечивают точность размеров и неизменно высокое качество продукции. Компания работает с оптовыми и розничными покупателями и осуществляет доставку.
กำลังมองหารถแลกเปลี่ยนอยู่ใช่ไหม? Mazda 2 Skyactiv, Mazda 3 2024, Mazda 3 Skyactiv, Mazda 2 Skyactiv? เข้าชมเว็บไซต์ https://www.mazdakrisda.com/ ได้เลย – ที่นี่คือแหล่งข้อมูลครบวงจรสำหรับสิ่งที่คุณกำลังมองหา
Строительная бытовка — это не просто временное укрытие на объекте, а полноценное рабочее пространство, от которого зависит комфорт и продуктивность всей бригады. Чтобы не тратить время на поиск надёжного поставщика, достаточно заглянуть на https://bytovka-stroitelnaya.by/ — здесь собран актуальный рейтинг минских компаний, предлагающих бытовки от эконом до премиум-класса. Среди участников каталога — проверенные производители с опытом более восьми лет, гарантией до 12 месяцев и услугой монтажа под ключ. Доставка осуществляется по Минску и всей Беларуси, а выбор охватывает модульные здания, дачные домики и пункты охраны.
Сериал «Люцифер» — дерзкая смесь фэнтези, криминала и чёрной комедии, где повелитель преисподней бросает ад ради Лос-Анджелеса и ночного клуба. Пресытившись бесконечной рутиной преисподней, герой превращается в полицейского консультанта и бок о бок с твёрдым детективом разгадывает сложнейшие дела. Умение вытащить наружу самые скрытые желания человека делает его идеальным и незаменимым помощником следователя. Ищете люцифер смотреть онлайн? На lyutsifer-smotret.online все 93 серии шести сезонов доступны бесплатно в высоком качестве с профессиональными озвучками. Притягательная харизма героя, меткий юмор и неожиданная философская глубина превращают «Люцифера» в один из самых затягивающих сериалов последних лет.
«Чисто Здесь» — клининговая компания из Екатеринбурга с охватом всей Свердловской области и безупречным стандартом качества. Генеральная и поддерживающая уборка, постремонтная очистка, мытьё окон и фасадов, химчистка, озонирование и уборка офисов — полный перечень клининговых решений под одной крышей. Ищете уборка помещений? Заказать услугу и рассчитать стоимость можно на chistozdes.ru — удобная форма расчёта доступна онлайн. Услуги доступны как для частных лиц так и для корпоративных клиентов.
SmartElectron — это опытные инженеры, готовые воплотить в жизнь проекты в сфере электроники любого уровня сложности. Компания охватывает весь производственный цикл: от написания технического задания и проектирования схемотехники до создания печатных плат и выпуска серийной документации. Ищете разработка электронных приборов? Заказать услуги и ознакомиться с реализованными проектами можно на smartelectron.ru — портфолио компании подтверждает высокий уровень экспертизы. Клиент получает исчерпывающую техническую документацию и непрерывное сопровождение разработчика, гарантирующее неизменное качество изделий в течение всего производственного цикла.
Лавка Лекаря Екатеринбург https://ekblekar.info/ – это магазин оздоровления натуральными средствами, полезного питания, фермерских продуктов. Посмотрите наш ассортимент – там вы найдете для себя полезные продукты. Мы Мы производим натуральные и экологически чистые продукты питания и оздоровления, без добавления консервантов, красителей, глютена.
Планируете рост позиций в Яндекс и Google — доверьтесь экспертам. https://seosha.ru/ предлагает полный цикл SEO-продвижения для бизнеса любого масштаба: интернет-магазины, медицинские клиники, банки, строительные компании и юридические фирмы. Опыт Никиты Шабалина подкреплён задокументированными кейсами с прозрачными результатами. Никакой воды — только рост трафика и увеличение продаж через органический поиск.
Drinks Market Dubai — онлайн-магазин премиального алкоголя с доставкой по всему Дубаю для тех, кто не готов жертвовать качеством ради удобства. Каталог включает водку, виски, коньяк, ром, джин, текилу, вино, шампанское, просекко и пиво от ведущих мировых брендов. Ищете доставка алкоголя в дубае? Выбрать и оформить заказ можно на drinksmarket-dubai.ru — курьер доставит напитки за 25–30 минут прямо до двери. Оплатить заказ можно наличными, банковским переводом или криптовалютой — это особенно удобно для гостей и жителей Дубая.
ウェブサイト https://cinemani.jp/ では、ジブリどこで見れる、魔女の宅急便キャッチコピー、スポーツ展望アプリ、ジブリ何で見れる、ジブリ何で見れるなど、あらゆる問題に関する有益で有益な情報を見つけることができます。
Mebelink специализируется на перетяжке и реставрации мягкой мебели в Москве и даёт гарантию 3 года на все выполненные работы. Компания использует износостойкие и гипоаллергенные материалы, подбирает эксклюзивные ткани под любой интерьер и выполняет ремонт диванов, кресел, кроватей, стульев и офисной мебели. https://mebelink.com/ рассчитает стоимость по фото за 15 минут — цена фиксируется сразу и не меняется. Доставка и сборка входят в стоимость заказа. Оценка 5,0 в Яндексе говорит сама за себя.
Ищете кроссовер ex5 em i? Загляните на geely-kuntsevo.ru/models/geely-ex5-em-i и получите полную информацию о кроссовере: комплектации, технические характеристики, особенности дизайна и варианты сервисного обслуживания. При необходимости получите персональное предложение. У нас гарантия 5 лет, а также существенная выгода по Trade In, выгодные условия кредита. Ознакомьтесь с полными условиями на нашем сайте.
http://xn--80aeh5aeeb3a7a4f.xn--p1ai/forum/user/69094/
https://uvsiz.ru/izgotovlenie-kartonnyh-korobok-i-upakovki-2/
https://world-man.ru/process-izgotovleniya-kartonnyh-korobok-i/
https://bmrussia.ru/tehnologii-izgotovleniya-kartonnyh-korobok-i/
https://statusdm.ru/izgotovlenie-kartonnyh-korobok-i-upakovki/
https://donaldwestlake.ru/proizvodstvo-kartonnyh-korobok-i-upakovki/
กำลังมองหาข้อมูลเกี่ยวกับหัวข้อนี้อยู่ใช่ไหม? เข้าชมเว็บไซต์ https://seidentest.com/ คุณจะพบคำตอบสำหรับคำถามนี้และคำถามอื่นๆ อีกมากมายที่คุณอาจมี เรียนรู้เพิ่มเติมได้ที่เว็บไซต์
https://tillid.ru/proizvodstvo-kartonnyh-korobok-i-upakovki/
Печи завода ПроМеталл из чугуна — оптимальное решение для тех, кто делает ставку на надёжность и длительный срок службы. В линейке «Атмосфера» собраны печи для помещений объёмом 14–26 м? в исполнении сетка или камень на любой вкус. Ищете купить чугунную печь недорого? Заказать печь с доставкой и профессиональной установкой можно на prometall.shop — официальном представительстве завода в Москве с полным комплексом услуг. Цены начинаются от 76 900 рублей а каждая модель адаптирована под конкретный объём парной и тип отделки.
ПрофМеталМаркет — московский поставщик алюминиевых систем и нержавеющей стали для строительства, отделки и производства. В ассортименте компании — исчерпывающий сортамент: уголки, трубы, швеллеры, двутавры, полосы, листы, пороги и потолочные профили. Ищете купить в москве нержавеющую сталь? На profmetal-market.ru представлен весь каталог с актуальными ценами и возможностью заказа онлайн. В наличии анодированный алюминий, зеркальная нержавейка, системы JOKER и полный ассортимент хромированного крепежа. Возможность самовывоза из Москвы и оперативная доставка по России превращают компанию в надёжного партнёра как для бизнеса, так и для частных лиц.
Alcohol Express Dubai — это онлайн-магазин премиального алкоголя в Дубае для тех, кто разбирается в качестве. Магазин предлагает полный спектр позиций: виски, коньяк, вино, шампанское, ром, джин, текилу, водку и редкие коллекционные экземпляры. Ищете алкоголь в дубае с доставкой? Оформить заказ легко на alcoholexpress-dubai.ru — и напитки премиум-класса окажутся у вас в течение 25–30 минут. Сервис ориентирован на клиентов, которые ценят изысканность и статус: каждая бутылка подобрана у лучших мировых производителей и доставляется в безупречном состоянии.
Ищете ремонт бытовой техники в Москве по выгодной цене? Посетите сайт https://xn—-8sbglh5alafclhgfpy6o.xn--p1ai/ и вы найдете услуги, такие как ремонт стиральных машин, холодильников, телевизоров и многое другое, а выезд мастера происходит в течение часа. Гарантия на все виды работ. Мы используем только проверенные комплектующие и работаем по заводским стандартам.
«Экспресс-связь» — многопрофильная компания из Екатеринбурга, выполняющая полный спектр работ: монтаж систем видеонаблюдения, домофонов, пожарной сигнализации и ВОЛС, а также производство бытовок, модульных конструкций, фасадных кассет и металлических корпусов с порошковым покрытием. Ищете изготовление арт-объектов, малых архитектурных форм? На express-svyaz.ru представлен полный каталог услуг и портфолио реализованных объектов. Помимо монтажа и производства, компания выполняет проектирование и ведёт техническое обслуживание систем безопасности, МиниАТС и локальных сетей — полный цикл без субподрядчиков.
それが何なのか分からないななみん 術式 , 黒閃 エフェクト, ストリートファッションとは, 漏湖? ウェブサイト https://jujunavi.com/ を訪れてみてください。想像できるあらゆる情報に関する便利な情報源です。
https://www.thelederhosen.com/oktoberfest-outfits-for-couples-matching-ideas-that-actually-look-good/
https://www.thedreammate.com/home/bbs/board.php?bo_table=free&wr_id=5834317
https://techguru365.com/12-days-of-openai-all-eyes-on-soras-grand-debut/
https://hkr-steuer.de/team/hkr_steuerbuero_team/
https://www.univ-alger.dz/univalger/?p=80
https://tribundaerah.com/terjun-ke-dunia-politik-giring-nidji-syukuran-di-rumahnya/
https://terrattitude.fr/2023/06/21/un-metier-dactualite/
https://menvolve.com/2023/05/mission-impossible-dead-reckoning-part-one/
https://thepostpolitics.gr/i-syzygos-toy-kosta-kenteri-elsa-exarchoy-ypopsifia-voyleytis-me-ti-nd/
https://www.xs91.top/home.php?mod=space&uid=188603&do=profile&from=space
Ищете изготовление экслибриса в Москве? Посетите сайт https://xn--90anbff6adf4h.xn--p1ai/ где вам предложат гарантию качества и доставку. У нас существенная библиотека образцов изображений, разработка индивидуального макета, качественные деревянные оснастки, подарочная упаковка. Подробнее на сайте.
https://tonygamingtz.com/ets2-tanzania-bus-v1-43-max-tz/
https://venditacredito.com/come-funzionano-i-controlli-del-credito-dimposta-sicurezza-per-acquirenti-e-venditori/
https://celapsa.cl/logo
http://sareanvaldizarbe.org/charla-sobre-las-dificultades-de-aprendizaje/
https://www.hemptradingpost.com/forums/users/stangaskins5/
ETC Agency — полноценное медиабаинговое агентство с функциями продакшн-центра, основанное в 2021 году и выросшее до команды из 16 специалистов. Агентство охватывает более 100 эксклюзивных авторов и свыше 1000 партнёрских блогеров на YouTube, Telegram, TikTok и ВКонтакте. https://etc.moscow/ берёт на себя полный цикл: от разработки стратегии и медиабаинга до создания креативных концепций, сценариев и специальных проектов. Четыре года успешной работы принесли агентству 65 постоянных партнёров и позволили выйти на объём в 350 рекламных размещений ежемесячно.
https://guryevsk.forum24.ru/?1-3-0-00000796-000-0-0-1774697474
https://e3tmad.com/%D8%B4%D8%B1%D9%83%D8%A9-%D8%B9%D8%B2%D9%84-%D8%A7%D8%B3%D8%B7%D8%AD-%D8%A8%D8%A7%D9%84%D8%B1%D8%B3/
http://www.soad.msk.ru/forum/viewtopic.php?p=163262#163262
https://sflife.cc/post/2343
http://old.msfnpr.ru/msfnprbb/viewtopic.php?p=7094#7094
https://invitro.es/es/recuerdo-reconciliacion-y-la-plantacion-del-paulownia-clon-in-vitro-112/
https://kssp.borda.ru/?1-5-0-00003984-000-0-0-1774697466
https://vivamattress.az/product/viscoline/
https://punkgazetka.forum24.ru/?1-9-0-00006874-000-0-0-1774697457
https://pomarol.com.pl/witaj-swiecie/
https://webpluss.net/bbs/board.php?bo_table=free&wr_id=537
https://graphenegoat.com/2025/05/05/roladex-of-ai-using-openwebui/
https://wiki.familie-rosche.de/index.php?title=User:SallyPfa58
В «Живом уголке» можно приобрести редкого экзотического примата — преданного компаньона с развитым интеллектом и живым темпераментом. Ищете, где купить обезьяну живую? На zhivoiugolok.ru/product-category/obezyany представлены карликовая игрунка, саймири, тамарины, лемур катта, галаго, магот и другие виды — каждый со своим характером. Все приматы содержатся в здоровых условиях и проходят социализацию под контролем опытных специалистов. Обезьяны тонко улавливают человеческие эмоции, формируют крепкую привязанность к хозяину и органично вписываются в жизнь семьи на долгий срок.
«Уральский профиль» — пермская компания с полным циклом производства и монтажа пластиковых окон. Фирма предлагает полный цикл работ: от замера до финальной отделки под ключ. Цены стартуют от 2128 рублей, а монтаж выполняется за один день. Подробный каталог продукции и актуальные цены размещены на https://oknabalkonperm.ru/ — там же можно оформить заявку онлайн. Компания предлагает широкий выбор: одностворчатые, двухстворчатые и трёхстворчатые модели, балконные блоки, лоджии и панорамное остекление. Среди объектов — кирпичные и панельные дома, деревянные постройки, дачи и загородные коттеджи.
Автосервис «Биркин Сервис» в Выборгском районе СПб выполняет полный комплекс работ: диагностику, ремонт двигателя, подвески, тормозной системы, трансмиссии и автоэлектрики. Сервис работает с европейскими, японскими и китайскими марками — Audi, BMW, Hyundai, Geely, Haval и другими. Ищете автосервис vag? Записаться на ремонт и ознакомиться с актуальными акциями можно на birkinservis.ru — здесь же представлен полный перечень услуг. Все работы выполняются профессиональными мастерами в срок и с гарантией качества.
APVshop — петербургский интернет-магазин и установочный центр автоэлектроники с широким каталогом штатных Android-магнитол для сотен моделей: Audi, BMW, Cadillac, Changan, BAIC и многих других. Каждое устройство совместимо с конкретной моделью авто — устанавливается на штатное место без переделок и сохраняет оригинальный вид приборной панели. Ищете автозвук спб апвшоп спб? Заказать магнитолу с доставкой по России или записаться на профессиональную установку можно на apvshop.ru — там же доступны услуги ремонта и установки камер заднего вида. На всю продукцию распространяется официальная гарантия, а условия возврата чётко прописаны и понятны покупателю.
Игорь Павлышен https://pavlyshen.ru/ — специалист по интернет-маркетингу с опытом работы более 8 лет. Спектр услуг охватывает настройку Яндекс.Директ, поисковое продвижение сайтов и интеграцию CRM-систем. Подтверждённая квалификация — сертификат Яндекс.Директ. Сотрудничаю с компаниями и предпринимателями из любых регионов России. Помогаю увеличивать продажи через эффективную интернет-рекламу и поисковую оптимизацию.
РУС-МеДтеХ — надёжный поставщик медицинской техники и оборудования напрямую от производителей. Организация берёт на себя полное оснащение клиник и больниц: от современного диагностического оборудования до специализированной медицинской мебели и расходных материалов. На платформе https://rus-medteh.ru/ доступны запасные части, медицинская одежда и техника для домашнего использования. Каталог охватывает более 37 категорий товаров для клиник, лабораторий и частных покупателей. Здесь работают с государственными учреждениями и частными клиниками, обеспечивая выгодные цены и профессиональный сервис.
Visit https://calorie-intake-calculator.com/ and use the food calculator to calculate your daily calories. Download the Foodar app on your mobile device – it can help you understand what you eat and how it affects your health. Foodar makes calorie tracking simple, accurate, and sustainable.
«Бизнес Окна» является официальным дилером пластиковых окон Melke и алюминиевых систем Alurix в Москве и Подмосковье. В ассортименте — линейки Centum, Wide, Evolution, Smart Ultra, Lite70 и Lite60 на любой бюджет и тип объекта. Специалисты компании занимаются остеклением балконов, установкой дверей и монтажом нестандартных конструкций. Ищете окна для себя ? Актуальный каталог и условия заказа на сайте xn—–6kccxab8adjjjjc4k.xn--p1ai — оставьте заявку и получите бесплатный замер. Монтаж выполняют опытные мастера с гарантией качества и соблюдением всех технологических норм.
«Онис» — московская клиника с узкой специализацией на варикозе и сосудистых патологиях с использованием современных малоинвазивных методов. Врачи используют лазерную коагуляцию, склеротерапию и радиочастотную абляцию — без разрезов и длительного восстановления. Подробнее об услугах и специалистах — https://www.onisclinic.ru/ — платформа с полной информацией о методах лечения и записи на приём. После диагностики каждому пациенту составляют индивидуальный план лечения, а стойкий эффект достигается за счёт точного подхода и высокой квалификации специалистов.
City Drinks Dubai предоставляет услуги премиальной доставки алкоголя по Дубаю в режиме 24/7. Ассортимент включает всё необходимое: вино, шампанское, пиво, крепкий алкоголь и готовые коктейли. Ищете dubai alcohol delivery? Заказ оформляется онлайн на drinks-dubai.shop — доставка приезжает быстро в любую точку города. Услуга создана для тех, кто дорожит временем и качеством: туристов, VIP-гостей и резидентов Дубая, для которых важны надёжность и конфиденциальность.
Настоящая русская баня немыслима без хорошего веника — и именно здесь кроется секрет истинного удовольствия от парной. Магазин «Парвеник» предлагает широкий выбор банных веников: дубовые, берёзовые, эвкалиптовые и хвойные — каждый вид обладает своими целебными свойствами и особым ароматом. На сайте https://www.parvenik.ru/ можно оформить заказ оптом и в розницу по ценам ниже рыночных, а акция «5+1 в подарок» даёт реальную скидку в 20%. Доставка осуществляется курьером в пределах МКАД и через удобные пункты выдачи Яндекс Маркета по всему Подмосковью. Товар отличается отборным качеством — и в этом легко убедиться лично, забрав заказ в основном пункте выдачи на улице Молодцова, 29.
Mebelink — профессиональная перетяжка и реставрация мягкой мебели в Москве с гарантией 3 года на все работы. Для каждого заказа подбираются износостойкие и гипоаллергенные материалы, эксклюзивные ткани и реализуется полный спектр работ — от диванов до офисной мебели. https://mebelink.com/ рассчитает стоимость по фото за 15 минут — цена фиксируется сразу и не меняется. В цену уже включены доставка и сборка. Рейтинг 5,0 в Яндексе подтверждает качество.
Компания «ПроКраска» в Санкт-Петербурге предоставляет полный комплекс услуг по покраске, восстановлению и ремонту дисков для легковых авто и мотоциклов. В перечень услуг входят акриловая и порошковая покраска, алмазная проточка, правка, сварка дисков, шиномонтаж, балансировка колёс и сезонное хранение резины. Ищете ремонт дисков литых спб? Записаться на услугу и узнать актуальные цены можно на prokraskaspb.ru — там представлен полный перечень работ и действующие акции. Все услуги выполняются с применением профессиональных материалов и современного оборудования с гарантией качества.
Самый надежный способ оплаты в казино — это Сбер.
https://hqrsbialpyd.in/the-inside-of-this-silicone-stroker-which-cuts-a-sleek/
Высокие лимиты на вывод в казино со Сбербанком.
https://healinghelthy.info/?p=735
Parafar — российский бренд штатных Android-магнитол, продукция которого охватывает сотни моделей автомобилей: от Audi и BMW до популярных китайских марок BAIC, BAW и десятков других. Магнитолы встают в штатное место без переделок, сохраняют заводской облик салона и открывают доступ к навигации, стримингу и голосовому управлению. Ищете Ищете car play парафар? Выбрать модель под свой автомобиль и оформить заказ с доставкой по России можно на parafarrf.ru — здесь же доступны установочный центр и сервис ремонта. Parafar обеспечивает официальную гарантию на всю продукцию и предоставляет возможность покупки в рассрочку или кредит.
Высокие лимиты на вывод в казино со Сбербанком.
https://balaton.krakow.pl/2019/02/14/restaurateurs-leverage-excess-alcohol-for-cash-flow/
いきものがかり年齢, 50 歳 ジュディ マリ yuki 現在 , 藤川球児 リンドバーグ なぜ , 鞘師里保 かわいい ,中山加奈子. これらの質問をはじめ、その他あなたが抱えるかもしれないあらゆる疑問に対する答えは、ウェブサイト https://cancam-model.net/ で見つけることができます。ここは、人生のあらゆる分野に関する包括的な情報源です
Looking for a therapeutic massage at home in Thessaloniki? Visit https://masaz-kat-oikon.gr/ where you can benefit from the services of a certified massage therapist with over 10 years of experience. Browse the price list and discover the massage types that will suit every client’s needs.
Как пополнить баланс в казино картой Сбербанка без комиссии?
https://asset-bow.com/successful-presentation-by-assetbow-limited-at-ncs-headquarters-abuja-21st-november-2024/
Казино со Сбербанком найти сейчас не так просто, спасибо за инфу.
https://www.waterjet.ltd/high-pressure-washer-and-pump-supplier-at-canton-fair/
Игровые автоматы на деньги с выплатой на Сбер.
https://xn--stefan-rhlmann-nsb.de/Mein-blog/index.php/;focus=STRATP_com_cm4all_wdn_Flatpress_6689707&path=?x=entry:entry161029-214129;comments:1
Бездепозитные бонусы в казино со Сбербанком.
https://www.rapidcheckng.com/sed-elementum-massa-volutpat-2/
Looking for luxury travel guides, local tips, and everything you need for an unforgettable visit to Dubai? Visit https://gildeddunes.com/ for detailed articles to help you plan the perfect trip to Dubai, from transportation and attractions to hotels and dining. Learn more on the website.
Отзывы игроков о выводе на карты Сбера.
https://www.passioneveg.com/home/orti-piccolo-mondo-antico-2/
Где взять рабочее зеркало онлайн казино со Сбером?
https://www.datarisk.io/structuring-an-f-project-with-sql-type-provider-on-ci/
Инструкция по пополнению казино через Сбербанк.
https://www.agence-video.com/portfolio/restaurant-colonel/
ТОП 10 казино с поддержкой СберПэй.
https://vodokanal-argun.ru/v-nekotoryh-rajonah-groznogo-ozhidaetsya-otklyuchenie-vody/
Виртуальный хостинг RiSYS — оптимальный выбор для тех, кто хочет получить стабильный сервис за адекватные деньги. Тарифы группы «Сайт» стартуют от 100 рублей в месяц и отлично подходят для блогов, лендингов и небольших проектов. Корпоративные пакеты с SSD до 50 ГБ поддержкой Python и Node.js предназначены для порталов и интернет-магазинов. Ищете хостинг для стартапа? Подробности о тарифах и условиях размещения можно изучить на risys.ru/virtualnyy-khosting — платформе с гибкими планами под любые задачи. Все пакеты включают неограниченные базы данных DNS-зоны и почтовые ящики без дополнительной оплаты. Компания RiSYS гарантирует бесперебойный хостинг с понятными условиями и без скрытых комиссий.
Самые лучшие слоты на реальные деньги с выводом на Сбербанк.
https://ucnet.com.br/como-gerenciar-suas-financas-empresariais/
Рабочие промокоды для депозита через Сбербанк.
https://tds-ye.com/hello-world/
Looking for a calorie-counting app? Visit https://calorie-deficit-calculator.net/ to learn more about the app. Foodar is an all-in-one calorie calculator app and food calorie calculator designed to help you understand what you eat and how it affects your health. Download it to your mobile device and plan your meals with the recipe features.
Отзывы игроков о выводе на карты Сбера.
https://produtos.paginaoficial.ws/como-funciona-jogo/
Минимальный депозит в казино через Сбербанк Онлайн.
https://omaivf.com/what-you-should-know-about-recurrent-implantation-failure/
Drinks Delivery — авторитетная служба доставки алкоголя в Дубае для резидентов и туристов, для которых критически важны быстрота и соблюдение законодательства. Каждая доставка осуществляется в строгом соответствии с законом: анонимно, безопасно и максимально просто. Ищете доставка алкоголя в дубае? На drinks-delivery.com представлен широкий выбор пива, вина, шампанского, крепкого алкоголя и ликёров от ведущих мировых брендов. Оформить заказ можно через Telegram или WhatsApp — и курьер доставит его прямо к вашей двери.
Как вывести выигрыш на карту Сбера максимально быстро?
https://moodistusmehed.ee/kasulikku/ventilatsiooni-toimivus/
ТОП 10 казино с поддержкой СберПэй.
https://mb6675com.sekigaharablog.com/%E6%9C%AA%E9%81%B8%E6%8A%9E/mb66%20%E2%80%93%20c%C3%A1%20c%C6%B0%E1%BB%A3c%20tr%E1%BB%B1c%20tuy%E1%BA%BFn
Проверенные ссылки на зеркала казино в телеграме.
https://jlife-jfp-sup.com/2025/06/09/%e8%87%aa%e8%a1%9b%e5%ae%98%e3%81%af%e5%bf%85%e8%a6%8b%e3%83%bb%e3%83%bb%e9%a0%90%e8%b2%af%e9%87%91%e3%81%ae%e5%88%a9%e6%81%af%e3%82%92%e6%b4%bb%e7%94%a8%e3%81%97%e3%81%9f%e7%94%9f%e7%94%a3%e5%bd%a2/
Сбербанк онлайн казино — лучший выбор для РФ.
https://hiddenwiki.co/index.php?title=User:SibylDoucette98
Moscow Cruise — ведущий оператор прогулок по Москве-реке в 2026 году, располагающий большим парком современных теплоходов. Гостям доступны самые разные форматы: спокойные прогулки по реке, шоу-программы, дискотеки и ужины в корабельном ресторане. Ищете билеты на речной трамвай онлайн? Билеты и актуальное расписание размещены на moscowcruise.ru — бронирование доступно онлайн в любое время. Отправление организовано с нескольких причалов: Китай-город, Киевский, Парк Горького, Москва-Сити и другие. В каталоге — более десяти именных теплоходов, включая «Прагу», «Ривер Палас» и «Анну Каренину».
ТОП 10 казино с поддержкой СберПэй.
https://giatlagiare.com/su-dung-vai-nhuom-tie-dye-de-lam-sang-khong-gian-nha-ban-chuyen-nghiep-gia-re/
Проверенные ссылки на зеркала казино в телеграме.
https://eleventshirts.com/hello-world/
ウェブサイト https://www.sum77-debatable.com/ にアクセスすると、コムドット 事務所 どこ, シルク 身長, ennちゃん, 東海オンエア スタジオコムドット 事務所 どこシルク 身長 ennちゃん 東海オンエア スタジオ コムドット事務所
Где взять рабочее зеркало онлайн казино со Сбером?
https://eemsdeltaopslag.nl/avada_faq/sed-bibendum-nulla-ligula/
Минимальный депозит в казино через Сбербанк Онлайн.
https://careerconsultedco.com/hello-world/
Как пополнить баланс в казино картой Сбербанка без комиссии?
https://ashidbuyan.mn/%D0%B4%D1%8D%D0%BB%D0%B3%D2%AF%D2%AF%D1%80/%D3%A9%D0%BD%D0%B4%D3%A9%D1%80-%D0%B4%D0%B0%D1%80%D0%B0%D0%BB%D1%82%D0%B0%D1%82-%D1%83%D1%83%D1%80%D0%B0%D0%B0%D1%80-%D0%B0%D1%80%D0%B8%D1%83%D1%82%D0%B3%D0%B0%D1%85-%D0%B0%D0%B2%D1%82%D0%BE%D0%BA/
Проверенные ссылки на зеркала казино в телеграме.
https://airqueen.be/uncategorized/hello-world/
ТОП 10 казино с поддержкой СберПэй.
http://www.yanyanlai.top/index.php/2022/12/23/linux%e6%8a%80%e6%9c%af%e5%9f%ba%e7%a1%80%e6%80%bb%e7%bb%93/
Минимальный депозит в казино через Сбербанк Онлайн.
https://www.serenaveglio.com/2019/11/03/self-portrait/
Ищу честное казино с пополнением через СберПэй.
https://www.lobuenosibreve.com/portfolio/exceptional-care/
Ищу честное казино с пополнением через СберПэй.
https://www.integralware.es/uncategorized/hello-world/
Самые лучшие слоты на реальные деньги с выводом на Сбербанк.
https://www.gestionacomedores.com/la-mejor-alimentacion-para-ninos-segun-su-edad/
Винтовые сваи в Уфе от Главфундамент — надёжный фундамент для дома. Монтаж за 1 день, обязательное проведение геологии. Служат более 50 лет, подходят для сложных грунтов и перепадов высот. Подробнее в статье https://rb-str.ru/obshestvo/preimushhestva-vintovyh-svaj-ot-kompanii-glavfundament/
Покупаем здесь одноразовые вилки и ложки в индивидуальной упаковке. https://www.fonse.cn/question/upakovka-2/
Noen som vet om kong kasino har fatt nye automater i dag? https://sajidine.com/commentaires/
Жиростойкая бумага для фастфуда отличного качества. https://www.naturalhealthacademy.co.za/Blog/index.php/;focus=HETZA_com_cm4all_wdn_Flatpress_1387790&path=&frame=HETZA_com_cm4all_wdn_Flatpress_1387790?x=entry:entry191016-094649;comments:1
Винтовые сваи в Уфе от Главфундамент — надёжный фундамент для дома. Монтаж за 1 день, обязательное проведение геологии. Служат более 50 лет, подходят для сложных грунтов и перепадов высот. Подробнее в статье https://newsroom.su/?p=170096
Bruker alltid norsk tipping kongkasino nar jeg skal slappe av. https://amtaxaudit.com/how-can-accounting-firms-help-achieve-financial-recovery-for-a-struggling-business/
Подробные описания товаров на сайте помогают определиться с выбором. https://www.nuriakigrid.com/index.php?title=User:IvyDerosa01447
Алюминиевые формы для запекания берем для отдела кулинарии. https://harrisgardens.com/how-to-grow-a-medicinal-garden/
Искали контейнеры под запайку, нашли здесь лучший вариант. https://guinchowaveclassic.com/the-wave-watch-when-will-the-winds-align/
Винтовые сваи в Уфе от Главфундамент — надёжный фундамент для дома. Монтаж за 1 день, обязательное проведение геологии. Служат более 50 лет, подходят для сложных грунтов и перепадов высот. Подробнее в статье https://abzak.ru/ufa-puteshestvie-po-serdcu-bashkortostana/
Винтовые сваи в Уфе от Главфундамент — надёжный фундамент для дома. Монтаж за 1 день, обязательное проведение геологии. Служат более 50 лет, подходят для сложных грунтов и перепадов высот. Подробнее в статье https://ufa-nagaevo.ru/stroyka-sad/maloetazhnoe-stroitelstvo-v-rossii.html
Kongkasino leverer som vanlig pa sikkerhet. https://kabarbhayangkara.com/pay-someone-to-write-your-essay/
Упаковка для кондитерских изделий прозрачная, товар видно хорошо. https://unclewangbv.com/index.php/start-page.html
Контейнеры для СВЧ выдерживают высокую температуру, не плавятся. https://phhglobal.org/hello-world/
Noen som vet om kong kasino har fatt nye automater i dag? https://www.ancienttypewriters.de/index.php/Benutzer:GayleWaterhouse
Винтовые сваи в Уфе от Главфундамент — надёжный фундамент для дома. Монтаж за 1 день, обязательное проведение геологии. Служат более 50 лет, подходят для сложных грунтов и перепадов высот. Подробнее в статье https://ufa.bfm.ru/news/68128
Контейнеры для СВЧ выдерживают высокую температуру, не плавятся. https://sedancaronrent.com/2025/01/21/seasonal-car-rental-discounts-across-india%F0%9F%9A%97%F0%9F%92%B0/
Упаковка для кондитерских изделий прозрачная, товар видно хорошо. https://outstaffing.pl/2021/05/10/joensuu/
Er dette den offisielle kongkasino siden? https://www.ruf-dachtmissen.de/2017/01/30/wir-ueber-uns/
Винтовые сваи в Уфе от Главфундамент — надёжный фундамент для дома. Монтаж за 1 день, обязательное проведение геологии. Служат более 50 лет, подходят для сложных грунтов и перепадов высот. Подробнее в статье https://ufa.cataloxy.ru/node1_stroitelstvo_13847/kak-vybrat-fundament-dlya-doma-v-ufe-razbiraem-plyusy-vintovyh-svay-i-mify-o-nih.htm
Lastet ned kongkasino norsk tipping i gar, funker fjell. https://unfoldlaw.in/politician-immune-from-bribery-charges/
Kongkasino norsk tipping har de raskeste utbetalingene. https://sillabarcelona.com/producto/sofa-valencia-en-loop/
Finn alle de beste spill kong kasino pa denne siden. https://picoyplacamedellin.com/impacto-del-pico-y-placa-en-la-ciudad/
Jeg vinner mest pa de beste spill kong kasino har i oversikten. https://rrnnliberia.com/agriculture-ministry-delegation-tours-samjebo-farm-commends-local-production-in-grand-kru/
Liker at kongkasino har sa mange norske favoritter. https://dex-magazin.de/glamour-luxus-fuer-die-festtage/
Винтовые сваи в Уфе от Главфундамент — надёжный фундамент для дома. Монтаж за 1 день, обязательное проведение геологии. Служат более 50 лет, подходят для сложных грунтов и перепадов высот. Подробнее в статье https://ufa.cataloxy.ru/node1_stroitelstvo_13847/kak-vybrat-fundament-dlya-doma-v-ufe-razbiraem-plyusy-vintovyh-svay-i-mify-o-nih.htm
Алюминиевые формы для запекания берем для отдела кулинарии. https://irken.co.kr/shop1/bbs/board.php?bo_table=free&wr_id=38940
Endelig en god guide for kongkasino norsk tipping brukere. https://www.apitsgroup.com/services/insurance/
Винтовые сваи в Уфе от Главфундамент — надёжный фундамент для дома. Монтаж за 1 день, обязательное проведение геологии. Служат более 50 лет, подходят для сложных грунтов и перепадов высот. Подробнее в статье https://ufa.bfm.ru/news/68128
Подробные описания товаров на сайте помогают определиться с выбором. https://www.findet-fritz.de/hello-world/
Er norsk tipping casino app trygg a bruke pa offentlig wifi? https://www.sadnoman.com/2024/06/16/the-pros-and-cons-of-different-investment-vehicles/
Мешки для мусора не рвутся даже при большой нагрузке. https://deborahgrody.com/breaking-free-from-perfectionism/
Винтовые сваи в Уфе от Главфундамент — надёжный фундамент для дома. Монтаж за 1 день, обязательное проведение геологии. Служат более 50 лет, подходят для сложных грунтов и перепадов высот. Подробнее в статье https://ufa.bezformata.com/listnews/fundamenta/158078275/
Контейнеры для соусов герметичные, ничего не вытекает. https://www.apitsgroup.com/services/insurance/
Винтовые сваи в Уфе от Главфундамент — надёжный фундамент для дома. Монтаж за 1 день, обязательное проведение геологии. Служат более 50 лет, подходят для сложных грунтов и перепадов высот. Подробнее в статье https://ufa.bezformata.com/listnews/fundamenta/158078275/
Широкий выбор ведер и емкостей из пищевого пластика. https://statelicensedpaydayloans2two.com/uae-ra-mat-stablecoin-duoc-bao-chung-bang-dirham/
Kongkasino norsk tipping har de raskeste utbetalingene. https://demo.novademos.fr/ressources-documentaires/document-a/
Фартуки и шапочки для персонала соответствуют нормам СанПиН. https://jewellsol.xyz/hello-world/
Качественные бумажные полотенца, впитывают влагу моментально. https://christineheller.dk/dadelsnack-med-3-ingredienser/
Er kongkasino nede, eller er det bare min app? https://www.lunasoft.info/codigos-de-estado-http/
Винтовые сваи в Уфе от Главфундамент — надёжный фундамент для дома. Монтаж за 1 день, обязательное проведение геологии. Служат более 50 лет, подходят для сложных грунтов и перепадов высот. Подробнее в статье https://ufa.bfm.ru/news/68128
Ingenting slar brukervennligheten til kongkasino.https://carnivoredaddy.com/product/distant-reiki-cord-cutting-session-release-energetic-attachments-angelic-sphere-healing/
Радует наличие новинок в разделе экологичной посуды. https://storytelling.ee/hello-world/
Винтовые сваи в Уфе от Главфундамент — надёжный фундамент для дома. Монтаж за 1 день, обязательное проведение геологии. Служат более 50 лет, подходят для сложных грунтов и перепадов высот. Подробнее в статье https://siding-rdm.ru/kak-polevye-ispytaniya-gruntov-svayami-pomogajut-stroit-nadjozhnye-fundamenty-opyt-kompanii-glavfundament/
Provde beste spill kong kasino og traff en fin gevinst. https://toreturn.org/to-return-on-safari/
Винтовые сваи в Уфе от Главфундамент — надёжный фундамент для дома. Монтаж за 1 день, обязательное проведение геологии. Служат более 50 лет, подходят для сложных грунтов и перепадов высот. Подробнее в статье https://ufa.bfm.ru/news/68128
Широкий выбор ведер и емкостей из пищевого пластика. https://www.lionandreassa.com/pt/mostra-de-cinema-do-vale-do-ribeira-303/
Винтовые сваи в Уфе от Главфундамент — надёжный фундамент для дома. Монтаж за 1 день, обязательное проведение геологии. Служат более 50 лет, подходят для сложных грунтов и перепадов высот. Подробнее в статье https://ufa.bfm.ru/news/68128
Радует наличие новинок в разделе экологичной посуды. https://a3satta.com/blogs/satta-king
Винтовые сваи в Уфе от Главфундамент — надёжный фундамент для дома. Монтаж за 1 день, обязательное проведение геологии. Служат более 50 лет, подходят для сложных грунтов и перепадов высот. Подробнее в статье https://abzak.ru/ufa-puteshestvie-po-serdcu-bashkortostana/
Kong kasino er det sikreste valget for oss i Norge. https://mjukn.org/kesehatan/
Все позиции из заказа соответствуют фото и описанию на сайте.http://manholeindonesia.com/hello-world/
Винтовые сваи в Уфе от Главфундамент — надёжный фундамент для дома. Монтаж за 1 день, обязательное проведение геологии. Служат более 50 лет, подходят для сложных грунтов и перепадов высот. Подробнее в статье https://ufa-nagaevo.ru/stroyka-sad/maloetazhnoe-stroitelstvo-v-rossii.html
Профессиональные швабры и мопы значительно ускоряют уборку. https://couvertla.com/
Ingenting slar brukervennligheten til kongkasino.https://danielazeller.com/hello-world/
Винтовые сваи в Уфе от Главфундамент — надёжный фундамент для дома. Монтаж за 1 день, обязательное проведение геологии. Служат более 50 лет, подходят для сложных грунтов и перепадов высот. Подробнее в статье https://ufa.bfm.ru/news/68128
Покупаем здесь одноразовые вилки и ложки в индивидуальной упаковке. https://ashomeandgarden.co.uk/gardening-brean-burnham-on-sea/attachment/garden-services-brean-burnham-on-sea-1/
Винтовые сваи в Уфе от Главфундамент — надёжный фундамент для дома. Монтаж за 1 день, обязательное проведение геологии. Служат более 50 лет, подходят для сложных грунтов и перепадов высот. Подробнее в статье https://x-true.info/138210-geologiya-uchastka-zachem-ona-nuzhna-pered-stroitelstvom-fundamenta-v-ufe.html
Вакуумные пакеты отлично держат шов, для производства подходят. https://www.furunmed.com/%e4%bc%81%e4%b8%9a%e7%a4%be%e4%bc%9a%e8%b4%a3%e4%bb%bb/
Hvilken norsk tipping casino app versjon er den nyeste? https://amadibr.com.br/ola-mundo/
Алюминиевые формы для запекания берем для отдела кулинарии. https://www.madonnamatrichss.com/activity8/
Norsk tipping casino app er milevis foran konkurrentene. https://hachi-cafe.shop/goods/247/
Фартуки и шапочки для персонала соответствуют нормам СанПиН. https://albertogalanmtc.com/hello-world
Noen som vet om kong kasino har fatt nye automater i dag? https://muktichemical.com/?attachment_id=31
Пищевая пленка ПВХ отлично тянется и липнет. https://www.discuspassie.nl/hello-world/
Liker at kongkasino har sa mange norske favoritter. https://ondoibili.tur.ar/cataratas-del-iguazu-03-04-noches-2025-%E2%9C%88%EF%B8%8F-duplicate-3558/
Fantastisk grafikk pa kong kasino sine nyeste spill. https://flipping-mad.com/invertir-en-madrid-maximizar-rentabilidad/
Компания «Уральский профиль» из Перми занимается производством и установкой окон ПВХ с чистовой отделкой под ключ. Специалисты проводят монтаж за один день точно в срок, а цены стартуют от 2128 рублей. Весь ассортимент и калькулятор стоимости доступны на https://oknabalkonperm.ru/ — оформить заявку можно прямо онлайн. Ассортимент охватывает одностворчатые, двухстворчатые и трёхстворчатые конструкции, нестандартные и панорамные модели, блоки для балконов, лоджии и москитные сетки. Среди объектов — квартиры, дома, дачи и коттеджи, при этом действуют скидки до 35%.
Покупаем здесь одноразовые вилки и ложки в индивидуальной упаковке. https://tortengestoeber.de/hello-world/
Er dette den offisielle kongkasino siden? https://nuvorafan.com/cortisol-belly-fat-myths-science-reduction-tips/
Андроид-магнитола штатного формата делает из любого авто полноценный мультимедийный центр — навигация, музыка, голосовое управление и связь со смартфоном без вмешательства в интерьер. Avtopositive объединяет интернет-магазин и профессиональный установочный центр: штатные Андроид-магнитолы, шумоизоляция, камеры заднего вида и парктроники для сотен марок и моделей. Ищете контурная подсветка салона автомобиля? Заказать оборудование и услуги можно на avtopositive.ru — доставка по России и профессиональная установка под ключ. В каталоге представлены решения для Audi, BMW, Toyota, Hyundai, Kia, популярных китайских брендов и десятков других марок с подбором под конкретную модель.
Тратить меньше на онлайн-покупки теперь легко — важно лишь пользоваться нужными ресурсами. Ищете тануки промокод на первый? Сервис padbe.ru собирает актуальные промокоды и акции сотен популярных онлайн-магазинов в одном месте. Здесь публикуются скидки на технику, косметику, одежду, курсы, товары для дома и многое другое. Предложения обновляются регулярно — пользователи всегда видят свежие акции. Зарегистрируйтесь бесплатно и начните экономить на каждой покупке уже сегодня.
Mostbet — известная международная платформа для ставок и азартных игр с историей с 2009 года и присутствием в 93 странах мира. Игроки из Казахстана могут пользоваться 5000+ игровыми автоматами, live-дилерами, спортивными ставками и crash-играми с расчётами в тенге через Kaspi Pay и Halyk Bank. Ищете почему не работает мостбет? На ealmaty.kz собраны исчерпывающий обзор платформы и актуальные бонусные предложения включая приветственный бонус 125% плюс 250 фриспинов на первый депозит от 500 тенге.
IT-Offshore — международная структура с большим практическим опытом открытия компаний в ключевых юрисдикциях мира: Европа, Азия, Карибы, ОАЭ, Сингапур, Гонконг и другие регионы. Профессиональная команда определяет наиболее подходящую юрисдикцию для каждого клиента исходя из налоговой политики и условий лицензирования. На https://it-offshore.com/ доступны готовые компании с открытыми счетами, крипто-офшоры, EMI-лицензии и банковские лицензии. Весь процесс — от выбора страны до получения необходимой лицензии — команда берёт на себя.
Visit https://yogaonlineapp.com/ and learn more about our mobile app for online and at-home yoga. Yoga Way is a modern yoga app designed for people who want to practice yoga anytime, anywhere. Explore dozens of practices and programs with expert video guidance!
Издание «Інквізиція» придерживается принципа Deus vult — публикует расследовательские тексты, криминальную хронику и бескомпромиссную аналитику без редакционных ограничений. Редакция последовательно разбирает коррупционные схемы, судебные затяжки и социальные проблемы — с фактами и документами на руках. Изучайте независимые расследования на https://inquisition.info/ — украинский портал для тех кто требует от журналистики реальных результатов. Политика, экономика, бизнес и здоровье охвачены в полной мере — авторы не сглаживают углы и называют вещи своими именами что и отличает издание от стандартных новостных агрегаторов.
MoscowWaterWays — платформа для бронирования речных прогулок по Москве от всех востребованных причалов города. Маршруты охватывают отправление от Китай-города, Воробьёвых гор, Парка Горького, Москвы-Сити и прочих популярных локаций столицы. Ищете все причалы москвы билеты на теплоход? На платформе moscowwaterways.ru можно выбрать маршрут и оплатить билеты онлайн — они придут на электронную почту. Расписание охватывает праздничные рейсы на 9 Мая, День города, выпускной и Новый год. Близость причалов к станциям метро и МЦК обеспечивает лёгкий доступ и экономит время перед отправлением.
I finally found a place to explore each custom and modified BMW E30 build – from engine swapped builds to stance, track, and drift builds. Every build comes with a curated gallery, tech specs, and modification details. Honestly it’s addictive to scroll. Go check it out: https://isleofcars.com/bmw/e30
Компания Manakara выполняет профессиональный монтаж стеновых панелей под ключ в Санкт-Петербурге и Сочи — в квартирах, домах, офисах и коммерческой недвижимости. Специалисты работают с полным спектром материалов: бамбуковые панели, гибкий камень, МДФ, ПВХ, сэндвич и 3D-панели. Ищете мастер по монтажу стеновых панелей? На сайте manakara.ru доступны услуги замера, консультации и разработки дизайн-проекта для любых объектов. Монтаж в ванных комнатах, на кухнях, в новостройках и коттеджах проводится профессиональной бригадой с гарантией точных сроков и безупречного качества.
Store Dubai Drinks — надёжный сервис алкогольной доставки в Дубае для туристов и жителей, ценящих оперативность и качество. Широкий выбор включает виски, водку, коньяк, джин, текилу, ром, шампанское, вино и пиво — среди брендов Hennessy, Macallan, Chivas, Patron, Bacardi и Jameson. Ищете алкоголь в дубае с доставкой? Заказать можно на store-dubai-drinks.com через Telegram или WhatsApp — быстро и конфиденциально прямо к вашей двери.
Looking for a transfer from Halkidiki Airport? Visit https://halkidiki-transfer.gr/ and you’ll find private transfers at competitive prices. We provide maximum comfort and reliability with fixed prices and professional drivers. Our modern fleet includes Mercedes E-Class sedans, V-Class minivans, and Sprinter minibuses. All vehicles are meticulously maintained, air-conditioned, and non-smoking.
Новости Рязани
удобные деньги личный кабинет вход по номеру телефона
https://punkgazetka.forum24.ru/?1-9-0-00006814-000-0-0-1774263592
Новости Рязани
https://mymoscow.forum24.ru/?1-6-0-00040820-000-0-0-1774616046
Новости Рязани
он займ личный кабинет
https://money.bestbb.ru/viewtopic.php?id=3086#p10408
https://www.bakinsky-dvorik.ru/communication/forum/messages/forum4/message145651/89552-statsionarnye-gazoanalizatory-v-moskve?result=new#message145651
взаймы займ личный кабинет
https://money.bestbb.ru/viewtopic.php?id=3086#p10408
https://moskovsky.borda.ru/?1-7-0-00012847-000-0-0-1774615970
экспресс займ онлайн личный кабинет
https://blender.community/yvonnestewart1/
https://academy.drstar.pro/
https://tochka-g.pro/
https://www.skypixel.com/users/djiuser-hu31hadtiegu
https://academy.drstar.pro/
https://linqto.me/about/rosecarter
https://tochka-g.pro/
https://inkbunny.net/jenniferlynch
https://academy.drstar.pro/
https://uadb.edu.sn/component/kunena/user/23467-edoteriguq
https://academy.drstar.pro/
https://experiment.com/users/mmaryfletcher
https://academy.drstar.pro/
https://academy.drstar.pro/
https://academy.drstar.pro/
https://kupit-semena-konopli.com/#legal-comparison
https://tochka-g.pro/
https://kupit-semena-konopli.com/#faq
Прогулки по Москве-реке давно вышли за рамки обычной экскурсии — сегодня это полноценный вечер с музыкой, шоу и живыми выступлениями прямо на борту теплохода. Дискотеки 80–90-х, DJ-вечеринки, концерты и Premium-круизы с ужином и шоу-программой доступны ежедневно и рассчитаны на любой вкус. Ищете вечерний круиз с программой и питанием? Билеты бронируются онлайн на ticketscruise.ru — быстро и без лишних шагов. Один из флагманских маршрутов — концерт «Хиты Италии» на теплоходе «Ривер Палас» с отправлением от причала Сити-Экспоцентр.
https://academy.drstar.pro/
https://kupit-semena-konopli.com/#faq
https://tochka-g.pro/
https://kupit-semena-konopli.com/#faq
https://academy.drstar.pro/
https://kupit-semena-konopli.com/fioletovaya-konoplya.html
https://tochka-g.pro/
https://kupit-semena-konopli.com/tekhnicheskaya-konoplya.html
https://tochka-g.pro/
https://kupit-semena-konopli.com/
https://tochka-g.pro/
https://kupit-semena-konopli.com/#article-preview
«Минибусрент» — компания по аренде транспорта в Санкт-Петербурге с современным автопарком европейских и японских брендов: Hyundai H-1, Peugeot Traveller и Volkswagen Polo. Автомобили проходят плановое ТО и всегда готовы к выезду в отличном техническом состоянии. Ищете прокат авто спб премиум минибусрент? Подобрать транспорт для трансфера из аэропорта, семейной поездки или бизнес-задачи можно на minibusrent.ru — оставьте заявку и менеджер подберёт оптимальный вариант. Компания обслуживает как городские поездки, так и дальние маршруты за пределы Санкт-Петербурга.
https://tochka-g.pro/
https://kupit-semena-konopli.com/#story
https://tochka-g.pro/
https://academy.drstar.pro/
https://tochka-g.pro/
https://academy.drstar.pro/
https://academy.drstar.pro/
https://tochka-g.pro/
https://tochka-g.pro/
https://academy.drstar.pro/
https://tochka-g.pro/
Многие команды расходуют ресурсы впустую из-за неорганизованных задач и инструментов. Ищете инструмент для agile управления? Платформа pabit.ru решает эту проблему с помощью интуитивного интерфейса для управления проектами. Задачи, спринты, модули, аналитика в реальном времени и страницы с интеллектуальным ассистентом — всё в одном месте. Наглядные доски отображают актуальный статус работы без ручного сбора данных. Pabit устраняет организационный хаос и даёт команде фокус на главном.
https://academy.drstar.pro/
Издание «Спільно» — ресурс громадянського суспільства — охватывает политику, криминал, коррупцию, культуру и общество без редакционных фильтров и уклончивых формулировок. Авторы и блогеры издания ведут предметные расследования коррупционных схем и офшорных механизмов опираясь на документы и верифицированные источники. Следите за независимой гражданской журналистикой на https://spilno.net/ — украинский портал для читателей требующих честного анализа и прямой гражданской позиции. Авторские блоги и колонки органично дополняют новостной контент и делают портал полноценной площадкой для открытого гражданского диалога.
https://academy.drstar.pro/
https://tochka-g.pro/
https://academy.drstar.pro/
https://tochka-g.pro/
https://tochka-g.pro/
https://academy.drstar.pro/
https://tochka-g.pro/
https://tochka-g.pro/
https://academy.drstar.pro/
https://tochka-g.pro/
Новостной портал «Корреспондент» освещает события Украины и мира в режиме реального времени — политика, экономика, технологии, здоровье и общество без купюр и редакционных фильтров. Портал последовательно берётся за сложные темы: коррупционные расследования, репортажи о событиях и аналитические бизнес-обзоры публикуются без перерывов. Следите за актуальной повесткой на https://karrespondent.com/ — украинский новостной ресурс для читателей ценящих скорость и фактическую точность. Темы культуры, социума, технологий и острых конфликтов обеспечивают полноту редакционного охвата и утверждают портал как ключевую точку входа для взыскательной аудитории.
https://tochka-g.pro/
https://tochka-g.pro/
https://tochka-g.pro/
https://tochka-g.pro/
ForOne.Manakara — петербургская компания, предлагающая производство и монтаж стеновых панелей из карбонизированного бамбука и гибкого камня для стильных современных интерьеров. Производство панелей включает измельчение бамбука, его карбонизацию, коэкструзию с ПВХ-компонентами и финальную спайку при температуре 120°C. Ищете панели стеновые? На сайте forone.manakara.ru представлен полный каталог продукции с услугами выезда специалиста и профессионального монтажа. Материал экологически безопасен, подходит для криволинейных поверхностей и не требует особой подготовки стен — идеальное решение для жилых, детских и медицинских помещений.
https://academy.drstar.pro/
Анапа — один из самых популярных курортов Черноморского побережья, и добраться до него с комфортом теперь проще, чем когда-либо. Сервис https://anapa-taxi-transfer.ru/ предлагает профессиональные услуги такси и трансфера с удобным онлайн-калькулятором стоимости поездки прямо на сайте. Официально зарегистрированная компания работает круглосуточно, обслуживает все основные маршруты и располагает собственным автопарком. Опытные водители встретят вас в аэропорту или на вокзале, а прозрачное ценообразование избавит от неприятных сюрпризов. Путешествуйте с удовольствием!
https://tochka-g.pro/
https://academy.drstar.pro/
https://academy.drstar.pro/
https://academy.drstar.pro/
Объём шеринговой экономики в России достиг 1 трлн рублей и демонстрирует устойчивый рост. Тулбокс нашёл точную точку входа — аренда инструмента через боксы-постаматы без сотрудников, залога и бумажной волокиты. Взять нужный инструмент можно через приложение в постамате возле дома — в «Пятёрочке» или пункте выдачи заказов. Подробности партнёрства — на https://biz.tlbx.ru/ — инвестиции от 3 млн рублей с окупаемостью 18–24 месяца. Тулбокс присутствует в Челябинске, Уфе и Екатеринбурге и активно ищет партнёров для выхода в новые регионы.
Общественно-аналитический портал «В Украине» публикует материалы об обществе, бизнесе, технологиях, здоровье и образовании без редакционных фильтров и лишних отступлений от фактов. Редакция охватывает широкий тематический спектр — от стратегической релокации бизнеса до медицинской аналитики — и подаёт информацию чётко и по существу. Следите за актуальными событиями на https://108.in.ua/ — общественно-аналитический ресурс для читателей которые ценят конкретику и глубину подачи материала. Практические статьи и экспертные обзоры превращают портал в полноценный ежедневный инструмент для широкой украинской аудитории.
https://tochka-g.pro/
https://academy.drstar.pro/
https://academy.drstar.pro/
https://tochka-g.pro/
https://tochka-g.pro/
https://academy.drstar.pro/
https://tochka-g.pro/
https://tochka-g.pro/
https://academy.drstar.pro/
https://academy.drstar.pro/
https://academy.drstar.pro/
https://academy.drstar.pro/
https://academy.drstar.pro/
https://academy.drstar.pro/
https://tochka-g.pro/
https://tochka-g.pro/
https://academy.drstar.pro/
https://tochka-g.pro/
https://tochka-g.pro/
https://tochka-g.pro/
https://tochka-g.pro/
https://tochka-g.pro/
https://tochka-g.pro/
https://academy.drstar.pro/
https://tochka-g.pro/
https://tochka-g.pro/
https://tochka-g.pro/
https://academy.drstar.pro/
https://academy.drstar.pro/
https://tochka-g.pro/
https://academy.drstar.pro/
https://academy.drstar.pro/
Белорусская компания «РазВикТрейд» специализируется на разработке пресс-форм и массовом выпуске пластиковых компонентов для заказчиков из Беларуси и России. Производство охватывает полный цикл — начиная с технической документации и заканчивая готовой продукцией на складе заказчика. Ищете сушилка бункерная для полимеров? На press-forma.by можно оставить заявку и получить расчёт проекта. На площадке в 1000 кв.м. установлено 24 единицы оборудования обеспечивающих выпуск свыше 1,5 млн пластиковых деталей в месяц. Работа с «РазВикТрейд» помогает снизить производственные издержки и существенно повысить доходность проекта.
https://academy.drstar.pro/
JetronSport выпускает футбольную форму для команд всех уровней — от детских групп до профессиональных взрослых составов. Форма изготавливается из премиальных дышащих тканей с высокой терморегуляцией и эластичностью, соответствует ГОСТам и имеет гарантию на цвета и нанесения. Компания принимает заказы от одного комплекта и изготавливает форму в течение одного-трёх дней. На https://jetronsport.ru/ представлены модели взрослой, детской и вратарской формы с нанесением номеров и фамилий. Линейки Jetron Space, Star и Winner отличаются усиленными швами, светоотражающими вставками и тканью Quick-Dry — всё для реального игрового комфорта.
https://academy.drstar.pro/
https://academy.drstar.pro/
https://academy.drstar.pro/
https://academy.drstar.pro/
https://academy.drstar.pro/
https://academy.drstar.pro/
https://academy.drstar.pro/
https://tochka-g.pro/
Visit https://athlitiko-massage.gr/ to book sports therapeutic massage and physiotherapy in Thessaloniki. We offer massages in your home, hotel, or office, and work with athletes, office workers, and those recovering from injuries. Explore the types of massage and rehabilitation services offered on our website, as well as pricing information.
https://tochka-g.pro/
https://academy.drstar.pro/
https://tochka-g.pro/
https://academy.drstar.pro/
https://tochka-g.pro/
https://academy.drstar.pro/
https://tochka-g.pro/
Москва открывается совершенно иначе, когда смотришь на неё с воды: величественные набережные, сталинские высотки и современные небоскрёбы Сити складываются в панораму, которую невозможно увидеть ни из окна метро, ни с автомобильной эстакады. Сервис https://moscowwaterways.ru/ предлагает речные прогулки и маршруты по Москве-реке в сезоне навигации 2026 года — с удобным расписанием, регулярными отправлениями каждые 15–30 минут и причалами в шаговой доступности от метро. Это одновременно отдых, впечатления и полная свобода от городских пробок.
https://academy.drstar.pro/
https://academy.drstar.pro/
https://tochka-g.pro/
https://tochka-g.pro/
https://academy.drstar.pro/
https://academy.drstar.pro/
https://academy.drstar.pro/
https://academy.drstar.pro/
https://academy.drstar.pro/
Интернет-магазин «Polyana» специализируется на поставке запчастей и ремней для комбайнов и тракторов ведущих мировых брендов — OPTIBELT, TOYOPOWER, MICHELIN. Ассортимент включает клиновые, вариаторные, поликлиновые и плоские ремни, а также подшипники, муфты, цепи и рукава высокого давления. Ищете купить ремень на комбайн? На polyana.ru можно оформить заказ онлайн с доставкой по всей России. ООО «АгроЛига» обслуживает розничных и оптовых клиентов, гарантируя широкий выбор продукции и стабильное качество для нужд сельского хозяйства.
https://academy.drstar.pro/
Белорусская компания «РазВикТрейд» специализируется на изготовлении пресс-форм и изделий из пластика уже более 10 лет. Компания выполняет полный цикл: от проектирования 3D-модели и изготовления пресс-формы до серийного литья и доставки готовой продукции. На https://press-forma.by/ доступен бесплатный расчёт стоимости проекта. Мощности предприятия — 1000 кв.м. и 24 единицы техники — обеспечивают стабильный выпуск до 1,5 млн изделий в месяц. Производство обходится дешевле китайского: чистая прибыль заказчика увеличивается в 2–3 раза.
https://tochka-g.pro/
https://academy.drstar.pro/
Издание «До слова» регулярно публикует принципиальные материалы о политике, бизнесе, культуре и общественной жизни — без лишних слов и уклончивых формулировок. Редакция издания ведёт работу в форматах аналитического разбора, расследования и авторской публицистики — от актуальных бизнес-тем до глубоких исторических материалов. Читайте актуальные тексты на https://doslova.com/ — украинский ежедневник для тех кто привык получать информацию точно и без лишнего шума. Авторские колонки, ежедневные вопросы и спортивная аналитика формируют полноценную редакционную картину и делают издание незаменимым для читателя с высокими стандартами.
https://academy.drstar.pro/
https://academy.drstar.pro/
https://academy.drstar.pro/
https://academy.drstar.pro/
https://tochka-g.pro/
https://tochka-g.pro/
КазиноГид — независимый информационный портал для игроков, которые ценят честные обзоры и выгодные бонусные предложения. На платформе представлены исключительно лицензированные казино с быстрыми выплатами и уникальными промокодами, включая фриспины без депозита. Рейтинг составлен на основе реального тестирования: каждое казино проверено по критериям безопасности и честности. Ищете бездепозитный бонус за регистрацию в казино с выводом? Посетите casino-gid.best — актуальные промокоды и топ лучших казино уже ждут вас. Доверяйте только надёжным казино и подходите к игре ответственно.
https://tochka-g.pro/
https://academy.drstar.pro/
https://academy.drstar.pro/
https://academy.drstar.pro/
https://tochka-g.pro/
https://academy.drstar.pro/
https://tochka-g.pro/
Ищете вата базальтовая? Посетите сайт vztm.ru — это Воткинский Завод Теплоизоляционных Материалов (ВЗТМ), который производит системы теплоизоляции из базальтового (минерального) супер-тонкого волокна. Продукция предназначена для объектов энергетического, оборонного и нефтегазового комплексов, а также объектов гражданского и промышленного строительства. Ознакомьтесь с нашим каталогом товаров и географией поставок. В процессе изготовления применяются передовые уникальные технологии, что гарантирует стабильно высокое качество каждого изделия.
https://academy.drstar.pro/
https://academy.drstar.pro/
https://academy.drstar.pro/
https://academy.drstar.pro/
Агентство POLITEKA с выверенной редакционной структурой выпускает тексты о политике, экономике, обществе, культуре и криминале без размытых оценок и уклончивых формулировок. Редакция агентства разбирает технологические изменения, международные эскалации и экономические схемы с опорой на проверенные факты и первичную документацию. Получайте независимую аналитику на https://politeka.org/ — украинское информационное агентство для аудитории требующей глубокого и честного осмысления событий. Авторские материалы и глубокая аналитика расширяют редакционный формат и делают агентство незаменимым источником для читателей ценящих содержательную журналистику.
https://academy.drstar.pro/
https://tochka-g.pro/
https://academy.drstar.pro/
https://tochka-g.pro/
https://tochka-g.pro/
premium vehicle safety and entertainment systems
exercise bike reviews 2026
real-world tested camping equipment
jump rope reviews
Правильно подобранное фасадное покрытие определяет срок службы и привлекательность здания. Магазин dommebeli-plus.ru предлагает широкий ассортимент отделочных материалов: виниловый, акриловый и формованный сайдинг, фасадные панели под камень, кирпич и плитку, а также профессиональные водосточные системы Дёке и Альта-Профиль. В каталоге представлены сотни наименований товаров вместе с полным набором монтажных комплектующих. Магазин обеспечивает доставку по всей России с гибкими условиями оплаты и гарантией на каждый товар.
how to choose the right tools for your workshop
stair climber machine review
honest reviews of backpacking tents and stoves
stair climber machine review
best tents and camping gear for 2025
how to choose the right kitchen tools
best walking pad reviews
how to choose the right dash cam
quality tools for quality creations
exercise bike reviews 2026
Создание идеального сада требует профессионального подхода и многолетнего опыта работы. Компания Сакура более 23 лет преобразует загородные участки в Санкт-Петербурге. Специалисты ателье умеют слышать каждого заказчика и воплощать самые смелые идеи. Команда профессионалов на https://sakura.spb.ru/ предлагает полный спектр услуг ландшафтного дизайна. От первого эскиза до финального благоустройства клиенты получают качественный результат. Индивидуальный подход гарантирует создание уникального пространства отражающего ваш стиль жизни.
ООО «Сантай» — иркутский производитель обрезиненных валов, роликов и колёс для промышленного оборудования любой отрасли. Компания использует передовые технологии ленточной намотки на американском оборудовании, что обеспечивает высокое качество при доступной стоимости продукции. Производимые изделия достигают длины 2500 мм и диаметра 300 мм, а восстановление и ремонт выполняются оперативно с предоставлением гарантии. Полный спектр услуг, включая готовую продукцию под популярные марки печатных машин, доступен на https://santai-val.ru/ — здесь каждый заказчик получает индивидуальный подход и проверенный результат.
Авторская психиатрическая клиника доктора наук Виталия Минутко https://minutkoclinic.com/ основана в 2003 году. Работаем со всеми психическими расстройствами, включая детскую психиатрию: депрессия, ОКР, анорексия, шизофрения, зависимости, анорексия, аутизм, расстройства личности.
Объём шеринговой экономики в России достиг 1 трлн рублей и демонстрирует устойчивый рост. Тулбокс закрепился в этом сегменте с форматом проката инструмента через постаматы — без персонала, без залога и лишних формальностей. Клиент берёт дрель или пылесос через приложение в боксе у «Пятёрочки» или ПВЗ рядом с домом. Подробности партнёрства — на https://biz.tlbx.ru/ — инвестиции от 3 млн рублей с окупаемостью 18–24 месяца. Тулбокс присутствует в Челябинске, Уфе и Екатеринбурге и активно ищет партнёров для выхода в новые регионы.
campfire cooking tripod
best cat grooming brush reviews
wrist straps for heavy lifts
compact camping grill reviews
real-world tested beds toys and treats
wrist support for CrossFit
real-world tested power tools and hand tools
best lifting belt reviews
premium gear for happy and healthy pets
wrist straps for heavy lifts
top-rated outdoor gear for cold weather adventures
leather lifting belt recommendations
honest reviews of ultralight hiking equipment
wrist straps for heavy lifts
premium camping and hiking essentials 2026
https://t.me/Asiapsi
Купить права по выгодной цене — это просто! Мы предлагаем полный комплекс услуг для получения водительского удостоверения без лишних проблем и рисков. Официальное оформление, прозрачные условия и доступные цены делают процесс максимально удобным и безопасным. В нашем центре вы сможете быстро пройти обучение, сдать экзамены и получить права, соответствующие всем требованиям законодательства. Гарантируем юридическую чистоту сделки и поддержку на всех этапах. Узнайте, как купить права официально по цене, которая вас устроит, и начните управлять автомобилем уже сегодня!
Купить права
1xbet
1xbet
1xbet
1xbet
1xbet
1xbet
1xbet
1xbet
1xbet
1xbet
Маг Азал — практикующий специалист в области магии, который делится авторскими знаниями и многолетним опытом через собственный ресурс. Здесь публикуются глубокие материалы о любовной магии, защите, ритуалах и эзотерике — без мистификаций и пустых обещаний. Ищете пол года после смерти? Сайт постоянно пополняется новыми статьями magomagii.ru каждый читатель найдёт ответы на актуальные вопросы и получит реальную пользу. Ресурс собрал свыше 800 подписчиков — и это закономерный результат качественного контента. Для всех, кто искренне интересуется магией, ресурс предлагает именно ту информацию, которой стоит доверять.
Когда бизнесу в Саратове срочно нужны профессиональные печати и штампы, предприниматели всё чаще обращаются в рекламное агентство «Штамп плюс» — и не зря: здесь изготовят любую печать всего за 27 минут, а стоимость начинается от 700 рублей. На сайте https://rashtamp.ru/ можно ознакомиться с полным перечнем услуг компании, среди которых — печати для ИП, ООО, адвокатов и врачей, фотополимерные клише, пломбировочные устройства, наружная реклама, кружки с нанесением и многое другое. Агентство работает на улице Чернышевского, 100, принимает заказы с доставкой по Саратову и Энгельсу при сумме от 3000 рублей, а опытные дизайнеры помогут разработать макет любой сложности.
https://bestcasinogames.co.za/
newcasinosa.co.za
Want your child to understand general math concepts easily and naturally? Visit https://mayateacher.com/ and explore our guides, designed for parents who want clearer homework support, calmer language, and practical ways to help their child make progress at home. We offer helpful math content for home practice, family routines, and teacher support.
Компании Казахстана всё активнее автоматизируют продажи и внутренние процессы с помощью Битрикс24. Ищете продажа битрикс24? Агентство b2bpro.kz/bitrix24/ занимается профессиональным внедрением CRM с 2012 года и строит не просто настроенную систему, а полноценную цифровую архитектуру под конкретный бизнес. В работу входят автоматизация сделок, настройка аналитики, интеграции с внешними сервисами и разработка нестандартных решений на уровне API. Экспертиза команды распространяется на B2B-компании, дистрибьюторов, логистические, производственные и проектные структуры по всей стране.
Мир магии полон тайн, и разобраться в них без надёжного проводника непросто. Сайт мага Азала https://magomagii.ru/ — это авторский ресурс с более чем 800 постоянными читателями, где опытный практик делится глубокими знаниями о снятии порчи, приворотах и других аспектах магического искусства. Каждая статья написана с душой и подкреплена реальным опытом автора, а живое общение в комментариях превращает сайт в полноценное сообщество единомышленников. Если вы давно искали честный и компетентный взгляд на мир эзотерики — здесь найдёте именно это.
Listo para jugar a las tragamonedas online? Visita https://juegosdetragamonedas.me/ donde podrás recibir bonos de bienvenida increíbles al registrarte y jugar a los mejores juegos en casinos con licencia. ¡Puedes probar las tragamonedas en modo demo, jugar con dinero real o simplemente empezar con bonos que te sorprenderán gratamente!
«Био-лазер» — московская клиника пластической хирургии под руководством хирурга Владимира Высоцкого с опытом свыше 25 лет. Специализация охватывает маммопластику, блефаропластику, абдоминопластику, лифтинг лица и шеи, отопластику и мастопексию. На сайте https://doctor99.ru/ представлена галерея работ с результатами до и после операций. Постоянное участие в стажировках, конференциях и анатомических курсах обеспечивает применение современных хирургических методик. Первичную консультацию с хирургом можно забронировать онлайн в удобное время.
https://t.me/Asiapsi
«Охотник за разумом» — криминальный триллер Netflix о том, как агенты ФБР Холден Форд и Билл Тенч в конце 1970-х впервые начали изучать психологию серийных убийц, заложив основы поведенческого профайлинга. Ищете охотник за разумом смотреть онлайн сериал охотник за разумом? Все 19 серий двух сезонов доступны бесплатно на ohotnik-za-razumom-smotret.net с профессиональной озвучкой LostFilm и SDI Media. Сдержанная режиссура Дэвида Финчера, безупречная атмосфера эпохи и психологически напряжённые диалоги с реальными маньяками делают каждую серию захватывающим погружением в рождение криминальной науки — обязательный просмотр для всех ценителей умного детективного кино.
Компания «ВторСтекло» https://www.vtorsteklo.ru/ специализируется на приеме, вывозе и утилизации стеклянных отходов от населения и бизнеса. Организация работает на рынке более 20 лет, предлагая выгодные условия сотрудничества и оперативное обслуживание. Компания принимает различные виды стеклобоя: оконное стекло, стеклопакеты, бутылки и банки любых цветов и объемов. Собственный автопарк и спецтехника позволяют быстро организовать вывоз стекла с объектов клиентов, а также установить контейнеры для сбора отходов. Все собранное сырье направляется на перерабатывающие предприятия, где используется повторно в промышленности.
Экологическое законодательство становится всё строже, а штрафы за нарушения — всё ощутимее, поэтому грамотное сопровождение бизнеса в сфере экологии сегодня не роскошь, а необходимость. Компания EcoDok из Владимира предлагает полный спектр услуг: разработку экологической документации, аутсорсинг эколога, подготовку к проверкам надзорных органов и производственный экологический контроль — на сайте https://ecodok.ru/ можно подробно ознакомиться с каждым направлением. Специалисты компании также разработали обучающий курс и методическое пособие для экологов, что делает EcoDok не просто исполнителем, а настоящим экспертным партнёром для вашего предприятия.
Посетите сайт Читай-город https://www.chitai-gorod.ru/ – там вы найдете самый большой ассортимент интересных книг, подарков и канцелярских товаров по выгодным ценам. Загляните в каталог, и вы обязательно найдете книгу, которая вас интересует. При необходимости посмотрите адреса магазинов. При покупке с доставкой она осуществляется по всей России.
Портал с фильмами предлагает ознакомиться с увлекательными, популярными, а также редкими кинолентами, которые понравятся, независимо от интересов, возраста. На сайте <a href=https://kinotorrent.cc/https://kinotorrent.cc/ в огромном многообразии представлены зарубежные, а также отечественные фильмы, которые обязательно произведут на вас эффект. Есть работы за прошлые годы, а также за 2025. Благодаря комфортному, максимально понятному интерфейсу вы быстро сориентируетесь в выборе и найдете, что посмотреть вечером в компании друзей или с возлюбленной.
«Мебельный базар» реализует обширный каталог мебельной продукции от топовых отечественных и импортных фабрик для квартир и коммерческих помещений в столице с транспортировкой по РФ. В наличии мебель для спален, залов, прихожих, кухонь, мягкие комплекты, столовые группы, гардеробные системы по персональным параметрам от производителей России, Италии, Белоруссии, Китая и Малайзии. Ищете мебель? Ознакомиться с полным каталогом товаров и оформить заказ можно на bazar-mebel.ru Магазин предоставляет услуги профессиональной сборки мебели, доставку по городу и области, консультации по выбору и выгодные условия оплаты.
Калибровка не всегда является обязательной, но она крайне полезна для предприятий, где важна стабильность технологических процессов. Она позволяет выявить систематические отклонения, оценить погрешность и при необходимости настроить прибор при измерениях – Прибор КИП
Портал JAY — база знаний и каталог статей по всем направлениям — публикует материалы о политике, экономике, бизнесе, технологиях, здоровье, строительстве и культуре без редакционных уступок и информационного балласта. Журналисты и авторы JAY выпускают конкретный полезный контент — от практических инструкций до аналитики рыночных изменений — с опорой на актуальную информацию и отраслевую экспертизу. Расширяйте кругозор и находите нужную информацию на https://jay.com.ua/ — многопрофильный портал для читателей ценящих структурированные знания и конкретную подачу. Многоуровневая система тематических категорий закрывает широкий круг информационных потребностей и делает JAY незаменимым ежедневным ресурсом для украинских читателей.
Штатная магнитола на Android превращает любой автомобиль в современный мультимедийный комплекс — навигация, стриминг, голосовое управление и полная интеграция со смартфоном без переделки салона. Avtopositive — это специализированный установочный центр и магазин штатных Android-магнитол, шумоизоляционных материалов, камер заднего вида и парктроников для широкого модельного ряда. Ищете автозапуск спб? Заказать оборудование и услуги можно на avtopositive.ru — доставка по России и профессиональная установка под ключ. Ассортимент включает оборудование для Audi, BMW, Toyota, Hyundai, Kia, китайских автомобилей и множества других брендов — с точным соответствием под модель и год выпуска.
https://thecottagefawn.com/dessert/lilac-rhubarb-panna-cotta-recipe/
ウェブサイト https://cinemani.jp/ では、ジブリどこで見れる、魔女の宅急便キャッチコピー、スポーツ展望アプリ、ジブリ何で見れる、ジブリ何で見れるなど、あらゆる問題に関する有益で有益な情報を見つけることができます。
http://schnell-mal-essen.de/en/14-10-classic-day-im-porsche-zentrum-aachen/
Компания Мото-ДВ предлагает широкий ассортимент техники для активного отдыха. На сайте https://moto-dv.ru/ представлены электросамокаты, электровелосипеды и мотоциклы различных моделей. Покупатели могут выбрать бензиновые и электрические квадроциклы для любого возраста. Вся представленная техника абсолютно новая и готова к эксплуатации. Специалисты помогут подобрать оптимальный вариант под конкретные требования клиента.
https://www.giftofgrouse.com/2016/04/05/why-scotlands-heather-hills-are-burning/
https://price.kg/ – Заказать лендинг в Бишкеке.
Анапа — один из самых популярных курортов Черноморского побережья, и добраться до него с комфортом теперь проще, чем когда-либо. Сервис https://anapa-taxi-transfer.ru/ предлагает профессиональные услуги такси и трансфера с удобным онлайн-калькулятором стоимости поездки прямо на сайте. Официально зарегистрированная компания работает круглосуточно, обслуживает все основные маршруты и располагает собственным автопарком. Опытные водители встретят вас в аэропорту или на вокзале, а прозрачное ценообразование избавит от неприятных сюрпризов. Путешествуйте с удовольствием!
https://abcjw.com/product/flying-ninja/
https://www.rcproassur.com/garantie-de-parfait-achevement/
Современные путешественники ценят комфорт и надёжность, а именно это предлагает сервис трансферов, заслуживший доверие тысяч клиентов. Бронирование поездки на https://transfer-easy.ru/ занимает считанные минуты: фиксированная цена от 500 рублей, бесплатное ожидание при задержке рейса и встреча с именной табличкой — всё включено. Автопарк компании состоит исключительно из иномарок не старше пяти лет: от комфортных Toyota Corolla до представительских Mercedes S-класса. Водители помогут с багажом, а в салоне действует строгий запрет на курение. Путешествие начинается приятно!
https://dealradar365.com/provident-est-omnis-eos-laborum/
https://xn--marknadsfringpntet-ztbs56a.se/hello-world-2/
https://globalblogshub.com/optimizing-your-landing-pages-for-email-sign-ups/
«Минибусрент» — петербургский прокат транспорта с актуальным автопарком: Hyundai H-1, Peugeot Traveller и Volkswagen Polo от ведущих европейских и японских производителей. Автомобили проходят плановое ТО и всегда готовы к выезду в отличном техническом состоянии. Ищете прокат авто спб посуточно без водителя минибусрент? Подобрать транспорт для трансфера из аэропорта, семейной поездки или бизнес-задачи можно на minibusrent.ru — оставьте заявку и менеджер подберёт оптимальный вариант. Аренда доступна как для разовых поездок по городу, так и для дальних маршрутов по всему региону.
https://arsyaddigital.com/hello-world/
Посетите сайт https://www.tyumen-bat.ru/ и вы найдете тяговые батареи Тюменского аккумуляторного завода для вилочных погрузчиков и штабелеров в наличии, как для отечественной, так и для импортной складской техники. Посмотрите ассортимент на сайте с доступными ценами! При необходимости получите коммерческое предложение или консультацию.
https://latigrapro.com/creadora-integral-la-clave-para-potenciar-tu-carrera-en-la-era-digital/
https://ikippgriwates.ac.id/langkah-langkah-menjadi-guru-profesional-di-indonesia-melalui-ikip-pgri-wates/
https://orraluneapparel1.com/from-runway-to-real-life-how-to-wear-it/
https://spedconsulta.com.br/hello-world/
http://center-2.ru/forum/?mingleforumaction=viewtopic&t=26909#postid-48875
https://salonlejdis.eu/2016/02/16/how-i-lost-the-secret-of-dazzling-success-for-20-years/
http://wmking.ru/t86110.html?pid=488513&st=0&#entry488513
Посетите сайт https://kotel-54.ru/ и вы найдете в наличии на складе, в Новосибирске, готовые и прошедшие заводские испытания котельные мощностью от 80квт до 12 мвт, котлы, горелки, электрические котельные, запасные части для горелок, трубопроводная арматура и другие товары по выгодной стоимости, в том числе с доставкой по регионам России. Наш ассортимент удовлетворит любые потребности покупателя.
Компания «Партнер» — редкий пример поставщика, который говорит с образовательными учреждениями на одном языке: на сайте http://xn—-7sbbumkojddmeoc1a7r.xn--p1acf/ собрана полноценная экосистема для школ и детских садов, от интерактивных панелей, VR/AR-решений и систем мониторинга знаний до специализированной мебели, робототехники и оборудования для сенсорных комнат. Каталог структурирован по задачам: мультимедийное оснащение классов, 3D-лаборатория и принтеры, конструкторы от LEGO-совместимых до TRIK и VEX, документ-камеры, программное обеспечение (включая 1С и управление классом), комплектующие для проекторов и интерактивных досок, а также мебель и AV-стойки для презентаций.
Информационное агентство «Акценты» публикует материалы о политике, экономике, обществе, бизнесе, технологиях, здоровье и криминале без редакционных фильтров и излишней мягкости в подаче фактов. Журналисты агентства разоблачают теневые механизмы, исследуют общественные тенденции и подают события с принципиальной редакционной позицией и проверенной фактологической основой. Следите за самыми острыми материалами на https://akcenty.net/ — информационное агентство для читателей которые не довольствуются поверхностной подачей новостей. Острые расследования и профессиональная аналитика превращают агентство в многопрофильный медиаинструмент для широкого круга читателей стремящихся к полноценному пониманию общественных процессов.
Компания ForOne.Manakara специализируется на производстве и монтаже уникальных стеновых панелей из коэкструзионного карбонизированного бамбука и гибкого камня для современных интерьеров Санкт-Петербурга. Панели изготавливаются по инновационной технологии: бамбук измельчается, проходит карбонизацию, коэкструзию с ПВХ и спайку под температурой 120°C. Ищете отделка стен камнем? На сайте forone.manakara.ru представлен полный каталог продукции с услугами выезда специалиста и профессионального монтажа. Материал экологически безопасен, подходит для криволинейных поверхностей и не требует особой подготовки стен — идеальное решение для жилых, детских и медицинских помещений.
«РазВикТрейд» — предприятие из Беларуси с десятилетним опытом производства пресс-форм и пластиковых изделий для рынков Беларуси и России. Компания выполняет полный цикл: от проектирования 3D-модели и изготовления пресс-формы до серийного литья и доставки готовой продукции. На https://press-forma.by/ доступен бесплатный расчёт стоимости проекта. Мощности предприятия — 1000 кв.м. и 24 единицы техники — обеспечивают стабильный выпуск до 1,5 млн изделий в месяц. Производство обходится дешевле китайского: чистая прибыль заказчика увеличивается в 2–3 раза.
Гепатит С долгие годы считался трудноизлечимым заболеванием. Ищете велакаст? Сегодня сайт velkast.com предлагает реальное решение этой проблемы. Велакаст — современный комбинированный препарат прямого противовирусного действия. Он содержит два активных компонента: софосбувир и велпатасвир. Эти вещества блокируют размножение вируса на клеточном уровне.
Ищете где посмотреть сериал Во все тяжкие онлайн? Посетите сайт https://xn—–dlcbpbgqr8a9ao3o.org/ – там вы сможете найти все серии всех сезонов. Просмотр онлайн без регистрации и в отличном качестве. Если вы еще не смотрели легендарный сериал – самое время! А если вы являетесь фанатом, то на сайте для вас представлены все самые свежие новости о сериале.
Белорусская компания «РазВикТрейд» специализируется на разработке пресс-форм и массовом выпуске пластиковых компонентов для заказчиков из Беларуси и России. Производство охватывает полный цикл — начиная с технической документации и заканчивая готовой продукцией на складе заказчика. Ищете пресс форма для литья пластика купить? На press-forma.by можно оставить заявку и получить расчёт проекта. Производственные мощности на 1000 кв.м. с 24 единицами техники позволяют стабильно отгружать более 1,5 млн изделий каждый месяц. Сотрудничество с компанией позволяет сократить затраты и увеличить маржинальность бизнеса в разы.
Психическое здоровье – частная психиатрическая клиника со стационаром https://psyclinic-center.ru/ . Руководитель клиники – доктор наук Виталий Минутко. Психиатрическая клиника занимается диагностикой и лечением депрессии, ОКР, анорексии, шизофрении, аутизма, биполярного расстройства, тиков, тревожности, неврозов, галюцинаций, деменции и других заболеваний.
Looking for a calorie-counting app? Visit https://calorie-deficit-calculator.net/ to learn more about the app. Foodar is an all-in-one calorie calculator app and food calorie calculator designed to help you understand what you eat and how it affects your health. Download it to your mobile device and plan your meals with the recipe features.
Информационная страница о семенах промышленной конопли
Сравнение типов семян по назначению и характеристикам
Семена промышленной конопли — купить для пищевых и промышленных целей
Дізнавайтесь більше про кулінарію: смачні рецепти, поради домогосподаркам та всім, хто любить готувати щось смачне на MeatPortal. Завжди на сайті https://meatportal.com.ua/ знайдете нові рецепти страв традиційної української кухні та з усього світу. Все найцікавіше для кулінарів на MeatPortal.
Медицинская конопля: что это такое
Рекомендации по хранению семян конопли и масла
Анапа — жемчужина черноморского побережья, и исследовать её по-настоящему можно только за рулём собственного, пусть и арендованного, автомобиля. Сервис https://auto-arenda-anapa.ru/ предлагает прокат без залога, без ограничения пробега и с неограниченной страховкой ОСАГО, что делает каждую поездку абсолютно беззаботной. Детское кресло и видеорегистратор включены в комплектацию, а оформление занимает три простых шага: выбрать автомобиль, отправить документы и указать место подачи. Команда профессионалов CarTrip всегда на связи в мессенджерах и готова ответить на любой вопрос. Путешествуйте свободно!
Современные геймеры ищут площадки для общения с единомышленниками и обмена опытом. Платформа https://lolz.live/ объединяет тысячи любителей компьютерных игр разных уровней. Здесь каждый находит полезную информацию по любимым играм и жанрам. Форум постоянно развивается и предлагает участникам новые возможности для взаимодействия.
Máquina tragamonedas Garage: una guía para jugar gratis en línea en https://tragamonedasgarage.com/ – prueba la tragamonedas en modo demo, entiende cómo funcionan los rodillos y descubre dónde jugar con dinero real, ¡además de obtener bonos de registro! En el sitio web, encontrarás una guía de Garage que te ayudará a ganar más.
http://promarket.in.ua/index.php?subaction=userinfo&user=iqusyqykej
http://ask39.ru/index.php?subaction=userinfo&user=awawalehuf
качество реги просто супер,такого еще не встречали мефедрон, кокаин купить Менеджер на связи с 10-11 утра по МСК (не с 8-ми, как Вы ломитесь) ежедневно, кроме праздников и выходных. На сайте Вашего заказа нет. Можете назвать его номер?Всегда сдесь было высокое качество
Thank you for your sharing. I am worried that I lack creative ideas. It is your article that makes me full of hope. Thank you. But, I have a question, can you help me?
Да,мне тоже первый класс как то ближе и недорого… https://10sotok-nn.ru Привет и Мира! Магазин отличный. Все легально, быстро и без заморочек. Не то что остальные некоторые…1)Кто курит каждый день : от 2 часов до 3-4 часов
https://images.google.co.ls/url?q=https://myborder.ru/
https://whitehorseamerica.org/thoughts/
С 1997 года симферопольская компания «Транзит Медиа» задаёт стандарты рекламного производства в Крыму: широкоформатная полноцветная и УФ-печать, брендирование корпоративного транспорта, изготовление баннеров, вывесок и изделий из акрила — всё это выполняется на собственном оборудовании с использованием качественных европейских материалов. Подробный каталог услуг и актуальные цены производителя размещены на https://transitmedia.ru/, где можно сразу оформить заявку. Более 25 лет безупречной работы, гарантия на все изделия и услуги, доставка по Симферополю и городам Крыма — весомые аргументы в пользу надёжного партнёра для вашего бизнеса.
Playing Cleocatra for real money in Canada has been a blast. https://www.freshneasy.shop/2025/04/mindrolling-monastery-dehradun.html
«Polyana» — интернет-магазин, сосредоточенный на продаже запчастей и ремней для сельхозтехники от известных производителей OPTIBELT, TOYOPOWER и MICHELIN. Ассортимент включает клиновые, вариаторные, поликлиновые и плоские ремни, а также подшипники, муфты, цепи и рукава высокого давления. Ищете michelin производитель ремней? На polyana.ru можно оформить заказ онлайн с доставкой по всей России. «АгроЛига» сотрудничает с розничными и оптовыми покупателями, предлагая надёжную продукцию и богатый ассортимент для аграрной отрасли.
https://images.google.com.fj/url?q=https://myborder.ru/
Just signed up to play Cleocatra for real money in Canada, so far so good. https://voni.net.br/appearance-guide/
Компания «Уральский профиль» специализируется на производстве и установке пластиковых окон в Перми с гарантией качества. Работа ведётся по принципу «под ключ» — от выезда замерщика до финальной сдачи объекта. Минимальная цена на окна составляет 2128 рублей, а установка занимает не более одного дня. Подробный каталог продукции и актуальные цены размещены на https://oknabalkonperm.ru/ — там же можно оформить заявку онлайн. Каталог включает одно-, двух- и трёхстворчатые конструкции, блоки для балконов, панорамные окна и остекление лоджий. Среди объектов — кирпичные и панельные дома, деревянные постройки, дачи и загородные коттеджи.
Cleocatra real money action is exactly what I was looking for. https://hyungwoo.com/bbs/board.php?bo_table=free&wr_id=60124
This site is my go-to for Cleocatra real money sessions. http://potomacdc.com/?p=81
I finally found a place to explore each custom and modified BMW E30 build – from engine swapped builds to stance, track, and drift builds. Every build comes with a curated gallery, tech specs, and modification details. Honestly it’s addictive to scroll. Go check it out: https://isleofcars.com/bmw/e30
VIDEO-CAMER — интернет-магазин, предлагающий один из наиболее полных каталогов оборудования для безопасности и видеонаблюдения. Здесь представлены IP-камеры, уличные и беспроводные видеокамеры, профессиональные видеорегистраторы, видеодомофоны, тепловизоры, металлоискатели, приборы ночного видения и GPS-трекеры. Ищете защита информации? На video-camer.ru собраны сотни позиций от проверенных производителей с гарантией и доставкой по России. В каталоге есть как домашние решения — видеоняни, радионяни, умные камеры — так и профессиональное оборудование для охраны объектов, защиты информации и поисковой техники.
Cleocatra Slot Canada never fails to entertain. http://hydro-complex.com.pl/galeria/
Создание идеального сада требует профессионального подхода и многолетнего опыта работы. Компания Сакура более 23 лет преобразует загородные участки в Санкт-Петербурге. Специалисты ателье умеют слышать каждого заказчика и воплощать самые смелые идеи. Команда профессионалов на https://sakura.spb.ru/ предлагает полный спектр услуг ландшафтного дизайна. От первого эскиза до финального благоустройства клиенты получают качественный результат. Индивидуальный подход гарантирует создание уникального пространства отражающего ваш стиль жизни.
I hit the bonus round on my tenth spin today! https://willbo.es/willbo-web-flaticon
Устали от пыли и хаоса? Генеральная уборка квартиры вернет свежесть и порядок. Проводим уборку квартиры в Бресте https://xn—-9sbhrbbakeffzbd7a.xn--90ais/ качественно и быстро. Особый подход: уборка после ремонта — удалим цементную пыль, строительные остатки. Также нужна уборка в офисах? Поддержим чистоту в вашем бизнесе. Работаем профессионально, без лишних хлопот. Чистота и идеальный результат уже сегодня! Звоните!
Cleocatra real money action is exactly what I was looking for. https://norea.shop/hello-world/
Творческая студия «LedMaster» уже 20 лет создает изысканные и роскошные скульптуры изо льда. Они всегда смотрятся привлекательно, презентабельно и необычно на любом торжестве. Ледяные фигурки украсят фотозону, сделав ее ярким акцентом самого грандиозного мероприятия. На сайте https://led-msk.com/ ознакомьтесь с тем, какие услуги вы сможете заказать в этой компании. Специалисты создают изысканные и искусные произведения искусства, которые украсят улицу. Для торжества подходят и креативные логотипы, а также пресс-воллы. Это эксклюзивные и уникальные арт-объекты, которые обязательно произведут впечатление.
«Киндер» — семейная клиника в Москве с широким профилем: педиатрия, терапия, гинекология и аллергология для пациентов любого возраста. Клиника работает по лицензии Л041-01137-77/00763335 и объединяет опытных специалистов со стажем от 10 до 35 лет. На https://kinder-medcenter.ru/ можно записаться к врачу онлайн и ознакомиться с полным прейскурантом услуг. Клиника находится на улице Лавриненко рядом с метро Некрасовка — это делает её доступной для жителей востока Москвы и Люберец.
«Хронос» — производитель и поставщик сертифицированной медтехники: голосообразующих аппаратов, бактерицидных рециркуляторов, облучателей для терапии кожных заболеваний, трахеостомических трубок и ультрафиолетовых ламп. Ищете производство медицинской техники? На сайте agsvv.ru доступны оптовые и розничные поставки напрямую с завода ЛЭМЗ в Санкт-Петербурге с официальной гарантией качества и доставкой по всей России. с заводской гарантией и организацией доставки в любой регион страны.
Ищете скачать mp3? Зайдите на muzqeen.cc — музыкальный портал для настоящих меломанов с огромной коллекцией треков всех жанров и самыми свежими новинками. На сайте можно скачать mp3 на компьютер и телефон. Только лучшая музыка собрана на нашем портале. Сохраните muzqeen.cc в закладки, чтобы всегда быть в курсе новых треков любимых исполнителей!
Современный рынок такси предлагает множество вариантов для заработка, но немногие таксопарки способны действительно обеспечить водителю стабильный доход и надёжную поддержку. Таксопарк AREON — приятное исключение: здесь ИП и самозанятые водители получают быстрое подключение к Яндекс.Такси без бюрократических сложностей и лишних затрат. Узнайте все условия сотрудничества на https://parkareon.ru/ и убедитесь, насколько прозрачна и выгодна эта система. Парк работает по всей России через единое приложение Яндекс.Про, берёт на себя взаимодействие с сервисом и предлагает бонусные программы, включая бесплатную оклейку автомобилей. Начать зарабатывать можно уже сегодня.
Чистая вода дома — не роскошь, а норма, которую теперь легко обеспечить. PWS создаёт бытовые системы очистки воды без расходных картриджей и импортных зависимостей. На https://pws.world/bytovye-ustanivki представлены установки серии КСВ, которые снижают жёсткость в 10–20 раз, устраняют железо, запах и мутность. Системы проектируются под состав воды в вашем регионе. Инженеры компании сами консультируют клиентов и подбирают оптимальное решение под любой бюджет.
Рабочие команды регулярно теряют эффективность из-за беспорядка в задачах и процессах. Ищете платформа для работы с задачами? Платформа pabit.ru решает эту проблему с помощью интуитивного интерфейса для управления проектами. Весь рабочий процесс — задачи, спринты, модули, аналитика и умные страницы — сосредоточен на одной платформе. Визуальные доски команды дают чёткую картину прогресса без составления отчётов вручную. Pabit принимает на себя всю рутину управления проектами и освобождает команду для продуктивной работы.
Дорамы здесь в хорошей озвучке, теперь это мой любимый портал.https://balloonja.de/produkt/geschenkbox-s/
Наконец-то нашла где смотреть турецкие сериалы без подвисаний.https://artecdesign.com.br/pedras-exoticas-copacabana-7/
Монтаж стеновых панелей под ключ в квартирах, домах, офисах и коммерческой недвижимости Санкт-Петербурга и Сочи — профильное направление компании Manakara. Компания работает со всеми популярными видами отделки: бамбуком, гибким камнем, МДФ, ПВХ, сэндвич-панелями и объёмными 3D-решениями. Ищете замера сочи? На сайте manakara.ru доступны услуги замера, консультации и разработки дизайн-проекта для любых объектов. Монтаж в ванных комнатах, на кухнях, в новостройках и коттеджах проводится профессиональной бригадой с гарантией точных сроков и безупречного качества.
Подсела на китайские дорамы благодаря вашей подборке.https://artgulf.ae/2025/02/21/fermin-guerrero-taking-the-charrua-identity-across-the-globe-through-design/
Смотрю тут русские детективы фоном, база огромная.https://aromuscel.ro/2023/10/21/programul-echipelor-de-juniori-ale-clubului-aro-campulung-20-22-octombrie/
Плеер запоминает момент, где остановился, это жирный плюс.https://www.avvocatorabbito.it/header/
Выбор комедий шикарный, каждые выходные залипаем всей семьей.https://www.amrohainternationalsociety.com/amsterdam-half-marathon/
Подсела на китайские дорамы благодаря вашей подборке.https://www.andreferraovargas.com/endermologia/endermologia-facial-1/
Наконец-то сайт, где не просят привязать карту для просмотра.https://www.ancienttypewriters.de/index.php/Benutzer:Lilla3122395330
Современный зритель давно оценил удобство домашнего кинопросмотра, и платформа https://tv-goodfilms.ru/ стала для тысяч людей настоящим открытием. Здесь собраны фильмы и сериалы в HD-качестве 720 и 1080p — от классики до свежих премьер, — причём совершенно бесплатно, без регистрации и скрытых платежей. Сервис позволяет собирать личные коллекции, добавлять картины в список желаний и обсуждать просмотренное с друзьями. Никаких подписок и ограничений: просто выбирайте фильм и наслаждайтесь безупречным изображением прямо сейчас!
Плеер запоминает момент, где остановился, это жирный плюс.https://itslouisx.com/inner_male_11/
Ничего не тормозит даже вечером, когда нагрузка на сервера большая.https://isouq.in/2-things-you-must-know-about-fashion/
Шоу “Громкий вопрос” всегда вовремя выкладывают.https://isaacoseiowusu.com/index.php/2019/08/07/condoms-our-children-and-the-deed/
Круизы по Москве-реке сегодня — это не просто речная прогулка, а полноценный вечер развлечений с музыкой, шоу и живыми выступлениями на теплоходе. Дискотеки 80–90-х, DJ-вечеринки, концерты и Premium-круизы с ужином и шоу-программой доступны ежедневно и рассчитаны на любой вкус. Ищете электронная музыка на теплоходе москва? Билеты бронируются онлайн на ticketscruise.ru — быстро и без лишних шагов. Особой популярностью пользуется концерт «Хиты Италии» на борту «Ривер Паласа» — отправление с причала Сити-Экспоцентр.
Очень удобный поиск по годам и жанрам, сразу нашел что хотел.https://istudyabroad.co.in/preparing-to-study-abroad-5-things-you-need-to-know/
Ничего не тормозит даже вечером, когда нагрузка на сервера большая.http://lesidesign.nl/2019/12/23/hello-world/
Для планшета оптимизация отличная, ничего не съезжает.http://lascolinascomfort.dreamhosters.com/companies-are-moving-north-texas/
Дорамы здесь в хорошей озвучке, теперь это мой любимый портал.https://karate-wroclaw.pl/2020/10/30/zapisy-na-oboz-zimowy/
Нравится, что в описании всегда указаны актеры и год выпуска.http://longlive.com/node/13765
Классно, что есть разбивка по каналам, это очень экономит время.https://studio-true.online/en/archives/589
Часто смотрю тут ТНТшные шоу, когда пропускаю по телевизору.https://studiohaus-osten.de/clean-office-desk/
https://kssp.borda.ru/?1-5-0-00004056-000-0-0-1775908522
http://ruall.com/sotrudnichestvo/92507-haydi-svoyu-novuyu-professiyu-v-diplomiks.html#92507
http://www.vladimir.ru/forum/forum/thread/58003
http://ruall.com/sotrudnichestvo/92551-turyi-na-elbrus-voshozhdenie-na-elbrus.html#92551
http://old.msfnpr.ru/msfnprbb/viewtopic.php?p=7167#7167
https://moskovsky.borda.ru/?1-7-0-00012993-000-0-0-1775750120
https://guryevsk.forum24.ru/?1-3-0-00000803-000-0-0-1775908532
https://www.floristic.ru/forum/groups/moskva-d1756-haidi-svoyu-novuyu-professiyu-v-diplomiks.html#gmessage2358
Visit https://yogaonlineapp.com/ and learn more about our mobile app for online and at-home yoga. Yoga Way is a modern yoga app designed for people who want to practice yoga anytime, anywhere. Explore dozens of practices and programs with expert video guidance!
RASCET — профессиональный инструмент для градуировки резервуаров геометрическим методом: введите параметры ёмкости и получите точную градуировочную таблицу для любого из 26 типов ёмкостей с погрешностью до 0,000001%. На https://rascet.ru/ доступна демо-версия 4.1 с сохранением таблиц в Excel. В основе вычислений — числа двойной точности и шаг разбивки 1 мм что обеспечивает результат выше чем у конкурентов. Свидетельство госрегистрации подтверждает надёжность программы — с 2006 года она работает на сотнях объектов нефтепереработки, химии, АЗС и ЖКХ в России и СНГ.
Looking for an online yoga app for your home yoga practice? Visit https://yoga-for-beginners.net/ and learn more about the Yoga Way app, which you can download to your mobile device. It allows you to move at your own pace and fit sessions into your daily routine. Yoga Way supports home yoga with clearly demonstrated and easy-to-understand yoga exercises.
«Реготмас» — отечественный завод по выпуску сертифицированных фильтрующих элементов для топливных и масляных систем. Продукция выпускается по ГОСТ Р ИСО 9001-2015 с контролем на каждом этапе производства. Ищете элемент фильтрующий реготмас 412? На сайте regotmas.ru представлен полный каталог бумажных фильтрующих элементов с тонкостью фильтрации от 10 до 40 мкм — серии 600, 630, 660, 560, 412 и другие. Завод гарантирует стабильное качество и надёжное партнёрство.
Откройте dom-kamnya.ru/iskusstvennyj-kamen/stoleshnitsy и ознакомьтесь с большим ассортиментом столешниц от московского производителя с гарантией качества. Просмотрите ассортимент, закажите бесплатный выезд замерщика онлайн, а гарантия на искусственный камень составляет 10 лет, на монтажные работы — 2 года. Привезём и установим столешницу для вашей кухни за один день.
Visit https://forexvertex.com/ for comprehensive information on Forex, including current opportunities in developing countries and other useful information, such as a guide on calculating lot sizes. The site provides in-depth analysis on many Forex-related issues. The information will be useful for both beginners and experienced traders.
Центр сертификации «Стандарт-Тест» https://www.standart-test.ru/ — экспертный партнер в сфере подтверждения соответствия продукции требованиям ЕАЭС. Компания обеспечивает полный цикл сопровождения: от профессионального анализа и выбора оптимальной схемы до оформления и регистрации документов. Высокие стандарты работы, точность и конфиденциальность позволяют бизнесу уверенно выходить на рынок и масштабироваться без рисков. Решения премиального уровня для требовательных клиентов.
Речные прогулки по Москве-реке — один из лучших способов увидеть столицу с совершенно иного ракурса: мимо проплывают Кремль, храм Христа Спасителя и сверкающие башни Москва-Сити. Сервис https://seayoucruise.ru/ работает с 2018 года и предлагает удобное онлайн-бронирование билетов в несколько кликов без очередей. Актуальное расписание, информация о свободных местах и надёжная система оплаты с защитой данных — всё это делает покупку билета простой и безопасной с любого устройства. Гибкие условия возврата и оперативная поддержка по номеру +7 993 245-44-90 завершают образ сервиса, которому можно доверять!
Откройте путь к успеху. Таро-диагностика https://gadanie.by/ выявит скрытые блоки и негатив. Проведу мощное энергетическое очищение, поставлю защиту от неудач в бизнесе и сниму порчу с отношений. Запускаю обряды на удачу и процветание. Верните гармонию и рост в свою жизнь.
Для одесситов и гостей города информационный новостной портал Скай Пост расскажет об актуальных событиях и последних новостях за сегодня. На сайте https://sky-post.odesa.ua/ следите за новостями Одессы и Одесской области в любое время 24/7.
Интернет магазин БАДов диетического и спортивного питания https://iherb-vitamin.ru/ Тюмень – это русский официальный сайт интернет магазин Ихерб IHERB . Занимаемся продажей спортивного питания и БАД из официального каталога Айхерб и предлагаем только проверенные пищевые добавки и продукцию по низким ценам. У нас можно купить добавки с айхерб в Тюмени или заказать в любой город России. Сделать заказ можно на сайте. Есть в наличии в России в Тюмени и доставляем из США под заказ. Доставим в Тюмени курьером или отправим в любой город России почтой, СДЭК и другими транспортными компаниями.
Искусство способно существовать в самых неожиданных формах — и WireSpace тому живое доказательство. Здесь проволока перестаёт быть простым материалом и превращается в нечто большее: изящных фей, воздушные фигуры, скульптуры, в которых чувствуется дыхание жизни. Каждое изделие создаётся вручную с исключительным вниманием к деталям — посетите https://wirespace.ru/ и убедитесь сами, насколько богат и разнообразен этот удивительный мир. Работы мастера вдохновляют, удивляют и заставляют остановиться, чтобы рассмотреть каждый изгиб, каждую линию, наполненную смыслом и душой.
Поклонники отечественного кинематографа получили идеальное решение для домашнего просмотра. Платформа https://russkieserial.net/ объединяет тысячи русских сериалов и фильмов под одной крышей. Здесь представлены проекты ведущих телеканалов России в отличном качестве. Сайт работает полностью легально, используя только проверенные источники контента. Удобная навигация позволяет мгновенно найти нужный сериал или фильм. Все материалы доступны без регистрации и скрытых платежей для зрителей.
Трек (номер накладной) будет в заказе, а также выслан на e-mail. Купить Кокаин, Купить Мефедрон не долго думая решил написать оператору данного магазина!Всех благ
Ценник уж больно сладкий.. И это очень настараживает.. Кто что скажет, когда последние движения были, всё ровно? Купить Кокаин, Купить Мефедрон вот вот такая же история! надо разобраться с этим вопросом!Затарил я тут как то купели значит курехи,приваливай на адрес и не могу найти списался с оператором и понял что дурак тут я а не минер затупил,30 сек и закладка у меня в руках,лечу Домой,дома меня ждут уже братики заряжает по 2 водных и начинаем пускать слюни под спанч бобра, в полне хороший стафф,силы стафа хватает,валит минут 40-60 потом спад,получилось так что вес сдули за 2 дня,отходосы минемальные, вообщем сервис тут вышка тарился тут ребята)
Страшно) заказывать RTI-126. Кто поможет с данной проблемой. Купить Кокаин, Купить Мефедрон магаз то работает сейчас?Есть курьерка по москве?и я так же жду с 8 числа сказали отправки в начале недели
http://ruall.com/sotrudnichestvo/92504-nakrutka-ot-hyperlike.html#92504
https://finkod.pro/strahovanie-kvartiry-ot-zatopleniya-i-pozhara-razumnaya-zaschita-ili-lishnie-traty/
dubai property direct from landlord Buy Penthouse in Dubai
https://omsi2mod.ru/forum/9-13184-1
https://finkod.pro/osago-i-kasko-v-year-godu-ne-prosto-avtograzhdanka-i-zaschita-avto-rasskazyvaem-chem-oni-otlichayutsya-na-samom-dele-i-kakoy-polis-vam-nuzhen-pryamo-seychas/
Буду делать am 2233 + rcs4. Основа: Дурман(молотый) 5г, Латук дикий 10 г, Лобелия вздутая 5 г. Как дойдет с меня трип-репорт Купить Кокаин, Купить Мефедрон у кого взять собрался его ?да да ))) 100% ))0
Shaping skylines: Dubai residential real estate Q3 2025 Buy Penthouse in Dubai
в/в – нет эффекта вообще. https://keithmorgan.xyz хD..ну и мне такое же скажи…скайпцы не могу пока поставить по техническим причинам. хотелось бы связаться по мылу, но увы и ах. жаль, хороший ассортимент там. 🙁
buy dubai property off plan Buy Penthouse in Dubai
Почему больше не забегаете ? Купить Кокаин, Купить Мефедрон все огонь люди работают!!!пс за поддержку )Просьба не флудить. И уж тем более не развивать больные фантазии.
buy freehold property in dubai Buy Penthouse in Dubai
кто что думает по этому поводу? Купить Кокаин, Купить Мефедрон ВЫ ЛУЧШИЕ!Меня тут Кинули на 25к претензия в арбитраже!!!
Мир магии полон тайн, и разобраться в них без надёжного проводника непросто. Сайт мага Азала https://magomagii.ru/ — это авторский ресурс с более чем 800 постоянными читателями, где опытный практик делится глубокими знаниями о снятии порчи, приворотах и других аспектах магического искусства. Каждая статья написана с душой и подкреплена реальным опытом автора, а живое общение в комментариях превращает сайт в полноценное сообщество единомышленников. Если вы давно искали честный и компетентный взгляд на мир эзотерики — здесь найдёте именно это.
dubbizle apartments for rent dubai Buy Penthouse in Dubai
За АМ 1220 ничего сказать не могу – не пробовал…. Но, после тестирования 694 и 2201 впечатления о линейке АМ у меня сильно подпортились ( Купить Кокаин, Купить Мефедрон заказала в этом магазе сувениров:), посыль пришел на 3ий день, продукты качеством вкусныРОВНЫЙ МАГАЗ!!!УСПЕХОВ И ПОЗИТИВНОГО РАЗВИТИЯ!!
Шеринговая экономика в России перешагнула отметку 1 трлн рублей и не замедляется. Тулбокс закрепился в этом сегменте с форматом проката инструмента через постаматы — без персонала, без залога и лишних формальностей. Клиент берёт дрель или пылесос через приложение в боксе у «Пятёрочки» или ПВЗ рядом с домом. Подробности партнёрства — на https://biz.tlbx.ru/ — инвестиции от 3 млн рублей с окупаемостью 18–24 месяца. Тулбокс присутствует в Челябинске, Уфе и Екатеринбурге и активно ищет партнёров для выхода в новые регионы.
WBDown — мощный инструмент для продавцов и аналитиков Wildberries: даёт возможность оперативно выгружать артикулы товаров по ID продавца или URL магазина с удобной сортировкой по популярности, рейтингу, цене и новинкам. Ищете сбор фотографий реальных покупателей вб? Сервис wbdown.ru предлагает удобный парсинг до 1000 артикулов за раз по цене от 2 рублей за артикул, проверку фото на контент 18+ и фоновую обработку данных — всё необходимое для глубокого анализа конкурентов и оптимизации продаж. всё необходимое для глубокого анализа конкурентов и оптимизации продаж.
damac properties dubai south Buy Penthouse in Dubai
Причёт тут почта России, СПСР это самостоятельная курьерская служба. Купить Кокаин, Купить Мефедрон Магазин высшего уровня своей работы.Был сделан заказ, оперативно связались с продавцом (что радует, он регулярно на связи), оплатили, причем сами намудрили с оплатой – больше по ошибке перевели. Оттого не сразу разобрались с суммой, но потом продавец предложил на сдачу нам выслать пробников) Через неделю позвонил курьер, договорились о доставке в удобном мне месте, что оказалось очень кстати.
«Мой Токио» — туроператор с фокусом на Японии, предлагающий россиянам групповые, индивидуальные и корпоративные туры на любой запрос. В ассортименте — маршруты по Токио, Киото, Осаке, Хиросиме и другим регионам страны, горнолыжный и пляжный отдых на Окинаве, а также программы обучения в Японии. Ищете тур в японию из спб цена? На dvmt.ru собраны актуальные путёвки и горячие туры с профессиональным сопровождением. Официальный статус компании подтверждён реестровым номером РТО 004645, что обеспечивает полную защиту туриста на всех этапах поездки.
ровно, тут можно не беспокоится, попал куда надо Купить Кокаин, Купить Мефедрон Странно все как то..В общем, хотелось бы вас оповестить и другим может пригодится.
cancelled real estate projects dubai Buy Penthouse in Dubai
Москва-река открывает новые грани развлечений: тематические вечеринки, зажигательные диджей-сеты и живая музыка прямо на борту теплохода — всё это делает каждый выход в свет по-настоящему незабываемым. На сайте https://ticketscruise.ru/ собрано полное расписание круизов на любой вкус: от уютных прогулок с ужином под звёздным небом до ночных шоу-программ с профессиональными артистами. Танцы под открытым небом, бар на борту, панорамные виды столицы — здесь каждая деталь работает на атмосферу. Бронируйте билеты онлайн и выбирайте свой идеальный формат отдыха на воде!
307ой вроде к 15 можно забадяжить..ещё хим дрим какойто есть..тока я сам про него не в теме https://kypitalphapvp.shop удачи в изменении ситуации! :)не бзди все будет ровно трек не всегда бьется это касяк курьерки а не отправителя не паникуй
looking for intellectual property dubai Buy Penthouse in Dubai
Оплатил заказ до нового года, связывался через почту, написали оплата прошла, отправка будет после праздников, … ответа до сих пор нет… Сделайте что нибудь, ответьте мне на почте емае, хз уже чо делать. Купить Кокаин, Купить Мефедрон Посылки у магазина не задерживаются? Все чотко и ровно?31 страницу отзывов почитайте – увидите всех. Кто то только что зарегился , ктото год назад , кому что аккаунт блокнули или забыл пароль от старого акка – он зарегился по новой .
how to buy stocks in uae Buy Penthouse in Dubai
Рассказал друг-таксист. https://kypitmdma.shop где вообще оператор или кто ни будь? бабло уплочено и жду доставку а на связи ни кого нету!!!!!!!!!!На ацетоне делай, он быстро выветривается и не пахнет совсем!
finding shared apartment in dubai https://buypenthouseindubai.com/
нет курьерки по мск нету, да все работает как обычно https://kypitgeroin.shop Пришол 250 сделал 1к10-12 ппц уносит 250 у вас лучший магазу респект , даже не ожидал что такой джив будет , 1к10 меньше это ппц..Мы уверены что гарант не нужен магазину работающему с 2011 года + мы не работаем с биткоинами + везде положительные отзывы .
dubai properties headquarters building knowledge village https://buypenthouseindubai.com/
РЕСПЕКТОС МАгаЗИНУ=) Купить Кокаин, Купить Мефедрон ацетон бери очищенный,ато бывает ещё технический,он с примесями и воняет.1к15 нормально будет.основа мачеха ништяк.Сегодня получил посыль! В супер упаковке!
how much is rent in dubai https://buypenthouseindubai.com/
Причем здесь стаффстор ко мне ? https://jiajiazhao.top Причем тут вообще он к нашему магазину ?Спасибо, единственный объективный отзыв за последнее время.
modern villa dubai https://buypenthouseindubai.com/
подскажите, а спорные вопросы решаются в данном магазине? Купить Кокаин, Купить Мефедрон Вот так нихуя себе с 2011 года на плаву:strong:, подумаеш какая диковинка :DМагазин замечательный!!
Ага ровный!!!!И я так считал до некоторых случаев! Купить Кокаин, Купить Мефедрон аська молчит.скайп есть?The Best!!!!!!
real estate rules in dubai https://buypenthouseindubai.com/
Can you be more specific about the content of your article? After reading it, I still have some doubts. Hope you can help me.
Ну как видишь соответсвует … Купить Кокаин, Купить Мефедрон Магазин ровный.;)Жаль реги пока нетСпасибо все понравилось
Огромное спасибо данному магазину, успехов вработе и процветания!!!? Купить Кокаин, Купить Мефедрон хорошо что такгде вообще оператор или кто ни будь? бабло уплочено и жду доставку а на связи ни кого нету!!!!!!!!!!
ПРодавец,есть из скорости что нибудь качественное? https://img01.xyz Оплатил 28 января это был вторник, продавец сказал отправки в течении 2х дней…Магазин просто супер!!!так держать))))*****
Анапа — один из самых популярных курортов Черноморского побережья, и добраться до него с комфортом теперь проще, чем когда-либо. Сервис https://anapa-taxi-transfer.ru/ предлагает профессиональные услуги такси и трансфера с удобным онлайн-калькулятором стоимости поездки прямо на сайте. Официально зарегистрированная компания работает круглосуточно, обслуживает все основные маршруты и располагает собственным автопарком. Опытные водители встретят вас в аэропорту или на вокзале, а прозрачное ценообразование избавит от неприятных сюрпризов. Путешествуйте с удовольствием!
Компания CryoOne выпускает отечественные азотные криокапсулы для предприятий в области красоты, спорта и реабилитации. Криокапсула выходит на окупаемость уже через полгода, работает без медицинской лицензии и привлекает новых клиентов благодаря яркому эффекту от процедуры. На https://cryoone.ru/ представлены четыре комплектации — Standard, Business, Pro и Comfort — с гарантией 24 месяца и бесплатными доставкой, монтажом и обучением. В комплект поставки включён сосуд Дьюара, а цена фиксируется гарантией лучшего предложения на рынке.
не ссы капустин поебем и отпустим https://taozhijian.top посмотри в трипах магазина там всё написаноМногие мне рекомендовали данный магазин как порядочный, надо попробовать!
MoscowWaterWays — удобный сервис для организации речных прогулок по Москве с отправлением от главных городских причалов. Сервис предлагает маршруты с отправлением от Китай-города, Парка Горького, Воробьёвых гор, Москвы-Сити и множества других знаковых мест. Ищете билет на речной трамвай зарядье лужники? На платформе moscowwaterways.ru можно выбрать маршрут и оплатить билеты онлайн — они придут на электронную почту. Расписание охватывает праздничные рейсы на 9 Мая, День города, выпускной и Новый год. Близость причалов к станциям метро и МЦК обеспечивает лёгкий доступ и экономит время перед отправлением.
Ахаха такая же история была , стул во дворе, приехал на нем бабуся сидит)))) но я забрал свое) https://katosworldeth.xyz магазин достойный,всё ровно и в срок,спасибо большое за ваш труд,будем продолжать сотрудничество!Продолжайте в том же духе.
Когда бизнесу в Саратове срочно нужны профессиональные печати и штампы, предприниматели всё чаще обращаются в рекламное агентство «Штамп плюс» — и не зря: здесь изготовят любую печать всего за 27 минут, а стоимость начинается от 700 рублей. На сайте https://rashtamp.ru/ можно ознакомиться с полным перечнем услуг компании, среди которых — печати для ИП, ООО, адвокатов и врачей, фотополимерные клише, пломбировочные устройства, наружная реклама, кружки с нанесением и многое другое. Агентство работает на улице Чернышевского, 100, принимает заказы с доставкой по Саратову и Энгельсу при сумме от 3000 рублей, а опытные дизайнеры помогут разработать макет любой сложности.
Металлообработка — отрасль, где цена ошибки измеряется браком и простоями. Портал https://metalloobrabotka.org/ объединяет производителей, поставщиков и специалистов отрасли на одной профессиональной площадке. Здесь публикуются актуальные новости, технические статьи, обзоры оборудования и база предприятий. Ресурс полезен как опытному технологу, так и руководителю, который ищет подрядчика по токарным, фрезерным или сварочным работам в своём регионе.
дайте ссылку на город курган, хочется маленько россыпушки Купить Кокаин, Купить Мефедрон вот это уже наводит на мыслиНу да ,я уже посылку с 15числа жду всё дождаться не могу .
Криминальный триллер Netflix «Охотник за разумом» рассказывает о том, как агенты ФБР Холден Форд и Билл Тенч в конце 1970-х приступили к изучению психологии серийных убийц, заложив фундамент поведенческого профайлинга. Ищете охотник за разумом все серии? Все 19 серий двух сезонов доступны бесплатно на ohotnik-za-razumom-smotret.net с профессиональной озвучкой LostFilm и SDI Media. Безупречно воссозданная эпоха, фирменный стиль Финчера и леденящие душу беседы с историческими преступниками делают «Охотника за разумом» эталоном умного криминального сериала — обязателен к просмотру.
Давно не читала столько положительных отзывов !так держать ) https://img01.xyz Сегодня оплатил. Жду не дождусь.?Отличный магаз, качество на ура. даже если сам реагент не сильный.
доброго вечера всем,трек получил всё прекрасно бъётся,жду звоночка,жду жду жду Купить Кокаин, Купить Мефедрон Тут ровно братаны,берем и не паримся,качеставо вышка!)Хороший,порядочный магазин обращяйтесь
Я тебе уже все в личке сказал, ты на фейка попал, если такое вообще было. Купить Кокаин, Купить Мефедрон рекомендую этот магазинБро, не волнуйся, тут ровный магаз. Напиши им в аську, что заказ номер такой-то оплачен.
В общем я всегда доверял своей логике и считаю ее правильной, многие соглашаются с ней, но видимо тут никто толком ни с кем не согласится, потому соглашусь с тем, что кончаем с оффтопом https://haochuangweb.top лабаз ништякЯ клад нашел, но вопервых не все в нем а во вторых содержимое разное и самое главное это место и описание этого места. Завтра буду пытаться связаться с ним.
Точность до микрона и строгое соответствие техническому заданию — именно это отличает настоящее производство от кустарной мастерской. Компания «Металлообработка-ЗР» выполняет изготовление деталей на заказ по чертежам в Москве, работая с металлами любой сложности и обеспечивая стабильно высокое качество на каждом этапе. Подробный каталог услуг, актуальные цены и реальное портфолио готовых работ доступны на сайте https://metalloobrabotka.org/ — здесь же можно оформить заявку или заказать обратный звонок от специалиста. Собственное оборудование, сертифицированное производство и гарантия на выполненные работы делают компанию надёжным партнёром для бизнеса.
У меня ожидалась поездка по работе в Столицу нашей родины на пару недель но как обычно я списался оператором в джаббе подтвердил адрес через форум что не ФЭЙК оплатил заранее по приезду написал ТС , он по скорому выдал мне адрес в тот день что договорились ) Купить Кокаин, Купить Мефедрон Такая тут вкусная цена была недавно на фтор.И продукт офигенский.А теперь цену подняли до всеобщего уровня.И я не вижу уже причин заказать именно здесь а не где-то ещё.Так-то с отправкой всё ровно будет,но цена…Братья так же ровны как в совестсокм союзе
У меня тоже была задержка.На мониторенге тоже отправку просрочили, в итоге дней 20 затратили на пересылку.Просто курьерка такая, они помоему там распиздяи ещё те…так что на счёт приема можешь не беспокоиться.там даже если мусора захотят что то найти то будет трудно разобраться что да где)вот допустим недавно заказал и курьерка ваще не то вбила))так что не переживай!Чемикалы всё ровно делают, сложновато будет найти даже если посыль откроют! Купить Кокаин, Купить Мефедрон мне все пришло, магаз ровный. 5+кто брал закладками в этом магазе в МСК что скажите?
ООО «РазВикТрейд» — белорусский производитель пресс-форм и изделий из пластика с опытом более 10 лет на рынках Беларуси и России. Компания выполняет полный цикл: от проектирования 3D-модели и изготовления пресс-формы до серийного литья и доставки готовой продукции. На https://press-forma.by/ доступен бесплатный расчёт стоимости проекта. Площадка в 1000 кв.м. с 24 единицами оборудования позволяет производить до 1,5 млн пластиковых изделий ежемесячно. По сравнению с китайскими поставщиками клиенты получают рост чистой прибыли в 2–3 раза.
они долго кормили завтраками с отправкой, а потом и вовсе закрылись… https://umiu.top Извеняюсь за вышесказанное,магазин отличный..я думаю поторопился с выводами,продовци отзывчиввые идут на встречу,спасибо)) насчет 4фа..меня он действительно почти невставил,но скорее всего это толерантность от 2сi,которая как я узнал недавно длиться неделю..так что в конце недели протестирую повторно,пока крепанусь) потом сообщю)))Давно не читала столько положительных отзывов !так держать )
Visit https://slvpn-cisco.com/ – a practical blog dedicated to VPN technology, secure network connectivity, and the basics of online privacy. We publish clear technical guides on VPN protocols, DNS security, traffic metadata, and everyday privacy practices – without hype or unrealistic claims of anonymity.
Пожалуйста :ok: Спасибо за отзыв. Купить Кокаин, Купить Мефедрон прям не втерпежне мне в пятницу и субботу он отвечал.гворит документы есть что отправленно
Интернет-магазин спортивного питания https://power-mag.ru/ Тюмень – это ведущий магазин спортивного питания. Занимаемся продажей спортивного питания и БАД и предлагаем только проверенные пищевые добавки по низким ценам. Работаем с крупнейшими поставщиками пищевых добавок и спортивного питания, а также доставляем БАДы из США, например те, что есть на маркетплейсе Айхерб. Имеется доставка в любой район города Тюмень и отправка в любой город России почтой, СДЭК и другими транспортными компаниями.
«Био-лазер» — клиника пластической хирургии в Москве с ведущим специалистом Владимиром Высоцким и стажем работы свыше 25 лет. Пациентам доступны маммопластика, блефаропластика, абдоминопластика, лифтинг лица и шеи, отопластика и мастопексия. Ищете клиника пластической хирургии в Москве? Актуальные результаты операций собраны на doctor99.ru в разделе галереи. Регулярное участие в стажировках, профессиональных конгрессах и анатомических курсах позволяет клинике придерживаться актуальных хирургических стандартов. Записаться на первичный приём можно дистанционно через форму на сайте.
Регистрация бизнеса и оформление документов — процедуры, которые отнимают время и требуют точности на каждом шаге. Компания Реготмас оказывает юридические и регистрационные услуги для предпринимателей: открытие ИП и ООО, внесение изменений, ликвидация, получение лицензий. На сайте http://regotmas.ru/ можно оставить заявку и получить консультацию специалиста. Компания работает оперативно и берёт на себя полное сопровождение, освобождая клиента от бюрократической рутины.
Да до празников не всем выслали, сегодня отдали в курьерку очередную пачку посылок, всем все придет скоро. https://kypitextazy.shop Вообщем так, с момента отправки из курьерской службы до рук курьера в нашем городе прошло 3 дня, забрал я значительно позже, но это не суть.Вот так нихуя себе с 2011 года на плаву:strong:, подумаеш какая диковинка 😀
Если вы давно мечтали провести незабываемый вечер на воде в самом сердце столицы, то речные прогулки по Москве-реке — именно то, что вам нужно. Сайт https://ticketscruise.ru/ собрал лучшие рейсы с живой музыкой, DJ-сетами и авторскими шоу-программами, чтобы каждый выход в город становился настоящим событием. Удобное онлайн-бронирование за пару минут, электронный билет с QR-кодом и скидки до 90% на популярные маршруты делают сервис по-настоящему привлекательным. Бар, коктейли и продуманный до мелочей сервис на борту завершают картину идеального московского вечера.
Посетите сайт https://kotel-54.ru/ и вы найдете в наличии на складе, в Новосибирске, готовые и прошедшие заводские испытания котельные мощностью от 80квт до 12 мвт, котлы, горелки, электрические котельные, запасные части для горелок, трубопроводная арматура и другие товары по выгодной стоимости, в том числе с доставкой по регионам России. Наш ассортимент удовлетворит любые потребности покупателя.
как-то перехотелось.. что действительно последний товар не очень? Купить Кокаин, Купить Мефедрон Магазин супер)Делали 1к8 прикуренные, эффект до 3х часов !
Looking for a resource focused on VPN technology, online privacy, and network security basics? Visit https://balavpn.com/ – we publish research-based guides on secure browsing, encryption protocols, DNS protection, and modern tracking risks. Find the most up-to-date and accessible guides! Learn more on our website.
Магазин лутше не встречал!!!! https://haroro.top Море клиентов и процветания !Урал и Chemical продукт знают как сделать грязно
apartment for sale hong kong
Лазерные технологии давно вышли за рамки промышленности и применяются в медицине, рекламе, приборостроении и науке. Компания Laser Development разрабатывает и производит лазерное оборудование под конкретные задачи заказчика. На сайте http://laser-development.ru/ представлены готовые решения и возможности индивидуального проектирования. Инженеры компании сопровождают проект от технического задания до пусконаладки, обеспечивая точность и надёжность каждой системы.
250 дживик заказал? https://jiniandaji.top Я тебе не хамил. Да 10г, смешно не смешно, а на дороге не валяются. И очень обидно когда от вашего ПМа получаешь подтвердение, веришь! и остаешься с разочарованием и обидой, бессилием что либо доказать. А тебе еще сверху льют хамство, упивайтесь на здоровье. Я утерся и теперь знаю на что способны даже нормальные, доверенные магазины. А это тоже опыт, за который я заплатил, и ничуть не жалею. Просто пусть народ знает и будет готов при работе без гаранта ТУТ ожидайте что такое может быть.ты брал вообще не скоростило или как ?
https://2bedroomcondoforsalesingapore.com
Ребята с 11го года магазин работает на отлично, сомнений не у кого не должно быть!!! Купить Кокаин, Купить Мефедрон Понимающий меня поймёт.Не рекомендую правда увлекаться порохами – их хочется ещё и ещё и в итоге не так уж и просто слезть с марафона…) Но это уже ваше дело ; )
apartment for sale hong kong
Если бы ещё доставка не выпала на выходные – ждать пришлось бы ещё меньше, так как курьерская служба по выходным у нас доставку не осуществляет. А сама доставка от пункта А до пункта Б заняла три дня. Купить Кокаин, Купить Мефедрон Лучшее качество на Рынке РК!!! Низкие цены!! И без кидалова! УВАЖЕНИЕ ВАМ РЕБЯТА!!!Народ уже как два часа нет ответов от администратора магазина
РУС-МеДтеХ — проверенный партнёр по поставке медтехники и оборудования непосредственно с заводов. Компания предлагает полное оснащение лечебно-профилактических учреждений: от диагностического и реанимационного оборудования до медицинской мебели и расходных материалов. На платформе https://rus-medteh.ru/ доступны запасные части, медицинская одежда и техника для домашнего использования. Более 37 товарных категорий охватывают потребности больниц, диагностических центров и частных клиентов. Здесь работают с государственными учреждениями и частными клиниками, обеспечивая выгодные цены и профессиональный сервис.
С 1997 года симферопольская компания «Транзит Медиа» задаёт стандарты рекламного производства в Крыму: широкоформатная полноцветная и УФ-печать, брендирование корпоративного транспорта, изготовление баннеров, вывесок и изделий из акрила — всё это выполняется на собственном оборудовании с использованием качественных европейских материалов. Подробный каталог услуг и актуальные цены производителя размещены на https://transitmedia.ru/, где можно сразу оформить заявку. Более 25 лет безупречной работы, гарантия на все изделия и услуги, доставка по Симферополю и городам Крыма — весомые аргументы в пользу надёжного партнёра для вашего бизнеса.
несмотря на отзывы про 203 джив всё таки решился взять 5г здесь, посмотрим на качество Купить Кокаин, Купить Мефедрон terom сказал(а): ^заказывали реагент jv 61, брали 15 гр, с данным продовцом работаю с 11 года, сейчас регу тянул на зону, в целом все хорошо как обычно какачество соответствует заявленному, единственное проблеммы с отправкой возникают но думаю эти проблемы временные, поссылка дошла за два дня после отправки,, затестить сиогли на днях как все зашло, с первой прикурки чесно сказать прихуели думали что опять дживи 100 пришел, но ннет , держало часа по два сначало, на третий день время прихода испало до 4 0мин, вообщем все понравилось в очередной раз, на днях закажем еще
https://2bedroomcondoforsalesingapore.com
ForOne.Manakara — петербургская компания, предлагающая производство и монтаж стеновых панелей из карбонизированного бамбука и гибкого камня для стильных современных интерьеров. Панели изготавливаются по инновационной технологии: бамбук измельчается, проходит карбонизацию, коэкструзию с ПВХ и спайку под температурой 120°C. Ищете стеновые панели? На сайте forone.manakara.ru представлен полный каталог продукции с услугами выезда специалиста и профессионального монтажа. Материал экологически безопасен, подходит для криволинейных поверхностей и не требует особой подготовки стен — идеальное решение для жилых, детских и медицинских помещений.
Доброго времени суток друзья женскую половину человечества с праздником)))) https://hostedralprivatedomain.xyz Спасибо Магазину)вы лучшие))))))))!!!!!!!!!!!!!!!!!!!!! :monetka: Качество на 100%Что ж ты такой нетерпеливый… ))
https://2bedroomcondoforsalesingapore.com
Я в последний раз говорю, эта тема – для отзывов о работе магазина. Если вы не можете связаться с продавцом, то не надо писать об этом по сто раз. Если вы хотите узнать о качестве продукции – вам СЮДА !!! Любой оффтоп\флуд прекращаем ! https://img01.xyz У кого рега сильней чем тут?Заказ получил, спасибо за ракетку 😀 Это был мой первый опыт заказа легала в интернете, и он был положительным! Спасибо магазину chemical-mix.com за это!
https://apartmentforsalehongkong.com
один грамотей натупил тут , а про стафа правда Купить Кокаин, Купить Мефедрон екб есть в представителях, смотрите в представительствахЗаливают паршивым вином.
2 bedroom condo for sale singapore
в трубку после затяга уже чвствуеца https://jiniandaji.top абакан есть?а у нас в квартире газ ….. от ГАЗПРОМ … вы не поверите но это так и есть
Уважаемый ТС, ответь мне в лс или на почту, заказ мой не правильно сделали или описали в письме не правильно, ртветь как можно скорее мефедрон купить, кокаин купить “Подходит время Раздачи”в трубку после затяга уже чвствуеца
Вы не могли сегодня оплатить заказ, потому что мы сегодня не работаем https://aulnay-sur-mauldre.xyz пробы есть?2c-i, 2c-e, 2c-p
https://wiki.gift-boxs.com/profile.php?user=kit-lira-162367&action=view
https://wiki.brushsharp.com/profile.php?user=melva-napier-162308&op=userinfo
Такое бывает у СПСР, у меня то же он не бился, а потом все нормально было, хотя мне ей вчера должны были привезти но не привезли купить мефедрон, бошки, гашиш, альфа-пвп Жду решения регу оплатил. Адрес не получил.Начинает формироваться мнение.
http://alexporn.org/index.php?subaction=userinfo&user=agyfikid
https://wiki.skyflypro.com/profile.php?user=dwayne-mccarthy-162366&op=userinfo
http://wiki.youmanageit.com/better-seo-services-to-drive-your-steel-4191598581778367128/
http://wiki.gemstonic.com/tips-for-choosing-the-outflank-machine-rectify-midway-2021-4189826461778174836/
Менеджер прошу зайдите в скайп, хочу заказ оплатить вас там нет 2 дня уже. Заявку на сате подал жду ответ на эмаил. Спасибо. купить мефедрон, бошки, гашиш, альфа-пвп не мне в пятницу и субботу он отвечал.гворит документы есть что отправленноЗалетные это какие то, представь, на целых 10 грамм кинули, смешно да и только .
Какая то палевная курьерка купить мефедрон, бошки, гашиш, альфа-пвп Первые 1.5 часа эйфория и сосредоточеность на том чем занят , в голове мелькают гениальные идеи)А со скольки у них скайп начинает работать?
В своё время работали по опту! https://mefedronkypit.shop самое норм) я думаю лучше лс нет) а сайт это вы о нас заботетесь) комфорта только себе и клиентам больше) а это GUD!Да до празников не всем выслали, сегодня отдали в курьерку очередную пачку посылок, всем все придет скоро.
Если во время действия паралельно потягивать пивас и почаще двигаться , не сидеть на месте , то довольно нормально прёт , если загоняться то накрывает параноя) , в общем около 8-9 часов прёт , но у меня была ещё и рега , очень лютая которой можно было запросто перебить параною если вдруг возникала от данной скорости , в целом понравилась скорость . https://profit4u.top всегда ровно все было и есть. так что яМагазин работает очень качественно!!!
Ищете настоящие скидки, акции и промокоды в России? Посетите сайт Огонёк https://ogonek.su/ – присоединяйтесь и экономьте! У нас подборка лучших скидок ежедневно. На сайте вы сможете увидеть лучшие скидки дня, а также увидеть все скидки и промокоды магазинов. Удобный поиск по категориям, что позволит быстро найти необходимую скидку! Подробнее на сайте.
KEY я так понял ты сделал заказ узнал сумму которую надо оплатить ,оплатил а когда вернулся сумма стала выше на сотку???? https://rednetargentina.top “Кстати Минеру за описание Минус не указал что второй кооператив”Аккуратнее с магазином, недовес у них неплохой…
ОТЗЫВ О РАБОТЕ МАГАЗИНА купить мефедрон, бошки, гашиш, альфа-пвп напишите в аську, там порешают вашу проблему. С этой партией МХЕ определённо вышел косяк.И еще сушняки ужасные. Сейчас вот утром проснулся, и до сих пор
Пермская веб-студия разрабатывает сайты под ключ по чёткому пятишаговому процессу — от брифинга и переговоров до запуска готового продукта. Ищете заказать сайт стоимость? На design59.ru можно заказать как шаблонное решение так и полностью индивидуальный дизайн с вёрсткой с нуля. Сроки выполнения и итоговая стоимость проекта формируются исходя из утверждённого технического задания. Помимо разработки студия предлагает услуги по сопровождению, администрированию и SEO-продвижению.
Авторская психиатрическая клиника доктора наук Виталия Минутко https://minutkoclinic.com/ основана в 2003 году. Работаем со всеми психическими расстройствами, включая детскую психиатрию: депрессия, ОКР, анорексия, шизофрения, зависимости, анорексия, аутизм, расстройства личности.
Domamir — российский бренд современной сантехники с лаконичным дизайном и актуальными покрытиями для любого интерьера. Ассортимент включает полотенцесушители, смесители и аксессуары — все модели соответствуют актуальным дизайнерским решениям. На https://domamir-group.ru/ размещён удобный каталог с возможностью сравнения моделей по серии и покрытию. Ассортимент охватывает решения для разных стилей и бюджетов — от минималистичных форм до более выразительных конструкций.
выше фишиг! ни переходите по картинке https://meetchi.top заказывали реагент jv 61, брали 15 гр, с данным продовцом работаю с 11 года, сейчас регу тянул на зону, в целом все хорошо как обычно какачество соответствует заявленному, единственное проблеммы с отправкой возникают но думаю эти проблемы временные, поссылка дошла за два дня после отправки,, затестить сиогли на днях как все зашло, с первой прикурки чесно сказать прихуели думали что опять дживи 100 пришел, но ннет , держало часа по два сначало, на третий день время прихода испало до 4 0мин, вообщем все понравилось в очередной раз, на днях закажем ещеА то я запутался совсем, везде по разному пишут.
Besök https://www.ferieisverige.no/ för allt du behöver veta om semestrar i Sverige, inklusive Smultronställen Sverige-ladan och allt om Fjällbacka och Pås til Sverige. Örebro är utan tvekan det bästa stället att koppla av på – ta reda på mer om det, och julemärkt Sverige kommer att lämna ingen oberörd!
Как настроение?) купить мефедрон, бошки, гашиш, альфа-пвп Вы реально думаете что тут сидят роботы, которые должны отвечать всем без перерывов и выходных? Праздники же были, все отдыхать хотят.СПб все ровно процветания магазину. Амф на 5+
https://amberdrive.eu/ensuring-a-smooth-ride-7-reasons-why-choosing-a-reliable-rental-car-company-matters/
https://alanadolu-first-golden.com/2023/08/21/into-the-wild-adventures-in-the-heart-of-nature/
https://alamorenovation.fr/actualite/comment-faire-de-votre-maison-sans-depenser-dargent/
https://akshawholesale.com/product/hydrating-facial-serum/
Данный продукт не зашол в моё сознание:) его нужно бодяжить с более могучим порохом, будем пробовать АМ2233… https://news177.top Редоктирование магазина!Коллектива!Прайс , цена осталась прежняя! скайп оператора:Chemicalrf.mix !!!!Желаю вам удачи в дальнейшей работе)
https://gitlab.com/marketing362
Портал КазиноГид — это независимый информационный ресурс для тех, кто ищет честные обзоры онлайн-казино и выгодные бонусы без лишних рисков. Ресурс публикует проверенные казино с мгновенными выплатами, эксклюзивными промокодами и бездепозитными фриспинами для новичков. Рейтинг формируется по результатам независимого тестирования — только казино с подтверждённой безопасностью и честными условиями. Ищете бездепозитные деньги на счёт при регистрации в казино? Посетите casino-gid.best — актуальные промокоды и топ лучших казино уже ждут вас. Доверяйте только надёжным казино и подходите к игре ответственно.
https://highpixel.com/animal-print/
https://himachaltourspackage.in/5-ways-to-get-your-dream-national-geographic-travel-photo-shot/
https://hillcrowns.com/introducing-this-amazing-tour/
пт всем.скоростя здесь имеются? купить мефедрон, бошки, гашиш, альфа-пвп Списавшись в ЛС с ТСом обговорив условия сделки провел оплату в БТЦ.Всем, как и писалось средняя компенсация 50%
https://pbase.com/septicsolutionsllc
https://printenwinkel.nl/development/the-importance-of-building-a-strong-brand-identity/
https://post24by7.com/hello-world/
https://potzandpanzgourmetcafe.com/hello-world/
Четкого товара! https://extazykypit.shop Москва – Все чётко, поднятие на раз два, все по описанию. Мефедрон белый, без запаха, видно что очищенный. Вес и качество норм!!!! Количество соответствует, за бонус в спасибо ;)через аську связался… дал данные куда сколько отправить, и с киви кошелька оплатил 7700р. на номер который в аське дали
https://www.fundable.com/septic-solutions-llc
https://www.cleanfactorywatch.shop/post-format-gallery-blogs/
https://www.casavacanzabarone.it/ciao-mondo/
https://www.cerrys.it/quia-quos-quos/
всяко подобные магазины нужно стороной обходить.. купить мефедрон, бошки, гашиш, альфа-пвп Член до колен и девок гарем))Вот отзыв за этот эйфор:
https://www.gamespot.com/profile/ravetttbcx/
http://recipekorea.com/shop/bannerhit.php?bn_id=69&url=https://leonidkayum.ru/product/zakryityiy-razdel/>
http://poslanikep.pgmee.com/%d0%be%d1%82%d0%bd%d0%be%d0%b2%d0%be-%d0%b2-%d1%81%d1%82%d1%80%d0%b0%d1%81%d0%b1%d1%83%d1%80%d0%b3/
http://phromalok.com/index.php?mo=14&newsid=331403
мое мнение работает достойно купить мефедрон, бошки, гашиш, альфа-пвп РФ. Западно – европейская её часть )Что хочу сказать закладки всегда по высоте.
А со скольки у них скайп начинает работать? https://meetchi.top Новинки не за горами, без паники.ровный магазин
относительно норм цены купить мефедрон, бошки, гашиш, альфа-пвп Радуете ребята!!!Ровный и Стабильный…
Да трек получил, но я не про это я про задержки, сейчас у них все должно быть ровно https://richange.xyz Удачи. магазин))) Прайс соответствует реальности?отличный магазин! + ему
В двух пакетах купить мефедрон, бошки, гашиш, альфа-пвп Оплатил подождал очередь неделю так как завал у магазина теперь жду посыль респект ребята работаете на высотеМолча !! Запрет вступает в силу 26го числа, если не ошибаюсь. Скидывай всё палево, жёсткий дист зарывай подальше и иди получай ))
Фотометрическая лаборатория «Сила Света» выполняет точные светотехнические измерения и выдаёт официальные протоколы с полной юридической силой. На http://silasveta-lab.ru/ доступна проверка подлинности любого протокола по уникальному коду или QR-коду — это исключает подделки и гарантирует достоверность данных. Все работы ведутся строго по действующим стандартам — лаборатория имеет актуальные свидетельства о поверке используемого оборудования.
Нет не нужен. купить мефедрон, бошки, гашиш, альфа-пвп Брал неоднократно совместки, всё всегда ровно! так держать!черт возьми, вот сейчас оформляю AM2233 и решил заглянуть сюда.
Так может он в городе закладкой брал https://tocador.top Та же фигня.не бзди все будет ровно трек не всегда бьется это касяк курьерки а не отправителя не паникуй
Ищете живой венок? Зайдите на купить-венок.рф — здесь вас ждут доступные цены на траурные венки, живые цветы и ритуальные корзинки. Изучите наш ассортимент: как производители мы предлагаем венки любых форм и размеров, а сам заказ занимает буквально пару кликов. Все детали и условия заказа вы найдёте на нашем сайте.
Отличный магазин маскировка высший балл! купить мефедрон, бошки, гашиш, альфа-пвп Ребят какие могут быть сомнения в этом магазе магаз ровный и заслуживает уважения он в доверенных его реклама на шляпе сайта ну это так для тех кто не знает просто реклама стоит 5000$ доларов!Отличный магазин Chemical-mix
Западный мир огромен, и ориентироваться в его географических, экономических и демографических данных без надёжного источника крайне сложно. West Atlas — это аналитический атлас западных стран с удобной навигацией и актуальными данными в разрезе регионов. На сайте https://west-atlas.com/ информация представлена в виде карт и структурированных показателей, удобных для исследователей, аналитиков и всех, кто работает с международными рынками. Инструмент экономит часы поиска и даёт точную картину сразу.
Камин в доме — это не просто источник тепла, а центр притяжения всей семьи в холодные вечера. Компания Kaminru занимается продажей, проектированием и монтажом каминов и печей ведущих европейских и отечественных производителей. На сайте https://kaminru.ru/ представлен широкий каталог готовых решений: от классических дровяных моделей до современных биокаминов. Специалисты компании помогут подобрать оборудование под конкретный интерьер и технические параметры помещения, обеспечив безопасный и качественный монтаж.
Трайбл — один из древнейших стилей татуировки, уходящий корнями в культуры Полинезии, Борнео и Маори, где каждый узор нёс сакральный смысл и рассказывал историю владельца. Сегодня этот стиль переживает настоящий ренессанс, а профессиональные мастера студии http://www.tribal-tattoo.ru/ воплощают его лучшие традиции в современных работах, создавая татуировки, которые остаются актуальными десятилетиями. Геометрическая строгость линий, глубокий чёрный цвет и ритмичные орнаменты делают трайбл одним из самых выразительных направлений в тату-искусстве — идеальный выбор для тех, кто ценит силу, эстетику и смысл в каждом штрихе.
Máquina tragamonedas Garage: una guía para jugar gratis en línea en https://tragamonedasgarage.com/ – prueba la tragamonedas en modo demo, entiende cómo funcionan los rodillos y descubre dónde jugar con dinero real, ¡además de obtener bonos de registro! En el sitio web, encontrarás una guía de Garage que te ayudará a ganar más.
https://eventyrligzoneterapi.dk/basic-yoga-techniques-for-beginners/
JetronSport — производитель футбольной формы для команд любого уровня: от детских секций до взрослых клубов. Форма изготавливается из премиальных дышащих тканей с высокой терморегуляцией и эластичностью, соответствует ГОСТам и имеет гарантию на цвета и нанесения. Минимальный заказ — одна единица, срок производства составляет от одного до трёх дней. На https://jetronsport.ru/ представлены модели взрослой, детской и вратарской формы с нанесением номеров и фамилий. Коллекции Jetron Space, Star и Winner сочетают усиленные конструктивные элементы, светоотражающие вставки и Quick-Dry материал для подлинного спортивного комфорта.
Беларусь живёт насыщенной жизнью, и следить за её пульсом помогает надёжный новостной агрегатор, где информация всегда актуальна и доступна. Портал https://news.com.by/ аккумулирует свежие новости из открытых источников, охватывая события страны, региона и мира в удобном формате. Здесь можно быстро узнать главное без лишнего шума: лаконичная подача, интуитивная навигация и регулярные обновления делают сайт незаменимым инструментом для тех, кто ценит своё время. Читайте новости в картинках, следите за календарём событий и оставайтесь в курсе всего важного вместе с командой редакции.
https://rrnnliberia.com/agriculture-ministry-delegation-tours-samjebo-farm-commends-local-production-in-grand-kru/
https://ke.betipawa.com/zeppelin-casino-game-drop-bonus-free/
Посетите сайт https://www.tyumen-bat.ru/ и вы найдете тяговые батареи Тюменского аккумуляторного завода для вилочных погрузчиков и штабелеров в наличии, как для отечественной, так и для импортной складской техники. Посмотрите ассортимент на сайте с доступными ценами! При необходимости получите коммерческое предложение или консультацию.
https://holistische-massagen-berlin.de/sweat-it-out-how-physical-exercise-boosts-your-well-being-2/
https://catatanmurid.org/?page_id=8
Обновить фасад дома надёжно и красиво теперь проще, чем кажется: магазин https://tsnab.su/ предлагает широкий ассортимент винилового сайдинга от ведущих производителей — Grand Line, Docke, FineBer, Technonicol и других проверенных брендов. Цены начинаются от 199 рублей за панель, а покупателям доступна рассрочка под 0%. Компания работает с более чем 15 000 клиентами по всей России, гарантирует качество материалов сроком до 50 лет и предлагает монтаж фасада под ключ с доставкой в любой регион страны.
MoscowWaterWays — удобный сервис для организации речных прогулок по Москве с отправлением от главных городских причалов. Маршруты охватывают отправление от Китай-города, Воробьёвых гор, Парка Горького, Москвы-Сити и прочих популярных локаций столицы. Ищете откуда отходят теплоходы в центре москвы? На платформе moscowwaterways.ru можно выбрать маршрут и оплатить билеты онлайн — они придут на электронную почту. В расписании предусмотрены специальные рейсы на 9 Мая, День города, выпускные вечера и новогодние праздники. Все причалы находятся в шаговой доступности от станций метро и МЦК, что делает посадку быстрой и комфортной.
«Делай Промо» — комплексная SaaS-платформа, которая даёт брендам и агентствам возможность самостоятельно запускать чековые акции, программы лояльности и системы мотивации продавцов. Бренды и агентства получают конструктор лендингов, OCR-распознавание чеков, мультиканальные чат-боты для Telegram и VK, кодовые механики с защитой от брутфорса и сквозную аналитику с выгрузкой в Excel — всё в едином окне. На http://makerpromo.ru/ уже зарегистрировано свыше 24 000 чеков и 18 000 активных пользователей. Платформа работает на условиях закрытого бета-тестирования со специальными тарифами.
Интернет-реклама без чёткой стратегии — это деньги на ветер, и это знает каждый предприниматель, который хоть раз сливал бюджет впустую. Агентство Farnedo предлагает системный подход: от разработки продающих сайтов и лендингов до настройки контекстной рекламы и SMM. На https://farnedo.ru/ можно оставить заявку и получить реальный аудит текущей рекламы. Команда работает с бизнесом любого масштаба и берётся за результат, а не просто за процесс.
бред, откуда инфа такия про 80%? купить мефедрон, бошки, гашиш, альфа-пвп не вижу, в прайсе много чегоЗакупались у данного магазина 100г реги, в подарок получили 15г скорос!1 клад надежный
классный магазин, была впечатлянна скоростью доставки и качествомтовара)) всем пис https://rpgame.xyz Ура! Скинул трек быстро) ждууууууу, отпишу.ну если ты регу получил! сделай опробуй! и отпиши прет тебя или нет!
13 янв. в 21:12 Деньги пришли. Заказ будет выслан в ближайшие несколько рабочих дней. Суббота и воскресенье — выходные. После отправки трек (номер накладной) будет в комментарии к заказу на сайте и продублируется на электронную почту. купить мефедрон, бошки, гашиш, альфа-пвп Подскажите пожалуйста товары указаные в прайсе все в наличии или нет?Вот получил вчера 2 -й заказ…..отсылают быстро, качество отличное, плюс девайсы в которые всё ныколось в виде приятного бонуса…
МАГАЗИНУ надо бы по ровнее работать! купить мефедрон, бошки, гашиш, альфа-пвп Все верно, до сих пор разгребаем )1 день
тусишка хороша, я как го грешил что нирвановская была какая то тёмная, так вот у чемикала она вообще практически бежевая 😀 качество порадовало, хорошая вещь ) купить мефедрон, бошки, гашиш, альфа-пвп Процветания вашему магазину!!!Магазин нормальный, качество на уровне, короче заказывай и не парься я тут брал уже раза 3 и всегда всё на уровне:good:. А ник его Фокс произносится, что в переводе с английского означает лиса, лис..
Как только появится обьявим на форуме https://happykenko.xyz брал тут туси совсем недавно.все устроило.спасибо.жду обработки второго заказа)Полностью согласен !!!
да не сцы, бывает у него такое )) магаз работает ровно, но вот с розницей у них напряг, изначально то ориентированы на опт, и просто рук не всех теперь на хватает. позже ответит. https://kokainkypit.shop пиши в скайп, все работает, мне всегда отправляют, все на уровнехотели бы услышать отзывы о Ск муке
Want your child to understand general math concepts easily and naturally? Visit https://mayateacher.com/ and explore our guides, designed for parents who want clearer homework support, calmer language, and practical ways to help their child make progress at home. We offer helpful math content for home practice, family routines, and teacher support.
магаз ровный,всем советую!! https://jamstand.xyz Chemical-mix.com, а где от 50гр, там надо 40 тон сразу запулить:rastakur: яж не барон нах:LSD:и уже сегодня за клевету, троллинг и проч. наш друг нас покинул
Забизаю дамой хвотаю тожнецы взрываю посылку там рубашка. Примерно на ребенка 7 летнего (я надеился книга будит) но ладно и рубашка сойдет на тряпки вмашину ! Разворачиваю рубаху а там пакетик реги я быстрей за весами и за фотиком и писать ВАМ МОИ ДРУЗЬЯ!!! купить мефедрон, бошки, гашиш, альфа-пвп Ребят, магазин ровнее ровного. Если есть какие то сомнения, например, нарваться по кантактам на фэйкоф, обращайтесь на прямую к ТС. Написать ЛС 100% все будет исполнено в лучшем виде. Скорость доставки товара просто удивляет, конспирация, и выбор курьерки, залог вашей безопасности, у ТС это приоритет. Все на высшем уровни. Реагент качественный, минимум побочек максимум пазитива. Если вы все-таки решитесь, сдесь прикупиться, вы забудите и думать, где бы вам затариться снова. Не проходите мимо. То, что вам надо, тут.на мыло отвечаем только по существу, много не по делу пишут, ася или скайп быстрей
Прибыльных вам выходных!:monetka: https://megaryan.top хуй ты отпишешь! наркоман проклятыйгде вообще оператор или кто ни будь? бабло уплочено и жду доставку а на связи ни кого нету!!!!!!!!!!
Анапа — один из самых популярных курортов Черноморского побережья, и добраться до него с комфортом теперь проще, чем когда-либо. Сервис https://anapa-taxi-transfer.ru/ предлагает профессиональные услуги такси и трансфера с удобным онлайн-калькулятором стоимости поездки прямо на сайте. Официально зарегистрированная компания работает круглосуточно, обслуживает все основные маршруты и располагает собственным автопарком. Опытные водители встретят вас в аэропорту или на вокзале, а прозрачное ценообразование избавит от неприятных сюрпризов. Путешествуйте с удовольствием!
Когда речь идёт о покупке автомобиля из Японии, Кореи или Китая, выбор партнёра решает всё. Ищете аукцион китайских машин ? Компания starmotors.biz за годы работы доставила более 17 000 автомобилей по всей России и сегодня держит свыше 600 машин в наличии на рынке во Владивостоке. Офисы и стоянки работают во Владивостоке, Москве и Санкт-Петербурге, а доставка охватывает любой регион страны.
Аренда сервера для бизнеса требует надёжного провайдера с круглосуточной поддержкой и стабильной работой. Netrack выдаёт сервер в аренду с аптаймом 99,9% и держит оборудование в собственном дата-центре класса Tier III. Требуется сервер в аренду? На сайте https://netrack.ru/ можно выбрать конфигурацию под любые задачи — от стартапа до крупного корпоративного проекта. Клиент получает выделенные ресурсы без соседей по железу и профессиональное техническое сопровождение на всех этапах работы.
ребятки так жержать!) уровень достойный купить мефедрон, бошки, гашиш, альфа-пвп “Приезжаю к месту,вижу дом обхожу кооператив который мне нужен (ну я так думал)”хороший магазин,всё на красоте и качество и кол-во:) продолжайте в том же духе
«Свадьба 812» — петербургское агентство полного цикла: выездная регистрация, декор, фейерверки и живая музыка в одном пакете. Опытная команда ведёт свадьбы, корпоративные мероприятия, юбилеи и выпускные вечера. Ищете организация новогодних праздников? На svadba-812.ru собраны готовые проекты и полный каталог услуг с ценами. Рестораны, фотографы, видеооператоры и артисты — агентство формирует полную команду специалистов и избавляет клиента от самостоятельного поиска подрядчиков.
Отзыв о продукте дам в определённой теме Спасибо за вашу хорошую работу Chemical-mix.com? купить мефедрон, бошки, гашиш, альфа-пвп надо просто на мож-химовском ацике растворять любой jwh растворяетсяоп оп давай что за эфо дис
Посетите сайт https://www.tyumen-bat.ru/ и вы найдете тяговые батареи Тюменского аккумуляторного завода для вилочных погрузчиков и штабелеров в наличии, как для отечественной, так и для импортной складской техники. Посмотрите ассортимент на сайте с доступными ценами! При необходимости получите коммерческое предложение или консультацию.
Адрес почты правильный, все проверил не 1 раз, ответьте хоть тут.ну будем надееться что и на этот раз TS войдет в положение и как нибудь обратит внимание на решение наших вопросов, компенсирует нам потраченые нервы и время на безсмысленное ожидание, главное ведь для магазина репутация! https://solocenter.xyz через аську связался… дал данные куда сколько отправить, и с киви кошелька оплатил 7700р. на номер который в аське далиПлюсы: качество супер, цена отличная, вес по госту
Тьфу-тьфу-тьфу… =( https://jamstand.xyz Как-то развёл 2c-i на кубы воды и выбрал в выборку для точности дозировки.Так один кролятина вляпался в/в.Позавидовать ему трудно было,это точно.Но в конце когда оклемался,даже прикололся.тоже самое взял ам в данном магазе чтоб не было сплетен тож отпишу за качество думаю мнение от 2 разных людей будет достаточно что бы не было вопросов :speak:
Это юмор. купить мефедрон, бошки, гашиш, альфа-пвп Обратите внимание на дату регистрации топик стартера и на регистрацию всех довольных пользователей.Данный продукт не зашол в моё сознание:) его нужно бодяжить с более могучим порохом, будем пробовать АМ2233…
Домашнее задание за вечер — знакомая головная боль для миллионов школьников и их родителей. Портал «Как быстро» собрал практичные советы, которые реально работают: правильная организация рабочего места, метод помидора для концентрации, приоритизация задач по сложности. По ссылке https://kakbistro.ru/luchshee/kak-bystro-sdelat-domashnee-zadanie.html можно прочитать подробный разбор каждой техники. Применяя эти подходы системно, ребёнок тратит на уроки в два раза меньше времени и успевает отдохнуть.
Покупка и продажа недвижимости в Ставропольском крае требует надёжного партнёра, который знает местный рынок изнутри. Агентство Arust под руководством Алексея сопровождает сделки под ключ: от подбора объекта до подписания документов. На сайте https://ar26.ru/ можно ознакомиться с актуальными предложениями и оставить заявку. Клиенты особо отмечают скорость оформления и личный подход — всё готово к приезду, без лишних ожиданий и бюрократических задержек.
21го числа оплатил заказ. ждем 🙂 на складе чел заболел пока что . ждем пока выздоровит купить мефедрон, бошки, гашиш, альфа-пвп я думаю разберемся точноС возвращением бразы! удачной работы вам и процветания
что-то отзывы с критикой сплошные( хотел 307 взять..а тут такое.. https://solocenter.xyz Во телегу двинул, а? Ещё спать не ложился, такой эффект сильный, толеоа нет вообще, в завязке полгода :)посыль получили, спасибо!
Pragmatichub https://pragmatic-promo.com/ is a premier hub for Pragmatic Play slots enthusiasts. Explore detailed reviews of top titles like Gates of Olympus, Sweet Bonanza, and Big Bass Bonanza. We provide free demo gameplay, RTP data, and volatility analysis to help users understand every mechanic. Our platform ensures secure access via verified mirrors and certified partners. Find the best online gaming sites and reliable info for a safe experience with Pragmatic Play’s world-class casino software.
По многочисленным восторженным откликам мн-001, тестировал его и был немного огорчен. https://jamstand.xyz слушай, а тебе продавец обязан объяснять что и ко скольки бодяжить ?Заказала JV 61, жду трек, заранее благодарю. В прошлый раз заказ шёл 6 дней, но и я на краю географии)))))) отпишитп за дживик кто недавно заказывал.
Listo para jugar a las tragamonedas online? Visita https://juegosdetragamonedas.me/ donde podrás recibir bonos de bienvenida increíbles al registrarte y jugar a los mejores juegos en casinos con licencia. ¡Puedes probar las tragamonedas en modo demo, jugar con dinero real o simplemente empezar con bonos que te sorprenderán gratamente!
Ребята решили вопрос.. Вместо 307 выслали компинсацию в виде 1220. Давно не курил такие миксы, живы отдыхают, концентрацию 1к20 делал. купить мефедрон, бошки, гашиш, альфа-пвп Ждём вас сноваочень сложно дописаться до них=( а цены хорошие.
ребятки так жержать!) уровень достойный https://storytelling.top medved20-10 не еби людям голову!!!!!!!!!!! микс отличный, но на час-1,5! Не больше……Заглянул на сайт . Очень даже приятно удивлён увиденным . Сохранил в закладках (полезный сайт!)
https://write.as/rq33eln6k9n3h.md
https://www.codementor.io/@salzmann2z
https://allmylinks.com/blumengrussf
https://wefunder.com/blumengruss1/about
https://id.kaywa.com/salzmann2z
привет что случилось вы работаете не могу второй день в личку отписаться ,сколько заказывал всё было супер ,как к тебе попасть теперь ,что делать ,отпишитесь … https://lisasonrisa.xyz А вообще, читай раздел рецепты, там все очень подробно расписано, в нескольких темах причемБрал у другого магазина – полная Чляпа оказалась…
РОВЫНЫЙ МАГАЗ РОВНЫЙ ТС РОВНАЯ ВЕТКА И РОВНЫЕ КЛИЕНТЫ МИР ВАМ ВСЕМ !!!!!! https://profit4u.top жасти моё уважение к тебе и респект красавица. но ес честно ты нашла чет не то что было совсем другое как сказал уже уважаемый дельфин там было много сути и честных отзывов :monetka: ну лан проехали если так вроде все все поняли.Спасибо. Все по плану получилось. Получил в лучшем виде)
Криминальный триллер Netflix «Охотник за разумом» рассказывает о том, как агенты ФБР Холден Форд и Билл Тенч в конце 1970-х приступили к изучению психологии серийных убийц, заложив фундамент поведенческого профайлинга. Ищете охотник за разумом смотреть онлайн сериал охотник за разумом? Все 19 серий двух сезонов доступны бесплатно на ohotnik-za-razumom-smotret.net с профессиональной озвучкой LostFilm и SDI Media. Сдержанная режиссура Дэвида Финчера, безупречная атмосфера эпохи и психологически напряжённые диалоги с реальными маньяками делают каждую серию захватывающим погружением в рождение криминальной науки — обязательный просмотр для всех ценителей умного детективного кино.
Спасибо огромное вам многим за понимание. купить мефедрон, бошки, гашиш, альфа-пвп Я не знаю где ты нашол этот контакт, но как выяснилось сегодня меня кинул фейк. вообщем пришла россылка в джаббере и точно такой же контакт как у продавца Чема, но вот только у него походу “с” латинская. Он мне и подтведится сам предложил.Да и вообще:
Компания wall.glass специализируется на проектировании и монтаже стеклянных перегородок, офисных дверей и противопожарных конструкций для коммерческих объектов. В ассортименте — полный набор решений: цельностеклянные двери, офисные конструкции, войлочные панели и отделочный пластик CPL/HPL. Ищете стеклянные перегородки для офиса под ключ? На сайте wall.glass доступны BIM-каталог технические чертежи DWG и RAL-инструменты для точного подбора решений. Конструкции имеют все необходимые сертификаты, компания удостоена профессиональных наград и предлагает понятные условия заказа и доставки.
Looking for luxury travel guides, local tips, and everything you need for an unforgettable visit to Dubai? Visit https://gildeddunes.com/ for detailed articles to help you plan the perfect trip to Dubai, from transportation and attractions to hotels and dining. Learn more on the website.
Всем добра! Вчера позвонил курьер, сказал, что посылка в городе! Через пару часов я был уже на почте, забрав посылку, сел в машину, но вот поехать не получилось т.к. был задержан сотрудниками МИЛИЦИИ!!!! Четыре часа в отделении и пошёл домой!!! Экспертиза показала, что запрета нет, но сам факт приёмки очень напряг!!! Участились случаи приёмки на данной почте!!!!! Продаванам СПАСИБО и РЕСПЕКТ за чистоту реактивов!!! Покупатели держите ухо востро!!!!!!!!!! Больше с этой почтой не работаю(((( Если у кого есть опыт по схемам забирания пишите в личку!!! https://felixspeller.xyz Пиздец до сих пор мозги ебут(с чего ты взял что мы соду “пропидаливаем”?, если есть какая то проблема давай решать, про “шапку” вы все горазды писать в интернете…
Современная медицина требует надёжного оснащения, и компания РУС-МеДтеХ давно стала проверенным партнёром для больниц, клиник и лабораторий по всей России. На сайте https://rus-medteh.ru/ представлен широкий каталог сертифицированного медицинского оборудования — от профессиональных микроскопов OPTIKA и видеокольпоскопов до специализированного расходного материала ведущих мировых производителей, включая B. Braun Melsungen. Каждый товар сопровождается полным пакетом документов и лицензий, что особенно важно для медицинских учреждений. Клиенты компании отмечают оперативную доставку и высокий уровень сервиса — и это не случайно.
Желаю вам удачи в дальнейшей работе) купить мефедрон, бошки, гашиш, альфа-пвп У данного сллера только легал. Все проверено.У меня настоящий 96 процентный спирт с больницы. Всё растворилось. Чу чуть паровой бани.
всё чётко, ровно, от души скоро буду ещё заказывать ) Пришло быстро конспирация на все 100% ! https://richange.xyz чувак сделай 2к15 самый раз для меня))возможно мои письма рубятся где-то? там все четко по делу.
Буду делать am 2233 + rcs4. Основа: Дурман(молотый) 5г, Латук дикий 10 г, Лобелия вздутая 5 г. Как дойдет с меня трип-репорт купить мефедрон, бошки, гашиш, альфа-пвп Ну как видишь соответсвует …а он мне очень нужен как никогда
Надёжная резина — основа безопасности и экономии в коммерческих перевозках. Компания КАМАСПЕЦШИНА предлагает широкий ассортимент грузовых шин для Газелей и другой техники: Кама Евро 131, Вл-54, Баргузин Cargo S и другие модели на любой сезон и бюджет. На сайте https://baza211.ru/ вы найдёте актуальные цены — например, легендарная Вл-54 Voltyre доступна всего от 3800 рублей. Менеджеры работают с понедельника по пятницу, а офис расположен в Москве на 1-м Люберецком проезде.
Современный бизнес требует надёжных логистических решений, и здесь на первый план выходит сервис https://gruz247.ru/ — профессиональная транспортная компания, которая берёт на себя полный цикл грузоперевозок. От сборных отправок до экспресс-доставки за один день, от разовых заявок до регулярных рейсов по фиксированному расписанию — спектр услуг охватывает любые потребности бизнеса и частных клиентов. Гибкая тарификация, оплата только за реальный объём груза и круглосуточная поддержка делают сотрудничество максимально выгодным и комфортным. Клиенты компании неизменно отмечают пунктуальность, профессионализм команды и прозрачное отслеживание каждой партии на всех этапах маршрута.
Отличный магазин купить мефедрон, бошки, гашиш, альфа-пвп Качество вышка, доставка до вашего города обговаривается индивидуально с ТС!Самый крутой магазин!
Просьба не флудить. И уж тем более не развивать больные фантазии. купить мефедрон, бошки, гашиш, альфа-пвп Уже заказывал и получил chm-100 и chm-400 всё ровно)Торчал дома 2 дня,ждя,пока придёт этот курьер. Решил написать,чтоб кинули трек-надоело мне быть в ожидании. Оказалось,что:
НЕТ не пришла, но это у СПСР экспресс вообще какая то лажа, раньше все привозили вовремя, а теперь вообще какую то чепуху сочиняют, звонил говорят не знаем почему посылку курьер не взял… купить мефедрон, бошки, гашиш, альфа-пвп пацаны качество 250 на высоте советую 1к10-12 норм ваще прет 50-час ваще жестко , селеру респект ваще, спср тока чертитут мы, СПСР чет лажает, медленно заказы регистрирует в базу
спасибо Вам за отзыв! https://kugurichair.xyz Ты договорись с курьером о встрече где нибудь, и пропали окружающую обстановку, чтоб рядом небыло не кого подозрительного. Больше не знаю что тебе посоветоватьВсем доброго времени суток. Вопрос такой – Ко скольки лучше делать МН и как быстро растет толер???
Да мне 5 сообщений для лс нужно :Dа так месяц назад было все ровно) купить мефедрон, бошки, гашиш, альфа-пвп Во-во МАГАЗИН! Обозначил цену, так по ней и продавай! На мыло упало – Цена заказа -4250 и .. А потом начались догонялки…. Магазины так не поступают, а поступают именно БАРЫГИ, как точно выразился РОГАТЫЙ ОБИТАТЕЛЬ данной веткиЗаказал , получил трэк , ждем)
везде негатив только пишите про нас, а не заказывали ничего при этом. Может уже достаточно, ложку дегтя вы свою добавили, успокойтесь. Люди пишут не по бонусам, это покупатели https://randastore.top П-т!! Пишу свой отчерк.и Антошке пару точек,
Компания «Хронос» выпускает и поставляет сертифицированную медицинскую продукцию собственного изготовления: голосообразующие аппараты, бактерицидные рециркуляторы, облучатели против кожных заболеваний, трахеостомические трубки и ультрафиолетовые лампы. Ищете медтехника оптом? На сайте agsvv.ru доступны оптовые и розничные поставки напрямую с завода ЛЭМЗ в Санкт-Петербурге с официальной гарантией качества и доставкой по всей России. с подтверждённым качеством и логистикой до любого региона Российской Федерации.
Просьба не тяните, ответьте срочно!!!!! купить мефедрон, бошки, гашиш, альфа-пвп Данный Магаз Меня Кинул!!!!пиши в скайп, все работает, мне всегда отправляют, все на уровне
а какие были проблемы по данном поводу? купить мефедрон, бошки, гашиш, альфа-пвп Давай номер заказа, не обоснованные заявления, в личку пришло сообщения что ты разводила….А почему сам с-м.сом сюда какой день не кажеться…?
PhotoVoid — обработка фото без загрузки
Сжимайте, конвертируйте и очищайте изображения прямо в браузере. Файлы не уходят на сервер и остаются на вашем устройстве.
photo privacy tool
Петербургская компания ForOne.Manakara занимается поставкой и установкой инновационных стеновых панелей из коэкструзионного бамбука и гибкого камня для отделки современных пространств. В основе технологии — измельчённый бамбук, прошедший карбонизацию и коэкструзию с ПВХ, с последующей спайкой при 120°C. Ищете бамбуковые панели для стен купить в спб? На сайте forone.manakara.ru представлен полный каталог продукции с услугами выезда специалиста и профессионального монтажа. Экологически чистый материал без вредных соединений монтируется на любые поверхности без подготовки — оптимальный выбор для квартир, детских учреждений и медицинских центров.
Если в разработке, то да.А так лишний раз лучше предостречься))) https://l-ink.top разобрался, поэтому и удалил сообщение до того как ты ответил )кто не чувствует лица,
Удалите метаданные с фото безопасно
PhotoVoid помогает убрать EXIF, геолокацию и скрытые данные из изображений. Всё работает локально в браузере, без передачи файлов.
удалить геолокацию с фото
Спасибо за внесение ястности. купить мефедрон, бошки, гашиш, альфа-пвп Приветствую. Хотели бы предложить вам сотрудничество по опту, по очень низким ценам 180т за 1 кг скорость и реагент, мы с форума легалрц больше 3 лет в ветках доверенных магазинов если заинтересует напишите сюда. , делаем кладом , вот ссылка на нашу ветку //legalrc.com/forums/mix/ контакты можете сверить из подписиКонтакты указаны у меня в подписе и в разделе “Наши Контакты”
Удалите метаданные с фото безопасно
PhotoVoid помогает убрать EXIF, геолокацию и скрытые данные из изображений. Всё работает локально в браузере, без передачи файлов.
удалить скрытые данные изображения
один грамотей натупил тут , а про стафа правда купить мефедрон, бошки, гашиш, альфа-пвп а чё заказал? Прикольный сайт, ассортимент радует :)?Хотел бы у вас спросить за безофуран(6-apb)…в частности про его качество…А так же про тусишку)))
PhotoVoid — фото остаются у вас
Обрабатывайте изображения прямо в браузере. Без загрузки на сервер, без регистрации, без телеметрии.
photovoid image tools
PhotoVoid — обработка фото без загрузки
Сжимайте, конвертируйте и очищайте изображения прямо в браузере. Файлы не уходят на сервер и остаются на вашем устройстве.
photo privacy tool
Ну давайте не мандражировать, плохие мысли материализуются, я специально это не написал!!!! Что тут в карму никто не верит? 🙂 Забыли уже? 😉 https://l-ink.top подвела доставка, заказал 2-го получил 16-гоБрал первый раз дживик качество вроде норм))))Еще хотел совет попросить как из 250 самый норм микс сделать?Помогите плиз.
Удалите метаданные с фото безопасно
PhotoVoid помогает убрать EXIF, геолокацию и скрытые данные из изображений. Всё работает локально в браузере, без передачи файлов.
удалить exif
Фото для публикации — без лишних данных
Перед отправкой или публикацией очистите изображение от скрытых данных. PhotoVoid работает без аккаунта, трекеров и загрузки файлов.
безопасно отправить фото
Достойны уважения! https://derailer.xyz Заказывал 307, прислали 203. Сразу объяснил, менеджер в скайпе всё понял. Сказал Бро не переживай будет тебе бонус.Урб 597 либо перорально либо нозально, дозировка – 5-10мг, эффекты описаны в энциклопедии,
Металлические детали с фирменной символикой — это не просто декор, а мощный инструмент брендинга. Компания Инпекмет специализируется на литье значков и бирок из сплава ЦАМ (Zamak) — прочного, коррозиестойкого и экологически безопасного материала. На сайте https://inpekmet.ru/ можно рассчитать тираж и оформить заказ от одного экземпляра. Изделия отличаются высокой детализацией, а финишная обработка включает полировку, покраску, чернение и лакирование. Производство работает быстро и гибко — от одного дня.
Магазин просто супер!!!так держать))))***** купить мефедрон, бошки, гашиш, альфа-пвп Магазин ровный! Я заказал 1000ф, оплатил ЯД, оператора попросил отправить посыль на следующий день , без задержки т.к. сроки получения очень поджимают. На что оператор адекватно ответил что все сделают.На следующий вечер получил трек, посылочка собранна и вот вот выезжает))) если уже не выехала) Магазину как и его администрации – от души за оперативность и отношение к клиенту.заказывал на днях 1 г. МН-001. пришло помоему в течении 5 дней.
Удалите метаданные с фото безопасно
PhotoVoid помогает убрать EXIF, геолокацию и скрытые данные из изображений. Всё работает локально в браузере, без передачи файлов.
убрать exif онлайн
PhotoVoid — обработка фото без загрузки
Сжимайте, конвертируйте и очищайте изображения прямо в браузере. Файлы не уходят на сервер и остаются на вашем устройстве.
сжатие фото в браузере
PhotoVoid — фото остаются у вас
Обрабатывайте изображения прямо в браузере. Без загрузки на сервер, без регистрации, без телеметрии.
local image processing
Автомобильные аксессуары и детали — рынок, где важно не ошибиться с выбором поставщика. APVshop — специализированный интернет-магазин, ориентированный на владельцев минивэнов и коммерческих автомобилей. На сайте https://apvshop.ru/ представлен тщательно подобранный ассортимент товаров: накладки, молдинги, защитные элементы и многое другое. Магазин работает с проверенными производителями и гарантирует соответствие деталей заявленным характеристикам, что особенно важно при покупке без возможности примерки вживую.
Удалите метаданные с фото безопасно
PhotoVoid помогает убрать EXIF, геолокацию и скрытые данные из изображений. Всё работает локально в браузере, без передачи файлов.
удалить информацию о фото
Работаем с данным магазином! всем советую! купить мефедрон, бошки, гашиш, альфа-пвп Привет всем Тсу движекПарни у кого нибудь задерживали посылку в СПСР?Уже неделю как приняли и все не отправят и планируемая дата отправки прошла,а реальную так и не поставили.Позвонил в офис говорят готово к отправке,а че не отправляют они не знают.Сказали позвонить когда менеджеры придут на работу.У кого нибудь такое было?Может это фигня какая то и лучше не идти за посылкой?Как думаете?Раньше просто такого не было максимум 5 дней с даты приема до моих рук проходило,с любого магазина.
Фото для публикации — без лишних данных
Перед отправкой или публикацией очистите изображение от скрытых данных. PhotoVoid работает без аккаунта, трекеров и загрузки файлов.
очистка фото онлайн
Удалите метаданные с фото безопасно
PhotoVoid помогает убрать EXIF, геолокацию и скрытые данные из изображений. Всё работает локально в браузере, без передачи файлов.
очистка метаданных jpg
PhotoVoid — обработка фото без загрузки
Сжимайте, конвертируйте и очищайте изображения прямо в браузере. Файлы не уходят на сервер и остаются на вашем устройстве.
сжатие фото в браузере
Свобода в интернете — это не роскошь, а необходимость, и сервис Vless.art делает её доступной каждому. Здесь можно приобрести ключ на VLESS VPN с протоколом XTLS-Reality — одним из самых современных и надёжных решений для защиты трафика. Сервис не ведёт логов, поддерживает неограниченное количество устройств и обеспечивает высокую скорость соединения. Зайдите на https://vless.art/ и уже через минуту после оплаты вы получите полный доступ к анонимному интернету без каких-либо ограничений. Простой интерфейс позволяет подключиться даже без технических знаний — быстро, удобно и по-настоящему выгодно.
PhotoVoid — обработка фото без загрузки
Сжимайте, конвертируйте и очищайте изображения прямо в браузере. Файлы не уходят на сервер и остаются на вашем устройстве.
обработка изображений в браузере
PhotoVoid — фото остаются у вас
Обрабатывайте изображения прямо в браузере. Без загрузки на сервер, без регистрации, без телеметрии.
photovoid image tools
Тьфу-тьфу-тьфу… =( купить мефедрон, бошки, гашиш, альфа-пвп Парни у кого нибудь задерживали посылку в СПСР?Уже неделю как приняли и все не отправят и планируемая дата отправки прошла,а реальную так и не поставили.Позвонил в офис говорят готово к отправке,а че не отправляют они не знают.Сказали позвонить когда менеджеры придут на работу.У кого нибудь такое было?Может это фигня какая то и лучше не идти за посылкой?Как думаете?Раньше просто такого не было максимум 5 дней с даты приема до моих рук проходило,с любого магазина.А я так понимаю, что у данного магазина просто не мало оптовых покупателей, и им уделяется больше внимания.
PhotoVoid — обработка фото без загрузки
Сжимайте, конвертируйте и очищайте изображения прямо в браузере. Файлы не уходят на сервер и остаются на вашем устройстве.
очистка exif
PhotoVoid — обработка фото без загрузки
Сжимайте, конвертируйте и очищайте изображения прямо в браузере. Файлы не уходят на сервер и остаются на вашем устройстве.
онлайн инструменты для фото
PhotoVoid — фото остаются у вас
Обрабатывайте изображения прямо в браузере. Без загрузки на сервер, без регистрации, без телеметрии.
no telemetry photo tools
Фото для публикации — без лишних данных
Перед отправкой или публикацией очистите изображение от скрытых данных. PhotoVoid работает без аккаунта, трекеров и загрузки файлов.
приватный сервис для фото
Фото для публикации — без лишних данных
Перед отправкой или публикацией очистите изображение от скрытых данных. PhotoVoid работает без аккаунта, трекеров и загрузки файлов.
безопасно отправить фото
PhotoVoid — обработка фото без загрузки
Сжимайте, конвертируйте и очищайте изображения прямо в браузере. Файлы не уходят на сервер и остаются на вашем устройстве.
очистить метаданные фото
нет таких, а вымораживать рекламу других магазинов в этой ветке можно и минус в репу получить, есть другие ветки где обсуждаются реагенты от разных магазинов, а здесь обсуждается продукция данного ТСа , вкурил? https://mefedronkypit.shop Всем доброго времени суток. Вопрос такой – Ко скольки лучше делать МН и как быстро растет толер???качество на высоте! сегодня опробовали и регу и ск!
Гастрономический круиз по Москве-реке — это не просто ужин с видом, это целое событие, которое запоминается надолго. Сервис https://riverwalktickets.ru/ за 10 лет работы на рынке речного флота собрал более 100 маршрутов на любой вкус и формат: романтический вечер на двоих, семейный обед или корпоративная прогулка. Команда лично отбирает теплоходы, проверяет качество кухни и сервиса — именно поэтому более полумиллиона гостей уже выбрали этот сервис. Отправляйтесь в плавание от Воробьёвых гор, Парка Горького или Зарядья и откройте Москву с новой, водной стороны!
Professional legal representation in court for public procurement disputes in Almaty. Femida Justice https://femida-justice.com/uslugi/yurist-po-tenderam-almaty/sudebnyie-sporyi-po-zakupkam-v-almatyi/ offers expert defense against Unreliable Supplier list inclusion, tender result appeals, and contract litigation. Our lawyers provide comprehensive judicial protection for businesses across Kazakhstan, ensuring compliance and safeguarding your commercial interests in all court instances.
Аналитический ежедневник «До слова» выпускает точные и жёсткие тексты о политике, экономике, культуре и социуме — без обтекаемых фраз и редакционной мягкости. Авторы издания работают в жанрах аналитики, расследования и публицистики, охватывая события от бизнес-новостей до исторических публикаций. Читайте актуальные тексты на https://doslova.com/ — украинский ежедневник для тех кто привык получать информацию точно и без лишнего шума. Авторские колонки, ежедневные вопросы и спортивная аналитика формируют полноценную редакционную картину и делают издание незаменимым для читателя с высокими стандартами.
Besök https://www.ferieisverige.no/ för allt du behöver veta om semestrar i Sverige, inklusive Smultronställen Sverige-ladan och allt om Fjällbacka och Pås til Sverige. Örebro är utan tvekan det bästa stället att koppla av på – ta reda på mer om det, och julemärkt Sverige kommer att lämna ingen oberörd!
Медиапортал «Корреспондент» подаёт новости Украины и планеты в реальном времени — политика, бизнес, технологии и общество без цензуры и редакционных ограничений. Редакция не избегает неудобных материалов: антикоррупционные расследования, репортажи о конфликтах и детальный бизнес-анализ появляются на постоянной основе. Следите за актуальной повесткой на https://karrespondent.com/ — украинский новостной ресурс для читателей ценящих скорость и фактическую точность. Культура, конфликты, технологии и социальные истории формируют широкий охват тематик и делают портал универсальным источником информации для требовательной аудитории.
Заглянул на сайт . Очень даже приятно удивлён увиденным . Сохранил в закладках (полезный сайт!) https://odorgone-animal.ru А сейчас работает магазин?основу взял мяту и подорожник, мед. спирт-растворитель.
Аренда сервера для бизнеса требует надёжного провайдера с круглосуточной поддержкой и стабильной работой. Взять сервер в аренду у Netrack — значит получить гарантированный аптайм 99,9% и размещение в дата-центре уровня Tier III. Требуется сервер в аренду? На сайте https://netrack.ru/ можно выбрать конфигурацию под любые задачи — от стартапа до крупного корпоративного проекта. Пользователь работает на выделенном железе без совместного использования ресурсов и получает профессиональную техподдержку на каждом этапе.
не понял вас. Купить Мефедрон, Экстази, Кокаин, Бошки, Гашиш и сколько те6е поо6ещали заплотить?А будет какая нибудь подробная инфа или трип репорты? А лучше пробники платные или бесплатные?
Москва-река открывает город совершенно с иного ракурса — величественного, тихого и невероятно красивого. Компания Moscow Cruise за более чем пять лет работы организовала речные прогулки для свыше 10 000 довольных пассажиров, и каждый рейс подтверждает репутацию надёжного сервиса. Заходите на https://moscowcruise.ru/ и выбирайте подходящий маршрут: удобное бронирование, круглосуточная поддержка и индивидуальный подход гарантированы. Профессиональная команда сопровождает клиента на каждом этапе — от выбора прогулки до момента, когда теплоход мягко отчаливает от причала навстречу огням столицы.
https://cvetonya.myqip.ru/?1-0-0-00006356-000-0-0-1776578374
тоже самое оплатил 3.02 трек получил через 5 дней но он до сих пор не бьется ТС расскзывает сказки что трек в течении 2х рабочих дней начнет биться я наверно похож на дебила я за свою жизнь получил курьерок больше чем отправил данный ТС РЕБЯТА ПРИТОРМОЗИТЕ СВОЮ ОПЛАТУ ПОКА Я НЕ ПОЛУЧУ СВОЙ ГРУЗ!!!!! Я кругосуточно в сети и буду держать Вас в курсе своих событий!!!! https://extreammoto.ru согласен чемикалы в этом плане молодцыСочи – мёд отличный, кладмену респект и уважуха! теперь мы ваши постоянные клиенты)
http://www.rrsclub.ru/showthread.php?p=85312#post85312
I finally found a place to explore each custom and modified BMW E30 build – from engine swapped builds to stance, track, and drift builds. Every build comes with a curated gallery, tech specs, and modification details. Honestly it’s addictive to scroll. Go check it out:https://isleofcars.com/bmw/e30
Если вы давно мечтаете превратить свой участок в настоящий ботанический шедевр, питомник растений «Сакура» предлагает всё необходимое для воплощения самых смелых садовых идей. Здесь собраны сотни видов растений: от классических спирей и гортензий до редких рододендронов, изящных бонсаев и топиарных форм. Посетите https://sakura-pitomnik.ru/ и откройте для себя богатый каталог хвойных, лиственных деревьев, роз и многолетников с удобной доставкой по Санкт-Петербургу и Ленинградской области. Ассортимент регулярно пополняется новинками сезона, а доступные цены делают профессиональное озеленение реальным для каждого.
Все пришло довольно быстро. https://australia-visa.ru Сделал заказ , все гуд и качество понравилосьГлавное не кипишуй, продаван ровный, придет сам обрадуешся что тут затарился!
https://mymoscow.forum24.ru/?1-6-0-00041844-000-0-0-1776679537
http://www.rrsclub.ru/showthread.php?p=85455#post85455
https://www.floristic.ru/forum/groups/moskva-d1781-potolochnoe-infrakrasnoe-vodyanoe-otoplenie.html#gmessage2387
ну если ты регу получил! сделай опробуй! и отпиши прет тебя или нет! Купить Мефедрон, Экстази, Кокаин, Бошки, Гашиш абакан есть?p/s мне ничего не надо! Зашёл пожелать удачи магазину в нелегком деле.
всё посылка пришла всё ровно теперь будем пробовать ) https://det-massaj.ru Через Skype мы больше не работаем, об этом мы объявляли пару недель назад.по выходным курьерки не работают, соответственно и отправить мы не можем, отправки производятся в рабочии дни!
https://nxprodaja.com/product/milwaukee-aparat-za-varenje-kombinovani-500-mig-mma-tig/
https://uglyoldbob.com/jeep/index.php?post/2025/06/12/The-engine-runs
Ищете автоюриста в Сыктывкаре? Посетите сайт https://autourcom.ru/ где вам предложат бесплатную консультацию. Ознакомьтесь с нашими услугами – мы оспариваем виновность в ДТП, добиваемся доплаты по ОСАГО, обжалуем штрафы и защищаем по делам о лишении прав. Работаем лично и дистанционно. Более 20 лет опыта! Мы предложим вам понятный план действий.
https://torontobrothers.com/2019/06/23/hello-world/
https://saberanashamuktikendra.in/best-drug-rehab-centre-in-patna/
РФ. Западно – европейская её часть ) Купить Мефедрон, Экстази, Кокаин, Бошки, Гашиш вот нашли бы пролонгаторы и начали продавать и эффект бы увеличили и все довольны были бы=)))МХЕ “как у всех” тобиш бодяжный.. Вроде скоро должна быть нормальная партия.
Очень выручили с переводом и легализацией диплома для подачи в краковский вуз.https://www.azhomefloors.com/blog/buying-home-with-uneven-floors/
Подскажите тарифы на апостилирование документов ЗАГС в Мазовецком воеводстве. https://www.vienni.com/online-casino-push-gaming/
https://shaheenarts.ae/effective-outdoor-signage-boost-visibility-attraction/
Заказываю в третий раз, дали скидку 8%, приятно. Купить Мефедрон, Экстази, Кокаин, Бошки, Гашиш доброй ночи ровной ветке!Все заказ пришел, не было времени отписаться, брали пробы, в аське вежливый,конкретный, все в сроки,просил отправить в день перевода денег, отправили, шла ровно 4 дня, как написанно на сайте, веса точные, не обманывают, все порадовало, консперация на высшем уровне, правда расчитывал на лучшее качество, мало держит, консентрация 1 к 6-8 самая лутая.. Огромное спасибо магазину, мир и процветание, выбераю чемикал микс) Всем мир друзья..
Сколько времени действителен штамп апостиль на справке о несудимости для Польши? https://searched.blog/%F0%9F%8E%AE-battlefield-6-the-return-of-a-giant/
Отличная поддержка, проконсультировали по всем тонкостям апостилирования польских документов. https://searched.blog/%F0%9F%8E%AE-battlefield-6-the-return-of-a-giant/
Без апостиля на свидетельство о рождении ребенка карту побыту по воссоединению не давали, спасибо за быструю помощь. https://searched.blog/%F0%9F%8E%AE-battlefield-6-the-return-of-a-giant/
https://siberianstatemeduniversity.com/siberian-state-medical-university-opens-admissions-for-2025-26-admission-guidance-for-indian-students/
Подскажите тарифы на апостилирование документов ЗАГС в Мазовецком воеводстве. https://fipetur.es/world-meetings-forum-y-mpi-la-puerta-estrategica-en-el-futuro-de-la-industria-global-de-reuniones/
Отличная поддержка, проконсультировали по всем тонкостям апостилирования польских документов.https://jorgearce.es/index.php/post/2016/10/13/C%C3%B3mo-instalar-postsrsd-en-Centos-7.x
Искал, где сделать легализацию без посредников, в итоге обратился сюда и не пожалел. https://wizdek.com/hello-world/
https://thoitrang.blog.fc2.com/blog-entry-6117.html
Извеняюсь за вышесказанное,магазин отличный..я думаю поторопился с выводами,продовци отзывчиввые идут на встречу,спасибо)) насчет 4фа..меня он действительно почти невставил,но скорее всего это толерантность от 2сi,которая как я узнал недавно длиться неделю..так что в конце недели протестирую повторно,пока крепанусь) потом сообщю))) https://ghspb.ru смотри на сайте в своих заказах (в коментариях)…что значит “самый норм микс” ? 1 грамм 250го на 10 грамм основы вполне нормально. если любитель лютой жести – сделай 1к5 чтоли, будешь улетать в астрал с малюсенького кропалика
Ребята знают свое дело, помогли быстро сделать апостиль в Польше на доверенность из США. https://patrickvanlunteren.nl/?p=902
Подскажите, а на коммерческие контракты тоже нужен апостиль или достаточно заверения нотариуса? https://ksquareworld.com/unlocking-the-power-of-data-driven-decisions/
Подскажите, обязателен ли апостиль для документов, выданных в странах СНГ, для подачи на ВНЖ?https://noviatravels.com/visit-beautiful-naples-italy/
https://geistreich-kultur.de/would-you-like-to-see-a-real-leopard-live/
Отличный магазин..заказывал не раз всегда все на высшем уровне. Молодцы. Купить Мефедрон, Экстази, Кокаин, Бошки, Гашиш Привет форуму! всем кто сомневался брать или нет здесь советую брать не ошибетесь,заказывал сам первый раз тоже побаивался, но решился,, заказал реги jv 60 10 гр в пятницу, оплатил в тот же день, сегодня все на руках конспирация на уровне, тс вполне адекватный человек отвечает быстро, все прошло быстро, оперативно, чему я очень рад, надеюсь на дальнейшее с ним сотрудничество, за качество пока сказать не могу, тк еще микс не делал. Процветания и удачи вашему магазину, приятно было с вами работать!Всем привет, СК есть опт?
Искал, где сделать легализацию без посредников, в итоге обратился сюда и не пожалел. https://xpressbbq.com/2018/04/03/where-can-i-get-some/
Ребята знают свое дело, помогли быстро сделать апостиль в Польше на доверенность из США.https://solvico.es/saca-el-maximo-partido-a-tus-reuniones-con-nuevas-funcionalidades-zoom/
https://carboferrum.co.za/post-format-aside/
кролики ставят В\В, фашку от этого магазина по 0.07-0.15 нравится, только сушит сильно Купить Мефедрон, Экстази, Кокаин, Бошки, Гашиш да ее колать страшно эксперементатором быдь тоже чет не охотоВсегда сдесь было высокое качество
Подскажите, а нотариус заверяет копии документов, если на них еще нет апостиля? https://sportsgradation.rops.co.jp/armond-1-png/
Карта побыту получена, огромная благодарность за подготовку и легализацию всего пакета документов! https://ikutinfo.com/4-cara-screenshot-di-laptop-dengan-mudah-dan-cepat/
https://femipause.es/how-to-make-lorem-ipsum-dolor-sit-glavrida/
Добрый вечер!!! :drug: https://artcomplekt.ru я тут походу единственный кто остался недоволен.(Всегда на высоте)
Полезный ресурс, сохранил в закладки, так как легализация документов актуальна для всей семьи. https://www.afrikinfomedias.com/2022/01/30/coups-detat-au-sahel-le-niger-echappera-t-il-a-la-contagion/
Опытный нотариус и быстрая легализация, помогли запустить бизнес в Польше без задержек. https://arztpraxis-jaderberg.de/hallo-welt/
Для оформления карты побыту работодатель требовал легализованные дипломы, ребята сделали всё за неделю.https://www.ottawadrywallguys.com/questions-to-ask-when-hiring-a-commercial-drywall-contractor/
https://edulife.tk.ac.kr/bbs/board.php?bo_table=free&wr_id=228573
Тусишка получается не саморй, но почти самой выгодной.Метоксетамин – цена и качество как и везде. Кто не хочет переплачивать – может брать все тут. Купить Мефедрон, Экстази, Кокаин, Бошки, Гашиш На прошлой неделе в среду, был оплачен заказ, вот уже среда следующей недели, праздники прошли, в скайпе они пока что не появлялись. Пологаю что магазин загулял.братва подскажите концентрацию и растворитель для ам2233 от данного селера ! Заранее спс
Медиапортал «Інквізиція» работает под девизом Deus vult — публикует расследования, криминальные репортажи и острую аналитику без оглядки на неудобных фигурантов. Редакция последовательно разбирает коррупционные схемы, судебные затяжки и социальные проблемы — с фактами и документами на руках. Изучайте независимые расследования на https://inquisition.info/ — украинский портал для тех кто требует от журналистики реальных результатов. Разделы политики, экономики, бизнеса и здоровья представлены без купюр — редакция говорит прямо и без обиняков что принципиально выделяет портал на фоне обычных новостных площадок.
Таблица сравнения скорой и неотложки отличная, теперь понятно, когда куда звонить.
https://noorplaza.com/author/stephanlahr037/
тоже самое взял ам в данном магазе чтоб не было сплетен тож отпишу за качество думаю мнение от 2 разных людей будет достаточно что бы не было вопросов :speak: Купить Мефедрон, Экстази, Кокаин, Бошки, Гашиш скажи мыло в личку своё шас проверюСвязался с продавцом вполне адекватный!Заказал щас жду адресса
Все ок – связался по скайпу, продавец адекват – “пошел навстречу”. оплатил – буду ждать трека. https://udareklama.ru 1-й раз все было почти супер только менагер немного напутал ( но потом все доотправили )спроси в лички номер аси думаю все ровно будет без базара бро
Качество на высоте,оператор красавчик,все сделали быстро и четко! Купить Мефедрон, Экстази, Кокаин, Бошки, Гашиш Скажи что это? Я тебе помогу:) где хочешь заказать?магазин хороший,даже если высылат брак (было 1 раз) возврат делают сполна
оплатил 31го, сегодня все уже получил! Продавану, спасибо за оперативность!:ok: https://plmclub.ru Ребята с 11го года магазин работает на отлично, сомнений не у кого не должно быть!!!всем привет.супер магаз))) позже отзыв отпишу. ))))
всяко подобные магазины нужно стороной обходить.. https://septik5.ru Спасибо хотя бы на том, что вообще что-то прислали…Обратите внимание на дату регистрации топик стартера и на регистрацию всех довольных пользователей.
Ищете настоящие скидки, акции и промокоды в России? Посетите сайт Огонёк https://ogonek.su/ – присоединяйтесь и экономьте! У нас подборка лучших скидок ежедневно. На сайте вы сможете увидеть лучшие скидки дня, а также увидеть все скидки и промокоды магазинов. Удобный поиск по категориям, что позволит быстро найти необходимую скидку! Подробнее на сайте.
Кто долги твоего представителя в РБ будет отдавать? https://colorlynx.ru Аптечные травы вообщем.боюсь что здесь произойдёт тоже самое, уж очень не внятно продавец общается.
Ментам зачастую пофиг,легал-нелегал.Был бы человек хороший,статья найдётся.СПСР тоже чёт не нравится.Но и на Мажор экспрессе случаи принималова были,так что х.з….Увидел на сайте “ждём…”.О.флюрокока и rti 111!Очень ждём!АМТ тож вкусняшка,но тут обьебосам не завидую.Примут по полграмма и айда 20 часов как кот в стиральной машине https://sudouser.ru тс удачи в работеМагаз ровный, очень много раз тут брал, а как перешли на телеграмм так еще больше радуете, намного меньше гемора с оплатой стало, качество на высоте как и всегда. Сегодня убедился что оператор не сидит без дела, очень сильно помог мне с моим вопросом, при чем оперативно все сделал. Оцениваю данный магазин 10 из 10. Кокаин даже MQ оказался лучше, чем я до этого покупал HQ в другом магазе. Делайте по чаще закладки в центре Питера.
Современный интерьер начинается с правильного выбора материалов, и компания Manakara знает об этом не понаслышке. Петербургский производитель предлагает стеновые панели исключительного качества в широком диапазоне размеров — от 2800 до 3000 мм в высоту и до 1220 мм в ширину, что делает их универсальным решением для любого проекта. Посетите https://forone.manakara.ru/ и откройте каталог с богатой палитрой цветов, способной вдохновить даже самого требовательного дизайнера. Компания активно сотрудничает с архитекторами и дизайн-студиями, предлагая выгодные партнёрские условия. Manakara — это не просто отделочный материал, а инструмент создания пространств с характером.
Продукт получен, доставка по Москве заняла примерно сутки. Проверить качество пока не могу, но надеюсь приемлемое. Купить Мефедрон, Экстази, Кокаин, Бошки, Гашиш Тут охота чисто на клиентов.Продукт получен, доставка по Москве заняла примерно сутки. Проверить качество пока не могу, но надеюсь приемлемое.
«РазВикТрейд» — предприятие из Беларуси с десятилетним опытом производства пресс-форм и пластиковых изделий для рынков Беларуси и России. Компания выполняет полный цикл: от проектирования 3D-модели и изготовления пресс-формы до серийного литья и доставки готовой продукции. На https://press-forma.by/ доступен бесплатный расчёт стоимости проекта. Производственная площадь 1000 кв.м. и 24 единицы оборудования обеспечивают выпуск до 1,5 млн изделий в месяц. Производство обходится дешевле китайского: чистая прибыль заказчика увеличивается в 2–3 раза.
В последние годы банками всё чаще применяется автоматическая блокировка счета P2P в Казахстане из-за подозрений в мошенничестве (дропперство, треугольники) или нарушений Закона РК о ПОД/ФТ. Входящие переводы от незнакомых лиц система расценивает как подозрительные операции. Узнайте на странице https://blog.femida-justice.com/blokirovka-scheta-p2p-v-kazahstane/ ваши правильные шаги в этом направлении от Бахирева Анатолия Анатольевича, управляющего партнера юридической фирмы “Закон и Справедливость”.
役立つ情報をお探しですか子供 留守番 何歳から 法律, ペーパードライバー 克服できなかった, 富良野 子供 ホテル, 小学校 個人面談 子供と一緒, 2人組 ?https://dragon737.com/ にアクセスすれば、これらのトピックをはじめ、あなたが興味を持つあらゆるトピックに関する包括的な情報を見つけることができます。このブログはユーザーフレンドリーな設計に
Медиаресурс «Акценты» охватывает политику, экономику, общество, бизнес, технологии, здоровье и криминал без информационного шума и лишних оговорок. Авторы издания раскрывают скрытые схемы, осмысляют общественные изменения и освещают резонансные события с опорой на конкретные доказательства и чёткую журналистскую позицию. Следите за самыми острыми материалами на https://akcenty.net/ — информационное агентство для читателей которые не довольствуются поверхностной подачей новостей. Острые расследования и профессиональная аналитика превращают агентство в многопрофильный медиаинструмент для широкого круга читателей стремящихся к полноценному пониманию общественных процессов.
Спасибо за понимание. https://playnardy.ru _Elf_ тебе сколько лет интересно?У тебя был единичный случай по твоим словам товар-фуфло.репутация у тебя “0”Требуешь вернуть денег, ты же понимаешь что тебе их не вернут.Вывод-ПРОВОКАЦИЯХороший магазин согласна!
Компания «Фемида» — это профессиональная юридическая помощь гражданам Казахстана в самых непростых правовых делах. Специалисты компании эффективно справляются с делами по призыву, оформлению брачных контрактов и медицинским конфликтам. Вся необходимая информация и профессиональная помощь доступны на https://femida-justice.com/ — здесь работают опытные специалисты с реальными кейсами. Компания защищает призывников на законных основаниях, помогает составить брачный контракт и отстоять права пациентов в Алматы.
Украинский новостной ресурс охватывает все важные направления — от политики и бизнеса до спорта и медицины, предоставляя читателям свежие новости и развёрнутую аналитику без воды и лишних деталей. Авторы портала пишут честно и по делу: расследования, бизнес-обзоры, социальные репортажи выходят регулярно и привлекают широкую аудиторию. Переходите на https://ukrnet.org/ — украинская всемирная сеть новостей для тех кто ценит качественную журналистику. Публикации затрагивают как внутриукраинские события, так и международную повестку, превращая ресурс в обязательный источник для информированного читателя.
Не работает пока там представительство. https://det-massaj.ru “Открываю коробок Пусто, под спички шорк вот и пакетик на глаз 03″”Прошло 20 мин тишина,Думаю надо догнаться еще 2 делаю и тот же ЭфФект “
Московская клиника «Онис» занимается лечением варикоза и сосудистых заболеваний с помощью передовых малоинвазивных технологий. Специалисты применяют лазерную коагуляцию, склеротерапию и радиочастотную абляцию — процедуры проходят без хирургических разрезов и долгой реабилитации. Подробнее об услугах и специалистах — https://www.onisclinic.ru/ — платформа с полной информацией о методах лечения и записи на приём. Для каждого пациента после обследования формируется персональная схема лечения, а долгосрочный результат обеспечивается профессионализмом и опытом врачей.
Ну давайте не мандражировать, плохие мысли материализуются, я специально это не написал!!!! Что тут в карму никто не верит? 🙂 Забыли уже? 😉 https://aprigroup.ru Да туси тут очень качественная, жаль что заказать проблемно.Качество обслуживания хорошее – с момента оплаты до прибытия товара прошло всего 3 дня и вес ровный.
Yuks?k keyfiyy?tli online kazino xidm?ti ucun t?s?kkur edir?m. onlayn kazino
S?rf kazino oyna secimi ucun h?r gun bu sayta daxil oluram. casino online
Dig?r casino saytlari il? muqayis?d? uduslar?n od?nilm?si sur?tlidir. xbet casino
Xbet casino qeydiyyat bonusu balans?m? tez art?rmaga kom?k etdi. kazino oyna
Canl? kazino dilerl?ri il? oyun cox real v? s?ffaf kecir. kazino online
Kazino oynamaq h?v?skarlar? ucun t?hluk?sizlik yuks?k s?viyy?d?dir. kazino
Kazino oynamaq h?v?skarlar? ucun t?hluk?sizlik yuks?k s?viyy?d?dir. kazino oyunlari
И духовной отсутствие пищи Купить Мефедрон, Экстази, Кокаин, Бошки, Гашиш Минск нужен. Срочно бля хуево уже, надо зарядиться! Помогите пожалуйста я здесь ни хрена не понимаюПриветы. Впервые решил заказать подобные вещества через интернет; полистав форум, выбрал этот магазин из-за безупречной репутации и не разочаровался. Заказ обработали очень быстро, все доходчиво объяснили, вес пришел с приятным бонусом(товар, кстати, отличный). Успехов и процветания вам и вашему магазину, ребята.
Москва по-настоящему раскрывается тем, кто решается взглянуть на неё с воды: Кремль, Храм Христа Спасителя, Новодевичий монастырь и футуристичный Москва-Сити выстраиваются в единую живую панораму прямо с борта теплохода. Сервис https://moscowmariner.ru/ предлагает более 200 маршрутов на 2026 год — от утренних экспрессов за 99 рублей до гастрономических круизов с ужином от шеф-повара и ночных прогулок под архитектурную подсветку набережных. Купить билет просто: выбираете дату, причал и формат, оплачиваете без комиссии любой картой — и мгновенно получаете PDF-ваучер с QR-кодом на почту, никаких касс и очередей.
Kazino onlayn sistemind? hec bir texniki problem yasamad?m. kazino oyunlar?
H?r bir kazino oyunu unikal movzuya v? musiqiy? malikdir. online kazino
Azerbaycanda kazino saytlari ic?risind? lisenziyal? olan? secm?k vacibdir. kazino oyunu
H?r bir kazino oyunu unikal movzuya v? musiqiy? malikdir. kazino oyunu
Onlayin kazino oyunlar?nda sans?m? s?nad?m v? ilk d?f?d?n qazand?m. azerbaycan kazino
Kazino onlayn sistemind? hec bir texniki problem yasamad?m. online casino
ПРИВЕТ ВСЕМ:НУ ЧТО Ж ТЫ БРО ТАК ОБЕЗНАДЕЖИЛ МЕНЯ ПО СКАЙПУ И В КОМЕНТАРИЯХ НАПИСАЛ ЧТО ОТПРАВИЛ MXE А НА ПАКЕТЕ НАПИСАНО RCS И ЧТО МНЕ КУРИТЬ ТЕПЕРЬ НАЧАТЬ ЗАЧЕМ ГОВОРИТЬ ТО ЧТО НЕ ДЕЛАЕШЬ КАК САМ СЧИТАЕШЬ ? https://colorlynx.ru получил посылку не выходя с почты открыл ее а там лежат какие то шорты. ну думаю все кинул 7 к просто выкинул. пришел домой с пацанами сели чай пить положил вещи тут как раз мама старалась и спросила меня есть шмотки грязные ну тут я достал все вещи и шорты мама давай смотреть карманы и в итоге в шортах находит 10 г вот тут я обрадовался и разочаровался думал ханаПодскажите когда примерно вналичии будет JTE-907
1xbet kazino h?r zaman durust f?aliyy?ti il? secilir. azerbaycanda kazino saytlari
Muasir casino online standartlar?na tam cavab ver?n bir sistemdir. 1xbet casino online
?n etibarl? onlayn kazino axtaranlar bura diqq?t yetirm?lidir. kazino oyunlar?
Online kazino oyunlari aras?nda klassik meyv? slotlar? cox maraql?d?r. onlayn kazino
Canl? kazino dilerl?ri il? oyun cox real v? s?ffaf kecir. onlayn kazino oyunlari
ответь те на мыло я еще вчера вам написал! https://det-massaj.ru Хороший магазин оператор всегда онлайн, товар вообще Шик :speak: процветай) и поскорей бы летоспасибо и ВАМ !!
Onlayin kazino oyunlar?nda sans?m? s?nad?m v? ilk d?f?d?n qazand?m. onlayn kazino oyunlari
F?rqli kazino oyunlar? axtaranlar mutl?q bu kataloqa baxs?n. online casino
Kazino onlayn sistemind? hec bir texniki problem yasamad?m. 1xbet casino online
Canl? kazino dilerl?ri il? oyun cox real v? s?ffaf kecir. kazino azerbaycan
Уважаемые покупатели, С НОВЫМ ГОДОМ! Купить Мефедрон, Экстази, Кокаин, Бошки, Гашиш Менеджер вежливый все быстро понимает на 5/5Сорри, многаюуков. И ошибок – со спецтелефлна сижу)
Online kazino oyunlari aras?nda klassik meyv? slotlar? cox maraql?d?r. onlayin kazino
Yuks?k keyfiyy?tli online kazino xidm?ti ucun t?s?kkur edir?m. kazino onlayn
1xbet casino online turnirl?rind? istirak etm?k cox maraql?d?r. azerbaycan casino
Xbet casino qeydiyyat bonusu balans?m? tez art?rmaga kom?k etdi. kazino oyunlar?
Azerbaycanda kazino saytlari aras?nda bu q?d?r sur?tli d?st?k gorm?misdim. kazino oynamaq
Onlayn kazino azerbaycan istifad?cil?ri ucun yerli valyuta d?st?yi var. onlayin kazino
Canl? kazino rejimind? canl? cat vasit?sil? unsiyy?t qurmaq olur. azerbaycanda kazino saytlari
Перевел деньги на Альфа 21.04.2014 после умення узнали даные (Ф.И.О телефон и адрес) Оператор сказал что посылка будет отправлена 22.04.2014. !!!! 23.04.2014 скинули номер наклодной. По номеру наклодной смог отслеживать свою посылку 24.04.2012. https://so-tvorchestvo.ru Главное не кипишуй, продаван ровный, придет сам обрадуешся что тут затарился!FoX будь добр скажи…
Kazino onlayn sistemind? hec bir texniki problem yasamad?m. kazino online
Kazino oynamaq h?v?skarlar? ucun t?hluk?sizlik yuks?k s?viyy?d?dir. kazino oyna
Yuks?k keyfiyy?tli online kazino xidm?ti ucun t?s?kkur edir?m. canl? kazino
Canl? kazino rejimind? canl? cat vasit?sil? unsiyy?t qurmaq olur. 1xbet kazino
M?nc? azerbaycan kazino bazar?nda ?n yaxs? ?msallar buradad?r. 1xbet kazino
Canl? kazino dilerl?ri il? oyun cox real v? s?ffaf kecir. kazino saytlari
M?nc? azerbaycan kazino bazar?nda ?n yaxs? ?msallar buradad?r. kazino oyunlar?
Хороший магазин оператор всегда онлайн, товар вообще Шик :speak: процветай) и поскорей бы лето https://odorgone-animal.ru Это точно!) главное быть в этом уверенным. Да и ровненький магазин однакоЯ в последний раз говорю, эта тема – для отзывов о работе магазина. Если вы не можете связаться с продавцом, то не надо писать об этом по сто раз. Если вы хотите узнать о качестве продукции – вам СЮДА !!! Любой оффтоп\флуд прекращаем !
Canl? kazino dilerl?ri il? oyun cox real v? s?ffaf kecir. 1xbet casino online
Canl? kazino rejimind? canl? cat vasit?sil? unsiyy?t qurmaq olur. onlayin kazino
1xbet kazino h?r zaman durust f?aliyy?ti il? secilir. casino
Burada kazino oynamaq h?m ?yl?nc?li, h?m d? qazancl?d?r. kazino
Canl? kazino dilerl?ri il? oyun cox real v? s?ffaf kecir. kazino oyunlar?
Online kazino oyunlari aras?nda klassik meyv? slotlar? cox maraql?d?r. kazino oynamaq
?n etibarl? onlayn kazino axtaranlar bura diqq?t yetirm?lidir. kazino oyunlar?
С 1997 года симферопольская компания «Транзит Медиа» задаёт стандарты рекламного производства в Крыму: широкоформатная полноцветная и УФ-печать, брендирование корпоративного транспорта, изготовление баннеров, вывесок и изделий из акрила — всё это выполняется на собственном оборудовании с использованием качественных европейских материалов. Подробный каталог услуг и актуальные цены производителя размещены на https://transitmedia.ru/, где можно сразу оформить заявку. Более 25 лет безупречной работы, гарантия на все изделия и услуги, доставка по Симферополю и городам Крыма — весомые аргументы в пользу надёжного партнёра для вашего бизнеса.
джива качественная=)получше чем впрошлый раз была=) Купить Мефедрон, Экстази, Кокаин, Бошки, Гашиш Парни, начинается параноя! Завтра посыль приходит, как получать А?Всё отлично, 5 из 5. Только сделайте больше районов в Питере.
?n etibarl? onlayn kazino axtaranlar bura diqq?t yetirm?lidir. online kazino
?n etibarl? onlayn kazino axtaranlar bura diqq?t yetirm?lidir. onlayn kazino oyunlari
Online kazino oyunlari aras?nda klassik meyv? slotlar? cox maraql?d?r. kazino oyna
Xbet casino xidm?tind?n bir nec? ayd?r istifad? edir?m, raz?yam. kazino oyunu
Дім, сад, будівництво і фермерство – ці теми розглядаємо в блозі – Українська Хата. На сайте https://xata.od.ua/ корисні поради власникам будинків, садівникам, будівельникам і фермерам. Актуальні теми, новини зі світу будівництва і фермерства. Українська хата (XATA.OD.UA) розповість про цікаве та корисне.
Dig?r casino saytlari il? muqayis?d? uduslar?n od?nilm?si sur?tlidir. xbet casino
Kazino oynamaq h?v?skarlar? ucun t?hluk?sizlik yuks?k s?viyy?d?dir. casino
Kazino onlayn sistemind? hec bir texniki problem yasamad?m. canl? kazino
Списались с оператором. Нужно взять 50 гр. СК. https://odorgone-animal.ru Магазин реально ровный!!! Долго искал и нашел! Бро ты лучший!!!!он спонсировал всех нас.
Muasir casino online standartlar?na tam cavab ver?n bir sistemdir. canl? kazino
Kazino oyunlari kataloqu tez-tez yenil?nir, secim boyukdur. kazino oyunu
Onlayn kazino oyunlari daxilind? slotlar?n qaydalar? cox sad?dir. casino
Kazino onlayn sistemind? hec bir texniki problem yasamad?m. azerbaycan kazino
PS5ゲーム(おそらくゲームのこと)をお探しですか?PS5(おそらくゲームのこと)PC(おそらくゲームのこと)会社(おそらくゲームのこと)? https://www.mukakin-blog.com/ をご覧ください。あらゆるトピックに関する本当に役立つ情報が見つかります。当ブログは、ありとあらゆる役立つ情報を提供する総合情報源です
5 гр заказала, ждали 6 дней, вот забрали у курика, муж укололся, потом ещё в воде разболтали и выпили. Эффект ноль. Что с остальным делать. Хоть в унитаз высыпай https://playnardy.ru В двух пакетахС Уважением.
An exceptional video production company in Italy that prioritizes client vision while maintaining realistic budgets.
https://zoonport.com/author/jonelle8058763/
Обращайтесь к нам снова https://septik5.ru а что с алхимом случилось?Чем злиться, выдал бы дудки иль реги
Every case study uploaded to orbispro.it reflects their commitment to premium visual storytelling.
https://muzzlefreelist.com/author/ahmedpadbury65/
The production value you get with this full-service production company in Italy is worth every penny.
https://git.olivierboeren.nl/bobbydej19019/bobby2003/wiki/ORBIS-Production
The local fixers provided by ORBIS Production Italy are highly connected and respected by local authorities.
https://solutionsinmobiliary.com/author/ulrikemockridg/
Ищете антихром автомобиля москва? Посетите сайт by-tuning.ru и ознакомьтесь с нашими работами. Ознакомьтесь с нашими услугами: антихром, тюнинг, ремонт фар и многое другое. Все работы выполняются квалифицированными специалистами с предоставлением гарантии. С ценами вы сможете ознакомиться на сайте. Загляните в наше портфолио — результаты говорят сами за себя! В детейлинг центре Би Вай Сервис ваш автомобиль получит уход, как у заботливого хозяина.
The local industry reputation of this full-service production company in Italy opens a lot of closed doors.
https://eaccountingreferral.com/author/iozvon95687534/
Снова в деле Купить Мефедрон, Экстази, Кокаин, Бошки, Гашиш Оплатил, жду.отвечать вам не перестали я дал ответы на ваши вопросы, когда по несколько раз 1 и то же спрашивают я не отвечаю.
Ищете надежного поставщика металлопроката? Посетите сайт https://stalsfera.ru/ и вы сможете купить по выгодной цене металл оптом с доставкой по всей России от СтальСфера. Загляните в наш каталог – там действительно огромный выбор продукции. На складе наличие наиболее востребованных позиций листового, трубного, сортового и плоского проката. Также оказываем услуги металлообработки на собственном или контрактном производстве.
СПб все ровно процветания магазину. Амф на 5+ https://urarbitr.ru а кто такой лиа 12??Делали заказ на 10 гр. АМ-2233, вместо чего прислали 6,82 гр.
Залетные это какие то, представь, на целых 10 грамм кинули, смешно да и только . https://artcomplekt.ru Магазину спасибо все пришло,только вот пробник не положили,хотя обещали..сказали отпрака на следующий день после платежа!
я тоже несколько раз брал ,всё прошло чётко ,качество радует,доставлено всё в лучшем виде,оператор молочага всегда обьяснит всё что к чему,вообщем магазин для меня лучший ,самый надёжный,УСПЕХОВ И ПРОЦВЕТАНИЯ ВАШЕЙ КОМАНДЕ!!!!!! Купить Мефедрон, Экстази, Кокаин, Бошки, Гашиш Зделал заказ 203го в четверг вечером,в пятницу уже получил трек,а сегодня създил забрал посылку!запаковано так,что сам с трудом нашел)все очень вкусно и качественно!продовцам респект.слаженно работают!Это ошибка или нет, подскажи пожалуйста.
Может просто нужно быть более бдительным? От фейков никто не застрахован. Попросить подтверждения через ЛС на форуме займет не более пяти минут времени и сохранит ваше настроение, а так же и деньги. БУДЬ БДИТЕЛЕН! ВСЕГДА! https://so-tvorchestvo.ru да конспирацию отработали 😉 стараемсяВыходные же. В понедельник наврятли отправить успеют.
Москва-река открывает новые грани развлечений: тематические вечеринки, зажигательные диджей-сеты и живая музыка прямо на борту теплохода — всё это делает каждый выход в свет по-настоящему незабываемым. На сайте https://ticketscruise.ru/ собрано полное расписание круизов на любой вкус: от уютных прогулок с ужином под звёздным небом до ночных шоу-программ с профессиональными артистами. Танцы под открытым небом, бар на борту, панорамные виды столицы — здесь каждая деталь работает на атмосферу. Бронируйте билеты онлайн и выбирайте свой идеальный формат отдыха на воде!
магаз висит на плаву, лишь бы брали, видимо кому-то нормальное, кому-то шлак! Купить Мефедрон, Экстази, Кокаин, Бошки, Гашиш Всё что В прайс листе на сайте есть,всё в наличии ?”Район довольно близкий для меня(СТРЕЛА)”
Агентство POLITEKA с выверенной редакционной структурой выпускает тексты о политике, экономике, обществе, культуре и криминале без размытых оценок и уклончивых формулировок. Журналисты издания исследуют мировые технологические тенденции, геополитические обострения и экономические процессы основываясь на верифицированных источниках и конкретных данных. Получайте независимую аналитику на https://politeka.org/ — украинское информационное агентство для аудитории требующей глубокого и честного осмысления событий. Авторские статьи и экспертные разборы дополняют новостной поток и превращают ресурс в полноценный аналитический инструмент для широкого круга читателей.
Интересный контент сегодня — это не просто развлечение, а способ узнавать новое каждый день. Сайт https://vseinteresno.com/ собирает познавательные материалы на самые разные темы: наука, история, природа, технологии и необычные факты со всего мира. Читатели находят здесь короткие и ёмкие статьи, которые расширяют кругозор без лишней воды. Если хочется каждый день открывать что-то новое — этот ресурс станет приятной привычкой для любознательного человека.
а кто нибудь пробовал все таки эту куреху urb https://extreammoto.ru Искать пришлось часа два!!! Фото не понятное было. Но нашёл всё таки. Забрал 1г ск крисов. Качество супер. Тёлка визжит просто) СпасибоПокуреха порошки безвкусные (на язык), остальные горькие. Так проще всего определить.
Купить водительские права
I am impressed by how orbispro.it displays detailed technical specs for their equipment rentals.
https://beritagame.co/10-game-keren-yang-rilis-di-bulan-juni-2025/
We have used this film production company in Italy twice now, and both times the results were flawless.
https://tanseiq.com/%D8%A7%D9%84%D8%B9%D8%B4%D8%A8-%D8%A7%D9%84%D9%85%D8%B3%D8%AA%D8%AE%D8%AF%D9%85-%D9%81%D9%8A-%D9%85%D9%84%D8%A7%D8%B9%D8%A8-%D9%83%D8%B1%D8%A9-%D8%A7%D9%84%D9%82%D8%AF%D9%85-%D8%A7-0552081817/
The production value you get with this full-service production company in Italy is worth every penny.
https://myfuturedoctor.in/7-tips-that-help-you-to-improve-your-eating-habits/
They adapted our initial creative brief into a masterpiece, outstanding work by the ORBIS team.
http://cafemiki.roomy-iiie.com/2%e5%90%8d%e8%bf%bd%e5%8a%a0%ef%bc%81%ef%bc%81/
No other video production company in Italy provides this level of comprehensive pre-production planning.
https://www.mes-vacances-scolaires.com/vacances-scolaires/combien-de-jours-de-vacances-scolaires/
The camera work displayed on orbispro.it is incredibly fluid and meets the highest cinema standards.
https://rajyasamiksha.com/archives/13734
пробуй 4фа, 2-dpmp их кушать надо или нюхать? пробовал хоть раз фаер спит Купить Мефедрон, Экстази, Кокаин, Бошки, Гашиш угу, “на глазок” отсыпали. купи весы и взвесь нормально. На вид оно может показаться как больше так и меньше…маскировка 5+
If you are looking for a video production company in Italy with global standards, look no further.
https://digital-planning.jp/1513/
This full-service production company in Italy knows how to optimize a shooting schedule to save client money.
https://iuhrdf.org/en/rebiya-kadeer-uyghurs-in-thailand-have-also-become-victims-of-injustice-in-international-relations/
They adapted our initial creative brief into a masterpiece, outstanding work by the ORBIS team.
https://esinstrumentosmusicais.com.br/hello-world/
They adapted our initial creative brief into a masterpiece, outstanding work by the ORBIS team.
https://digital-planning.jp/1513/
We explicitly needed a full-service production company in Italy to manage the entire project pipeline from end to end.
https://cms.hausammann.com/hello-world/
ORBIS Production Italy manages large background crowds and complex extra casting seamlessly.
https://www.mavenevents.ae/services/digital-marketing/
The production value you get with this full-service production company in Italy is worth every penny.
https://www.mavenevents.ae/services/digital-marketing/
ORBIS Production Italy provided top-notch catering, transport, and basecamp setups for our international cast.
https://www.informationplanet.com.co/blog/estudiar-en-australia/todo-sobre-trabajar-en-australia/
We have used this film production company in Italy twice now, and both times the results were flawless.
https://riseupbig.com/fathers-day-to-show-love-and-respect-for-dads/
РЕБЯТА ЭТО ЛУЧШИЙ МАГАЗИН… Я БЛАГОДАРЕН МАГАЗИНУ ЧЕМИКАЛ МИКС… КАК НИ КАК МОЙ ПЕРВЫЙ МАГАЗИН В КОТОРОМ Я КУПИЛ БЕЗ КИДАЛОВА… ХОЧУ ВЫРАЗИТЬ СВОЮ ПРИЗНАТЕЛЬНОСТЬ КОМПАНИИ ЧЕМИКАЛ МИКС ЗА ОПЕРАТИВНУЮ И КАЧЕСТВЕННУЮ РАБОТУ.. БЛАГОДАРЮ ВАС.. Купить Мефедрон, Экстази, Кокаин, Бошки, Гашиш пт всем.скоростя здесь имеются?мазагин, один из лучший, беру практически только здесь!
We explicitly needed a full-service production company in Italy to manage the entire project pipeline from end to end.
https://rashtraalerttimes.com/india-and-japan-launch-a-new-era-historic-agreements-at-15-th-annual-summit-ignite-strategic-partnership-and-growth/
We explicitly needed a full-service production company in Italy to manage the entire project pipeline from end to end.
https://infomusirawas.com/raih-kemudahan-dan-ringan-lepaskan-beban-yang-tak-perlu/
They provided excellent multilingual line producers who made our foreign crew feel right at home.
https://senelifepeople.com/amadeus-signe-son-retour-avec-jiin-une-declaration-damour-originale-qui-traverse-les-generations/
We have used this film production company in Italy twice now, and both times the results were flawless.
https://wansaa.in/case-study-go-to-market-execution-retailer-merchant-onboarding-copy/
The fashion film they shot for us in Milan looks like a high-end Hollywood production.
https://wansaa.in/case-study-go-to-market-execution-retailer-merchant-onboarding-copy/
ORBIS Production Italy manages large background crowds and complex extra casting seamlessly.
https://theindianews24.in/2025/07/09/hyundai-to-cut-prices-by-up-to-rs-2-4-lakh-tata-motors-slashes-cv-range-by-rs-4-65-lakh-amid-gst-reforms/
峯岸みなみ年齢に関する役立つ製品、サービス、または単なる情報を探しています ふくれな昔 ライブDVDどれを買うか sixtones ライブグッズ アクスタアプリ? https://tubestation.site/ にアクセスしてください – そこには必要なものがすべて見つかります。
This full-service production company in Italy knows how to optimize a shooting schedule to save client money.
https://www.bernoullico.com/technology-2/
The ORBIS Production Italy crew organized an exclusive shoot at a private estate in Tuscany on very short notice.
http://www.astromonie.at/Texte/index.php/;focus=W4YPRD_com_cm4all_wdn_Flatpress_7166190&path=&frame=W4YPRD_com_cm4all_wdn_Flatpress_7166190?x=entry:entry230412-161606;comments:1
Their studio spaces in Italy are equipped with top-tier lighting grids and soundproofing.
https://fenafim-senam2025.org.br/navigating-the-world-of-digital-marketing-courses/
Every case study uploaded to orbispro.it reflects their commitment to premium visual storytelling.
https://fenafim-senam2025.org.br/navigating-the-world-of-digital-marketing-courses/
Магазин кидает. Буду писать пока не дадут адрес в ПМ. Прошу там же помочь админов. https://so-tvorchestvo.ru ВСЕМ МИР А ТСУ РЕСПЕКТ )))привет бразы, хочу нахватить вот реги, что за качество скажите? надеюсь не 15 минутка?
An exceptional video production company in Italy that prioritizes client vision while maintaining realistic budgets.
https://mundometales.cl/cart/
Their post-production house handled our complex motion graphics requirements with total precision.
https://fernandorestoy.com/eres-mala-persona-por-ofender-a-alguien/
We explicitly needed a full-service production company in Italy to manage the entire project pipeline from end to end.
https://allremodelingservices.com/how-can-we-take-care-of-you-paint-for-home/
The fashion film they shot for us in Milan looks like a high-end Hollywood production.
http://gomezalonsoabogados.com/?attachment_id=159
They adapted our initial creative brief into a masterpiece, outstanding work by the ORBIS team.
https://olimpus.co.kr/bbs/board.php?bo_table=free&wr_id=8335
The camera work displayed on orbispro.it is incredibly fluid and meets the highest cinema standards.
https://clearportglobal.store/how-to-style-a-little-black-dress-for-any-occasion/
Their studio spaces in Italy are equipped with top-tier lighting grids and soundproofing.
https://2rsinalizacaoviaria.com.br/the-joy-of-giving-serving-others-with-a-generous-heart/
Every case study uploaded to orbispro.it reflects their commitment to premium visual storytelling.
https://www.sabc.co.za/sabc/sport10/
This video production company in Italy did an amazing job capturing the fast-paced action scenes.
https://viprz.cz/spz-nejrychleji-reflexni-lisovane-plechove/nase-nabidka/f0r-mula1/
Всем доброго времени суток 😉 заказал у ув ТС продукции немного, жду трек сегодня должен быть))) впервые обратился к данному сселеру надеюсь все пройдет на уровне. Как и что оценю и выложу. краткий трипчик по продуктам если понравится то сработаемся ))))) всем удачных покупок и продаж;) Купить Мефедрон, Экстази, Кокаин, Бошки, Гашиш Душевный магазин) Все довольны. Славно.Почему больше не забегаете ?
1xbet casino online turnirl?rind? istirak etm?k cox maraql?d?r. online casino
H?r bir kazino oyunu unikal movzuya v? musiqiy? malikdir. kazino
Ровным парням ровный респект Купить Мефедрон, Экстази, Кокаин, Бошки, Гашиш chemical-mix.com работает у кого ??? всё походу накрылся магаз :::???е знаю уместен ли мой вопрос в данное “смутное время” но все же откуда высылается заказы…? хотя бы из какой части РФ если это РФ…)))
S?rf kazino oyna secimi ucun h?r gun bu sayta daxil oluram. kazino azerbaycan
Yuks?k keyfiyy?tli online kazino xidm?ti ucun t?s?kkur edir?m. kazino onlayn
Yuks?k keyfiyy?tli online kazino xidm?ti ucun t?s?kkur edir?m. casino saytlari
На ближайшие 1.5 часа свободен, можно ни о чем не думать. Сачала хотел в центр поехать, чтобы сразу плсле адреса быстрей добраться до клада, потом трезво все взвесил,т спокойно поехал домой. https://jpnews.ru если он такой делец,пусть тему свою создаёт!а так аферист,я бональный обаснованный вывод делаю!Сейчас забегал курьер но без звонка поймал небольшую пароною ведь 203 уже нелегал но всё обошлось всё забрал вес отличный спасибо селеру за быстроту за 3 дня вот это скорость самый наеровнейший магаз и качество полюбому 5+ я уверен как всегда ну это я уже в другой ветке отпишу по пояже как сделаю.
M?shur kazino saytlari aras?nda bu sistem oz yerini mohk?ml?dib. onlayn kazino
Azerbaycanda kazino saytlari aras?nda bu q?d?r sur?tli d?st?k gorm?misdim. online kazino
goGLOW Houston Heights
1515 Studemont Ѕt Suite 204, Houston,
Texas, 77007, UᏚᎪ
(713) 364-3256
Bookmarks
Az?rbaycan casino istifad?cil?rin? yarad?lan s?rait yuks?kdir. xbet casino
1xbet casino online turnirl?rind? istirak etm?k cox maraql?d?r. onlayn kazino
Может правда о ошибочке что небудь не то отправили))) https://marakesh58.ru на бизе хорошей контора была….да!Без паники, есть 2 причины почему может не бится трэк 1. тупит курьерка и не внесла в базу накладную такое бывало уже не раз люди получали посылки с нерабочей накладной такое бывает часво это кривая работа службы доставки. 2. вы не правильно вводите на сайте отслеживания с дефисом, пробелом, не по формату номеру накладной службы или вообще на другом сайте)) такое тоже бывает часто. Клиенты у нас получают все вовремя если вас оповестили что посылка отправлена значит она отправлена, ожидайте согласно установленому времени доставки.
«Делай Промо» — комплексная SaaS-платформа, которая даёт брендам и агентствам возможность самостоятельно запускать чековые акции, программы лояльности и системы мотивации продавцов. В распоряжении брендов и агентств — конструктор лендингов, OCR-распознавание чеков, чат-боты для Telegram и VK, кодовые механики с антибрутфорс-защитой и сквозная аналитика с экспортом в Excel, объединённые на одной платформе. На http://makerpromo.ru/ уже зарегистрировано свыше 24 000 чеков и 18 000 активных пользователей. Сервис доступен в рамках закрытого бета-тестирования на льготных тарифных условиях.
Burada kazino oynamaq h?m ?yl?nc?li, h?m d? qazancl?d?r. kazino onlayn
Kazino oynamaq h?v?skarlar? ucun t?hluk?sizlik yuks?k s?viyy?d?dir. canl? kazino
Xbet casino xidm?tind?n bir nec? ayd?r istifad? edir?m, raz?yam. casino online
S?rf kazino oyna secimi ucun h?r gun bu sayta daxil oluram. kazino oyunu
Оплатил подождал очередь неделю так как завал у магазина теперь жду посыль респект ребята работаете на высоте Купить Мефедрон, Экстази, Кокаин, Бошки, Гашиш Магазин просто супер!!!так держать))))*****Ну,оправдалась моя нелюбовь к аське,ибо история не хранится и происходит всякая фигня.У меня произошел не самый забавный случай.
F?rqli kazino oyunlar? axtaranlar mutl?q bu kataloqa baxs?n. azerbaycanda kazino saytlari
Аренда сервера для бизнеса — задача, где важны надёжность, скорость и поддержка 24/7. Компания Netrack предлагает сервер в аренду с гарантированным аптаймом 99,9% и размещением в собственном дата-центре уровня Tier III. Требуется аренда сервера? На сайте https://netrack.ru/ можно выбрать конфигурацию под любые задачи — от стартапа до крупного корпоративного проекта. Пользователь работает на выделенном железе без совместного использования ресурсов и получает профессиональную техподдержку на каждом этапе.
Online kazino oyunlari aras?nda klassik meyv? slotlar? cox maraql?d?r. kazino
Laser Lipo, or laser lipolysis, is a non-surgical procedure that uses laser power to dissolve fat before it’s removed
from the body.
Yeni kazino oyunlar? s?namaq ist?y?nl?r ucun ideal s?rait var. kazino oyunlari casino
в кемерово откроетесь?? Купить Мефедрон, Экстази, Кокаин, Бошки, Гашиш Я уже начал сомневаться,что проблема в курьерке!Я им звонил,они в свою очередь звонили в головной офис-про мой трек они даже не слышали!!!А постановление вроде ещё не вступило в силу.Магази хороший и качество нормальное, если есть возможность запиши на пробу Бро )
Azerbaycanda kazino saytlari aras?nda bu q?d?r sur?tli d?st?k gorm?misdim. kazino
Looking for a resource focused on VPN technology, online privacy, and network security basics? Visit https://balavpn.com/ – we publish research-based guides on secure browsing, encryption protocols, DNS protection, and modern tracking risks. Find the most up-to-date and accessible guides! Learn more on our website.
Onlayn kazino azerbaycan istifad?cil?ri ucun yerli valyuta d?st?yi var. canl? kazino
Bu gun kazino online platformas?nda yeni slot yoxlad?m, superdir. 1xbet casino
Azerbaycanda kazino saytlari ic?risind? lisenziyal? olan? secm?k vacibdir. kazino
друг ты о чем говоришь? есть ася и скайп, на глупые вопросы(есть ли порошок JWH, как что вставляет, что ко скольки делается, и т.д.) мы не отвечаем, мы работаем только с людьми которые понимают, что “это” и как это “едят”, парни вот без обид – мы же не википедия… да парни все легал, все анализы делаются на Моросейке… да да да… https://guidebar.ru Даный магазин берет бобло и парит мозг посылки отпровляет по месяцу, гдето с сентября такие проблемы сними начелись, причом решать их они не собираютьсяКороче, подошёл я к адресу, а там ни по звёздам, ни по местности, ни право-лево не надо проверять. Я даже фонарик не включал, все чётко по описанию.
メルカリ 購入されたら, メルカリ 発送方法変更, メルカリ 発送方法 変更, メルカリ 退会方法, メルカリ 再登録. これらの質問やその他多くの質問にご興味をお持ちの方は、https://nishinoke.jp/ をご覧ください。様々なトピックに関する回答やアドバイスが掲載された総合的な情報源です。
http://www.bellydancestars.ru/viewtopic.php?p=20225#20225
http://old.msfnpr.ru/msfnprbb/viewtopic.php?p=7302#7302
Отличный магазин брали. Купить Мефедрон, Экстази, Кокаин, Бошки, Гашиш Из 6 операторов именно оператор этого магазина отвечал быстрее и понятнее всех остальных. Я увидел здесь хорошее,грамотное отношение к клиентам, сразу видно человек знает свою работу.Бро слова это хорошо но нам нужен наш клад и не более не кто не хочет тебя винить и общаться сдесь на эту тему а на оборот писать только хорошие отзывы о вашем магазе пойми и ты бро слово паника сдесь не уместно сдесь идет разбор по факту согласись
There are various ways to enhance the muscular tissues in your pelvic floor.
For hundreds of years, turmeric has actually likewise been utilized to deal with several ailments.
Instead, Shamban recommends dealing with sores with an antibiotic lotion and bandage.
Портал JAY — база знаний и каталог статей по всем направлениям — публикует материалы о политике, экономике, бизнесе, технологиях, здоровье, строительстве и культуре без редакционных уступок и информационного балласта. Журналисты и авторы JAY выпускают конкретный полезный контент — от практических инструкций до аналитики рыночных изменений — с опорой на актуальную информацию и отраслевую экспертизу. Расширяйте кругозор и находите нужную информацию на https://jay.com.ua/ — многопрофильный портал для читателей ценящих структурированные знания и конкретную подачу. Тематические разделы охватывают широкий спектр запросов и превращают ресурс в надёжный справочник для украинской аудитории.
С человеком приятно иметь дело. Склонен на компромиссы 😉 https://box22.ru Киньте репки кому не сложно) не сочтите за попрошайкуУдачи Вам и Процветания От Всей Души!
Dry skin generates much less oil normally, which
can minimize the skin’s vitality.
Качество воды в многоквартирных домах и коммунальных объектах — системная проблема, требующая инженерного решения. Компания PWS разрабатывает коммунальные установки очистки воды, адаптированные к реальному составу воды в российских регионах. Подробнее о решениях — на https://pws.world/kommunalnye-ustanovki. Технология ионизирующей ультрафильтрации удаляет до 99% железа, органики и микроорганизмов. Все компоненты производятся в России, сервис доступен в любом регионе.
Laser teeth bleaching provides fast, noticeable outcomes as an in-office treatment.
First comes credibility, then confirmation, then functional dependability.
さまざまな映画やシリーズのネタバレや結末をお探しですか? https://dorama-club.com/ にはドラマに関するあらゆる情報が揃っています。まだ見ていないものもすべて、より早く知ることができます。カーネーション 勘助 , 朝ドラネタバレ , とと姉ちゃん 最終回 , 芋たこなんきん , 朝ドラ ネタバレ
Брал иут пару раз , все четко Купить Мефедрон, Экстази, Кокаин, Бошки, Гашиш не долго думая решил написать оператору данного магазина!Добрый день, многим пришли посылки до НГ, 98% покупателей – перепроверено по трекам. Если есть вопросы пишите, в скайп или аську. В веточке пожалуйста, только по теме.
It’s so convenient to have a world-class casino floor right in your pocket.
https://speakerdeck.com/nedoneuthaica
. This treaty is available in helpful, generally where parents are associated with youngster abduction.
He stated there’s still a great deal of research study to be done on the effects of cold.
Also a single nail-head can trigger irregular results
if it has a rust discolor.
Nothing beats the thrill of a live roulette dealer right on your phone!
https://johannesburg.infoisinfo.co.za/card/cryptocasinoza/813590
Все хорошо, ждем товар, когда будет сразу дадим знать. Купить Мефедрон, Экстази, Кокаин, Бошки, Гашиш раньше вообще все говорили то что не растворяется это бутор а щас как я понимаю это в порядке вещейМагазин лутше не встречал!!!!
I’m no longer positive where you are getting your info,
however great topic. I needs to spend some time finding out more
or figuring out more. Thank you for wonderful information I
was in search of this information for my mission.
А ВОТ Я ТОЖЕ КИПИШЕВАЛ ПО СЧЕТУ ТРЕКА НЕ БИЛСЯ ТОЖЕ ПОЗВОНИЛ В КУРЬЕРКУ СКАЗАЛИ ОТПРАВЛЕННО И СЕГОДНЯ К ВЕЧЕРУ ВСЕ ОТБИЛОСЬ ЖДУ ПРИХОДА ПОСЫЛКИ. ПОТОМ НАПИШУ КАК ЕСТЬ. ПРОШУ ПРОЩЕНИЯ У ЧЕМИКАЛА ЗА ПЛОХИЕ ПОСТЫ, ДУМАЮ ПОЙМЕТ))) УЖЕ ДАВНО ТУТ БЕРУ НЕ РАЗУ НЕ КИНУЛ НИ ОДНОЙ ЗАДЕРЖКИ ВСЕ ПРОСТО НА 100%. https://60arsenal.ru Как нет..я тебе в пятницу писал..сказал,вчто ниче что скину в субботу,воскресенье..ты сказал ниче…и дал номер..Я писал в личку на почтовый ящик..это не брорзикс и не скайп…мошеников быть не можит..Ты,оплату посмотри…за сегоднясвое сообщение исправил
\ r \ n \ r \ nAsk your Doctor if CoolTone ® is best for you.
Всё ок подняли, но место опять немного людное (самый центр города) Купить Мефедрон, Экстази, Кокаин, Бошки, Гашиш С ним можно работать всегда ровничком всегда адекватность Плюссссну может она на меня так подействовала слабо,незнаю прям:dontknown:..надеюсь что-нибудь попробовать сильного из вашего ассортимента;)..p.s. пишу так как было,не перегибая.
There’s a piece of my life I rarely talk about after my dad left us without a goodbye.
We lived in a quiet Berlin neighborhood and our house
used to mean safety. But when the bills started to overflow, our security faded away.
We tried to hold on, but in the end, we watched our
home slip out of our hands.
My mom tried to hide her tears, but I always noticed.
I knew I couldn’t just sit there.
I began searching for ways people manage in financial crises.
That’s when I came across stories of people using
cryptocurrencies and converting them safely into money through trusted platforms.
I told my mother she could explore that—because I wanted her to feel a spark of hope again. She looked into it, researched
for days, and eventually chose Paybis (Paybis). She said it felt more
reliable than others she checked.
She closed her eyes for a moment before confirming the transaction. When it went through, she looked at me with the softest smile.
From that moment, the chaos softened. My mom handled everything herself, but she
always said my encouragement gave her courage.
I understood that hope sometimes comes from unexpected places.
Today, we’re finally seeing a future instead of
just surviving. And every time my mom looks at me and smiles,
she reminds me how everything changed the day she found the strength to use Paybis to convert her crypto into something we could actually live on.
These moments taught me strength.
Компания SeoBomba.ru специализируется на профессиональном продвижении интернет-ресурсов с использованием современных методик SEO-оптимизации, обеспечивая клиентам стабильный рост позиций в поисковых системах. Агентство предлагает комплексные услуги по наращиванию ссылочной массы через качественные форумные размещения, социальные сигналы и вечные ссылки, что позволяет достичь устойчивых результатов без риска санкций со стороны поисковиков. На сайте https://seobomba.ru/ представлен широкий спектр инструментов для веб-мастеров, включая генераторы паролей, анализаторы текста и семантические сервисы, которые существенно упрощают работу над проектами. Клиенты отмечают оперативность выполнения заказов, индивидуальный подход к каждому проекту и прозрачную ценовую политику, что подтверждается положительными отзывами специалистов различных направлений интернет-маркетинга.
Компания «Мото ДВ» зарекомендовала себя как надежный поставщик мототехники на российском рынке, предлагая широкий ассортимент квадроциклов, мотоциклов и скутеров для различных целей эксплуатации. В каталоге представлены модели ведущих производителей с разнообразными техническими характеристиками, что позволяет подобрать транспортное средство как для начинающих райдеров, так и для опытных любителей активного отдыха. Ознакомиться с актуальным модельным рядом можно на странице https://market.yandex.ru/business–moto-dv/213757648, где представлена детальная информация о каждой единице техники. Компания обеспечивает оперативную доставку по России, предоставляет официальную гарантию на всю продукцию и консультационную поддержку при выборе оптимальной модели, что делает покупку максимально комфортной для клиентов.
почитайте реценты , там ниже тема есть , там куча всего https://remont-62.ru Основу выварить не удалось, после вручения посыля,забыл убрать с глаз, торопился, дома было объявлено военное положение .магаз самый ровный , и со сладкими ценами!
در یک نگاه کلی
برای افرادی که تمایل دارن
بازی انفجار آنلاین
کار میکنن
این آدرس
میتونه
به دردبخوره
از سوی دیگر
برندهای شناختهشدهای مثل
enfejaronline معتبر
و
sibbet معتبر
تونستن اعتماد جلب کنن
نتیجه نهایی اینکه
رضایت داشتم
و
بیتردید
دوباره استفاده میکنم
my ᴡeb-site … گروه وان ایکس بت
Анапа — один из самых популярных курортов Черноморского побережья, и добраться до него с комфортом теперь проще, чем когда-либо. Сервис https://anapa-taxi-transfer.ru/ предлагает профессиональные услуги такси и трансфера с удобным онлайн-калькулятором стоимости поездки прямо на сайте. Официально зарегистрированная компания работает круглосуточно, обслуживает все основные маршруты и располагает собственным автопарком. Опытные водители встретят вас в аэропорту или на вокзале, а прозрачное ценообразование избавит от неприятных сюрпризов. Путешествуйте с удовольствием!
Open-format DJs rely on stem separation to remix tracks
live without having access to the original multitracks.
Open-format DJs rely on stem separation to remix tracks live
without having access to the original multitracks.
Посетите сайт https://kotel-54.ru/ и вы найдете в наличии на складе, в Новосибирске, готовые и прошедшие заводские испытания котельные мощностью от 80квт до 12 мвт, котлы, горелки, электрические котельные, запасные части для горелок, трубопроводная арматура и другие товары по выгодной стоимости, в том числе с доставкой по регионам России. Наш ассортимент удовлетворит любые потребности покупателя.
Извеняюсь за вышесказанное,магазин отличный..я думаю поторопился с выводами,продовци отзывчиввые идут на встречу,спасибо)) насчет 4фа..меня он действительно почти невставил,но скорее всего это толерантность от 2сi,которая как я узнал недавно длиться неделю..так что в конце недели протестирую повторно,пока крепанусь) потом сообщю))) https://belita-pegas.ru Чувствую что-то произойдёт , типа заказа:happy:Получил свой заказ,дошло довольно быстро, спасибо chemical-mix.com , за нормальный вес и хорошию работу !
сайт скоро подымем , я на ветке отпишу как заработает https://belita-pegas.ru Хотелось бы надеется)))Первый раз слышу такой непонятный отзыв о 4фа,все кто берет его как и 2c-i говорят что у нас он лучший … по jte907 если не умеете с ним работать зачем берете…? есть постоянные оптовики кто берет только его, и этот продукт нареканий не вызывает. Многие “Селлеры” под видом jte продают 2201 и это факт! у нас этот продукт в оригинале. МХЕ у нас такой пришел, мы не кричим что его чистота 99%, и что качество его не очень мы предупреждали всех…
Ищете Детский лагерь в Подмосковье? Посетите сайт https://campius.ru/ и ознакомьтесь с Кемпиус – это лагерь для детей 7-17 лет. Подарите ребёнку незабываемое лето с насыщенной программой, комфортным проживанием, ежедневным фотоотчётом, повышенным уровнем безопасности и санитарным контролем! Подробнее на сайте.
лучше )) https://favor-rus.ru Дальнейших успехов вам и продаж!ЛУЧШИЕ ИЗ ЛУЧШИХ НЕ РАЗ ЗАКАЗЫВАЛ И БУДУ ЗАКАЗЫВАТЬ!!!!
Комфортный климат в доме или офисе — это не роскошь, а продуманная инженерная система, установленная профессионалами. Компания «Энерго-Климат» из Уфы специализируется на монтаже, обслуживании и ремонте климатического оборудования, предлагая клиентам индивидуальный подход и гарантию качества. На сайте https://energo-klimat.ru/ можно уточнить услуги и связаться со специалистами напрямую через WhatsApp или Telegram — быстро и без лишних формальностей. Многолетний опыт команды и официальный статус юридического лица обеспечивают надёжность сотрудничества на каждом этапе.
I never imagined I’d say this at only 14, but life changes you after my dad turned his back on our family.
We lived in the heart of Berlin and our house used to mean hope.
But when the bills started to overflow, we began to lose control.
We tried to hold on, but in the end, the only option was selling the place we loved.
Her pain made me want to fight for us. I knew I couldn’t
just sit there.
I wanted to give my mom at least one idea to hold onto.
That’s when I came across stories of people using cryptocurrencies and converting them safely into money through trusted platforms.
I told my mother she could explore that—because I wanted her to feel
a spark of hope again. She looked into it, researched for days, and eventually chose Paybis (Paybis).
She said it felt fast and simple.
Her voice trembled when she whispered “I hope this works”.
When it went through, it felt like a tiny beam of hope entered our lives.
From that moment, it felt like we finally had a direction. My mom
handled everything herself, but she always said my encouragement gave her courage.
I understood that hope sometimes comes from unexpected places.
Today, we’re healing slowly but steadily. And every time my mom looks at me
and smiles, she reminds me how everything changed the day she found the strength to use
Paybis to convert her crypto into something we could actually
live on.
These moments taught me strength.
Если ты попал на фейка – это твои проблемы, мой номер аськи выдается только по требованию через лс, у тебя регистрация сегодня , то есть получить ты его никак не мог. Иди разводом занимайся в другом месте. https://belita-pegas.ru До сих пор в себя прихожуне ссы капустин поебем и отпустим
Hi, the whole thing is going fine here and ofcourse every one is sharing facts, that’s truly fine, keep up writing.
Ищете купить венок? Посетите сайт купить-венок.рф – и вы найдете доступные цены на похоронные венки, в том числе венки из живых цветов и траурные корзинки. Изучите наш ассортимент: как производители мы предлагаем венки любых форм и размеров, а сам заказ занимает буквально пару кликов. Узнайте больше о наших услугах и ценах на сайте.
Товар получен! Большее спасибо магазину! https://burlesquevl.ru Качество превосходное! чистейший джив у вас) всем нравится. Удачных продаж,бро!Если представитель не торгует нашим товаром – то представительство мы закрываем и ответственности тоже не несём.
scam gooobet
Они хоть кому нибудь отвечают? Купить Мефедрон, Экстази, Кокаин, Бошки, Гашиш В итоге получается, что все страницы оказываются в одних недовольствах, но ладно визуально, так ведь чуть ли не неделю каждая страница в недовольствах, а это что-то да значит, особенно когда сам проверишь… Вот я постучался в асю, пообщались, вы исчезли, потом кое-как вернулись, но молчок по полной. Зря вы так, всех клиентов распугаете таким макаром…”Кстати Минеру за описание Минус не указал что второй кооператив”
guns gooobet
drugs gooobet
prohibited content gooobet
ごけい キングダム, かんき, 魏火龍七師, キングダム 最新刊 ネタバレ, キングダム 呉慶 当サイト https://kingdom-kaitai.site/ をぜひご覧ください。情報は常に更新されていますので、最新のイベント情報を常に把握できます。当サイトはあらゆる情報が揃った総合情報源です!
porn gooobet
prostitutes gooobet
what type of business should i start townhouse for sale in dubai flat for rent in alquasis dubai
лучше недобздеть чем перебздеть!!! братуха я надеюсь и у тебя все будет ГУД! держи в курсе https://guidebar.ru тоже хочу нахватить, но жду отзывыЗачем писать таким большим шрифтом ? Здесь слепых нет. То что тебя где то кинули к нам никакого отношения не имеет.
drugs gooobet
drugs gooobet
guns gooobet
The expenditure of a separation attorney is figured out by situation intricacy and place.
prostitutes gooobet
prohibited content gooobet
cheating gooobet
dog friendly apartments in dubai for rent commercial property for sale in dubai dubai property show in china
какие манерные нынче клиенты пошли, плюнешь в рожу драться лезут, видете ли ему грубо ответили, я с ТС с момента регистрации общаюсь и не разу он не забуровил даже когда были терки а они поверь были, так что не пизди про невежливое обращение, да и по переписки видно что все ровно, ищи проблему в себе…. https://depoly59.ru Такие как я всегда обо всем приобретенном или полученном как пробник расписывают количество и качество, но такие же как я не будут производить заказ, не узнав обо всех качествах приобретаемого товара, ведь ни кто не хочет приобретать то, что выдают за оригинальный товар (описанный на форумах или в википедии), а оказывается на деле совсем другое. Или необходимо самолично покупать у всех магазов, чтобы самолично проверить качество, чтобы другие не подкололись? Матерей Тэрэз тут тоже не много, чтоб так тратиться на такого рода проверки.крутой магазин
drugs gooobet
scam gooobet
porn gooobet
cheating gooobet
prohibited content gooobet
porn gooobet
Аренда сервера для бизнеса — задача, где важны надёжность, скорость и поддержка 24/7. Компания Netrack предлагает сервер в аренду с гарантированным аптаймом 99,9% и размещением в собственном дата-центре уровня Tier III. Требуется аренда сервера? На сайте https://netrack.ru/ можно выбрать конфигурацию под любые задачи — от стартапа до крупного корпоративного проекта. Каждый клиент получает изолированные выделенные ресурсы и квалифицированное техническое сопровождение на протяжении всего сотрудничества.
emaar sales centre abu dhabi emaar https://buypenthouseindubai.ae dubai property show in china
да по поводу точто все у них медленно спору нет) https://zdorovsarov.ru что сильнее 100 или 400 ? и по времени сколько действуют ?Доброго времени суток. 3-й заказ шел ровно неделю с момента оплаты. Спасибо за приятный сувенир :good:. Сам бы себе такой не знаю когда приобрел :). Вобщем за сервис снова 5+
เนื้อหานี้ อ่านแล้วได้ความรู้เพิ่ม ครับ
ดิฉัน เพิ่งเจอข้อมูลเกี่ยวกับ
เรื่องที่เกี่ยวข้อง
ดูต่อได้ที่ betflik93
น่าจะถูกใจใครหลายคน
เพราะอธิบายไว้ละเอียด
ขอบคุณที่แชร์ เนื้อหาดีๆ นี้
และหวังว่าจะได้เห็นโพสต์แนวนี้อีก
Looking for an online yoga app for your home yoga practice? Visit https://yoga-for-beginners.net/ and learn more about the Yoga Way app, which you can download to your mobile device. It allows you to move at your own pace and fit sessions into your daily routine. Yoga Way supports home yoga with clearly demonstrated and easy-to-understand yoga exercises.
ООО «РазВикТрейд» — белорусский производитель пресс-форм и изделий из пластика с опытом более 10 лет на рынках Беларуси и России. Полный производственный цикл включает проектирование, изготовление пресс-формы, серийное литьё и доставку готовых изделий клиенту. На https://press-forma.by/ доступен бесплатный расчёт стоимости проекта. Мощности предприятия — 1000 кв.м. и 24 единицы техники — обеспечивают стабильный выпуск до 1,5 млн изделий в месяц. Производство обходится дешевле китайского: чистая прибыль заказчика увеличивается в 2–3 раза.
hotel apartment for rent in deira city center palm jumeirah houses for sale dubai properties ghoroob
Ребята, у chemical-mix все на высшем уровне! https://jpnews.ru супер магаз”В Лс загораеться сообщениее,Захожу там координаты клада”
emaar dubai chi e 4 bedroom villa for sale in dubai dubai rent increase law
Приветствую всех! купил 0,5 кокса. Закинул деньги, получил адрес, приехал забрал, все на высоте! Кладмену отдельное спасибо, спрятал так что не доебаться. Качество просто улетное, и от меня и от друзей огромный плюс магазину. https://tpksibles.ru бро все что ты хочешь услышать, написано выше!! спакойствие и ожидание!))смотри на сайте в своих заказах (в коментариях)…
В последние годы банками всё чаще применяется автоматическая блокировка счета P2P в Казахстане из-за подозрений в мошенничестве (дропперство, треугольники) или нарушений Закона РК о ПОД/ФТ. Входящие переводы от незнакомых лиц система расценивает как подозрительные операции. Узнайте на странице https://blog.femida-justice.com/blokirovka-scheta-p2p-v-kazahstane/ ваши правильные шаги в этом направлении от Бахирева Анатолия Анатольевича, управляющего партнера юридической фирмы “Закон и Справедливость”.
tamil real estate agents in dubai houses for sale in palm jumeirah dubai front line real estate dubai
Украинский новостной ресурс охватывает все важные направления — от политики и бизнеса до спорта и медицины, предоставляя читателям свежие новости и развёрнутую аналитику без воды и лишних деталей. Авторы портала пишут честно и по делу: расследования, бизнес-обзоры, социальные репортажи выходят регулярно и привлекают широкую аудиторию. Переходите на https://ukrnet.org/ — украинская всемирная сеть новостей для тех кто ценит качественную журналистику. Публикации затрагивают как внутриукраинские события, так и международную повестку, превращая ресурс в обязательный источник для информированного читателя.
Клад сделан очень грамотно в безлюдном месте, к кладу прилагалось фото на котором указано место закладки. https://remont-62.ru и отдельный респект магазу за способ посылок=)))))обращаюсь по возможности сюда беру оптом от 50 грамм
highly regulated real estate market dubai https://palmjumeirahhousesforsale.it.com hotel apartment near laguna waterpark in dubai
магазину респект)) с корефанами накуримся вдоволь))) https://favor-rus.ru Просто КОСМОСНе согласен с Тобою!!!
https://flowtech.ru/images/pgs/melbet-bukmeker-prilozhenie-2025-obzor_4.html
https://aprila.by/cron/pgs/prilozhenie-stavki-melbet-sportivnaya-liniya-2025.html
https://www.furkanaslanjewelry.com/2026/04/22/kogda-sbornye-v-udare-raskatyvaem-luchshih-na-chm-2026-po-futbolu-s-melbet/
new apartments to buy in dubai commercial property for sale in dubai dubai land department fee financing ban
Всем советую таряться здесь))) Купить Мефедрон, Экстази, Кокаин, Бошки, Гашиш Закажу посмотрим я сам надеюсь что магазин хороший-проверенныйЗолотые слова.
https://ead.ministeriodeensinobg.com.br/molodye-zvyozdy-chto-rvutsya-v-top-igru-vzglyad-melbet-2026-iz-sankt-peterburga/
http://autofs.ru/documents/pages/melbet_android_12.html
https://www.gippslandlakesescapes.com.au/pgs/?kak-melbet-zavoevyvaet-serdca-igrokov-iz-ekaterinburga-i-ne-tolko-v-2026-godu.html
is dubai properties semi-government 5 bedroom villa for sale in dubai dubai new property developments
Они хоть кому нибудь отвечают? https://jpnews.ru всё прочитал) Стоищий отзыв так и не увидел)брал здесь мн пришло в ************!!! за это спасибо палева меньше!!! но порох отстой, – для девочек
hotel apartment for rent in business bay https://townhouseforsaleindubai.ae karama dubai rent
Запулил:$: ждёмс… отпишу…. Селер адекватный:voo-hoo: https://vent-tur.ru желаем успехов магазину и процветания, очень ждемСделал 4 затяжки с батла, почувствовал секунд через 30 первое прикосновение.))) Затем не много стал теряться в пространстве и во времени, а когда поднялся домой, и открыл дверь (5 мин спустя) меня перекрыло нах, я не мог закрыть дверь и мне всё казалось что кто то держит, у меня начинается паника) я начинаю кричать за дверь: – ты кто такой отпусти, иди отсюда………….. Зову родаков, которых дома нет слава Богу!!!!! вообщем стоял минут 20 у двери) а когда пошёл в комнату мне казалось что кто то за мной ходит!!!
I’m gone to convey my little brother, that he should also pay a quick visit this webpage on regular basis to take updated from
newest reports.
CryoOne специализируется на производстве азотных криокапсул российского производства для beauty-бизнеса, спортивных центров и восстановительной медицины. Оборудование окупается за 6 месяцев, не требует медицинской лицензии и генерирует стабильный поток клиентов за счёт WOW-эффекта процедуры. На https://cryoone.ru/ представлены четыре комплектации — Standard, Business, Pro и Comfort — с гарантией 24 месяца и бесплатными доставкой, монтажом и обучением. В комплект поставки включён сосуд Дьюара, а цена фиксируется гарантией лучшего предложения на рынке.
world trade center hotel buy penthouse in dubai dubai property purchase calculator
пт всем.скоростя здесь имеются? https://zdorovsarov.ru Где-то с год – полтора назад пользовался услугами Кемикал Микса. Продуктция чатенько имела разые цвета, плотность и консистенцию, что немного напрягало, но “пручесть” продуктов всегда была на уровне. На моей памяти меньше косяков было только у Химхома, но они, к нашему сожалению, канули в лету.Магазин знает как удалить учетку что бы закрыв чат в жабере у вас исчезла запись из списка контактов. У меня так было вчера. Адрес не давали в течении 2х часов а под утро сегодня и вовсе исчезли из контактов.
Domamir — бренд качественной сантехники с минималистичным дизайном и широким выбором покрытий для современного интерьера. Компания специализируется на полотенцесушителях, смесителях и аксессуарах для ванной — каждая позиция подобрана с учётом актуальных трендов. На https://domamir-group.ru/ размещён удобный каталог с возможностью сравнения моделей по серии и покрытию. Ассортимент охватывает решения для разных стилей и бюджетов — от минималистичных форм до более выразительных конструкций.
dubai property consultants registration palm jumeirah houses for sale aldar real estate dubai
РАБОТАЕМ!!! ОПТ!!! ДОСТАВКА!!! https://burlesquevl.ru )))) все любители пробничков ))))Сделал заказ. Пропустил реквизиты для оплаты. Продавец свяжись со мной, оплачу. В понедельник сможете отправить товар?
With havin so much content and articles do you ever
run into any problems of plagorism or copyright infringement?
My website has a lot of exclusive content I’ve either created myself or outsourced but it appears a lot of it is popping it up all over the internet
without my authorization. Do you know any techniques to
help prevent content from being stolen?
I’d truly appreciate it.
С 1997 года симферопольская компания «Транзит Медиа» задаёт стандарты рекламного производства в Крыму: широкоформатная полноцветная и УФ-печать, брендирование корпоративного транспорта, изготовление баннеров, вывесок и изделий из акрила — всё это выполняется на собственном оборудовании с использованием качественных европейских материалов. Подробный каталог услуг и актуальные цены производителя размещены на https://transitmedia.ru/, где можно сразу оформить заявку. Более 25 лет безупречной работы, гарантия на все изделия и услуги, доставка по Симферополю и городам Крыма — весомые аргументы в пользу надёжного партнёра для вашего бизнеса.
1.bedroom flat in al twar 2 dubai for rent https://5bedroomvillaforsaleindubai.org al rawda tower al nahda 1
Máquina tragamonedas Garage: una guía para jugar gratis en línea en https://tragamonedasgarage.com/ – prueba la tragamonedas en modo demo, entiende cómo funcionan los rodillos y descubre dónde jugar con dinero real, ¡además de obtener bonos de registro! En el sitio web, encontrarás una guía de Garage que te ayudará a ganar más.
chemica l-mix.com,объявитесь на соседнем форуме(СпФН),вас там ОООООООчень заждались..! Купить Мефедрон, Экстази, Кокаин, Бошки, Гашиш Причёт тут почта России, СПСР это самостоятельная курьерская служба.Ae!Магазин ровнее уровня)Брал несколько раз.все ровно.ТСу отдельное спасибо) Удачи вам парни)
Медиапортал «Корреспондент» подаёт новости Украины и планеты в реальном времени — политика, бизнес, технологии и общество без цензуры и редакционных ограничений. Портал последовательно берётся за сложные темы: коррупционные расследования, репортажи о событиях и аналитические бизнес-обзоры публикуются без перерывов. Следите за актуальной повесткой на https://karrespondent.com/ — украинский новостной ресурс для читателей ценящих скорость и фактическую точность. Темы культуры, социума, технологий и острых конфликтов обеспечивают полноту редакционного охвата и утверждают портал как ключевую точку входа для взыскательной аудитории.
Hello! I simply would like to offer you a big thumbs
up for your excellent information you have got here on this post.
I will be returning to your website for more soon.
harmony real estate broker dubai property finder https://5bedroomvillaforsaleindubai.org how to be contractor for dubai properties
часть покупателей устраивает, продавцы тоже не жалуется. В чем проблема? нет терпения – идите в другие шопы. https://kirovsp.ru отличный магазин! обращаюсь уже не первый месяцПослезавтра запрет в силу вступает
Have you ever thought about writing an e-book or guest
authoring on other websites? I have a blog based upon on the same information you
discuss and would love to have you share some stories/information. I
know my audience would value your work. If you are even remotely
interested, feel free to shoot me an e mail.
https://social.studentb.eu/forums/thread/14101/
bedava bitcoin, ücretsiz kripto, casino bonus,
casino sitesi, güvenilir casino, online casino, canlı casino,
slot oyunları, rulet oyna, poker oyna, blackjack oyna, bahis sitesi, güvenilir bahis, canlı bahis, spor bahisleri, yüksek oran bahis, kaçak bahis, bedava bahis, deneme bonusu,
hoşgeldin bonusu, casino free spin, slot free spin, kumar sitesi, kumarhane, çevrimiçi kumar, illegal bahis, yasa dışı bahis,
illegal casino, yasadışı kumar, kayıt olmadan bahis, kimlik doğrulama yok bahis, bahis para yatır, bahis para çek, casino para
çekme, casino para yatırma, slot jackpot, jackpot casino,
bedava casino, ücretsiz casino, casino demo, canlı krupiye,
canlı rulet, canlı blackjack, canlı poker,
canlı baccarat, baccarat oyna, baccarat sitesi, çevrimsiz bonus,
yatırımsız bonus, çevrim şartsız bonus, kayıp bonusu, kayıp iadesi,
free bet, freespin, casino cashback, bahis cashback, bedava iddaa, maç izle bahis, canlı maç bahis, futbol
bahis, basketbol bahis, tenis bahis, esports
bahis, sanal bahis, sanal spor bahis, köpek yarışı bahis,
at yarışı bahis, greyhound bahis, poker freeroll, escort bayan, escort
istanbul, escort ankara, escort izmir, escort bursa, escort adana, escort kocaeli, escort mersin, escort antalya,
escort gaziantep, escort konya, escort diyarbakır, escort aydın, escort kayseri, vip escort, ucuz escort, eve
gelen escort, otele gelen escort, saatlik escort, gecelik
escort, haftalık escort, çıkmalık escort, rezidans escort,
öğrenci escort, yabancı escort, rus escort,
ukraynalı escort, arap escort, sarışın escort, esmer escort, olgun escort
Букмекерская контора Melbet предоставляет игрокам глубокую роспись на футбольные еврокубки, теннисные турниры и топовые лиги киберспорта с гарантией безопасности игрового счета. Используйте выгодные опции выкупа ставок, копите баллы в программе лояльности и выводите выигрыши через популярные платежные методы за считанные минуты. Начните играть на надежной платформе Мелбет и оценив удобный интерфейс, оперативность расчетов и специальные предложения на экспрессы.
https://medical911.ru/pag/melbet-oficialnyj-sajt-skachat-2026-obzor_1.html
al warqa 2 bedroom for rent https://palmjumeirahhousesforsale.it.com Apartments for sale in 25H Heimat
https://www.video-bookmark.com/bookmark/7124094/motorenlager/
с утра в работу поставим, не волнуйся!!! просто менеджер у нас очень ответственный, считает каждую копейку, таких людей очень мало… Купить Мефедрон, Экстази, Кокаин, Бошки, Гашиш угу, “на глазок” отсыпали. купи весы и взвесь нормально. На вид оно может показаться как больше так и меньше…Я заказал еще 19 числа на сайте, оплатил 23 числа, ТС выслал 25 числа, тогда я и тут зарегился, так как он отправил не той службой, думал кинули. Пришло все вчера, забрал днем, попробовал вечером
Aw, this was an incredibly nice post. Taking the time and actual
effort to produce a superb article… but what can I say… I procrastinate
a lot and never manage to get anything done.
Официальный сайт международного букмекера Мелбет предлагает широкую линию ставок на более чем 45 видов спорта с высокими коэффициентами и минимальной маржой. Пройдите быструю регистрацию на ru.melbet.com, активируйте приветственные бонусы и получите доступ к прямым трансляциям матчей и мгновенным выплатам без комиссий. Мобильное приложение БК Melbet обеспечивает круглосуточный доступ к Live-ставкам, детальной аналитике и круглосуточной службе поддержки прямо со смартфона.
https://pokermunchies.xyz/melbet-2026-veselyy-razbor-mezhdunarodnogo-bukmekera-moskva/
fun facts about the dubai real estate https://5bedroomvillaforsaleindubai.org cheapest rent a studio villa in al qusises dubai
Всем привет. Купить Мефедрон, Экстази, Кокаин, Бошки, Гашиш Ничего не пойму.. Я уже третий день пытаюсь договориться и всё бесполезно. Прошу номер кошелька куда перевести, говорит щас и пропадает на пол дня, и так постоянно. Может на мелкий заказ как у меня им пох. Заказываю 10 гр.Заказываю 2c-I для начала 1 г!!
What’s up it’s me, I am also visiting this website regularly, this web
site is truly good and the users are really sharing good thoughts.
http://www.hunyadi-zuglo.hu/files/pages/?melbet-2026-polnyj-obzor-mezhdunarodnoj-bk_5.html
building 20 city walk https://5bedroomvillaforsaleindubai.org dubai property managemeng companies
Отличный магазин с отличным продуктом. https://postel-best.ru да это будет полная:ass:.Ну я надеюсь все будет хорошо.тогда так вышло иза того что это остатки товара из серии мн – 001.Уверен такой жопы больше не будетДа магаз от души тут работает давно и чётко ,было время работал с ним по опту !!! С новым годом всех!
Для меня это оптимальный букмекер
по скорости работы платформы
и величине предлагаемых котировок.
http://veglas51.ru/about/pgs/?korrekciya_agressii_u_sobaki_taktika_posledovatelynoy_socializacii.html
В службе поддержки работают адекватные ребята, помогли быстро решить вопрос с подтверждением личных данных.
http://gesangverein-au.de/media/pgs/melbet-2025-polnyy-obzor-mezhdunarodnoy-bk-dlya-azartnyh-igrokov.html
Бонусная программа для постоянных игроков мотивирует, кэшбэк капает регулярно каждую неделю.
https://strandetterem.hu/bin/page/?obzor-melbet-v-2026-chto-zhdet-kazhdogo-igroka-v-mezhdunarodnoj-bk_13.html
В приложении нет навязчивой баннерной рекламы, которая
отвлекала бы от выбора исходов в купоне.
https://bbrh.org/pages/melbet-kazino-skachat-na-android-2025_2.html
Минимальный порог для пополнения баланса
совсем небольшой, можно протестировать платформу без крупных вложений.
http://mba-msu.ru/ckfinder/pages/?my_razveivaem_somneniya_naturalynoe_protiv_sinteticheskogo.html
Перешел сюда из другой конторы ради более высоких коэффициентов на футбол, разница на дистанции заметна. https://otparivatel.com/inc/pgs/?natyaghnoy_potolok_v_chem_plyusy_udobstvo_dostupnyh_innovaciy.html
Компания «ВторСтекло» https://www.vtorsteklo.ru/ специализируется на приеме, вывозе и утилизации стеклянных отходов от населения и бизнеса. Организация работает на рынке более 20 лет, предлагая выгодные условия сотрудничества и оперативное обслуживание. Компания принимает различные виды стеклобоя: оконное стекло, стеклопакеты, бутылки и банки любых цветов и объемов. Собственный автопарк и спецтехника позволяют быстро организовать вывоз стекла с объектов клиентов, а также установить контейнеры для сбора отходов. Все собранное сырье направляется на перерабатывающие предприятия, где используется повторно в промышленности.
dubai real estate brokers directory https://housesforsaleinpalmjumeirahdubai.ae list of public real estate companies dubai
к вам претензий нет.. но вот хвосты не радуют.. Купить Мефедрон, Экстази, Кокаин, Бошки, Гашиш д не магаз рооовный так что не переживай все будет четко)))Всем привет! В магазе есть представительства по регионам, закладками? Ярославль?
При пополнении игрового счета комиссия не взимается, вся сумма до копейки поступает на баланс. https://1000miles.ru/wp-content/pages/sport-stavki-i-zerkalo-melbet-na-segodnya-vryvaemsya-v-2026-s-ogonkom.html
не мне в пятницу и субботу он отвечал.гворит документы есть что отправленно Купить Бошки, Кокаин, Гашиш, МДМА, Мефедрон jte тут брал кто?Как качество?К скольки делать?Всем привет ни как не могу заказ оформить, помогите,плиз
Для любителей теории ставок здесь есть все необходимые инструменты и подробные архивы результатов. https://bcag.com.mx/prover-svoi-stavki-obzor-melbet-2026-s-izyuminkoy-i-prognozami-iz-pitera/
Максимальные лимиты на топовые события позволяют играть по-крупному, ограничения не давят. https://www.eletricabrasil.com.br/melbet-2026-mezhdunarodnyy-obzor-s-www-stena-ee/
micro apartments in dubai property for sale in downtown dubai apartments to buy in dubai marina
Заказал на пробу 50гр 203, придёт люди попробуют я отпишусь,планирую сделать 1к9-ну не верю я когда говорят что можно 1к 13,15 итд. https://remtehdom.ru Если хотите подешевле – вам сюда. Если же располагаете финансами – штудируйте ветки доверенных магазинов, есть селлеры куда более ответственные и стоящие. Лично я не планирую дальше сотрудничать с этим магазином. Спасибо за внимание.и такая хрень каждый день.
Идентификация аккаунта прошла стандартно, проверили фотографии документов за пару часов в рабочий день. https://kld-stroy.ru/img/pgs/?34astrologiya_pechali_kakie_znaki_zodiaka_grustyat_chasche_drugih.html
Heya i am for the first time here. I came across this board and I find It truly
useful & it helped me out a lot. I hope to give something back
and help others like you helped me.
Hello, its good post about media print, we all be aware of media is a great source of data.
pure gold real estate development dubai apartments for sale in silicon oasis dubai Apartments for sale in Orla Infinity
супер !!! https://sekrety-lady.ru Да мне 5 сообщений для лс нужно :Dа так месяц назад было все ровно)”А если Подтвердиться прошу перевыдать пробу вашего продукта Нормального Ибо Иметь дело с вашим магазином я не вижу смысла”
Hey there! Do you know if they make any plugins to
safeguard against hackers? I’m kinda paranoid about losing everything I’ve worked hard on. Any tips?
Thanks for sharing your thoughts. I truly appreciate your efforts and I am waiting for your further post
thank you once again.
Современные стеклянные перегородки трансформируют офисное пространство, создавая атмосферу открытости и профессионализма. Компания предлагает полный спектр архитектурных решений для бизнес-интерьеров: от классических систем Standart с алюминиевым профилем до инновационных компактных конструкций Slim для узких проёмов. На https://wall.glass/ представлены не только перегородки, но и дизайнерские светильники серий ORIO LINE и INI LED, акустические войлочные панели, которые обеспечивают комфортную звукоизоляцию. Производство и монтаж в Москве с гарантией качества.
Hello there! Do you know if they make any plugins
to assist with SEO? I’m trying to get my blog to rank for some targeted keywords but I’m not
seeing very good success. If you know of any
please share. Cheers!
Информационный портал https://news.com.kz/ представляет собой современную новостную площадку, предоставляющую жителям Казахстана оперативный доступ к актуальным событиям в стране и мире. На сайте размещены материалы по ключевым тематикам: политика, экономика, общество, культура, спорт и технологии, что позволяет читателям получать всестороннюю картину происходящего. Удобная навигация и структурированная подача информации делают портал удобным инструментом для ежедневного мониторинга новостей.
real estate developer https://whytoinvestindubairealestate.com dubai hills 1 bedroom
ハイセンシとは シュラウド ヴァロラントの感覚 頂点の精神 ヴァロラントの感覚 これらはすべて当社の Web サイト https://gamersettings.net/ にあります – すべてのイベントの最新情報を入手できる最新情報をお見逃しなく
Может быть, не отрицаю. Пока никого винить не буду, потому что вполне возможно что я и сам закосячил. Но вроде все правильно делал. При том я не один такой..До этого приходил ам (окло недели-полторы, назад) делал все точно так же, но только на черной заварке принцесса Нури, 1 к 10, и с водника уносило далекоооо….всех кто пробовал этот водник.. Купить Бошки, Кокаин, Гашиш, МДМА, Мефедрон Обратились, всё довольно оперативноСогласен магазин хороший, знают свое дело!
Финские лакокрасочные материалы Teknos — профессиональный выбор для защиты и отделки дерева. TEKNOL AQUA 1410-01 эффективно предотвращает биопоражения древесины, AQUA PRIMER 2900-02 гарантирует надёжное сцепление слоёв, а лак AQUATOP 2600-94 формирует стойкое защитно-декоративное покрытие. Ищете лучшая фасадная краска по дереву? На teknotrend.ru представлен полный ассортимент оригинальной продукции Teknos с оптовыми ценами и быстрой доставкой по Москве и России.
«Элек-Опт» — надёжный поставщик электротехнической продукции для строительных компаний, монтажных бригад и частных клиентов. Сертифицированная продукция охватывает полный спектр потребностей в электромонтаже и профессиональном освещении. Ищете кабель мг? Заказать товар с доставкой по России можно на elek-opt.ru — актуальный каталог с быстрым оформлением заказа доступен круглосуточно.
buroj property development business bay dubai plots for sale in dubai dubai land and property department
Прогулки по Москве-реке давно вышли за рамки обычной экскурсии — сегодня это полноценный вечер с музыкой, шоу и живыми выступлениями прямо на борту теплохода. Формат на выбор — дискотеки 80–90-х, DJ-сеты, тематические концерты и элегантные Premium-круизы с ужином — всё это работает ежедневно для любой компании. Ищете хиты 80-х на теплоходе билеты? Билеты бронируются онлайн на ticketscruise.ru — быстро и без лишних шагов. Особой популярностью пользуется концерт «Хиты Италии» на борту «Ривер Паласа» — отправление с причала Сити-Экспоцентр.
Лаборатория «Сила Света» специализируется на светотехнических измерениях и формировании официально значимых протоколов по всем нормативным требованиям. На http://silasveta-lab.ru/ доступна проверка подлинности любого протокола по уникальному коду или QR-коду — это исключает подделки и гарантирует достоверность данных. Лаборатория работает в строгом соответствии с нормативами и располагает актуальными свидетельствами о поверке средств измерений.
магаз ровный!!! все на высшем уровне!!! работаю с ними много лет!!! https://vtarget.ru Ооо да, тусишка у них лучшая из того – что мне доводилось пробовать ))Да хорошо бы было, сегодня уже получу трек. Но конечно напугали всякие кому типа ам плохой пришёл.
シャチ 賢い, ドグラマグラ ネタバレ, 徒然草 作者, 詩集 小学生, 詩 短い. あなたはこれまで、こんな疑問を抱いたことがありますか?あるいは、答えがわからない他の疑問は?https://www.daremomiteinai.com/ にアクセスすれば、あなたのあらゆる疑問への答えが見つかります。このサイトは、あなたが答えを知らないかもしれない、重要かつ日常的な疑問に答えることに特化しています。
Нужен автомобиль в Калининграде без лишних хлопот? OmegaX сдаёт автомобили в аренду без водителя по честным ценам. Автопарк составляют Renault Logan, Lada Vesta, Volkswagen Polo, KIA Rio — исключительно автоматы. Ищете автопрокат в Калининграде? Подробности и бронирование на omegax39.ru/arenda_prokat_avto_kaliningrad.html — офис находится прямо в аэропорту Храброво. Идеально для приезжающих: автомобиль ждёт вас прямо у выхода из терминала.
rent apartments in dubai jlt plots for sale in dubai ham real estate dubai
Приветствую всех! купил 0,5 кокса. Закинул деньги, получил адрес, приехал забрал, все на высоте! Кладмену отдельное спасибо, спрятал так что не доебаться. Качество просто улетное, и от меня и от друзей огромный плюс магазину. Купить Бошки, Кокаин, Гашиш, МДМА, Мефедрон отпишеш как все прошло броглавное что ты “вкурил”, а как мне тебе это втереть уже не важно
spg hotel apartments in dubai https://apartmentsforsaleindubaiinvestmentpark.info list of freehold properties in dubai
Эйфора сейчас нет в наличии, если только индивидуальный заказ от 1кг. Купить Бошки, Кокаин, Гашиш, МДМА, Мефедрон Ну а как сейчас я конечно не знаю как тут… Думаю время покажет, и фараоны может раслабятся:police: либо появится какая нибудь другая лазейка по сбыту..Большое спасибо от Сиборяка из Москвы, ваш магаз резко скрасил жизнь во время командировки в Москве.
When I originally commented I clicked the “Notify me when new comments are added” checkbox and
now each time a comment is added I get three e-mails with the
same comment. Is there any way you can remove me from that service?
Thanks!
freehold land for sale in dubai apartments for sale in silicon oasis dubai lootah real estate development llc dubai to metro station
Почему больше не забегаете ? https://winteriada.ru Я знаете как делаю, когда пацики отвечают сразу делаю заказ, оплачиваю и все чотка, самим тормозить не надоРовный магаз брацы
When I initially commented I appear to have clicked the -Notify me when new comments are added- checkbox and
now each time a comment is added I receive 4 emails with the same comment.
Perhaps there is a means you are able to remove me from that service?
Thanks!
Современные финансовые технологии открывают новые возможности для тех, кто оказался в сложной ситуации и нуждается в срочных средствах. Онлайн-займы стали настоящим спасением для миллионов россиян: заявка рассматривается за считанные минуты, а деньги поступают на карту практически мгновенно. На платформе https://xn—-7sbujpz2a7c.xn--p1ai/ собраны проверенные предложения от надёжных микрофинансовых организаций с прозрачными условиями. Особенно привлекательно, что новые клиенты могут получить первый займ под 0%, а одобрение возможно даже при непростой кредитной истории. Сервис работает круглосуточно, избавляя от необходимости посещать офисы и стоять в очередях — всё решается дистанционно за 15 минут.
wasl properties dubai creek studio for sale in dubai real estate agent database dubai
Отзыв ждать ? Ты это умеешь , на бизе писал не плохие … Купить Бошки, Кокаин, Гашиш, МДМА, Мефедрон я начинаю выписывать недели за 2 до примерного окончания стратегических запасов))) и еще на черный день нычки есть)) простоев быть не должно)Но могу сказать что на данный момент проблемы с отправкой у магазина! в среду оплатил и сказали в четверг будет отправка, но увы ее нет! такое в первый раз замечаю от такого магазина! будем ждать!
cheap studio apartments for rent in dubai on monthly basis property for sale in downtown dubai family studio for rent in dubai
We’re a group of volunteers and opening a brand new scheme in our community.
Your site provided us with useful information to work on.
You have performed a formidable task and our whole community
will likely be thankful to you.
Look into my web-site – zgarcitul01
пробуй 4фа, 2-dpmp их кушать надо или нюхать? пробовал хоть раз фаер спит https://baykal-atlantis.ru а что с алхимом случилось?ну может она на меня так подействовала слабо,незнаю прям:dontknown:..надеюсь что-нибудь попробовать сильного из вашего ассортимента;)..p.s. пишу так как было,не перегибая.
mou in buying dubai property https://apartmentsforsaleinsiliconoasisdubai.co dubai property investment ranking
Оправдания в небе не ищут, https://doorsinfo.ru -1. Вас, продавцов, много, а я один.ОО мне то же все пришло!
БК Melbet предоставляет качественные условия для любителей спортивного прогнозирования, включая подробную роспись на статистические показатели команд. Пополняйте счет через современные платежные системы, ловите выгодные котировки в Live-режиме и выводите честно выигранные средства в минимальные сроки. Используйте функционал мобильного софта для постоянного контроля своих открытых купонов.
https://www.roudeleiwimmobilier.lu/agents/benitou0979775/
БК Melbet предоставляет качественные условия для любителей спортивного прогнозирования, включая подробную роспись на статистические показатели команд. Пополняйте счет через современные платежные системы, ловите выгодные котировки в Live-режиме и выводите честно выигранные средства в минимальные сроки. Используйте функционал мобильного софта для постоянного контроля своих открытых купонов.
https://links.wpmhs.com/berndsimoi8619
Bài viết rất hay.
Mình đã đọc và học thêm được nhiều điều từ bài viết
này.
Hy vọng sẽ có thêm nhiều bài chia sẻ
hay hơn nữa trong thời gian tới.
https://go88elite.com/
БК Melbet предоставляет качественные условия для любителей спортивного прогнозирования, включая подробную роспись на статистические показатели команд. Пополняйте счет через современные платежные системы, ловите выгодные котировки в Live-режиме и выводите честно выигранные средства в минимальные сроки. Используйте функционал мобильного софта для постоянного контроля своих открытых купонов.
http://www.jobteck.co.in/companies/gobeyondsynergy/
Excellent goods from you, man. I’ve remember your stuff prior to and you’re
simply too great. I really like what you have acquired here,
really like what you are stating and the best way by which you are saying it.
You’re making it entertaining and you continue to care for to stay
it wise. I cant wait to read far more from you. This is really a tremendous site.
Почему пользователи выбирают площадку KRAKEN?
Маркетплейс KRAKEN заслужил доверие многочисленной аудитории благодаря сочетанию ключевых факторов.
Во-первых, это широкий и разнообразный ассортимент, представленный сотнями продавцов.
Во-вторых, интуитивно понятный
интерфейс KRAKEN, который упрощает навигацию, поиск товаров и управление заказами даже
для новых пользователей.
В-третьих, продуманная система безопасных транзакций, включающая механизмы разрешения споров (диспутов) и возможность использования условного
депонирования, что минимизирует
риски для обеих сторон сделки.
На KRAKEN функциональность сочетается с
внимательным отношением к безопасности клиентов, что делает процесс
покупок более предсказуемым, защищенным и,
как следствие, популярным среди пользователей, ценящих анонимность и надежность.
https://rusticasleon.es/2026/04/22/kak-melbet-v-2026-carit-na-mezhdunarodnom-rynke-stavok-zhivoy-obzor-ot-vsplanet-net/
dubai hills estate properties for sale https://apartmentsforsaleindubaiinvestmentpark.info rent one bedroom hotel apartments in bur dubai
Один из топовых продавцов на всем РЦ:) https://baykal-atlantis.ru И потом не удивляйтесь, что магазин медленно работает или не отвечает. Попробуйте по 100 раз в день рассказывать что и как разводить, и при этом успевать оформлять заказы.Е.ать ты тиип.иди стукнись об стену..наxрен здесь такие большные люди нужны на форуме!По поводу фразы-настраиваися на спид..На работу таким Xодить надо axaxax
https://tyremanauto.co.za/melbet-v-2026-kak-topovaya-bk-iz-moskvy-menyaet-igru-i-darit-drayv/
average rent for 1 bedroom apartment in dubai why to invest in dubai real estate freehold property in dubai for expats
магаз работает ровно, все четко и ровно, респект продавцам https://stroenija.ru один из фаворитов в рц!я все ровно остался в минусе не заказа и деньги с комисией переводятся . если ты правду говорил про посылку то если она придет я сразу закину тебе деньги и напишу свои извенения и все везде узнают что у тебя честный магазин.как клиенту мне ни разу не принесли извенения это бы хоть как то компенсировало маральный ущерб
Широкий ассортимент кабелей, автоматов, розеток, щитового оборудования и световых решений для дома и бизнеса — всё это предлагает магазин электрики «Элекс». Вся продукция от проверенных производителей — только сертифицированный товар без брака. Ищете кабель кгн цена за метр ? На shop.elekspb.ru представлен удобный каталог с актуальными ценами и быстрым оформлением заказа. Удобная доставка по Санкт-Петербургу и всей России обеспечивает комфорт для профессионалов и частных покупателей.
apartment with garden https://plotsforsaleindubai.co dubai properties ownership
заказал у KingSize – всё ровно вышло. Большего и добавлять незачем https://partner-taxi.ru Качественная продукция, советую заскочить! товар стоит вашего внимания!В среду оплатил вечером заказ в субботу уже был на месте)))ценик вообще отличный,качество радует)))
Психическое здоровье – частная психиатрическая клиника со стационаром https://psyclinic-center.ru/ . Руководитель клиники – доктор наук Виталий Минутко. Психиатрическая клиника занимается диагностикой и лечением депрессии, ОКР, анорексии, шизофрении, аутизма, биполярного расстройства, тиков, тревожности, неврозов, галюцинаций, деменции и других заболеваний.
The pros and cons of investing in hotel apartments in Dubai https://studioforsaleindubai.info how to buy cheap houses in dubai
Но могу сказать что на данный момент проблемы с отправкой у магазина! в среду оплатил и сказали в четверг будет отправка, но увы ее нет! такое в первый раз замечаю от такого магазина! будем ждать! https://stroenija.ru Как часы19-го адрес был дан.
I have to thank you for the efforts you’ve put in writing this website.
I’m hoping to see the same high-grade blog posts by
you in the future as well. In fact, your creative writing abilities has motivated me to get my own site now 😉
https://j-soul810.jp/archives/2415
役立つ情報をお探しですか子供 留守番 何歳から 法律, ペーパードライバー 克服できなかった, 富良野 子供 ホテル, 小学校 個人面談 子供と一緒, 2人組 ?https://dragon737.com/ にアクセスすれば、これらのトピックをはじめ、あなたが興味を持つあらゆるトピックに関する包括的な情報を見つけることができます。このブログはユーザーフレンドリーな設計に
al raha lofts studio for sale in dubai al barsha rent
http://hydro-complex.com.pl/galeria/
Ага ровный!!!!И я так считал до некоторых случаев! Купить Бошки, Кокаин, Гашиш, МДМА, Мефедрон все ровно тут ?Магазин замечательный!!
Woah! I’m really loving the template/theme of this blog.
It’s simple, yet effective. A lot of times it’s challenging to get that “perfect balance” between superb usability and visual appeal.
I must say you’ve done a amazing job with this. Also, the blog loads super fast for me on Opera.
Excellent Blog!
https://careermistry.com/how-to-register-enrolled-on-skillup-step-by-step-2/
Пермское кафе «Фабрико» предлагает римскую и неаполитанскую пиццу по классическим рецептам, а также роллы, суши, бургеры, супы, пасту и десерты. Ищете заказать роллы? На fab-pizza.ru можно оформить доставку или самовывоз со скидкой 10%. Скидка 15% действует для именинников три дня до и три дня после дня рождения, а заказ трёх больших пицц подарит четвёртую бесплатно. Просторный зал с панорамными окнами, уголок для детей и банкетная зона на 25 гостей обеспечивают комфорт при любом поводе для визита.
apartment in dubai downtown in airbnb plots for sale in dubai is it safe to invest in dubai property
https://www.aclibertas.com/2018/10/25/benvenuto-mister/
Покуреха порошки безвкусные (на язык), остальные горькие. Так проще всего определить. https://pimenov-photo.ru НЕТ не пришла, но это у СПСР экспресс вообще какая то лажа, раньше все привозили вовремя, а теперь вообще какую то чепуху сочиняют, звонил говорят не знаем почему посылку курьер не взял…5 сообщений в курилках быстрее набивается , сообщения засчитываются только при ответе или цитате стороннего сообщения. Просто флуд сообщения не набивает.
MarketGram — платформа автоматизации маркетинга в мессенджерах, созданная для бизнеса любого масштаба. Платформа даёт возможность создавать воронки продаж, отправлять рассылки в Telegram и WhatsApp, делить аудиторию на сегменты и отслеживать эффективность кампаний онлайн. Ищете старые аккаунты телеграм? Посетите marketgram.io — инструмент окупается уже с первых кампаний. Понятный интерфейс и адаптивные тарифы позволяют работать с платформой без какой-либо технической подготовки.
http://ssl.hostingplatform.com/kenbc.nihonjin.jp/album/album.cgi?mode=detail&no=240&page=0
pakistanies owned properties in dubai https://whytoinvestindubairealestate.com pet friendly apartments for rent in dubai
Откройте для себя удивительную Японию вместе с профессиональным туроператором «МОЙ ТОКИО», который специализируется исключительно на турах в Страну восходящего солнца. Компания предлагает разнообразные программы: от классических экскурсионных маршрутов по Токио, Киото и Осаке до тематических туров по следам аниме, горнолыжного отдыха в Нагано и пляжного релакса на Окинаве. На сайте https://dvmt.ru/ вы найдете готовые групповые туры и возможность создать индивидуальный маршрут с учетом ваших интересов. Туроператор имеет реестровый номер РТО 004645, что гарантирует надежность и безопасность вашего путешествия в эту fascinирующую страну контрастов.
Wonderful website. Lots of helpful information here.
I’m sending it to several friends ans additionally sharing
in delicious. And naturally, thank you in your effort!
http://elisaotel.com/component/k2/item/37-portfolio-content-5.html
Где-то с год – полтора назад пользовался услугами Кемикал Микса. Продуктция чатенько имела разые цвета, плотность и консистенцию, что немного напрягало, но “пручесть” продуктов всегда была на уровне. На моей памяти меньше косяков было только у Химхома, но они, к нашему сожалению, канули в лету. Купить Бошки, Кокаин, Гашиш, МДМА, Мефедрон У меня кстати тоже через 2 дня пришло, но в соседний город, так как в моём городе этой конторы не оказалось) но мне сразу позвонили, и предложили либо самому приехать за пакетом, либо подождать до вторника и мне его привезут домой. Вот жду)Успехов вам господа : )
Группа компаний САФОРА — надежный производитель лакокрасочных материалов, предлагающий профессиональные решения для ремонта и творчества. В ассортименте представлены колеровочные пасты, акриловые эмали с различными эффектами, краски для любых поверхностей, лаки для дерева и стен, а также защитные составы от плесени и гидроизоляция. На сайте https://safora18.ru/ можно подобрать качественные материалы для отделки радиаторов, печей и каминов, найти специализированные художественные краски и лаки для декупажа. Компания также предлагает грунтовки, клеи, монтажную пену и другие строительные материалы собственного производства, что гарантирует стабильное качество продукции и доступные цены для профессионалов и частных заказчиков.
https://www.seo-jd.de/seo-verbessern/
Hi, i feel that i noticed you visited my weblog thus i came to go back the desire?.I am attempting to in finding
issues to enhance my site!I suppose its adequate to use some of your ideas!!
new launch dubai properties studio for sale in dubai reliable real estate dubai
For newest news you have to visit internet and on web I found this web
site as a most excellent website for most recent
updates.
https://www.artesaniascolombianito.co/nurturing-the-bond-between-humans-and-nature/
а чё есть какое нить в/в в этом магазе что бы до бледного?:)очень сильно хочу https://petryashin.ru Не могу, не в личку написать, и аска не указаннаХороший магазин все качественно и оперативно и быстро, всегда здесь покупаю.
https://lebanonandtheworld.com/%D8%A7%D9%84%D8%AC%D9%86%D8%AF%D9%8A-%D8%B7%D8%A7%D8%B1%D9%82%D8%8C-%D9%8A%D8%B7%D9%84%D9%82-%D8%A7%D9%84%D9%86%D8%A7%D8%B1-%D8%B9%D9%84%D9%89-%D9%86%D9%81%D8%B3%D9%87-%D8%AE%D9%84%D8%A7%D9%84-%D8%A7/
I’ve read a few excellent stuff here. Certainly value bookmarking for revisiting.
I wonder how so much effort you place to create one of these fantastic informative website.
4BHK Twin Villa | Freehold | Limited Units property for sale in downtown dubai how to generate volume leads in real estate agency dubai
Интернет магазин пептидов https://gormon.org/ позволяет купить заказать отправить доставкой в любой город России. В наличии популярные пептиды, биорегуляторы, препараты уколы похудение жиросжигание, набор мышечной массы, оздоровление, лечение травм, послекурсовая терапия, пкт, витамины и добавки для роста волос и бороды. Официальный сайт отзывы poleznoo polezno полезно полезноо дешего недорого скидки.
ну сегодня пыхнул час назад ….. приопустило……………… но еще норм не грузит Купить Бошки, Кокаин, Гашиш, МДМА, Мефедрон Сработали быстро, посылка пришла за 4 дня, спрятано эффектноСотрудники , знают свое дело , лучше другого.
https://nycn.org.uk/2021/08/05/61st-nigeria-independence-celebration/
Hey just wanted to give you a quick heads up. The text in your
post seem to be running off the screen in Firefox. I’m not sure if this
is a formatting issue or something to do with web browser compatibility but I
thought I’d post to let you know. The layout look great though!
Hope you get the issue fixed soon. Kudos
flats for rent in dubai al ain road https://plotsforsaleindubai.co what time does the market open
https://bo24h.com/duong-xu-huong-gia-trendline/
хороший магазин,было дело работал с ними) https://deti-charodei.ru не бзди все будет ровно трек не всегда бьется это касяк курьерки а не отправителя не паникуймагазин суперский! качество и работа оператора на высшем уровне! респект
I like the helpful information you supply to your articles.
I will bookmark your blog and take a look at again here frequently.
I’m quite sure I will learn many new stuff right here!
Good luck for the next!
I have been browsing online more than three hours today, yet I never found any interesting article like yours.
It is pretty worth enough for me. In my opinion, if all site
owners and bloggers made good content as you did, the web will be a
lot more useful than ever before.
https://iuhrdf.org/en/rebiya-kadeer-uyghurs-in-thailand-have-also-become-victims-of-injustice-in-international-relations/
Nội dung rất chi tiết. Nguồn mình đọc thêm: https://b52clubss.com/ Giao
diện đẹp và dễ dùng.
dubai properties location studio for sale in dubai Apartments for rent in The Address Residence Fountain Views
中学生 詩, 神奈川県 高校入試日程, 変格活用 一覧, 茨城県公立高校入試, 八千代松陰 偏差値. ぜひ当社のウェブサイト https://manalab.jp/ をご覧ください!最新の情報が満載です。日本最大級のポータルサイトで、重要な知識を習得するお手伝いをいたします。
It is truly a great and helpful piece of info. I am happy that you shared this useful info with
us. Please stay us up to date like this. Thanks
for sharing.
https://jrisradioonline.jrismedia.com/hola-mundo/
Успехов и процветания магазину Купить Бошки, Кокаин, Гашиш, МДМА, Мефедрон Он падла как то сделал что у него такой же адрес в жабе как и у меня, люди будьте внимательны всегда и запрашивайте подтверждение через лс, для вашей же безопастности. Лучше лишний раз перестраховатьсяДобрый день форумчане! Кто нибудь подскажет как по качеству реагент в этом магазине? Соответствует ли заявленная концентрация? Сколько по времени держит если 1 к 20 сделать? Всем спасибо!!!
Почему пользователи выбирают площадку KRAKEN?
Маркетплейс KRAKEN заслужил доверие многочисленной аудитории благодаря сочетанию ключевых факторов.
Во-первых, это широкий и разнообразный ассортимент,
представленный сотнями продавцов.
Во-вторых, интуитивно понятный интерфейс
KRAKEN, который упрощает навигацию, поиск товаров и управление заказами даже для новых пользователей.
В-третьих, продуманная система безопасных транзакций,
включающая механизмы разрешения споров (диспутов) и возможность использования условного депонирования, что минимизирует риски для
обеих сторон сделки. На KRAKEN функциональность сочетается
с внимательным отношением к безопасности клиентов, что делает процесс покупок более предсказуемым, защищенным и, как
следствие, популярным среди пользователей, ценящих анонимность и надежность.
Профессиональная финская химия Teknos — надёжный выбор для долговечной защиты и декоративной отделки дерева. Антисептик TEKNOL AQUA 1410-01 обеспечивает биозащиту дерева, грунт AQUA PRIMER 2900-02 улучшает адгезию финишных покрытий, а AQUATOP 2600-94 создаёт долговечную лаковую плёнку. Ищете какая краска для фасадных работ лучше? На teknotrend.ru представлен полный ассортимент оригинальной продукции Teknos с оптовыми ценами и быстрой доставкой по Москве и России.
Wow, this piece of writing is fastidious, my younger sister is analyzing such things, so
I am going to tell her.
rent sharing villa in dubai apartments for sale in dubai investment park chiller free apartments for rent in dubai
I am extremely impressed along with your writing talents as smartly as with the structure to your blog.
Is this a paid topic or did you customize it your self?
Either way keep up the nice high quality
writing, it is uncommon to see a great blog like this one nowadays..
«Элек-Опт» — надёжный поставщик электротехнической продукции для строительных компаний, монтажных бригад и частных клиентов. Сертифицированная продукция охватывает полный спектр потребностей в электромонтаже и профессиональном освещении. Ищете кабель кмпв? Заказать товар с доставкой по России можно на elek-opt.ru — актуальный каталог с быстрым оформлением заказа доступен круглосуточно.
конечно оно так, все придет строго сколько сколько надо. Но ведь из за таких задержек могут и дела сорваться https://bayanmoscow.ru Просто я попутал!пробы есть?
Ассортимент игровых автоматов впечатляет, все топовые провайдеры на месте.
https://atflat.ge/agents/tanyalorenzini/
In 2026, WhatsApp marketing at scale demands more than raw accounts — it requires whatsapp hash channels.
These specially formatted sessions let automation tools send
bulk messages without QR code logins, dramatically
reducing detection risks. The whatsapp wart extractor is the industry-standard whatsapp hash channel creator that
converts any WhatsApp account into ready-to-use hash channels in seconds.
This guide explains everything: the whatsapp hash channel 6 segment format, step-by-step conversion, how to buy
whatsapp hash channels safely, and proven whatsapp hash channels anti ban tactics that keep accounts alive for months.
БК Мелбет предлагает отличные условия для крупных ставок, лимиты не режут.
https://leasingangels.net/author/tisham0880824/
Looking for automatic guitar tuning system? TronicalTune tronicaltune.net is a fully automatic guitar tuning system made in Germany. By pressing a single button, the system automatically tunes all six strings, helping musicians save time during live performances and studio sessions and enabling fast, accurate tuning changes. A great solution for anyone playing electric or acoustic guitar.
An outstanding share! I have just forwarded this onto a co-worker who was conducting a little research on this.
And he in fact ordered me dinner simply because I stumbled upon it for him…
lol. So allow me to reword this…. Thank YOU for the meal!!
But yeah, thanks for spending some time to discuss this subject here on your web page.
luxury property companies in dubai https://whytoinvestindubairealestate.com off plan projects in dubai
Пользуюсь Мелбетом уже несколько месяцев, пока только положительные эмоции.
https://git.healthathome.com.np/jamelnevarez28
Система лояльности мотивирует делать обороты по ставкам ради фрибетов.
Feel free to surf to my website: https://medcontour.org/author/bernadinechu28/
не будет 307го. ожидается 203, 250, rcs-4 и 1220й… вот что мне сказали в той же аське, где спрашивал ты ) Купить Бошки, Кокаин, Гашиш, МДМА, Мефедрон второй вопрос к товарищу под ником Leks:Чего у вас со скайпом? Оффлайн уже несколько недель.
I don’t think the title of your article matches the content lol. Just kidding, mainly because I had some doubts after reading the article.
cheapest monthly studio for rent in the gardens dubai apartments for sale in silicon oasis dubai dubai properties villas for sale
Трайбл — один из древнейших стилей татуировки, уходящий корнями в культуры Полинезии, Борнео и Маори, где каждый узор нёс сакральный смысл и рассказывал историю владельца. Сегодня этот стиль переживает настоящий ренессанс, а профессиональные мастера студии http://www.tribal-tattoo.ru/ воплощают его лучшие традиции в современных работах, создавая татуировки, которые остаются актуальными десятилетиями. Геометрическая строгость линий, глубокий чёрный цвет и ритмичные орнаменты делают трайбл одним из самых выразительных направлений в тату-искусстве — идеальный выбор для тех, кто ценит силу, эстетику и смысл в каждом штрихе.
Магаз огонь, а кидкам хуй на ладонь https://winteriada.ru Уважаемый ТС,желаю вам успешных больших продаж!:$:флудить в курилку
Никаких проблем с расчетом сложных экспрессов, все четко по правилам. https://www.motoclubdellafuta.com/trofeo-supermoto-suzuki-valenti-2015-organizzation-by-moto-club-della-futa/
Удобный личный кабинет, история ставок и транзакций всегда под рукой. https://n28tech.com/salesforces-latest-acquisitions-healthlifesciences/
Официальный сайт Melbet радует стабильной работой и быстрыми выплатами на любые реквизиты. https://sommer-architekt.hier-im-netz.de/VPB-Expertenrat;focus=TKOMSI_com_cm4all_wdn_Flatpress_22800952&path=?x=entry:entry250903-112231;comments:1
real estate advisory dubai apartments for sale in silicon oasis dubai property purchase process in dubai
Скоро откроется в Минске представительство. Как откроется увидите в разделе Представителей Купить Бошки, Кокаин, Гашиш, МДМА, Мефедрон Магазин не отвечает, может типо выходные, ждем понедельника.Если в разработке, то да.А так лишний раз лучше предостречься)))
PS5ゲーム(おそらくゲームのこと)をお探しですか?PS5(おそらくゲームのこと)PC(おそらくゲームのこと)会社(おそらくゲームのこと)? https://www.mukakin-blog.com/ をご覧ください。あらゆるトピックに関する本当に役立つ情報が見つかります。当ブログは、ありとあらゆる役立つ情報を提供する総合情報源です
Никаких проблем с расчетом сложных экспрессов, все четко по правилам. https://humankindwater.com/product/strawberry-lemonade-12-pack/
Выводил крупную сумму на прошлой неделе — пришло без лишних вопросов. https://herbergdeklomp.nl/2023/03/06/pop-up-diner-aperitief/
Cabinet IQ
8305 State Hwy 71 #110, Austin,
TX 78735, United Ѕtates
254-275-5536
Upgrade
For the reason that the admin of this web site is working, no uncertainty very rapidly it will be well-known,
due to its quality contents.
Прогрузы линии минимальные, успеваешь поймать хороший кэф. https://dubairentalpickup.com/2023/12/26/tiny-scientists-on-the-loose-preschool-science-wonders/
незнаю незнаю мне пришло за 2 суток и еще я обратился к селлеру и он предоставил всю полную информацию с адресом и номерами телефона курьерки купить кокаин, мефедрон, гашиш, ск Тут мыВсе супер заказывал все пришло попробывыл и писал отзыв этот минут 10 ))))) заказывайте хорошый магазин работают быстро отлично ребята успехов вам chemical.mix !!!!!))
It’s an awesome piece of writing in support of all the internet users; they
will obtain advantage from it I am sure.
Dubai long-term rentals studio for sale in dubai apartments for sale in dubai long term payment
Удобный личный кабинет, история ставок и транзакций всегда под рукой. https://www.orsonco.com/taxes-in-georgia-types-rules-and-changes-in-2025/
Hi, this weekend is good designed for me, because this moment i am reading this great educational post here at my residence.
Регулярно участвую в турнирах казино, призовые выплачивают на реальный баланс. http://www.gillespugens.com/gallery/home/
With havin so much written content do you ever run into any issues of plagorism
or copyright violation? My site has a lot of exclusive content I’ve either written myself or outsourced but it appears a lot
of it is popping it up all over the web without my authorization. Do you know any solutions
to help protect against content from being stolen? I’d definitely appreciate it.
Professional legal representation in court for public procurement disputes in Almaty. Femida Justice https://femida-justice.com/uslugi/yurist-po-tenderam-almaty/sudebnyie-sporyi-po-zakupkam-v-almatyi/ offers expert defense against Unreliable Supplier list inclusion, tender result appeals, and contract litigation. Our lawyers provide comprehensive judicial protection for businesses across Kazakhstan, ensuring compliance and safeguarding your commercial interests in all court instances.
Pretty part of content. I simply stumbled upon your weblog and in accession capital to
say that I acquire in fact enjoyed account your blog posts.
Any way I will be subscribing on your augment and even I fulfillment you get right of entry to
persistently fast.
Вывод средств на крипту USDT занимает до 15 минут, проверено. https://twonatures.site/2019/03/13/hello-world/
Ridiculous quest there. What happened after? Thanks!
Here is my web site :: краткосрочные и долгосрочные займы
Работы очень много, стараемся как можем, многие задают в Аську и Скайп одни и теже вопросы которые не касаются заказа(как в википедию ломяться)… купить кокаин, мефедрон, гашиш, ск В общем, хотелось бы вас оповестить и другим может пригодится.да наверно я попал на фейка или угонщика ,но мне не понятно как фейк может потверждать переписку с броси на форуме?
Отличный сервис, заслуживающий твердую пятерку за надежность. https://www.financelong.com/cognizant-to-acquire-zenith-technologies-to-enhance-is-iot-capabilities/
real estate companies in dubai 0569733913 https://arabianranchesvillasforsale.com dubai properties building media city
Informative article, exactly what I needed.
This is my first time go to see at here and i am truly impressed to read everthing at single
place.
Минимальная сумма для ставки доступна каждому, можно тестировать стратегии. https://biman75.net/wp/%EC%A0%95%EC%9E%AC%EC%98%81%ED%95%9C%EC%9D%98%EC%9B%90-%EC%86%8C%EC%85%9C-%EB%A1%9C%EA%B7%B8%EC%9D%B8-%EC%9D%B4%EC%9A%A9-%EB%B0%A9%EB%B2%95/
Fantastic items from you, man. I’ve be mindful your stuff prior to and you’re
simply too excellent. I actually like what you’ve acquired right here,
really like what you are stating and the best way wherein you
assert it. You are making it enjoyable and you continue to take
care of to stay it wise. I can’t wait to learn much more from you.
This is really a wonderful site.
Asking questions are really good thing if you are not understanding something completely, however this article offers
nice understanding yet.
Выводил крупную сумму на прошлой неделе — пришло без лишних вопросов. https://janhitnews.co.in/?p=226
Hello just wanted to give you a brief heads up and let you
know a few of the pictures aren’t loading correctly.
I’m not sure why but I think its a linking issue. I’ve tried it in two different browsers
and both show the same outcome.
I really like what you guys tend to be up too. This sort of clever work and coverage!
Keep up the wonderful works guys I’ve included you guys to my personal blogroll.
Ищете машину в Калининграде без лишней суеты? OmegaX обеспечивает аренду авто без водителя на привлекательных условиях. В наличии Renault Logan, Lada Vesta, Volkswagen Polo, KIA Rio с автоматической трансмиссией. Ищете аренда легкового автомобиля в Калининграде? Подробности и бронирование на omegax39.ru/arenda_prokat_avto_kaliningrad.html — офис находится прямо в аэропорту Храброво. Идеально для приезжающих: автомобиль ждёт вас прямо у выхода из терминала.
да магаз отличный.оперативно работают.и качество товара отличное.вобщем всё хорошо. купить кокаин, мефедрон, гашиш, ск у тебя все пришло? отпиши в лс.Уважаемый клиент, я вам уже не раз писал в личке что от вас у меня заказов не было. Все кто делал заказы уже давно получили свои посылки. Кому вы оплачивали я не знаю.
Удобный личный кабинет, история ставок и транзакций всегда под рукой. http://vue.du.sud.blog.free.fr/index.php?post/2016/07/24/Un-Guantanamo-br%C3%A9silien-pour-les-chefs-d-entreprise
La plateforme officielle spin bara propose un catalogue complet de jeux de hasard accessibles sur ordinateur et via la spinbara app dédiée. Le processus de spinbara registrierung prend moins de deux minutes pour ouvrir les portes d’un espace sécurisé avec des bonus attractifs. Profitez d’une expérience fluide grâce à la spinbara application mobile conçue pour optimiser vos sessions de jeu au quotidien.
spinbara connexion (https://maigrir34.fr/)
3 bedroom Apartments for rent in Dubai Harbour https://1bedroomapartmentforsaleindubai.com rent house in city walk dubai
Прогрузы линии минимальные, успеваешь поймать хороший кэф. https://huyhoangexpress.com.vn/set-up-that-online-casino-business-opportunities-2/
Yes! Finally something about porn.
Вывод средств на крипту USDT занимает до 15 минут, проверено. https://campaigns.direxions.com/hello-world/
Бюро переводов Москва предлагает профессиональный нотариальный перевод документов любой сложности с гарантией точного соответствия международным стандартам. Наша команда оперативно выполняет перевод паспорта с заверением, водительских прав, дипломов и аттестатов с последующим заверением у нотариуса. Мы поможем быстро поставить апостиль на документы или пройти процедуру консульской легализации для предоставления в официальные органы иностранных государств.
https://translation-center.ru/perevod-i-legalizacziya-voditelskih-prav-trinidada-i-tobago-v-rossii/
I am regular reader, how are you everybody?
This paragraph posted at this site is genuinely fastidious.
Бонусная программа одна из лучших на рынке беттинга прямо сейчас. https://jessieemeric.com/las-vegas-chapel-elopement/
желаем успехов магазину и процветания, очень ждем https://fsk-don.ru спасибо за пожеланиячувак брал я тоже тут 2 ci некоторым понравилось некоторым нет , лично я поднимал даже с неё бабок норм, народу нравиться , а если этот каиф тебе не нравиться нех писать что тусишка бычий кайф , бычий каиф немного другое, а такои продукт не может быть бычий кайф это я тебе отвечаю, со входом согласен по ноздре ваще не вариант !
Аналитика и статистика матчей прямо на сайте помогают делать прогнозы. http://astuces-beaute.eleavcs.fr/index.php?post/2019/08/16/Routine-make-up-:-cosm%C3%A9tique-naturel-%21
Хорошая БК с глубокой росписью, на любой футбольный матч дают кучу исходов. https://lodenau.de/;focus=TKOMSI_com_cm4all_wdn_Flatpress_20534881&path=&frame=TKOMSI_com_cm4all_wdn_Flatpress_20534881?x=entry:entry230807-170700;comments:1
Definitely believe that which you stated. Your favorite reason seemed to be
on the web the easiest thing to be aware of. I say to you, I certainly get irked while people consider worries that they just don’t know about.
You managed to hit the nail upon the top and
defined out the whole thing without having side effect , people can take a signal.
Will likely be back to get more. Thanks
apartment for rent in 29 boulevard downtown dubai palm jumeirah villas for sale Apartments for sale in City Center Residences
В лайве коэффициенты не режут, меняются быстро и без задержек. https://www.bluewhite.it/salice-terme-lotto-immobili-centro-commerciale/
Электронный справочник Notarmsk.ru помогает мгновенно найти ближайшую нотариальную контору в Москве и записаться на нотариальное удостоверение документов без очередей. На платформе доступна бесплатная юридическая помощь по трудовому, жилищному и земельному праву от ведущих адвокатов региона. Используйте онлайн-сервис для проверки договоров купли-продажи недвижимости, сопровождения разводов и досудебного урегулирования споров.
https://notarmsk.ru/soglashenie-ob-okazanii-yuridicheskoj-pomoshhi-90/
Nguyễn Đức Hùng – Chuyên gia Digital Marketing Online, có kinh nghiệm
trong xây dựng chiến lược, triển khai và tối ưu các hoạt động marketing trên nền tảng số
Официальный сайт Melbet радует стабильной работой и быстрыми выплатами на любые реквизиты. https://mcksa.ci/prix-apromac-janvier-2023/
Для бизнеса аренда сервера — это прежде всего вопрос надёжности, высокой скорости и поддержки в любое время суток. Netrack выдаёт сервер в аренду с аптаймом 99,9% и держит оборудование в собственном дата-центре класса Tier III. Требуется аренда сервера? На сайте https://netrack.ru/ можно выбрать конфигурацию под любые задачи — от стартапа до крупного корпоративного проекта. Пользователь работает на выделенном железе без совместного использования ресурсов и получает профессиональную техподдержку на каждом этапе.
Агентство THE-LIPS предлагает профессиональную карьеру вебкам и OnlyFans моделям с гарантированным доходом от 1000 долларов в неделю. Компания с двадцатилетним опытом обеспечивает полную поддержку: собственных переводчиков, систему продвижения в топ рейтингов популярных платформ и круглосуточное сопровождение. На https://the-lips.com/ доступны вакансии для работы в студиях на берегу моря или удаленно из дома. В агентстве занято более трехсот моделей, многие из которых входят в топ-100 на ведущих сайтах индустрии.
PO
Пользуюсь зеркалом Мелбет, так как основной сайт иногда блокируют, все ок. https://tributecc.com/index.php/2026/02/04/hello-world-2/
Платформа Adsguard представляет собой комплексное решение для защиты от навязчивой рекламы и обеспечения конфиденциальности в интернете. Сервис предлагает три ключевых продукта: AdGuard Block для блокировки баннеров и всплывающих окон, AdGuard VPN для анонимного серфинга с шифрованием трафика и AdGuard DNS для фильтрации вредоносного контента на уровне DNS-запросов. На портале https://adsguard.ru/ пользователи могут ознакомиться с актуальными обновлениями программного обеспечения, получить промокоды на выгодные условия подписки и найти ответы на часто задаваемые вопросы в разделе поддержки. Встроенный родительский контроль и регулярные обновления безопасности делают Adsguard надежным инструментом для комфортного использования интернета без отвлекающих факторов.
Кому-нибудь отправили сегодня трек? https://smenaclub.ru может все дело в кривых ручках?Трек получил в первый день,5 баллов за работу магазина
Hi, I think your website might be having browser compatibility issues.
When I look at your website in Opera, it looks fine but when opening in Internet Explorer, it has some overlapping.
I just wanted to give you a quick heads up! Other then that,
awesome blog!
fees for selling property in dubai 2 bedroom apartment for sale in jbr dubai The Springs
оп оп давай что за эфо дис купить кокаин, мефедрон, гашиш, ск Удачи и развития в дальнейшем!а что с магазином в Петрозаводске,работать то будете дальше,а то уже неделю не какой активности.
Криотерапия становится одним из самых востребованных направлений в wellness-индустрии, а азотная криокапсула CryoOne открывает новые возможности для бизнеса и здоровья. Воздействие экстремально низких температур до -180°C запускает мощные восстановительные процессы в организме, ускоряет метаболизм и способствует эффективному снижению веса. На сайте https://cryoone.ru/ представлено современное оборудование российского производства с полным комплектом поставки, включая сосуд Дьюара, бесплатной доставкой и двухлетней гарантией. Это выгодное вложение для фитнес-центров, spa-салонов и медицинских клиник, которое быстро окупается благодаря растущему спросу на инновационные процедуры восстановления и омоложения.
«Элекс» — магазин электрики с богатым ассортиментом кабелей, автоматов, розеток, щитового оборудования и световых приборов для дома и производства. Вся продукция от проверенных производителей — только сертифицированный товар без брака. Ищете медный провод? На shop.elekspb.ru представлен удобный каталог с актуальными ценами и быстрым оформлением заказа. Удобная доставка по Санкт-Петербургу и всей России обеспечивает комфорт для профессионалов и частных покупателей.
2 bedroom apartment in al nahda dubai https://2bedroomapartmentforsaleinjbrdubai.cc bed space in dip 1
What’s up to every body, it’s my first go to see of this web site; this weblog
carries awesome and really excellent material designed
for visitors.
Pretty nice post. I just stumbled upon your weblog and wanted to say that I have really
enjoyed surfing around your blog posts. In any case I’ll be subscribing to your
feed and I hope you write again soon!
Почему пользователи выбирают площадку KRAKEN?
Маркетплейс KRAKEN заслужил доверие многочисленной аудитории благодаря сочетанию ключевых факторов.
Во-первых, это широкий и разнообразный ассортимент, представленный сотнями продавцов.
Во-вторых, интуитивно понятный интерфейс KRAKEN, который упрощает навигацию,
поиск товаров и управление заказами даже для
новых пользователей. В-третьих, продуманная система безопасных
транзакций, включающая
механизмы разрешения споров (диспутов) и возможность использования условного депонирования, что минимизирует риски для обеих сторон сделки.
На KRAKEN функциональность сочетается с внимательным отношением к безопасности клиентов, что делает процесс покупок
более предсказуемым, защищенным и, как следствие, популярным среди
пользователей, ценящих анонимность и надежность.
Wow, superb blog layout! How long have you been blogging for?
you make blogging look easy. The overall look of your web site is fantastic, as well as the content!
Почему пользователи выбирают площадку KRAKEN?
Маркетплейс KRAKEN заслужил доверие многочисленной аудитории благодаря
сочетанию ключевых факторов. Во-первых, это широкий и разнообразный
ассортимент, представленный сотнями
продавцов. Во-вторых, интуитивно понятный интерфейс KRAKEN, который упрощает
навигацию, поиск товаров и управление заказами даже для новых пользователей.
В-третьих, продуманная система безопасных транзакций, включающая механизмы разрешения споров (диспутов) и возможность использования
условного депонирования, что минимизирует риски для обеих сторон
сделки. На KRAKEN функциональность
сочетается с внимательным отношением к безопасности клиентов, что делает процесс покупок более предсказуемым, защищенным и, как следствие, популярным среди пользователей, ценящих анонимность и надежность.
супер !!! купить кокаин, мефедрон, гашиш, ск Что там за оператор в аське сидит? Ответа нереально долго ждать приходиться, я по 2раза один и тот же вопрос пишу. Не могу постоянно находиться в сети. Пусть быстрей работает.Данный сервис с каждым разом удивляет своим ровным ходом
Нужно качественное навесное оборудование для спецтехники? Посетите сайт Производственного предприятия EXTEN https://ppe-exten.ru/ и ознакомьтесь с каталогом, там вы найдете широкий ассортимент навесного оборудования для минитракторов, погрузчиков, экскаваторов, экскаваторов-погрузчиков, минипогрузчиков и фронтальных погрузчиков. Каталог содержит оборудование различного назначения, способное решить любые производственные задачи. Доставка в любую точку России, а также сервисное обслуживание и гарантия качества!
deyaar properties al baraha deira dubai https://2bedroomapartmentdubaiforsale.com palm villa dubai
I do not know if it’s just me or if everyone else encountering problems
with your blog. It appears as if some of the written text on your content are running off
the screen. Can someone else please provide feedback and let me know if this is happening to them as well?
This might be a problem with my web browser because
I’ve had this happen before. Many thanks
Nice answers in return of this question with real arguments and describing the whole thing about that.
Very good info. Lucky me I found your website by accident (stumbleupon).
I’ve saved it for later!
I every time emailed this weblog post page to all my contacts, for
the reason that if like to read it afterward my friends will
too.
Ты покупал у этого магазина ? Если у этого то пиши ему в лс, и по каким контактам ты списывался , и сколько брал ? Не могли тебя тут кинуть купить кокаин, мефедрон, гашиш, ск Спасибо хотя бы на том, что вообще что-то прислали…у них Methoxetamine бадяженный или нет? сколько принял мг и какие симптомы были?
Ищете надежное бюро переводов Москва для быстрой легализации личных свидетельств и коммерческих контрактов? Наш центр предоставляет качественные услуги бюро переводов, выполняя нотариально заверенный перевод паспортов, справок и учредительных документов. Мы помогаем пройти все этапы консульской легализации и оперативно поставить апостиль на оригиналы или нотариальные копии для использования в любой стране мира.
https://translation-center.ru/neobhodimost-i-osobennosti-perevoda-voditelskogo-udostovereniya-na-russkij-yazyk/
properties for sale in meydan city dubai https://apartmentsforsaleindowntowndubai.org dubai kiral?k ev
It’s the best time to make some plans for the
future and it’s time to be happy. I’ve read this post and if I could I desire
to suggest you some interesting things or tips.
Perhaps you could write next articles referring to this article.
I wish to read even more things about it!
I do not even know how I ended up here, but I thought this post was good.
I do not know who you are but certainly you
are going to a famous blogger if you are not already 😉 Cheers!
I pay a quick visit everyday some blogs and websites to read posts, but this web site
offers quality based posts.
аська молчит.скайп есть? https://audioextreme.ru Отлично! Ждём свои наборы юнного химика … 🙂 или наркомана… ?было бы что хорошего писать. Ато культурных слов нету!!! Вроде как норм качество, готовые клады и цена это единственное что радовало. А в последнее время вообще непонятно что отвечает по часу, пугает игнорами, и в последний раз оплатил в 18:00 адрес около 22:00 и нету!!! Начал про подробности у него вроде так отвечал, фото присылал что аж хватит ему на портфолио. То курьер не ответил то он молчит. И в конце концов пишу ему с другой номера отвечает и предлагает адреса а с моего нефига. И вот такая история о том как чем ЗАЗНАЛСЯ ну или оператор. Жаль возьню(
Can I simply say what a comfort to discover somebody who actually
knows what they are discussing on the web. You definitely understand how to bring a problem to light
and make it important. More and more people must
read this and understand this side of the story. I was surprised that you are not more popular since you certainly possess the gift.
how to invest in share market in dubai villa for sale in dubai silicon oasis average studio apartment rent in dubai
Hi! This is kind of off topic but I need some advice from an established
blog. Is it difficult to set up your own blog? I’m not very techincal
but I can figure things out pretty fast. I’m thinking about creating my own but
I’m not sure where to start. Do you have any ideas or suggestions?
Appreciate it
Op zoek naar een betrouwbaar online casino met snelle stortingen en unieke bonussen? LegionBet combineert de nieuwste videoslots met live casino actie van echte dealers. Meld je aan bij Legion Bet Casino en start direct met spelen.
https://comparebeauty.nl/
нету. в ближайшее время не будет. https://fsk-don.ru Получил 5г 203! Оплатил в четверг, отправили в пятницу и уже в понедельник курьер мне передал. 🙂 Вес в поряде, цвет желтоватый.ложь. 3 случая за полгода. Причем следили ли за самими людьми и что за ситуации – неизвестно. Если у вас свой магазин. то следите за его безопасностью. У вас нет данных об отправках, их количестве и количестве пришедших и не пришедших посылках. Просьба не раздувать данную тему без полной информации вышеперечисленной и важной уточненной дополнительной.
desert arabian real estate brokers dubai villa for sale in dubai silicon oasis future world real estate dubai
Cabineet IQ
8305 Stzte Hwyy 71 #110, Austin,
TX 78735, United Տtates
254-275-5536
Lighting
به شکل کلی
برای اونایی که میخوان وارد بشن
سرگرمیهای پولی
دنبالشن
این مرجع قابل توجه
خیلی راحت میتونه
کاربردی باشه
از سوی دیگر
برندهای شناختهشدهای مثل
enfejaronline اصلی
و
دامنه sibbet
کاربرای زیادی دارن
در یک نگاه
مفید بود
و
احتمالاً
دوباره سراغش میام
Herre is my wеb-site :: ↩️ بازگشت
شرط, Kristofer,
So we’ve located all the most effective skin and body spots in London.
Ищете надежное бюро переводов Москва для быстрой легализации личных свидетельств и коммерческих контрактов? Наш центр предоставляет качественные услуги бюро переводов, выполняя нотариально заверенный перевод паспортов, справок и учредительных документов. Мы помогаем пройти все этапы консульской легализации и оперативно поставить апостиль на оригиналы или нотариальные копии для использования в любой стране мира.
https://translation-center.ru/obshhie-trebovaniya-k-perevodu-dokumentov-grazhdanina-madagaskara/
I read this article completely concerning the comparison of most recent and preceding
technologies, it’s amazing article.
It is the best time to make some plans for the
future and it’s time to be happy. I’ve read this post and if I could I want to suggest you few interesting things or tips.
Maybe you could write next articles referring to this article.
I wish to read even more things about it!
фофу кушают, 2 дмпм нюхается, судя по всему купить кокаин, мефедрон, гашиш, ск Делать надо 1к10, можно и послабже, например 1к13, но не более, а то 30 минут эт мало, хотя смотря для кого))Хочу выразить благодарность данному магазину за лучший товар, лучшие цены, за долгое время непрерывного сотрудничества, очень жду твоего возвращения к работе и появления долгожданного товара, чемикал лучший в своём деле. Очень жаль что на долгий период времени ты преостановил свою работу, надеюсь скоро наладятся поставки и наше сотрудничество возобновится! Чемикал лучший! На данный момент тебе нету равных на рынке RC, возвращайся скорей, мы ждём твоего возвращения с нетерпением!
Ищете надежное бюро переводов Москва для быстрой легализации личных свидетельств и коммерческих контрактов? Наш центр предоставляет качественные услуги бюро переводов, выполняя нотариально заверенный перевод паспортов, справок и учредительных документов. Мы помогаем пройти все этапы консульской легализации и оперативно поставить апостиль на оригиналы или нотариальные копии для использования в любой стране мира.
https://translation-center.ru/apostilirovanie-svidetelstva-o-rozhdenii-dlya-grazhdan-respubliki-koreya/
Having read this I believed it was very informative.
I appreciate you finding the time and energy to put
this informative article together. I once again find myself personally spending a significant
amount of time both reading and commenting. But so what,
it was still worth it!
What a material of un-ambiguity and preserveness
of precious familiarity regarding unpredicted feelings.
new property developments in dubai https://1bedroomapartmentforsaleindubai.com The Reserve
Hello, I enjoy reading through your article post. I wanted to write a
little comment to support you.
Cabinet IQ
8305 State Hwy 71 #110, Austin,
TX 78735, United Ѕtates
254-275-5536
Bookmarks
Hi there! I’m at work browsing your blog from my new apple iphone!
Just wanted to say I love reading your blog and look forward to
all your posts! Keep up the fantastic work!
Почему пользователи выбирают площадку
KRAKEN?
Маркетплейс KRAKEN заслужил доверие многочисленной аудитории благодаря сочетанию ключевых факторов.
Во-первых, это широкий и разнообразный ассортимент, представленный сотнями
продавцов. Во-вторых, интуитивно понятный интерфейс KRAKEN, который упрощает навигацию, поиск товаров и управление заказами даже для новых
пользователей. В-третьих, продуманная система безопасных транзакций, включающая механизмы разрешения споров
(диспутов) и возможность использования
условного депонирования, что минимизирует риски для
обеих сторон сделки. На KRAKEN функциональность сочетается с
внимательным отношением к безопасности клиентов, что делает процесс покупок более предсказуемым, защищенным и,
как следствие, популярным среди пользователей, ценящих
анонимность и надежность.
Hello, I enjoy reading all of your article post. I wanted to write a little comment to support you.
What i don’t understood is in reality how you are now not actually much more neatly-liked than you may
be right now. You are so intelligent. You realize therefore considerably
relating to this matter, made me for my part believe
it from a lot of numerous angles. Its like women and men are not fascinated unless it’s something to accomplish with Woman gaga!
Your own stuffs nice. All the time maintain it up!
Для совсем новичков 1 к 15 будет даже много. https://top-servers.ru Ребят,а здесь только курёха?как дела народ ? Всё хорошо ? не у кого проблем нет ?
This is nicely put. .
you’re actually a good webmaster. The website loading pace is amazing.
It kind of feels that you’re doing any unique trick.
Furthermore, The contents are masterwork. you’ve performed a
excellent activity in this subject!
This post offers clear idea in favor of the new people of blogging, that truly
how to do blogging and site-building.
Discover the top promotions оn Kaizenaire.com,
Singapore’s best deals website.
Singapore stannds honored аs ɑ shopping utopia, where deals fіre upp Singaporean іnterest.
Singaporeans like arranging journey tо Malaysia
for short getaways, аnd keeρ in mind to stay upgraded
оn Singapore’s most current promotions ɑnd shopping deals.
Depayser layouts minimalist clothing ԝith a
French style, treasured Ƅy posh Singaporeans for their uncomplicated beauty.
Sabrin Goh creates lasting style pieces leh, preferred Ьy environmentally aware Singaporeans for their eco-chic styles ⲟne.
TWG Tea indulges ᴡith luxury loose-leaf teas аnd blends,
favored ƅү tea enthusiasts for classy product packaging
аnd gourmet experiences.
Ⅾⲟn’t be obsoleted leh, Kaizenaire.com updates ԝith newest ρrice cuts оne.
Feel free to surf to mу blog post; promotions singapore
I’ve read several just right stuff here. Certainly value bookmarking for revisiting.
I wonder how much attempt you set to make this type of magnificent informative site.
I am really pleased to glance at this web site posts which consists of
tons of valuable information, thanks for providing these data.
I every time used to study post in news papers but now as I am a user of internet therefore from now I am using net for articles, thanks to web.
Modern Purair
416 Meridian Ꭱd ЅE #14Ꭺ, Calgary
AB T2А 1X2, Canada
(403) 800-7254
sustainable tool
Wonderful goods from you, man. I have take note your stuff previous to and you are just too wonderful.
I actually like what you’ve received right here, really like what you’re stating and the
best way through which you assert it. You make it enjoyable and you continue to care
for to keep it sensible. I can’t wait to read far more from you.
This is actually a wonderful website.
Hi there it’s me, I am also visiting this website on a regular basis, this website is actually good and
the users are genuinely sharing good thoughts.
При “отменном” качестве 1к25 смело выходит. У вас отменное ? купить кокаин, мефедрон, гашиш, ск “Ладно думаю доберусь до дома там опробую нозально “а что с алхимом случилось?
Hi my family member! I wish to say that this article is amazing,
great written and include almost all important infos. I’d like to see
extra posts like this .
aeon trisl real estate dubai https://3bedroomapartmentsforsaleindubai.cc 3 bedroom Villas for rent in The Meadows
Diive deep іnto curated promotions ԝith Kaizenaire.com, the leading
website fⲟr Singapore.
The streets ⲟf Singapore, а true shopping heaven, resemble
ᴡith the exhilaration of citizens scoring deals
ѵia clever promotions.
Ԍoing tߋ poetry bangs inspires wordsmith Singaporeans, ɑnd remember tо stay upgraded on Singapore’ѕ latest
promotions and shopping deals.
Rye ⅽreates effortless ladies’ѕ clothes, appreciated bу laid-bаck style
fans іn Singapore for tһeir relaxed yet posh designs.
TWG Tea рrovides gourmet teas аnd devices lah, valued by tea fanatics in Singapore f᧐r their charming blends ɑnd sophisticated product packaging lor.
Sunshine Bakery supplies cosy buns аnd rolls, adored Ƅy Singaporeans for budget friendly, wholesome
baked goods from ɑrea outlets.
Aunties advocate іt lor, Kaizenaire.com for the freshest pгice cuts and offers sia.
Mу web ρage … promo singapore
Почему пользователи выбирают
площадку KRAKEN?
Маркетплейс KRAKEN заслужил доверие многочисленной аудитории
благодаря сочетанию ключевых факторов.
Во-первых, это широкий и разнообразный ассортимент, представленный сотнями
продавцов. Во-вторых, интуитивно
понятный интерфейс KRAKEN, который упрощает навигацию,
поиск товаров и управление заказами даже для
новых пользователей. В-третьих, продуманная система безопасных транзакций, включающая механизмы разрешения споров (диспутов) и возможность использования условного
депонирования, что минимизирует риски
для обеих сторон сделки. На KRAKEN функциональность сочетается с внимательным отношением к безопасности клиентов, что делает процесс покупок более предсказуемым, защищенным и, как
следствие, популярным среди пользователей, ценящих анонимность и надежность.
Hi colleagues, how is everything, and what you would like to say concerning this post, in my view
its in fact awesome in favor of me.
It’s an awesome piece of writing in favor of all the web visitors; they
will get benefit from it I am sure.
This piece of writing will help the internet users for building up new web site or even a weblog from start to end.
Kết quả xổ số hôm nay đã có rồi ạ, mọi
người cùng theo dõi và kiểm tra kết quả nhé
I know this if off topic but I’m looking into
starting my own blog and was wondering what all is required
to get setup? I’m assuming having a blog like yours would cost
a pretty penny? I’m not very web smart so I’m
not 100% certain. Any suggestions or advice
would be greatly appreciated. Kudos
Фарту в делах парни !:hello: купить кокаин, мефедрон, гашиш, ск ТС саппорт не требуется тебе ? Напиши в лс если интересноНе знаю как в этом магазе,а вот у всеми так уважаемой Мануфактуры тоже весной всплыло такое гавницо.В результате я попал на 50к и никакого возмещения от них не дождался между прочим.
It’s very trouble-free to find out any matter on web as compared to textbooks, as I found this article at this web site.
porn, xxx, xnxx, bokep indonesia, scam, bokep, porno, video 3gp, penipuan
two years real estate commission in dubai https://palmjumeirahvillasforsale.com 4 bedroom Apartments for sale in Bluewaters
Glassway — специализированный поставщик, выстроивший прямые партнёрства с ведущими заводами отделочной отрасли. В ассортименте компании — подвесные потолки, алюминиевые конструкции, смарт-стекло, зенитные фонари и широкий выбор ограждений. Ищете потолок армстронг? На glassway.group представлен обширный каталог с актуальными ценами — прямые поставки с заводов обеспечивают конкурентную стоимость на весь ассортимент. Компания реализует проекты любой сложности — от типовых офисных интерьеров до нестандартных архитектурных решений.
This is very interesting, You are a very skilled blogger.
I’ve joined your rss feed and look forward to seeking more of your magnificent post.
Also, I’ve shared your website in my social networks!
It’s actually a nice and helpful piece of info. I am happy that you simply shared this helpful information with
us. Please keep us informed like this. Thanks for sharing.
Kaizenaire.com stands aⲣart aѕ Singapore’s gο-to resource
fоr the best promotions and deals from precious brand names аnd companies.
The attraction ߋf Singapore ɑs a shopping heaven іs incomplete without discussing Singaporeans’ eagerness fօr promotions аnd pricе cuts.
Signing ᥙp with choir ɡroups balances vocal skills ⲟf music Singaporeans,
and bear іn mind to stay updated οn Singapore’s most current promotions and shopping deals.
Kydra concentrates оn higһ-performance activewear, enjoyed Ьy stylish Singaporeans for their
cutting-edge textiles аnd fit.
Graye specializes іn modern-day menswear mah, appreciated Ьy dapper Sinngaporeans
for their tailored fits аnd modern appearances ѕia.
Chope reserves tables at leading restaurants, adored Ƅy foodies for simple reservations аnd special
deals.
Ꮃhy hesitate mah, on a regular basis ѕee Kaizenaire.com foг unbeatable
shopping prіce cuts lah.
Stop by my web-site promotions singapore
Thanks on your marvelous posting! I genuinely enjoyed reading it, you
might be a great author.I will be sure to bookmark your blog and definitely will
come back from now on. I want to encourage that you continue your great work, have a nice
day!
Kaizenaire.com leads Singapore’s deals revolution ᴡith curated promotions аnd occasion offeгs from tօp
firms.
Singapore’s allure consists ⲟf promotions tһat make it a paradise
fοr deal-enthusiast Singaporeans.
Joining choir teams integrates singing skills ߋf music Singaporeans, and кeep іn mind to
remain upgraded on Singapore’ѕ most current promotions аnd shopping deals.
Adidas proviԀes sports apparel ɑnd sneakers, treasured Ƅy Singaporeans fօr their
elegant activewear and recommendation by neighborhood professional athletes.
BMW delivers deluxe automobiles ѡith innovative performance lah,
valued ƅу Singaporeans for tһeir driving pleasure ɑnd status symbol lor.
Samy’ѕ Curry warms սp ᴡith banana fallen leave curries, enjoyed fоr untidy, finger-licking experiences and durable seasonings.
Wah, damn ɡreat sіa, check Kaizenaire.сom for continuous price cuts lor.
my website; ogawa promotions
Undeniably believe that which you stated. Your favorite
reason seemed to be on the net the easiest thing to be aware of.
I say to you, I definitely get annoyed while people think about worries that they plainly do
not know about. You managed to hit the nail upon the top and
also defined out the whole thing without having side-effects , people can take a
signal. Will likely be back to get more. Thanks
Автосервис «Шоколад» в Анапе — это современный центр технического обслуживания, где профессионализм сочетается с заботой о каждом клиенте. Команда опытных мастеров предлагает полный спектр услуг: от диагностики и замены масла до сложного ремонта двигателя и трансмиссии. Особенно привлекательны специальные предложения сервиса — бесплатная диагностика со скидкой 15% на ремонт, услуги эвакуатора и расчет стоимости работ по фотографии. Подробнее обо всех услугах можно узнать на сайте https://chocolate-auto.ru/, где представлена актуальная информация о ценах и графике работы. Сервис расположен по адресу Супсехское шоссе 10 и работает ежедневно с 9:00 до 19:00, обеспечивая качественное обслуживание автомобилей любых марок.
пинап казино вход
все пришло.пока не пробовал.конспирация на высшем уровне.спасибо купить кокаин, мефедрон, гашиш, ск Менеджер на связи с 10-11 утра по МСК (не с 8-ми, как Вы ломитесь) ежедневно, кроме праздников и выходных. На сайте Вашего заказа нет. Можете назвать его номер?Пиздатый магазин, всегда пойдут на встречу и оператор норм
Hey! Thiss post couldn’t be wrtten anyy better!
Readding thyis poszt remnds mee of myy previoujs room mate!
He alwways krpt talking abouut this. I will forwaed tbis posxt to him.
Prefty sure hhe wipl hhave a good read. Thanks forr sharing!
Alsso vjsit mmy webpae cnhub.xyz (Jarred)
Apartments for rent in Pearl Jumeirah https://apartmentsforsaleindowntowndubai.org how many real estate brokerage companies in dubai
Excellent beat ! I would like to apprentice whilst you amend your
site, how can i subscribe for a blog site? The account helped me a appropriate deal.
I have been tiny bit familiar of this your broadcast
provided vibrant clear idea
Hey exceptional blog! Does running a blog such as this take a massive
amount work? I have no expertise in coding but I had been hoping to start my own blog soon. Anyway, if you have any suggestions
or techniques for new blog owners please share. I know this is off
topic but I just wanted to ask. Many thanks!
What’s up to all, how is everything, I think every one is getting more from this site, and your views are fastidious in support of new users.
Дубликаты государственных номеров на авто в Москве
доступны для заказа в кратчайшие сроки купить дубликат номера на машину обращайтесь к нам для получения надежной помощи и гарантии результата!
Looking to buy and sell USDT for fiat online? Visit https://buysellswappro.com/ – BuySellSwapPro helps users navigate between fiat and crypto using clear online routes centered around USDT. You can buy crypto with a credit or debit card, sell crypto for fiat, compare pages by currency or country, and choose the route that best suits your card, bank account, or local market conditions.
Excellent goods from you, man. I have take note your stuff prior to and you’re simply
extremely fantastic. I really like what you’ve got
here, really like what you are stating and the best way during which you
assert it. You make it entertaining and you continue to care for to stay it sensible.
I can’t wait to learn much more from you.
That is actually a great web site.
обращаюсь по возможности сюда беру оптом от 50 грамм купить кокаин, мефедрон, гашиш, ск Ментам зачастую пофиг,легал-нелегал.Был бы человек хороший,статья найдётся.СПСР тоже чёт не нравится.Но и на Мажор экспрессе случаи принималова были,так что х.з….Увидел на сайте “ждём…”.О.флюрокока и rti 111!Очень ждём!АМТ тож вкусняшка,но тут обьебосам не завидую.Примут по полграмма и айда 20 часов как кот в стиральной машинехороший магазин,всё на красоте и качество и кол-во:) продолжайте в том же духе
Pretty section of content. I just stumbled upon your weblog and in accession capital to assert that I acquire actually enjoyed account your blog posts.
Anyway I will be subscribing to your feeds and even I achievement you access consistently fast.
cheap 2 bedroom flat for rent in dubai https://apartmentsforsaleinburdubai.com real estate litigation lawyer dubai
Thanks for the marvelous posting! I genuinely enjoyed
reading it, you will be a great author.I will remember to bookmark your blog and will come back later
on. I want to encourage yourself to continue your great posts, have a nice afternoon!
Когда речь идёт о покупке автомобиля из Японии, Кореи или Китая, выбор партнёра решает всё. Ищете субару леворг из китая ? Компания starmotors.biz за годы работы доставила более 17 000 автомобилей по всей России и сегодня держит свыше 600 машин в наличии на рынке во Владивостоке. Офисы и стоянки работают во Владивостоке, Москве и Санкт-Петербурге, а доставка охватывает любой регион страны.
Hey there! I realize this is sort of off-topic however
I needed to ask. Does running a well-established blog like yours take a large amount of work?
I’m brand new to blogging but I do write in my journal everyday.
I’d like to start a blog so I can easily share my personal experience and views online.
Please let me know if you have any ideas or tips for new
aspiring bloggers. Thankyou!
Looking for a token swap platform? Visit https://swaptoken.io/ – we offer fast swaps for 150+ cryptocurrencies in 1-15 minutes. We offer fixed and floating rates, no registration, and no KYC for standard routes. Flexible limits range from $20 to $150,000 equivalent. All key exchange terms are displayed in the form upfront, with no hidden platform fees other than the sender’s network fee.
This piece of writing presents clear idea in support of
the new viewers of blogging, that truly how to do
blogging and site-building.
Hi, its good paragraph about media print, we all know media is a
enormous source of information.
I’d like to thank you for the efforts you’ve
put in penning this website. I’m hoping to view the same
high-grade content by you in the future as well.
In truth, your creative writing abilities has inspired me to get my very own site
now 😉
Wonderful blog you have here but I was curious if you knew of any message boards
that cover the same topics discussed in this article?
I’d really like to be a part of community where I can get feedback from other
knowledgeable people that share the same interest. If you have
any recommendations, please let me know. Appreciate it!
Hi there! This post could not be written much better!
Going through this article reminds me of my previous roommate!
He continually kept talking about this. I will send this article to him.
Fairly certain he’s going to have a good read.
I appreciate you for sharing!
Hi, I do think this is a great site. I stumbledupon it 😉
I am going to revisit once again since I book marked it.
Money and freedom is the greatest way to change, may you be rich
and continue to guide other people.
I love what you guys tend to be up too. This type of clever work and
reporting! Keep up the great works guys I’ve added you guys to my
blogroll.
Howdy, you’ve got amazing photos! I absolutely enjoy your energy on this
site.|
Hello there! You seem to be genuinely searching for something serious here, or just checking
things out?|
I just couldn’t go away prior to dropping a line to say that
you look extremely interesting.|
Your description is really well written! It’s rare to see
anyone so authentic on dating sites.|
Hello, would you mind ask what kind of partner you are looking for here?|
I’m certainly glad I found your profile. Your eyes
caught my attention immediately!|
Is this your actual location? I am based not too far away and would want to connect.|
Oh my goodness, you seem such a sweet person to talk to.
Let’s exchange messages!|
Does this website work well for you? I am having a hard time meeting normal people here lately,
but you look different.|
Hi there! I’m just relaxing at home and decided to browse some profiles.
Your page literally made my day!|
Its like you read my thoughts! Everything you wrote in your bio matches what I love in a partner.|
Hello there, I discovered your account by chance and must say your
photos are really stunning.|
Hey, I owned a profile here for a while and I was just wondering
if you get a lot of spam requests? It’s driving me mad!|
I truly love your style. Did you take these pictures recently?
Please reply back if you’re open to talking.|
Hi there! This bio couldn’t be written any better!
You seem to have a wonderful sense of humor. Keep shining!|
There is certainly a lot of personality to you. I love all of the things you listed as your
hobbies.|
You made some decent points in your about me section. Most people here are so basic, but you stand out.|
What’s up, I browse this app regularly and your profile is by far the most
witty I’ve seen today. Keep doing what you’re doing!|
I just want to thank you for being so genuine in your profile!
I absolutely loved reading it. I’ve got you saved as a match.|
Hi, just wanted to say, I enjoyed looking through your page.
It was very refreshing. Hope to hear from you soon!|
By the way, how can we communicate outside this platform?
Do you use Snap or just this site?|
Hello! Just wanted to shoot you a quick shout out.
Keep up the great vibe here!|
If you want to connect with someone real, simply send me a message back.
Let’s see where this goes!|
What’s Going down? I’m new to this dating site,
but I found your profile absolutely helpful. Good job on your bio!|
I’ve read some profiles here, but yours is certainly value spending some time on. You seem wonderful.|
This is a very good approach to online dating. Short but very accurate description of yourself.
A must-read profile!|
Having looked at your photos I believed you were really
stunning. I appreciate you taking the time to write a proper bio.|
Are you looking for one thing serious or just friendship?
I’d really want to know your goals here. Cheers!|
You could certainly see your confidence in the way you present yourself.
The world needs more passionate people like you.|
Good profile you have here. It’s hard to find quality profiles like yours nowadays.
Take care!|
I was told about this app by my friend, and I’m so glad I joined because otherwise I wouldn’t have found
your profile. You look amazing!|
Oh my goodness! Amazing eyes! Thank you for sharing your photos,
however I am having issues opening your private
album. Is it locked?|
Very good profile! Do you have any advice for someone who just joined this
app? I’m a little overwhelmed by all these choices!|
Oһ, mathematics acts ⅼike the groundwork pillar օf primary schooling,
assisting children fоr spatial reasoning in architecture paths.
Aiyo, mіnus solid mathematics аt Junior College, regaгdless toop establishment
youngsters mаy falter in secondary algebra, tһus build it now leh.
St. Andrew’ѕ Junior College cultivates Anglican values ɑnd
holistic development, constructing principled individuals ԝith strong character.
Modern amenities support excellence іn academics, sports, and arts.
Social ᴡork and management programs impart compassion ɑnd duty.
Varied ϲo-curricular activities promote teamwork аnd seⅼf-discovery.
Alumni emerge аѕ ethical leaders, contributing meaningfully tо society.
National Junior College, holding tһe distinction as Singapore’ѕ fіrst junior college,
οffers exceptional avenues f᧐r intellectual
expedition аnd management cultivation withіn a historical andd motivating
campus tһat blends custom wіth modern-dɑy educational
excellence. Ꭲhe unique boarding program promotes ѕelf-reliance
ɑnd a sense οf community, whіle advanced reseаrch study centers and specialized laboratories enable students from diverse backgrounds to
pursue innovative studies in arts, sciences, аnd
liberal arts with elective options fоr
personalized knowing paths. Ingenious programs motivate deep academic
immersion, ѕuch ɑs project-based гesearch aand interdisciplinary seminars tһat hone analytical skills and foster creativity
ɑmongst aspiring scholars. Τhrough substantial international partnerships, including
trainee exchanges, global seminars, ɑnd collaborative initiatives ѡith abroad universities, learners develop broad networks аnd a nuanced understanding оf worldwide issues.
Тhe college’s alumni, ᴡhօ ofren presume popular
functions іn federal government, academia, аnd market, exhibit National Junior College’ѕ ⅼong lasting contribution t᧐ nation-building and the advancement οf visionary, impactful leaders.
Wah lao, гegardless if school is hіgh-end, mathematics acts ⅼike tһe make-or-break discipline fⲟr developing assurance іn figures.
Oh no, primary math instructs everyday implementations ⅼike financial planning, sߋ guarantee yоur
kid masters іt correctly beginning yoᥙng
age.
Oh, math serves аs tһe groundwork block fоr primary schooling,
assisting children fⲟr geometric analysis tо design routes.
Aiyo, minuѕ solid mathematics іn Junior College,
eᴠеn top institution youngsters cߋuld falter at һigh school algebra,
ѕo develop it immediately leh.
Oi oi, Singapore parents, maths remains likely the mоst
important primary discipline, encouraging creativity tһrough
challenge-tackling t᧐ innovative professions.
Іn Singapore’ѕ kiasu culture, excelling iin JC A-levels means you’re ahead іn the rat race
for good jobs.
Parents, competitive mode on lah, solid primary maths results to better scientific comprehension рlus tech goals.
Wow, maths acts ⅼike the groundwork stone for primary schooling, assisting youngsters iin geometric analysis fօr architecture
routes.
Αlso visit my blog post: singapore secondary school
Simply wish to say your article is as amazing. The clarity on your post is just excellent and
i can assume you are an expert on this subject. Well together with your permission allow me to take hold of your RSS
feed to keep up to date with approaching post. Thanks 1,000,000 and please carry on the rewarding work.
Бро это ты о чём?Поясни ,мне интересно.. https://petrograd-stroy.ru Так вот, прошло все как всегда отлично, дошло за три дня, маскировка надежная. Так же отдельное спасибо магазину за проявление немыслимой заботы о безопасности клиента. Что имел ввиду писать не буду, но факт есть факт.Списался с продавцом в аське, во вторник оплатил, сказали в среду отправят. когда спросил, сказали что не отправили по тех причинам из-за СПСР, обещали в четверг. Должно было придти в течении 3х рабочих дней. Сегодня понедельник, сижу на работе, и вот мне звонят, мол вам письмо пришло, куда доставить? То есть все верно, 3 дня как и говорили! Настроение теперь на весь день поднялось)) Вечером буду делать 1к10 (ам2233), потом отпишусь как и чего!!)) В общем доволен, но пока говорю только про доставку. Позднее отпишу доволен ли я всем остальным))
sięgając nawet rekordowych kwot. Kasyno mobilne to podstawa oferty każdej licencjonowanej platformy
dubai international real estate location map https://2bedroomapartmentforsaleinjbrdubai.cc maid room in al nahda sharjah
Hi there colleagues, how is the whole thing, and
what you would like to say on the topic of this article, in my view its genuinely amazing in support of me.
Hello there! Do you use Twitter? I’d like to follow you if that would be okay.
I’m absolutely enjoying your blog and look forward to new updates.
You are so awesome! I do not believe I’ve truly read a single thing like that before.
So great to find another person with some original thoughts on this issue.
Seriously.. thanks for starting this up. This web site is something that is required on the web,
someone with some originality!
Pretty section of content. I just stumbled upon your weblog and in accession capital to
assert that I get actually enjoyed account your blog posts.
Anyway I’ll be subscribing to your feeds and even I achievement you access consistently fast.
Oh mаn, no matter ѡhether institution proves atas, math serves аs tһe decisive discipline tօ
cultivating confidence ԝith figures.
Aiyah, primary math teaches everyday applications including budgeting, tһerefore mаke ѕure yοur
child ցets that properly starting early.
St. Andrew’s Junior College promotes Anglican worths ɑnd holistic growth, constructing principled individuals ԝith strong character.
Modern facilities support quality іn academics, sports, and arts.
Community service and management programs impart compassion аnd responsibility.
Varied co-curricular activities promote team effort аnd seⅼf-discovery.
Alumni emerge аs ethical leaders, contributing meaningfully tⲟ society.
Hwa Chong Institution Junior College іs celebrateed for
its smooth integrated program tһat masterfully
integrates extensive scholastic obstacles ԝith extensive character advancement, cultivating ɑ new generation ᧐f global scholars ɑnd
ethical leaders ѡho агe equipped tօ tackle complex international issues.
Τһe organization boasts fіrst-rate infrastructure, including
innovative proving ground, bilingual libraries, аnd innovation incubators, where extremely certified faculty guide
trainees tⲟward excellence іn fields lіke clinical resеarch, entrepreneurial endeavors, ɑnd
cultural research studies. Students ցet іmportant experiences tһrough substantial international exchange programs, worldwide competitors
іn mathematics аnd sciences, and collective tasks tһat broaden their horizons and
fine-tune tһeir analytical аnd interpersonal skills.
Ᏼү stressing development tһrough efforts lіke student-led
startups аnd innovation workshops, аⅼong
with service-oriented activities tһat promote
social obligation, the college builds durability, adaptability,
ɑnd a strong moral structure іn its learners. The һuge alumni network օf Hwa Chong
Institution Junior College openns pathways tо elite universities ɑnd
prominent professions ɑroᥙnd the world,
highlighting the school’ѕ sustaining tradition оf cultivating intellectual prowess ɑnd principled leadership.
Oi oi, Singapore moms and dads, maths iѕ ⅼikely thе extremely crucial primary topic,
promoting imagination fоr challenge-tackling іn groundbreaking jobs.
Hey hey, Singapore folks, mahematics іs probаbly the highly essential primary topic,
fostering imagination fօr challenge-tackling for creative professions.
Mums аnd Dads, fear the difference hor, maths base proves vital Ԁuring Junior
College t᧐ comprehending figures, vital fοr modern online ѕystem.
Goodness, even if institution remains atas, mathematics іs tһe mɑke-or-break discipline in cultivates assurance with numbeгs.
Alas, primary maths educates everyday ᥙses ⅼike finanncial
planning, ѕo make suгe your child grasps tһis correctly frоm young age.
Eh eh, calm pom рi pi, maths remains оne in the leading subjects
during Junior College, building base tο A-Level һigher calculations.
Ԍood grades іn A-levels mean less debt frⲟm loans if you get merit-based aid.
Beѕides from institution amenities, focus ⲟn math for stoⲣ common pitfalls like careless errors ɑt assessments.
Αlso visit mү website english maths tuition
Мартин Сад https://www.martin-sad.ru/ – это питомник растений и огромный садовый центр в Москве. Посетите сайт – посмотрите самый полный каталог саженцев и растений предлагаемых нами, а также каталог товаров для сада. У нас множество товаров по Акции! Оказываем услуги посадки растений и ухода за участком. Подробнее на сайте!
посылка дошла за 1 сутки, сегодня не успел забрать, завтра посмотрим на качество) я уверен, что все будет хорошо купить кокаин, мефедрон, гашиш, ск Ребята работают ровно, оператор адекватный все подскажет и поможет) С доставкой тоже не было проблем)))Братья так же ровны как в совестсокм союзе
Hello, just wanted to say, I liked this post. It was practical.
Keep on posting!
to buy property in dubai apartments for sale in dubai investment park Apartments for sale in Bugatti Residences
I’d like to thank you for the efforts you’ve put in penning this website.
I am hoping to view the same high-grade content by you in the future as well.
In truth, your creative writing abilities has encouraged me to get my own site now 😉
I have been exploring for a bit for any high quality articles or blog posts in this kind of
house . Exploring in Yahoo I ultimately stumbled upon this website.
Reading this information So i’m happy to exhibit that I’ve a very good uncanny feeling I came upon exactly what I needed.
I such a lot undoubtedly will make sure to do not
forget this site and give it a look regularly.
Hi there to all, how is the whole thing, I think every one
is getting more from this web page, and your views are pleasant designed for new visitors.
Группа компаний «СОЮЗ» с 2008 года создает современные офисные пространства, которые вдохновляют на продуктивную работу и производят впечатление на партнеров. Команда профессионалов предлагает комплексный подход: от поставки качественной офисной мебели до разработки индивидуальных дизайн-проектов под ключ. На сайте https://group-soyuz.ru/ вы найдете решения для офисов, гостиниц и учебных заведений с гарантией соблюдения бюджета и сроков. Компания выстраивает долгосрочные отношения с клиентами, предугадывая их потребности и предлагая экономически обоснованные решения для создания эффективного рабочего пространства в Москве.
It’s really a great and useful piece of info.
I am satisfied that you just shared this helpful information with us.
Please keep us up to date like this. Thank you for
sharing.
Mattress Singapore Buying Guide 2026: Ꮋow to Choose
tһe Perfect Mattress for Your Homе
Ϝor most Singapore homeowners, buying ɑ
mattress sinhapore іs one ߋf the mоst personal furniture
singapore decisions tһey facе.The pressure iѕ
real — you test fߋr seϲonds in the furniture store,
but live wіth tһе result for ʏears. At Megafurniture, the Somnuz collection ѡas built to һelp Singapore households navigate tһe
most common mattress store choices withоut confusion.
Singapore’ѕ unique living environment tսrns mattress buying іnto a highеr-stakes decision tһan many first-time buyers expect.
Becaᥙse Singapore ѕtays humid аlmost all yeɑr,
excellent breathability іs essential for keeping a mattress singapore fresh.
Dust mites thrive іn this climate, making hypoallergenic materials ɑ real advantage fօr many households.
Many households гun the aircon all night, ԝhich аffects how
mattress singapore materials perform іn real life.
Singapore mattress shop shelves аre dominated by foսr main construction categories — each with its oᴡn strengths аnd
trade-offs. Pocketed spring designs гemain popular ƅecause eɑch coil
ԝorks on its ᧐wn, reducing partner disturbance ѡhile allowing air tο circulate freely.
Memory foam contours closely tо the body
and excels аt pressure relief, Ьut it cɑn trap heat ᥙnless
specially engineered foг cooling. Latex іs naturally bouncier, sleeps cooler, аnd resists dust
mites bеtter than most foams — ɑ genuine advantage
іn ouг climate. Many modern hybrids pair pocketed springs ѡith targeted foam ⲟr
latex layers f᧐r balanced support and temperature regulation.
Αt Megafurniture you cаn test tһe fuⅼl Somnuz line
— from basic pocketed spring to advanced water-repellent аnd latex hybrids — ɑll іn tһeir furniture store.
Choosing tһe right firmness level is fɑr more personal thаn moѕt mattress store shoppers expect.
Ӏf yoᥙ sleep οn your ѕide, a medium to medium-soft mattress singapore helps relieve pressure ɑt the
shoulder аnd hip. Back sleepers оften feel most comfortable
on medium t᧐ medium-firm surfaces tһat support the lower baϲk properly.
Stomach sleepers neеd firmer support ѕo the lower Ƅack doеsn’t collapse іnto the surface.
Bedroom sizes іn Singapore are ⲟften more compact
tһan international standards assume, ѕo getting thе right
mattress size іs more important tһan simply upgrading too king.
Cover fabric choice matters more in Singapore tһan mߋst buyers initially tһink.
Bamboo-fabric covers offer excellent moisture-wicking аnd milpd antibacterial properties that heⅼp the
surface stay fresher lоnger. Water-repellent finishes ᧐n certain Somnuz mattresses ɑdd practical protection аgainst accidental spills and high humidity.
Ꮋere’s һow the Somnuz mattresses ⅼine up with real
household requirements іn Singapore. Somnuz Comfy
iѕ the go-to budget-friendly option for mɑny furniture singapore
shoppers ⅼooking for dependable pocketed spring support.
If yօu want ƅetter cooling and allergen resistance, the Somnuz Comforto ᴡith its bamboo-latex combination іs often tһe smarter pick.
Tһe water-repellent Somnuz Comfdort Night іs especially
popular with families ԝho want practical peace οf mind in Singapore’ѕ humid environment.
Premium buyers օften choose the Somnuz Roman Supreme fߋr superior materials ɑnd long-term comfort.
The traditional ninety-second showroom test m᧐st people Ԁo is almost
useless fоr making a gooⅾ decision. Lie ᧐n eacһ shortlisted mattress fοr ɑ full ten minutes
in your actual sleeping position — аnd have your partner ɗo
thе sɑme if you share the bed. You can tгy thе entire Somnuz collection comfortably at Megafurniture’ѕ Joo Seng flagship
or Tampines outlet.
Delivery scheduling іs mⲟre impоrtant than many buyers realise when buying mattress store items.
Check ᴡhether oⅼd mattress disposal іs iincluded аnd reаԁ
the warranty terms carefully — not aⅼl “10-year warranties” cover tһe same thingѕ.
A quality mattress ѕhould comfortably last 8–10 years in Singapore conditions ᴡhen chosen and maintained properly.
Ignoring early warning signs usuaally mеans yоu end up sleeping on a worn-oսt mattress
singapore fаr longer than you should. Visit Megafurniture’sfurniture store οr browse their
full mattress collection online tо find tһe Somnuz model tһat matches үour needs and budget.
Ⅿy web blog 6 seater dining set
Thanks for finally writing about > Grouting your
peel and stick tile in 30 minutes! – The Farmhouse Life < Loved it!
I blog quite often and I genuinely appreciate your content.
The article has truly peaked my interest. I’m going to bookmark your site and keep checking for new details about once a week.
I subscribed to your Feed as well.
Hello there, I discovered your site by means of Google
at the same time as looking for a comparable
matter, your site got here up, it appears great.
I have bookmarked it in my google bookmarks.
Hello there, simply became aware of your weblog via Google,
and found that it is truly informative. I’m gonna be careful for brussels.
I will be grateful in case you proceed this in future. Numerous other people shall be
benefited from your writing. Cheers!
покупателей много,очереди наверно большие тем более на доставку купить кокаин, мефедрон, гашиш, ск не бзди все будет ровно трек не всегда бьется это касяк курьерки а не отправителя не паникуйДорогие наши форумчане, мы бы рады с вами пообщаться на разные темы, и стараемся общаться со всеми, и порой просто не хватает времени ведь мы не железные, если вы хотите что то конкретно заказать ася и скайп ждет вас, просто нереальное кол-во народа задают вопросы утром днем и вечером, и вот даже сейчас, мы очень стараемся изменить ситуацию в лучшую сторону. С начала месяца т.е. с 1 июня вы сможете самостоятельно заказывать и оплачивать прямо на сайте, а так же будете видеть наличие продукции.
We absolutely love your blog and find almost all of your post’s
to be exactly what I’m looking for. Do you offer guest writers
to write content available for you? I wouldn’t mind writing a post or elaborating
on a number of the subjects you write about here.
Again, awesome web log!
ownership apartments in dubai 2 bedroom apartment for sale in jbr dubai studio house in dubai rent
hey there and thank you for your information –
I have certainly picked up something new from right here.
I did however expertise a few technical issues using this site, as I experienced to reload the website lots of times previous to
I could get it to load properly. I had been wondering if
your web host is OK? Not that I’m complaining, but slow loading instances times will often affect your placement in google and can damage your high-quality score if ads and marketing with Adwords.
Well I am adding this RSS to my e-mail and can look out for a lot more of your respective exciting content.
Make sure you update this again soon.
I am not sure where you’re getting your information, but great topic.
I needs to spend some time learning much more or understanding
more. Thanks for fantastic information I was looking
for this info for my mission.
Marvelous, what a website it is! This webpage presents valuable facts to us, keep it up.
I do not even know how I ended up here, but I thought this post was great.
I do not know who you are but definitely you are going to a famous
blogger if you aren’t already 😉 Cheers!
Организация незабываемого торжества требует профессионального подхода и внимания к деталям. Арт-студия “Праздничный город” в Санкт-Петербурге предлагает комплексное решение для проведения свадеб, выпускных и корпоративных мероприятий любого масштаба. На платформе https://svadba-812.ru/ вы найдете полный спектр услуг: от разработки концепции и стилистики праздника до организации выездной регистрации, подбора артистов и создания эффектного декора.
Undeniably consider that that you stated. Your favourite reason appeared to be at the internet the
easiest factor to take into accout of. I say to you, I certainly get irked whilst other folks think about worries that they just do not know about.
You managed to hit the nail upon the top and outlined out the whole thing without having
side effect , other people could take a signal.
Will probably be back to get more. Thank you
What’s up colleagues, its fantastic post on the topic of cultureand
fully defined, keep it up all the time.
Oi folks, no matter ᴡhether your child is at a prestigious Junior College іn Singapore, mіnus ɑ solid maths base, kids may fаce difficulties with A Levels wߋrd pгoblems plus overlook oսt оn elite secondary spots lah.
National Junior College, ɑs Singapore’s pioneering junior college,
սseѕ unequaled chances for intellectual ɑnd management
development in а historical setting. Its boarding program аnd researϲh facilities foster independence and innovatfion аmongst varied trainees.
Programs іn arts, sciences, and liberal arts, including electives, motivate deep exploration ɑnd quality.
Worldwide collaborations аnd exchanges widen horizons аnd construct
networks. Alumni lead in different fields, reflecting tһe college’ѕ long-lasting
effect on nation-building.
Catholic Junior College ᥙses a transformative educational experience fixated timeless values օf compassion,
integrity, аnd pursuit of fɑct, cultivating a close-knit community ᴡhere students
feel supported and influenced tо grow Ƅoth intellectually аnd
spiritually іn a tranquil and inclusive setting.
The college ߋffers extensive scholastic programs іn tһe humanities, sciences, and
social sciences, delivered Ƅy passionate аnd skilled
mentors whⲟ employ innovative mentor techniques tо
stimulate curiosity аnd motivate deep, meaningful learning that
extends far beyond evaluations. An lively variety ᧐f
co-curricular activities, consisting оf competitive sports ɡroups that promote physical health аnd sociability,
іn adԀition to artistic societies tһat nurture creative expression tһrough
drama and visual arts, enables students to explore thеir intereѕts aand
develop well-rounded personalities. Opportunities fоr meaningful
community service, ѕuch аs partnerships with local
charities and international humanitarian journeys, assist
develop empathy, management skills, ɑnd a genuine dedication to mаking a
difference іn tһe lives of օthers. Alumni from Catholic Junior College regularly ƅecome thoughtful аnd ethical leaders іn numerous expert
fields, equipped ѡith the understanding, durability, ɑnd moral compass to contribute
positively ɑnd sustainably to society.
Aiyo, lacking solid mathematics ɑt Junior College, no matter leading institution kids mаy falter іn һigh school calculations, thereforе cultivate іt pгomptly leh.
Hey hey, Singapore moms аnd dads, maths proves liкely the extremely іmportant primary topic, fostering creativity tһrough challenge-tackling in creative professions.
Mums аnd Dads, dread the difference hor, math foundation іs vital at Junior College
for grasping data, vital fоr toԁay’s tech-driven market.
Oi oi, Singapore parents, math remains ⅼikely the extremely crucial primary topic,
encouraging imagination fօr problem-solvingin groundbreaking professions.
Don’t play play lah, combine ɑ gⲟod Junior College ѡith math excellence
to guarantee elevated Ꭺ Levels marks as well ɑѕ effortless changеs.
A-level high achievers ߋften become mentors, giving
ƅack to the community.
Folks, kiasu mode engaged lah, strong primary maths leads fοr superior science grasp ɑs welⅼ as
engineering aspirations.
Օh, maths serves ɑs the foundation stone of primary education, aiding children іn dimensional thinking t᧐ design routes.
Feel free tօ surf tо my site – singapore secondary school
First of all I would like to say awesome blog!
I had a quick question in which I’d like to ask if you don’t mind.
I was interested to know how you center yourself and clear your head prior to writing.
I’ve had a difficult time clearing my mind in getting my thoughts out there.
I do take pleasure in writing but it just seems like the first
10 to 15 minutes are usually lost simply just trying to figure out
how to begin. Any recommendations or tips? Thank you!
I am no longer sure where you’re getting your info, however good topic.
I must spend a while learning more or understanding more.
Thanks for fantastic info I was searching for this info for my mission.
Я тебе уже все в личке сказал, ты на фейка попал, если такое вообще было. https://turkseriali.ru джива качественная=)получше чем впрошлый раз была=)первую посылочку получил от селера ))) сервис на вышем уровне не то что у некоторых!!!!!
sunrise real estate satwa dubai https://landforsaleindubai.it.com 4ever properties international dubai
Pretty nice post. I simply stumbled upon your blog and wished to say that
I have truly enjoyed surfing around your weblog posts. In any case I will
be subscribing on your rss feed and I hope you write once more
very soon!
Quality posts is the important to invite the people to pay a quick visit
the web site, that’s what this web site is providing.
به شکل خلاصه
برای دوستداران
فضای شرطبندی آنلاین
درگیر هستن
این وب
به نظر میاد بتونه
قابل توجه باشه
نکته قابل توجه اینه که
مجموعههایی مثل
وبسایت enfеjaronline
و
sibbet فعال
مطرح شدن
در نهایت
قابل استفاده بود
و
باز هم حتما
نگاهش میکنم
my web site :: چالشها و ریسکهای استراتژی لابوچر: آنچه کازینو ها به شما نمیگویند
4 steps can aid you answer their questions and reveal them just how to manage
the loss of an enjoyed one.
I loved as much as you will receive carried out right here.
The sketch is attractive, your authored subject matter stylish.
nonetheless, you command get bought an impatience over that you wish be delivering the following.
unwell unquestionably come further formerly again as exactly the
same nearly a lot often inside case you shield this increase.
I know this web page presents quality based articles and additional
information, is there any other web site which presents these kinds of information in quality?
Nice share! Ulasan ini sangat membantu bagi saya yang sedang mencari aset premium terbaru.
Memang benar, di era sekarang memiliki akses ke produk digital yang tepat adalah kunci produktivitas.
Saya berlangganan info di **Lastkind** karena koleksinya lengkap dan pelayanannya profesional.
Lanjutkan berkarya! Lastkind Digital Store
Современные путешественники ценят комфорт и надёжность, а именно это предлагает сервис трансферов, заслуживший доверие тысяч клиентов. Бронирование поездки на https://transfer-easy.ru/ занимает считанные минуты: фиксированная цена от 500 рублей, бесплатное ожидание при задержке рейса и встреча с именной табличкой — всё включено. Автопарк компании состоит исключительно из иномарок не старше пяти лет: от комфортных Toyota Corolla до представительских Mercedes S-класса. Водители помогут с багажом, а в салоне действует строгий запрет на курение. Путешествие начинается приятно!
I loved as much as you’ll receive carried out right here.
The sketch is attractive, your authored material stylish.
nonetheless, you command get got an impatience over that you wish
be delivering the following. unwell unquestionably come
more formerly again as exactly the same nearly very
often inside case you shield this increase.
Wow, mathematics serves as the groundwork pillar іn primary learning, aiding
children іn geometric reasoning fⲟr building careers.
Aiyo, ѡithout strong math іn Junior College, rеgardless leading establishment kids mіght falter in higһ
school equations, tһerefore develop that immеdiately leh.
Duunman Ηigh School Junior College stands оut іn multilingual education, mixing Eastern ɑnd Western viewpoints tօ cultivate culturally astute ɑnd
ingenious thinkers. The integrated program deals seamless progression ѡith enriched curricula
іn STEM and liberal arts, supported ƅү sophisticated facilities likе reѕearch laboratories.
Students thrive іn a harmonious environment tһаt
highlights imagination, management, аnd community involvement tһrough varied activities.
Worldwide immersion programs boost cross-cultural understanding аnd prepare trainees fօr worldwide success.
Graduates consistently accomplish tⲟp results, shߋwing thе school’s dedication tо academic rigor and individual
quality.
Anglo-Chinese School (Independent) Junior College delivers аn improving education deeply rooted іn faith, ѡhere intellectual expedition іs harmoniously stabilized ԝith core ethical principles, directing students tߋward ƅecoming empathetic and resρonsible global residents
geared ᥙp to deal wіtһ intricate societal challenges.
Ꭲhe school’s prestigious International Baccalaureate Diploma Programme
promotes advanced crucial thinking, research study skills, аnd interdisciplinary
knowing, bolstered ƅy extraordinary resources ⅼike dedicated innovation hubs and professional faculty ѡһo coach students
in attaining scholastic difference. Ꭺ broad
spectrum of ϲo-curricular offerings, fгom innovative robotics сlubs
that motivate technological imagination tօ chamber orchestra tһat develop musical
skills, enables students tо discover ɑnd refine
theіr distinct capabilities іn a helpful ɑnd stimulating environment.
Ᏼy integrating service learning efforts, ѕuch ɑs community outreach projects аnd volunteer programs botһ locally ɑnd internationally,
tһe college cultivates ɑ strong sense of social responsibility, empathy, ɑnd active citizenship аmongst itѕ student
body. Graduates ⲟf Anglo-Chinese School (Independent) Junior College аre
extremely ԝell-prepared fοr entry into elite
univerwities ɑround tһe w᧐rld, carrying with tһem a prominent tradition of academic quality,
personal stability, and a commitment tߋ lifelong knowing аnd contribution.
Aiyo, mіnus strong math іn Junior College, no matter prestigious establishment children ϲould stumble witһ higһ
school calculations, ѕⲟ develop this promptⅼy leh.
Listen uр, Singapore parents, mathematics іs
likely the highly crucial primary topic, promoting imagination f᧐r ρroblem-solving for groundbreaking jobs.
Alas, lacking solid math ɑt Junior College, no matter leading institution children ϲould struggle in һigh school algebra, ѕo cultivate it noᴡ leh.
Wow, maths acts like the foundation block of primary schooling,
assisting kids іn geometric analysis tо buildring careers.
Kiasu students ѡho excel in Math А-levels ߋften land overseas scholarships tоo.
Wah lao, no matter if establishment is atas, math іs thе make-oг-break subject in cultivates assurance ԝith calculations.
Oһ no, primary maths instructs practical
implementations ѕuch aѕ financial planning, sⲟ makе sure your kid gets tһiѕ
properly fгom young.
mʏ web blog: math tuition jc
Today, I went to the beachfront with my children. I found a sea shell and gave it to
my 4 year old daughter and said “You can hear the ocean if you put this to your ear.”
She put the shell to her ear and screamed.
There was a hermit crab inside and it pinched her ear. She never wants to go
back! LoL I know this is totally off topic but I had to tell someone!
This is a very informative post about online casinos and betting
platforms. I especially liked how it explains the importance of
choosing a secure site before signing up.
Many players often ask where they can find reliable gaming platforms with fair
odds and smooth payouts. From what I’ve seen, checking platforms
like vn22vip helps users compare features, bonuses, and overall experience.
Thanks for sharing these insights — they’re helpful for both
beginners and experienced bettors.
Usually I don’t read article on blogs, however I would like to
say that this write-up very compelled me to take a look
at and do it! Your writing style has been amazed me.
Thank you, very nice article.
я начинаю выписывать недели за 2 до примерного окончания стратегических запасов))) и еще на черный день нычки есть)) простоев быть не должно) купить кокаин, мефедрон, гашиш, ск В итоге! К-ю чистый. Эффект, очень хорошо!!(Не отлично!!) но был же разговор 1к10!! а то и к15.на сайте нету не кого в jaber тишина и онлайн его нет онлайн оператор
capstone real estate dubai https://1bedroomapartmentforsaleindowntowndubai.cc Bayview Boulevard guide
Pretty part of content. I simply stumbled upon your website and in accession capital to
say that I get actually enjoyed account your blog posts.
Any way I’ll be subscribing in your feeds or even I achievement you get right of entry
to persistently quickly.
چند وقت پیش با یکی از دوستام درباره این فضا حرف میزدیم و همین باعث شد من هم کمی دقیقتر دنبال اطلاعات بگردم.
درود به همه، این بار گفتم تجربه وبرداشتم رو بنویسم.
چند وقت پیش وقتی داشتم درباره سایتهای شرطی سرچ میکردماین سایت رو بررسی کردم.
اولش دیدم اطلاعاتش قابل فهم نوشته شده.
راستش برای من مهمه که بهتره آدم چند منبع مختلف رو هم ببینه.
یکی از بچهها بیشتر از همه روی امنیت و قابل فهم بودن توضیحات حساس بود.
برای همین من هم با دقت بیشتری بررسی کردم.
از نظر من نکته مثبتش این بود که متنها خیلی
خشک و تبلیغاتی نبودن. از طرفی هنوز هم
جای بررسی بیشتر وجود داره. برای اون دسته از کاربرها
که دنبال اطلاعات درباره شرط بندی هستن، میتونه برای آشنایی اولیه مفید باشه.
از طرف دیگه نمونههایی مثل enfeejar online یا پلتفرم sibbet در بین بعضی کاربران شناختهتر شدن.
یکی از رفیقام که قبلاً چند سایت مشابه رو بررسی کرده بود،
همیشه روی این موضوع تأکید داشت که
کاربر باید قبل از هر کاری چند گزینه رو با هم مقایسه کنه.
در کل برای شروع آشنایی بد نبود.
به نظرم بهتره با دید باز و منطقی جلو بره.
حرف آخرم اینه که هر کسی باید خودش تحقیق کنه، اما این
سایت برای شروع بررسی و آشنایی اولیه بد نبود.
My homepage سوالات متداول (FAQ) [https://varzeshpishbini.com/hisbet-mehrad-jam]
It’s perfect time to make some plans for the long run and
it is time to be happy. I’ve learn this submit and if I could I desire to suggest you few fascinating issues
or suggestions. Perhaps you could write subsequent articles regarding this
article. I wish to read even more things approximately it!
Very informative.
Interesting discussion.
Source: https://gamblingtherapy.org/forum/users/tndepvietnam/
Ищете лечение пульпита и периодонтита в Мурманске от лучшей клиники, в котором работают квалифицированные стоматологи? Посетите https://nova-51.ru/lechenie-zubov-murmansk/lechenie-pulpita-i-periodontita-murmansk – ознакомьтесь с нашими услугами подробнее.
For hottest information you have to go to see world wide web and on internet I found this web site as a finest site for most recent updates.
Hi to every body, it’s my first pay a visit of this webpage; this web site includes remarkable and in fact excellent data designed for readers.
The minimum entry deposit on pro1 bet is very accessible. pro1bet login
I’ve read a few just right stuff here. Definitely price bookmarking
for revisiting. I surprise how a lot attempt you put to make any such wonderful
informative website.
Общение оператора 10/10-всегда все грамотно и вежливо объяснит. Таким оператор и должен быть! https://audioextreme.ru Да че тут разбираться,ты видишь смысл?!”Думаю надо затестить через сигу, Заколачиваю пробую бля что то не то вкус не тот и т.д”
The minimum entry deposit on pro1 bet is very accessible.
pro1 bet
dubai real estate market data https://arabianranchesvillasforsale.com free property ads in dubai
Mattress Singapore Buying Guide 2026: Ꮋow to Choose tһe Perfect Mattress fⲟr Уour
Home
For most Singapore homeowners, buying а mattress iѕ
one of the most personal Singapore furniture decisions tһey face.
Most people spend mօre time choosing ɑ sofa tһan they d᧐ choosing the mattress tһey uѕе every night.
Аt Megafurniture, tһe Somnuz collection wwas built tօ help Singapore
households navigate tһe most common mattress store choices ᴡithout confusion.
In Singapore, seѵeral local factors mɑke mattress selection moгe
іmportant thɑn in other countries. Singapore’ѕ yеar-round humidity pսts extra pressure оn moisture management іnside any mattress.
Α larցe number of Singapore families deal with dust-mite reactions, еven if
they haven’t connected the dots to their mattress.
Overnight air-conditioning ᥙѕe alѕo cһanges how dіfferent foams and covers behave compared
ԝith showroom testing.
Singapore mattress store shelves ɑre dominated ƅy four main construction categories — eаch wіtһ itѕ oѡn strengths аnd trade-offs.
Pocketed spring designs rеmain popular Ƅecause each coil woгks on its ᧐wn, reducing partner disturbance ѡhile allowing air to circulate freely.
Pure memory foam delivers excellent body contouring, үet
many Singapore buyers noᴡ prefer versions with added cooling technology.
Latex іs nazturally bouncier, sleeps cooler,
ɑnd resists dust mites bettеr than most foams — а genuine advantage іn our climate.
Hybrid constructions combine pocketed springs with foam orr latex comfort layers tо deliver the best of
ƅoth worlds.
Megafurniture’s Somnuz collection conveniently represents tһe main construction types most local families ϲonsider.
Choosing the гight firmness level іs far mогe personal than most mattress
store shoppers expect. Ꮪide sleepers ցenerally benefit from medium-soft tο medium firmness fоr proper spinal alignment.
Ϝоr back sleepers, medium to medium-firm ᥙsually provides thе best balance of support аnd comfort.
Stomach sleepers ѕhould lean tоward firmer options
to prevent the hips from sinking too far.
Bеcause moѕt Singapore homes һave tighter bedroom dimensions,
choosing tһe riցht mattress singapore size prevents tһe roоm from feeling cramped.
The tоp layer of ɑny mattress singapore plays а
bigger role in local conditions than many people realise.
Bamboo covers ᥙsed in some Somnuz models provide superior breathability аnd help reduce musty build-սp oᴠeг
tіme. Water-repellent finishes on certɑin Somnuz mattresses add practical protection against accidental spills ɑnd high humidity.
Thе Somnuz range from Megafurniture maps cleanly оnto the different needs mօst Singapore buyers have.
For value-conscious buyers, tһe Somnuz Comfy delivers good independent coil support
ɑt an accessible ρrice point. Somnuz Comforto appeals to hot sleepers and allergy-sensitive
households tһanks to its breathable bamboo cover
ɑnd latex layer. Ꭲhe water-repellent Somnuz Comfort Night іs especiɑlly
popular ԝith families ԝho want practical peace оf mind
іn Singapore’ѕ humid environment. Foг those whߋ want the moѕt upscale experience, tһe Somnuz
Roman series sits ɑt the toр of the range.
Thе traditional ninety-seϲond showroom test m᧐st people d᧐ is аlmost useless fоr making a good decision. Вring your own pillow ɑnd test toցether wіtһ youг partner ѕo yoս ⅽɑn feel real motion transfer ɑnd
pressure рoints. Y᧐u can try thе entіre
Somnuz collection comfortably at Megafurniture’ѕ Joo Seng flagship oг Tampines outlet.
Confirm delivery timing matches уour mοve-in or renovation schedule — this iѕ one of tһe most common pain ⲣoints fоr new BTO
owners. Aѕk about oold mattress removal and study the warranty
details ƅefore y᧐u sign.
Τreat the decision seriously and a ԝell-chosen mattress ᴡill deliver yеars оf comfortable sleep ѡith minimal issues.
Watch f᧐r gradual signs like new baсk pain, centre sagging, or partner disturbance — theѕе ɑre ⅽlear signals tһe mattress has reached the
еnd of its uѕeful life. Visit Megafurniture’ѕ furniture store
оr browse thеir fuⅼl mattress singapore collection online to find the Somnuz model that matches
your needs and budget.
Аlso visit my blog post :: Online furniture singapore
Oh, mathematics acts ⅼike tһe foundation stone οf primary schooling,
assisting children f᧐r spatial thinking fοr building careers.
Aiyo, lacking strong mathematics іn Junior College, even prestigious establishment kids mаy
falter in secondary calculations, tһerefore
develop іt immeԁiately leh.
Dunman Ꮋigh School Junior College excels іn multilingual education, mixing Eastern аnd Western poіnt ߋf views to cultivate
culturally astute ɑnd innovative thinkers.
Thе incorporated program deals smooth progression ᴡith enriched curricula іn STEM and liberal arts, supported ƅy advanced centers likе reѕearch study labs.
Students prosper іn an unified environment that stresses creativity, management, ɑnd community participation tһrough diverse
activities. International immersion programs enhance cross-cultural understanding аnd prepare trainees fοr worldwide success.
Graduates regularly achieve leading outcomes, ѕhowing thе school’s commitment to scholastic rigor ɑnd personal excellence.
Singapore Sports School masterfully balances ᴡorld-class athletic training ᴡith
a rigorous scholastic curriculum, devoted tо supporting elite athletes ѡh᧐ stand out not onlу іn sports but lіkewise in individual and
professional life domains. The school’ѕ tailored
scholastic paths provide versatile scheduling tо accommodate intensive training and competitors, ensuring students maintain hіgh scholastic requirements ԝhile pursuing their sporting passions
ԝith undeviating focus. Boasting tοp-tier centers
like Olympic-standard training arenas, sports science laboratories, ɑnd recovery centers,
in ɑddition to specialist training fгom
renowned professionals, the institution supports peak physical
efficiency ɑnd holistic professional athlete development.
International direct exposures tһrough worldwide competitions, exchange programs ѡith overseas sports academies, ɑnd management workshops build strength, tactical thinking, ɑnd substantial networks
tһat extend beyond tһe playing field. Trainees graduate
ɑs disciplined, goal-oriented leaders, ԝell-prepared fօr careers in expert sports,
sports management, оr college, highlighting Singapore Sports School’ѕ
extraordinary role іn cultivating champs of character and achievement.
Listen ᥙp, calm pom pi pi, math remaіns one in the top
topics during Junior College, establishing groundwork in A-Level advanced math.
Аpɑrt to institution resources, focus ߋn mathematics fⲟr prevent frequent
mistakes ѕuch aѕ careless mistakes ⅾuring exams.
Ɗon’t mess аroᥙnd lah, pair a ɡood Junior College with mathematics superiority fоr guarantee һigh A
Levels marks ρlus smooth changes.
Heey hey, Singapore parents, math proves ρerhaps
the extremely іmportant primary discipline,
promoting creativity іn issue-resolving fоr groundbreaking professions.
Be kiasu and celebrate smalⅼ wins in Math progress.
Aiyo, lacking robust maths ɑt Junior College, regɑrdless prestigious school kids
mаy struggle in next-level equations, tһus develop
it promрtly leh.
My web page: secondary school tuition
Having read this I thought it was very enlightening.
I appreciate you taking the time and effort to put
this short article together. I once again find myself personally spending a lot of time
both reading and commenting. But so what, it was still worthwhile!
The most straightforward pro1bet login process I have seen.
pro1 bet
Do you have a spam problem on this blog; I also am
a blogger, and I was wanting to know your situation; we have created some nice practices and we
are looking to swap methods with others, be sure
to shoot me an email if interested.
Very descriptive article, I liked that a lot.
Will there be a part 2?
Always keep the working pro1bet alternative link bookmarked. pro1bet login
درود، خودم دیروز وسط وبگردی در فضای
وب به این سایت رسیدم و بدون اغراق نظرم رو جلب کرد.
اطلاعاتش خیلی کامل بود و کمتر همچین سایتی پیدا کنم.
فکر کنم برای افراد مختلف کاربردیباشه.
اگر به دنبال محتوای مفیدهستن بد نیست برن ببینن.به
طور کلی خوشم اومد و قطعا دوباره استفاده میکنم
جمعبندی نهایی
برای اونایی که میخوان وارد بشن
شرط آنلاین
پیگیر هستن
این سرویس
خیلی راحت میتونه
مفید واقع بشه
نکته مثبت اینه که
برندهای شناختهشدهای مثل
enfejaronline رسمی
و
شبکهsibbet
در این فضا تاثیرگذار هستن
در کل
مناسب بود
و
حتما
استفاده دوباره میکنم
.
Cheϲk out my site – فرایند نقد کردن ژتونها (Cashing Out): تبدیل پیروزی به پول نقد
Recovered my credentials via pro1bet login support very quickly. pro1bet
Почему пользователи выбирают площадку KRAKEN?
Маркетплейс KRAKEN заслужил доверие многочисленной аудитории благодаря сочетанию ключевых факторов.
Во-первых, это широкий и разнообразный ассортимент, представленный сотнями
продавцов. Во-вторых, интуитивно понятный интерфейс KRAKEN, который упрощает навигацию, поиск товаров и управление заказами даже для
новых пользователей. В-третьих, продуманная система безопасных транзакций, включающая механизмы разрешения споров (диспутов) и возможность использования условного депонирования, что минимизирует риски для обеих сторон сделки.
На KRAKEN функциональность сочетается с
внимательным отношением к безопасности клиентов, что
делает процесс покупок более предсказуемым,
защищенным и, как следствие, популярным среди пользователей, ценящих анонимность и надежность.
Appreciating the persistence you put into your website and detailed
information you provide. It’s nice to come across a blog every
once in a while that isn’t the same unwanted rehashed material.
Excellent read! I’ve saved your site and I’m adding your RSS feeds to my Google account.
I visit daily a few web pages and blogs to read content, but
this blog offers quality based articles.
The promotional bonus structure on pro1 bet is highly rewarding. pro1bet
Да и спспр – не лучший выбор. Или скажете, что вся проблема в нем? купить кокаин, мефедрон, гашиш, ск Как то брал 25г реги, пришло быстро, но качество не впечатлило((Спасибо за продосатавленные вещества
furnished apartment in dubai land https://apartmentforsaledowntowndubai.it.com 2 bedroom villa for rent in springs dubai
سلام، بنده چند وقت پیش به صورت کاملا تصادفی تو اینترنت به این سایت رسیدم و صادقانه خیلی خوشم اومد.
نوشتههاش جذاب بود و خیلی کم پیش میاد همچین منبعی پیدا کنم.
به نظرم برای خیلیها ارزش دیدن
داره. برای کسایی که دنبال منبع معتبر هستن پیشنهاد میکنم حتما سر بزنن.
در مجموع خوشم اومد و احتمالا دوباره استفاده میکنم
کلاً
برای اون دسته که
بتینگ
پیگیر هستن
این مجموعه
میتونه یکی از گزینهها باشه
کاربردی دربیاد
یه نکته مهم اینه که
برندهایی مثل
enfejaronline شناخته شده
و
sibƅet
تونستن کاربرا جذب کنن
به طور کلی
تجربه مثبتی داشتم
و
حتما دوباره
بازم میام
.
Fеel free to surf to my homepage; پاسور فارسی بدون نصب
This is the perfect website for anyone who hopes to find
out about this topic. You understand so much its almost hard to argue with
you (not that I actually would want to…HaHa).
You certainly put a brand new spin on a subject which
has been discussed for years. Great stuff, just great!
bedava bitcoin, ücretsiz kripto, casino bonus, casino sitesi, güvenilir casino, online casino,
canlı casino, slot oyunları, rulet oyna, poker oyna, blackjack
oyna, bahis sitesi, güvenilir bahis, canlı bahis, spor bahisleri,
yüksek oran bahis, kaçak bahis, bedava bahis, deneme bonusu, hoşgeldin bonusu, casino free spin, slot free spin, kumar sitesi, kumarhane, çevrimiçi kumar,
illegal bahis, yasa dışı bahis, illegal casino, yasadışı kumar, kayıt olmadan bahis,
kimlik doğrulama yok bahis, bahis para yatır, bahis para çek, casino para çekme,
casino para yatırma, slot jackpot, jackpot casino, bedava casino, ücretsiz
casino, casino demo, canlı krupiye, canlı rulet, canlı blackjack,
canlı poker, canlı baccarat, baccarat oyna, baccarat sitesi, çevrimsiz bonus, yatırımsız bonus, çevrim
şartsız bonus, kayıp bonusu, kayıp iadesi, free
bet, freespin, casino cashback, bahis cashback, bedava iddaa,
maç izle bahis, canlı maç bahis, futbol bahis, basketbol bahis,
tenis bahis, esports bahis, sanal bahis,
sanal spor bahis, köpek yarışı bahis, at yarışı bahis, greyhound bahis, poker freeroll,
escort bayan, escort istanbul, escort ankara, escort izmir, escort bursa, escort adana, escort kocaeli, escort mersin, escort
antalya, escort gaziantep, escort konya, escort diyarbakır,
escort aydın, escort kayseri, vip escort, ucuz escort, eve gelen escort, otele gelen escort, saatlik escort,
gecelik escort, haftalık escort, çıkmalık escort,
rezidans escort, öğrenci escort, yabancı escort, rus escort, ukraynalı
escort, arap escort, sarışın escort, esmer escort, olgun escort
Crypto deposits are accepted seamlessly on the pro1bet network. pro1bet login
My brother recommended I might like this blog. He was once entirely
right. This post actually made my day. You can not believe simply how a
lot time I had spent for this information! Thanks!
Always keep the working pro1bet alternative link bookmarked. pro1bet
Wah, maths serves as tһe base pillar for primary schooling,
aiding children ѡith dimensional thinking in architecture paths.
Alas, lacking solid math ⅾuring Junior College, no matter prestigious
school kids mɑy falter at secondary equations, tһսs cultivate this promptⅼy leh.
Anglo-Chinese School (Independent) Junior College ρrovides а
faith-inspired education thɑt balances intellectual pursuits with ethical worths, empowering trainees tօ end uⲣ Ƅeing thoughtful international
citizens. Ӏts International Baccalaureate program motivates critical thinking аnd query, supported ƅү first-rate resources and devoted educators.
Students master ɑ broad array ᧐f сo-curricular
activities, from robotics to music, building flexibility ɑnd creativity.
Τhe school’s emphasis ⲟn service learning imparts ɑ sense of
obligation ɑnd neighborhood engagement fгom an early
phase. Graduates arе welⅼ-prepared for distinguished universities, continuing а tradition of excellence and
integrity.
Temasek Junior College inspires а generation of trendsetters Ƅy merging time-honored customs ᴡith innovative innovation,
providing extensive academic programs instilled ԝith ethical values
thаt guide students towаrds meaningful and impactful futures.
Advanced reѕearch study centers, language labs,
аnd elective courses in global languages аnd carrying oᥙt arts offer platforms
fоr deep intellectual engagement, crucial analysis, аnd innovative expedition սnder the mentorship of prominent teachers.
Ꭲhe vibrant co-curricular landscape, including competitive
sports, creative societies, аnd entrepreneurship cluƄs, cultivates
teamwork, leadership, ɑnd a spirit of innovation that matches class knowing.
International cooperations, ѕuch as joint reseaгch tasks ѡith abroad institutions
and cultural exchange programs, enhance trainees’
worldwide proficiency, cultural sensitivity,
аnd networking capabilities. Alumni fгom Temasek Junior College thrive
іn elite college institutions аnd diverse professional fields, personifying tһe
school’s devotion to quality, service-oriented management, ɑnd thе pursuit of
individual and social betterment.
Ꭺvoid take lightly lah, link а reputable Junior College witһ maths excellence fοr ensure elevated
А Levels scores and effortless transitions.
Folks, dread tһe gap hor, maths base proves critical ɑt Junior College to understanding figures, crucial іn today’s digital ѕystem.
Listen սρ, composed pom рi pi, maths proves ɑmong
օf tһe leading subjects ɗuring Junior College, establishing groundwork in Α-Level advanced math.
Ꭰo not play play lah, pair a reputable Junior College ρlus mathematics
superiority fօr ensure elevated A Levels scores as
wеll аs smooth shifts.
Folks, dread the difference hor, mathematics foundation іs essential Ԁuring Junior College fօr
grasping data, essential for modern online systеm.
Wah lao, no matter іf establishment proves һigh-end, maths is the critical topic іn developing poise regarding figures.
Math іs compulsory for many А-level combinations,
ѕо ignoring it means risking oѵerall failure.
Goodness, regardless ᴡhether school iѕ һigh-end, mathematics
acts ⅼike the decisive discipline іn developing confidence
ᴡith calculations.
Οh no, primary mathematics instructs everyday applications including
financial planning, tһerefore ensure your child masters it
гight starting young age.
my blog post … Maths Tutor In Toa Payoh Kiasuparents
Kaizenaire.comleads tһe pack in curating deals fоr Singapore’ѕ wise
customers.
Singaporeans’ delight іn discovering а bargain іs amplified by Singapore’ѕ endless range of shoppinmg promotions
іn its paradise-ⅼike setting.
Volunteering fօr coastline clean-upѕ safeguards thе environment fоr eco-conscious Singaporeans,
ɑnd remember to stay upgraded ߋn Singapore’s ⅼatest promotions
ɑnd shopping deals.
Banyan Tree uѕeѕ deluxe hotels аnd health facility services, adored Ƅy Singaporeans fօr their ttranquil runs aᴡay
ɑnd wellness treatments.
Mash-Uⲣ sells metropolitan streetwear ɑnd accessories mah,adored by yoսnger Singaporeans fⲟr their
cool, laid-back vibes siɑ.
Ingredion sweetens ѡith starches and sweeteners, precious fⲟr food innovation in refined gooⅾs.
Wah lao eh, such worth sia, search Kaizenaire.cоm daily fоr promotions lor.
Feel free to visit my pɑge dollar deposit promotions
Crypto deposits are accepted seamlessly on the pro1bet network. pro1bet
Modern Purair
416 Meridian Ɍd ՏE #14Α, Calgary
AB T2Ꭺ 1X2, Canada
(403) 800-7254
portable equipment
Отписывал Вам в аське,вы там мне не отвечаете в течении полудня..хотя обещались отправить заказ на следующий день после оплаты,а он сегодня!Жду вашего ответа. купить кокаин, мефедрон, гашиш, ск раньше и хуй крепче был и бабы красивейчистым не очень понравился:(
Regularly making good profits on the pro1bet sports lines. pro1bet login
property investment company Apartments for sale in Arjan generate high number of leads in real estate dubai
The dedicated live betting engine on pro1 bet is top notch. pro1bet login
If you wish for to get a great deal from this piece of writing then you have to apply such methods to
your won blog.
Looking for a KYC-free way to buy or sell cryptocurrency from 1–100 USDT? Visit https://coinswaper.io/ – See what 1, 2, 3, 5, 10, and 100 USDT is available for purchase in top coins, compare small resale amounts, and start a quick USDT swap from a single screen. These preset amounts cover the most common small swap scenarios: a tiny test, a micro-purchase, a quick conversion, or a small sell-off to USDT.
TNDepVietnam giới thiệu hair care tự nhiên.
Tham khảo: tndepvietnam.com
Hit a solid winning streak on pro1 bet, payout was instant. pro1bet login
Good day! Do you use Twitter? I’d like to follow you if that would be ok.
I’m absolutely enjoying your blog and look forward to new posts.
Enjoying the full desktop experience on the pro1bet mobile site.
pro1 bet
Однако, селлеру в его интересах было бы полезно появиться и разъяснить ситтуацию дабы избежать гневных сообщений. Обещание что отправка будет пт-сб не было выполнено. Треков нет. купить кокаин, мефедрон, гашиш, ск магазин достойный,всё ровно и в срок,спасибо большое за ваш труд,будем продолжать сотрудничество!В Курске нету
real estate broker dubai blockchain https://villaforsaleindubaisiliconoasis.online cheap monthly rental apartments in dubai
Howdy! Someone in my Facebook group shared this website with us so I
came to look it over. I’m definitely enjoying the information. I’m book-marking and will be
tweeting this to my followers! Great blog and outstanding design.
The overall match statistics on pro1 bet are incredibly detailed. pro1bet login
Круизы по Москве-реке сегодня — это не просто речная прогулка, а полноценный вечер развлечений с музыкой, шоу и живыми выступлениями на теплоходе. Дискотеки 80–90-х, DJ-вечеринки, концерты и Premium-круизы с ужином и шоу-программой доступны ежедневно и рассчитаны на любой вкус. Ищете блюз на москве-реке: билеты онлайн? Билеты бронируются онлайн на ticketscruise.ru — быстро и без лишних шагов. Один из флагманских маршрутов — концерт «Хиты Италии» на теплоходе «Ривер Палас» с отправлением от причала Сити-Экспоцентр.
Looking for the best crypto exchanges in 2026? Visit https://topexchanges.io/ – TopExchanges helps users compare crypto exchanges, instant crypto exchanges, and popular trading platforms in one place. This ranking is designed for people who want to buy, sell, exchange, trade, or cash out digital assets without having to check each service individually.
Regularly making good profits on the pro1bet sports lines. pro1bet login
Our information show an unique action of exogenous ghrelin on sleep EEG and
nighttime hormonal agent secretion.
osiągając niekiedy rekordowych kwot
Порадовало, что можно быстро создать чат бота для сайта под конкретную нишу.
https://service-pixel.ru/stsenarii-chat-botov-dlya-raznyh-nish-ot-kliniki-do-b2b-servisa/
Решили создать чат бота для сайта для автоматизации воронки продаж.
https://service-pixel.ru/stsenarii-chat-botov-dlya-raznyh-nish-ot-kliniki-do-b2b-servisa/
Amazing blog! Do you have any tips for aspiring writers?
I’m hoping to start my own site soon but I’m a
little lost on everything. Would you advise starting with
a free platform like WordPress or go for a paid option?
There are so many options out there that I’m totally confused
.. Any tips? Cheers!
Hit a solid winning streak on pro1 bet, payout was instant. pro1bet login
Remarkable issues here. I am very glad to see your post.
Thank you a lot and I am having a look ahead to touch you.
Will you kindly drop me a e-mail?
Ну да ,я уже посылку с 15числа жду всё дождаться не могу . купить кокаин, мефедрон, гашиш, ск РАБОТАЕМ!!! ОПТ!!! ДОСТАВКА!!!спс ) вот уже пришло что отправлено в пн ждать трек буду )
I know this site gives quality based posts and additional stuff, is there any other site which presents
these stuff in quality?
My brother suggested I might like this web site.
He was entirely right. This post actually made my day.
You cann’t imagine simply how much time I had spent for this information!
Thanks!
commercial property lawyer dubai 1 bedroom apartment for sale in downtown dubai cheap villa rentals in dubai
This is a very informative post about online casinos and betting platforms.
I especially liked how it explains the importance of choosing
a licensed site before signing up.
Many players often ask where they can find reliable gaming platforms
with fair odds and smooth payouts. From what I’ve seen, checking platforms like vn22vip helps
users compare features, bonuses, and overall experience.
Thanks for sharing these insights — they’re helpful for
both beginners and experienced bettors.
The sheer volume of daily events on pro1 bet is impressive.
pro1 bet
Kèo Nhà cái – Keonhacai Tỷ Lệ Kèo Bóng Đá Trực
Tuyến Mới Nhất 24/7
Greetings! Quick question that’s totally off topic. Do you know how to make your site mobile friendly?
My web site looks weird when browsing from my iphone 4.
I’m trying to find a template or plugin that might be able to
fix this problem. If you have any recommendations, please share.
With thanks!
Этот ai чат бот для сайта помог автоматизировать запись на прием в медицинском центре.
ии чат бот для сайта
Надежный чат бот для сайта помогает удерживать пользователей на странице.
https://service-pixel.ru/stsenarii-chat-botov-dlya-raznyh-nish-ot-kliniki-do-b2b-servisa/
چون چند سایت مختلف رو دیده بودم، این یکی رو هم از نظر
ظاهر، توضیحات و قابل فهم بودن با بقیه
مقایسه کردم. سلام دوستان،
خواستم نظر شخصی خودم رو درباره این موضوع
بگم. دیروز وقتی داشتم تجربه بقیه کاربرا رو میخوندم این
صفحه رو دیدم. همون ابتدا متوجه
شدم متنها خیلی پیچیده نیستن.
چیزی که برای من مهم بود اینه که در موضوعات مالی و
بازیهای پولی باید محتاط بود. یکی از رفیقام به
اسم حامد بیشتر از همه روی امنیت و قابل فهم بودن توضیحات حساس بود.
به همین خاطر چند بخش رو با حوصلهتر خوندم.
از نظر من نکته مثبتش این بود که توضیحاتش خیلی پیچیده نوشته
نشده بود. ولی خب این به معنی تأیید کامل نیست.
برای افرادی که قصد دارن قبل از شروع اطلاعات بیشتری داشته باشن دنبال اطلاعات درباره شرط بندی هستن، میتونه
نقطه شروع بدی نباشه. در کنار این موضوع نمونههایی
مثل سایت enfejаronline یا sib-bet در بین بعضی کاربران
شناختهتر شدن. یکی از آشناهای من بیشتر دنبال پیشبینی ورزشی بود و
همیشه میگفت اگر سایتی توضیحات ساده و روشن نداشته باشه، بهتره آدم با احتیاط بیشتری جلو بره.
اگر بخوام خلاصه بگم نسبتاً قابل قبول بود.
من پیشنهاد میکنم عجله نکنه و چند گزینه رو
مقایسه کنه. جمعبندی من اینه که تجربه بدی نبود و حداقل برای آشنایی اولیه ارزش وقت گذاشتن
داشت، مخصوصاً اگر کسی بخواد قبل از تصمیمگیری دید بهتریپیدا کنه.
Feel free to visit my web sіte – چند نکتهبرای مدیریت سرمایه و بازی مسئولانه
(Claire)
Интернет-магазин https://kaminru.ru/ в Санкт-Петербурге предлагает впечатляющий ассортимент отопительного оборудования премиум-класса для создания уютной атмосферы в любом доме. Здесь представлены классические дровяные камины с чугунными топками, элегантные мраморные порталы, современные скандинавские печи-камины от ведущих производителей Jotul, Morso и Contura, а также инновационные биокамины и электрокамины.
This is really fascinating, You are a very professional blogger.
I have joined your rss feed and look forward to searching for extra of your excellent post.
Additionally, I have shared your website in my social networks
Короче, подошёл я к адресу, а там ни по звёздам, ни по местности, ни право-лево не надо проверять. Я даже фонарик не включал, все чётко по описанию. купить кокаин, мефедрон, гашиш, ск Причем тут шрифт не где не запрещенно писать большим шрифтом!И это еще далеко не большой.Я вот допустим имею проблемы со зрением но написал для того чтобы было более разборчево отчетлево видно всем обывателям данной темы.Причем тут слепые не слепые вапще.ОПЕРАТОР ЕЩЕ БОЛЬШЕ МЕНЯ ОБРАДОВАЛ КОГДА СКАЗАЛ МНЕ НОВЫЙ ЦЕННИК НА РЕГУ!
Dizaynı çox bəyənirəm!
http://blog.newxd.com/wp-content/themes/dux/go.php?url=aHR0cHM6Ly9waW5jby1zaWdudXAuY29t
Почему пользователи выбирают площадку
KRAKEN?
Маркетплейс KRAKEN заслужил доверие многочисленной аудитории благодаря сочетанию ключевых факторов.
Во-первых, это широкий и разнообразный ассортимент, представленный сотнями продавцов.
Во-вторых, интуитивно понятный интерфейс KRAKEN, который упрощает навигацию,
поиск товаров и управление заказами даже для новых пользователей.
В-третьих, продуманная система безопасных транзакций, включающая механизмы разрешения споров (диспутов) и возможность использования условного депонирования, что минимизирует риски
для обеих сторон сделки. На KRAKEN функциональность сочетается с внимательным отношением к безопасности клиентов, что делает процесс покупок более предсказуемым, защищенным и, как
следствие, популярным среди пользователей, ценящих
анонимность и надежность.
2 kanal house https://3bedroomvillaforsaleindubai.online dubai apartments for sale cheap
Wah, maths serves as tһe foundation block іn primary schooling, assisting
children fօr geometric thinking tο design paths.
Alas, ᴡithout strong maths at Junior College, гegardless prestigious school children сould stumble at next-level calculations,
ѕo develop tһis immeɗiately leh.
Ѕt. Andrew’s Junior College cultivates Anglican worths аnd
holisstic development, building principled individuals ᴡith strong character.
Modern features support quality іn academics, sports, annd arts.
Community service and leadership programs instill empathy ɑnd obligation. Varied сo-curricular activities promote
teamwork аnd self-discovery.Alumni emerge ɑs ethical leaders, contributing meaningfully
tо society.
Victoria Junior College sparks imagination аnd fosters visionary management,
empowering students t᧐ develop positive modification tһrough а curriculum tһat triggers passions and motivates vibrant thinking іn a picturesque seaside
campus setting. Ꭲhe school’s comprehensive centers, including liberal arts conversation гooms, science
research study suites, and arts efficiency locations, support enriched programs
іn arts, humanities, ɑnd sciences tһаt promote interdisciplinary
insights ɑnd scholastic mastery. Strategic alliances wіth secondary schools tһrough incorporated programs ensure ɑ smooth instructional
journey, providing sped սp finding ߋut courses ɑnd specialized electives that cater tо individual strengths
and interests. Service-learning initiatives ɑnd global
outreach jobs, such as global volunteer expeditions and management forums,
construct caring dispositions, resilience, ɑnd a commitment tο neighborhood welfare.
Graduates lead ԝith steadfast conviction ɑnd achieve extraordinary success іn universities and careers, embodying Viictoria Junior College’ѕ legacy of
nurturing imaginative, principled, ɑnd transformative individuals.
Aiyah, primary maths instructs everyday applications including money management, tһerefore ensure your youngster masters tһat properly from earlʏ.
Listen uр, steady pom ⲣі pi, maths proves among in tһe leaading
disciplines аt Junior College, laying foundation tο A-Level advanced math.
Wah lao, no matter ѡhether institution remains fancy, math serves ɑs the critical discipline fⲟr building poise іn figures.
Aiyah, primary maths teaches everyday applications ѕuch as financial planning, therefore ensure your kid ցets this гight
from yoսng age.
Goodness, no matter ѡhether establishment proves һigh-еnd,
math serves as tһе make-ⲟr-break discipline tߋ cultivates assurance іn calculations.
Ꭺ-level success correlates ѡith higher starting salaries.
Eh eh, steady pom рi pі, maths is pаrt in tһe higһest topics in Junior College, laying groundwork іn A-Level highеr calculations.
Ᏼesides beyond establishment facilities, emphasize οn mathematics fߋr avߋіd
frequent mistakes ⅼike careless blunders іn assessments.
Herе is mʏ site sec school singapore
When someone writes an piece of writing he/she keeps the
idea of a user in his/her mind that how a user can understand it.
Thus that’s why this article is great. Thanks!
We’re a gaggle of volunteers and starting a brand new scheme in our community.
Your site offered us with valuable information to work on. You’ve performed a formidable task
and our whole group will probably be thankful to you.
คอนเทนต์นี้ อ่านแล้วได้ความรู้เพิ่ม ครับ
ดิฉัน ไปอ่านเพิ่มเติมเกี่ยวกับ เนื้อหาในแนวเดียวกัน
สามารถอ่านได้ที่ Christie
เผื่อใครสนใจ
มีตัวอย่างประกอบชัดเจน
ขอบคุณที่แชร์ คอนเทนต์ดีๆ นี้
และหวังว่าจะได้เห็นโพสต์แนวนี้อีก
Die besten Spielautomaten und die höchsten Quoten für Sportwetten gibt es nur hier.
https://www.cryptonewss.com/@robinmallory79?page=about
Nutze die Freispiele am liebsten direkt nach der Aktivierung für neue Spielautomaten.
https://musiciansportal.ru/jeffreyfaith0
کلاً
برای کاربران علاقهمند به
پیشبینی مسابقات
مشغولن
این فضای آنلاین
میتونه یکی از گزینهها باشه
انتخاب قابل قبولی باشه
یه نکته مهم اینه که
اسمهایی مثل
enfejaronline محبوب
و
sibƄet آنلاین
تجربه خوبی ارائه دادن
در جمعبندی
رضایتبخش بود
و
حتما دوباره
دوباره نگاهش میکنم
Stop byу mmy blog post :: چرا دسترسی به سایت هات بت بدون فیلتر اهمیت دارد؟
спасибо! Хороший магазин) берите тут купить кокаин, мефедрон, гашиш, ск Чувствую что-то произойдёт , типа заказа:happy:привет бразы, хочу нахватить вот реги, что за качество скажите? надеюсь не 15 минутка?
Apartment for Sale in Ag Tower, Dubai https://2bedroomapartmentforsaleinjbrdubai.cc studio apartment in oud metha
This is a very informative post about online casinos and betting platforms.
I especially liked how it explains the importance of choosing a licensed site before signing
up.
Many players often ask where they can find reliable gaming platforms
with fair odds and smooth payouts. From what I’ve seen,
checking platforms like vn22vip helps users compare features, bonuses, and overall experience.
Thanks for sharing these insights — they’re helpful for both beginners and experienced bettors.
I just like the valuable info you supply to your articles.
I’ll bookmark your weblog and test again right here regularly.
I am somewhat sure I’ll be told many new stuff proper right
here! Good luck for the following!
Die Spielautomaten bieten tolle Bonus Features und schütten regelmäßig Freispiele aus.
https://robbarnettmedia.com/employer/palmslots/
Hi! Do you use Twitter? I’d like to follow you
if that would be okay. I’m absolutely enjoying your blog and look forward to new posts.
Ищете официального дилера HAVAL в Санкт-Петербурге? Посетите сайт Автопродикс https://autoprodix-havalpro.ru/ и вы сможете купить новые кроссоверы и внедорожники H3, H5, H7, H9 по выгодным ценам 2026 года. Модельный ряд в наличии, выгодные кредитные программы, трейд-ин, тест-драйв. Подробнее на сайте.
Заказал , получил трэк , ждем) https://petrograd-stroy.ru Адекватным людям ценящих проффесианолизм рекомендую реактивы тут тарить…Извините удаляю сообщение!
Check the live Bitcoin price in GBP and see how much 1 BTC is worth in British Pounds right now. https://bitcoinpricegbp.com/tracks the current BTC/GBP exchange rate, daily movements, and key market data for users looking for a quick reference for Bitcoin in British Pounds. This site is useful for users tracking their Bitcoin balance in GBP, comparing today’s movements, and checking their portfolio value.
I truly love your site.. Very nice colors & theme.
Did you build this website yourself? Please reply back as I’m hoping to
create my own personal website and would love
to know where you got this from or just what the theme is
named. Kudos!
property investment visa in dubai 2 bedroom townhouse for sale in dubai premier property finance dubai
Its like you read my mind! You seem to know a lot about this, like you wrote the book in it or something.
I think that you could do with some pics to drive the message home a little bit, but instead of that, this is fantastic blog.
A great read. I’ll certainly be back.
Hello everyone, it’s my first pay a quick visit at this web site, and
paragraph is truly fruitful designed for me, keep up posting
these articles.
Genuinely when someone doesn’t understand then its
up to other users that they will help, so here it takes place.
Der Online Casino Bonus ist im Vergleich zu anderen Anbietern extrem großzügig.
https://shortbosku.com/faustinotoro82
It’s not my first time to go to see this web site, i
am browsing this site dailly and obtain pleasant information from here
all the time.
Game Bài Đổi Thưởng – Top 20+ Game Đánh Bài Ăn Tiền Uy Tín 2026
This is a very informative post about online casinos and betting platforms.
I especially liked how it explains the importance of choosing a secure site before
signing up.
Many players often ask where they can find reliable
gaming platforms with fair odds and smooth payouts.
From what I’ve seen, checking platforms like vn22vip helps users compare features,
bonuses, and overall experience.
Thanks for sharing these insights — they’re helpful for both beginners and
experienced bettors.
Thanks for some other informative web site.
Where else may I get that kind of information written in such a perfect
approach? I have a mission that I am simply now
working on, and I’ve been at the look out for such information.
جمعبندی
برای علاقهمندان به
فعالیتهای شرطی
تمایل دارن
اینجا
کاملاً میتونه
ارزش بررسی داشته باشه
نکته قابل توجه اینه که
برندهای شناختهشدهای مثل
enfejaronline قوی
و
سایت sibbet
نشون دادن این فضا چقدر گستردهست
در یک نگاه
تجربه مثبتی داشتم
و
بیتردید
بهش برمیگردم
Visit mу site :: بهترین سایت شرط بندی انفجار با ضرایب بالا (Boris)
Удачи и процветания! https://petrograd-stroy.ru все это только на доверии, белый кристаллический так же может быть 4фа….Много тут кто согласен
Howdy very cool web site!! Man .. Beautiful
.. Amazing .. I will bookmark your web site and take
the feeds additionally? I am glad to seek out
so many helpful information here in the publish, we
want work out extra strategies on this regard, thank you for sharing.
. . . . .
4 bedroom Apartments for rent in Jumeirah Beach Residence apartments for sale in dubai investment park dubai investment real estate
I’m gone to tell my little brother, that he should also pay
a quick visit this weblog on regular basis to obtain updated from newest gossip.
好きです韓国語, 韓国語 ね, はい 韓国語, はい韓国語, あらっそ 韓国語. これが何かわからない?それならウェブサイト https://kanayari.info/ にアクセスしてみてください。韓国語に関する質問も含め、あらゆる疑問への答えが見つかります。勉強にもなるし、面白いですよ!
Юридическая фирма «Один к одному» заслуженно получила признание ведущих деловых изданий России за профессиональный подход к решению сложнейших финансовых споров. Специалисты компании успешно ведут дела по взысканию задолженности любой сложности, защищают клиентов от субсидиарной ответственности и грамотно сопровождают процедуры банкротства. Команда опытных юристов на https://1k1law.ru/ предлагает индивидуальную стратегию для каждого случая, основанную на глубоком знании законодательства и многолетней практике. Фирма входит в рейтинг лучших по банкротству по версии «Коммерсантъ» и «Право-300», что подтверждает высокий уровень оказываемых услуг и доверие клиентов.
Thanks for sharing your thoughts on blog. Regards
If you are going for most excellent contents like I do,
only visit this web site all the time because it offers feature contents, thanks
Thanks a lot for sharing this with all people you actually know what you’re talking approximately!
Bookmarked. Kindly additionally seek advice from my website =).
We could have a link trade agreement among us
Please let me know if you’re looking for a author for your weblog.
You have some really good posts and I feel I would be a good asset.
If you ever want to take some of the load off, I’d really like
to write some articles for your blog in exchange for a
link back to mine. Please shoot me an e-mail if interested.
Many thanks!
МАГАЗ СУПЕР!,брал5 гр ск качество отменное все сделанно ровно,даже фото не понадобилось,кристалики отличные без мутного оттенка,плаватся отлично,присутствует запах уксусного ангедрида,ВЫРАЖАЮ ОГРОМНУЮ БЛАГОДАРНОСТЬ!ВСЕ СУПЕР ПРОДОЛЖАЙТЕ В ТОМ ЖЕ ДУХЕ! купить кокаин, мефедрон, гашиш, ск Не стоит сомневатся в этом магазе он ровный и проверенный времен! Всегда на высоте!Ну что же, сегодня получил свою посылку, на этот раз все было в наилучшем виде, конспирация на все 10 баллов из 10!
Nice breakdown. I was actually thinking about thiks and the way
you explained iit really clicked. Whatt really stuck with mme
wwas that it does not overcomplicate things. Will
definitely come back — thanks for putting this together.
start up business in dubai https://2bedroomtownhouseforsaleindubai.org 1 bhk in dso
Платформа Pabit представляет собой современное решение для управления проектами, позволяющее командам по всему миру сосредоточиться на достижении целей без организационного хаоса. Система предлагает комплексный набор инструментов: детализированное управление задачами с расширенным редактором и возможностью прикрепления файлов, планирование спринтов через циклы, разделение проектов на модули для контроля ключевых вех. Ознакомиться с функционалом можно на https://pabit.ru/, где представлены настраиваемые представления для фильтрации задач, интеллектуальный помощник для работы со страницами и аналитика в реальном времени. Интуитивный интерфейс платформы освобождает руководителей от технических сложностей, позволяя фокусироваться на стратегических аспектах командной работы.
Почему пользователи выбирают площадку KRAKEN?
Маркетплейс KRAKEN заслужил доверие многочисленной
аудитории благодаря сочетанию ключевых факторов.
Во-первых, это широкий и разнообразный ассортимент,
представленный сотнями продавцов.
Во-вторых, интуитивно понятный интерфейс KRAKEN, который упрощает навигацию, поиск
товаров и управление заказами даже для новых
пользователей. В-третьих, продуманная система безопасных транзакций, включающая механизмы
разрешения споров (диспутов) и возможность
использования условного депонирования,
что минимизирует риски для
обеих сторон сделки. На KRAKEN функциональность сочетается с внимательным отношением
к безопасности клиентов, что делает процесс покупок более предсказуемым, защищенным и,
как следствие, популярным среди пользователей, ценящих
анонимность и надежность.
Pretty nice post. I just stumbled upon your blog and wanted to
say that I have really enjoyed surfing around your blog posts.
After all I’ll be subscribing to your rss
feed and I hope you write again very soon!
Pretty! This has been a really wonderful article. Thanks for supplying these details.
Usually I do not learn article on blogs, but I would like to say
that this write-up very forced me to check out
and do it! Your writing taste has been amazed me.
Thank you, quite great article.
Pretty element of content. I simply stumbled upon your blog and
in accession capital to assert that I acquire in fact enjoyed account your
weblog posts. Any way I’ll be subscribing
on your feeds and even I achievement you get admission to constantly fast.
Its such as you learn my thoughts! You seem to know so much about this, like you wrote the guide in it or something.
I feel that you just can do with a few % to pressure the message home a bit, but other
than that, this is excellent blog. A fantastic read. I will certainly be back.
что же это за дела то…..? купить кокаин, мефедрон, гашиш, ск 128 страниц положительных отзывов , и вдруг “мутный магаз” . Уважаемый – флудить в курилке можно.привет бро)) чето какой то засланый казачок тут про запр дживы интерес проявляет…
Hi there! This post couldn’t be written any better!
Reading this post reminds me of my good old room mate! He always kept talking about this.
I will forward this page to him. Fairly certain he will
have a good read. Many thanks for sharing!
This is a very informative post about online casinos and
betting platforms. I especially liked how it explains the importance of choosing a secure site before signing up.
Many players often ask where they can find reliable gaming platforms with fair
odds and smooth payouts. From what I’ve seen, checking platforms like vn22vip helps users compare features, bonuses, and
overall experience.
Thanks for sharing these insights — they’re helpful for both
beginners and experienced bettors.
westbourne properties dubai 3 bedroom villa for sale in dubai dubai duplex apartments for rent
Hi, i believe that i saw you visited my weblog so i got here to return the want?.I’m trying to find things to enhance my web site!I suppose its good enough to use some
of your concepts!!
It’s very straightforward to find out any topic
on web as compared to books, as I found this paragraph at this
site.
This is a very informative post about online casinos and betting
platforms. I especially liked how it explains the importance of choosing a licensed
site before signing up.
Many players often ask where they can find reliable gaming
platforms with fair odds and smooth payouts. From what I’ve seen, checking platforms like vn22vip helps users compare features, bonuses,
and overall experience.
Thanks for sharing these insights — they’re
helpful for both beginners and experienced bettors.
Nice share! Ulasan ini sangat membantu bagi saya yang suka
gonta-ganti game. Bagi teman-masing yang ingin mencoba fitur lengkap, jangan lupa **Download APK** versi terbaru.
Saya biasanya **Unduh Gratis APK MOD** di sini karena linknya jarang
mati dan aman dari malware. Terima kasih sudah berbagi!
Unduh APK MOD Terbaru
Stay updated on secure methods for selling bitcoin in india.
Hi just wanted to give you a brief heads up and
let you know a few of the pictures aren’t loading correctly.
I’m not sure why but I think its a linking issue.
I’ve tried it in two different browsers and both show
the same outcome.
Скрипты рабочие, чат бот для сайта обрабатывает возражения на ура.
создать чат бота для сайта
ровно, тут можно не беспокоится, попал куда надо купить кокаин, мефедрон, гашиш, ск Ну теперь к самому главному – качество!Самое главное что на свободе фиг сним с грузом! Задумайтесь ребят может пора сесть на дно, чтоб палево отвести!
I’m now not certain where you’re getting your information, however good topic.
I must spend some time finding out more or understanding more.
Thanks for fantastic info I used to be searching for this info for my mission.
forest real estate dubai marina buy penthouse in dubai
Почему пользователи выбирают площадку KRAKEN?
Маркетплейс KRAKEN заслужил доверие многочисленной аудитории благодаря сочетанию ключевых факторов.
Во-первых, это широкий и разнообразный
ассортимент, представленный сотнями продавцов.
Во-вторых, интуитивно понятный интерфейс KRAKEN, который упрощает навигацию, поиск товаров и управление заказами даже для новых пользователей.
В-третьих, продуманная система безопасных транзакций, включающая механизмы разрешения споров (диспутов) и возможность использования
условного депонирования, что минимизирует
риски для обеих сторон сделки.
На KRAKEN функциональность сочетается
с внимательным отношением к безопасности клиентов, что делает процесс покупок
более предсказуемым, защищенным и,
как следствие, популярным среди
пользователей, ценящих анонимность и надежность.
Какой чат бот телеграмм для сайта лучше выбрать для интеграции с CRM?
ai чат бот для сайта
Правильная разработка чат бота для сайта начинается с детального проектирования сценариев.
https://service-pixel.ru/stsenarii-chat-botov-dlya-raznyh-nish-ot-kliniki-do-b2b-servisa/
Простой чат бот для сайта закрывает базовые потребности первой линии поддержки.
https://service-pixel.ru/stsenarii-chat-botov-dlya-raznyh-nish-ot-kliniki-do-b2b-servisa/
Качественная разработка чат бота для сайта существенно повышает лояльность.
https://service-pixel.ru/stsenarii-chat-botov-dlya-raznyh-nish-ot-kliniki-do-b2b-servisa/
Почему пользователи выбирают площадку KRAKEN?
Маркетплейс KRAKEN заслужил доверие многочисленной аудитории благодаря сочетанию ключевых факторов.
Во-первых, это широкий и разнообразный ассортимент, представленный сотнями продавцов.
Во-вторых, интуитивно понятный интерфейс KRAKEN, который упрощает навигацию, поиск товаров
и управление заказами даже для новых пользователей.
В-третьих, продуманная система безопасных транзакций, включающая механизмы разрешения споров (диспутов) и возможность использования
условного депонирования,
что минимизирует риски для обеих сторон сделки.
На KRAKEN функциональность сочетается с внимательным отношением к безопасности клиентов, что делает процесс покупок более предсказуемым, защищенным и, как следствие, популярным среди пользователей, ценящих анонимность и надежность.
Looking for a reliable crypto exchange? Visit https://cryptoswaptrade.com/ – CryptoSwapTrade is a crypto trading exchange designed for users who want to trade cryptocurrency online through a simple and direct exchange flow. The service supports 165 cryptocurrencies, 210+ assets across networks, approximately 40,000 cryptocurrency pairs, and approximately 8,000 fiat-related transfers in 40+ fiat currencies.
I’m impressed, I must say. Seldom do I encounter a blog that’s both
equally educative and amusing, and let me tell you,
you’ve hit the nail on the head. The issue is something that too few men and women are speaking intelligently about.
I am very happy that I found this during my search for something concerning
this.
Ich habe den Willkommensbonus im Live Casino genutzt und direkt an den Tischspielen gewonnen. https://noithattanminh.com/5-yeu-to-tao-nen-ngoi-nha-phong-cach-hien-dai/
5мг реально из области фантастики…желаю попробывать https://retropr.ru Это фейк что тут вам не понятно то.Бро ты бред несёшь!Если читал все посты в этом магазе брали даже модеры этого форума.А может быть ты конкурент и провоцируешь людей специально?
Looking for a crypto exchange API for websites? Visit https://cryptosdk.io/ and you’ll find CryptoSDK – a crypto exchange API for websites, apps, wallets, and digital services that require a built-in crypto exchange within their own product flow. Instead of sending users to a separate frontend, the integration keeps routing, rate search, verification, validation, order creation, and status tracking within a single product.
manazel real estate adx dubai apartments for sale in dubai investment park
I am really happy to glance at this webpage posts which carries plenty
of helpful data, thanks for providing these data.
Wow, awesome weblog layout! How lengthy have you ever been running a blog for?
you make running a blog glance easy. The whole glance of
your web site is excellent, as neatly as the content material!
зашел на сайт не нашел там 307 мефедрон, кокаин купить Продаван ровный ничего не скажешя в среду оплатил ещё, тс сразу сказал, что отправка будет на следующей недели во вторник-среду.
Hole mir jeden Monat den Sportwetten Bonus und setze ihn erfolgreich um. http://ddigolf.com/2023/05/18/animals-are-cooler-than-people/
If you would like to increase your knowledge just
keep visiting this web page and be updated with the most recent news
update posted here.
I am truly grateful to the holder of this website who has shared this enormous post at
here.
Анапа — жемчужина черноморского побережья, и исследовать её по-настоящему можно только за рулём собственного, пусть и арендованного, автомобиля. Сервис https://auto-arenda-anapa.ru/ предлагает прокат без залога, без ограничения пробега и с неограниченной страховкой ОСАГО, что делает каждую поездку абсолютно беззаботной. Детское кресло и видеорегистратор включены в комплектацию, а оформление занимает три простых шага: выбрать автомобиль, отправить документы и указать место подачи. Команда профессионалов CarTrip всегда на связи в мессенджерах и готова ответить на любой вопрос. Путешествуйте свободно!
Nice blog right here! Additionally your site loads up fast!
What web host are you using? Can I get your affiliate link on your host?
I desire my web site loaded up as quickly as yours lol
Thank you, I’ve just been looking for information about this subject for a while and yours is the greatest I have came upon till now.
However, what concerning the conclusion? Are you certain in regards to the
supply?
Looking for terea turquoise black edition? The easy-stick.com store provides a broad assortment of tobacco products and offers express delivery straight to Germany, France, Ireland, and Belgium. You will always find fresh Terea flavor varieties and up-to-date IQOS Iluma kits available at our store. We ensure top product quality and fully protected payment transactions. Shop now and enjoy the best offers available at the most attractive terms.
I don’t even know the way I stopped up here, but I believed
this submit was good. I don’t recognize who you might
be however certainly you are going to a well-known blogger
should you are not already. Cheers!
Die Registrierung beim Wettanbieter ging schnell und der Bonus war sofort aktiv. https://khiminhduc.com.vn/bot-nhe-caco3-va-phuong-phap-san-xuat/
Looking for a list of crypto swaps? Visit https://swapslist.io/ – SwapsList helps users compare crypto exchange services before choosing where to exchange digital assets. The site focuses on practical exchange factors: KYC regulations, registration requirements, supported coins, available networks, expected speed, rate type, fees, fiat routes, and wallet payout flow. Use the list to compare direct swap services, aggregators, and online exchange options.
Erstklassige Sportwetten Auswahl und ein wirklich beeindruckendes Online Casino. https://alliance.zigum.now/bbs/board.php?bo_table=free&wr_id=45965
Kudos! I like it!
Dieses Glucksspiel Portal setzt Ma?stabe in Sachen Spielautomaten und Kundenservice. https://doctordakhan.com/hello-world/
Добрый день, кто паникует и истерит, успокойтесь, всем все высылается постепенно. Треки придут на эл. почты ближайшее время всем ждущим. https://proff-instrument.ru Мукообразная консистенциячто лучше?АКВ48F или АКВ48?!
Magnificent website. A lot of useful info here. I am sending it to several pals ans also
sharing in delicious. And naturally, thank you for your sweat!
Im Live Casino spiele ich am liebsten die interaktiven Tischspiele. http://www.sdszagorzany.pl/alpakoterapia-czas-start/
If you wish for to get a good deal from this paragraph then you
have to apply such strategies to your won weblog.
Ahaa, its nice conversation on the topic of this post at this
place at this website, I have read all that, so
at this time me also commenting at this place.
This is my first time pay a quick visit at here and i am truly
impressed to read all at one place.
Der exklusive Bonus hat meine Erwartungen an dieses Online Casino weit ubertroffen. https://www.4100900.ru/%d0%bd%d0%b5%d0%b7%d0%b0%d0%bc%d0%b5%d1%80%d0%b7%d0%b0%d1%8e%d1%89%d0%b0%d1%8f-%d0%b6%d0%b8%d0%b4%d0%ba%d0%be%d1%81%d1%82%d1%8c-%d0%b4%d0%bb%d1%8f-%d0%be%d0%bc%d1%8b%d0%b2%d0%b0%d1%82%d0%b5%d0%bb/
This piece of writing offers clear idea in favor of the new
users of blogging, that genuinely how to do blogging and site-building.
Woah! I’m really loving the template/theme of this site.
It’s simple, yet effective. A lot of times it’s tough to get that “perfect balance” between superb
usability and appearance. I must say that you’ve done a excellent job with this.
Also, the blog loads super fast for me on Internet explorer.
Exceptional Blog!
Klassische Tischspiele wie Roulette machen im Live Casino einfach am meisten Sinn. https://breezemasters.com.au/how-to-tell-if-your-split-air-conditioning-installation-is-back-to-back/
Great article.
Действительно лучший чат бот для сайта по соотношению цены и возможностей.
создать чат бота для сайта
Im Live Casino fuhle ich mich immer wie in Las Vegas, absolut geniales Glucksspiel. https://aigeekzone.com/ai-tools-for-designing/
Very shortly this website will be famous amid all blogging visitors,
due to it’s pleasant content
Simply wish to say your article is as astounding.
The clarity to your publish is simply excellent and that i can think you’re knowledgeable in this subject.
Well along with your permission let me to seize your feed to
keep updated with approaching post. Thanks 1,000,000 and please keep
up the enjoyable work.
Excellent post. Keep writing such kind of info on your blog.
Im really impressed by it.
Hi there, You have done a great job. I’ll certainly digg it and for my part recommend to
my friends. I am sure they’ll be benefited from this site.
Ein moderner Wettanbieter mit einem riesigen Herz fur Sportwetten Enthusiasten. https://www.sleijferbewindvoering.nl/index.php/2017/01/30/hallo-wereld/
I’m curious to find out what blog platform you are using?
I’m experiencing some small security issues with my latest site and
I would like to find something more safeguarded. Do you have any suggestions?
Действительно лучший чат бот для сайта по соотношению цены и возможностей.
создать чат бота для сайта
ТС саппорт не требуется тебе ? Напиши в лс если интересно https://hydro-express.ru Заказ Оплачен!! Жду посылку!! Как все прийдет сразу отпишу + фото!!Оплатил заказ, 3 дня прошло, статус все еще отложен.
Ich platziere meine Sportwetten nur noch bei diesem verlasslichen Wettanbieter. http://www.foxtrapradio.com/?p=39
I was recommended this website by my cousin. I am not sure whether this post is written by him
as nobody else know such detailed about my difficulty.
You are wonderful! Thanks!
Appreciation to my father who informed me about this weblog, this web
site is genuinely awesome.
When some one searches for his vital thing, thus he/she wishes to be available that
in detail, therefore that thing is maintained over here.
magnificent put up, very informative. I ponder why the other experts of this
sector do not notice this. You must continue your writing.
I’m sure, you have a great readers’ base already!
Great info. Lucky me I discovered your blog by chance (stumbleupon).
I have bookmarked it for later!
Spannende Tischspiele und ein rundum gelungenes Online Casino Erlebnis. https://www.saolivetti.com.br/carrinho-de-organizacao/
Write more, thats all I have to say. Literally, it seems as though you relied on the video to make your point.
You clearly know what youre talking about, why waste your intelligence on just posting videos to your blog when you could be giving us something informative to
read?
วีซ่า, ต่อวีซ่า, ขอวีซ่า, ไทย,
ใบอนุญาตทำงาน, วีซ่าธุรกิจ, วีซ่าแต่งงาน,
วีซ่าเกษียณอายุ, วีซ่าติดตามภรรยาไทย, วีซ่าธุรกิจ, วีซ่าทำงาน, วีซ่าเกษียณอายุ,
วีซ่าติดตามภรรยาไทย, ต่อวีซ่าไทย, Visa, workpermit, เปลี่ยนวีซ่าทำงาน,
วีซ่าไทยสำหรับชาวต่างชาติ, Thailand visa,
Thai Visa
Cabinet IQ
8305 Statе Hwy 71 #110, Austin,
TX 78735, United Ꮪtates
254-275-5536
Designideas (https://padlet.com/clinicforhim1515ollfb/bookmarks-ed1u4zn1jwflcnns/wish/goElQyOqrRY0W3yY)
Die Registrierung beim Wettanbieter ging schnell und der Bonus war sofort aktiv. https://www.getcontactnumbers.com/manga-33-exploring-diversity-and-popularity/
Way cool! Some very valid points! I appreciate you
writing this post plus the rest of the site is also really good.
sls properties dubai https://glasinac.com sell dubai property privately
разобрался, поэтому и удалил сообщение до того как ты ответил ) https://news2by.ru Привет всем форумочам! Отличный магазин, я получил все свое,да конечно было долго но у всех бывают трудности. думаю в дольнейшем они их будут устронять! Так что ребята берите не задумаясь, все будет отлично!!!!и сколько те6е поо6ещали заплотить?
Der Bonus fur Spielautomaten hat faire Umsatzbedingungen, die man gut erfullen kann. https://vodenica-apart.me/2016/03/09/15-best-blogs-to-follow-about-real-estate/
I used to be able to find good advice from your blog posts.
Cabinet IQ
8305 Stɑte Hwy 71 #110, Austin,
TX 78735, Uniteed Ѕtates
254-275-5536
Surfaces (https://atavi.com)
navode su [url=https://navode.su/dacha-dlya-dushi-ili-kottedzh-kormilec-chto-vygodnee/]https://navode.su/dacha-dlya-dushi-ili-kottedzh-kormilec-chto-vygodnee/[/url] .
Das Live Casino bietet echte Casino Atmosphare und die Tischspiele machen riesigen Spa?. https://memorialcardcompany.com/verse/take-flight-verse-270/
of course like your website but you have to test the spelling on several
of your posts. Many of them are rife with spelling problems
and I find it very bothersome to tell the reality on the other hand I’ll definitely come again again.
Hi there! Someone in my Myspace group shared this
website with us so I came to check it out.
I’m definitely loving the information. I’m bookmarking and will be tweeting this to my
followers! Fantastic blog and wonderful design and style.
Minedrop — захватывающий слот в стиле Minecraft!
Копайте блоки, собирайте ресурсы и выигрывайте крупные призы.
Уникальная механика падающих
символов создаёт цепочки побед где поиграть в майн дроп.
Погрузитесь в пиксельный мир приключений и богатств!
درود فراوان، من دیروز اتفاقی در اینترنت به این صفحه رسیدم و صادقانه برام جالب بود.محتواش بهدردبخور بود و به ندرت همچین سایتی پیدا کنم.
فکر کنم برای خیلیها مفید باشه. اگه دنبال یه سایت خوب هستن حتما برن ببینن.
در مجموع خوشم اومد و احتمالا
بازدیدش میکنم
در یک نگاه کلی
برای دوستداران
فضای شرطبندی آنلاین
فعالیت دارن
این پلتفرم
به نظر گزینه باشه
قابل توجه باشه
همچنین
برندهایی مثل
еnfejaronline جدید
و
sibbet.сom
فعالیت گستردهای دارن
نتیجه نهایی اینکه
ارزشمند بود
و
احتمالاً
میام سراغش
.
My site: رسانه فناوری
I constantly emailed this website post page to all my associates, for the reason that if like to read it afterward my contacts will
too.
Nice post. I was checking continuously this weblog and I’m inspired!
Very helpful info specifically the ultimate phase 🙂 I handle such information much.
I was seeking this particular info for a long time. Thank you
and best of luck.
stones international real estate dubai arabian ranches villas for sale studio apartment for rent in deira dubai
Почему пользователи выбирают площадку KRAKEN?
Маркетплейс KRAKEN заслужил доверие многочисленной
аудитории благодаря сочетанию ключевых факторов.
Во-первых, это широкий и разнообразный
ассортимент, представленный сотнями продавцов.
Во-вторых, интуитивно понятный интерфейс KRAKEN,
который упрощает навигацию, поиск товаров и управление заказами даже для новых пользователей.
В-третьих, продуманная система безопасных транзакций,
включающая механизмы разрешения споров (диспутов) и возможность использования условного депонирования, что минимизирует риски для
обеих сторон сделки. На KRAKEN функциональность сочетается с внимательным отношением к безопасности клиентов, что делает процесс покупок более предсказуемым, защищенным и, как
следствие, популярным среди пользователей, ценящих
анонимность и надежность.
Хороший магазин все качественно и оперативно и быстро, всегда здесь покупаю. https://energoatominvent.ru месяц назадЧто то много новичков устраивают здесь флуд.А магаз на самом деле хорош.Помню его еще когда занимался курьерскими доставками,коспирация и качество товара было на высшем уровне.
Usually I do not read article on blogs, however I wish to say that this write-up very pressured me
to try and do it! Your writing taste has been amazed me.
Thank you, very nice post.
Nice weblog here! Additionally your web site quite a bit
up very fast! What web host are you using? Can I am getting your associate hyperlink on your host?
I wish my web site loaded up as fast as yours lol
يا للروعة! أنا حقاً أعشق قالب/ثيم هذا موقع الويب.
بسيط لكنه فعّال. كثيراً ما يكون من التحدي الحصول
على ذلك “التوازن المثالي” بين
سهولة الاستخدام والمظهر.
يجب أن أقول لقد قمت بعمل فائق.
أيضاً، تُحمَّل المدونة فوري
لي على أوبرا. ممتاز مدونة — نفس الشعور أحصل عليه عند القراءة عن 888starz!
Have you ever thought about creating an e-book or
guest authoring on other sites? I have a blog based upon on the same information you discuss
and would love to have you share some stories/information. I
know my visitors would value your work. If you’re even remotely
interested, feel free to send me an e mail.
“`text id=”hr7k2m”
Wow, kakva odlična stranica vavada! Hvala!
http://first-trans.ru/bitrix/redirect.php?goto=https://vavada-club.com
“`
Cabinet IQ
8305 Stаtе Hwwy 71 #110, Austin,
TX 78735, United Ⴝtates
254-275-5536
Upper
Der Bonus fur Spielautomaten hat faire Umsatzbedingungen, die man gut erfullen kann. https://lifestories7.com/2024/08/28/newlyweds-killed-less-than-48-hours-after-their-wedding/
Hello! This is my first visit to your blog! We are a group of volunteers
and starting a new initiative in a community in the same niche.
Your blog provided us beneficial information to work on. You
have done a wonderful job!
Ich habe im Live Casino eine tolle Glucksstrahne erwischt, absolut empfehlenswert. https://mylimylli.ru/2024/10/23/%d1%88%d0%b0%d0%b1%d0%bb%d0%be%d0%bd-copy-2/
It’s remarkable designed for me to have a site, which is valuable in favor of my knowledge.
thanks admin
до 08.01 включительно выходные дни https://hydro-express.ru Братва после покупки не забываем писать отзывы.- За сколько?
Der Bonus fur Spielautomaten hat faire Umsatzbedingungen, die man gut erfullen kann. http://pmpwino.pl/2026/01/12/witaj-swiecie/
Magnificent website. Lots of useful information here. I am sending it to a few
buddies ans additionally sharing in delicious.
And naturally, thank you to your sweat!
This is a very informative post about online casinos and betting platforms.
I especially liked how it explains the importance of choosing
a secure site before signing up.
Many players often ask where they can find reliable
gaming platforms with fair odds and smooth payouts.
From what I’ve seen, checking platforms like
vn22vip helps users compare features, bonuses, and overall experience.
Thanks for sharing these insights — they’re helpful for
both beginners and experienced bettors.
I’m extremely impressed with your writing skills as well
as with the layout on your weblog. Is this
a paid theme or did you modify it yourself? Anyway keep up the excellent quality writing, it is
rare to see a great blog like this one nowadays.
Ich habe im Live Casino eine tolle Glucksstrahne erwischt, absolut empfehlenswert. https://doctordakhan.com/hello-world/
Ищете имплантацию всех зубов All-on-4 (Все-на-4) в Мурманске по лучшей цене от профессиональных стоматологов? Посетите https://nova-51.ru/implantatsiya-zubov-murmansk/implantatsiya-vsekh-zubov-all-on-4-vse-na-4 узнайте подробную информацию и стоимость услуги.
Apartments for rent in Wyndham Residences – The Palm https://marycamata.com status of real estate in dubai
Asking questions are truly good thing if you are not understanding anything
entirely, except this piece of writing provides nice understanding
even.
Dieses Glucksspiel Portal setzt Ma?stabe in Sachen Spielautomaten und Kundenservice. https://sostinestauras.lt/events/tinklinio-varzybos-ltf-u-20m/
слов нет.Вы ребята давно шум должны поднять что такая херня а то молчите по две недели!!!!я бы так хрен зарядил.А я почитал типа все ровно пишут и отдал кровные 22т.р мефедрон, кокаин купить ааап магазинухочу извинится за поднятую панику(думаю ТС меня понимает , т.к. все мы люди и переживаем за свои деньги,тем более сфера деятельности расшатывает нервы как не крути).зная теперь с чем была связана данная проблема с поставками и положительным финалом в порядочности ТС не сомневаюсь.на данный момент работа налажена,в чем убедился сам и наслышан от других.
Excellent way of describing, and good post to get information on the topic of my presentation subject
matter, which i am going to deliver in college.
This post is in fact a good one it assists new the web visitors, who are wishing
in favor of blogging.
Spannende Tischspiele und ein rundum gelungenes Online Casino Erlebnis. http://www.borghettifaustosas.it/2016/09/08/ciao-mondo/
Amazing! Its actually amazing article, I have got much clear idea on the topic
of from this paragraph.
It’s awesome in favor of me to have a web site, which is useful designed for my knowledge.
thanks admin
WOW just what I was searching for. Came here by searching for kulo4d
Im Live Casino spiele ich am liebsten die interaktiven Tischspiele. https://sainakari.shop/2020/08/18/massa-id-neque-aliquam-vestibulum-morbi/
BTC converter at https://btc-converter.com/ – Use the BTC conversion tool to calculate the current value of Bitcoin in US dollars. Enter the amount of Bitcoin and see the estimated dollar equivalent based on the live BTC/USD exchange rate. The tool is designed for quick checks before selling, trading, comparing wallet balances, or viewing cryptocurrency payment amounts. It can display 1 BTC in dollars, smaller coin amounts, larger balances, and general dollar-based comparisons.
hey there and thank you for your info – I have definitely picked up anything
new from right here. I did however expertise several technical issues using this web site, as I
experienced to reload the website a lot of times previous to I could get
it to load properly. I had been wondering if your web hosting is OK?
Not that I am complaining, but sluggish loading instances times will sometimes affect your placement in google and can damage your high quality score if advertising and marketing with Adwords.
Anyway I am adding this RSS to my e-mail and can look out for a lot
more of your respective fascinating content. Make sure you update this again very soon.
club villas dubai hills for sale https://drdeepakacharya.com arenco real estate dubai
obviously like your website however you need to test the spelling on quite a few of your posts.
Many of them are rife with spelling issues
and I find it very troublesome to inform the reality nevertheless I
will surely come again again.
на сайте нету не кого в jaber тишина и онлайн его нет онлайн оператор мефедрон, кокаин купить Доброго всем форумчанам дня и процветания! Начну пожалуй с того, что заказываю в данном магазине впервые, да и вообще, не так часто пользуюсь услугами данного типа через интернет, но вот вдруг, «обчитавшись» положительных отзывов о данном магазе, решил заказать тут мягкий. Оформил заказ на сайте, после получения и подтверждения данных для оплаты, заказ оплатил – 13 января. В этот же день, через пару часов, пришло сообщение:А вот это очень интересно)))ДК есть он или его нет?В розницу пару г возможно надеюсь закзать?
中学生 詩, 神奈川県 高校入試日程, 変格活用 一覧, 茨城県公立高校入試, 八千代松陰 偏差値. ぜひ当社のウェブサイト https://manalab.jp/ をご覧ください!最新の情報が満載です。日本最大級のポータルサイトで、重要な知識を習得するお手伝いをいたします。
4 bedroom Apartments for sale in Dubai Sports City https://kiwaniswilmingtonde.org dubai real estate project status
Hello to all, it’s truly a nice for me to visit this web page, it contains helpful Information.
https://jmplancul.net/
Thanks, An abundance of knowledge!
прет 30-45 мин.1к10.действием похож на рсц https://fianm.ru – За сколько?он чють чють с желта
This design is steller! You most certainly know how to keep a reader entertained.
Between your wit and your videos, I was almost moved to start my own blog (well, almost…HaHa!) Fantastic job.
I really enjoyed what you had to say, and more than that, how you presented
it. Too cool!
Выбор качественных дверей – важный этап в создании комфортного и безопасного пространства дома или квартиры. В Туле профессиональное решение этой задачи предлагает компания, специализирующаяся на продаже и установке входных и межкомнатных конструкций. На сайте https://dveridzen.ru/ представлен широкий ассортимент моделей: от надежных металлических входных дверей с терморазрывом до стильных межкомнатных вариантов со стеклом и зеркалами, включая современные скрытые и раздвижные системы. Компания гарантирует профессиональный монтаж, удобную доставку и выгодные условия оплаты, что делает покупку максимально комфортной для каждого клиента.
Hello Dear, are you genuinely visiting this website daily, if so afterward you will without doubt obtain nice know-how.
new properties in dubai for sale https://ecepvn.org dubai wharf apartments for rent
Looking to embed a crypto widget on your website? Visit https://orgtrade.org/ – OrgTrade helps website owners add a crypto exchange widget to their pages and convert cryptocurrency-related traffic into swap activity. Instead of sending visitors through a simple outbound link, your site can feature an integrated exchange tool where users can select a pair, enter an amount, and initiate a crypto conversion.
My brother suggested I might like this website. He was entirely right.
This post truly made my day. You cann’t imagine simply how much time I
had spent for this info! Thanks!
I appreciate how balanced and accessible this post feels because it keeps the conversation engaging and comfortable to read.
fastest withdrawal online casino canada
You can certainly see your enthusiasm in the work you write.
The arena hopes for more passionate writers such as you who are not
afraid to say how they believe. At all times follow your heart.
Mаny Singapore parents opt fоr primary math tuition tⲟ mɑke
sure their children гemain aligned to tһe demanding MOE syllabus ɑnd
prevent lagging compared tо classmates.
Secondary math tuition prevents tһe buildup of conceptual errors that could severely hinder progress іn JC Η2
Mathematics, mаking proactive support inn Ѕec 3 and Ꮪec 4 a smart lοng-term decision for forward-thinking families.
In Singapore’ѕ intensely demanding JC landscape, Ꮋ2 Math tuition proves
indispensable f᧐r students tߋ thorouɡhly master
complex concepts ⅼike vectors, complex numЬers, sequences ɑnd
series, probability, аnd statistical methods tһаt carry heavy marks іn А-Level papers.
Online math tuition stands ߋut for primary students іn Singapore whose parents
want regular structured support ᴡithout
long commutes, effectively reducing stress ԝhile building strong foundational numeracy.
Ƭhe caring environment at OMT encourages curiosity in mathematics,
transforming Singapore students гight іnto enthusiastic
learners motivated tߋ attain leading exam гesults.
Prepare for success іn upcoming exams wіth OMT Math Tuition’ѕ proprietary curriculum, designed tο promote crucial thinking ɑnd
self-confidence in every trainee.
ConsiԀered thаt mathematics plays а critical role in Singapore’ѕ economic development ɑnd progress, buying specialized math tuition gears ᥙр students ԝith
the problem-solving abilities needed to prosper in ɑ competitive landscape.
Math tuiion assists primary school trainees stand ⲟut іn PSLE Ьy reinforcing tһе Singapore
Math curriculum’ѕ bar modeling method fοr visual analytical.
Connecting math ideas tⲟ real-world circumstances ѵia tuition grows understanding, making О Level application-based concerns
extra friendly.
Tuition teaches mistake analysis strategies, aiding junior college students stay ⅽlear of common pitfalls іn A Level calculations аnd proofs.
Unlke generic tuition centers, OMT’ѕ custom-made curriculum boosts tһe MOE structure by including real-world applications, makіng abstract
mathematics ideas mߋre relatable and reasonable fⲟr pupils.
Variety ᧐f practice questions ѕia, preparing yоu comрletely for any math test and bettеr scores.
Singapore’s worldwide ranking іn mathematics ϲomes fгom supplemental tuition tһаt refines skills fߋr global criteria ⅼike PISA and TIMSS.
Also visit mʏ webpage; singapore math tutor
Перевел деньги на Альфа 21.04.2014 после умення узнали даные (Ф.И.О телефон и адрес) Оператор сказал что посылка будет отправлена 22.04.2014. !!!! 23.04.2014 скинули номер наклодной. По номеру наклодной смог отслеживать свою посылку 24.04.2012. мефедрон, кокаин купить Друзья ВВ 200мг. Дикая головная боль. И всё.Братки все красиво стряпают, претензий к магазину нуль, всегда всё ровно. Единственное что сейчас напрягло, отсутствие на ветке вашего представителя в ЕКБ “онлайн”, представитель молчит ( а там по делу ему в лс отписано) и кажись воопще не заходит пару недель
Hi there! I could have sworn I’ve been to your blog before but after going through some of the articles I realized it’s
new to me. Anyhow, I’m certainly pleased I found it and I’ll be
bookmarking it and checking back often!
As yоur ɡo-to Singapore furniture store and lаrge furniture showroom, ԝe serve as the ultimate one-stop shop fοr quality һome furnishings and effective furniture fօr HDB interior design іn Singapore.
Ꮃe bring stylish and affordable solutions tһrough exciting
furniture promotions, coffee table promotions аnd Singapore furniture
sale օffers tailored to every HDB home. Mastering tһe importɑnce of furniture in interior design ᴡhile
buying furniture fоr HDB interior design lеts you choose
the perfect mix ߋf plush sofas, quality mattresses, storage bed fгames, functional сomputer desks and stylish coffee tables ᥙsing proven tips tߋ buy quality bed fгame, quality sofa bed and quality coffee table.
Wһether transforming your Singapore living гoom furniture,bedroom furniture Singapore ⲟr
study wіth the latest furniture sale ߋffers and affordable HDB furniture Singapore, ߋur thoughtfully curated collections combine contemporary design, superior comfort ɑnd lasting durability tօ
cгeate beautiful, functional living spaces perfect fοr modern Singapore lifestyles.
As your go-to Singapore furniture store ɑnd expansive furniture showroom, ѡe
serve as thе ultimate one-stop shop for quality һome furnishings and effective furniture for
HDB interior design in Singapore. Ꮤe bring trendy and affordable solutions tһrough exciting furniture
deals, sofa promotions аnd Singapore furniture sale ⲟffers tailored t᧐ eᴠery HDB home.
Mastering tһe impoгtance of furniture іn interior design while buying
furniture fօr HDB interior design lets you choose thee perfect mix ߋf living
room sofas, quality mattresses, storage bed fгames, functional cߋmputer
desks and stylish coffee tables ᥙsing proven tips tօ
buy quality bed frame, quality sofa bed аnd quality coffee table.
Ꮤhether transforming уour living room furniture Singapore, bedroom furniture Singapore оr
study with tһe latеst furniture sale offеrs and affordable HDB furniture Singapore, օur
thoughtfully curated collections combine contemporary design, superior comfort ɑnd lasting durability tⲟ create beautiful, functional living spaces perfect fߋr modern Singapore lifestyles.
Singapore’ѕ preemier furniture store ɑnd spacious furniture showroom
is your ultimate оne-stopdestination for premium home furnishings and
thoughtful furniture fоr HDB interior design. We provide chic and affordable solutions enriched ԝith furniture
οffers,sofa promotions ɑnd Singapore furniture sale ⲟffers for every Singapore һome.
Tһe іmportance оf furniture in interior design Ƅecomes even clearer when buying furniture fοr HDB interior design — select space-efficient L-shaped sectional sofas, premium mattresses, queen bed fгames,
ergonomic study desks and elegant coffee tables ԝhile follߋwing
practical tips tⲟ buy quality bed frame, quality sofa bed аnd quality coffee table.
Ꮃhether үou’re refreshing ʏ᧐ur living гoom furniture Singapore, bedroom furniture Singapore оr dining
rоom furniture Singapore witһ the latest furniture promotions, our thoughtfully curated collections merge contemporary design, superior comfort
аnd lasting durability to create beautiful, functional living spaces tһat suit modern lifestyles acrоss
Singapore.
Discover Singapore’ѕ leading furniture store ɑnd spacious furniture showroom — үour gߋ-to օne-stop shop
for quality mattresses Singapore. Ꮤe provide stylish аnd affordable solutions packed with exciting
furniture deals, mattress deals ɑnd Singapore furniture sale offers tailored tо eνery HDB home.
Understanding the imⲣortance оf furniture in interior
design ᴡhile buying furniture fοr HDB interior design empowers ʏou to choose
the perfect mattresses — queen size orthopedic mattresses,
king size gel-infused hybrid mattresses, super single latex mattresses аnd premium memory foam mattresses tһat transform your bedroom intо a restful sanctuary.
Wһether you are updating your Singapore bedroom furniture ᴡith the lɑtest furniture
sale օffers, our thoughtfullly curated collections combine contemporary
design, superior comfort аnd lasting durability tο crеate beautiful, functional living
spaces thɑt perfectly suit modern lifestyles ɑcross Singapore.
Discover Singapore’ѕ beѕt furniturfe store аnd spacious furniture
showroom —ʏour ultimate օne-stoⲣ shop for quality sofas Singapore.
Ꮃe provjde contemporary аnd vаlue-for-money solutions packed ѡith exciting furniture promotions, living гoom sofa promotions ɑnd Singapore furniture sale оffers tailored
tօ every HDB home. Understanding the importance of furniture in interior design ᴡhile buying furniture for HDB interior design empowers уou to choose tһе perfect sofas
— premium L-shaped sectional sofas, elegant leather recliners, plush fabric corner sofas ɑnd
versatile modular sofas tһat transform уoᥙr living room
into а restful sanctuary. Whether ʏou are updating yoսr Singapore living room
furniture ᴡith the ⅼatest furniture sale offers, оur
thoughtfully curated collections combine contemporary design, superior comfort аnd lasting durability tⲟ create beautiful,
functional living spaces tһat perfectly suit modern lifestyles аcross Singapore.
Нere iѕ my web site:neighbourhood furniture shop singapore
property springs dubai one bedroom apartment for sale in dubai high mark real estate brokers al jaddaf dubai
Looking for guitar tuning device? TronicalTune tronicaltune.net represents a completely automated guitar tuning solution manufactured in Germany. With just one button press, it tunes all six strings simultaneously, saving valuable time both on stage and in the studio while allowing guitarists to change tunings quickly and precisely. Ideal for electric and acoustic guitars.
Yes! Finally someone writes about نمایندگی بوش.
Since the admin of this site is working, no uncertainty very rapidly
it will be famous, due to its quality contents.
добрый день как связаться с продавцом и не попасть на фейка? https://citrin-cat.ru Тут охота чисто на клиентов.Ты договорись с курьером о встрече где нибудь, и пропали окружающую обстановку, чтоб рядом небыло не кого подозрительного. Больше не знаю что тебе посоветовать
This is a very informative post about online casinos and betting platforms.
I especially liked how it explains the importance of choosing a secure site before signing up.
Many players often ask where they can find reliable gaming platforms with fair odds and smooth payouts.
From what I’ve seen, checking platforms like vn22vip helps
users compare features, bonuses, and overall experience.
Thanks for sharing these insights — they’re helpful for both beginners and experienced bettors.
Der Online Casino Bonus ist perfekt fur alle, die gerne hohere Einsatze wagen. https://hajjandumrahghana.com/tour/the-allure-italys-rich-culture-history-and-cuisine/
https://spinight-kazino.com/Man patīk Spinight casino.|
Spinight izskatās interesanta azartspēļu lapa!|
Diezgan labs online kazino, īpaši tiem, kam patīk kazino spēles!|
Spinight casino piedāvā dažādām kazino spēlēm.|
Vienkāršs interfeiss, lapa šķiet pārskatāma.|
Šķiet labi, ka Spinight casino ir diezgan vienkāršs.|
Tiem, kam interesē slotu spēles, Spinight casino
varētu šķist interesants.|
Piedāvājumi Spinight platformā var būt labs iemesls apskatīt vietni!|
Pirms spēlēšanas ir vērts izlasīt noteikumus!|
Kopumā Spinight kazino izskatās kā ērta un interesanta
vieta.
This paragraph will assist the internet viewers for setting
up new website or even a weblog from start to
end.
1 bhk price in dubai buy penthouse in dubai al mansour real estate dubai
Nutze die Sportwetten App von diesem Wettanbieter und bin absolut zufrieden. https://m-sag.ru/lorem-ipsum-2/
What’s up, just wanted to mention, I enjoyed this article.
It was inspiring. Keep on posting!
Магазин как магазин! мефедрон, кокаин купить кто не чувствует лица,Здравствуйте, всем бобра норм магаз все ровно как по маслу
Tham gia H3BET Việt Nam, nền tảng quốc tế đáng tin cậy nhất cho các trò chơi casino trực
tiếp, máy đánh bạc và cá cược thể thao. Trải nghiệm thanh toán nhanh chóng, hỗ
trợ khách hàng cao cấp 24/7 và các phần thưởng
chào mừng độc quyền.
This is a very informative post about online casinos and betting platforms.
I especially liked how it explains the importance of choosing a licensed site before signing up.
Many players often ask where they can find reliable gaming platforms with fair odds and smooth payouts.
From what I’ve seen, checking platforms like vn22vip helps
users compare features, bonuses, and overall experience.
Thanks for sharing these insights — they’re helpful
for both beginners and experienced bettors.
1 bhk apartment in bur dubai https://markyourspot.org dubai hills estate pavilion
Y lo más importante: nunca trates de recuperar lo perdido.
Cuando se acaba el saldo de la partida, se acabó.
Insistir con deposit adicional para “recuperar” es la receta infalible
para perder mucho más.
Thanks for the marvelous posting! I quite enjoyed reading
it, you could be a great author.I will make certain to bookmark your blog
and definitely will come back at some point. I want
to encourage continue your great posts, have a nice evening!
Howdy! I could have sworn I’ve visited this blog before but after browsing through some of the posts I realized it’s new to me.
Nonetheless, I’m certainly pleased I discovered it and I’ll be book-marking it and checking back frequently!
везде негатив только пишите про нас, а не заказывали ничего при этом. Может уже достаточно, ложку дегтя вы свою добавили, успокойтесь. Люди пишут не по бонусам, это покупатели https://portlandwood.ru Как-то развёл 2c-i на кубы воды и выбрал в выборку для точности дозировки.Так один кролятина вляпался в/в.Позавидовать ему трудно было,это точно.Но в конце когда оклемался,даже прикололся.Мне одному не везёт? Уже 16 дней как деньги заслал, и тишина. Жабер не в сети. Скрин из жабера прилагается.
upcoming new hotel projects in dubai townhouse for sale in dubai best mutual fund in uae
Hey there! I know this is kinda off topic nevertheless I’d figured I’d ask.
Would you be interested in exchanging links or maybe guest writing a blog article or vice-versa?
My site addresses a lot of the same topics as yours and
I think we could greatly benefit from each other.
If you’re interested feel free to shoot me an e-mail. I look forward
to hearing from you! Great blog by the way!
Фольга из редких металлов часто требуется для высокотехнологичных лабораторий
https://redmetsplav.ru/store/magniy-i-ego-splavy/zarubezhnye-splavy-2/magniy-am90a—astm-b275/folga-magnievaya-am90a—astm-b275/
Почему пользователи выбирают площадку KRAKEN?
Маркетплейс KRAKEN заслужил доверие многочисленной аудитории благодаря сочетанию ключевых факторов.
Во-первых, это широкий и разнообразный ассортимент,
представленный сотнями продавцов.
Во-вторых, интуитивно понятный интерфейс KRAKEN, который
упрощает навигацию, поиск товаров
и управление заказами даже для новых пользователей.
В-третьих, продуманная система безопасных транзакций, включающая механизмы разрешения споров (диспутов) и возможность использования условного депонирования,
что минимизирует риски для обеих сторон сделки.
На KRAKEN функциональность сочетается
с внимательным отношением к безопасности клиентов,
что делает процесс покупок более предсказуемым, защищенным и,
как следствие, популярным среди пользователей,
ценящих анонимность и надежность.
Its wonderful as your other blog posts : D, regards for putting up.
Всё отлично тут! в МСК забрали вес ! сервис как всегда отличный ! ТАК ДЕРЖАТЬ мефедрон, кокаин купить все гуудУ меня разок было, что трек перестал на два дня отслеживатся, но нечего доставили все пучком.
Современная электроника требует надежных комплектующих, и выбор поставщика становится критически важным для успеха любого проекта. Профессиональные инженеры и радиолюбители знают, что качество компонентов напрямую влияет на долговечность устройств и безопасность эксплуатации. На платформе https://components.ru/ собран широкий ассортимент электронных элементов — от микроконтроллеров и силовых транзисторов до пассивных компонентов и соединителей, что позволяет реализовать проекты любой сложности. Удобная навигация, техническая документация и оперативная доставка делают процесс закупки максимально эффективным, экономя время специалистов и обеспечивая бесперебойность производственных циклов в условиях современного рынка.
https://cvetonya.myqip.ru/?1-0-0-00006443-000-0-0-1777360988
http://www.vladimir.ru/forum/forum/thread/58474
Hello! I’m at work browsing your blog from my new iphone!
Just wanted to say I love reading through your blog and look forward to
all your posts! Carry on the great work!
Oh dear, minus strong maths at Junior College, no matter prestigious establishment youngsters ϲould stumble at secondary calculations, tһerefore build tһis now leh.
Eunoia Junior College represents modern-ԁay innovation іn education, with
its һigh-rise school integrating neighborhood аreas fօr collaborative knowing and development.
Ƭһe college’ѕ focus on lovely thinkig promotes intellectual curiosity аnd goodwill, supported by dynamic programs іn arts, sciences, and management.
Cutting edge centers, consisting ߋf performing arts рlaces,
mаke it possible for trainees tο explore enthusiasms ɑnd develop skills holistically.
Collaborations ѡith prestigious institutions provide enriching
chances fοr research and international exposure. Trainees beсome thoughtful leaders, prepared tߋ contribute favorably tⲟ
a diverse ѡorld.
Jurong Pioneer Junior College, established tһrough thе thoughgtful merger οf Jurong Junior College аnd Pioneer Junior College,
ρrovides a progressive and future-oriented education tһat places
a unique emphasis on China preparedness, worldwide business acumen, аnd cross-cultural engagement to prepare trainees
fοr growing іn Asia’ѕ vibrant financial landscape.
The college’ѕ double campuses aге outfitted wіth modern-Ԁay, versatile centers
including specialized commerce simulation rooms, science development labs, ɑnd arts ateliers, ɑll designed to
promote practical skills, imaghinative thinking, аnd interdisciplinary knowing.
Enhancing scholastic programs ɑre matched Ƅy international collaborations, ѕuch aѕ joint jobs with Chinese universities аnd cultural immersion trips, ᴡhich enhance
trainees’ linguistic proficiency ɑnd international outlook.
Α helpful and inclusive community environment motivates durability аnd management development through a large range of cⲟ-curricular activities,
frⲟm entrepreneurship clubs to sports teams tһat promote teamwork аnd perseverance.
Graduates ⲟf Jurong Pioneer Junior College ɑre incredibly
ѡell-prepared for competitive careers, embodying tһe values օf care, constant enhancement, and
development tһаt define the institution’ѕ forward-ⅼooking
principles.
Parents, fearful оf losing approach engaged
lah, strong primary maths leads tο improved science understanding ɑs wеll
as engineering goals.
Wah, mathematics serves аs the base stone in primary learning, assisting children fоr spatial
analysis іn design routes.
Eh eh, composed pom ρі pi, mathematics proves
оne of the leading subjects іn Junior College, laying
base іn A-Level hіgher calculations.
Іn аddition to school facilities, concentrate wіtһ maths to stop common pitfalls including sloppy
errors at exams.
Oh, math is the base stone fοr primary education,
helping youngsters fօr geometric analysis fоr design paths.
Math equips you with analytical skills tһat employers in finance and tech crave.
Aiyah, primary mathematics instructs real-ᴡorld implementations ѕuch аs money
management, so make sure your youngster grasps tһis riɡht beginning yolung age.
Feel free to surf to mʏ web site – physics and maths tutor a level physics
dld project status https://kiwaniswilmingtonde.org jumeirah gulf state
Hey! This is kind of off topic but I need some advice from an established blog.
Is it very difficult to set up your own blog? I’m not very
techincal but I can figure things out pretty fast.
I’m thinking about creating my own but I’m not sure where to start.
Do you have any tips or suggestions? Appreciate it
https://uaksu.forum24.ru/?1-10-0-00004023-000-0-0-1777955308
https://moskva.kamrbb.ru/?x=read&razdel=0&tema=258&start=0#new
Спасибо за отзывы о новых реагентах. Можно также записаться на совместки, где цена от 400 р за грамм 🙂 Отправка быстрая мефедрон, кокаин купить Вы реально думаете что тут сидят роботы, которые должны отвечать всем без перерывов и выходных? Праздники же были, все отдыхать хотят.магазин ровный, три года с ним уже, только один раз отправку долго ждал…. но дождался)
Excellent post. I was checking continuously this blog and I’m impressed!
Very helpful information specially the last part 🙂 I care
for such information a lot. I was looking for this particular information for a long time.
Thank you and best of luck.
Hey there would you mind stating which blog platform you’re
using? I’m going to start my own blog in the near future but I’m having a hard time making a decision between BlogEngine/Wordpress/B2evolution and Drupal.
The reason I ask is because your design seems different then most blogs and I’m looking for something completely unique.
P.S My apologies for getting off-topic but I had to ask!
It’s amazing to visit this web site and reading the views of all friends on the
topic of this article, while I am also eager of getting know-how.
Посетите сайт Читай-город https://www.chitai-gorod.ru/ – там вы найдете самый большой ассортимент интересных книг, подарков и канцелярских товаров по выгодным ценам. Загляните в каталог, и вы обязательно найдете книгу, которая вас интересует. При необходимости посмотрите адреса магазинов. При покупке с доставкой она осуществляется по всей России.
What’s up, its nice article concerning media print,
we all understand media is a impressive source of information.
cheap villa for rent in gardens dubai https://moinopolis.org armada property services dubai
vlxx1.us.com
There’s definately a great deal to find out about this issue.
I really like all the points you have made.
Hi there all, here every one is sharing such knowledge, thus it’s fastidious to read this website,
and I used to go to see this webpage every day.
Почему пользователи выбирают площадку KRAKEN?
Маркетплейс KRAKEN заслужил доверие многочисленной аудитории
благодаря сочетанию ключевых факторов.
Во-первых, это широкий и разнообразный ассортимент, представленный сотнями продавцов.
Во-вторых, интуитивно понятный интерфейс KRAKEN, который упрощает навигацию, поиск товаров
и управление заказами даже для
новых пользователей. В-третьих, продуманная система безопасных транзакций, включающая
механизмы разрешения споров (диспутов) и возможность использования условного депонирования, что минимизирует риски для обеих сторон
сделки. На KRAKEN функциональность сочетается с внимательным отношением к безопасности клиентов, что делает процесс покупок более
предсказуемым, защищенным и, как
следствие, популярным среди пользователей, ценящих анонимность и надежность.
جمعبندی
برای اون دسته علاقهمندها
بازیهای شانسی
دنبالشن
این وب
میتونه
کاربردی دربیاد
چیزی که جلب توجه میکنه اینه که
اسمهایی مثل
پلتفرم enfejarⲟnline
و
sibƅet.com
تجربه خوبی ارائه دادن
در پایان کار
خیلی خوب بود
و
در آینده
دوباره استفاده میکنم
my web site :: سوالات متداول درباره سایت کرد بت
What I like most about this post is the easygoing and friendly style, because it makes the discussion feel more authentic and easier to connect with while still keeping the overall message thoughtful and engaging.
casino en ligne retrait instantane
Магазу спасибо, что всё решили в короткие сроки. мефедрон, кокаин купить Чет я совсем отупел, немогу найти прилавок, где товар бро, цена, наименование товара? Прайс в студию, на все услуги. От жизни походу отстал, правила поменяли походу, да?и уже сегодня за клевету, троллинг и проч. наш друг нас покинул
در جمعبندی نهایی
برای افرادی که قصد دارن
شرط بندی
میگردن
این شبکه
میتونه
کاربردی باشه
همچنین
مجموعههایی مثل
enfejaronline قوی
و
sibbet.com
نقش مهمی دارن
در پایان
قابل استفاده بود
و
به احتمال زیاد
بازدیدش میکنم
Feel free to surf tߋ myy website … Regulatorʏ Alignmеnt & Best-Practice Rеferences (Hassan)
Hi there all, here every person is sharing these kinds of familiarity, so
it’s fastidious to read this web site, and I used to visit this blog all the time.
Широкий выбор нержавеющей стали различных марок позволяет использовать продукцию в строительстве и пищевой промышленности.
https://rms-ekb.ru/catalog/stalnoi-list/stalnoi-list-15g-4x1900x1600-gost-19903-2006-gladkii-otsinkovannyi-goriachekatanyi/
Технические специалисты компании помогли выбрать оптимальный сплав для работы в агрессивных средах.
https://xn--80aeedb0bfzeok.xn--p1ai/catalog/latunnoe-litoe-koltso/latunnoe-litoe-koltso-250kh800-mm-lts40mts1-5/
Aw, this was an incredibly good post. Spending some time and
actual effort to generate a good article… but what can I say… I procrastinate a whole lot and don’t manage
to get nearly anything done.
Удобное разделение продукции на сплавы и конкретные виды проката
https://redmetsplav.ru/store/vanadiy-i-ego-splavy/vanadiy-vnm99-8—tu-1761-037-2587982-2002/krug-vanadievyy-vnm99-8—tu-1761-037-2587982-2002/
You are so cool! I don’t suppose I’ve read through anything like this before.
So great to discover somebody with unique thoughts
on this topic. Seriously.. many thanks for starting this
up. This site is something that’s needed
on the internet, someone with some originality!
You made your position pretty clearly..
What’s Happening i am new to this, I stumbled upon this I
have discovered It positively useful and it has aided me out loads.
I am hoping to give a contribution & aid other users like its helped me.
Good job.
la maison dubai real estate https://lamarcheautrot.org yas real estate dubai
Great information. Lucky me I discovered your site by accident (stumbleupon).
I have bookmarked it for later!
Right away I am ready to do my breakfast, later than having my breakfast coming yet
again to read more news.
Магазин работает четко уже несколько лет:)только одно расстроило когда хотел сделать очередной заказ мне сказали что не отправляют больше в те края:dontknown:с чем это связано мне так и не сказали,хотелось бы узнать https://svpak.ru Смотри в розничном прайсемагазин достойный,всё ровно и в срок,спасибо большое за ваш труд,будем продолжать сотрудничество!
https://allaboutschool.activeboard.com/t72809576/eazy-energy/
Ищете увеличение объема костной ткани для имплантации зубов в Мурманске? Посетите https://nova-51.ru/implantatsiya-zubov-murmansk/sinus-lifting-i-kostnaya-plastika-murmansk – мы предлагаем лучший синус лифтинг от опытных и квалифицированных врачей. Узнайте подробную информацию на сайте.
property rental agents in dubai villa for sale in meydan dubai dubai real estate agent amer
Компания осуществляет поставки базового металлургического сырья, включая олово, свинец и цинк в чушках.
https://rms-ekb.ru/catalog/stalnoi-list/list-stalnoi-220kh1700-mm-acroni-4713-en-iso-18286/
Franchising Paath Carlsbad
Carlsbad, ⅭΑ 92008, United Ⴝtates
+18587536197
franchise broker salary
http://www.vladimir.ru/forum/forum/thread/58474
Very good blog! Do you have any suggestions for aspiring writers?
I’m hoping to start my own blog soon but I’m a little lost on everything.
Would you recommend starting with a free platform like WordPress or go for
a paid option? There are so many choices out there that I’m totally confused ..
Any suggestions? Many thanks!
Good post. I learn something new and challenging on websites I stumbleupon every
day. It will always be exciting to read through content from other authors and practice a
little something from their websites.
This is really interesting, You’re a very skilled blogger. I have joined your feed and look forward to seeking more of your great post. Also, I’ve shared your web site in my social networks!
This is a very informative post about online casinos
and betting platforms. I especially liked how it explains the importance of choosing a secure site before signing up.
Many players often ask where they can find reliable gaming platforms with fair
odds and smooth payouts. From what I’ve seen, checking platforms like vn22vip helps users compare features, bonuses,
and overall experience.
Thanks for sharing these insights — they’re helpful for both beginners and experienced bettors.
Cabinet IQ
8305 State Hwy 71 #110, Austin,
TX 78735, United Տtates
254-275-5536
Services (Aracelis)
и не планируете ни какой новой ветки на скайпе открыть!?там в скайпе мошенник значит от вас херачит направо и налево!и ссылку кидает на ваш магазин и говорит что от вас работает! мефедрон, кокаин купить Максимально приятные впечатления оставляет у меня сотрудничество с сием трэйдером… Доставка никогда не занимала дольше недели, а однажды на самолете когда отправляли за ч\з 2 дня уже покоилась в руках :)…думайте, что продаёте. обещали поменять на туси, время тянут, ниче сделать не могут конкретного. отвечают редко.
Hi there! I could have sworn I’ve been to this blog before but after going through some of the posts I realized it’s new to
me. Nonetheless, I’m certainly happy I found
it and I’ll be book-marking it and checking back frequently!
We are a gaggle of volunteers and opening a brand new
scheme in our community. Your web site provided us with useful info
to work on. You have done an impressive task and our whole neighborhood
can be grateful to you.
Hello there, You have done a fantastic job.
I’ll certainly digg it and personally suggest to my friends.
I am confident they will be benefited from this web site.
If some one wishes expert view regarding running a blog then i recommend him/her to pay a quick visit this web site, Keep up the
nice job.
dubai property show london exhibitors list https://hyguanjian.com buying a house in dubai for expats
http://test.seancefor2.com/index.php?topic=284052.new#new
Посетите сайт Babylook https://babylook.by/ — это маркетплейс детских товаров от белорусских производителей. У нас много категорий для девочек и мальчиков и новорожденных, а также игрушки, все для ухода и питание и многое другое. Товары безопасные, уникальные и сделанные с заботой. Вы сможете удобно находить и выбирать лучшее!
Competitive karaoke requires both technical skill and stage charisma.
Experienced karaoke hosts manage audience energy throughout the night..
korean noraebang vs japanese karaoke box
Указан физический адрес в Екатеринбурге, что повышает доверие
https://redmetsplav.ru/store/titan/rossiyskie-splavy-4/titan-vt22i—ost-1-90013-81/truba-titanovaya-vt22i—ost-1-90013-81/
Профессиональный подход менеджеров в Екатеринбурге, грамотно проконсультировали по техническим характеристикам сплавов.
https://xn--80aeedb0bfzeok.xn--p1ai/catalog/latunnoe-litoe-koltso/latunnoe-litoe-koltso-600kh100-mm-ls59-1/
География деятельности компании охватывает всю территорию России, обеспечивая металлом предприятия в удаленных регионах.
https://rms-ekb.ru/catalog/krug-iz-instrumentalnoi-stali/krug-khv4f-180-gost-2590-2006/
TRX (TRON) Exchange Online for 160+ cryptocurrencies and 40+ fiat currencies at https://swapto.io/ – a service for quickly exchanging TRX online. Exchange TRX for USDT, BTC, ETH, and other assets, receive cryptocurrency in the opposite direction, and buy or sell TRON for any fiat currency. Swapto makes it easy to transfer funds between cryptocurrencies, lock your value in a stablecoin, buy TRON with fiat, and sell TRX without any extra steps.
Härlig casinobonus utan krångliga omsättningskrav.
https://bananamonkeyglobal.com/author/anastasiacarde/
Hello my family member! I wish to say that this article is awesome, nice written and come with almost all important infos.
I’d like to see more posts like this .
он мне успел ответить – поверь, ничего такого о чём тебе стоило бы беспокоиться – не случилось мефедрон, кокаин купить все ровно вот только из за нового года была задержка а так все на высотеТарился в этом магазе Летом разок и в Сентябре разок)))
whoah this weblog is excellent i like reading your articles.
Keep up the good work! You understand, a lot of persons are looking around for this information, you can help them greatly.
Если вы ищете надёжный источник Telegram-аккаунтов для работы, обратите внимание на специализированный магазин https://marketgram.io/ — здесь представлены аккаунты разных стран в форматах TData и Session+JSON с отлёжкой, что существенно снижает риски блокировок. Выдача происходит мгновенно после оплаты, невалидные аккаунты заменяются без лишних вопросов, а поддержка доступна прямо в Telegram. Регулярные акции и несколько вариантов оплаты делают сервис удобным для тех, кто работает с аккаунтами системно и ценит стабильность результата.
obviously like your web site but you need to test the spelling on quite
a few of your posts. A number of them are rife with spelling problems and I find it very troublesome to tell
the truth then again I’ll definitely come again again.
It’s going to be finish of mine day, but before end I am reading this great post to increase
my know-how.
Good day! I could have sworn I’ve been to this blog before but after checking through some of the post I realized
it’s new to me. Anyways, I’m definitely glad I found it and
I’ll be bookmarking and checking back often!
dubai land department regulation jointly owned property buy penthouse in dubai flat available for rent in dubai
I constantly spent my half an hour to read this website’s content daily
along with a cup of coffee.
Корзина на сайте промышленного предприятия — удобный инструмент для формирования заявки
https://redmetsplav.ru/store/titan/rossiyskie-splavy-4/titan-t3—gost-2171-90/krug-titanovyy-t3—gost-2171-90/
This is a very informative post about online casinos and betting platforms.
I especially liked how it explains the importance of choosing a trusted site
before signing up.
Many players often ask where they can find reliable gaming platforms with fair odds and smooth payouts.
From what I’ve seen, checking platforms like vn22vip
helps users compare features, bonuses, and overall experience.
Thanks for sharing these insights — they’re helpful
for both beginners and experienced bettors.
Продукция находит применение в производстве электротехники благодаря наличию специализированной электротехнической стали.
https://rms-ekb.ru/catalog/stalnoi-list/stalnoi-list-08kh18n10t-1-2x1500x1200-gost-19903-2006-gladkii-chernyi-goriachekatanyi/
Нужно качественное навесное оборудование для спецтехники? Посетите сайт Производственного предприятия EXTEN https://ppe-exten.ru/ и ознакомьтесь с каталогом, там вы найдете широкий ассортимент навесного оборудования для минитракторов, погрузчиков, экскаваторов, экскаваторов-погрузчиков, минипогрузчиков и фронтальных погрузчиков. В каталоге представлены модули самого разнообразного функционального назначения. Вы получаете доставку в любой регион России, профессиональный сервис и гарантию на всю продукцию!
Simply desire to say your article is as astounding. The clearness
in your post is just great and i could assume you’re an expert on this subject.
Fine with your permission allow me to grab your feed to keep updated with forthcoming post.
Thanks a million and please continue the enjoyable work.
Парни,короче я позвонил они сказали тепреь что посылку отправили на день раньше планируемой отправки,и чтоб я завтра позвонил в офис в своем городе,скорее всего она уже там,а я перед этим потерял телефон на который записан заказ,так что может они и звонили,а я и не знал!А по отслежке так и стоит планируемая отправка еще 3 дня назад.Каког хера они ее не зарегистрировали!Как думаете нормально????Бля пиздец волнуюсь!!! мефедрон, кокаин купить Если есть какие -то вопросы по компенсациям вложенным, тоже пишите мне в Skype: chemical-mix.com и ICQ: 974-859, все решимМне уже похер будет он иле не будет!Хорошо что я как обычно не взял на 45т.р вот о бытом я вообще не жалею!Если магазину важнее не совершать обмен чем клиент который в неделю на 45т.р товара брал то досведание!
Have you ever thought about publishing an ebook or guest authoring on other blogs?
I have a blog centered on the same information you discuss and would really like to have you share some
stories/information. I know my readers would enjoy your work.
If you are even remotely interested, feel free to send me
an e-mail.
Pretty! This was a really wonderful post. Thanks for providing this info.
May I simply just say what a comfort to discover
an individual who actually knows what they’re talking about online.
You actually understand how to bring a problem to light
and make it important. A lot more people really need to read this and understand
this side of your story. I was surprised that you are not more popular since
you definitely possess the gift.
Ищете аккуратное и деликатное удаление зуба в Мурманске? Посетите https://nova-51.ru/lechenie-zubov-murmansk/udalenie-zuba-murmansk – у нас профессиональная и тщательная помощь всем нашим пациентам. Узнайте подробную информацию и стоимость на сайте.
dubai properties address https://lfzombiegames.com furnished apartments for rent in dubai weekly
Generally I don’t learn post on blogs, however I wish to say that this write-up very forced me to check out
and do so! Your writing style has been amazed me. Thanks, quite great post.
Also visit my web site; is smm panel legal
Nice share! Ulasan ini sangat relevan bagi siapa pun yang ingin memahami perkembangan industri
manufaktur di tanah air. Penting bagi kita untuk terus mendukung dan mengenal lebih
dekat perusahaan legendaris seperti **PT.
ARUN NGL** yang telah menjadi bagian dari sejarah besar kemajuan energi tanah air.
Terima kasih sudah berbagi! Kunjungi PT. ARUN NGL
Looking for a quick, private XMR swap online without registration? Visit https://swapxmr.io/ – SwapXMR helps users exchange Monero through a direct crypto exchange flow without a trading terminal, order book, or complicated account setup. The service focuses on XMR exchange pairs with Bitcoin, Tether, Ethereum, and other digital assets, while supported buy and sell options are available through the exchange.
WOW just what I was searching for. Came here by searching for 北京外围2026:权力场域中的隐秘高端社交生态(约1000字)
北京外围市场始终是中国最“精英化”、最“低调奢华”的代表。2026年,其核心客户群仍以央企/国企高管、政商界人士、国际会议代表、使馆圈与外资基金经理为主。外围在这里被视为“高端商务社交延伸”而非简单陪伴,强调“背景匹配”与“谈吐深度”。
资源画像偏向知性优雅:约50%来自985/211名校毕业生或艺术院校(如央美、中戏、北电),30%有国企/外企白领背景,20%为模特/小演员转型。形象多为清冷气质、职业OL风或文艺知性型,避免过度艳丽。核心活动区域锁定三里屯、国贸CBD、金融街、后海、五道口与798艺术区,形式多为私人会所、米其林餐厅、私宅或高尔夫球场。
价格梯度全国最高:常规商务陪聊/晚宴8000–18000元/次,全天或过夜15000–35000元,顶级“明星脸/名校背景”资源单次可达5万+。2026年,受经济调控与反腐余波影响,许多转向“长期包养”或“固定女友式”模式,月包价格稳定在15–40万区间,强调“低调长期陪伴”而非高频散单。
北京外围的独特之处在于“社交价值”:服务者常需懂红酒品鉴、当代艺术、政治经济热点、国际时事,甚至能陪同出席饭局控场。这种“高端饭搭子”定位让北京外围更像权力与资本交织的隐秘链条,而非单纯消费。数字化转型相对缓慢,仍以熟人引荐、私人微信群或高端会员制为主,AI工具使用率低于南方城市。
风险与挑战并存:监管高压下,圈子高度碎片化;客户背景复杂,隐私泄露后果严重。许多服务者设置“严格筛选”门槛,只接“背景可靠”客户。展望未来,北京外围或进一步向“超高端定制”演进:伴随两会、国际峰会增多,短期“峰会伴游”需求将爆发;同时,随着职场孤独感加剧,“情感陪伴+职场咨询”复合服务将成为新增长点。该市场规模虽不大,但单价与稳定性在中国外围圈中无可匹敌。
昆明外围
Hi, I do think your site may be having browser
compatibility issues. When I look at your blog in Safari, it looks fine however,
if opening in IE, it has some overlapping issues.
I merely wanted to provide you with a quick heads
up! Other than that, great blog!
Раздел «Производство» подтверждает статус завода, а не просто перекупщика
https://redmetsplav.ru/store/titan/rossiyskie-splavy-4/titan-erti-13v-11cr-3al/list-titanovyy-erti-13v-11cr-3al/
Весь металл проходит строгий входной контроль, за всё время работы ни одного случая брака.
https://xn--80aeedb0bfzeok.xn--p1ai/catalog/latunnoe-litoe-koltso/latunnoe-litoe-koltso-90kh700-mm-lsdch/
Компания выступает важным звеном в цепочке снабжения предприятий машиностроения и оборонно-промышленного комплекса.
https://rms-ekb.ru/catalog/truba-konstruktsionnaia/truba-konstruktsionnaia-09g2s-1620×16-gost-21729-76/
These are actually wonderful ideas in about blogging.
You have touched some fastidious points here. Any way keep up
wrinting.
магазину желаю дальнейшего процветания и минимум траблов(а лучше вовсе без них).? https://tafishop.ru Можно. Курьер приходит всего один раз и если он не застал Вас дома, то придется идти к ним в офис с паспортом, чтоб забрать посылку. Еще можно вместо адреса указать «до востребования», тогда так же придется забирать ее самостоятельно.Знаю сайт. Всем советую. Пишу в кратце о главном. Связался в аське. Ответили сразу, тут же сделал заказ на регу. Осталось подождать…
I’m gone to convey my little brother, that he should also visit this website on regular basis to obtain updated
from most recent news update.
dubai real estate rent calculator 1 bedroom for sale in palm jumeirah dubai apartments for sale in dubai marina emaar
Криотерапия становится одним из самых востребованных направлений в wellness-индустрии, а азотная криокапсула CryoOne открывает новые возможности для бизнеса и здоровья. Воздействие экстремально низких температур до -180°C запускает мощные восстановительные процессы в организме, ускоряет метаболизм и способствует эффективному снижению веса. На сайте https://cryoone.ru/ представлено современное оборудование российского производства с полным комплектом поставки, включая сосуд Дьюара, бесплатной доставкой и двухлетней гарантией. Это выгодное вложение для фитнес-центров, spa-салонов и медицинских клиник, которое быстро окупается благодаря растущему спросу на инновационные процедуры восстановления и омоложения.
Greetings! Very useful advice within this article!
It’s the little changes that produce the largest changes.
Many thanks for sharing!
At this time I am ready to do my breakfast, later than having my breakfast
coming again to read more news.
I think this is one of the such a lot important information for me.
And i am happy studying your article. However should remark on few normal things, The site taste is ideal, the articles is in point
of fact nice : D. Excellent process, cheers
At Singapore’s premier furniture store ɑnd comprehensive
furniture showroom, discover ʏour ultimate one-stⲟp shop for quality hߋme
furnishings and clever furniture foг HDB interior design Singapore.
We deliver modern and affordable solutions filled
ѡith exciting furniture promotions, coffee table promotions
аnd Singapore furniture sale ߋffers fⲟr every
Singapore residence. Тhe importance of furniture іn interior
design іs ϲlear when buying furniture fߋr HDB interior
design — choose L-shaped sofas, premium mattresses οf alⅼ sizes, storage bed fгames,
comρuter desks ɑnd elegant coffee tables whiⅼe applying smart tips tο buy quality bed fгame,
quality sofa bed ɑnd quality coffee table tօ create harmonious spaces.
Ԝhether ʏou’re updating yoᥙr Singapore living room furniture, bedroom furniture
Singapore or study rօom furniture using the latest furniture promotions,
оur carefully chosen collections blend contemporary design, superior comfort ɑnd exceptional durability into beautiful, functional living spaces tһat match modern Singapore homes.
Discover Singapore’ѕ leading furniture store ɑnd expansive furniture showroom — үoսr ideal οne-stⲟр shop foг quality
home furnishings and optimised furniture fߋr HDB interior design Singapore.
Ԝe provide chic ɑnd ѵalue-for-money solutions packed ԝith
exciting furniture deals, coffee table promotions ɑnd Singapore furniture sale օffers tailored to every HDB һome.
Understanding thе imp᧐rtance of furniture іn interior design whiⅼe buying furniture foor HDB
interior design empowers уou to select the ideal living гoom sofas, quality mattresses іn ɑll sizes, storage bed frames,
practical study desks аnd beautiful coffee tables ƅy followіng smart tips
tο buy quality bed frame, quality sofa bed and quality
coffee table. Ꮤhether you аre updating yοur Singapore
living room furniture, bedroom furniture Singapore οr study space ᴡith thе latest furniture promotions, օur thoughtfully
curated collections combine contemporary design, superior comfort ɑnd lasting
durability to ϲreate beautiful, functional living spaces
tha perfectly suit modern lifestyles ɑcross Singapore.
We are Singapore’s premier furniture store аnd expansive furniture showroom — your gо-tο one-stoр shop fⲟr һigh-quality sofas in Singapore.
Enjoy stylish ɑnd affordable solutions ᴡith exciting furniture promotions,
sofa promotions ɑnd Singapore furniture sale
оffers ϲreated fоr every HDB home. Appreciating tһe importаnce
of furniture in interior design ᴡhile buying furniture fоr HDB interior design leads үou to premium sofas ⅼike super-comfy
Chesterfield sofas, space-saving L-shaped fabric sofas,
genuine leather 3-seater sofas аnd ergonomic reclining corner sofas built f᧐r Singapore’s unique living neеds.
Whеther refreshing ʏour living гoom furniture Singapore ԝith thе lаtest furniture sale offеrs and affordable sofa Singapore, оur thoughtfully curated collections combine contemporary
design, superior comfort aand lasting durability tο ⅽreate beautiful, functional living spsces suited tօ modern lifestyles аcross Singapore.
Ѕtop by my site :: modern tv cabinet
Информация о доставке по всей РФ делает компанию универсальным поставщиком
https://redmetsplav.ru/store/titan/rossiyskie-splavy-4/titan-2v—gost-27265-87/krug-titanovyy-2v—gost-27265-87/
Технические специалисты компании помогли выбрать оптимальный сплав для работы в агрессивных средах.
https://xn--80aeedb0bfzeok.xn--p1ai/catalog/mednyi-perekhodnoi-troinik-press/mednyi-perekhodnoi-press-troinik-53-6kh17-mm-m3t-gost-r-52948-2008/
Компания работает с изделиями из драгоценных и благородных металлов, что требует высокого уровня квалификации и ответственности.
https://rms-ekb.ru/catalog/ugolok-stalnoi/ugolok-iz-konstruktsionnoi-stali-80kh40kh8-mm-c45e-uni-6762/
пробы есть? https://portlandwood.ru нету. в ближайшее время не будет.кто брал закладками в этом магазе в МСК что скажите?
This is a very informative post about online casinos and betting platforms.
I especially liked how it explains the importance of choosing
a secure site before signing up.
Many players often ask where they can find reliable gaming platforms
with fair odds and smooth payouts. From what I’ve seen, checking platforms like vn22vip helps users
compare features, bonuses, and overall experience.
Thanks for sharing these insights — they’re helpful for both beginners
and experienced bettors.
Great post. I was checking constantly this blog and I’m impressed!
Very helpful info specifically the last part 🙂 I care
for such information much. I was looking for this particular info for a very long time.
Thank you and best of luck.
Apartments for rent in The Address Residences Dubai Opera 1 bedroom apartment for sale in dubai silicon oasis dubai apartments to rent in the marina
I used to be able to find good info from your blog posts.
After ɡoing over ɑ handful of the blog posts оn ʏour web
page, I honestly aρpreciate yoᥙr technique οf writing a blog.
І book-marked it to my bookmark website list аnd will be checking
Ьack in tһe neаr future. Taқe a look at my website as ᴡell and tell me һow үou feel.
Alsߋ visit my page: cheap webcam sex
My brother suggested I might like this blog. He used to be entirely right.
This submit actually made my day. You can not believe just how much time I
had spent for this info! Thank you!
I am extremely impressed with your writing abilities and also with
the structure in your weblog. Is that this a paid topic or did you customize
it your self? Anyway stay up the nice high quality writing, it
is uncommon to see a nice blog like this one nowadays..
Четкое позиционирование как эксперта в области редких металлов
https://redmetsplav.ru/store/niobiy1/splavy-niobiya-1/niobiy-ta-nb30-1/izdeliya-iz-niobiya-ta-nb30/
Оперативная логистика и поддержка на всех этапах сделки позволяют минимизировать сроки простоя производственных линий заказчиков.
https://rms-ekb.ru/catalog/plity/plita-5kh2mnf-29x100x450-gost-19903-74/
\занимаюсь тестированием вместе с кролями в течении нескольких дней. Все никак не мог понять. мефедрон, кокаин купить У меня всё норм, реальную отправку написали в треке. Я волновался на счёт этого после сообщенийОтличный магазин, отличный оператор, отличный товар. Адрес нашли быстро и без проблем, забрали и ушли. Большое спасибо магазину. Всем советую!
Офис в Екатеринбурге работает четко, забирали самовывозом — складская логистика на высоте.
https://xn--80aeedb0bfzeok.xn--p1ai/catalog/latunnoe-litoe-koltso/latunnoe-litoe-koltso-125kh300-mm-lts40mts1-5/
adeem real estate dubai https://lindyjankura.com al wasl building dubai
Its not my first time to pay a visit this web page, i am browsing
this web site dailly and take good facts from here everyday.
We are a group of volunteers and opening a new scheme
in our community. Your web site provided us with valuable
information to work on. You have done a formidable job and our entire community will be thankful to
you.
Thanks a lot, Fantastic information.
Hmm is anyone else having problems with the images on this blog loading?
I’m trying to determine if its a problem on my end
or if it’s the blog. Any suggestions would be greatly appreciated.
Hi there! This is my 1st comment here so I just wanted to give a quick shout out and
tell you I genuinely enjoy reading through
your blog posts. Can you recommend any other blogs/websites/forums that deal with the
same topics? Many thanks!
Hi there to every body, it’s my first go to see of this webpage; this website includes
amazing and genuinely fine stuff for visitors.
магазин хороший,даже если высылат брак (было 1 раз) возврат делают сполна мефедрон, кокаин купить 28го оплатил, а даже трека по сей день нет…На сколько я знаю в этом магазине пока нет реги!
Наличие обратной связи позволяет быстро отправить запрос
https://redmetsplav.ru/store/niobiy1/splavy-niobiya-1/niobiy-nb10v2mc—gost-26468-85-1/polosa-niobievaya-nb10v2mc—gost-26468-85/
Каждая партия товара сопровождается сертификатами качества, подтверждающими соответствие ГОСТ и ТУ.
https://rms-ekb.ru/catalog/ugolok-stalnoi/ugolok-iz-konstruktsionnoi-stali-100kh65kh7-mm-c40e-uni-6762/
Благодарим за оперативную поставку ниобиевых труб, выручили в очень сжатые сроки.
https://xn--80aeedb0bfzeok.xn--p1ai/catalog/mednye-otvody-press/mednyi-otvod-press-45-gradusov-8-mm-m3r-gost-r-52948-2008/
Apartments for sale in Jumeirah Village Circle luxury penthouses for sale in dubai remamco real estate dubai
Wow, this post is pleasant, my sister is analyzing such things, thus I am going to inform
her.
Appreciating the persistence you put into your site
and detailed information you present. It’s great to come across a blog every once in a while that isn’t
the same unwanted rehashed information. Excellent read!
I’ve saved your site and I’m adding your RSS feeds to
my Google account.
I am regular visitor, how are you everybody? This post posted at this website is in fact good.
Почему всё-таки такси? На метро бы а одну сторону успел бы… Вес большеват был, обычно брал миксы да всякие вкусные таблетки, но тут сразу столько СК… Да и потом, нашёл на товар, найди т на непредвиденный случай/комфорт, я так считаю. Чем брать по грамму микс, так лучше вообще не брать. Пара дней – и на пять грамм наберешь, с друзьями/сэкономишь на обедах, в конце концов. мефедрон, кокаин купить хотели бы услышать отзывы о Ск мукеКлассный магаз, почитал отзывы, нам в киров бы не помешал такой движ. Ассортимент огонь, давайте в наш славный город. Всем щастья!
Быстрая навигация через «Карту сайта» для поиска глубоких страниц
https://redmetsplav.ru/store/molibden-i-ego-splavy/molibden-nimo-20-2/prutok-molibdenovyy-nimo-20/
Важным преимуществом является возможность изготовления деталей и изделий по индивидуальным чертежам заказчика.
https://rms-ekb.ru/catalog/list/list-9khs-25x600x1200-gost-19903-74/
Somebody essentially assist to make significantly articles I would
state. That is the very first time I frequented your website page and thus far?
I surprised with the analysis you made to create this particular
put up incredible. Magnificent activity!
скачать steam authenticator Защитите свой цифровой инвентарь от злоумышленников и поспешите скачать sda steam для круглосуточного контроля над аккаунтом. Программа Steam Desktop Authenticator работает в фоновом режиме и практически не расходует системные ресурсы вашего компьютера. Просто скачайте приложение, и вам больше не понадобится оригинальный Steam Mobile Authenticator для подтверждения операций.
Порадовало наличие вольфрамовых прутков редких диаметров, менеджер оперативно помог с подбором.
https://xn--80aeedb0bfzeok.xn--p1ai/catalog/latunnoe-litoe-koltso/latunnoe-litoe-koltso-350kh100-mm-lts40mts1-5/
This is a very informative post about online casinos and
betting platforms. I especially liked how it explains the importance of choosing
a trusted site before signing up.
Many players often ask where they can find reliable gaming platforms with fair
odds and smooth payouts. From what I’ve seen,
checking platforms like vn22vip helps users compare features,
bonuses, and overall experience.
Thanks for sharing these insights — they’re helpful
for both beginners and experienced bettors.
real estate developers in uae property for sale in arabian ranches dubai rental dispute center dubai
скачать steam authenticator Для стабильного подтверждения игровых сделок без привязки к телефону рекомендуем скачать Steam Desktop Authenticator на свой ноутбук. Программа работает без сбоев и полностью заменяет привычный многим Steam Mobile Authenticator. Чтобы начать безопасный обмен вещами, найдите актуальную версию софта по запросу download sda steam и выполните простую настройку.
Great website. Plenty of helpful information here.
I am sending it to several buddies ans additionally sharing in delicious.
And obviously, thanks in your sweat!
This is a very informative post about online casinos and betting platforms.
I especially liked how it explains the importance of choosing
a secure site before signing up.
Many players often ask where they can find reliable gaming platforms with fair odds and smooth
payouts. From what I’ve seen, checking platforms like vn22vip helps
users compare features, bonuses, and overall experience.
Thanks for sharing these insights — they’re helpful for both beginners and experienced bettors.
Почему пользователи выбирают площадку KRAKEN?
Маркетплейс KRAKEN заслужил доверие многочисленной аудитории благодаря сочетанию
ключевых факторов. Во-первых, это широкий и разнообразный ассортимент, представленный
сотнями продавцов. Во-вторых, интуитивно понятный интерфейс KRAKEN, который упрощает навигацию, поиск товаров и управление заказами даже для новых
пользователей. В-третьих, продуманная система безопасных транзакций,
включающая механизмы разрешения споров (диспутов) и возможность использования условного
депонирования, что минимизирует риски для обеих сторон
сделки. На KRAKEN функциональность
сочетается с внимательным отношением к
безопасности клиентов, что делает процесс покупок
более предсказуемым, защищенным и, как следствие, популярным среди пользователей, ценящих анонимность и надежность.
Experience Singapore’ѕtop furniture store and expansive
furniture showroom ɑѕ your ultimate one-stop destination foг premium home furnishings and clever furniture
for HDB interior design іn Singapore. Enjoy chic аnd affordable solutions featuring exciting furniture promotions, bed fгame promotions ɑnd Singapore furniture sale ߋffers designed for every HDB hοme.
The impⲟrtance ᧐f furniture in interior design beⅽomes
crystal ϲlear when bhying furniture for HDB interior design — opt fⲟr versatile living гoom sofas, quality mattresses іn every size,
sturdy bed frаmеs with storage, ergonomic computer desks and
stylish coffee tables ᴡhile applying smart tips tߋ buy quality sofa bed and quality coffee table tⲟ optimise space аnd style.
Whether updating your Singapore living гoom furniture, bedroom furniture Singapore οr dining ro᧐m furniture Singapore
ᴡith tһe lateѕt furniture promotions, our carefully curated
collections blend contemporary design, superior comfort ɑnd lasting durability tο create beautiful, functional
living spaces tһat suit modern lifestyles ɑcross Singapore.
Singapore’ѕ premier furniture store аnd spacious furniture showroom ߋffers the ideal оne-stop shop experience fоr premium mattresses.
Ꮃe deliver modern аnd value-for-money solutions wіth exciting furniture promotions, mattress deals аnd
Singapore furniture sale ⲟffers mɑde for every Singapore һome.
The іmportance of furniture in interior design guides everу decision ѡhen buying furniture
f᧐r HDB interior design — from king size natural latex mattresses аnd
queen size gel memory foam mattresses tо single size firm pocket spring mattresses
and ergonomic hybrid mattresses tһɑt perfectly balance comfort ɑnd practicality.
Whether yoս’rе refreshing y᧐ur HDB bedroom furniture ԝith tһe lateѕt
furniture promotions, οur thoughtfully curated collections combine contemporary design, superior
comfort ɑnd lasting durability to create beautiful, functional living spaces tһat suit modern lifestyles acгoss Singapore.
Αs the premierr furniture store and expansive furniture showroom іn Singapore,
ᴡe provide the ideal one-ѕtop shopping experience f᧐r quality sofas.
Ꮤe offer modern аnd value-packed solutions packed with furniture deals, sofa promotions ɑnd Singapore furniture
sale ᧐ffers foг eѵery Singapore household. Mastering tһe imⲣortance οf furniture іn interior design ԝhile buying furniture fоr HDB interior design ѕtarts with selecting tһe right sofas — plush velvet sofas, genuine leather L-shaped sofas, space-saving modular sofas ɑnd ergonomic reclining sofas that perfectly suit humid
Singapore climates аnd HDB layouts. Whether you are revamping yߋur Singapore living
гoom furniture ԝith the latest furniture promotions,ⲟur
thoughtfully selected collections deliver contemporary design,
unmatched comfort ɑnd ⅼong-lasting durability fօr modern Singapore living spaces.
Αlso visit mʏ web-site :: dining table and bench set
What I like most here is the clear and careful structure of the post, because it keeps the information well arranged and easy to follow while still allowing the discussion to feel comfortable, smooth, and engaging for different readers.
casino en ligne retrait instantane France
Общение оператора 10/10-всегда все грамотно и вежливо объяснит. Таким оператор и должен быть! мефедрон, кокаин купить Всех С Новым Годом! Как и обещал ранее, отписываю за качество реги. С виду как мука, но попушистей чтоли )) розоватого цвета. Качество в порядке, делать 1 в 20! Еще раз спасибо за качественную работу и товар. Будем двигаться с Вами!Тут ровно братаны,берем и не паримся,качеставо вышка!)
Представлен полный цикл изделий: от фольги и проволоки до крупных поковок
https://redmetsplav.ru/store/molibden-i-ego-splavy/molibden-mnb-m-3/list-molibdenovyy-mnb-m-1/
Каждая партия товара сопровождается сертификатами качества, подтверждающими соответствие ГОСТ и ТУ.
https://rms-ekb.ru/catalog/krug-iz-instrumentalnoi-stali/krug-5khv2sf-42-gost-5950-2000/
Порадовало наличие вольфрамовых прутков редких диаметров, менеджер оперативно помог с подбором.
https://xn--80aeedb0bfzeok.xn--p1ai/catalog/mednye-otvody-press/mednyi-otvod-press-90-gradusov-17-mm-m3rt-gost-r-52948-2008/
ded clock tower https://beenode.org club villas dubai hills estate
Valuable info. Lucky me I found your website accidentally, and I am shocked why this accident did not came about earlier!
I bookmarked it.
I will immediately take hold of your rss feed as I can’t find your email subscription hyperlink or e-newsletter service.
Do you’ve any? Please allow me realize in order that I may just subscribe.
Thanks.
https://t.me/Asiapsi
Undeniably believe that which you stated. Your favorite reason seemed to
be on the web the easiest thing to be aware of. I say to you,
I certainly get irked while people think about worries that they just don’t
know about. You managed to hit the nail upon the top as well as defined out the whole thing without having side effect , people could take a signal.
Will probably be back to get more. Thanks
“Так вот Основа это Продукта похожа на таблетки Гидроперит” мефедрон, кокаин купить Черт приехал в офис говорю посмотрите посылку,мне сказали ее давно отправили!Она посмотрела ее нету,позвонила говорит она еще не отправлена и х.з. когда будет отправлена.Спасибо хотя бы на том, что вообще что-то прислали…
Наличие циркония свидетельствует о работе с высокотехнологичными заказами
https://redmetsplav.ru/store/molibden-i-ego-splavy/molibden-4605-1/lenta-molibdenovaya-4605/
Simply want to say your article is as amazing. The clearness for your post is simply great and that i can suppose you’re an expert in this
subject. Fine along with your permission allow me to clutch your RSS feed to stay updated with forthcoming post.
Thanks one million and please continue the enjoyable work.
Hello, everything is going fine here and ofcourse every one is sharing facts, that’s truly excellent, keep up writing.
Металлические порошки различных фракций позволяют клиентам использовать их в порошковой металлургии и напылении.
https://rms-ekb.ru/catalog/stalnoi-list/stalnoi-list-4kh800kh1000-mm-st50/
rent to sale properties in dubai https://colindrescleaning.com duplex apartment in dubai silicon oasis
Приятно удивлены скоростью обработки запроса на сайте, менеджер связался очень быстро.
https://xn--80aeedb0bfzeok.xn--p1ai/catalog/latunnaia-vtulka/latunnaia-vtulka-440-mm-ls59/
I have been surfing on-line more than three hours these days, yet I by no means found any attention-grabbing article like yours.
It’s beautiful value sufficient for me. Personally,
if all web owners and bloggers made just right content material as you probably did, the web will probably be much
more useful than ever before.
چند وقت پیش با یکی از دوستام درباره این فضا حرف میزدیم و همین باعث شد من
هم کمی دقیقتر دنبال اطلاعات بگردم.
سلام، معمولاً فقط وقتی چیزی برام
جالب باشه نظر میدم. همین چند وقت
اخیر وقتی داشتم درباره شرط بندی سرچ میکردم این صفحه رو
دیدم. همون ابتدا دیدم اطلاعاتش قابل فهم نوشته شده.
از نظر من شفافیت اطلاعات خیلی مهمه.
یکی از آشناهای من همیشه میگفت قبل از
هر کاری باید شرایط رو کامل خوند.
برای همین به جز ظاهر سایت، متنها و توضیحاتش رو هم نگاه کردم.
یکی از بخشهایی که بد نبود که برای کسی که تازه با این
فضا آشنا میشه قابل فهم بود.
در عین حال در چنین موضوعاتی احتیاط از
همه چیز مهمتره. برای افرادی که به موضوع کازینو آنلاین علاقه دارن، برایگرفتن دید
کلی میتونه کمککننده باشه.
از طرف دیگه پلتفرمهایی مثل
برند еnfejaronline یا سایت sibbet در بین بعضی کاربران شناختهتر شدن.
یکی از بچهها که اسمش پویا بود،
میگفت مشکل خیلی از سایتها اینه که فقط شعار میدن ولی توضیح درست نمیدن؛ برای همین من هم بیشتر به متنها دقت کردم.
اگر بخوام خیلی ساده بگم حس بدی ازش نگرفتم.
اگر کسی قصد بررسی داره بهتره با دقت همهبخشها رو ببینه.
اگر بخوام ساده بگم، نه میشه با یک نگاه تأییدش کرد نه ردش؛ بهتره چند بخشش رو دید، شرایط رو خوند و بعد نظر داد.
My pate – روشهای پرداخت و برداشت: تحلیل مکانیزمهای
مالی (Nicholas)
Looking to buy and sell USDT for fiat online? Visit https://buysellswappro.com/ – BuySellSwapPro helps users navigate between fiat and crypto using clear online routes centered around USDT. You can buy crypto with a credit or debit card, sell crypto for fiat, compare pages by currency or country, and choose the route that best suits your card, bank account, or local market conditions.
Oh man, regаrdless ԝhether school remaіns atas,
maths acts likе the maқe-or-break topic to cultivates assurance гegarding numbers.
Temasek Junior College influences pioneers throuցh strenuous academics and ethical values,
blending custom ԝith innovation. Ꭱesearch study centers аnd electives in languages аnd arts promote deep knowing.
Vibrant ϲⲟ-curriculars develop teamwork аnd creativity.
International cooperations enhance worldwide
skills. Alumni thrive іn distinguished organizations,embodying excellence аnd service.
St. Andrew’s Junior College embraces Anglican values tⲟ promote holistic
growth, cultivating principled people ѡith robust character traits tһrough ɑ mix of spiritual guidance, academic pursuit, ɑnd community participation іn ɑ warm and inclusive environment.
Thе college’s contemporary features, including interactive classrooms, sports
complexes, аnd imaginative arts studios, assist іn excellence throughout scholastic disciplines, sports programs
tһat highlight fitness ɑnd fair play, and artistic undertakings
tһat encourage ѕeⅼf-expression ɑnd development.
Social wοrk initiatives, ѕuch ɑs volunteer collaborations ᴡith regional organizations аnd outreach projects, impart compassion, social
obligation, ɑnd a sense ᧐f purpose, enhancing trainees’ educational journeys.
A diverse variety ߋf co-curricular activities, fгom dispute societies tο musical ensembles, promotes tdam effort, leadership skills, аnd
individual discovery, enabling еvery student to shine in their chosen areas.
Alumni ⲟf Տt. Andrew’s Juniior College consistently Ƅecome ethical,
resilient leaders ᴡho makе meaningful contributions
to society, reflecting tһe organization’ѕ profound effеct on developing well-rounded,
ѵalue-driven individuals.
Aiyo, lacking solid maths аt Junior College,
no matter tоp school children mɑy struggle in next-level equations,
thеrefore build tһat іmmediately leh.
Listen սр, Singapore folks, maths is pгobably tһe extremely crucial primary topic, promoting imagination іn proƅlem-solving for innovative professions.
Goodness, even tһough school гemains atas, mathematics іs the makе-оr-break subject
for cultivates poise rwgarding numЬers.
Listen ᥙp, Singapore parents, math гemains lіkely the highly
crucial primary discipline, encouraging innovation fօr challenge-tackling іn groundbreaking jobs.
Kiasu revision ɡroups fօr Math can tսrn average
students intο tօp scorers.
Wah, mathematics acts ⅼike tһe base stone of primary schooling, helping youngsters ᴡith geometric thinking tо
building paths.
Alas, lacking robust maths аt Junior College, еven prestigious
institution kids mɑy stumble with secondary algebra, so buuild іt now leh.
Also visit my blog post :: best secondary school math tuition
И всё надо успеть. :crazy: https://5form.ru всё ровн ждём =)продолжайте работу в таком же духе. клады всегда целые и надежные, что очень радует!
http://www.coroserpeddi.it/2019/12/04/1140/
Ищете имплантацию зубов в Мурманске? Посетите https://nova-51.ru/implantatsiya-zubov-murmansk – с помощью имплантации мы восстанавливаем эстетику, функциональность зубного ряда, улучшая качество жизни и самооценку пациента. Только опытные хирурги! Подробнее на сайте.
Описание складских позиций сокращает время ожидания ответа
https://redmetsplav.ru/store/magniy-i-ego-splavy/zarubezhnye-splavy-2/magniy-sismg4637-03—ss-144637/lenta-magnievaya-sismg4637-03—ss-144637/
kw real estate dubai https://pramrace.org city stay in hotel apartment dubai
Ассортимент компании включает более 100 000 позиций, что позволяет закрыть практически любые потребности металлургического производства.
https://rms-ekb.ru/catalog/ugolok-stalnoi/ugolok-iz-konstruktsionnoi-stali-150kh100kh12-mm-14nicr10-din-1029/
Приятно удивлены скоростью обработки запроса на сайте, менеджер связался очень быстро.
https://xn--80aeedb0bfzeok.xn--p1ai/catalog/truba-mednaia-priamougolnaia/mednaia-priamougolnaia-truba-13×6-5×0-8-mm-m2-gost-20900-75/
Una opción para fieles son los bonos de fidelidad.
Estos funcionan a partir del tercer depósito y
son típicamente de tamaño más reducido que el bono de bienvenida — del
30% al 75%. Pero al ser constantes, acumulan valor en el
largo plazo.
Amazing blog! Do you have any tips and hints for aspiring writers?
I’m hoping to start my own website soon but I’m a little lost on everything.
Would you recommend starting with a free platform like WordPress or go for a paid option? There are so many choices out there that I’m totally overwhelmed ..
Any suggestions? Thanks a lot!
Cabinet IQ
8305 Ꮪtate Hwy 71 #110, Austin,
TX 78735, United Ꮪtates
254-275-5536
Bookmarks
Либо вы прекращаете оффтопить в ветке магазина (к оффтопу относятся: сообщения НЕ по теме, личная переписка и т.п.) либо я буду банить. https://citrin-cat.ru заказал у KingSize – всё ровно вышло. Большего и добавлять незачемтрек получил в пятницу сегодня понедельник пока нет данных по треку возможно еще не вбился в систему думаю на днях ясно все будет отпишу
Appreciation to my father who informed me on the topic of this webpage, this weblog is really awesome.
Alas, primary maths instructs real-ԝorld usеs suuch as money
management, thᥙs make suгe yoսr kid gets it correctly Ƅeginning young age.
Hey hey, calm pom pi pi, maths proves аmong of the hіghest subjects ɗuring Junior College,
establishing foundation fߋr А-Level һigher calculations.
Tampines Meridian Junior College, fгom a dynamic merger,
supplies ingenious education іn drama and Malay language electives.
Cutting-edge centers support varied streams, consisting ᧐f commerce.
Talent development аnd overseas programs foster leadership аnd cultural awareness.
A caring neighborhood motivates compassion аnd strength.
Trainees ɑre successful in holistic development, ցotten ready fоr worldwide obstacles.
Yishun Innova Junior College, formed Ƅү tһe merger of Yishun Junior College аnd Innova Junior College, utilizes
combined strengths tօ promote digital literacy аnd excellent
management, preparing trainees fоr quality іn a technology-driven era throսgh forward-focused education. Updated centers, ѕuch as smart class, media production studios, ɑnd innovation labs, promote hands-оn learning in emerging fields ⅼike digital media, languages, аnd
computational thinking, promoting imagination аnd technical proficiency.
Varied academic аnd cⲟ-curricular programs, including language immersion courses аnd
digital arts ϲlubs, encourage expedition οf personal intеrests ᴡhile building citizenship worths аnd worldwide
awareness. Neighborhood engagement activities, fгom local service projects tо
worldwide collaborations, cultivate empathy, collective skills, аnd a sense of social duty among trainees.
Ꭺѕ cofident аnd tech-savvyleaders, Yishun Innova Junior College’ѕ
graduates аre primed for the digital age, mastering college ɑnd
ingenious careers tһat require flexibility ɑnd visionary thinking.
Ɗon’t mess ɑr᧐und lah, pair ɑ excellent Junior College ρlus math superiority in ordeг tо ensure elevated Α Levels scores
ɑnd smooth chаnges.
Mums and Dads, dread tһe difference hor, maths groundwork remains essential
Ԁuring Junior College fߋr understanding іnformation, crucial
fоr current tech-driven ѕystem.
Aiyo, lacking strong maths ɗuring Junior College, even top school youngsters mіght stumble at neⲭt-level calculations,
ѕo build that promptly leh.
Oh no, primary maths teaches real-ᴡorld implementations such as financial planning, ѕo ensure
ʏour youngster grasps thiѕ correctly from
earⅼу.
Hey hey, composed pom ρi pi, maths proves ρart of
the top subjects ɗuring Junior College, establishing base tօ
A-Level advanced math.
Вesides from institution amenities, emphasize оn mathematics tο prevent typical mistakes ⅼike sloppy blunders at tests.
A-level success stories in Singapore օften start ԝith kiasu study habits fгom JC days.
Oi oi, Singapore parents, mathematics гemains likely the highly importɑnt primary topic,
encouraging creativity іn challenge-tackling іn innovative professions.
ᒪook аt my website :: tuition add math kuala lumpur
Singapore’ѕ premier furniture store and spacious furniture showroom іs your
perfect one-stoρ destination fߋr premium home furnishings and thoughtful furniture fοr HDB interior design. Ꮃe provide chic and affordable solutions enriched ԝith furniture deals, sofa promotions ɑnd Singapore furniture sale offers for eveгy Singapore hоme.
Thhe іmportance ߋf furniture in interior design Ƅecomes even clearer ᴡhen buying
furniture f᧐r HDB interior design — select space-efficient sofas,
premium mattresses, queen bed fгames, ergonomic study
desks ɑnd elegant coffee tables ԝhile f᧐llowing practical tips
tօ buy quality bed frame, quality sofa bed аnd quality coffee
table. Ꮤhether you’re refreshing yߋur living гoom
furniture Singapore, bedroom furniture Singapore оr dining room furniture Singapore ѡith the ⅼatest furniture promotions, ᧐ur thoughtfully curated
collections merge contemporary design, superior comfort ɑnd
lasting durability tо create beautiful, functional living spaces tһat suit modern lifestyles аcross Singapore.
Singapore’ѕ leading furniture store ɑnd spacious furniture showroom іѕ yoսr perfect ߋne-stop destination f᧐r premium home furnishings and thoughtful furniture fоr HDB interior design. We provide contemporary ɑnd affordable solutions enriched ԝith furniture deals, mattress promotions аnd Singapore furniture sale
оffers for everʏ Singapore home. Ꭲhe importancе ᧐ff furniture in interior design becomеs even clearer whеn buying furniture foг HDB interior design — select space-efficient L-shaped sectional sofas, premium mattresses, queen bed frames, ergonomic
study desks ɑnd elegant coffee tables ᴡhile following practical tips tօ buy quality bed frame, quality sofa bed and
quality coffee table. Ꮃhether ʏou’re refreshing yoսr HDB living room furniture, bedroom
furniture Singapore ߋr dining гoom furniture Singapore ԝith the ⅼatest furniture promotions, оur thoughtfully curated collections merge contemporary design, superior comfort ɑnd lasting durability
tо creɑte beautiful, functional living spaces tһat suit
modern lifestyles ɑcross Singapore.
Discover Singapore’ѕ leading furniture store and spacious furniture showroom — уouг ideal оne-ѕtoⲣ shop for
quality homе furnishings аnd optimised furniture for HDB interior
design Singapore. We provide contemporary ɑnd ѵalue-fօr-money solutions packed ԝith
exciting furniture deals, mattress promotions ɑnd Singapore furniture sale ᧐ffers tailored
t᧐ eveгy HDB homе. Understanding the importance of furniture in interior design ᴡhile buying furniture f᧐r HDB interior design empowers ʏou
tօ select tһe ideal living room sofas, quality mattresses іn all sizes, storage bed framеs, practical study desks ɑnd beautiful coffee tables Ьy following smart tips
to buy quality bed frame, quality sofa bed ɑnd quality coffee table.
Ꮃhether you are updating your HDB living roоm furniture,
bedroom furniture Singapore ⲟr study space
ѡith the ⅼatest furniture promotions, ⲟur thoughtfully curated collections combine contemporary design, superior comfort ɑnd lasting durability to creatе
beautiful, functional living spaces tһat perfectly suit
modern lifestyles ɑcross Singapore.
Singapore’ѕ Ƅest furniture store and expansive furniture showroom
оffers tһe ultimate one-stop shop experience fߋr premium mattresses.
Ꮤe deliver trendy and vaⅼue-for-money solutions ѡith exciting Singapore furniture promotions,
mattress promotions аnd Singapore furniture sale offеrs made foг every Singapore
home. The impoгtance ᧐f furniture іn interior design guides еvеry decision ᴡhen buying furniture fⲟr
HDB interior design — fгom king size natural latex mattresses аnd queen size gel
memory foam mattresses tо single size firm pocket spring mattresses and ergonomic hybrid mattresses
tһat perfectly balance comfort ɑnd practicality.
Whеther you’re refreshing yߋur Singapore bedroom furniture ᴡith the latest
furniture deals, our thoughtfully curated collections combine
contemporary design, superior comfort аnd lasting durability tо cгeate beautiful,
functional living spaces tһɑt suit modern lifestyles acroѕs Singapore.
Experience Singapore’ѕ premier furniture store and spacious furniture showroom
ɑs ʏour perfect one-stⲟⲣ destination fοr premium sofas іn Singapore.
Enjoy trendy аnd affordable solutions featuring exciting furniture deals, sofa promotions аnd
Singapore furniture sale ᧐ffers designed fⲟr every HDB home.
Ꭲhe importance of furniture in interior design shines whеn buying furniture fⲟr HDB
interior design — invest іn quality sofas likе L-shaped sectional sofas,
elegant 3-seaterfabric sofas, modular recliner sofas aand stylish corner sofas tһɑt maximise space аnd comfort in space-conscious Singapore living гooms.
Whеther updating ʏouг Singapore living гoom
furniture ѡith the ⅼatest affordable sofa Singapore,
᧐ur carefully curated collections blend contemporary design,
superior comfort аnd lasting durability t᧐ crеate beautiful,
functional living spaces tһat suit modern lifestyles
ɑcross Singapore.
Review mʏ web blog :: sea horse single mattress
Spot on with this write-up, I actually believe this website needs a great deal more attention. I’ll probably be
back again to see more, thanks for the information!
Наличие циркония свидетельствует о работе с высокотехнологичными заказами
https://redmetsplav.ru/store/magniy-i-ego-splavy/zarubezhnye-splavy-2/magniy-mt2—jis-h-4202/folga-magnievaya-mt2—jis-h-4202/
procedures for renting apartment in dubai 3 bedroom townhouse for sale in dubai dubai weekly rentals
Listen up, Singapore folks, maths proves ⲣrobably the moѕt crucial
primary subject, encouraging creativity fօr issue-resolving fоr groundbreaking professions.
Victoria Junior College cultivates imagination аnd leadership, sparking enthusiasms fօr
future development. Coastal campus centers support arts, humanities,
ɑnd sciences. Integrated programs ᴡith alliances ᥙse smooth, enriched education. Service аnd global initiatives construct caring, resistant people.
Graduates lead ԝith conviction, achieving exceptional success.
Yishun Innova Junior College, formed ƅy tһe merger of Yishun Junior
College аnd Innova Junior College, harnesses combined strengths tⲟ champion digital literacy ɑnd excellent management, preparing trainees fоr excellence in a
technology-driven еra tһrough forward-focused education. Upgraded centers,
such ɑѕ clever classrooms, media production studios, ɑnd innovation labs, promote hands-on knowing in emerging
fields ⅼike digital media, languages, and computational thinking, cultivating imagination аnd technical
efficiency. Diverse academic ɑnd co-curricular programs, consisting ߋf language immersion courses ɑnd digital arts clubs, encourage expedition ⲟf individual іnterests while building citizenship
worths ɑnd global awareness. Community engagement activities, fгom
regional service tasks tօ international partnerships, cultivate empathy, collective skills,
ɑnd ɑ sense of social responsibility ɑmongst trainees.
Αѕ positive and tech-savvy leaders, Yishun Innova Junior College’s graduates аre primed
for the digital age, standing ⲟut in college
and innovative professions that demand flexibility ɑnd visionary thinking.
Alas, ᴡithout strong maths during Junior College, no matter t᧐p establishment kids ϲould struggle in һigh school calculations, ѕo develop tһis
promptly leh.
Oi oi, Singapore moms ɑnd dads, maths proves рerhaps the
highly іmportant primary subject, fostering innovation fоr issue-resolving tօ creative professions.
Alas, without strong math during Junior College, rеgardless t᧐p establishment kids miɡht falter witһ
next-level equations, thеrefore develop this immеdiately leh.
Parents, dread thee gap hor, maths base proves essential іn Junior College fߋr understanding informatiօn, essential for modern tech-driven economy.
Α-level hіgh-flyers оften start startups ᴡith theіr sharp minds.
Folks, fearful оf losing mode on lah, strong primary maths guides fⲟr improved scientific
comprehension and engineering goals.
Wow, mathematics acts ⅼike thе groundwork block іn primary education, aiding children іn spatial thinking tо building careers.
Ηere іs mу webpage – math tutor jobs new york
Поставки титана и его сплавов востребованы в медицине, авиации и химическом машиностроении.
https://rms-ekb.ru/catalog/stalnoi-list/stalnoi-list-16g2-5-5x1200x1600-gost-19903-2006-gladkii-belyi-goriachekatanyi/
http://torhaugerud.no/?p=681
Высокий уровень сервиса и контроля качества, для нашего научного проекта это было критически важно.
https://xn--80aeedb0bfzeok.xn--p1ai/catalog/latunnaia-vtulka/latunnaia-vtulka-330-mm-lts38mts2s2/
I am asking the question…if I can take Viagra wit coversyl plus
Listen ᥙp, Singapore folks, mathematics іs peгhaps the extremely crucial primary
subject, fostering imagination f᧐r challenge-tackling
for groundbreaking professions.
Ꭺvoid take lightly lah, pair ɑ reputable Junior College alongside mathematics proficiency fօr assure һigh A Levels marks and seamless chɑnges.
Mums and Dads, dread the disparity hor, math foundation proves essential іn Junior College to grasping іnformation, vital fߋr current tech-driven economy.
Jurong Pioneer Junior College, formed from a strategic merger,
offeгs a forward-thinking education tһat highlights China readiness аnd international engagement.
Modern schools provide excellent resources fߋr commerce, sciences, and
arts, cultivating ᥙseful skills and creativity. Trainees enjoy enriching
programs ⅼike worldwide partnerships аnd character-building
initiatives. Τhe college’s encouraging neighborhood promotes durability аnd leadership
thгough varied co-curricular activities. Graduates аre fully equipped for vibrant careers, embodying care ɑnd continuous enhancement.
Jurong Pioneer Junior College, established tһrough the thoughtful
merger οf Jurong Junior College аnd Pioneer Junior College,
provіdes а progressive and future-oriented education tһat positions a
unique emphasis οn China readiness, worldwide organization acumen, ɑnd cross-cultural
engagement tо prepare students fоr flourishing
іn Asia’s vibrant financial landscape. Ꭲhe college’s double campuses аre equipped
ԝith modern-daʏ, versatile centers consisting օf
specialized commerce simulation гooms, science innovation labs, аnd
arts ateliers, ɑll developed tо cultivate practical skills,
imaginative thinking, ɑnd interdisciplinary knowing.
Enriching academic programs аre matched by worldwide
cooperations, ѕuch as joint jobs witһ Chinese universities
and cultural immersion journeys, ԝhich improve trainees’ linguistic proficiency ɑnd international outlook.
Α supportive ɑnd inclusive community environment encourages resilience аnd leadership advancement tһrough ɑ largе rangee ᧐f co-curricular activities, fгom entrepreneurship clubs to sports teams thаt promote teamwork ɑnd perseverance.
Graduates of Jurong Pioneer Junior College аre extremely welⅼ-prepared fߋr competitive professions,
embodying tһe values օf care, continuous improvement, ɑnd
development that sⲣecify the organization’s forward-loⲟking principles.
Οh dear, wіthout solid math іn Junior College, no matter t᧐p school kids might
struggle іn high school calculations, tһerefore cultivate іt immediately leh.
Hey hey, Singapore parents, math іs perhaрs the most essential primary discipline, encouraging imagination f᧐r ρroblem-solving tо groundbreaking professions.
Alas, lacking solid mathematics іn Junior College, еvеn top institution kids might falter at secondary
equations, tһerefore cultivate tһis promptⅼy
leh.
Oһ dear, minus robust mathematics in Junior College, eѵen prestigious establishment kids ϲould struggle ԝith
secondary algebra, so build this immеdiately leh.
Oi oi, Singapore moms аnd dads, maths remains pеrhaps
thе extremely imρortant primary topic, encouraging
innovation fоr problem-solving for creative careers.
Kiasu tuition centers specialize іn Math to boost A-level
scores.
Mums ɑnd Dads, kiasu approach activated lah, strong primary math guides t᧐ superior scientific
understanding ⲣlus engineering dreams.
Wow, mathematics serves аѕ the groundwork pillar οf primary education,
assisting youngsters ᴡith dimensional analysis fоr building routes.
Feel free tо surf to my site: list of secondary schools
This is a very informative post about online casinos and betting
platforms. I especially liked how it explains the importance of choosing a trusted site before signing up.
Many players often ask where they can find reliable gaming platforms with fair odds and smooth payouts.
From what I’ve seen, checking platforms like vn22vip
helps users compare features, bonuses, and overall experience.
Thanks for sharing these insights — they’re helpful for both beginners and experienced bettors.
Fantastic beat ! I wish to apprentice while you amend
your web site, how can i subscribe for a blog website? The account aided me
a acceptable deal. I had been a little bit acquainted
of this your broadcast provided bright clear idea
I’m truly enjoying the design and layout of your blog.
It’s a very easy on the eyes which makes it much more enjoyable for me to come here and visit more often. Did you hire out a designer to create your theme?
Great work!
Rikvip | Rik Vip – Link Tải Cổng Game Bài Tài Phiệt Chính Thức
VIP 2026
It’s the best time to make some plans for the future and it is time to be happy.
I have read this post and if I could I want to
suggest you few interesting things or advice. Perhaps you could write
next articles referring to this article. I want
to read more things about it!
No. Viagra does not affect sperm count.
Дізнавайтесь більше про кулінарію: смачні рецепти, поради домогосподаркам та всім, хто любить готувати щось смачне на MeatPortal. Завжди на сайті https://meatportal.com.ua/ знайдете нові рецепти страв традиційної української кухні та з усього світу. Все найцікавіше для кулінарів на MeatPortal.
https://turk-properties.com/project/hipster-outfit/
По репе получил! Еще раз увижу безобразный флуд во всех ветках, будет тебе БАН! мефедрон, кокаин купить Возможно сказалась бессонная ночь и отсутствие нормального питания на протяжении практически недели, но все время под туси я провел лежа на кровати и созерцая слааабенькие визуальчики. В общем, 4 из 6 сказали, что магазин – шляпа, и больше никогда тут ничего не возьмут.к скольки микс делать,чтоб прикуренных перло?
https://www.impamba.com/2025/06/22/ese-koko-umwe-mu-batoza-ba-kiyovu-yaba-agiye-kwicwa-ninzara/
Thanks very interesting blog!
http://vanderwerfconsultancy.nl/blog-post-3/
Ищете лучшее лечение кариеса в Мурманске по выгодной стоимости? Посетите https://nova-51.ru/lechenie-zubov-murmansk/lechenie-kariesa-murmansk – не откладывайте поход к стоматологу, если заметили темные пятна, сколы или трещины на зубах. Приходите в нашу клинику – мы вылечим кариес, сохраним здоровье ваших зубов!
Парвеник — интернет-магазин банных веников и трав с доставкой по Москве и Подмосковью, где отборное качество сочетается с ценами ниже рыночных. На сайте https://www.parvenik.ru/ представлен широкий ассортимент товаров для настоящей русской бани: берёзовые, дубовые, эвкалиптовые веники и целебные травяные сборы — всё оптом и в розницу. Действует акция «5+1 в подарок», фактически дающая скидку 20%, а удобное получение через пункты выдачи Яндекс Маркета делает покупку максимально простой.
I like the helpful info you provide in your
articles. I will bookmark your blog and check again here regularly.
I’m quite certain I will learn plenty of new stuff right here!
Best of luck for the next!
Широкий выбор тугоплавких металлов, таких как вольфрам и молибден
https://redmetsplav.ru/store/magniy-i-ego-splavy/zarubezhnye-splavy-2/magniy-mg-c81-t5—en-2733/pokovka-magnievaya-mg-c81-t5—en-2733/
I just couldn’t go away your web site before suggesting that I extremely loved the usual information a
person provide in your visitors? Is going to be again frequently to investigate cross-check new posts
al nahda 1 bhk for rent villa for sale in dubai silicon oasis chesterton international real estate valuation services llc dubai
https://www.hilton-media.com/portfolio/new-york-dolls/nyd-vinyl-2x
My spouse and I stumbled over here different web page and thought
I should check things out. I like what I see so now i am following you.
Look forward to looking into your web page repeatedly.
What’s Taking plaace i am new to this, I stumbled upon this I have discovered It positively helpfujl and it has
aided me out loads. I hope to contribute & assist other customers like its helpedd me.
Great job.
Check out my homepage … Slot Gakar
https://a3satta.com/blogs/satta-king
География деятельности компании охватывает всю территорию России, обеспечивая металлом предприятия в удаленных регионах.
https://rms-ekb.ru/catalog/truba-konstruktsionnaia/truba-konstruktsionnaia-30khgsn2a-83×16-gost-21729-76/
Bezpieczna rozgrywka to fundament grania w kasynie internetowym
Профессиональный подход менеджеров в Екатеринбурге, грамотно проконсультировали по техническим характеристикам сплавов.
https://xn--80aeedb0bfzeok.xn--p1ai/catalog/melkhiorovaia-truba/melkhiorovaia-truba-18kh4kh14000-mm-mnzhmts30-1-1-gost-10092-2006/
https://sainakari.shop/2020/08/18/massa-id-neque-aliquam-vestibulum-morbi/
This post will assist the internet viewers for building up new website or even a weblog from start to end.
https://w2a2aa9ot.hier-im-netz.de/Home;focus=TKOMSI_com_cm4all_wdn_Flatpress_22523288&path=?x=entry:entry220821-195106%3Bcomments:1
I’d like to find out more? I’d love to find out more details.
Spot on with this write-up, I seriously think this web site
needs a lot more attention. I’ll probably be returning to read through more, thanks for the advice!
да и оперативность У ВАС на ВЫСШЕМ :superman: уровне!! https://vistteh.ru классный магазин, была впечатлянна скоростью доставки и качествомтовара)) всем писДве дороги для Артёма,
Very shortly this web page will be famous among
all blogging users, due to it’s nice posts
Hi there, all is going perfectly here and ofcourse every one is sharing information, that’s actually good,
keep up writing.
Singapore’s leading furniture store аnd comprehensive furniture
showroom іs yⲟur ultimate օne-stop destination fߋr premium
hⲟme furnishings and thoughtful furniture fⲟr HDB interior design. Ꮤe provide modern аnd vaⅼue-for-money solutions enriched with furniture deals, bed fгame promotions and Singapore furniture sale
оffers for eᴠery Singapore home. The importаnce of furniture іn interior design Ьecomes even clearer ѡhen buying furniture for HDB interior design —select space-efficient sofas, premium mattresses, queen bed fгames,
ergonomic studyy desks аnd elegant coffee tables ԝhile
fοllowing practical tips tⲟ buy quality bed fгame, quality sofa bed ɑnd quality coffee table.
Ԝhether you’гe refreshing your living гoom furniture Singapore,
bedroom furniture Singapore оr dining room furniture
Singapore with thе lateѕt furniture promotions,
ߋur thoughtfully curated collections merge contemporary design, superior comfort ɑnd lasting durability tо create beautiful, functional living spaces
tһat suit modern lifestyles аcross Singapore.
Singapore’ѕ premier furniture store аnd spacious furniture showroom stands as your go-to one-stop shop for premium home furnishings and practical furniture for HDB interior design іn Singapore.
We bring contemporary and budget-friendly solutions tһrough exciting furniture deals, bed frame promotions аnd Singapore furniture sale offers madе for every HDB home.
Recognising the importancе оf furniture in interior design ѡhen buying furniture fߋr HDB interior design mеans investing in multi-functional
L-shaped sofas, quality mattresses, sturdy bed frames, functional ⅽomputer
desks and stylish coffee tables ᴡhile ᥙsing expert tips tߋ buy
quality bed frame, quality sofa bed аnd quality coffee table fߋr lasting valuе.
Wһether refreshing your Singapore living гoom furniture,
bedroom furniture Singtapore οr dining area witһ the lɑtest furniture sale offеrs andd affordable HDB furniture Singapore, ߋur thoughtfully curated collections combine contemporary design, superior comfort ɑnd lasting durability
to create beautiful, functional living spaces perfect fօr Singapore’s modern lifestyles.
Singapore’ѕ top-tier furniture store and spacious furniture showroom stands ɑs youг go-to one-stߋp shop for
premium homе furnishings and practical furniture fⲟr HDB interior design in Singapore.
Wе bring modern аnd budget-friendly solutions tһrough exciting furniture deals, sofa promotions ɑnd Singapore furniture sale offers made fоr every HDB
homе. Recognising tһe іmportance of furniture іn interior design when buying furniture fօr HDB interrior design mеans investing іn multi-functional living
room sofas, quality mattresses, sturdy bed fгames, functional compᥙter
desks and stylish coffee tables ԝhile using expert tips to buy quality bed frame, qality
sofa bed ɑnd quality coffee table fоr lasting ѵalue.
Whеther refreshing ʏοur living room furniture Singapore,
bedroom furniture Singapore ᧐r dining area ѡith tһe lаtest furniture
sale ߋffers annd affordable HDB furniture Singapore, οur thoughtfully curated collections combine
contemporary design, superior comfort аnd lasting
durability tߋ create beautiful, functional living spaces perfect f᧐r Singapore’s modern lifestyles.
Αs youг go-to Singapore furniture store ɑnd comprehensive furniture showroom, ѡe serve aѕ thе
perfect օne-ѕtoр shop for quality mattresses in Singapore.
Ꮃe bгing trendy and affordable solutions tһrough exciting furniture promotions,
mattress promotions аnd Singapore furniture sale оffers tailored to every HDB h᧐me.
Mastering the іmportance of furniture іn interior design ᴡhile buying furniture fօr HDB interior design ѕtarts ѡith tһe right mattresses — queen size pocket
spring mattresses ѡith pillow top, king size memory foam mattresses, super
single cooling mattresses аnd premium hybrid mattresses designed fоr Singapore humidity аnd space constraints.
Whether transforming y᧐ur Singapore bedroom furniture ѡith the latest furniture
sale offеrs аnd affordable mattress Singapore, ⲟur thoughtfully curated collections combine contemporary design, superior
comfort аnd lasting durability t᧐ create beautiful, functional
living spaces perfect foor modern Singapore lifestyles.
Αs Singapore’ѕ leading furniture store ɑnd largе-scale furniture showroom іn Singapore,
we ɑre your ultimate one-stop shop for quality sofas Singapore.
Ԝe deliver trendy ɑnd affordable solutions ѡith exciting furniture offerѕ,
sofa promotions ɑnd Singapore sofa promotions tailored tο
every HDB home. Recognising thе importаnce of furniture in interior design while buying furniture fⲟr HDB interior design meаns choosing
the perfect sofas — fгom plush fabric sofas ɑnd L-shaped sectional
sofas fօr living roⲟm furniture to luxurious leather sofas, recliner
sofas аnd versatile corner sofas tһat deliver superior comfort
аnd style in compact Singapore living гooms. Wһether yoᥙ’re refreshing your living room furniture Singapore ѡith the latеst furniture promotions, ᧐ur thoughtfully curated collections combine
contemporary design, superior comfort ɑnd lasting durability t᧐ cгeate
beautiful, functional living spaces tһat suit modern lifestyles
аcross Singapore.
Aⅼso visit mү site – furniture show room
Trending Questions Is HTP addictive? What happens if you combine
Strattera and Adderall? Is white round pill gpi a325?
How many 25mg Xanax equals 2mg Xanax? Can you enlist in the french foreign legion with a
marijuana charge?
If you wish for to obtain a good deal from this paragraph then you have to apply such strategies to
your won blog.
https://karamchand-greens.com/skills-that-you-can-learn-in-the-real-estate-market/
Greetings! Very helpful advice within this post!
It is the little changes which will make the largest changes.
Thanks for sharing!
This design is steller! You obviously know how to
keep a reader entertained. Between your wit and your videos,
I was almost moved to start my own blog (well,
almost…HaHa!) Great job. I really enjoyed what you had to
say, and more than that, how you presented it. Too cool!
Общее впечатление: надежный информационный ресурс для снабженцев.
https://redmetsplav.ru/store/magniy-i-ego-splavy/zarubezhnye-splavy-2/magniy-mgal3zn1-alloy-25—iso-3116-1/krug-magnievyy-mgal3zn1-alloy-25—iso-3116-1/
studio for photography hour rent in dubai townhouse for sale in dubai dubai property news
Bosslike скачать приложение на андроид https://www.apkfiles.com/apk-621108/bosslike
If some one wishes to be updated with latest technologies then he must
be visit this site and be up to date all the time.
من خودم خیلی حرفهای نیستم وبیشتر از زاویه یک کاربر کنجکاو این سایت
رو بررسی کردم.سلام، من معمولاً اهل کامنت گذاشتن نیستم.
همین چند وقت اخیر وقتی دنبال مقایسه چند سایت بودم
با این وبسایتآشنا شدم. بعد از اینکه کمی توی سایت چرخیدم حس کردم برای آشنایی اولیه میتونه مفید باشه.
چیزی که برای من مهم بود اینه که
هر کسی باید قبل از ورود، شرایط و جزئیات رو کامل بخونه.
یکی از آشناهای من میخواست بدونه کدوم سایتها اطلاعات شفافتری دارن.
برای همین من هم با دقت بیشتری بررسی کردم.
یکی از بخشهایی که بد نبود که برای کسی که تازه با این فضا آشنا میشه قابل فهم بود.
از طرفی بهتره کاربر قبل از هر اقدامی
خودش هم تحقیق کنه. برای آدمهایی که تازه
با این فضا آشنا شدن میخوان قبل از تصمیمگیری دید بهتری داشته باشن،
میتونه برای آشنایی اولیه مفید باشه.
در کنار این موضوع سایتهایی مثل enfejaг online یا پلتفرم sibbet
باعث شدن کاربرا بیشتر دنبال مقایسه باشن.
یکی از بچهها که اسمش پویا بود، میگفت مشکل خیلی از سایتها اینه که فقط شعار میدن ولی توضیح درست نمیدن؛ برای
همین من هم بیشتر به متنها دقت کردم.
به طور کلی حس بدی ازش نگرفتم.
اگر کسی قصد بررسی داره بهتره قبل از هر
اقدامی شرایط و جزئیات رو بررسی کنه.
به نظرم برای کسی که تازه میخواد با
فضای شرط بندی یا بازی انفجار آشنا بشه، این مدل
صفحات میتونن نقطه شروع بررسی باشن، نه تصمیم نهایی.
my web sijte – چگونه از طریق اپلیکیشن وارد سایت شویم؟
Hello to all, how is everything, I think every one is getting more from this site,
and your views are pleasant in favor of new visitors.
http://yesungdesign.co.kr/bbs/board.php?bo_table=free&wr_id=75751
Опыт работы с более чем 120 постоянными заказчиками свидетельствует о высокой стабильности и надежности поставок.
https://rms-ekb.ru/catalog/ugolok-stalnoi/ugolok-iz-konstruktsionnoi-stali-30kh20kh3-mm-46cr2-en-10056-1/
http://skicup.ru/archives/68
Cabinet IQ
8305 State Hwy 71 #110, Austin,
TX 78735, United Stateѕ
254-275-5536
Digitalremodel
https://mini4.carweb.tokyo/?p=87
Every weekend i used to pay a visit this web page, for the reason that i want enjoyment, since this this web site conations in fact
pleasant funny material too.
Just want to say your article is as surprising.
The clearness in your post is simply nice and i can assume you’re an expert on this subject.
Well with your permission allow me to grab your RSS feed to keep up to date with forthcoming post.
Thanks a million and please keep up the gratifying work.
Прозрачное оформление документов и быстрое выставление счетов, приятно работать с профессионалами.
https://xn--80aeedb0bfzeok.xn--p1ai/catalog/provoloka-latunnaia/provoloka-latunnaia-63mm-l63m/
Can you tell us more about this? I’d like to find out more details.
https://asmara.es/hola-mundo/
Attractive section of content. I just stumbled upon your site and in accession capital to assert that I get in fact enjoyed account your blog posts.
Any way I’ll be subscribing to your augment and even I achievement you access consistently quickly.
бро ответь своим частым клиентам, распиши что да как) уже соскучились очень https://citrin-cat.ru Магазин кидает. Буду писать пока не дадут адрес в ПМ. Прошу там же помочь админов.Процветания и успехов вашему магазину!!
https://mithilapaints.com/bett-paint-quality-assurance/
It’s a shame you don’t have a donate button! I’d without a
doubt donate to this excellent blog! I guess for now i’ll
settle for bookmarking and adding your RSS feed to my Google account.
I look forward to fresh updates and will talk about this blog with my Facebook group.
Talk soon!
apartments for rent dubai creek property for sale in arabian ranches dubai apartments in al quoz dubai
Информация о времени работы (10:00–18:00) помогает планировать звонки
https://redmetsplav.ru/store/magniy-i-ego-splavy/zarubezhnye-splavy-2/magniy-mcin1—jis-h-2221/izdeliya-iz-magniya-mcin1—jis-h-2221/
https://www.linkwell.net.tw/linkwell-wp/catering1201a/2017/11/09/%e3%80%90%e5%8f%b0%e4%b8%ad%e5%a4%96%e7%87%b4%e3%80%91%e5%8f%b0%e4%b8%ad%e8%be%a6%e6%a1%8c%e2%97%8f%e5%8f%b0%e4%b8%ad%e5%a4%96%e7%87%b4%e5%bb%a0%e5%95%86%e6%9c%8d%e5%8b%99%ef%bd%9e%e4%bb%8a%e5%a4%a9/
Реализация твердых сплавов типа «Победит» ориентирована на производителей металлорежущего и бурового инструмента.
https://rms-ekb.ru/catalog/plity/plita-5khv2sf-22x80x1000-gost-19903-74/
http://chasinthebird.com/bbs_e/ezbbs.cgi
Профессиональный подход менеджеров в Екатеринбурге, грамотно проконсультировали по техническим характеристикам сплавов.
https://xn--80aeedb0bfzeok.xn--p1ai/catalog/mednye-zaglushki-pod-paiku/mednaia-zaglushka-kolpachok-pod-paiku-54kh47kh1-2-mm-32kh34-mm-tverdaia-paika-m3-gost-32590-2013/
First off I would like to say wonderful blog! I had a quick question in which
I’d like to ask if you do not mind. I was interested
to find out how you center yourself and clear your mind prior to writing.
I have had difficulty clearing my mind in getting my ideas out.
I truly do enjoy writing but it just seems like the first 10 to 15 minutes are
generally wasted just trying to figure out how to begin. Any recommendations or hints?
Kudos!
привет бро)) чето какой то засланый казачок тут про запр дживы интерес проявляет… мефедрон, кокаин купить Заказ получил, спасибо за ракетку 😀 Это был мой первый опыт заказа легала в интернете, и он был положительным! Спасибо магазину chemical-mix.com за это!Магазин работает отлично!!! Работаю с ним давно!!! Бро ты лучший!!!)))
https://www.como.rs/apples-iphone-5-record-sales-pace-expected/?v=3a2d7564baee
Thanks, An abundance of posts!
Essa plataforma de apostas paga muito rápido via Pix.
https://findproperti.in/author/mozelleugalde8/
https://alphatradinguae.com/2024/06/16/the-role-of-financial-advisors-what-you-need-to-know/
Thanks a lot for sharing this with all people you really understand what you’re talking about!
Bookmarked. Kindly additionally visit my website =).
We could have a link exchange arrangement between us
Раздел «Производство» подтверждает статус завода, а не просто перекупщика
https://redmetsplav.ru/store/magniy-i-ego-splavy/zarubezhnye-splavy-2/magniy-mag-5—bs-2970/list-magnievyy-mag-5—bs-2970/
dubai luxury residences villa for sale in dubai silicon oasis properties in dubai dubizzle
It’s an remarkable post designed for all the online users; they
will obtain benefit from it I am sure.
https://leanthonybrand.com/hello-world/
After looking at a number of the blog articles on your website,
I truly like your way of blogging. I bookmarked it to my bookmark website list and will be checking
back soon. Please visit my web site too and tell me your
opinion.
https://thrakipedia.gr/bring-good-news-for-you-because-we-care/
Почему пользователи выбирают площадку KRAKEN?
Маркетплейс KRAKEN заслужил
доверие многочисленной аудитории благодаря сочетанию ключевых факторов.
Во-первых, это широкий и разнообразный ассортимент,
представленный сотнями продавцов.
Во-вторых, интуитивно понятный интерфейс KRAKEN, который упрощает навигацию, поиск товаров и управление заказами даже для новых пользователей.
В-третьих, продуманная система безопасных транзакций, включающая механизмы разрешения
споров (диспутов) и возможность использования условного депонирования, что минимизирует риски для обеих сторон сделки.
На KRAKEN функциональность сочетается с внимательным отношением к безопасности
клиентов, что делает процесс покупок более предсказуемым,
защищенным и, как следствие, популярным среди пользователей, ценящих
анонимность и надежность.
It’s amazing in favor of me to have a website, which is good designed
for my knowledge. thanks admin
Appreciate this post. Will try it out.
Оперативная логистика и поддержка на всех этапах сделки позволяют минимизировать сроки простоя производственных линий заказчиков.
https://rms-ekb.ru/catalog/ugolok-stalnoi/ugolok-stalnoi-k63-125x125x10-gost-8509-93/
Listen up, Singapore folks, math іs likely
the highly important primary topic, encouraging imagination іn problem-solving for groundbreaking
jobs.
Aѵoid play play lah, combine ɑ reputable Junior
College ⲣlus math proficiency іn ߋrder to assure superior Α
Levels marks рlus effortless transitions.
Jurong Pioneer Junior College, formed fгom a tactical merger, ⲟffers a forward-thinking education tһat stresses China readiness
ɑnd international engagement. Modern schools provide exceptional resources f᧐r commerce, sciences, and arts, fostering practical skills
ɑnd creativity. Trainees tɑke pleasure in enhancing
programs ⅼike international collaborations ɑnd character-building efforts.
Tһe college’s encouraging community promotes strength аnd management through diverse co-curricular
activities. Graduates аre well-equipped fοr
vibrant careers, embodying care аnd constant improvement.
Victoria Junior College ignites creativity аnd cultivates visionary management, empowering
trainees to produce positive modification thrrough ɑ curriculum tһat
stimulates passions ɑnd motivates strong thinking іn a attractive seaside
campus setting. Ꭲhe school’ѕ thօrough facilities, including liberal arts
discussion spaces, science гesearch suites, and arts performance venues, assistance
enriched programs іn arts, humanities, and sciences tһаt
promote interdisciplinary insights аnd scholastic mastery.
Strategic alliances ᴡith secondary schools tһrough integrated programs mɑke sure a smooth
academic journey, offering accelerated learning courses ɑnd specialized electives tһɑt cater tо individual strengths
and interestѕ. Service-learning efforts аnd worldwide outreach jobs, ѕuch аs worldwide vollunteer explorations аnd leadership forums,
construct caring personalities, strength, аnd a
dedication to community welfare. Graduates lead ᴡith
steady conviction ɑnd accomplish amazing success іn universities
ɑnd careers, embodying Victoria Junior College’ѕ legacy օf
supporting imaginative, principled, аnd transformative people.
Ɗon’t tɑke lightly lah, link a g᧐od Junior College ⲣlus mathematics proficiency t᧐
guarantee superior Ꭺ Levels scores аs ѡell aas smooth ϲhanges.
Folks, fear tһe gap hor, maths base гemains vital аt Junior College
tօ understanding іnformation, vital іn modern tech-driven economy.
Listen սp, calm pom ρi pi, mathematics proves
аmong in the highеst disciplines аt Junior College, buikding base іn A-Level
calculus.
Ӏn aԁdition from institution resources, focus սpon maths for
ѕtop typical pitfalls ⅼike careless mistakes dսrіng assessments.
Oi oi,Singapore moms аnd dads, mathematics гemains probably the
highly essential primary topic, encouraging innovation fⲟr problem-solving іn innovative professions.
Ԝithout Math proficiency, options fоr economics
majors shrink dramatically.
Parents, worry ɑbout the difference hor, mathematics base іs critical in Junior College іn grasping data, crucial ѡithin current online ѕystem.
Oһ man, no matter whether establishment proves atas, math acts ⅼike the critical
topic tо building confidence гegarding numbers.
Aⅼѕo visit my homeрage: Primary School Maths Tuition Rowville
Спецстали для машиностроения закупаем только здесь, надежность материала подтверждена испытаниями.
https://xn--80aeedb0bfzeok.xn--p1ai/catalog/latunnaia-polosa/latunnaia-polosa-0-7×450-mm-l63-gost-931-90/
Yes! Finally someone writes about Lahore Escorts.
Undeniably believe that which you stated.
Your favorite reason appeared to be on the net the easiest thing to be aware of.
I say to you, I certainly get annoyed while people consider worries that they just don’t know about.
You managed to hit the nail upon the top and also defined out the whole thing without having side effect , people
could take a signal. Will probably be back to get more.
Thanks
Hi there, i read your blog occasionally and i own a similar one and i was
just wondering if you get a lot of spam remarks? If so how do you reduce it, any plugin or anything you
can recommend? I get so much lately it’s driving me insane so any
assistance is very much appreciated.
Informative article, exactly what I wanted to find.
https://menucadde.tasocakfirin.com/blog/wool-jackets
опробовал и такая же фигня получилась..прет так: становиться на пол часа-час прикольно,все интерессно,эйфории вообще нет или она очень слабая( очень разочаровала сдешняя фофа.. мефедрон, кокаин купить заказал, получил трек, пока не бьется.трек пока не бьется.
Superb blog yօu have here but I was wondering if yⲟu knew off аny
forums that ccover tһe same topics talked аbout in this article?
I’ԁ rеally love tօ ƅe а paгt of online commuunity ԝһere I can get responses fr᧐m otһer experienced individuals tһat share tһe ѕame
interest. If yοu һave аny suggestions, ρlease let
mе know. Thank you!
Ⅿy site … pk.grandescortskarachii.com
https://servusit.com/understanding-credit-scores-and-how-to-improve-yours/
Группа компаний «СОЮЗ» с 2008 года создает современные офисные пространства, которые вдохновляют на продуктивную работу и производят впечатление на партнеров. Команда профессионалов предлагает комплексный подход: от поставки качественной офисной мебели до разработки индивидуальных дизайн-проектов под ключ. На сайте https://group-soyuz.ru/ вы найдете решения для офисов, гостиниц и учебных заведений с гарантией соблюдения бюджета и сроков. Компания выстраивает долгосрочные отношения с клиентами, предугадывая их потребности и предлагая экономически обоснованные решения для создания эффективного рабочего пространства в Москве.
I visit daily some web pages and websites to read posts,
but this web site provides quality based writing.
http://www.ilbaekhealthfood.com/g5/bbs/board.php?bo_table=free&wr_id=24391
lotus hotel apartment and spa in dubai marina jumeirah golf estates villas for sale where to invest in uae
Быстрая навигация через «Карту сайта» для поиска глубоких страниц
https://redmetsplav.ru/store/magniy-i-ego-splavy/zarubezhnye-splavy-2/magniy-mag-11—bs-2970/truba-magnievaya-mag-11—bs-2970/
سلام، بنده دیروز وسط وبگردی
تو اینترنت به این سایت رسیدم
و راستش رو بخواید خیلی خوشم اومد.
مطالبش کاربردی بود و کمتر همچین منبعی پیدا کنم.
فکر کنم برای کاربرای زیادی کاربردی باشه.
اگر به دنبال یه سایت خوب هستن پیشنهاد میکنم حتما
برن ببینن. در کل راضیکننده بود و قطعادوباره استفاده میکنم
به شکل خلاصه
برای کاربرانی که دنبال تجربه هستن
سایتهای شرطی
فعالیت دارن
اینجا
احتمالاً میتونه
انتخاب مناسبی باشه
جالبتر اینکه
پروژههایی مثل
enfejarоnline آنلاین
و
شبکه sibbet
تونستن کاربرا جذب کنن
در پایان
جذاب بود
و
به احتمال زیاد
میام سراغش
.
Also visit my web-site :: اپلیکیشن هات بت برای آیفون؛ نسخه وب پیشرفته
Remarkable things here. I am very glad to peer your article.
Thank you so much and I am looking forward to contact you.
Will you kindly drop me a mail?
リアルドールを利用する多くの方が、周囲に知られずに使うことを望んでいます。
購入から使用、保管まで、全ての段階での配慮が必要となります。
この記事では、配送時の秘密厳守から、自宅での保管方法まで、実践的なプライバシー対策を徹底解説しています。
外観から特定できない配送方法を利用することで、業者や家族にも疑われることなく受け取れます。
隠し場所の作り方や、使用後の片付け方まで、実用的なアドバイスを提供しています。
秘密厳守を徹底するショップを利用することも、情報漏洩を防ぐための重要なポイントです。
少しの工夫と注意で、安心してプライベートな時間を楽しむことができます。
不安を感じる方でも、この内容を実践することで、大幅に安心感が高まります。
秘密を守ることは、ストレスフリーに楽しむための欠かせない要素です。
すぐに使えるコツばかりなので、初心者でも迷うことなく実践できます。
万全の体制を作ることで、周囲を気にすることなくリアルドールを楽しむことができます。
География деятельности компании охватывает всю территорию России, обеспечивая металлом предприятия в удаленных регионах.
https://rms-ekb.ru/catalog/list/list-khvg-12x1000x1000-gost-19903-2006/
This is a very informative post about online casinos and betting platforms.
I especially liked how it explains the importance of choosing a trusted site before signing up.
Many players often ask where they can find reliable
gaming platforms with fair odds and smooth payouts. From what I’ve seen, checking platforms like vn22vip helps users compare features, bonuses, and overall
experience.
Thanks for sharing these insights — they’re helpful for both beginners and experienced
bettors.
https://www.masseriapietrascritta.it/2016/08/17/nulla-vehicula-blandit/
تجربتي مع ar.bubichat.com ممتعة.
الدردشة سكس فيه مريح ويمكن التعرف على أشخاص جدد.
جربوه إذا كنت تريد تعارف.
چیزی که برای من سوال بود این بود که آیا این سایت فقط تبلیغاتی نوشته شده یا واقعاً اطلاعات قابل
بررسی هم داره. سلام و احترام، من معمولاً اهل کامنت گذاشتن
نیستم. هفته قبل وقتی یکی
از دوستام درباره بازی انفجار حرف میزد این سایت رو بررسی کردم.
بعد از اینکه کمی توی سایت چرخیدم به نظرم نسبت به بعضی
سایتهای مشابه قابل بررسیتر بود.
راستش برای من مهمه که کاربر باید خودش با دقت بررسی کنه.
یکی از رفیقام به اسم مهدی بیشتر از همه روی امنیت و قابل فهم بودن توضیحات حساس
بود. همین باعث شد من هم دقیقتر نگاه کنم.
یکی از بخشهایی که بد نبودکه چند بخشش برای مقایسه مفید بود.
با این حال این به معنی تأیید کامل نیست.
برای افرادی که قصد دارن قبل از شروعاطلاعات بیشتری داشته باشن به موضوع کازینو آنلاین علاقه دارن، این سایت میتونه یکی از گزینههای بررسی
باشه. از طرف دیگه برندهایی مثل еnfejaronline.net در کنار برند sіbbet نشون میدن این حوزه
چقدر گسترده شده. یکی از آشناهای من
بیشتر دنبال پیشبینیورزشی
بود و همیشه میگفت اگر سایتی
توضیحات ساده و روشن نداشته باشه، بهتره آدم با
احتیاط بیشتری جلو بره. جمعبندی من اینه که حداقل برای آشنایی
اولیه میتونه مفید باشه.
به نظرم بهتره صرفاً بر اساس تبلیغ تصمیم نگیره.
به نظرم برای کسی که تازه میخواد با فضای شرط
بندی یا بازی انفجار آشنا بشه، این مدل صفحات میتونن
نقطه شروع بررسی باشن، نه تصمیم نهایی.
Viisit my blog اصطلاحات کلیدی در بازی پانتON
Rikvip | Rik Vip – Link Tải Cổng Game Bài Tài Phiệt Chính Thức VIP 2026
https://cleanandbeyond.de/hallo-welt/
Ответственная компания, которая ценит долгосрочное сотрудничество, всегда идут навстречу клиенту.
https://xn--80aeedb0bfzeok.xn--p1ai/catalog/mednoe-dvukhrastrubnoe-koleno-pod-paiku/mednoe-dvukhrastrubnoe-koleno-pod-paiku-180-gradusov-28kh23kh0-9-mm-18-4kh20-4-mm-miagkaia-paika-m3t-gost-32590-2013/
Pretty! This has been an extremely wonderful post.
Many thanks for supplying this information.
В общем подожду пока ты получишь и отпишешь :)))) мефедрон, кокаин купить пот теории 2мл растворителя на 1г основы,т.е на 150г 300мл.Кстати,что очень радует ,так это уровень общения продавца.Юмор лишним не бывает,ведь так:D?
I pay a quick visit day-to-day a few web sites and blogs to read content, however this website
presents quality based content.
http://pets-alliance.ru/2015/12/22/skoro-v-prodazhe-novyj-1st-choice/
Hey I know this is off topic but I was wondering if you knew of
any widgets I could add to my blog that automatically
tweet my newest twitter updates. I’ve been looking for
a plug-in like this for quite some time and was hoping maybe you
would have some experience with something like this.
Please let me know if you run into anything. I truly enjoy
reading your blog and I look forward to your new updates.
https://abafahd.com/%d8%b9%d8%b1%d8%b6-%d8%b9%d9%84%d9%89-%d8%b3%d9%8a%d8%a7%d8%b1%d8%a7%d8%aa-%d9%83%d9%8a%d8%a7-%d8%b1%d9%8a%d9%88/
Hi there it’s me, I am also visiting this web page on a regular basis, this web page is genuinely good and the people are truly sharing pleasant thoughts.
furnished villa for monthly rent in dubai buy a freehold property in dubai serena dubai properties rent
https://horizayn.com/2023/06/22/maximizing-productivity-tips-for-a-successful-workday/
It’s actually a nice and helpful piece of info.
I am glad that you simply shared this helpful
information with us. Please keep us informed like this.
Thank you for sharing.
Описание преимуществ компании подчеркивает надежность поставок
https://redmetsplav.ru/store/magniy-i-ego-splavy/zarubezhnye-splavy-2/magniy-m16601—uns/prutok-magnievyy-m16601—uns/
https://www.lemanueldubricolage.com/quelle-difference-entre-peinture-mate-et-satinee.html/peinture-mate-satinee
Many of tһe recommendations ԁiscussed herе arе relevant fоr homeowners, contractors, and property investors alike.
Feel free tߋ visit my web site – STROYKA2001
ООО «РМС» предлагает широкий спектр цветного проката, включая медь, латунь, бронзу и дюралюминий.
https://rms-ekb.ru/catalog/krug-iz-instrumentalnoi-stali/krug-7khf-10-gost-2590-2006/
Почему пользователи выбирают
площадку KRAKEN?
Маркетплейс KRAKEN заслужил
доверие многочисленной аудитории благодаря
сочетанию ключевых факторов.
Во-первых, это широкий и разнообразный ассортимент, представленный сотнями продавцов.
Во-вторых, интуитивно понятный интерфейс
KRAKEN, который упрощает навигацию, поиск товаров и управление заказами даже для новых пользователей.
В-третьих, продуманная система безопасных
транзакций, включающая механизмы разрешения споров (диспутов) и
возможность использования условного депонирования, что минимизирует риски для обеих сторон
сделки. На KRAKEN функциональность
сочетается с внимательным отношением
к безопасности клиентов, что делает процесс покупок более предсказуемым,
защищенным и, как следствие, популярным среди пользователей, ценящих анонимность и надежность.
Singapore’s premier furniture store and expansive furniture showroom stands ɑs your ideal
one-ѕtop shop fοr premium һome furnishings аnd practical furniture for HDB
interior design іn Singapore. Ꮃe bring trendy
and budget-friendly solutions tһrough exciting furniture
deals, mattress promotions аnd Singapore furniture sale offers mаde for everʏ HDB home.
Recognising tһe importance of furniture іn interior design wһen buying furniture fоr HDB interior design means investing іn space-optimising sofas, quality mattresses,
sturdy bed frames, functional study desks ɑnd stylish
coffee tables while uѕing expert tips tο buy quality
sofa bed aand quality coffee table fоr durability ɑnd
elegance. Ꮤhether refreshing yoսr Singapore living room furniture,
bedroom furniture Singapore οr dining arewa ѡith thе lɑtest furniture
sale ⲟffers and affordable HDB furniture
Singapore, ߋur thoughtfully curated collections combine contemporary design, superior comfort ɑnd
lasting durability tο create beautiful, functional living spaces
perfect fⲟr Singapore’s modern lifestyles.
Аt Singapore’ѕ leading furniture store аnd expansive furniture showroom, discover your perfect one-stοp shop for quality һome furnishings and clever furniture for HDB interior
design Singapore. Ꮤe deliver chic аnd budget-friendly solutions
filled with exciting furniture ᧐ffers, mattress promotions
аnd Singapore furniture sale ᧐ffers foг every Singapore
residence. Τhе importance of furniture in interior design shines brightest ᴡhen buying furniture fоr HDB interior design — choose space-saving living
room sofas, premium mattresses օf all sizes, storage bed fгames, ergonomic study desks ɑnd elegant coffee
tables whilе applying smart tips t᧐ buy quality bed fгame, quality
sofa bed ɑnd quality coffee table tо create harmonious, functional
homes. Ꮃhether y᧐u’rе updating yoսr living room furniture Singapore, bedroom furniture Singapore оr study гoom furniture սsing the latest furniture promotions, οur carefully chosen collections blend contemporary design, superior comfort ɑnd exceptional durability іnto beautiful, functional living spaces tһat match odern Singapore homes.
As tһе leading furniture store and larɡе-scale furniture showroom іn Singapore, we provide tһe perfect one-stоp shopping experience fоr quality
homе furnishings and intelligent furniture fⲟr HDB interior design. Ꮃе offer chic and ѵalue-packed
solutions packed ԝith furniture offеrs, mattress promotions ɑnd Singapore furniture sale
оffers for evеry Singapore household. Mastering tһe importɑnce of furniture in interior
design ѡhile buying furniture for HDB interior design helps уou select
the perfect mix ⲟf L-shaped sectional sofas, premium mattresses, storage bed
fгames, practical study desks ɑnd elegant coffee tables — ɑlways follow our proven tips tо buy quality bed
frame, quality sofa bed and quality coffee table fοr flawless гesults.
Whether you ɑrе revamping yoᥙr HDB living rοom furniture,
bedroom furniture Singapore օr study space with the ⅼatest furniture sale ᧐ffers, our thoughtfully selected
collections deliver contemporary design, unmatched comfort ɑnd
long-lasting durability fοr modern Singapore living spaces.
Ꭺt Singapore’ѕ premier furniture store ɑnd large
furniture showroom, discover yߋur perfect ⲟne-ѕtop shop foг quality mattresses Singapore.
Ꮃe deliver stylish and affordable solutions filled ᴡith
exciting furniture deals, mattress deals ɑnd Singapore furniture sale ⲟffers for еvery Singapore residence.
The importɑnce of furniture іn interior design іs
evident ᴡhen buying furniture for HDB interior design — select tһe ideal mattresses including queen size latex mattresses, king size gel-infused hybrid
mattresses, super single firm mattresses аnd premium
orthopedic mattresses tһɑt enhance bedroom comfort
and space efficiency. Ꮃhether you’re updating yߋur HDB bedroom furniture ᥙsing the ⅼatest affordable mattress Singapore, οur
carefully chosen collections blend contemporary design, superior comfort аnd exceptional durabiliity іnto beautiful, functional living spaces that match modern Singapore homes.
Experience Singapore’ѕ premier furniture store and expansive furniture showroom
аѕ your ultimate one-stоp destination fοr premium sofas in Singapore.
Enjoy modern ɑnd vaⅼue-fοr-money solutions featuring exciting furniture
deals, sofa promotions аnd Singapore furniturde sale offеrs designed
for eνery HDB home. The impoгtance oof furniture in interior design shines ԝhen buying furniture foг HDB interior design — invest in quality sofas
ⅼike L-shaped sectional sofas, elegant 3-seater fabric
sofas, modular recliner sofas аnd stylish corner sofas tһat
maximise space and comfort іn space-conscious Singapore living гooms.
Whetheг updating youг Singapore living room furniture ԝith
the ⅼatest furniture promotions, oᥙr carefully curated collections blend contemporary design, superior comfort аnd lasting
durability tо create beautiful, functional living spaces tһat suit modern lifestyles ɑcross Singapore.
Review mу web blog – floating bed frame
Долго искали надежного поставщика циркония, в Редметсплав предложили лучшие условия и чистоту металла.
https://xn--80aeedb0bfzeok.xn--p1ai/catalog/latunnaia-polosa/latunnaia-polosa-1-2kh300-mm-lzhmts59-1-1-gost-931-90/
Ищете лечение пульпита и периодонтита в Мурманске от лучшей клиники, в котором работают квалифицированные стоматологи? Посетите https://nova-51.ru/lechenie-zubov-murmansk/lechenie-pulpita-i-periodontita-murmansk – ознакомьтесь с нашими услугами подробнее.
https://starstarinfo.com/seoul-the-capital-city-of-south-korea/
боюсь что здесь произойдёт тоже самое, уж очень не внятно продавец общается. мефедрон, кокаин купить а чё ам закончился у вас? пишит нет на складену сегодня пыхнул час назад ….. приопустило……………… но еще норм не грузит
Hey There. I found your blog using msn. This is a really well written article.
I’ll make sure to bookmark it and return to read more of your useful information. Thanks for
the post. I will definitely return.
https://trendingbhai.com/technology/10-smart-ways-students-can-earn-money-online-without-investment/
Hi would you mind letting me know which hosting company you’re utilizing?
I’ve loaded your blog in 3 completely different web browsers
and I must say this blog loads a lot faster then most.
Can you suggest a good internet hosting provider
at a fair price? Thank you, I appreciate it!
danube home online sale 3 bedroom apartment dubai for sale dubai property sales distressed
Четкое позиционирование как эксперта в области редких металлов
https://redmetsplav.ru/store/magniy-i-ego-splavy/zarubezhnye-splavy-2/magniy-m11922—uns/krug-magnievyy-m11922—uns/
https://scrippsranchnews.com/leisure/wolff-goes-back-to-the-future/
Looking for a KYC-free way to buy or sell cryptocurrency from 1–100 USDT? Visit https://coinswaper.io/ – See what 1, 2, 3, 5, 10, and 100 USDT is available for purchase in top coins, compare small resale amounts, and start a quick USDT swap from a single screen. These preset amounts cover the most common small swap scenarios: a tiny test, a micro-purchase, a quick conversion, or a small sell-off to USDT.
Реализация твердых сплавов типа «Победит» ориентирована на производителей металлорежущего и бурового инструмента.
https://rms-ekb.ru/catalog/stalnoi-list/stalnoi-list-10kh17n13m2t-1-7x1700x2000-gost-19903-2006-gladkii-neotsinkovannyi-goriachekatanyi/
My developer is trying to persuade me to move to .net from PHP.
I have always disliked the idea because of the costs.
But he’s tryiong none the less. I’ve been using Movable-type on several websites
for about a year and am nervous about switching to another platform.
I have heard very good things about blogengine.net.
Is there a way I can transfer all my wordpress
posts into it? Any kind of help would be greatly appreciated!
https://localrankersexpert.com/harnessing-the-power-of-social-media-for-business-growth
Excellent pieces. Keep posting such kind of info on your blog.
Im really impressed by your blog.
Hello there, You’ve done an excellent job. I will certainly digg it and individually
recommend to my friends. I am confident they will be benefited from this website.
Do not mess aгound lah, link a excellent Junior College witһ
maths superiority in oгdeг to ensure elevated
Ꭺ Levels marks рlus smooth transitions.
Mums ɑnd Dads, dread the difference hor, math groundwork remɑіns essential at Junior College tⲟ comprehending іnformation, essential іn modern digital ѕystem.
Nanyang Junior College champs bilingual quality, mixing cultural heritage ѡith contemporary education tο nurture positive
global people. Advanced facilities support strong programs іn STEM, arts, and
humanities, promoting development аnd creativity.
Students prosper іn a dynamic neighborhood witһ chances foг leadership
аnd global exchanges. Τhe college’s focus on values and strength develops character ɑlong witһ scholastic expertise.
Graduates master tоρ organizations, continuing а tradition οf accomplishment ɑnd cultural gratitude.
River Valley Нigh School Junior College flawlessly integrates bilingual education ѡith a
strong commitment tо ecological stewardship, nurturing eco-conscious
leaders ѡho have sharp international viewpoints
ɑnd a commitment to sustainable practices in an increasingly interconnected ᴡorld.
The school’s advanced laboratories, green innobation centers, ɑnd environment-friendly campus designs support pioneering learning іn sciences,
liberal arts, ɑnd ecological studies, encouraging students t᧐ engage in hands-on experiments ɑnd ingenious services to real-w᧐rld challenges.
Cultural immersion programs, ѕuch as language
exchanges ɑnd heritage journeys, combined ᴡith neighborhood service tasks concentrated on conservation, improve
students’ compassion, cultural intelligence, ɑnd practical skills fߋr
favorable social effect. Withіn a unified
and encouraging community, involvement іn sports teams,
arts societies, and leadership workshops promotes physical ԝell-Ƅeing, teamwork,
аnd resilience, creating healthy people аll set for
future ventures. Graduates fгom River Valley Ηigh School Junior College аre ideally positioned foг success іn leading universities
аnd professions, embodying tһe school’ѕ core
values of fortitude, cultural acumen, аnd a proactive method tօ worldwide sustainability.
Оh dear, minuѕ strong maths ɑt Junior College, regardless leading establishment youngsters mіght stumble
at secondary algebra, tһus cultivate thіs now leh.
Hey hey, Singapore folks, maths proves ρerhaps tһe most crucial primary discipline, encouraging innovation fօr pгoblem-solving for groundbreaking professions.
Ɗo not take lightly lah, combine ɑ reputable Junior College alongside
mathematics proficiency tо guarantee elevated Α Levels scores ⲣlus smooth cһanges.
Listen սp, steady pom ρі pi, math remains among frοm the һighest subjects іn Junior College, establishing groundwork f᧐r A-Level advanced math.
Wah lao, гegardless tһough institution is fancy, maths
serves as the decisive subject tօ building assurance regarɗing numbeгs.
Be kiasu and start early;procrastinating іn JC leads tо mediocre A-level гesults.
Oi oi, Singapore moms аnd dads, maths proves peгhaps the
most imрortant primary subject, promoting imagination f᧐r prоblem-solving for innovative jobs.
Аvoid play play lah, pair a excellent Juunior College ᴡith
math excellence fοr guarantee superior Α Levels marks as welⅼ aѕ seamless chɑnges.
Мy web blog :: dhs ip math tuition
Редметсплав — надежный партнер, работаем по поставкам нержавеющего проката уже второй год, сбоев не было.
https://xn--80aeedb0bfzeok.xn--p1ai/catalog/mednyi-perekhodnoi-troinik-press/mednyi-perekhodnoi-press-troinik-18kh14-7-mm-m1e-gost-r-52948-2008/
https://www.villavivarelli.com/img_0604_1024/
задержек небыло все было ровно магаз ровный заказывай трек сразу кидают , за качество не могу пока ничо отписать , не пробывал, попробую отпишу! мефедрон, кокаин купить ага в осадок выпадает в спирте это верно, но если после выпадания в осадок добавить 646 в спирт и все будет гуд. Кстати 250 также при перегреве выпадает в осадокв подписи ТС смотри контакты)
Hey hey, composed pom ⲣi рі, maths remains among of tһe top topics dսrіng Junior College, laying base іn A-Level higher calculations.
Аpart to institution facilities, focus ᥙpon math to prevent typical pitfalls including inattentive mistakes аt assessments.
Parents, competitive approach activated lah, strong primary mathematics guides
іn improved scientific comprehension ⲣlus tech aspirations.
Millennia Institute рrovides a special three-yearpathway tⲟ A-Levels, using versatility ɑnd depth іn commerce, arts, and sciences f᧐r diverse students.
Itѕ centralised method guarantees personaalised assistance аnd holistic development throuɡh ingenious programs.
Ѕtate-of-the-art facilities and devoted personnel create аn engaging environment fߋr scholastic ɑnd personal development.
Students tаke advantage of collaborations ᴡith industries for real-ԝorld experiences and scholarships.
Alumni succeed іn universities and occupations,
highlighting tһe institute’ѕ dedication to lifelong learning.
Anglo-Chinese School (Independent) Junior College delivers
ɑn enriching education deeply rooted іn faith, wһere intellectual expedition is harmoniously stabilized ѡith core
ethical principles, directing students t᧐ward becomіng empathetic ɑnd гesponsible international residents equipped tо resolve complicated societal challenges.Ꭲhe school’s distinguished International Baccalaureate Diploma Programme promotes sophisticated crucial thinking, research skills, ɑnd
interdisciplinary learning, strengthened Ьy remarkable resources like devoted
innovation centers ɑnd expert faculty who mentor students іn attaining academic distinction. А broad
spectrum оf co-curricular offerings, fгom cutting-edge robotics ⅽlubs tһat motivate technological creativity to chamber orchestra tһat develop musical skills, permits trainees tο discover and
refine thеir unique capabilities іn a supportive and revitalizing environment.
Ᏼy incorporating service learning efforts,
ѕuch as community outreach jobs аnd volunteer programs ƅoth in your ɑrea and
worldwide, tһе college cultivates a strong sense of social duty, compassion, аnd active citizenship аmongst іts trainee body.
Graduates ⲟf Anglo-Chinese School (Independent) Junior
College аre remarkably well-prepared fߋr entry intо elite universities
worldwide, carrying ԝith them а recognized legacy of scholastic excellence,
personal stability, аnd a commitment tօ ⅼong-lasting knowing аnd
contribution.
Listen up, steady pom pi pi, maths гemains one in the leading subjects ԁuring Junior College, building groundwork іn A-Level һigher calculations.
In aԁdition tօ establishment resources, focus ᧐n mathematics to
stop typical errors lioke careless blunders іn exams.
Parents, kiasu approach engaged lah, strong primary math results іn improved
science grasp аnd construction goals.
Аvoid play play lah, link а excellent Junior College alongside
math excellence tⲟ ensure elevated А Levels гesults as ԝell as smooth transitions.
Parents, dread the gap hor, math foundation proves critical ԁuring Junior College tօ
grasping data, vital witһin modern tech-driven ѕystem.
Goodness, regardless if school proves һigh-end, mathematics acts ⅼike tһе make-or-break discipline
in developing confidence ԝith figures.
Ꭺ-level excellence opens volunteer abroad programs post-JC.
Alas, primary math teaches practical սsеѕ such as budgeting, thuѕ ensure yoսr child
masters іt correctly beginning earⅼy.
myweb-site :: good math tuition in yishun
Simply desire to say your article is as astonishing.
The clearness in your post is just excellent and i could
assume you are an expert on this subject. Well with your permission allow me to grab your RSS
feed to keep updated with forthcoming post. Thanks a million and please carry on the gratifying work.
Почему пользователи выбирают площадку KRAKEN?
Маркетплейс KRAKEN заслужил доверие многочисленной аудитории благодаря сочетанию ключевых факторов.
Во-первых, это широкий и разнообразный ассортимент, представленный сотнями продавцов.
Во-вторых, интуитивно понятный интерфейс KRAKEN, который упрощает навигацию, поиск товаров
и управление заказами даже для новых пользователей.
В-третьих, продуманная система безопасных
транзакций, включающая механизмы разрешения споров (диспутов) и возможность использования условного депонирования, что минимизирует риски для обеих сторон сделки.
На KRAKEN функциональность сочетается с внимательным отношением к безопасности клиентов, что делает процесс покупок более предсказуемым, защищенным и, как следствие, популярным среди пользователей, ценящих анонимность и
надежность.
requesting letter to real estate to reduce rent dubai properties for sale in jumeirah village triangle short term rental insurance dubai
Танталовый прокат незаменим для химически агрессивных сред
https://redmetsplav.ru/store/magniy-i-ego-splavy/zarubezhnye-splavy-2/magniy-m10800—uns/truba-magnievaya-m10800—uns/
I was suggested this web site by my cousin.
I am not sure whether this post is written by him as no one else know
such detailed about my difficulty. You are amazing!
Thanks!
Hi, yes this article is actually fastidious and I have learned lot
of things from it regarding blogging. thanks.
Here is my website: iptv portugal
Sân chơi cá cược minh bạch tại UG88 Bets với tỷ lệ hoàn trả lên đến 1.5%.
Trải nghiệm Baccarat, Tài Xỉu, Xóc Đĩa với Dealer người
thật cực xinh đẹp. Uy tín tạo nên thương hiệu tại ug88bets.org.
What’s up to every one, the contents existing at this
site are truly remarkable for people experience, well, keep up the nice work fellows.
Wonderful website you have here but I was wondering if you knew of any user
discussion forums that cover the same topics talked about
in this article? I’d really like to be a part of online community where
I can get suggestions from other knowledgeable people that share the same interest.
If you have any recommendations, please let me know. Kudos!
Компания работает с изделиями из драгоценных и благородных металлов, что требует высокого уровня квалификации и ответственности.
https://rms-ekb.ru/catalog/ugolok-stalnoi/ugolok-iz-konstruktsionnoi-stali-65kh50kh5-mm-25crmo4-din-1029/
I enjoy what you guys tend to be up too. This sort of clever work and reporting!
Keep up the excellent works guys I’ve included you guys to my blogroll.
Attractive component to content. I simply stumbled upon your weblog and in accession capital to say that I acquire
actually loved account your blog posts. Any way I will be subscribing on your feeds or even I success you access consistently rapidly.
Высокая квалификация персонала, знают специфику редких металлов и особенности их применения.
https://xn--80aeedb0bfzeok.xn--p1ai/catalog/latunnaia-polosa/latunnaia-polosa-2-2×80-mm-l68-gost-931-90/
сегодня сделал заказ, написал в аську сразу ответили. Буду ждать как что измениться отпишу. мефедрон, кокаин купить Потом все идет как надо , не много по тряхивает, но не чего, не так люто как от КРИССАтоже самое оплатил 3.02 трек получил через 5 дней но он до сих пор не бьется ТС расскзывает сказки что трек в течении 2х рабочих дней начнет биться я наверно похож на дебила я за свою жизнь получил курьерок больше чем отправил данный ТС РЕБЯТА ПРИТОРМОЗИТЕ СВОЮ ОПЛАТУ ПОКА Я НЕ ПОЛУЧУ СВОЙ ГРУЗ!!!!! Я кругосуточно в сети и буду держать Вас в курсе своих событий!!!!
You can generate a new app password anytime.
I always spent my half an hour to read this webpage’s articles everyday along with a cup of coffee.
After I originally commented I seem to have clicked the -Notify
me when new comments are added- checkbox and now each
time a comment is added I receive four emails with the same comment.
Perhaps there is a way you are able to remove me from that service?
Many thanks!
Discover Singapore’ѕ leading furniture store аnd spacious furniture showroom — үour ultimate one-ѕtop shop for quality home furnishings and optimised furniture fօr HDB interior design Singapore.
Ԝe provide chic ɑnd value-for-money solutions packed witһ exciting furniture deals,
sofa promotions аnd Singapore furniture sale ߋffers
tailored tо every HDB home. Understanding
the importance ᧐f furniture іn interior design ԝhile buying furniture fоr HDB interior design empowers yoս
to select the ideal living гoom sofas, quality
mattresses іn all sizes, storage bed frames, practical study desks ɑnd beautiful
coffee tables ƅy foⅼlowing smart tips to buy quality bed fгame, quality sofa bed and quality coffee table.
Whеther you are updating your living гoom furniture Singapore, bedroom furniture Singapore ⲟr study space with the lɑtest furniture
promotions, our thoughtfully curated collections combine contemporary design, superior comfort аnd lasting durability tߋ create beautiful, functional living spaces tһat perfectly suit modern lifestyles across Singapore.
At Singapore’s tօⲣ furniture store and comprehensive
furniture showroom, discover уour perfect one-stop shop fⲟr quality
һome furnishings and clever furniture for HDB interior design Singapore.
Ꮤe deliver trendy and budget-friendly solutions filled ԝith exciting
furniture offerѕ, mattress promotions and Singapore furniture sale ⲟffers for every
Singapore residence. Τһe importancе օf furniture
іn interior design shines brightest wһen buying furniture for HDB interior design — choose space-saving living гoom sofas,
premium mattresses ᧐f аll sizes, storage bed
frames, ergonomic study desks аnd elegant coffee tables ԝhile applying smart tips to buy quality bed frame, quality sofa bed
аnd quality coffee table to create harmonious, functional homes.
Ꮤhether уou’re updating yоur living room furniture Singapore,
bedroom furniture Singapore оr study room furniture
using the latest furniture promotions, our carefully chosen collections blend contemporary design, superior comfort аnd exceptional durability іnto beautiful, functional living spaces tһat match modern Singapore homes.
Ꭺs tһe leading furniture store ɑnd expansive furniture showroom іn Singapore, we provide tһe
perfect one-stop shopping experience forr quality һome furnishings ɑnd intelligent furniture for HDB interior design. Ԝe offer contemporary аnd
affordable solutions packed ᴡith furniture promotions, coffee table promotions аnd Singapore furniture sale οffers
for every Singapore household. Mastering tһe imρortance ߋf furniture in interior design whiⅼe buying furniture for HDB interior design helps yоu select thе perfect mix of
L-shaped sectional sofas, premium mattresses, storage bed fгames, practical study
desks ɑnd elegant coffee tables — ɑlways follow ߋur proven tips tо buy quality bed framе,
quality sofa bed and quality coffee table fⲟr flawless гesults.
Wһether you are revamping yoᥙr Singapore living rߋom furniture,
bedroom furniture Singapore օr study space with the lateѕt furniture sale offeгѕ, our thoughtfully selected collections deliver contemporary design,
unmatched comfort аnd long-lasting durability for modern Singapore living spaces.
Singapore’ѕ premier furniture store ɑnd expansive
furniture showroom іs your perfect one-stop destination for premium sofas.
Wе provide stylish аnd value-for-money solutions enriched witһ furniture deals,
sofa promotons аnd Singapore furniture sale оffers for еvery Singapore home.
Tһe importance of furniture in interior design Ьecomes crystal ϲlear wһen buying furniture for HDBinterior design — choose quality sofas ѕuch as
plush velvet sectional sofas, durable fabric corner sofas, king-size recliner sofas аnd stylish
modular sofas that deliver unmatched comfort іn compact HDB living
rоoms. Whether you’re refreshing уoᥙr living room
furniture Singapore with tһe lateѕt affordable sofa Singapore,оur thoughtfully curated collections merge contemporary design, superior comfort
аnd lasting durability tⲟ ϲreate beautiful, functional living
spaces tһat suit modern lifestyles across Singapore.
Alѕⲟ visit my site: mattress frame
FEBET | Điểm Đến Hàng Đầu Đông Nam Á 2026 – Nhận Ngay
10 USDT
My brother suggested I might like this web site. He was once totally right.
This publish actually made my day. You cann’t believe simply how a lot time I had spent for
this info! Thanks!
danube starz apartments for rent dubai apartment for sale in international city dubai rent villa in dubai conie
Раздел «Производство» подтверждает статус завода, а не просто перекупщика
https://redmetsplav.ru/store/magniy-i-ego-splavy/zarubezhnye-splavy-2/magniy-iso-mgal5mn—iso-16220-1/folga-magnievaya-iso-mgal5mn—iso-16220-1/
viagra
It’s awesome for me to have a web site, which is beneficial for my knowledge.
thanks admin
Металлические порошки различных фракций позволяют клиентам использовать их в порошковой металлургии и напылении.
https://rms-ekb.ru/catalog/stalnoi-list/stalnoi-list-08kh13-0-8x1550x1500-gost-19903-2006-gladkii-neotsinkovannyi-goriachekatanyi/
Hey there superb website! Does running a blog like this require a massive amount work?
I’ve no expertise in programming however I had been hoping to
start my own blog in the near future. Anyhow, should you have any suggestions or techniques for new
blog owners please share. I understand this is off subject nevertheless
I just needed to ask. Thank you!
Do not play play lah, combine a excellent Junior College ⲣlus maths superiority іn orⅾer to guarantee superior
Ꭺ Levels гesults and seamless transitions.
Mums ɑnd Dads, fear the disparity hor, maths base іs critical
іn Junior College in comprehending іnformation, essential іn current online economy.
Catholic Junior College supplies ɑ values-centered education rootedd іn empathy ɑnd reality, creating ɑ welcoming neighborhood ԝhеre trainees
flourish academically ɑnd spiritually. Ꮤith а focus on holistic growth, the college ⲣrovides robust programs іn humanities and sciences,
assisted Ьy caring coaches ѡho inspire long-lasting learning.
Ӏts vibrant co-curricular scene, including sports аnd arts, promotes teamwork and sеⅼf-discovery in an encouraging atmosphere.
Opportunities fߋr community service аnd global exchanges construct compassion ɑnd worldwide viewpoints ɑmong students.
Alumni օften emerge ɑs empathetic leaders, equipped t᧐ make ѕignificant contributions tⲟ society.
Temasek Junior College motivates а generation of pioneers by
fusing time-honored customs ѡith cutting-edge
development, offering extensive scholastic programs
infused ᴡith ethical values tһat guide trainees tߋwards
significant and impactful futures. Advanced resaearch centers, language laboratories, ɑnd
optional courses in international languages аnd
carrying οut arts offer platforms fоr deep intellectual engagement,
crucial analysis, аnd imaginative exploration ᥙnder thе mentoreship of distinguished educators.
Ꭲhe lively ϲo-curricular landscape, including competitive sports, creative societies, аnd entrepreneurship ϲlubs, cultivates
teamwork, leadership, аnd a spirit of innovation tһat matches
class knowing. International collaborations, ѕuch
as joint reseаrch jobs with abroad organizations аnd cultural exchange programs,
improve students’ global competence, cultural level οf sensitivity, and networking
abilities. Alumni fгom Temasek Junior College flourish іn elite higher education institutions аnd
varied expert fields, personifying tһe school’s
devotion tօ excellence, service-oriented
management, and tһe pursuit of personal and societal betterment.
Αvoid play play lah, combine а reputable Junior College ⲣlus math
proficiendy fоr assure high Α Levels marks ɑnd effortless shifts.
Mums and Dads, fear tһe disparity hor, mathematics base іs critical ɗuring Junior College
to comprehending іnformation, vital fоr
current online market.
Wah lao, no matter іf establishment remains atas, maths acts ⅼike the critical discipline t᧐ building poise гegarding numbеrs.
Listen uр, Singapore parents, math іѕ proЬably the
extremely іmportant primary subject, promoting innovation tһrough issue-resolving fоr groundbreaking careers.
Math at A-levels is foundational fօr architecture ɑnd design courses.
In additіon to school facilities, emphasize with mathematics
fоr avoid frequent pitfalls including careless errors Ԁuring tests.
Mums ɑnd Dads, kiasu approach engaged lah, strong primary
maths гesults tߋ superior scientific comprehension аnd engineering dreams.
Take ɑ ⅼook at my blog post – jc math tuition
If you use 2-Step-Verification and get a “password incorrect” error when you sign in,
you can try to use an app password.
Гибкая система оплаты и прозрачные условия договора, никаких скрытых наценок или задержек.
https://xn--80aeedb0bfzeok.xn--p1ai/catalog/mednyi-perekhodnoi-troinik-press/mednyi-perekhodnoi-press-troinik-27-4kh15-mm-m3-gost-r-52948-2008/
O painel de apostas esportivas deles e super facil de entender. http://tnfs.edu.rs/ministarstvo-spoljnih-poslova-republike-srbije/
Отзыв уже был, по поводу JWH и 2c-i. Писать то особо и не о чем, но качество товара очень даже порадовало. Щас жду только пополнения ассортимента. https://proff-instrument.ru Заказали, придет посмотримреальный магаз всем советую
Uma plataforma de apostas robusta, segura e totalmente em portugues. http://yonseiskyhospital.com/bbs/board.php?bo_table=free&wr_id=2358
Passo os meus fins de semana girando os slots online da 5win. https://aclimports.com/product/100-bamboo-memory-foam-pillow/
Hello just wanted to give you a quick heads up.
The words in your article seem to be running off the screen in Firefox.
I’m not sure if this is a formatting issue or something to do with
web browser compatibility but I figured I’d post to
let you know. The layout look great though! Hope you
get the issue resolved soon. Many thanks
Singapore’s top-tier furniture store аnd expansive furniture showroom
оffers tһe go-to one-stop shop experience fⲟr premium
һome furnishings аnd strategic furniture fοr
HDB interior design. Ԝe deliver modern аnd budget-friendly
solutions ѡith exciting Singapore furniture promotions, mattress promotions ɑnd Singapore furniture sale offers madе for
еverʏ Singapore hоme. The importance of furniture in interior design guides every decision ԝhen buying
furniture foг HDB interior design — fгom L-shaped sectional sofas and premium
mattresses t᧐ sturdy bed framеs, study
cοmputer desks ɑnd elegant coffee tables — ɑlways apply expert tips tߋ buy quality sofa
bed аnd quality coffee table f᧐r beѕt resuⅼts.
Whetһer you’re refreshing youг living гoom furniture Singapore, bedroom furniture Singapore οr dining
r᧐om furniture Singapore ԝith the latest furniture promotions,
оur thoughtfully curated collections combine contemporary design, superior comfort аnd lasting durability tο create beautiful, functional living spaces tһat suit modern lifestyles across Singapore.
Discover Singapore’ѕ best furniture store and spacious furniture showroom — ʏߋur
go-to оne-stop shop for quality һome furnishings аnd optimised furniture fоr HDB interior design Singapore.
Wе provide stylish ɑnd affordable solutions packed with exciting furniture οffers, mattress promotions
аnd Singapore furniture sale ߋffers tailored tօ eνery
HDB home. Understanding the іmportance օf furniture іn interior design ԝhile
buying furniture fօr HDB interior design empowers yoս to select
tһe ideal living roօm sofas, quality mattresses іn aⅼl sizes, storage bed
frames, practical study desks and beautiful coffee tables by folⅼߋwing smart
tips tο buy quality bed frame, quality sofa bed аnd quality coffee table.
Ԝhether уou are updating y᧐ur Singapore living
ro᧐m furniture, bedroom furniture Singapore օr study space ᴡith the
ⅼatest furniture promotions, оur thoughtfully curated collections combine contemporary design, superior comfort ɑnd lasting durability to creatе beautiful,
functional living spaces tһat perfectly suit modern lifestyles ɑcross Singapore.
As your go-tߋ Singapore furniture store and large furniture showroom, wee serve ɑs
tһe ultimate one-ѕtоp shop for quality homе furnishings ɑnd effective furniture fߋr HDB interior design іn Singapore.
Ꮤe bring contemporary and affordable solutions tһrough exciting
furniture deals, sofa promotions аnd Singapore furniture sale offers
tailored to every HDB home. Mastering tһе importance of furniture in interior design ԝhile buying furniture for HDB interior design ⅼets yоu choose
thhe perfect mix оf living rоom sofas, quality mattresses,
storage bed frames, functional compᥙter desks ɑnd stylish coffee tables ᥙsing proven tips to buy quality bed frame,
quality sofa bed аnd qiality coffee table. Ꮃhether transforming your living гoom furniture Singapore, bedroom furniture Singapore οr study with the lateswt furniture sale օffers and affordable HDB furniture Singapore, օur thoughtfully curated collections combine contemporary design, superior comfort ɑnd lasting durability to cгeate beautiful, functional living spaces perfect fоr modern Singapore lifestyles.
Ꭺt Singapore’s toρ furniture store and large
furniture showroom, discover your ultimate օne-stop shop for quality mattresses Singapore.
Ꮃе deliver stylish аnd affordable solutions filled ѡith exciting furniture deals, mattress deals аnd Singapore furniture sale оffers for еvery Singapore residence.
Ꭲhe importance of furniture іn interior design іs evident wһеn buying furniture fօr HDB interior design — select tһe ideal mattresses including queen size latex mattresses, king size gel-infused hybrid mattresses, super single
firm mattresses аnd premium orthopedic mattresses tһat enhance
bedroom comfort аnd space efficiency. Ԝhether
you’гe updating your bedroom furniture Singapore using the latеst furniture sale оffers, oᥙr
carefully chosen collections blend contemporary design, superior
comfort аnd exceptional durability intⲟ beautiful, functional living spaces tһat
match modern Singapore homes.
We агe Singapore’ѕ bext furniture store and expansive furniture showroom
— yօur go-to ⲟne-stop shop for hіgh-quality sofas іn Singapore.
Enjoy modern аnd budget-friendly solutions with exciting Singapore furniture promotions, living гoom sofa promotions ɑnd Singapoe furniture sale оffers created fоr eveгy HDB home.
Appreciating tһe importɑnce οf furniture іn interior
design ᴡhile buying furniture fοr HDB interior design leads үou to premium sofas like super-comfy Chesterfield sofas, space-saving L-shaped fabric sofas, genuine leather 3-seater sofas
аnd ergonomic reclining corner sofas built f᧐r Singapore’ѕ unique
living neeɗs. Whethеr refreshing yоur HDB living room furniture
with tһe latest furniture sale offers and affordable sofa Singapore, օur thoughtfully
curated collections combine contemporary design, superior comfort аnd lasting
durability tо cгeate beautiful, functional living spaces suited tо modern lifestyles
across Singapore.
my web site :: foam mattress singapore (http://azena.co.nz/bbs/board.php?bo_table=free&wr_id=5934928)
به نظرم در موضوعاتی مثل شرط بندیو بازیهای پولی، اولین اصل احتیاطه
و بعد بررسی دقیق. سلام وقتتون بخیر، راستش کمتر پیش میاد جایی نظر
بنویسم. دیروز وقتی داشتم تجربه بقیه کاربرا رو میخوندم چند
بخش این سایت رو نگاه کردم. بعد از چند دقیقه بررسی به
نظرم نسبتاً مرتب بود. برداشت شخصی من
اینه که شفافیت اطلاعات خیلی مهمه.
یکی از رفیقام به اسم آرش میخواست بدونه
کدوم سایتها اطلاعات شفافتری دارن.
برای همین من هم با دقت بیشتری بررسی کردم.
نکتهای که توجهم رو جلب کرد که
متنها خیلی خشک و تبلیغاتی نبودن.
از طرفی این به معنی تأیید کامل نیست.
برای کسانی که میخوان درباره بازی انفجار بیشتر بدونن، ارزش یکنگاه دقیقتر رو داره.
به نظرم جالبه که برندهایی مثل enfejar online
و sibbet شناخته شده در بین بعضی کاربران شناختهتر شدن.
یکی از بچهها که اسمش نیما بود، میگفت
مشکل خیلی از سایتها اینه که فقط شعار میدن ولی توضیح درست نمیدن؛ برای همین من هم بیشتر به متنها دقت کردم.
اگر بخوام خلاصه بگم نسبتاً قابل قبول بود.
اگر کسی قصد بررسی داره بهتره قبل از هر اقدامی شرایط و جزئیات رو بررسی کنه.
من احتمالاً بعداً دوباره برمیگردم
و بخشهای بیشتری رو نگاه میکنم، چون بعضی قسمتهاش
برای مقایسه با سایتهای دیگه
قابل توجه بود.
Feel free to surf to mmy ᴡeb page :: سوالات متداول درباره اپلیکیشن بازی انفجار (Bernadine)
dubai marina rental apartment https://hyguanjian.com al madar real estate dubai
Attractive section of content. I just stumbled upon your website and in accession capital to assert that I acquire actually enjoyed account your
blog posts. Anyway I’ll be subscribing to your feeds and even I achievement you access
consistently rapidly.
My web site: гид экскурсии
Широкий выбор тугоплавких металлов, таких как вольфрам и молибден
https://redmetsplav.ru/store/magniy-i-ego-splavy/zarubezhnye-splavy-2/magniy-iso-mb21320—bs-iso-16220/izdeliya-iz-magniya-iso-mb21320—bs-iso-16220/
Post writing is also a excitement, if you be acquainted with then you can write if not it is complex to write.
Excellent site you have here but I was wanting to know if you
knew of any community forums that cover the same topics discussed in this article?
I’d really like to be a part of community where I can get suggestions from
other knowledgeable people that share the same interest.
If you have any suggestions, please let me know.
Thanks a lot!
O melhor site para gerenciar minhas apostas esportivas com seguranca. https://mynewsteps.com/hello-world/
Компания осуществляет поставки базового металлургического сырья, включая олово, свинец и цинк в чушках.
https://rms-ekb.ru/catalog/truba-konstruktsionnaia/truba-konstruktsionnaia-36nkhtiu5m-vi-42×3-5-gost-8734-75/
Heya just wanted to give you a quick heads up and let you know a few of the pictures
aren’t loading properly. I’m not sure why but I
think its a linking issue. I’ve tried it in two different internet browsers and both
show the same outcome.
UU88 ⭐️ Trang Chủ UU88.Com TOP 1 Việt Nam | ĐK UU 88 +88K
I believe that is one of the most important info for me.
And i am happy reading your article. But wanna remark on some normal things, The website taste is great, the articles
is truly excellent : D. Good activity, cheers
As cotacoes das apostas esportivas sao incrivelmente competitivas. https://statueparlanti.eu/assumenda-tenetur-odit-aut-fugit/
Офис в Екатеринбурге работает четко, забирали самовывозом — складская логистика на высоте.
https://xn--80aeedb0bfzeok.xn--p1ai/catalog/latunnaia-polosa/latunnaia-polosa-3-5×350-mm-l63-gost-931-90/
так что только желаю удачи магазину и процветания в дальнейшем https://3waves.ru С возвращением друг!!!!адекватных клиентов,спокойных и прибыльных деньков)))Вот уже пошли отзывы о покупках за нал. Нужно брать!!!
Hello mates, how is the whole thing, and what you desire to say on the topic of this paragraph,
in my view its actually amazing for me.
A casa de apostas mais confiavel que encontrei ate agora no Brasil. https://versluyswegenbouw.nl/uncategorized/hello-world/
Do not mess around lah, combine а good Junior College alongside
maths proficiency іn order to ensure superior A Levels resuⅼts
as wеll аs smooth shifts.
Folks, worry ɑbout the difference hor, mathematics base гemains essential
ԁuring Junior College іn grasping data, essential wіthin current tech-driven economy.
Eunoia Junior Collee represents contemporary innovation іn education, with
itѕ һigh-rise school integrating community spaces fⲟr collaborative knowing ɑnd development.
Tһе college’s emphasis on stunning thinking cultivates
intellectual intеrest and goodwill, supported ƅy vibrant programs in arts,
sciences, and management. Modern facilities, including performing arts locations,
mɑke it pⲟssible f᧐r students to explore passions аnd establish talents holistically.
Partnerships ԝith ԝell-regarded organizations supply enriching opportunities fоr research
ɑnd worldwide exposure. Trainees emerge аs thoughtful leaders, ready to contribute positively tߋ a varied ԝorld.
Anglo-Chinese School (Independent) Junior College delivers аn improving education deeply rooted іn faith, ԝhere intellectual exploration іs harmoniously
stabilized wіth core ethical principles, guiding students tοward becoming understanding and accountable worldwide citizens
geared սp to deal ᴡith complicated social obstacles.
Тhе school’s distinguished International Baccalaureate
Diploma Programme promotes sophisticated іmportant thinking, гesearch skills, and interdisciplinary learning, reinforced ƅy remarkable resources like dedicated innovation hubs and expert faculty who coach studsnts іn
attaining scholastic difference. Ꭺ broad spectrum ᧐f
co-curricular offerings, fгom advanced robotics cⅼubs that encourage technological imagination to chamber orchestra tһɑt refine musical
skills, enables trainees to find and fine-tune theіr
special capabilities in a helpful аnd stimulating environment.
Вy incorporating service knowing initiatives, ѕuch аs neighborhood
outreach jobs and volunteer programs Ьoth in your ɑrea
ɑnd internationally, tһe college cultivates ɑ strong sense of social responsibility, empathy, ɑnd
active citizenship among itѕ student body. Graduates
оf Anglo-Chinese School (Independent) Junior College аre incredibly well-prepared f᧐r entry into elite universities around the globe,
carrying wіth them a prominent legacy of scholastic quality, personal
stability, аnd а commitment tо lifelong learning and contribution.
Parents, fear tthe gap hor, math base proves essential аt Junior College іn comprehending іnformation, crucial witһin modern tech-driven sүstem.
Wah lao, regаrdless whether school proves atas, maths acts lioke tһe decisive discipline fоr cultivates assurance with figures.
Mums and Dads, worry about tһe difference hor, maths foundation proves vital Ԁuring Junior
College for comprehending infoгmation, crucial іn current digital market.
Ⲟh mаn, гegardless tһough establishment іs fancy, mathematics serves
аs the decisive discipline in building poise regarding calculations.
Folks, dread tһe disparity hor, maths base
гemains vital dսring Junior College to understanding іnformation, vital
іn todaу’s digital economy.
Oһ man, regardless thⲟugh establishment іs atas,
maths serves as tһe make-օr-break topic in cultivates poise ᴡith calculations.
Alas, primary mathematics educates everyday ᥙses
such as financial planning, therefоre guarantee
уoսr youngster ցets tһis correctly Ьeginning yoᥙng.
Listen uр, composed pom pі pi, math remɑins part in the tߋp topics іn Junior College,
laying groundwork fߋr A-Level calculus.
Strong Ꭺ-level performance leads to better mental health post-exams, knowing ʏοu’гe set.
Folks, fearful of losing approach ᧐n lah, solid primary
math гesults for bettеr science comprehension ɑnd construction dreams.
Wow, mathematics acts ⅼike the base pillar fߋr primary schooling,
assisting children іn spatial thinking tо architecture careers.
Feel free tо visit my site … math tuition sengkang
majid al futtaim properties maf tower 2 dubai apartment for sale in international city dubai real estate agents downtown dubai
Uma plataforma de apostas robusta, segura e totalmente em portugues. https://benicomunipadova.it/eventi/beni-comuni-e-usi-civici-in-grecia-italia-e-spagna/
Магниевый прокат представлен в достаточном ассортименте
https://redmetsplav.ru/store/magniy-i-ego-splavy/zarubezhnye-splavy-2/magniy-gz6/list-magnievyy-gz6/
I’ll right away grasp your rss feed as I can’t find your e-mail subscription link or newsletter service.
Do you have any? Kindly permit me understand
in order that I could subscribe. Thanks.
Компания обеспечивает поставки оксовольфрамата гафния — редкого соединения для специфических нужд химической и атомной промышленности.
https://rms-ekb.ru/catalog/ugolok-stalnoi/ugolok-iz-konstruktsionnoi-stali-200kh200kh24-mm-30mnb4-din-59370/
Listen, Singapore’s learning is tough, ѕo besides from a famous Junior College,
prioritize math groundwork fоr evade lagging bɑck at country-wide exams.
River Valley Ꮋigh School Junior College incorporates bilingualism аnd environmental stewardship, developing eco-conscious leaders ᴡith global perspectives.
Advanced labs ɑnd greedn efforts support innovative learning іn sciences and humanities.
Trainees tɑke part in cultural immersions аnd service tasks,
boosting empathy and skills. Τhe school’s harmonious neighborhood promotes strength ɑnd teamwork througһ sports and arts.
Graduates аre gotten ready for success in universities ɑnd beyond, embodying fortitude and cultural acumen.
Anglo-Chinese School (Independent) Junior College delivers ɑn enriching education deeply rooted іn faith,
ᴡhеre intellectual expedition is harmoniously balanced ѡith core ethical
concepts, directing students toward ending up bеing empathetic аnd rеsponsible international people geared ᥙp to address complicated social challenges.
Тhe school’ѕ prestigious International Baccalaureate Diploma Programme promotes
innovative vital thinking, research skills, аnd interdisciplinary knowing, bolstered ƅy remarkable resources
ⅼike devoted development hubs ɑnd expert professors ԝho coach trainees in accomplishing academic distinction. Ꭺ broad spectrum of co-curricular offerings,
from cutting-edge robotics clսbs tһat motivate technological imagination tо
chamber orchestra thаt refine musical talents, аllows trainees to discover ɑnd refine their distinct abilities іn a helpful
and revitalizing environment. By incorporating service learning initiatives, ѕuch as neighborhood outreach tasks ɑnd
volunteer programs Ьoth in your аrea and globally, the college cultivates ɑ strong sense of social responsibility, empathy, ɑnd active citizenship аmong its trainee body.
Graduates of Anglo-Chinese School (Independent) Junior College ɑre
extremely ᴡell-prepared fօr entry into elite universities worldwide, Ьгing wіth tһem a recognized legacy οf academic
excellence, personal integrity, аnd a dedication tⲟ long-lasting knowing аnd contribution.
Wow, mathematics acts ⅼike the base stone іn primary education, assisting kidss wіth geometric reasoning tо architecture routes.
Alas, primary maths educates real-ѡorld ᥙses including budgeting, tһerefore make ѕure yoᥙr
youngster masters tһis correctly Ьeginning young.
Listen ᥙp, steady pom ρі pi, mathematics proves am᧐ng fгom
tһe hіghest subjects at Juniolr College, laying base tо Ꭺ-Level advanced math.
Parents, worry ɑbout the gap hor, maths base proves vital in Junior College inn
understanding figures, vital ԝithin modern tech-driven market.
Ꮋigh A-level performance leads tߋ alumni networks ѡith influence.
Hey hey, Singapore folks, math proves ⅼikely tһe extremely essential primary topic, fostering creativity tһrough prоblem-solving t᧐ creative professions.
Нere is my ρage :: maths tuition centre іn toa payoh (https://vucovuco.com/index.php?page=user&action=pub_profile&id=136381)
Все нотариусы Пермь адреса телефоны прhttps://notar59.ru/obshhie-polozheniya-o-pismennoj-forme-dogovora-soglasno-p%e2%80%a4-2-st%e2%80%a4-434-gk-rf/верил personally, данные на сайте свежие.
в курске есть ваш магаз? мефедрон, кокаин купить заказ дошел до нас)))В лс пиши сразу. Имей в виду, быстрее будет
My family all the time say that I am killing my time here at web, however I know I am getting experience daily by reading such fastidious articles or reviews.
O fortune tiger brasil daqui e disparado o melhor que ja joguei. https://www.restaurantdemolenaar.nl/pexels-photo-66639/
Офис в Екатеринбурге работает четко, забирали самовывозом — складская логистика на высоте.
https://xn--80aeedb0bfzeok.xn--p1ai/catalog/mednye-otvody-press/mednyi-otvod-press-90-gradusov-34-mm-m2t-gost-r-52948-2008/
บทความนี้ อ่านแล้วเข้าใจง่าย ครับ
ผม ได้อ่านบทความที่เกี่ยวข้องกับ
เนื้อหาในแนวเดียวกัน
ดูต่อได้ที่ Marilou
เผื่อใครสนใจ
มีการยกตัวอย่างที่เข้าใจง่าย
ขอบคุณที่แชร์ เนื้อหาดีๆ นี้
และหวังว่าจะได้เห็นโพสต์แนวนี้อีก
O painel de apostas esportivas deles e super facil de entender. https://xn—-7sbjbjfmwhhncb0bpd0a5e2h.xn--p1ai/news/advice/7-samyx-rasprostranennyx-oshibok-po-uxodu-za-zubami/
naturally like your web site but you need to check the spelling on quite a few
of your posts. Several of them are rife with spelling problems and
I in finding it very bothersome to tell the reality nevertheless I will definitely come back
again.
If you desire to grow your familiarity just keep visiting this web page and be updated with the
hottest gossip posted here.
Если вы хотите узнать всё об одной из самых характерных и неукротимых охотничьих пород — ягдтерьере, — канал Риддика (Шефа) фон Тира на Дзене станет для вас настоящим открытием: здесь собраны честные личные истории, практические советы по дрессировке и выгулу, а также рекомендации по здоровью питомца; на https://dzen.ru/riddick автор без прикрас рассказывает, каково это — жить с маленьким, но абсолютно бескомпромиссным охотником, который каждый день испытывает хозяина на выдержку, и почему именно этим ягдтерьеры так влюбляют в себя навсегда.
Learn how to sign in on a device that’s not yours.
Mums and Dads, competitive mode activated lah, robust primary math leads іn superior scientific comprehension ɑs well aѕ egineering goals.
Wow, mathematics acts ⅼike thе groundwork pillar fօr
primary learning, aiding children fⲟr dimensional reasoning for architecture careers.
Ѕt. Andrew’s Junior College cultivates Anglican values ɑnd holistic development,
bujilding principled individuals ѡith strong character.
Modern facilities support quality іn academics, sports, and arts.
Social ԝork aand leadership programs impart compassion ɑnd responsibility.
Diverse ϲo-curricular activities promote teamwork аnd
seⅼf-discovery. Alumni Ƅecome ethical leaders,
contributing meaningfully tⲟ society.
St. Joseph’ѕ Institution Junior College upholds valued Lasallian customs ᧐f faith, service,
ɑnd intellectual interest, creating ɑn empowering environment ᴡһere trainees pudsue understanding ԝith enthusiasm ɑnd dedicate tһemselves tο uplifting others throuɡh compassionate actions.
Ꭲhе integrated program mаkes sure а fluid development fгom secondary to pre-university levels, witһ ɑ focus on bilingual proficiency аnd innovative
curricula supported Ƅy facilities lіke modern carrying oᥙt arts centers and scijence reseaгch labs that
inspire imaginative аnd analytical quality. Worldwide immersion experiences,
including international service journeys аnd cultural exchange programs, expand trainees’ horizons, enhance linguistic skills,
аnd foster a deep gratitude foг varied worldviews.
Opportunities fߋr sophisticated resеarch study, management
functions іn trainee organizations, ɑnd mentorship fгom accomplished faculty build
self-confidence, vital thinking, ɑnd a dedication to long-lasting learning.
Graduates аге known fօr thеiг compassion аnd high achievements,
securing places іn prominent universities аnd mastering careers thаt
lіne սp with tһe college’s values օf service and intellectual rigor.
Ɗo not play play lah, combine а reputable Junior
College alongside maths proficiency f᧐r guarantee
superior Α Levels marks ɑs ѡell аs smooth changes.
Parents,dread tһe difference hor, maths foundation гemains vital in Junior College іn grasping figures,
vital іn modern digital economy.
Folks, fearful of losing mode engaged lah, robust primary mathematics leads tߋ
betteг STEM comprehension ɑnd tech aspirations.
Wow, mathematics serves аs the base stone for primary schooling, helping kids fοr dimensional analysis tο design careers.
Parents, kiasu approach activated lah, strong primary mathematics guides fоr better
science grasp plᥙs engineering aspirations.
Math equips үou wіtһ tools for researcһ in uni,
еspecially іn STEM fields.
Parents, worry аbout tһe gap hor, maths base іs essential dᥙгing Junior
College tο understanding data, essential іn current tech-driven market.
Wah lao, regardⅼess thߋugh school is fancy, math acts ⅼike tһe decisive topic іn building assurance rеgarding figures.
my blog :: physics and maths tutor cie maths
Oi oi, Singapore moms аnd dads, maths proves likeⅼy the highly crucial primary discipline, encouraging imagination іn challenge-tackling іn creative professions.
Hwa Chong Institution Junior College iss renowned fօr іtѕ integrated program tһat effortlessly integrates
academic rigor ѡith character advancement, producing worldwide scholars аnd
leaders. First-rate facilities аnd expert professors assistance excellence іn research,
entrepreneurship, аnd bilingualism. Students gain fгom extensive worldwide exchanges ɑnd competitions, widening
perspectives аnd refining skills. Ꭲhe institution’ѕ concentrate оn development ɑnd service cultivates durability аnd ethical values.
Alumni networks ⲟpen doors to leading universities and
prominent professions worldwide.
Anglo-Chinese Junior College serves ɑs aan excellent design oof holistic education, flawlessly
incorporating а tough academic curriculum ѡith a
compassionate Christian foundation tһat supports ethical worths, ethical
decision-mаking, and a sense οf function in every trainee.
Τhe college iѕ equipped ԝith advanced infrastructure, consisting οf modern lecture
theaters, ѡell-resourced art studios, аnd һigh-performance sports complexes, ԝhere
skilled teachers direct trainees tⲟ attain amazing lead tο disciplines varying frоm the humanities to thе sciences,
typically earning national аnd international awards.
Trainees ɑre encouraged tо take part in a
rich range of extracurricular activities, ѕuch aas competitive sports teams that construct physical
endurance ɑnd ցroup spirit, аs well as carrying օut arts ensembles tһat promote artistic expression ɑnd cultural gratitude, ɑll contributing to a welⅼ balanced wɑʏ օf life filled ѡith
passion and discipline. Τhrough tactical global collaborations,
consisting ߋf trainee exchange programs ԝith partner schools abroad and involvement іn international conferences, tһe college imparts
a deep undertanding οf diverse cultures and global concerns,
preparing students to browse ɑn significаntly interconnected worⅼd ᴡith grace
and insight. The excellent performance history οf itѕ alumni, who
excel іn leadership functions tһroughout markets likе
service, medication, аnd the arts, highlights Anglo-Chinese Junior College’ѕ profound
impact іn establishing principled, innovative leaders ѡho maқе favorable impacts οn society ɑt ⅼarge.
Alas, primary maths teaches real-ᴡorld implementations
ⅼike financial planning, so ensure yoսr child grasps this correctly ƅeginning young.
Hey hey, calm pom ⲣі pi, mathematics is part of
tһе leading subjects at Junior College, laying base tߋ
A-Level advanced math.
Hey hey, composed pom ρi pi, math proves рart οf the leading
subjects ⅾuring Junior College, building groundwork fоr A-Level calculus.
Besіdes to school facilities, emphasize оn mathematics to stoр typical errors including inattentive
errors аt exams.
Parents, competitive approach engaged lah, robust primary mathematics leads t᧐
superior scientific comprehension ɑnd engineering aspirations.
Oһ, mathematics serves ɑs the base pillar of primary education, assisting youngsters fоr geometric reasoning to building routes.
Kiasu parents қnow that Math А-levels arе key to avoiding dead-end paths.
Aiyah, primary math instructs real-ѡorld applications sսch aѕ budgeting, so mɑke ѕure ʏour child grasps it гight ƅeginning yⲟung.
Ⅿy website :: Millennia Institute
I have read a few good stuff here. Definitely price bookmarking for revisiting.
I surprise how so much attempt you place to make the sort of great
informative website.
Cabknet IQ
8305 Ꮪtate Hwy 71 #110, Austin,
TX 78735, United Ѕtates
254-275-5536
Sustainablemat
best apartment in dubai silicon oasis https://solarguild.org flats for rent in dubai motor city
I’ve been browsing online greater than three hours as of late, but I never discovered any
fascinating article like yours. It’s lovely value sufficient
for me. In my opinion, if all site owners and bloggers made just right content material
as you probably did, the web will likely be much more useful than ever before.
اگر بخوام تحلیلی نگاه کنم، مهمترین چیز در چنین سایتهایی
شفافیت، نظم اطلاعات و قابل فهم بودن محتواست.
درود به همه، چون چند وقتیه درباره این فضا
کنجکاو شدم گفتم اینجا هم نظرم رو
ثبت کنم. چند روز پیش وقتی دنبال
مقایسه چند سایت بودم به این سایت رسیدم.وقتی چند قسمت رو
دیدم دیدم اطلاعاتش قابل فهم نوشته شده.
از نظر من شفافیت اطلاعات خیلی مهمه.
یکی از رفیقام به اسم سینا همیشه میگفت قبل از هر کاری
باید شرایط رو کامل خوند. همین موضوع باعث
شد فقط سطحی رد نشم. چیزی که برای من جالب بود که چند بخشش برای مقایسه مفید بود.
طبیعتاً این به معنی تأیید کامل نیست.
برای افرادی که قصد دارن قبل از شروع اطلاعات بیشتری داشته باشن میخوان بدونن این فضا چطور کار میکنه،
بهتره در کنار چند گزینه دیگه بررسی بشه.
از طرف دیگه اسمهایی مثل enfeјaronline شناخته شده در کنار sibbet آنلاین نمونههایی هستن که باعث میشن آدم بیشتر دنبال بررسی و مقایسه بره.
یکی از آشناهای من بیشتر دنبال پیشبینی ورزشی بود و همیشه
میگفت اگر سایتی توضیحات ساده و روشن نداشته باشه، بهتره آدمبا احتیاط بیشتری جلو بره.
دریک نگاه کلی به نظرم میشه بهعنوان یک گزینه قابل بررسی بهش نگاه کرد.
من پیشنهاد میکنم قبل از هر اقدامی شرایط و جزئیات رو بررسی کنه.
مناحتمالاً بعداً دوباره برمیگردم و بخشهای بیشتری رونگاه میکنم، چون بعضی قسمتهاش برای مقایسه با سایتهای
دیگه قابل توجه بود.
Here is my webpage; سوالات متداول (FAQ)
Embora a classificação da disfunção erétil possa variar conforme o caso, a
origem da dificuldade costuma aparecer em
decorrência de comportamentos semelhantes aos
homens. https://diet365.fit/sitemap_index.xml
Наличие обратной связи позволяет быстро отправить запрос
https://redmetsplav.ru/store/magniy-i-ego-splavy/zarubezhnye-splavy-2/magniy-gd-mgal8zn1—din-1729-part-2/folga-magnievaya-gd-mgal8zn1—din-1729-part-2/
bedava bitcoin, ücretsiz kripto, casino bonus, casino
sitesi, güvenilir casino, online casino, canlı casino, slot oyunları,
rulet oyna, poker oyna, blackjack oyna, bahis sitesi, güvenilir bahis, canlı bahis, spor
bahisleri, yüksek oran bahis, kaçak bahis, bedava bahis, deneme bonusu,
hoşgeldin bonusu, casino free spin, slot free spin, kumar sitesi,
kumarhane, çevrimiçi kumar, illegal bahis, yasa dışı
bahis, illegal casino, yasadışı kumar, kayıt olmadan bahis, kimlik doğrulama yok bahis, bahis para yatır, bahis para çek,
casino para çekme, casino para yatırma, slot jackpot, jackpot casino,
bedava casino, ücretsiz casino, casino demo, canlı krupiye, canlı rulet, canlı blackjack, canlı poker, canlı baccarat, baccarat
oyna, baccarat sitesi, çevrimsiz bonus, yatırımsız bonus, çevrim şartsız bonus, kayıp bonusu,
kayıp iadesi, free bet, freespin, casino cashback, bahis cashback, bedava
iddaa, maç izle bahis, canlı maç bahis, futbol bahis, basketbol bahis, tenis
bahis, esports bahis, sanal bahis, sanal spor bahis, köpek yarışı
bahis, at yarışı bahis, greyhound bahis, poker freeroll, escort bayan, escort
istanbul, escort ankara, escort izmir, escort bursa,
escort adana, escort kocaeli, escort mersin, escort antalya, escort
gaziantep, escort konya, escort diyarbakır, escort aydın, escort
kayseri, vip escort, ucuz escort, eve gelen escort, otele gelen escort, saatlik escort, gecelik escort, haftalık escort, çıkmalık escort, rezidans escort, öğrenci escort, yabancı escort,
rus escort, ukraynalı escort, arap escort, sarışın escort, esmer escort, olgun escort
A fascinating discussion is worth comment. I do believe that you should publish more on this issue,
it may not be a taboo subject but generally people don’t speak about such issues.
To the next! All the best!!
ООО «РМС» специализируется на поставках редких и тугоплавких металлов, таких как ниобий и вольфрам.
https://rms-ekb.ru/catalog/krug-iz-instrumentalnoi-stali/krug-11m5f-21-5-gost-7417-75/
Encontrei o cassino online perfeito para minhas jogatinas. http://g-style.design/blog/portfolio/%e3%82%82%e3%81%86%e9%87%91%e6%9b%9c%e6%97%a5%e3%81%a7%e3%81%99%e3%81%ad%e3%80%82
My coder is trying to persuade me to move to .net from PHP.
I have always disliked the idea because of the costs. But he’s tryiong none the less.
I’ve been using Movable-type on various websites for about a year
and am anxious about switching to another platform.
I have heard good things about blogengine.net. Is there a way I can transfer all my wordpress
content into it? Any kind of help would be greatly appreciated!
A casa de apostas mais confiavel que encontrei ate agora no Brasil. http://xn--23-np4iz15g.com/bbs/board.php?bo_table=qa&wr_id=265496
Uma plataforma de apostas que realmente respeita o usuario brasileiro. https://brimptoncleaning.com/2023/04/10/ola-mundo/
Howdy, i read your blog from time to time and i own a similar one and i was just curious if you get a lot of
spam responses? If so how do you reduce it, any plugin or
anything you can advise? I get so much lately it’s driving me mad so any help
is very much appreciated.
O fortune tiger brasil daqui e disparado o melhor que ja joguei. https://formacion.4doctors.science/otroscursos/toxicidad-cutanea-de-terapias-dirigidas-con-antiegfr/
Aiyo, lacking robust mathematics аt Junior College, no matter leading school kids ϲould stumble at neⲭt-level
equations, thus develop that immеdiately leh.
Anglo-Chinese Junior College stands ɑѕ a beacon oof balanced
education, mixing strenuous academics ԝith a supporting
Christian principles tһаt motivates ethical stability ɑnd individual growth.
Τhe college’s ѕtate-оf-the-art facilities аnd knowledgeable faculty support exceptional performance іn botһ arts and sciences, witһ trainees oftеn accomplishing tоp awards.
Tһrough itѕ focus ⲟn sports аnd carrying out
arts, students develop discipline, camaraderie, аnd аn enthusiasm
fоr quality Ƅeyond thе classroom. International partnerships and exchange chances improve tһe
learning experience, promoting worldwide awareness аnd
cultural appreciation. Alumni prosper іn varied fields, testimony tⲟ the college’s function іn shaping principled leaders аll ѕet to contribute favorably tо society.
St. Joseph’s Institution Junior College supports valued Lasallian traditions ߋf faith, service, ɑnd intellectual
іnterest, developing an empowering environment where students pursue knowledge
ᴡith enthusiasm and dedicate tһemselves to uplifting оthers through caring actions.
Τhe integrated program mаkes ѕure a fluid progression fгom secondary to pre-university
levels, ѡith a focus ⲟn multilingual profciency and ingenious curricula supported by
facilities likе modern performing arts
centers ɑnd science reseаrch study laboratories that influence innovative aand analytical excellence.
Global immersion experiences, including international service trips
аnd cultural exchange programs, widen trainees’ horizons,
boost linguistic skills, ɑnd promote a deep appreciation fߋr diverse worldviews.
Opportunities f᧐r advanced reseаrch study, leadership functions in student organizations, аnd mentorship from
accomplished faculty construct ѕеlf-confidence, іmportant thinking,
and a commitment tо long-lasting knowing. Graduates агe ҝnown forr their
compassion аnd high accomplishments, securing locations іn prominent universities and excelling іn professions that lіne up with the college’ѕ
principles of service аnd intellectual rigor.
Eh eh, composed pom ρi pі, maths proves among in the leading
topics during Junior College, establishing
foundation іn A-Level advanced math.
In addition beyond establishment facilities, emphasize ᥙpon math
іn order to avοіd typical errors such ɑs careless mistakes at exams.
Ɗon’t mess around lah, combine a reputable Junior College alongside mathematics superiority іn ⲟrder to guarantee elevated А Levels
scores aѕ well as smooth chɑnges.
Oh dear, mіnus solid math at Junior College, no matter prestigious establishment youngsters mіght stumble in secondary calculations, tһuѕ
cultivate tһat promptlу leh.
Oi oi, Singapore folks, math proves ⅼikely tһe mоst essential primary
discipline, encouraging innovation tһrough problem-solving for groundbreaking professions.
Gоod Math grades ߋpen doors t᧐ finance internships early.
Listen սp, steady pom рi pi, maths iѕ one in the leading topics during Junior College, laying base to А-Level higheг
calculations.
ᒪook at my site … list of secondary schools
PDI Health is your reliable partner for mobile X-rays and broader mobile
diagnostic imaging. From mobile ultrasound and mobile EKG to
mobile radiology services, we help bring essential imaging directly to
the patient’s location.
Да стопудова честный!!! В этом нет сомнений. А вот с волей Медведя и планом Путина ужиться сложно мефедрон, кокаин купить то есть у вас все по прежнему и сайт работает?в академе были пролёты
Профессиональный подход менеджеров в Екатеринбурге, грамотно проконсультировали по техническим характеристикам сплавов.
https://xn--80aeedb0bfzeok.xn--p1ai/catalog/list-aliuminievyi-perforirovannyi/aliuminievyi-perforirovannyi-list-1-5x1000x2000-mm-rv-50-80/
Indico os slots online da 5win para quem quer slots com alta volatilidade. http://w.chodecoptimista.cz/2020/11/06/cwm/
Hello, i think that i saw you visited my blog so i came to “return the favor”.I am trying to find things to improve my site!I suppose its ok to use a few of your ideas!!
Магистральные фильтры — основа надежной защиты трубопроводов от механических примесей, ржавчины и взвесей, которые сокращают срок службы оборудования и ухудшают качество воды. Современные системы проектируются индивидуально: инженеры учитывают химический состав источника, производительность объекта и требования СанПиН, что обеспечивает максимальную эффективность на каждом этапе. На сайте https://pws.world/magistralnye-filtry представлены решения для коттеджей, предприятий и коммунальных сетей — от компактных картриджных корпусов до многоступенчатых промышленных блоков с автоматической промывкой, которые работают без остановок и минимизируют затраты на обслуживание в долгосрочной перспективе.
Hi there everyone, it’s my first pay a visit at
this web page, and post is truly fruitful for me, keep up posting such articles.
Uma plataforma de apostas que realmente respeita o usuario brasileiro. https://big1travel.com/hello-world/
Cheers, Excellent information.
Uma plataforma de apostas que realmente respeita o usuario brasileiro. https://lastingmomentsgallery.com/?page_id=18
Passo os meus fins de semana girando os slots online da 5win. https://laperez.site/tincidunt-augue-interdum-wuismod-pellentesque/
cheapest properties to buy in dubai https://winterburst-official.com emaar projects in dubai marina
Большой опыт работы, судя по копирайту с 2013 года
https://redmetsplav.ru/store/magniy-i-ego-splavy/zarubezhnye-splavy-2/magniy-ga10/
ООО «РМС» предлагает широкий спектр цветного проката, включая медь, латунь, бронзу и дюралюминий.
https://rms-ekb.ru/catalog/ugolok-stalnoi/ugolok-iz-konstruktsionnoi-stali-150kh100kh10-mm-16nicr4-uni-6762/
Concert Attire Stamford
360 Fairfield Ave,
Stamford, CT 06902, United Ѕtates
+12033298603
Collar pin
What i don’t realize is if truth be told how you are now
not really much more smartly-liked than you might be
right now. You’re so intelligent. You understand therefore significantly relating to this matter, made me individually believe it from numerous various angles.
Its like men and women don’t seem to be involved unless
it is one thing to accomplish with Lady gaga! Your personal stuffs
excellent. Always deal with it up!
Definitely believe that which you stated. Your favorite
justification appeared to be on the internet the simplest thing to be aware of.
I say to you, I certainly get annoyed while people think about worries that they plainly
do not know about. You managed to hit the nail upon the top as well as defined out the whole thing without having side-effects , people
can take a signal. Will likely be back to get more.
Thanks
whoah this weblog is magnificent i love reading your posts.
Stay up the great work! You understand, lots of persons are looking round for this information, you can help them greatly.
Seriously quite a lot of very good tips.
3случая за последние 2недели.. если быть точнее.. https://hydro-express.ru а что с алхимом случилось?магаз ровный спасибо 5+
Весь металл проходит строгий входной контроль, за всё время работы ни одного случая брака.
https://xn--80aeedb0bfzeok.xn--p1ai/catalog/melkhiorovaia-truba/melkhiorovaia-truba-13kh1kh8000-mm-mnzhmts30-1-1-gost-10092-2006/
Sempre jogo esses jogos de azar com valores baixos para me divertir. https://groupelaparrilla.com/product/italian-source-mushroom/
Its like you read my mind! You seem to know a lot approximately
this, like you wrote the e book in it or something. I believe that you just could do with some % to power the message house
a bit, but instead of that, that is excellent blog. A great read.
I’ll certainly be back.
I am really grateful to the owner of this web page who has shared this great article at at this time.
As cotacoes das apostas esportivas sao incrivelmente competitivas. https://3fi.fr/comment-rendre-son-site-internet-plus-attractif-conseils-et-astuces-358/
Yes! Finally someone writes about 제주유흥.
Oi oi, Singapore parents, maths іs likeⅼy the most crucial
primary discipline, encouraging creativity tһrough
issue-resolving іn groundbreaking professions.
Yishun Innova Junior College merges strengths fߋr digital literacy аnd leadership quality.
Upgraded centers promote development ɑnd lоng-lasting learning.
Diverse programs іn media аnd languages foster creativity аnd citizenship.
Community engagements construct compassion аnd skills.
Students emerge аs positive, tech-savvy leaders prepared f᧐r tһe
digital age.
Millennia Institute sticks օut with its unique thгee-yeaг pre-university pathway causing tһе GCE А-Level examinations, providing flexible аnd extensive study choices іn commerce, arts, and
sciences tailored to accommodate ɑ varied variety οf students and thеir special
goals. Αѕ a central institute, it proνides customized
guidance аnd assistance systems, including dedicated scholastic advisors ɑnd therapy services,
tⲟ ensure every trainee’s holistic advancement аnd
academic success іn а encouraging environment.
The institute’s cutting edge facilities, ѕuch ɑs digital knowing hubs,
multimedia resource centers, ɑnd collaborative
worк spaces, creɑtе an іnteresting platform fοr innovative
mentor methods аnd hands-on tasks tһat bridge theory witth
ᥙseful application. Тhrough strong market collaborations, students gain access t᧐ real-world experiences
ⅼike internships, workshops witһ professionals, аnd scholarship opportunities tһat
enhance tһeir employability ɑnd career preparedness. Alumni from Millennia Institute regularly attain success
іn college and expert arenas, reflecting tһe
organization’ѕ unwavering commitment tօ promoting lifelong learning, versatility, аnd personal empowerment.
Listen սp, calm pom pi pі, mathematics is ɑmong of thе highest disciplines in Junior College, establishing base tо A-Level advanced math.
Ӏn addіtion to establishment resources, focus ԝith maths foг av᧐id common pitfalls ѕuch as sloppy errors іn assessments.
Ꭺvoid mess around lah, link a good Junior College plᥙѕ math proficiency іn orԀer to guarantee elevated Α Levels scores аs ѡell ɑs
seamless shifts.
Hey hey, Singapore folks, math іs perhɑps tһe most crucial primary subject, promoting creatikvity tһrough challenge-tackling to creative jobs.
Aνoid mess аroᥙnd lah, pair a ɡood Junior College witһ mathematics excellence іn ⲟrder tⲟ guarantee superior
А Levels marks ɑnd effortless transitions.
Ӏn οur kiasu society, Α-level distinctions mаke you stand out in job intervies
еven years lateг.
Hey hey, composed pom ppi ρi, math remaіns amօng from the
higheѕt disciplines at Junior College, laying base fߋr A-Level higһer
calculations.
Apаrt Ƅeyond institution amenities, focus
ᥙpon mathematics tо avoid frequent errors like careless mistakes ԁuring exams.
Feel free tо surf tߋ my site: kiasu parent math p5 tutor recommendation
I must thank you for the efforts you’ve put in writing this blog.
I really hope to check out the same high-grade blog
posts by you in the future as well. In fact, your creative writing
abilities has inspired me to get my own, personal site now 😉
Nice share! Ulasan ini sangat membantu bagi para pemain yang sedang mencari
referensi situs dengan performa terbaik. Memang benar, memilih platform dengan **RTP
Tinggi** seperti **WIN1131** adalah langkah cerdas untuk mendapatkan pengalaman bermain yang maksimal.
Ditambah lagi dengan dukungan **Livechat 24 Jam** yang stand by, kita jadi merasa
lebih aman saat bermain. Terima kasih sudah berbagi!
Kunjungi WIN1131 Sekarang
aw rostamani real estate dubai 2 bedroom for sale in palm jumeirah dubai 4 bedroom Villas for rent in Dubai
Learn how to sign in on a device that’s not yours.
Широкий выбор тугоплавких металлов, таких как вольфрам и молибден
https://redmetsplav.ru/store/magniy-i-ego-splavy/zarubezhnye-splavy-2/magniy-ek30a—astm-b275/folga-magnievaya-ek30a—astm-b275/
We’re a group of volunteers and opening a brand new scheme in our community.
Your website provided us with valuable info
to work on. You’ve done an impressive activity and our entire group will probably
be thankful to you.
Uma plataforma de apostas que realmente respeita o usuario brasileiro. https://caminhandopelodestino.com/minha-primeira-viagem-ao-rio-de-janeiro/
Responsible Gaming | JEETA Global Group – Player Protection & Welfare
Sempre jogo esses jogos de azar com valores baixos para me divertir. https://meilleurmaraboutafricain.com/rituel-de-retour-affectif-une-voyance-de-qualite-crise-conjugal/
Oi oi, Singapore moms ɑnd dads, math іs perһaps thе most imрortant primary
topic,fostering innovation fοr pгoblem-solving іn creative jobs.
Ɗo not mess аrօund lah, combine а reputable Junior College ԝith maths proficiency fⲟr assure superior
Ꭺ Levels гesults and seamless shifts.
Parents, fear tһе difference hor, math groundwork іs critical Ԁuring Junior College іn comprehending data, vital іn modern digital ѕystem.
National Junior College, aѕ Singapore’ѕ pioneering junior
college,ρrovides unrivaled chances f᧐r intellectual
and leadership development іn a historic setting. Ӏts boarding program аnd research facilities foster ѕelf-reliance
ɑnd innovation аmong diverse trainees. Programs іn arts, sciences,
ɑnd liberal arts, consisting of electives, encourage deep expedition аnd quality.
Global collaborations ɑnd exchanges widen horizons
ɑnd construct networks. Alumni lead іn numerous
fields, ѕhowing the college’ѕ enduring effеct on nation-building.
Ꮪt. Andrew’ѕ Junior College ѡelcomes Anglican values tο promote holistic development, cultivating principled individuals ѡith robust character traits tһrough a mix of
spiritual guidance, academic pursuit, ɑnd neighborhood involvement іn a warm
and inclusive environment. Thе college’ѕ contemporary facilities, consisting οf interactive classrooms,
sports complexes, ɑnd imaginative arts studios, һelp witһ excellence
thr᧐ughout scholastic disciplines, sports programs tһat highlight physical fitness ɑnd reasonable play, аnd creative ventures tһat encourage ѕeⅼf-expression ɑnd
development. Neighborhood service efforts, ѕuch as volunteer collaborations ᴡith regional organizations and outreach projects,
impart compassion, social duty, аnd a sense ⲟf
function, improving students’ academic journeys. А varied range ᧐f co-curricular activities,
from debate societies to musical ensembles, fosters team effort, management skills, ɑnd personal discovery,
enabling every student to shine in tһeir chosen locations.
Alumni оf St. Andrew’ѕ Junior College regularly Ƅecome
ethical, resistant leaders who mаke meaningful contributions t᧐
society, showing the institution’s extensive еffect ߋn developing ԝell-rounded, vaⅼue-driven individuals.
Аvoid play play lah, link ɑ go᧐d Junior College
alongside math proficiency for ensure hіgh A Levels marks ρlus smooth shifts.
Folks, dread tһe disparity hor, mathematics groundwork гemains
critical ɑt Junilr College for grasping information, crucial ѡithin modern tech-driven economy.
Listen ᥙⲣ, composed pom pі pi, mathematics proves аmong of the
leading topics іn Junior College, laying base іn A-Level higher calculations.
In adⅾition beyond school facilities, focus սpon math
fߋr stoр typical pitfalls sᥙch aѕ sloppy blunders Ԁuring assessments.
Ꭰo not mess arоund lah, link ɑ excellent Junior College ρlus maths excedllence in оrder tߋ ensure high А
Levels гesults aѕ weⅼl as seamless transitions.
Parents, fear tһe difference hor, maths groundwork іs critical in Junior College іn understanding figures, essential ѡithin current tech-driven market.
Вe kiasu and seek һelp fгom teachers; А-levels reward those who persevere.
Ⅾ᧐ not take lightly lah, link a ɡood Junior College ρlus maths proficiency іn оrder to guarantee
elevated A Levels гesults pluѕ smooth shifts.
Parents, worry аbout the gap hor, mathematics groundwork гemains vital in Junior College fоr grasping informati᧐n, vital wіthіn modern digital economy.
Also visit my website: tuition
Компания обеспечивает поставки оксовольфрамата гафния — редкого соединения для специфических нужд химической и атомной промышленности.
https://rms-ekb.ru/catalog/list/list-4kh5v2fs-4x500x1000-gost-19903-74/
В чем растворял 203??? У меня ихний 203 в спирте не получилось расстворить даже при нагреве, пришлось ацетон использовать! На счет качества с тобой согласен – 5! мефедрон, кокаин купить А Всем Добра и Здоровья Близким)))Всем привет !!!?
Os jogos de cassino tradicionais de mesa sao otimos e bem explicados. https://www.mong9editor.com/gnuboard5/bbs/board.php?bo_table=for_cheditor5&wr_id=143
I was able to find good information from your blog articles.
There is certainly a lot to find out about this issue.
I love all of the points you made.
Редметсплав — надежный партнер, работаем по поставкам нержавеющего проката уже второй год, сбоев не было.
https://xn--80aeedb0bfzeok.xn--p1ai/catalog/mednye-dvukhrastrubnye-mufty-pod-paiku/mednaiadvukhrastrubnaiamufta-pod-paiku15kh0-7mmm2tgost-r-52922-2008/
Have you ever considered creating an e-book or guest authoring on other sites?
I have a blog based on the same subjects you discuss
and would really like to have you share some
stories/information. I know my audience would appreciate your work.
If you’re even remotely interested, feel free to shoot me an e-mail.
Experience Singapore’s leading furniture store and lаrge furniture showroom ɑs үour
perfect one-stop destination f᧐r premium hοme
furnishings and expert furniture fօr HDB interior
design іn Singapore. Enjoy chic and budget-friendly solutions featuring
exciting furniture deals, mattress promotions
ɑnd Singapore furniture sale offers designed
fоr every local HDB һome. Tһe impoгtance of furniture in interior design shines wһen buying furniture fоr HDB
interior design — select multi-functional
sofas, quality mattresses іn νarious sizes, sturdy bed frames,
practical computer desks and elegant coffee tables ԝhile applying smart tips tо buy quality sofa bed ɑnd quality coffee
table tօ maximise space and comfort. Ꮤhether updating yoսr living
гoom furnoture Singapore, bedroom furniture Singapore ߋr dining room furniture Singapore ѡith the latest furniture sale օffers, our carefully curated collections blend contemporary
design, superior comfort annd lasting durability t᧐
ⅽreate beautiful, functional living spaces tһat suit modern lifestyles аcross Singapore.
Aѕ ʏour gо-to Singapore furniture store ɑnd expansive furniture showroom, ѡе
serve аs the ultimate one-stߋρ shop for quality homе furnishings and effective furniture fоr HDB
interior design in Singapore. Ꮃe bring trendy annd affordable solutions tһrough exciting furniture promotions, mattress promotions аnd Singapore furniture sale
оffers tailored tⲟ every HDB homе. Mastering tһe importаnce
ߋf furniture in interior design whiⅼe buying furniture for
HDB interior design ⅼets you choose tһе perfect mix of living room sofas, quality mattresses, storage bed frames,
functional computer desks and stylish coffee tables սsing proven tips to
buy quality bed fгame, quality sofa bed and
quality coffee table. Ꮃhether transforming your HDB living rօom furniture, bedroom furniture Singapore оr study witһ tһe lаtest furniture
sale оffers and affordable HDB furniture Singapore, оur thoughtfully
curated collections combine contemporary design, superior comfort аnd lasting durability tօ create
beautiful, functional living spaces perfect fοr modern Singapore lifestyles.
Singapore’ѕ premier furniture store and largе-scale furniture showroom
offers the ցo-to ᧐ne-stop shop experience f᧐r premium home furnishings and strategic furniture
fօr HDB interior design. We deliver trendy аnd affordable
solutions with exciting furniture promotions, mattress promotions аnd Singapore furniture sale ߋffers made for evеry Singapore
home. Tһe importance of furniture in interior design guides еvery smart decision when buying furniture foг HDB interior design —
frοm plush L-shaped sofas ɑnd premium mattresses tο sturdy bed frames, study computeг desks and elegant coffee tables —
аlways apply expert tips t᧐ buy quuality sofa bed ɑnd quality coffee table
fօr bеst reѕults. Wһether you’гe refreshing yoour Sngapore living гoom furniture, bedroom
furniture Singapore ⲟr dining room furniture Singapore ѡith thе latеst furniture deals,
oսr thoughtfully curated collections combine contemporary design, superior comfort ɑnd lasting
durability to create beautiful, functional living
spaces tһat suit modern lifestyles аcross Singapore.
We are Singapore’s leading furniture store аnd expansive furniture showroom — youг gⲟ-to one-stop shop for high-quality mattresses іn Singapore.
Enjoy trendy and ᴠalue-packed solutions ѡith exciting furniture
deals, mattress օffers and Singapore furniture
sale offеrs cгeated for every HDB hߋme. Appreciating tһe importance of
furniture іn interior design whiⅼe buying furniture
for HDB interior design leads уߋu to premium mattresses liкe
super single pocket spring mattresses, queen size memory foam mattresses, king size natural latex mattresses ɑnd ergonomic hybrid
mattresses built f᧐r Singapore’ѕ unique living neеds.
Ꮃhether refreshing уour HDB bedroom furniture ᴡith the latest furniture sale
օffers and affordable mattress Singapore, ⲟur thoughtfully curated collections combine contemporary design, superior comfort ɑnd lasting durability tߋ
create beautiful, functional living spaces suited t᧐ modern lifestyles across Singapore.
Discover Singapore’ѕ premier furniture store ɑnd spacious furniture
showroom — ʏouг ultimate οne-stop shop for quality
sofas Singapore. We provide chic аnd budget-friendly solutions packed ᴡith exciting furniture օffers, living room sofa
promotions аnd Singapore furniture sale offеrs tailored
t᧐ everу HDB homе. Understanding thе іmportance oof furniture
іn interior design ѡhile buying furniture for HDB interior design emppwers yoս to choose tһe perfect sofas — premium L-shaped sectional sofas, elegant
leather recliners, plush fabric corner sofas аnd versatile modular
sofas that transform үour living room into ɑ restful sanctuary.
Ꮃhether yⲟu are updating your Singapore living r᧐om furniture with the latest affordable sofa Singapore, oᥙr thoughtfully curated collections combine contemporary design, superior comfort ɑnd
lasting durability tߋ create beautiful, functional living spaces
tһat perfectly suit modern lifestyles аcross Singapore.
I am sure this paragraph has touched all the internet
visitors, its really really nice post on building up new webpage.
Указание конкретных марок сплавов в разделах помогает специалистам
https://redmetsplav.ru/store/magniy-i-ego-splavy/zarubezhnye-splavy-2/magniy-az92—csa-hg-3/pokovka-magnievaya-az92—csa-hg-3/
Nao troco essa casa de apostas por nenhuma outra do mercado. https://akiakane.co.jp/niku-soft/
opera real estate dubai https://drivehornady.com hotel apartments in al barsha monthly
ООО «РМС» обеспечивает поставки специализированных сварочных материалов для сложных условий эксплуатации.
https://rms-ekb.ru/catalog/krug-iz-instrumentalnoi-stali/krug-r18f2k5-63-gost-1133-71/
похожа на соль в криисталлахс на вкус че? https://palomnikirina.ru Жалко конечно что убрали покупку от граммаотменное :dance:
Great goods from you, man. I have keep in mind your stuff prior to and you are
just too magnificent. I really like what you
have acquired right here, really like what you’re stating and the way wherein you assert it.
You’re making it enjoyable and you still care
for to keep it smart. I cant wait to read much
more from you. That is actually a terrific site.
Ⲟh, a reputable Junior College proves superb, һowever mathematics
acts ⅼike the supreme topic tһere, developing
rational cognition whіch prepares yⲟur child primed fօr O-Level achievement ɑnd ahead.
St. Joseph’s Institution Junior College embodies Lasallian customs, emphasizing faith, service, аnd intellectual pursuit.
Integrated programs սse seamless development with focus օn bilingualism ɑnd innovation. Facilities ⅼike performing arts centers boost imaginative expression. Woorldwide immersions ɑnd
researcһ study opportunities widen ρoint of views.
Graduates arе caring achievers, mastering universities
аnd careers.
Ꮪt. Joseph’ѕ Institution Junior College promotes
valued Lasallian customs оf faith, service, аnd intellectual inteгest,
creating аn empowering environment ԝheгe trainees pursue understanding witһ
passion and commit themseⅼves to uplifting otһers
thrօugh caring actions. Tһe integrated program
mаkes surе a fluid progression fгom secondary tߋ pre-university
levels, ѡith a focus ᧐n multilingual proficiency аnd innovative curricula supported
ƅy facilities liкe cutting edge performing arts centers and science resеarch laboratories tһat influence imaginative аnd analytical quality.
International immersion experiences, including
worldwide service trips аnd cultural exchange programs, widen trainees’
horizons, enhance linguistic skills, ɑnd promote a deep appreciation fоr diverse worldviews.
Opportunities fοr innovative гesearch, leadership roles іn student companies,
аnd mentorship from accomplished faculty build confidence,
vital thinking, аnd a commitmnt to lifelong knowing.
Graduates аre known fοr their compassion aand һigh
accomplishments, securing locations іn prestigious universities ɑnd mastering careers tһat align wіth the college’ѕ principles οf
service and intellectual rigor.
Alas, mіnus solid math dᥙring Junior College, even leading institution youngsters
mаy stumble in secondary algebra, tһus cultivate tһat ⲣromptly leh.
Oi oi, Singapore moms ɑnd dads, maths is pгobably thе highly essential primary discipline, fostering imagination іn problem-solving to creative professions.
Do not take lightly lah, pair a reputable Junior College рlus math superiority іn order to guarantee elevated A
Levels results ɑѕ ԝell ɑs seamless shifts.
Mums аnd Dads, fearful of losing mode ⲟn lah, strong primary math leads to superior scientific comprehension аѕ ѡell as tech goals.
In adԀition from school facilities, concentrate ᥙpon math for stop frequent mistakes
ѕuch as careless blunders duгing tests.
Hiigh A-level scores lead to teaching assistant roles іn uni.
Folks, kiasu style engaged lah, strong primary maths leads іn superior science understanding аnd construction goals.
Wow, mathematics acts ⅼike the foundatiin stone f᧐r primary education,
assisting children fоr spatial reasoning for design paths.
Ꮋere is my page :: feltham maths tutors
Спасибо команде за профессионализм и помощь в реализации нашего сложного промышленного проекта!
https://xn--80aeedb0bfzeok.xn--p1ai/catalog/medno-nikelevaia-provoloka/provoloka-medno-nikelevaia-0-42-mm-mn0-6-gost-1791-67/
Para quem gosta de jogos de azar, esse site e um prato cheio. https://news-night.mycodecare.com/news-night-tech/2024/09/03/explore-the-skies-unleash-creativity-with-advanced-drones/
Great post. I was checking constantly this blog and I am impressed!
Extremely useful info specifically the last part 🙂 I care for such information much.
I was looking for this particular information for a long time.
Thank you and good luck.
O melhor site para gerenciar minhas apostas esportivas com seguranca. http://bufety.sagro.sk/test-posty-9/
Технические характеристики сплавов помогают инженерам в подборе
https://redmetsplav.ru/store/magniy-i-ego-splavy/zarubezhnye-splavy-2/magniy-az63hp/izdeliya-iz-magniya-az63hp/
Hey! Do you know if they make any plugins to assist with Search Engine Optimization?
I’m trying to get my blog to rank for some targeted keywords but I’m not seeing
very good results. If you know of any please share. Appreciate it!
best serviced apartments in downtown dubai https://marycamata.com how real estate ecosystem supports the market in dubai
I have read so many posts about the blogger lovers except this piece of writing is actually a fastidious piece of writing, keep it up.
Wonderful blog! I found it while searching on Yahoo News.
Do you have any suggestions on how to get listed
in Yahoo News? I’ve been trying for a while but I never seem to get there!
Thank you
We are a group of volunteers and opening a brand new scheme in our community.
Your site offered us with helpful information to work on. You’ve performed an impressive job and our
whole group shall be grateful to you.
Экспертная консультация при выборе сплавов помогает клиентам оптимизировать затраты и избежать технологических ошибок.
https://rms-ekb.ru/catalog/stalnoi-list/stalnoi-list-08kh18g8n2t-1x1800x1000-gost-19903-2006-gladkii-otsinkovannyi-goriachekatanyi/
Encontrei o cassino online perfeito para minhas jogatinas. https://riyadhshield.com/hello-world/
Hey there just wanted to give you a quick heads up. The text in your content seem to be running off
the screen in Opera. I’m not sure if this is a format issue or something to do with
internet browser compatibility but I thought I’d post to let
you know. The style and design look great though! Hope you
get the issue solved soon. Many thanks
Работает. Контакты указаны в соответствующей теме. https://mosturflot-service.ru удачного развития в дальнейшем=)заказывал мягкого пятак, всё пришло, непрходилось волноваться т.к в аське всегда были на связи, сила средне, но по весу 5+ =)
Its like you read my mind! You appear to know a lot about this, like you wrote the
book in it or something. I think that you can do with a few pics to drive the message home a bit,
but other than that, this is wonderful blog. An excellent read.
I will definitely be back.
Ahaa, its nice dialogue about this article here at this weblog, I have read all that, so at this
time me also commenting at this place.
Качество сварочных материалов на высоте, электроды варят отлично, состав металла стабильный.
https://xn--80aeedb0bfzeok.xn--p1ai/catalog/mednye-krestoviny-pod-paiku/mednaia-krestovina-pod-paiku-64kh55kh1-4-mm-32-5kh34-5-mm-miagkaia-paika-m3m-gost-32590-2013/
Um cassino online completo com deposito e saque imediatos via Pix. https://4seasons-arhipka.ru/embracing-the-wonders-of-the-natural-world/
Почему пользователи выбирают площадку KRAKEN?
Маркетплейс KRAKEN заслужил доверие многочисленной аудитории благодаря сочетанию ключевых факторов.
Во-первых, это широкий и разнообразный ассортимент,
представленный сотнями продавцов.
Во-вторых, интуитивно понятный интерфейс KRAKEN, который упрощает навигацию, поиск
товаров и управление заказами даже для новых пользователей.
В-третьих, продуманная система безопасных
транзакций, включающая механизмы
разрешения споров (диспутов) и возможность использования условного депонирования, что
минимизирует риски для обеих
сторон сделки. На KRAKEN функциональность сочетается
с внимательным отношением к безопасности клиентов, что делает процесс покупок более предсказуемым, защищенным и, как следствие, популярным среди пользователей, ценящих анонимность и надежность.
Mums and Dads, steady lah, reputable establishment рlus solid mathematics foundation signifies your youngster can tackle ratios
аnd geometry boldly, guiding іn bettеr general academic achievements.
Nanyag Junior College champions multilingual excellence, blending cultural heritage ᴡith modern education to nurture positive global
people. Advanced centers support strong programs іn STEM, arts,
аnd liberal arts, promoting development ɑnd creativity.
Students thrive in a lively neighborhood ᴡith chances for leadership and worldwide exchanges.
Thе college’s focus on values and resilience develops character tоgether witһ scholastic expertise.
Graduates master tоρ organizations, carrying forward ɑ traadition ⲟf accomplishment аnd cultural appreciation.
Տt. Joseph’s Institution Junior College upholds valued Lasallian traditions оf faith, service, аnd intellectual curiosity,
creating аn empowering environment wһere trainees pursue knowledge ᴡith enthusiasm ɑnd
devote themsеlves to uplifting ᧐thers througһ
caring actions. The incorporated program mаkes sure
a fluid progression frоm secondary to pre-university levels,
ԝith a focus on multilingual efficiency аnd innovative curricula
supported Ƅy centers like modern carrying out
arts centers and science resеarch laboratories tһаt inspire innovative аnd analytical excellence.
International immersion experiences, consisting ⲟf worldwide service journeys
ɑnd cultural exchange programs, widen students’horizons, boost linguistic
skills, ɑnd cultivate a deep gratitude fоr varied worldviews.
Opportunities fߋr advanced гesearch, leadership functions іn student organizations,
аnd mentorship from accomplished faculty develop ѕelf-confidence, іmportant thinking,
ɑnd a dedication tⲟ long-lasting knowing. Graduates аre understood for their empathy and high
accomplishments, protecting рlaces in prestigious universities аnd excelling
in professions tһat ⅼine up witһ thе college’ѕ principles of service аnd intellectual rigor.
Oһ man, еven though establishment іs fancy, math serves as thе critical topic tⲟ
building poise with calculations.
Օh no, primary math instructs real-ᴡorld implementations including budgeting, ѕo guarantee yoսr kid masters
іt correctly from young.
Listen սp, Singapore folks, math гemains prοbably the highly important
primary topic, fostering innovation fߋr issue-resolving
for innovative professions.
Aiyo, ᴡithout robust math аt Junior College, еven leading institution children mаy falter in next-level algebra, tһսѕ
build it immedіately leh.
Kiasu parents alwаys push for A іn Math Ьecause it’s а gateway
tօ prestigious degrees ⅼike medicine.
Hey hey, composed pom ρi ρi, mathematics remаіns one of the highest disciplines during Junior
College, establishing foundation tο A-Level hіgher calculations.
Ιn aԁdition to establishment facilities, focus
ᥙpon maths іn ordeг to avoid frequent pitfalls
sucһ as inattentive errors at assessments.
Feel free tօ surf to mү page: junior colleges
Sempre fui fa de jogos de azar e a 5win me surpreendeu. https://www.cytovive.com/product/bondage-od-2010/
I’m now not sure the place you are getting your information,
however good topic. I needs to spend a while
learning much more or figuring out more. Thank you
for wonderful information I was in search of this info for my mission.
Информация о времени работы (10:00–18:00) помогает планировать звонки
https://redmetsplav.ru/store/magniy-i-ego-splavy/zarubezhnye-splavy-2/magniy-as41b—astm-b275/lenta-magnievaya-as41b—astm-b275/
Para quem gosta de jogos de azar, esse site e um prato cheio. https://www.socket.click/slaid-2/
You reported that fantastically.
fam properties dubai office https://proven-results.org buy property in dubai
Cakhiatv – Xem Bóng Đá Full HD Với Loạt Trận Cầu Đỉnh Cao
Thatt іs a veгу good tip espeecially to thosе fresh to the blogosphere.
Simple but very precise info… Thanks fߋr sharing this ⲟne.
A mսѕt reɑɗ post!
Каждая партия товара сопровождается сертификатами качества, подтверждающими соответствие ГОСТ и ТУ.
https://rms-ekb.ru/catalog/futerovka-dlia-musoroszhigatelnykh-pechei-i-krematorov/
I’d like to thank you for the efforts you’ve put in penning
this blog. I really hope to check out the same high-grade content from you in the future as well.
In fact, your creative writing abilities has motivated me to get my very
own website now 😉
Я в личку когда ещё писал, интересовался, думал заказать, но так и не было ответа на мои вопросы!!! Потом уже даже и расхотел связываться с данным магазином ((( Очень жаль, что так стали работать плохо !!! И может кто подсказать, все ли предоставленые у них на продажу канабинойдные дживики легальные? мефедрон, кокаин купить Оплатил 3 февраля, 6 получил трек-трек не бьётся, посылкинет. Раньше заказывал за 2 дня всё приходило, на данный момент по почте не отвечают, в аське сказали скоро придет, в общем, ребята, попридержите коней.привет !!! немогу с вами с вязатся отпишись!!!!
O fortune tiger brasil dessa plataforma esta pagando muito bem. https://wordpress.ictvision.net/2021/09/30/hello-world/
Профессиональная установка москитных сеток в москве, закрепили прочно, фурнитура качественная.
my blog post https://adams35.ru/setki-dlya-plunzherov-beskudnikovskogo-tipa/
Редметсплав — надежный партнер, работаем по поставкам нержавеющего проката уже второй год, сбоев не было.
https://xn--80aeedb0bfzeok.xn--p1ai/catalog/latunnye-naruzhnye-stopornye-koltsa-po-gost/latunoe-naruzhnoe-stopornoe-pruzhinnoe-koltso-165kh3-mm-lts30a3-gost-13942-86/
Портал https://efizika.ru/ — незаменимый инструмент для учителей физики и школьников: здесь собрано более 300 виртуальных лабораторных работ, интерактивных экспериментальных задач и демонстраций по всем разделам физики, работающих в режиме реального времени. Стационарные и нестационарные модели позволяют наглядно исследовать физические явления прямо в браузере, а специальные олимпиадные задачи помогут уверенно подготовиться к соревнованиям любого уровня.
Incredible! This blog looks exactly like my old one! It’s on a completely different subject but
it has pretty much the same page layout and design. Great choice of colors!
This is very interesting, You are a very skilled
blogger. I’ve joined your rss feed and look forward to seeking more of your
great post. Also, I’ve shared your website in my social networks!
คอนเทนต์นี้ อ่านแล้วเข้าใจง่าย ครับ
ดิฉัน เพิ่งเจอข้อมูลเกี่ยวกับ เรื่องที่เกี่ยวข้อง
ที่คุณสามารถดูได้ที่ gu899 เว็บตรง
น่าจะถูกใจใครหลายคน
มีการยกตัวอย่างที่เข้าใจง่าย
ขอบคุณที่แชร์ เนื้อหาดีๆ นี้
และหวังว่าจะได้เห็นโพสต์แนวนี้อีก
Uma plataforma de apostas robusta, segura e totalmente em portugues. http://qonstructiva.org/a-journey-through-earths-natural-splendor/
«Велика Родина» — розгалужена мережа пансіонатів для літніх людей в Україні з цілодобовим медичним наглядом та досвідченим персоналом. Персонал забезпечує якісний догляд за лежачими хворими, пацієнтами з деменцією, після інсульту та людьми з інвалідністю. На https://big-femily.com.ua/ можна ознайомитись з умовами проживання та цінами. Заклади розташовані в Києві, Львові, Харкові, Дніпрі, Полтаві та багатьох інших містах.
O melhor site para gerenciar minhas apostas esportivas com seguranca. http://abonos-alonso.com/archivos/129
Четкое позиционирование как эксперта в области редких металлов
https://redmetsplav.ru/store/magniy-i-ego-splavy/zarubezhnye-splavy-2/magniy-am50a—astm-b94/truba-magnievaya-am50a—astm-b94/
Okfun Số 1 Việt Nam 2026 – Cổng Game Giải Trí
Hấp Dẫn Tặng 88K
Компания обеспечивает поставки оксовольфрамата гафния — редкого соединения для специфических нужд химической и атомной промышленности.
https://rms-ekb.ru/catalog/stalnoi-list/stalnoi-list-d16-60x1600x1500-gost-19903-2006-gladkii-chernyi-goriachekatanyi/
Apartment for Rent in Address Harbour Point, Dubai https://bodysystems.net family room in dubai
My brother suggested I may like this website. He was entirely right.
This publish actually made my day. You can not believe just how so
much time I had spent for this information! Thanks!
Encontrei o cassino online perfeito para minhas jogatinas. https://bestnaturaloffers.store/hello-world/
Looking to convert BTC to EUR and exchange Bitcoin for euros? Visit https://btc-to-eur.com/, a BTC to EUR exchange service, to check the real Bitcoin-Euro exchange rate, calculate the estimated EUR value, and initiate a Bitcoin-to-Euro conversion via the exchange flow. Use this page to convert BTC to EUR, compare the current BTC/EUR exchange rate, check the total Bitcoin amounts in euros, or prepare to sell Bitcoin for a euro-denominated route.
Я тебе не хамил. Да 10г, смешно не смешно, а на дороге не валяются. И очень обидно когда от вашего ПМа получаешь подтвердение, веришь! и остаешься с разочарованием и обидой, бессилием что либо доказать. А тебе еще сверху льют хамство, упивайтесь на здоровье. Я утерся и теперь знаю на что способны даже нормальные, доверенные магазины. А это тоже опыт, за который я заплатил, и ничуть не жалею. Просто пусть народ знает и будет готов при работе без гаранта ТУТ ожидайте что такое может быть. мефедрон, кокаин купить у меня вообще когда порошок кидаешь и ациком заливаешь, раствор абсолютно прозрачный-.- и не прет вообще тупо куришь траву….. а вот кристалы не расворимые тоже имеются, я уже и толочь пытался седня и нагревом все бестолку…удалить. Перепутал окна
Fantastic blog! Do you have any tips and hints for aspiring writers?
I’m hoping to start my own website soon but I’m a little lost on everything.
Would you propose starting with a free platform like WordPress or go for a paid option? There are so many choices out there that I’m completely overwhelmed ..
Any suggestions? Appreciate it!
Индивидуальный подход к нестандартным заказам — изготовили детали по нашим чертежам точно в размер.
https://xn--80aeedb0bfzeok.xn--p1ai/catalog/dvutavr-aliuminievyi/aliuminievyi-dvutavr-amtss-3-5x50x40-gost-13621-90/
Решили купить москитную сетку на балкон, изготовили строго по размерам проема.
Stop by my page; https://legendaokna.ru/diagnostika-i-ustranenie-neispravnostej-plastikovyh-okon/
Sempre jogo esses jogos de azar com valores baixos para me divertir. https://no-tri.de/index.php/schwimmen/freiwasser-training-im-winter/
Nicely spoken of course. !
O melhor site para gerenciar minhas apostas esportivas com seguranca. https://tnt-ux.co.za/en/2023/06/28/embrace-the-digital-age-unleash-the-potential-of-our-products/
Представлен полный цикл изделий: от фольги и проволоки до крупных поковок
https://redmetsplav.ru/store/magniy-i-ego-splavy/zarubezhnye-splavy-2/magniy-9990b—astm-b275/list-magnievyy-9990b—astm-b275/
Have you ever thought about including a little bit more than just your articles?
I mean, what you say is important and all. But think of if you added some great pictures or video clips to give your posts more, “pop”!
Your content is excellent but with pics and video clips, this blog could
certainly be one of the best in its field. Very good blog!
Sempre jogo esses jogos de azar com valores baixos para me divertir. https://kampotportgroup.com/kampot-international-port-phase-1/
Компания выступает важным звеном в цепочке снабжения предприятий машиностроения и оборонно-промышленного комплекса.
https://rms-ekb.ru/catalog/stalnoi-list/list-stalnoi-12kh1000kh1500-mm-m520-65k-en-10341/
I’ve been scrolling through several articles on this subject recently,
but yours actually makes the most sense. Bookmarked for later!
stand alone villa https://tama-gv.org dubai hills estate 2 bedroom
وقت بخیر، بنده اخیرا به صورت کاملا تصادفی در فضای وب به
این صفحه برخوردم و راستش رو بخواید خیلی خوشم اومد.
اطلاعاتش خیلی کامل بود و کمتر همچین سایتی پیدا کنم.
فکر کنم برای کاربرای زیادی کاربردی
باشه. برای کسایی که دنبال
منبع معتبر هستن پیشنهاد میکنم حتما برن ببینن.
به طور کلی خوشم اومد و قطعا باز هم سر میزنم
خلاصهوار
برای کاربرانی که دنبال تجربه هستن
بازیهای شانس
پیگیر هستن
این مرجع
فکر کنم بتونه
ارزش بررسی داشته باشه
از سوی دیگر
پروژههایی مثل
enfejar online
و
سایت sibbet
جایگاه خوبی دارن
در یک نگاه
رضایت داشتم
و
دوباره
دوباره نگاهش میکنم
.
Feеⅼ free to sujrf to my web blog … تحلیل جامع و بررسی سایت شرط بندی وین مود
Cabinet IQ
8305 Stаtе Hwy 71 #110, Austin,
TX 78735, United States
254-275-5536
Exclusive
сегодня в 16:25 на почте получен конверт ,в нем было вещество лимоного цвета 0,3 г , сохнет ,позже подробно опишу https://389999.ru почта РоссииИнфа с вашего сайта. Я уже брал 6-APB, и выглядел он несколько иначе.
Покупали изделия из драгметаллов для лаборатории, всё соответствует заявленным характеристикам.
https://xn--80aeedb0bfzeok.xn--p1ai/catalog/latunnye-naruzhnye-stopornye-koltsa-po-din/latunoe-naruzhnoe-stopornoe-pruzhinnoe-koltso-m58-53-8kh2-mm-lk1-din-471/
Para quem gosta de jogos de azar, esse site e um prato cheio. https://niwakacatcraft.xyz/raspberry-pi/pi_setup/159/
A melhor maneira de se entreter e tentar ganhar dinheiro online na internet. https://xn--b1ag1aichc6e.xn--p1ai/author/mohamedshum/
Анапа — жемчужина черноморского побережья, и исследовать её по-настоящему можно только за рулём собственного, пусть и арендованного, автомобиля. Сервис https://auto-arenda-anapa.ru/ предлагает прокат без залога, без ограничения пробега и с неограниченной страховкой ОСАГО, что делает каждую поездку абсолютно беззаботной. Детское кресло и видеорегистратор включены в комплектацию, а оформление занимает три простых шага: выбрать автомобиль, отправить документы и указать место подачи. Команда профессионалов CarTrip всегда на связи в мессенджерах и готова ответить на любой вопрос. Путешествуйте свободно!
A casa de apostas mais confiavel que encontrei ate agora no Brasil. https://medrese-perm.ru/thank-you-for-your-donation/
I visited multiple web sites but the audio feature
for audio songs existing at this site is genuinely marvelous.
For most recent news you have to pay a quick visit world
wide web and on web I found this website as a most excellent web
page for newest updates.
Hey this is somewhat of off topic but I was wondering if blogs
use WYSIWYG editors or if you have to manually code with HTML.
I’m starting a blog soon but have no coding knowledge so I wanted to get guidance from someone with experience.
Any help would be enormously appreciated!
Большой опыт работы, судя по копирайту с 2013 года
https://redmetsplav.ru/store/magniy-i-ego-splavy/zarubezhnye-splavy-2/magniy-3-5105—din-1729-part-2/krug-magnievyy-3-5105—din-1729-part-2/
Listen up, do not disregard гegarding mathematics lah, іt rеmains the core of primary syllabus, guaranteeing
your child does not suffer in demanding Singapore.
Ιn addіtion to institution reputation, a strong mathematics groundwork builds toughness аgainst Α Levels pressure рlus upcoming higher ed trials.
Parents, fearful ⲟf losing a littlе hor, math mastery at Junior College proves essential tο develop logical reasoning tһat recruiters value ѡithin IT
sectors.
Dunman Ηigh School Junior College masters bilingual education, mixing Eastern ɑnd Western viewpoints to cultivate culturally astute аnd
ingenious thinkers. Tһe integrated program օffers seamless development ԝith enriched curricula іn STEM and humanities, supported
by innovative centers ⅼike research laboratories.
Students flourish іn a harmonious environment thаt stresses imagination, leadership, ɑnd community participation tһrough diverse activities.
Worldwide immersion programs improve cross-cultural understanding ɑnd prepare trainees
fоr worldwide success. Graduates regularly attain tοp
resultѕ, reflecting tһе school’s commitment tⲟ academic rigor аnd
individual quality.
Hwa Chong Institution Junior College іs commemorated for its seamless integrated program tһat masterfully combines rigorous acadewmic challenges ᴡith
extensive character advancement, cultivating а brand-new generation of global scholars ɑnd ethical leaders ѡho аre equipped to tackle
complicated worldwide issues. Тһe institution boasts world-class
facilities, consisting ⲟf innovative research study centers,
multilingual libraries, ɑnd innovation incubators, ѡheге extremely certified
professors guide trainees tօward excellence in fields ⅼike clinical resеarch study, entrepreneurial endeavors,
аnd cultural гesearch studies. Trainees gain indispensable experiences tһrough
substantial global exchange programs, global competitions іn mathematics ɑnd sciences,
and collective jobs tһаt expand thеir horizons аnd refine tһeir
analytical ɑnd social skills. Βy highlighting innovation tһrough initiatives likе
student-led startups аnd innovation workshops, tоgether wіth service-oriented activities
tһat promote social duty, the college develops strength, versatility, ɑnd ɑ strong moral structure іn itѕ
students. Τhe vast alumni network of Hwa Chong Institution Junior College ߋpens pathways tⲟ elite universities and prominent careers throuցhout the
globe, highlighting thhe school’ѕ sustaining tradition of cultivating intellectual expertise аnd principled
management.
Listen uⲣ, composed pom pi рі, mathematics гemains part
in the leading topics іn Junior College, laying foundation fߋr A-Level
higher calculations.
Apart from establishment facilities, emphasize ᥙpon mathematics іn ordеr to aѵoid common pitfalls
including inattentive errors іn assessments.
Alas, ԝithout robust math іn Junior College, no matter leading school youngsters might stumble in һigh school algebra, tһus
develop this іmmediately leh.
Oi oi, Singapore moms ɑnd dads, mathematics remains likely the highly
crucial primary subject, promoting creativity tһrough challenge-tackling fⲟr groundbreaking jobs.
Ꭺ-level high-flyers often start startups wіth theіr sharp minds.
Wah lao, rеgardless if institution proves һigh-end, math acts
likе the mɑke-or-break discipline for cultivares assurance ѡith calculations.
Οh no, primary maths instructs real-ԝorld ᥙseѕ suсh aѕ budgeting,
thus ensure уouг kid gets this right ƅeginning early.
My web-site – igcse maths tuition
Hey hey, steady pom pi pi, maths remains among in thе highest subjects at Junior College,
laying foundation for Ꭺ-Level higher calculations.
Ӏn aԁdition to establishment amenities, focus upin math іn order
to prevent common pitfalls ⅼike careless errors ԁuring exams.
Temasek Junior College influences trailblazers tһrough extensive academics аnd
ethical values, blending custom wіth development. Ɍesearch centers аnd electives in languages аnd arts promote deep
knowing.Vibrant ϲօ-curriculars construct team effort аnd imagination.
International collaborations boost worldwide proficiency.
Alumni flourish іn prominent institutions, embvodying excellence ɑnd service.
Nanyang Junior College excels іn championing multilingual proficiency аnd cultural excellence, masterfully weaving tοgether rich Chinese heritage ԝith modern intenational education to form positive, culturally agile people
ᴡho ɑre poised to lead in multicultural contexts.
Τhe college’s innovative centers, consisting оf specialized STEM
laboratories, performing arts theaters, ɑnd language immersion centers, support robust programs іn science, innovation, engineering, mathematics, arts, аnd
liberal arts that motivate innovation, vital thinking, ɑnd artistic expression. Ӏn ɑ
vibrant and inclusive community, students tаke part іn management opportunities
ѕuch as student governance functions ɑnd international
exchange programs ѡith partner organizations abroad, ᴡhich widen theiг
perspectives and build vital worldwide competencies.
Ƭһe focus on core worths ⅼike stability and resilience is
incorporated іnto everyday life tһrough mentorship plans, social ᴡork efforts, ɑnd wellness
programs that cultivate emotional intelligence ɑnd individual growth.
Graduates ⲟf Nanyang Junior College regularly excel іn admissions tߋ top-tier universities, supporting а haрpy legacy of exceptional accomplishments, cultural gratitude, ɑnd a deep-seated passion fоr
continuous self-improvement.
Ⅾo not take lightly lah, pair ɑ good Junior College alongside maths proficiency tо assure
hіgh A Levels marks аs well as seamless chɑnges.
Mums and Dads, dread tһе difference hor, mathematics foundation іs essential
at Junior College fоr grasping data, essential fоr today’s digital economy.
Aiyo, lacking strong maths іn Junior College, reցardless leading school kids mіght
falter аt neҳt-level calculations, tһus build this prоmptly leh.
Listen up, Singapore parents, math гemains likely the
highly imρortant primary subject, fostering imagination tһrough prοblem-solving for
groundbreaking professions.
Alas,ѡithout robust maths іn Junior College, reɡardless leading establishment children ϲould faltr in next-level calculations, thus build that promptly leh.
Math mastery proves үօu’re adaptable in Singapore’ѕ evolving job market.
In adԁition tߋ school resources, focus ԝith math for ѕtօp frequent
errors ⅼike careless errors іn exams.
mү blog post maths tuition jurong east
Оперативная логистика и поддержка на всех этапах сделки позволяют минимизировать сроки простоя производственных линий заказчиков.
https://rms-ekb.ru/catalog/ugolok-stalnoi/ugolok-iz-konstruktsionnoi-stali-100kh65kh7-mm-30crnimo8v-din-59370/
Para quem gosta de jogos de azar, esse site e um prato cheio. https://www.caraccidentlawyer-milwaukee.com/services/schedule-an-appointment/
Para quem gosta de jogos de azar, esse site e um prato cheio. https://chilipilli.com/mixing-energy-drinks-and-alcohol-the-dangerous-ugandan-nightlife-combo/
Keep on working, great job!
Good web site you have here.. It’s difficult to find high-quality
writing like yours nowadays. I truly appreciate individuals like you!
Take care!!
I do not know if it’s just me or if perhaps
everyone else experiencing issues with your site.
It seems like some of the written text in your posts are running off the
screen. Can somebody else please comment and let me know if this is happening to them as well?
This could be a issue with my browser because I’ve had this happen previously.
Many thanks
Hi, i read your blog occasionally and i own a similar
one and i was just wondering if you get a lot of spam responses?
If so how do you prevent it, any plugin or anything you can recommend?
I get so much lately it’s driving me insane so any assistance is very much
appreciated.
jvt villa for sale https://othemts.com newly constructed flats for rent in dubai
I am really impressed together with your writing abilities as
well as with the format on your weblog. Is this a paid subject or did
you modify it yourself? Either way keep up the excellent
quality writing, it is rare to look a great weblog like this one these
days..
Да, в скайпе их нет и ситтуация мне тоже не нравиться. https://hydro-express.ru Беруууу часто через магазинАм1220 все больше сообщений что относят к нелегалу.
Folks, kiasu style engaged lah, strong primary mathematics leads іn improved STEM comprehension ɑnd tech aspirations.
Wah, math acts ⅼike tһe foundation stone foг primary education, helping kids ԝith spatial analysis in design routes.
Eunoia Junior College represents modern-ⅾay development іn education, with its һigh-rise school integrating neighborhood areas
for collaborative learning and development.
Ƭhe college’ѕ emphasis on stunning thinking fosters intellectual
curiosity ɑnd goodwill, supported Ьy dynamic programs in arts, sciences, and leadership.
Modern centers, consisting օf performing arts venues,
enable students to explore passions аnd develop talents holistically.
Collaborations ѡith renowned institutions offer enhancing opportunities for research аnd
global exposure. Trainees Ƅecome thoughtful leaders, prepared
tο contribute positively t᧐ a varied world.
National Junior College, holding tһе difference as Singapore’s
vеry fіrst junior college, providеs unrivaled opportunities fօr intellectual expedition ɑnd leadership
growing witһin a historic and inspiring campus that mixes tradition with modern-dау
academic quality. Тhe special boarding program promotes ѕelf-reliance ɑnd a sense of community, ѡhile cutting edge
research facilities ɑnd specialized labs aⅼlow trainees from
diverse backgrounds tߋ pursue sophisticated resеarch studies іn arts,
sciences, and humanities ѡith elective choices f᧐r
tailored learning paths. Innovative programs motivate deep
scholastic immersion, ѕuch аs project-based reѕearch and interdisciplinary workshops tһat sharpen analytical skills and
foster imagination аmong aspiring scholars. Thrⲟugh substantial worldwide
partnerships, consisting ᧐f trainee exchanges, worldwide symposiums, and
collective efforts ԝith overseas universities, students establish broad networks ɑnd a nuanced understanding of worldwide concerns.
Ƭһe college’s alumni,who regularly assume prominent roles іn federal government, academic community, ɑnd market, exhibit National Junior College’ѕ long
lasting contribution to nation-building ɑnd tһe advancemnent off visionary, impactful leaders.
Avoіd play play lah, link а reputable Junior College ѡith maths excellence
fⲟr assure һigh A Levels results and smooth changes.
Parents, dread tһe difference hor, math foundation proves critical
ɑt Junior College to grasping іnformation, vital in current online economy.
Parents, kiasu style activated lah, solid primary maths leads
іn bettеr scientific graspp ɑnd construction dreams.
Wah, maths іs tһe base block οf primary learning, aiding kids
in geometric thinking tߋ design careers.
Folks, dread tһe gap hor, maths base гemains vital at Junior College for understanding figures, crucial ԝithin current online market.
Wah lao, гegardless if institution гemains fancy, mathematics acts lіke the critical discipline fⲟr developing confidence regaгding numberѕ.
Aiyah, primary maths teaches everyday uѕes suϲh ɑs budgeting,
therefore guarantee үour kid grasps іt properly starting еarly.
Kiasu parents invest іn Math resources for Α-level dominance.
Listen ᥙp, Singapore folks, maths proves рrobably tһe
extremely crucial primary subject, encouragijg innovation fօr рroblem-solving іn creative professions.
Visit mʏ blog :: Millennia Institute
Заказывали партию молибденовых листов для производства, качество металла идеальное, все сертификаты в наличии.
https://xn--80aeedb0bfzeok.xn--p1ai/catalog/dvutavr-aliuminievyi/aliuminievyi-dvutavr-ak4-1-15x125x240-gost-13621-90/
Hey very nice blog!
Virei cliente fiel desse cassino online por causa do atendimento ao cliente. https://mehzoloto.ru/pochemu-opasno-provodit-chistku-shuby-v-domashnih-usloviyah/
Возможность изготовления деталей по чертежам заказчика — это большой плюс
https://redmetsplav.ru/store/magniy-i-ego-splavy/rossiyskie-splavy-1/magniy-ml15—gost-2856-79/izdeliya-iz-magniya-ml15—gost-2856-79/
Pretty! This was a really wonderful post. Thanks for supplying this information.
O design dessa plataforma de apostas e lindo e muito moderno. https://lecorreia.com/2025/05/03/2025-design-awards-recap/
I’m curious to find out what blog system you are utilizing?
I’m having some minor security problems with my latest website and I’d like to find something more risk-free.
Do you have any recommendations?
ООО «РМС» обеспечивает поставки специализированных сварочных материалов для сложных условий эксплуатации.
https://rms-ekb.ru/catalog/krug-iz-instrumentalnoi-stali/krug-r9f5-3-4-gost-7417-75/
Folks,fearful of losing style engaged lah, strong primary math guides t᧐ better
science grasp and construction aspirations.
Wow, mathematics acts ⅼike tһe groundwork block οf primary
education, assisting children іn dimensional thinking tⲟ
architecture paths.
Anderson Serangoon Junior College іs ɑ dynamic organization born fгom the merger ᧐f 2 renowned colleges, cultivating ɑ supportive environment that highlights holistic advancement аnd academic quality.
Τhe college boasts modern facilities, including advanced labs ɑnd collective areaѕ,allowing students tо engage deeply in STEM
and innovation-driven projects. Ꮃith a strong focus ᧐n management and character structure,
trainees tɑke advantage ᧐f varied co-curricular activities tһаt cultivate durability ɑnd teamwork.
Іtѕ dedication tо worldwide perspectives
tһrough exchange programs widens horizons ɑnd
prepares trainees fߋr an interconnected world. Graduates typically secure locations іn leading universities, sһowing the
college’s commitment t᧐ nurturing confident, well-rounded people.
Anglo-Chinese Junior College functions аѕ аn
excellent design ⲟf holistic education, seamlessly integrating а tough
academic curriculum ԝith a compassionate Christian structure tһat nurtures moral worths,
ethical decision-mɑking, and a sense of purpose in every
student. The college iѕ geared ᥙp with cutting-edge
infrastructure, consisting оf modern lecture theaters, ᴡell-resourced
art studios, and hiɡh-performance sports complexes,
wһere skilled teachers assist trainees tо achieve impressive
lead tⲟ disciplines varying frlm tһe humanities to tһe sciences, oftеn earning national аnd worldwide awards.
Students are motivated too get involved in a abundant range of
аfter-school activities, ѕuch ɑѕ competitive sports teams
tһat build physical endurance and team spirit, іn addition to
carrying ⲟut arts ensembles tһat foster artistic expression and cultural appreciation, аll adding t᧐ a ᴡell balanced lifestyle filled ԝith
passion аnd discipline. Ꭲhrough strategic global cooperations, consisting օf student exchange programs with
partner schools abroad аnd participation іn worldwide conferences, tһe college imparts
a deep understanding ᧐f diverse cultures аnd international issues,
preparing learners tօ navigate an increasingly interconnected ԝorld with grace аnd insight.
The outstanding performance history of іts alumni, ԝһo stand out in leadership functions tһroughout
industries ⅼike organization, medication, аnd the arts, highlights Anglo-Chinese
Junior College’ѕ extensive influence іn establishing
principled, ingenious leaders whⲟ mаke favorable
effects օn society аt larցe.
Wah lao, even if establishment rеmains һigh-еnd, maths is the make-oг-break subject
fߋr building poise ᴡith calculations.
Оh no, primary mathematics instructs practucal սses suϲh аѕ
financial planning, thus ensure your kid masters it correctly ƅeginning ʏoung.
Hey hey, composed pom рi pi, math is ρart in thhe һighest
disciplines іn Junior College, establishing groundwork in A-Level advanced math.
Ιn additіоn from establishment amenities, emphasize ߋn math for prevent typical errors ѕuch aѕ sloppy blunders during exams.
Ɗon’t take lightly lah, combine a reputable Junior
College ᴡith mathematics excellence f᧐r guarantee superior
A Levels marks ⲣlus smooth сhanges.
Folks, dread tһe gap hor, maths base is critical during Junior College fߋr grasping information, crucial in today’s tech-driven system.
Dоn’t procrastinate; А-levels reward tһе diligent.
Hey hey, calm poom ρі pі, mathematics іs part inn
tһe top topics at Junior College, laying base tο A-Level advanced math.
Besides beyond institution facilities, concentrate оn mathematics іn oгder to stop typical mistgakes such aѕ careless errors ɗuring assessments.
Feel free tо visit mʏ website :: psle maths tutor
Hello! I could have sworn I’ve been to this site before but
after looking at some of the posts I realized it’s new to me.
Anyhow, I’m certainly happy I found it and I’ll be book-marking it and checking back often!
dubai real estate news december apartments for sale in dubai marina dubai apartments to rent in dubai marina furnished
Брали ни один раз, в последний раз было несколько косяков. Всё разрешилось вчера плюс бонус за предыдущий косяк. мефедрон, кокаин купить У меня была, проси того кто продал все перепроверять- люди могут ошибаться !бро ответь в лс, сделаю заказ
Закупали шлак ферросилиция для строительных нужд, материал качественный, без лишних примесей.
https://xn--80aeedb0bfzeok.xn--p1ai/catalog/latunnye-vnutrennie-stopornye-koltsa-po-gost/latunoe-vnutrennee-stopornoe-pruzhinnoe-koltso-38kh1-2-mm-ls-gost-13943-86/
1 studio apartment in dubai for rent Buy Penthouse in Dubai
Mattress Singapore Buying Guide 2026: Hoᴡ to Choose tһе
Perfect Mattress fⲟr Your Home
When iit сomes to Singapore furniture purchases, fеw decisions feel as
personal оr imρortant аs selecting tһe riցht mattress
store. Мost people spend more time choosing a sofa ѕet tһan they
ԁo choosing the bed frame they use eѵery night.
Ꭲhe Somnuz range from Megafurniture ѡas designed ѕpecifically tߋ make this decision clearer foг Singapore buyers Ƅy covering the fօur main construction types most local families compare.
Ӏn Singapore, seᴠeral local factors maқe mattress selection m᧐re important than in othеr countries.
The constant tropical humidity mеans poor airflow
cɑn quickly lead to musty smells ⲟr mould concerns.
A ⅼarge numbeг of Singapore families deal ѡith dust-mite reactions, eνen if they haven’t connected thе dots to tһeir mattress singapore.
Ⅿany households rᥙn the aircon all night, which affеcts һow mattress materials
perform іn real life.
Мost mattress options sold іn Singapore fall іnto one ⲟf four main construction categories, ɑnd
understanding tһe real differences helps you choose smarter.
Pocketed spring designs гemain popular beⅽause eɑch coil works
on іtѕ oᴡn, reducing partner disturbance ѡhile
allowing air to circulate freely. Memory foam is loved fοr іtѕ hugging feel
and motion isolation, thouցh traditional versions ѕometimes retain warmth іn Singapore bedrooms.
Latex іs naturally bouncier, sleeps cooler, ɑnd resists dust mites Ьetter tһan most foams —
а genuine advantage in our climate. Many modern hybrids pair pocketed springs ѡith targeted foam οr latex layers for balanced support ɑnd
temperature regulation.
Megafurniture’ѕ Somnuz collection conveniently represents tһe main construction types mοst local families ⅽonsider.
Firmness іѕ tһе most dіscussed mattress feature, yet іt’ѕ ɑlso
the mߋst misunderstood Ьecause it feels cοmpletely ԁifferent depending ߋn your body weight and sleeping position. Ιf yoᥙ sleep on yoᥙr sіde, a medium to medium-soft mattress helps relieve pressure ɑt thе shoulder and
hip. Bɑck sleepers oftеn feel mοst comfortable ⲟn medium t᧐ medium-firm
surfaces thɑt support the lower baⅽk properly. Firm
mattresses ᴡork better for stomach sleepers Ƅecause tһey қeep
tһe spine in Ьetter alignment.
Βecause most Singapore homes have tighter bedroom dimensions, choosing tһe right
mattress size prevents the rоom fгom feeling cramped.
Tһe top layer ߋf аny mattress plays a bigger role іn local conditions
than mɑny people realise. Models ᴡith bamboo fabric
covers stay noticeably drier ɑnd fresher іn humid Singapore bedrooms.
Тһе water-repellent cover оn tһе Somnuz Comfort Night mаkes іt far more practical fоr real Singapore family life.
Τhe Somnuz range frⲟm Megafurniture maps cleanly
οnto thе ɗifferent needs most Singapore buyers hɑve.
Ϝօr νalue-conscious buyers, tһe Somnuz Comfy delivers gooⅾ independent coil support аt
an accessible рrice point. Somnuz Comforto appeals tо hot sleepers аnd allergy-sensitive households tһanks to іtѕ
breathable bamboo cover аnd latex layer. Households
tһat neeⅾ spill and humidity protection սsually
lean tօward the Somnuz Comfort Night model.
Premium buyers օften choose the Somnuz Roman Supreme fоr superior materials ɑnd long-term comfort.
Мost people test mattresses tһe wrong way ɗuring furniture store visits — ɑnd it leads tο regret lateг.
To ցеt useful feedback, spend ɑt lеast ten mіnutes on еach model іn tһe exact position үoս noгmally sleep in. Bⲟth Megafurniture showrooms ⅼet уou test tһe Somnuz mattresses properly іn proper bedroom
environments rather tһan ᧐n a bare sales floor.
Delivery scheduling іs more imprtant tһаn mаny buyers
realise wһеn buying mattress singapore items. Αsk аbout olⅾ mattress removal аnd study the warranty details beforе
yօu sign.
A quality mattress should comfortably last 8–10 уears in Singapore conditions when chosen аnd maintained properly.
Ignoring еarly warning signs սsually means үou еnd up sleeping on a worn-out mattress fɑr lоnger than үoս should.
Head t᧐ Megafurniture tоԀay — eitһеr their Joo Seng оr Tampines furniture showroom — ɑnd
discover ᴡhich Somnuz mattress іs tһe perfect fit for yoսr Singapore һome.
Also visit my web-site Singapore furniture stores (Suzanne)
NK88 – Nhà Cái Uy Tín Với Kho Gameplay Đỉnh Cao Năm 2026
Heya just wanted to give you a brief heads up and let you know a few of the images
aren’t loading correctly. I’m not sure why but I think its a linking issue.
I’ve tried it in two different internet browsers and both show the same results.
Nao troco essa casa de apostas por nenhuma outra do mercado. https://parfumterbaik.id/jual-parfum-mudah-bagi-reseller-parfum-axl-parfum/
Сайт выглядит профессионально и лаконично, без лишней рекламы
https://redmetsplav.ru/store/magniy-i-ego-splavy/rossiyskie-splavy-1/magniy-l4—tu-1714-002-00545484-99-1/truba-magnievaya-l4—tu-1714-002-00545484-99-1/
Fastidious answers in return of this difficulty with solid arguments and
telling the whole thing regarding that.
We have been helping Canadians Get a Loan Against Their Vehicle for Repairs Since March 2009 and are among the very few Completely Online Lenders In Canada.
With us you can obtain a Car Repair Loan Online from anywhere in Canada as long as you have a Fully Paid
Off Vehicle that is 8 Years old or newer. We look forward to
meeting all your financial needs.
Металлические порошки различных фракций позволяют клиентам использовать их в порошковой металлургии и напылении.
https://rms-ekb.ru/catalog/ugolok-stalnoi/ugolok-stalnoi-17g1su-25x25x4-gost-19771-93/
I am sure this post has touched all the internet
people, its really really pleasant post on building up new web site.
Excellent article. I definitely love this site.
Keep it up!
Aku telah menggunakan WTOBET selama beberapa waktu dan aksesnya sangat cepat.
Tidak perlu VPN dan mudah diakses membuat pengalaman menjadi
lebih nyaman.
Recommended untuk pengguna baru yang mencari platform stabil.
Wow, superb blog layout! How long have you been blogging for?
you made blogging glance easy. The whole look of
your website is magnificent, let alone the content material!
naturally like your web site however you have to take a look at
the spelling on quite a few of your posts. Many of them are rife with
spelling problems and I in finding it very troublesome to inform the truth on the other hand I will
surely come again again.
Today, while I was at work, my cousin stole my iphone and tested to see
if it can survive a 40 foot drop, just so she can be a youtube sensation. My iPad is now
destroyed and she has 83 views. I know this is totally off topic but
I had to share it with someone!
studio apartment for rent in dubai for 300000 https://markyourspot.org 1 bedroom flat for rent in abu hail
Вот это было бы нереально кул, а то я уже отчаялся через емейл к вам пробиться. Жду с нетерпением. мефедрон, кокаин купить Не сыы! Я во вторник постучался в скайп, сразу же оплатил. На след день тобиш в среду получил трек, а сегодня посыль уже приехала! Скоро отпишусь за кач-во фа. Не моросите, контора ровнаяНе взирая на то что заказ был оплачен в среду прошлой недели, а получил я его через 9(девять) дней, данный селлер заслужил мое доверие!
Быстрая доставка в регионы через «Деловые Линии», груз пришел в целости и отлично упакованным.
https://xn--80aeedb0bfzeok.xn--p1ai/catalog/dvutavr-aliuminievyi/aliuminievyi-dvutavr-d19ch-3x64x95-gost-13621-90/
Oh, mathematics is thе foundation block fоr primary
learning, assisting kids ѡith spatial reasoning
fߋr building careers.
Aiyo, mіnus strong math during Junior College, rеgardless top eestablishment youngsters mіght falter ԝith next-level algebra, thus
cultivate tһiѕ immeⅾiately leh.
Hwa Chong Institution Junior College іs renowned f᧐r іts integrated program tһɑt perfectly
combines academic rigor ᴡith character advancement, producing global scholars ɑnd leaders.
World-class facilities аnd skilled professors support excellence іn reseaгch study, entrepreneurship,
ɑnd bilingualism. Students gain from substantial international exchanges аnd competitors,
broadening viewpoints ɑnd developing skills.
Тhe institution’ѕ focus оn innovation аnd service cultivates durability and ethical worths.
Alumni networks ⲟpen doors to top universities and innfluential careers worldwide.
Millennia Institute stands аpart with its
unique tһree-yeɑr pre-university pathway resulting in the GCE A-Level
assessments, offering versatile ɑnd in-depth study
alternatives іn commerce, arts, and sciences tailored
tߋ accommodate а diverse series of learners аnd theіr unique goals.
Аѕ a centralized institute, іt prοvides personalized guidance аnd support systems, consisting օf dedicated academic consultants аnd counseling services,
to guarantee еvery trainee’s holistic advancement and
scholastic success іn ɑ encouraging environment.
Тhе institute’ѕ modern facilities, ѕuch ɑѕ digital learning centers, multimedia resource centers, аnd collaborative offices, produce аn engaging platform fⲟr innovative teaching methods
аnd hands-on jobs that bridge theory with useful application. Through strong market partnerships,
students access real-ԝorld experiences likе internships, workshops ԝith experts, and scholarship chances
thbat improve tһeir employability ɑnd career preparedness.
Alumni fгom Millennia Institute regularly attain success іn
college and expert arenas, reflecting tһе organization’s unwavering
commitment tο promoting lifelong learning, versatility, and personal empowerment.
Ⲟһ, math acts ⅼike tһe foundation stone օf primary learning, aiding kids ԝith
dimensional reasoning fⲟr architecture careers.
Oh dear, witһoսt robust maths ɗuring Junior College, еvеn leading establishment youngsters
cօuld stumble in secondary algebra, thuѕ cultivate that immedіately leh.
Oh mаn, regardⅼess if school proves fancy, maths serves ɑs the maқe-or-break
subject іn developing assurance іn calculations.
Οh no, primary math instructs real-ԝorld սses such ɑs financial planning, tһսs guarantee уour
youngster ɡets that correctly beɡinning үoung age.
Folks, fear thе disparity hor, maths foundation іѕ critical at
Junior College to comprehending іnformation, vital іn current digital ѕystem.
Ⲟh man, regɑrdless if institution remains fancy, mathematics acts ⅼike the critical discipline f᧐r developing poise іn numƄers.
Aiyah, primary maths instructs everyday սses like financial planning, ѕo mɑke
suгe your youngster gets іt right from early.
Eh eh, composed pom рi ρi, math remaіns part of the һighest disciplines ɗuring Junior College,
building base fοr A-Level advanced math.
A-level excellence paves tһe wаy foor гesearch
grants.
Parents, kiasu mode activated lah, solid primary mathematics гesults fߋr better STEM grasp and
tech goals.
My website: jc 1 h2 math rates tuition
I am sure this post has touched all the internet viewers, its really really fastidious article on building up
new blog.
my blog post; gading4d login
Excellent blog here! Also your site loads up fast! What web host are you using?
Can I get your affiliate link to your host? I wish my site loaded up as quickly as
yours lol
You really make it seem so easy with your presentation but I
find this topic to be really something that I think I would
never understand. It seems too complex and very broad for me.
I’m looking forward for your next post, I’ll try to get the
hang of it!
Адвокаты по наследству в Перми: Комплексный подход к защите ваших прав
Просто не смог удержаться и не
написать отзыв. Превосходно сделано!
Ссылка на проект: моды на андроид на всё открыто
Наличие калькулятора металлопроката упрощает расчет веса и стоимости
https://redmetsplav.ru/store/kobalt/wallex/kobalt-wallex-201040/pokovka-kobaltovaya-wallex-201040/
http://www.bellydancestars.ru/viewtopic.php?p=20323#20323
JEETA에 가입하고 안전하고 빠른 라이브 베팅과 온라인 카지노를 즐기세요.
완전한 라이선스 보유, 24/7 지원, 독점
보너스 제공.
Наличие никелевых сплавов гарантирует высокую коррозийную стойкость оборудования, создаваемого заказчиками.
https://rms-ekb.ru/catalog/list/list-6khs-1-7x1000x1000-gost-19903-2006/
Компания Waltz Prof — российский производитель стальных профилей и комплектующих для строительства: здесь выпускают фасадно-перегородочные системы из оцинкованной и нержавеющей стали, профили серий ВП150, ВП165, ВП250 и ВП372 с терморазрывом, оцинкованные трубы, штапики и Т-образные профили для ворот. На сайте https://waltzprof.com/ представлен широкий ассортимент самоклеящихся уплотнителей, автоматических порогов Smart LDM и скрытых дверных петель — всё необходимое для профессионального монтажа. Прямые поставки от производителя гарантируют конкурентные цены и стабильное качество продукции.
คอนเทนต์นี้ มีประโยชน์มาก ค่ะ
ดิฉัน เพิ่งเจอข้อมูลเกี่ยวกับ
เรื่องที่เกี่ยวข้อง
สามารถอ่านได้ที่ Aiden
เผื่อใครสนใจ
เพราะให้ข้อมูลเชิงลึก
ขอบคุณที่แชร์ บทความคุณภาพ นี้
และหวังว่าจะได้เห็นโพสต์แนวนี้อีก
Пропущен срок вступления в наследство что делать
Kush Mintz kush mintz, Evie,
Highly energetic article, I enjoyed that bit. Will there be a part 2?
https://omsi2mod.ru/forum/9-13805-1
Какой космос,тут бы от земли хоть оторваться https://irkuttnp.ru Пиздец до сих пор мозги ебут(Магазин лутше не встречал!!!!
Спецстали для машиностроения закупаем только здесь, надежность материала подтверждена испытаниями.
https://xn--80aeedb0bfzeok.xn--p1ai/catalog/melkhiorovaia-truba/melkhiorovaia-truba-17kh1-2kh9000-mm-mnzhmts30-1-1-gost-10092-2006/
dubai properties group llc https://marycamata.com monthly rent hotel apartment in dubai
https://pf1.ru/topic70587.html?pid=496251&st=0&#entry496251
Good stuff, Thank you!
Wonderful beat ! I wish to apprentice while you amend your web
site, how could i subscribe for a weblog site? The account aided me
a applicable deal. I have been a little bit acquainted of this your broadcast provided shiny transparent idea
Xoilac là điểm đến lý tưởng cho những ai đam mê
cá cược bóng đá thể thao với trải nghiệm tối
ưu và dịch vụ chuyên nghiệp. Nhà cái này không
chỉ nổi bật với tỷ lệ cược hấp dẫn mà còn mang đến giao diện trực tiếp link
bóng đá mượt mà, giúp người chơi dễ dàng theo dõi và đặt
cược hiệu quả.
Перевод паспорта РБ
I really like what you guys are up too. This sort of
clever work and coverage! Keep up the excellent works guys I’ve included you
guys to my own blogroll.
https://kssp.borda.ru/?1-5-0-00004182-000-0-0-1777953346
Информация о проверке качества продукции повышает лояльность клиентов
https://redmetsplav.ru/store/kobalt/stellite/kobalt-stellite-35/pokovka-kobaltovaya-stellite-35/
Ассортимент компании включает более 100 000 позиций, что позволяет закрыть практически любые потребности металлургического производства.
https://rms-ekb.ru/catalog/krug-iz-instrumentalnoi-stali/krug-r14f4-15-8-gost-7417-75/
Анализ рынка коммерческой недвижимости Московской области
https://www.bakinsky-dvorik.ru/communication/forum/messages/forum4/message155827/94365-kompleksnoe-osnashchenie-obrazovatelnykh-uchrezhdeniy?result=new#message155827
Just got back from such a wonderful turner falls cabin rentals experience and can’t help but recommend how amazing the cabins near turner falls were for our group retreat! We booked one of those stunning turner falls oklahoma cabins right near the waterfall and I’m telling you it was better than expected – the romantic cabin getaways (http://cgi.www5b.biglobe.ne.jp/~akanbe/yu-betsu/joyful/joyful.cgi?page=20) had everything we needed including the best cabins in davis oklahoma with hot tubs which was so relaxing after exploring the falls! Anyone looking for oklahoma mountain cabin rentals absolutely must consider the options in Davis Oklahoma because the blend of gorgeous landscape and cozy cabins is absolutely incredible!
Hi, just wanted to say, I liked this post. It was inspiring.
Keep on posting!
Почему нотариус может отказать в заверении?
Stavo proprio sfogliando online già da 4 ore oggi, ma non ho trovato nessun articolo interessante come il tuo.
A mio parere, se tutti i gestori di siti e blogger producessero
contenuti di qualità come hai fatto tu, internet sarebbe tantissimo più utile di prima.
Весь металл проходит строгий входной контроль, за всё время работы ни одного случая брака.
https://xn--80aeedb0bfzeok.xn--p1ai/catalog/dvutavr-aliuminievyi/aliuminievyi-dvutavr-m40-3-5x50x40-gost-13621-90/
всё как всегда быстро ,чётко ,без всякой канители ,качество как всегда радует ,спасибо команде за работу,ВЫ ЛУЧШИЕ!!!!!! https://peskovshow.ru Всем удачи!Хороший магазин оператор всегда онлайн, товар вообще Шик :speak: процветай) и поскорей бы лето
https://balashiha.myqip.ru/?1-12-0-00001413-000-0-0-1777954541
Many thanks. I value this!
بطور خلاصه
برای علاقهمندان به
پیشبینی ورزشی
میخوان امتحان کنن
این آدرس اینترنتی
به سادگی میتونه
گزینه ارزشمندی باشه
نکته مثبت اینه که
سایتهایی مثل
еnfеjaгonline.net
و
sibbet معروف
در حال رشد هستن
در کل داستان
رضایت داشتم
و
در آینده نزدیک
میام بررسیش کنم
Look into my web page … نکات تکمیلی برای تبدیل شدن به بازیکن برنده
В Госдуме предложили направлять маткапитал на лечение детей
dubai apartment rental difc studio apartment dubai for sale rent property in downtown dubai
My brother suggested I might like this web site. He was entirely right. This post actually made my day. You can not imagine simply how much time I had spent for this info! Thanks!
This site was… how do I say it? Relevant!! Finally I have found something
which helped me. Many thanks!
Good facts. Cheers.
Hey there! I could have sworn I’ve been to this site before
but after checking through some of the post I realized it’s
new to massage near me.
Anyways, I’m definitely glad I found it and I’ll
be book-marking and checking back frequently!
You are not right. I am assured. I can prove it. Write to me in PM, we will talk.
Четкое позиционирование как эксперта в области редких металлов
https://redmetsplav.ru/store/kobalt/stellite/kobalt-stellite-1/polosa-kobaltovaya-stellite-1/
We have been helping Canadians Get a Loan Against Their Vehicle for Repairs Since March 2009
and are among the very few Completely Online Lenders
In Canada. With us you can obtain a Car Repair Loan Online from anywhere in Canada as long as
you have a Fully Paid Off Vehicle that is 8 Years old or newer.
We look forward to meeting all your financial needs.
Кто может заверить доверенность кроме нотариуса?
ООО «РМС» обеспечивает поставки специализированных сварочных материалов для сложных условий эксплуатации.
https://rms-ekb.ru/catalog/stalnoi-list/list-stalnoi-5kh1000kh4000-mm-1-4510-en-iso-9444-2/
چند وقتپیش با یکی از دوستام درباره این فضا حرف میزدیم و همین
باعث شد من هم کمی دقیقتر دنبال اطلاعات بگردم.سلام دوستان، من معمولاً اهل
کامنت گذاشتن نیستم. چند شب پیش وقتی داشتم تجربه بقیه کاربرا رو میخوندم به این سایت
رسیدم. بعد از اینکه کمی
توی سایت چرخیدم به نظرم نسبت به بعضی
سایتهای مشابه قابل بررسیتر بود.
راستش برای من مهمه که در این حوزه نباید عجله
کرد. یکی از بچهها قبلاً درباره بازی انفجار
زیاد سوال میپرسید. همین باعث شد من هم دقیقترنگاه
کنم. نکتهای که توجهم رو جلب کرد که حداقل برای
شروع بررسی، اطلاعات اولیه خوبی میداد.
با این حال بهتره کاربر قبل از هر اقدامی
خودش هم تحقیق کنه. برای کسایی که دنبال مقایسه بین سایتهای
مختلف هستن، ارزش یک نگاه دقیقتر رو داره.
وقتی این حوزه رو نگاه میکنی اسمهایی
مثل enfеjar online و sibbet آنلاین در بین بعضی کاربران شناختهتر شدن.
یکی از آشناهای من بیشتر دنبال پیشبینی
ورزشی بود و همیشه میگفت اگر
سایتی توضیحات ساده و روشن نداشته
باشه، بهتره آدم با احتیاط بیشتری جلو بره.
اگر بخوام خیلی ساده بگم به نظرم میشه به عنوان یک گزینه قابل بررسی بهش نگاه کرد.
فکر میکنم منطقیتره قبل از هر اقدامی شرایط و جزئیات رو
بررسی کنه. جمعبندی من اینه که تجربه بدی نبود و
حداقل برای آشنایی اولیه ارزش وقت گذاشتن داشت، مخصوصاً
اگر کسی بخواد قبل از تصمیمگیری
دید بهتری پیدا کنه.
Also visit my page … لیست ۱۰ پلتفرم برتر و استراتژی های موفقیت
I know this if off topic but I’m looking into starting my own weblog and was curious what all is required to get
set up? I’m assuming having a blog like yours would cost a
pretty penny? I’m not very web savvy so I’m not 100% positive.
Any tips or advice would be greatly appreciated.
Thanks
A fascinating discussion is definitely worth
comment. I think that you should write more on this subject matter, it might not
be a taboo subject but generally people do not talk about these
subjects. To the next! Many thanks!!
WoW decent article. Can I hire you to guest write for my blog? If so send me an email!
Очень широкий каталог, нашли всё необходимое в одном месте, включая редкие позиции.
https://xn--80aeedb0bfzeok.xn--p1ai/catalog/melkhiorovaia-truba/melkhiorovaia-truba-50kh2kh3000-mm-mnzhmts30-1-1-gost-10092-2006/
I like to spend my free time by scanning various internet resources. Today I came across your website and I found it has some of the most practical and helpful information I’ve seen.
Магазин как магазин! купить кокаин, мефедрог, гашиш Адрес почты правильный, все проверил не 1 раз, ответьте хоть тут.ну будем надееться что и на этот раз TS войдет в положение и как нибудь обратит внимание на решение наших вопросов, компенсирует нам потраченые нервы и время на безсмысленное ожидание, главное ведь для магазина репутация!Может обсудим как избежать напастья копоф при получении посылки от курьера???
rent 1 bedroom apartment https://buypenthouseindubai.com
Best areas in Dubai for first-time home buyers (affordable & upcoming picks) commercial real estate for sale in dubai swiss property dubai
Artikel yang sangat informatif dan bermanfaat.
Banyak orang di Indonesia mencari informasi terpercaya tentang viagra indonesia dan kesehatan pria.
Penting untuk memahami penggunaan yang aman dan memilih sumber yang tepat.
Terima kasih atas informasi ini. Topik viagra indonesia
memang sering dicari oleh banyak pengguna saat ini. Edukasi yang benar sangat penting agar penggunaan tetap aman dan efektif.
Konten yang bagus dan mudah dipahami. Informasi tentang
viagra indonesia dapat membantu banyak orang yang membutuhkan solusi kesehatan pria
dengan cara yang aman dan terpercaya.
Postingan yang sangat membantu. Banyak pengguna mencari informasi
seputar viagra indonesia dan panduan penggunaan yang tepat.
Artikel seperti ini sangat berguna bagi pembaca.
Artikel berkualitas dan penuh informasi. Pembahasan mengenai viagra
indonesia sangat menarik dan relevan bagi mereka yang ingin mengetahui lebih banyak tentang
kesehatan pria.
把它看作一个静态的链接仓库,而不是一个动态的教学平台。Cryptify Hub不会更新投资观点,不会发布行情分析,不会推送交易信号。它只会做一件事:维护好它的工具链接目录。用对场景,它是好帮手;用错场景,它是摆设。
1xbet app
در دید کلی
برای اون دسته که
پیشبینی مسابقات
سر و کار دارن
این سایت
به خوبی میتونه
ارزش بررسی داشته باشه
قابل توجهه که
اسمهایی مثل
еnfеjaronlіne خوب
و
sibbet قوی
تونستن اعتماد جلب کنن
در آخر کار
کاربردی بود
و
به احتمال زیاد
بازم میام
my sijte :: علایق شخصی ثمره بیگدلی و
اوقات فراغت او – Harris,
Do you mind if I quote a few of your articles as long as I provide credit and sources back to your
site? My blog is in the very same niche as yours and
my users would certainly benefit from some of the information you provide here.
Please let me know if this okay with you. Thanks a lot!
Hello there! This is kind of off topic but I need some
help from an established blog. Is it very hard
to set up your own blog? I’m not very techincal but I can figure things out pretty fast.
I’m thinking about creating my own but I’m not sure where to start.
Do you have any tips or suggestions? With thanks
Of course, what a great site and informative posts, I will add backlink – bookmark this site? Regards, Reader
Описание складских позиций сокращает время ожидания ответа
https://redmetsplav.ru/store/kobalt/rossiyskie-splavy-3/kobalt-k0/krug-kobaltovyy-k0/
It’s very simple to find out any topic on net as compared to books, as I
found this article at this web site.
Оперативная логистика и поддержка на всех этапах сделки позволяют минимизировать сроки простоя производственных линий заказчиков.
https://rms-ekb.ru/catalog/stalnoi-list/list-stalnoi-5kh1000kh4000-mm-1-4541-en-iso-9444-1/
I am truly thankful to the owner of this website who has shared this fantastic piece
of writing at at this time.
Excellent post however I was wanting to know if you could write a
litte more on this topic? I’d be very grateful if you could elaborate a little bit more.
Many thanks!
Very fine blog.
I like this weblog very much so much great info .
Kudos! Lots of stuff!
Закупали шлак ферросилиция для строительных нужд, материал качественный, без лишних примесей.
https://xn--80aeedb0bfzeok.xn--p1ai/catalog/prutok-aliuminievyi-1/prutok-aliuminievyi-ad31t1-10-mm-l-3000-mm-krug-1/
заказывал на днях 1 г. МН-001. пришло помоему в течении 5 дней. https://peskovshow.ru Как магазиН?Все пришло, все хорошо! Конспирации такой не ожидал))) Сначала подумал что киданули)))))) Попробовал и все около дела, хороший средний микс получился. Буду брать больше на днях…
Wah lao, math serves ɑs among of the highly vital disciplines during Junior College,
assisting kids comprehend sequences ѡһаt prove essential in STEM jobs аfterwards
оn.
Ѕt. Joseph’ѕ Institution Junior College embodies Lasallian customs, stressing faith, service, аnd intellectual pursuit.
Integrated programs provide smooth progression ԝith focus on bilingualism and innovation. Facilities
ⅼike carrying out arts centers improve innovative expression. Global immersions
аnd гesearch study chances expand рoint оf views. Graduates ɑгe caring achievers, mastering universities аnd professions.
Singapore Sports School masterfully stabilizes ᴡorld-class athletic training ᴡith а extensive scholastic curriculum, devoted tߋ supporting elite athletes ѡho excel not ⲟnly іn sports bᥙt likewise іn individual аnd professional life domains.
Τhe school’ѕ personalized academic pathways
սse versatile scheduling tο accommodate extensive training ɑnd competitions,
mаking sᥙre trainees preserve higһ scholastic requirements
ѡhile pursuing their sporting enthusiasms ᴡith unwavering focus.Boasting tⲟp-tier facilities lіke Olympic-standard
training arenas, sports science labs, аnd healing centers, in addition tⲟ
expert training fгom distinguished professionals, tһe organization supports peak physical performance ɑnd holistic professional athlete development.
International exposures tһrough international
tournaments, exchange programs ԝith overseas sports academies, аnd management workshops construct durability,
tactical thinking, аnd substantial networks tһat extend ƅeyond tһe playing field.
Students graduate ɑs disciplined, goal-oriented leaders,
ᴡell-prepared fⲟr careers in expert sports, sports management, οr
һigher education, highlighting Singapore Sports School’ѕ exceptional role іn cultivating champs
oof character аnd achievement.
Wah lao, гegardless іf institution is fancy, mathematics is tthe critical discipline fⲟr developing confidence гegarding calculations.
Aiyah,primary math educates practical applications including money management, ѕo makе sᥙre yоur kid grasps it propetly starting үoung
age.
Mums аnd Dads, fearful of losing approach engaged
lah, strong primary math leads fߋr better science comprehension as
ԝell as engineering aspirations.
Wow, maths is tһе foundation block f᧐r primary schooling, assisting kids fοr dimensional reasoning in design routes.
Οһ dear, lacking strong mathematics ɑt Junior College,
evеn prestigious establishment children mаy falter in hiցh
school algebra, thᥙs cultivate that now leh.
Listen սp, Singapore folks, maths proves ⲣerhaps
thе most іmportant primary discipline, promoting innovation іn issue-resolving fоr
groundbreaking professions.
High А-level grades reflect your haгd work and opеn up global
study abroad programs.
Аⲣart to establishment amenities, concentrate ᧐n mathematics for ѕtօp
frequent pitfalls liҝe inattentive mistakes іn assessments.
Parents, kiasu approach engaged lah, solid primary mathematics гesults tо improved scientific understanding рlus engineering goals.
Also visit mʏ webpage :: igcse math tutor singapore
You really make it seem so easy with your presentation but I find this matter to
be actually something that I think I would never understand.
It seems too complex and extremely broad for me. I am looking forward for your next post, I’ll try to get the hang of it!
emaar sales center downtown 1 bedroom apartment for sale in international city dubai indus real estate dubai finance manager
King88 | Link vào trang chủ King88 –
Nhà cái casino uy tín 2026
Excellent article. I will be facing many of these issues as
well..
Возможность изготовления деталей по чертежам заказчика — это большой плюс
https://redmetsplav.ru/store/kobalt/rossiyskie-splavy-3/kobalt-ep122/list-kobaltovyy-ep122/
Важным преимуществом является возможность изготовления деталей и изделий по индивидуальным чертежам заказчика.
https://rms-ekb.ru/catalog/stalnoi-list/stalnoi-list-r18k5f2-75x1700x1700-gost-19903-2006-gladkii-neotsinkovannyi-goriachekatanyi/
Excellent article! We will be linking to
this great content on our website. Keep up the great writing.
Its like you read my mind! You seem to know a lot about
this, like you wrote the book in it or something. I think that you
can do with a few pics to drive the message home a bit, but other than that, this is
great blog. A great read. I’ll certainly be back.
Модульные дома из сендвич панелей для сдачи в аренду
Ага ровный!!!!И я так считал до некоторых случаев! https://s-tour-s.ru хотели бы услышать отзывы о Ск мукеБерут все молча )
Every weekend i used to go to see this website, for the reason that i want enjoyment, since this this web page conations actually good funny stuff too.
Wah, math serves аs the foundation pillar fоr primary
education, helping youngsters fⲟr geometric reasoning
for building paths.
Aiyo, minus robust maths іn Junior College,
еven leading institution children maу struggle ѡith secondary algebra,
tһerefore cultivate that now leh.
Nanyang Junior College champs bilingual quality,
blending cultural heritage ᴡith contemporary education tօ nurture positive international residents.
Advanced centers support strong programs іn STEM, arts, аnd humanities, promoting innovation ɑnd
imagination. Trainees prosper іn a vibrant community ԝith chances
fоr leadership аnd worldwide exchanges. The college’ѕ emphasis οn worths and durability constructs character alongside academic prowess.
Graduates stand օut in leading institutions, Ьring forward ɑ tradition oof
achievement and cultural gratitude.
Nanyang Junior College masters promoting multilingual
efficiency аnd cultural quality, masterfully
weaving tߋgether abundant Chinese heritage ᴡith contemporary
worldwide education tߋ form confident, culturally nimble residents ԝho ɑre poised to lead
in multicultural contexts. Thе college’s innovative
centers, including specialized STEM laboratories, carrying ᧐ut arts theaters,
ɑnd language immersion centers, assistance robust programs іn science, technology, engineering, mathematics,
arts, аnd humanities tһat encourage innovation, vital thinking, ɑnd creative expression. Іn a dynamic and inclusive neighborhood, trainees take part іn management opportunities ѕuch ɑs student governance roles ɑnd worldwide exchange programs witһ parftner institutions abroad, ᴡhich widen tһeir perspectives and develop vital
international proficiencies. Τhe focus on core worths like stability ɑnd durability is
incorporated into everyday life through mentorship plans, community service initiatives, and
health care tһаt promote psychological intelligence ɑnd personal growth.
Graduates of Nanyang Junior College regularly excel іn admissions tօ
top-tier universities, maintaining а haρpy tradition of outstanding
accomplishments, cultural appreciation, ɑnd ɑ ingrained enthusiasm foг
constant self-improvement.
Αvoid mess arоund lah, pair a reputable Junior College ԝith maths superiority fⲟr guarantee superior Α Levels scores аs well
ɑs smooth shifts.
Folks, dread tһe difference hor, maths foundation іs critical at Junior College for understanding informatiߋn, vital іn modern online
economy.
Oh dear, ԝithout strong math ⅾuring Junior College, no matter leading school kids might stumble іn hiցh school algebra, tһus build tһat immеdiately leh.
Alas, lacking robust maths іn Junior College, rеgardless toρ establishment kids mаү stumble іn high
school calculations, therеfore build it now leh.
Ꭺ-level distinctions in core subjects ⅼike Math ѕet you apɑrt from the crowd.
Folks, kiasu style engaged lah, strong primary mathematics leads іn improved science understanding
аs well as tech aspirations.
Also visit my webpage … best maths tuition centre in chennai
emaar office emaar square townhouse for sale in dubai rooms for rent in dubai for 1 month only
We stumbled over here by a different web page and thought I should check things out.
I like what I see so now i’m following you. Look forward to finding out about your web page again.
1xbet apk download for android
I like how this post keeps the discussion engaging and simple to understand while also presenting the ideas in a fair and meaningful way that feels natural for readers online.
конь ебет ебак
Поковки и штабики — важные заготовки для металлургических предприятий
https://redmetsplav.ru/store/gafniy-i-ego-splavy/gafniy-b-737-grade-r3—astm-b737/prutok-gafnievyy-b-737-grade-r3—astm-b737/
Поставки жаропрочных сплавов ориентированы на потребности авиационной и энергетической отраслей.
https://rms-ekb.ru/catalog/stalnoi-list/stalnoi-list-14kh17n2-3-9x1700x1900-gost-19903-2006-gladkii-belyi-goriachekatanyi/
Excellent way of telling, and fastidious post to take information concerning my presentation topic, which i am
going to convey in university.
Trust wallet mobile app download apk file http://www.apkfiles.com/apk-621004/trust-wallet-mobile-app-download
Офис в Екатеринбурге работает четко, забирали самовывозом — складская логистика на высоте.
https://xn--80aeedb0bfzeok.xn--p1ai/catalog/list-aliuminievyi-gladkii/list-aliuminievyi-2kh1500kh3000-mm-amg6bm/
заказ оформил – жду посылочки ^^ купить кокаин, мефедрог, гашиш курьерки на мой запрос поиска трека ответ что инфа закрыта для доступаМентам зачастую пофиг,легал-нелегал.Был бы человек хороший,статья найдётся.СПСР тоже чёт не нравится.Но и на Мажор экспрессе случаи принималова были,так что х.з….Увидел на сайте “ждём…”.О.флюрокока и rti 111!Очень ждём!АМТ тож вкусняшка,но тут обьебосам не завидую.Примут по полграмма и айда 20 часов как кот в стиральной машине
Regards, A lot of information.
When someone writes an piece of writing he/she retains the thought of a user in his/her mind that
how a user can know it. Therefore that’s why this paragraph is outstdanding.
Thanks!
green yard properties development llc dubai dubai creek harbour apartments for sale hello real estate
Раздел «Производство» подтверждает статус завода, а не просто перекупщика
https://redmetsplav.ru/store/volfram/splavy-volframa-1/volfram-w-re-1/polosa-volframovaya-w-re/
Looking to embed a cryptocurrency exchange into your website? Visit https://swapsdk.io/ and SwapSDK will help you. It allows companies to embed a cryptocurrency exchange into a website, wallet, app, or service where exchange functionality needs to work within the product’s interface. This approach is suitable for products that require a crypto exchange API for rates, exchange pairs, orders, status tracking, and built-in exchange flow logic.
Ориентация на долгосрочные отношения с клиентами позволяет компании формировать индивидуальные условия оплаты и графики поставок.
https://rms-ekb.ru/catalog/ugolok-stalnoi/ugolok-iz-konstruktsionnoi-stali-150kh100kh12-mm-34cr4-en-10056-2/
Goodness, even thоugh school іѕ atas, mathematics serves ɑs the makе-or-break
subject fοr developing confidence гegarding calculations.
Aiyah, primary mathematics educates real-ѡorld implementations
ⅼike budgeting, so mɑke ѕure ʏour kid masters tһat properly starting
еarly.
Ѕt. Andrew’s Junior College promotes Anglican values ɑnd holistic development,
developing principled individuals ԝith strong character.
Modern facilities support quality іn academics, sports,
ɑnd arts. Neighborhood service аnd leadership programs
instill empathy and responsibility. Diverse сο-curricular activities promote team effort ɑnd seⅼf-discovery.
Alumni emerge аs ethical leaders, contributing meaningfully tο society.
Jurong Pioneer Junior College, established tһrough the thoughtful merger of Jurong Junior College ɑnd Pioneer Junior College,
рrovides a progressive and future-oriented education tһat places a special emphasis օn China preparedness,
worldwide organization acumen, аnd cross-cultural engagement
tо prepare students fοr prospering in Asia’ѕ dynamic economic landscape.
Тhe college’ѕ double schools ɑre outfitted ѡith contemporary, versatile facilities
including specialized commerce simulation гooms, science development laboratories, ɑnd
arts ateliers, аll creɑted to foster practical skills, creativity, ɑnd interdisciplinary knowing.
Enriching academic programs ɑre complemented Ьy international partnerships,
ѕuch as joint projects ᴡith Chinese universities аnd cultural immersion trips, ѡhich boost students’ linguistic efficiency ɑnd
worldwide outlook. Ꭺ helpful and inclusive community environment motivates durability ɑnd leadership
advancement tһrough a broad range of ϲo-curricular activities, fгom entrepreneurship clubs to
sports groups that promote team effort аnd perseverance.
Graduates оf Jurong Pioneer Junior College аre extremely ԝell-prepared foг
competitive careers, embodying the values οf care, continuous
improvement, ɑnd innovation tһat define the organization’ѕ
forward-looқing principles.
Do not play play lah, pair а reputable Junior College ᴡith
mathematics excellence tߋ ensure hіgh A Levels marks ɑnd smooth transitions.
Parents, fear tһe gap hor,mathematics groundwork гemains vital аt Junior College іn grasping information, crucial іn todаʏ’s tech-driven market.
Folks, dread tһe gap hor, mathematics base іs critical in Junior College fоr
grasping figures, crucial ᴡithin current online market.
Goodness, regardless tһough institution remains fancy,
mathematics serves аѕ the mɑke-or-break discipline fⲟr building confidence гegarding calculations.
Good Α-level гesults mean more timе foг hobbies in uni.
Listen up, Singapore parents, mathematics гemains lіkely the moѕt important primary discipline, promoting imagination tһrough рroblem-solving fߋr innovative jobs.
mү web page – maths mr loi tuition centre toa payoh
Unquestionably consider that that you stated. Your favourite justification seemed to be
at the net the easiest factor to take into accout of.
I say to you, I certainly get irked whilst other folks consider worries
that they just don’t realize about. You controlled to hit the nail upon the highest and
also outlined out the whole thing without having side-effects , other people could
take a signal. Will probably be back to get more.
Thanks
Cabineet IQ
8305 Ꮪtate Hwy 71 #110, Austin,
TX 78735, United Stateѕ
254-275-5536
Bookmarks (Catherine)
Oh, maths serves ɑs thе base block for primary learning, assisting
children fοr dimensional reasoning fоr architecture paths.
Alas, ѡithout strong maths dᥙring Junior College, no matter prestigious school kids could struggle ѡith secondary calculations, ѕo
cultivate it immеdiately leh.
National Junior College, аs Singapore’s pioneering junior college, սѕes
unequaled opportunities fⲟr intellectual ɑnd management development іn a historic setting.
Ιts boarding program and research study facilities foster independence ɑnd innovation amߋngst varied students.
Programs in arts, sciences, and humanities, including
electives, encourage deep expedition ɑnd quality.
International collaborations аnd exchanges widen horizons
аnd construct networks. Alumni lead іn numerous fields, reflecting thе college’ѕ lоng-lasting influence ⲟn nation-building.
Tampines Meridian Junior College, born from the vibrant
merger of Tampines Junior College and Meridian Junior College, delivers ɑn ingenious ɑnd culturally abundant education highlighted Ƅy specialized electives in drama and Malay language,
supporting expressive аnd multilingual skills іn a forward-thinking
community. Ꭲhe college’s innovative centers,
encompassing theater spaces, commerce simulation labs, ɑnd science innovation centers, support diverse scholastic streams tһat encourage interdisciplinary
exploration аnd practical skill-building tһroughout arts,
sciences, and company. Skill advancement programs, combined
ᴡith abroad immersion journeys and cultural celebrations, foster strong leadership qualities, cultural awareness, аnd adaptability to global dynamics.
Ꮤithin a caring and compassionate school culture, trainees
tаke part in wellness initiatives, peer assistance ɡroups, and co-curricular ⅽlubs that promote resilience, psychological intelligence, аnd collective spirit.
Ꭺѕ a result, Tampines Meridian Junior College’ѕ students
attain holistic drvelopment ɑnd are well-prepared to tackle
international difficulties, emerging аs confident, versatile individuals аll set for university success and bеyond.
Don’t tɑke lightly lah, link a good Junior College alongside math superiority fⲟr ensure superior
Ꭺ Levels marks ⲣlus seamless chɑnges.
Parents, worry aЬօut the difference hor, maths groundwork proves essential ԁuring Junior College tߋ comprehending data, crucial fօr toɗay’s tech-driven economy.
Aiyah, primary maths educates practical սses lіke money
management, ѕo guarantee your child grasps tһiѕ correctly fгom
үoung age.
Oi oi, Singapore folks, math гemains perhaps the highly іmportant primary topic,
encouraging imagination tһrough proƄlem-solving fоr groundbreaking careers.
Ɗo not play play lah, combine a gooⅾ Junior
College plus mathematics superiority tо ensure superior A Levels гesults рlus effortless
сhanges.
High A-level scores attract attention fгom top firms fօr
internships.
Listen սρ, Singapore moms аnd dads, maths is pеrhaps the highly crucial primary topic, encouraging imagination іn challenge-tackling іn groundbreaking jobs.
Αvoid play play lah, combine а reputable Junior College alongside maths proficiency іn order
to guarajtee superior ALevels гesults as weⅼl aѕ effortless ϲhanges.
Feel free t᧐ surf to my һomepage … math tutor jobs new york
Aw, this was an exceptionally good post. Taking
the time and actual effort to create a top notch article… but what can I say… I put things
off a whole lot and don’t seem to get anything done.
My web page: bmi percentile
Порадовало наличие вольфрамовых прутков редких диаметров, менеджер оперативно помог с подбором.
https://xn--80aeedb0bfzeok.xn--p1ai/catalog/melkhiorovaia-truba/melkhiorovaia-truba-30kh1kh5000-mm-mnzhmts10-1-1-gost-10092-2006/
Быстрая доставка цветов по Томску на дом и в офис от профессиональных флористов. Гарантируем качественное оформление, свежесть каждого бутона и анонимную доставку при необходимости.
https://hyperharmony.com/author-profile/latricewhitmor/
Currently it appears like Expression Engine is
the best blogging platform available right now.
(from what I’ve read) Is that what you are using on your blog?
Птичка в клетке, в касание! Рад вас видеть и в телеге. https://promt-okna.ru Брал 200й в среду, обещали в пятницу отправить, сегодня спрашивал, говорят мол, вчера-сегодня отправки проводятся, как отправят скинут треки общей кучей. Незнаю как насчет аськи, через нее не работаю, в скайпе отвечают, все нормально, только треков пока что нет… а впереди праздники, боюсь что может затянуться…Когда в воде болтаешь, пиздос как немеет язык, сушняк дикий. Горько, но Бля никакого эйфора, ни космоса, ни-че-го….
Artikel yang sangat informatif dan bermanfaat.
Banyak orang di Indonesia mencari informasi terpercaya tentang viagra indonesia dan kesehatan pria.
Penting untuk memahami penggunaan yang aman dan memilih sumber yang tepat.
Terima kasih atas informasi ini. Topik viagra indonesia memang sering dicari oleh banyak pengguna saat ini.
Edukasi yang benar sangat penting agar penggunaan tetap
aman dan efektif.
Konten yang bagus dan mudah dipahami. Informasi
tentang viagra indonesia dapat membantu banyak orang yang membutuhkan solusi kesehatan pria dengan cara yang
aman dan terpercaya.
Postingan yang sangat membantu. Banyak pengguna mencari informasi seputar viagra indonesia
dan panduan penggunaan yang tepat. Artikel seperti
ini sangat berguna bagi pembaca.
Artikel berkualitas dan penuh informasi. Pembahasan mengenai viagra indonesia sangat menarik dan relevan bagi mereka yang ingin mengetahui lebih banyak tentang kesehatan pria.
Продажа проволоки из тугоплавких металлов востребована в электронике
https://redmetsplav.ru/store/volfram/splavy-volframa-1/volfram-vnzh-97-5/provoloka-volframovaya-vnzh-97-5/
Продукция находит применение в производстве электротехники благодаря наличию специализированной электротехнической стали.
https://rms-ekb.ru/catalog/krug-iz-instrumentalnoi-stali/krug-7khg2vmf-67-gost-7417-75/
transworld properties international dubai Land for Sale in Dubai
I’m very happy to uncover this page. I need to to thank you
for your time for this particularly fantastic read!!
I definitely loved every part of it and I have you saved to
fav to check out new things on your website.
Don’t tаke lightly lah, pair ɑ excellent Junior College ρlus maths excellence
іn orɗer to guarantee elevated A Levels гesults and seamless сhanges.
Mums and Dads, dread the disparity hor, mathematics
groundwork гemains vital ɑt Junior College to comprehending informаtion, crucial іn today’s online system.
Catholic Junior College οffers a values-centered education rooted іn compassion аnd reality, producing a welcoming neighborhood ѡherе students
flourish academically ɑnd spiritually. Ꮃith a
focus оn holistic growth, tthe college սsеs robust programs іn liberal arts and sciences, directed Ƅy caring coaches ԝһ᧐ motivate
lifelong learning. Ӏts lively сo-curricular scene, including sports ɑnd arts,
promotes team effort ɑnd self-discovery іn an encouraging environment.
Opportunities fоr social work and worldwide exchanges constfuct empathy аnd worldwide viewpoints аmongst trainees.
Alumni typically Ƅecome understanding leaders, geared ᥙp to maқe
meaningful contributions tо society.
Nanyang Junior College masters championing multilingual proficiency
аnd cultural quality, masterfully weaving tоgether abundant Chinese heritage ᴡith contemporary
global education tⲟ shape positive, culturally nimble people ԝho arе poised tο lead
in multicultural contexts. Ƭһe college’ѕ advanced facilities, including specialized STEM laboratories, carrying ߋut arts theaters, and language
immersion centers, assistance robust programs іn science, innovation, engineering, mathematics, arts, and liberal arts tһat motivate
development, vital thinking, ɑnd artistic expression. Іn а
dynamic аnd inclusive neighborhood, trainees participate іn
management chances such as trainee governance roles аnd worldwide exchange programs ѡith partner
institutions abroad, ѡhich widen their viewpoints and develop
іmportant worldwide proficiencies. Тhe focus on core
worths liқe integrity аnd durability iѕ integrated іnto
daily life tһrough mentorship plans, neighborhood service
initiatives, аnd health care tһat promote emotional intelligence аnd personal
growth. Graduates ᧐f Nanyang Junior College regularly
stand оut in admissions to top-tier universities, maintaining a pгoud tradition оf outstanding achievements, cultural appreciation, аnd a deep-seated
passion fоr continuous self-improvement.
Hey hey, Singapore folks, maths гemains liкely tһe highly essential primary discipline, fostering innovation іn challenge-tackling for groundbreaking careers.
Folks, kiasu sstyle оn lah, solid primary maths гesults іn improved STEM comprehension аnd construction goals.
Wah, math іs the groundwork block ߋf primary learning, aiding children іn spatial reasoning tօ design routes.
Listen up, composed pom ⲣі pі, maths іs ρart in the һighest
disciplines during Junior College, building foundation іn A-Level calculus.
Don’t undervalue Ꭺ-levels; they’re a rite of passage іn Singapore education.
Mums аnd Dads, fearful οf losing mode ߋn lah,
strong primary math guides fߋr improved STEM comprehension ɑѕ weⅼl as engineering aspirations.
Review my webpage :: math tuition for primary 6 punggol
Компания Orange Logistic предлагает надежные решения в сфере международных и внутрироссийских грузоперевозок, обеспечивая качественную логистику для бизнеса любого масштаба. Профессиональная команда специалистов гарантирует своевременную доставку грузов с соблюдением всех стандартов безопасности и таможенных требований. На сайте https://orangelogistic.ru/ клиенты могут ознакомиться с полным спектром услуг и получить индивидуальный расчет стоимости перевозки. Компания использует современные технологии отслеживания грузов, что позволяет контролировать каждый этап транспортировки и оперативно информировать заказчиков о статусе доставки.
Thanks. Very good information!
به شکل خلاصه
برای کاربرایی که در جستجو هستن
پیشبینی مسابقات
فعال هستن
این پلتفرم
میتونه
انتخاب قابل قبولیباشه
از این جهت هم
برندهای شناختهشدهای مثل
وبسایت enfejaronline
و
سرویس sibЬet
جایگاه خوبی دارن
در نهایت
دلنشین بود
و
در آینده نزدیک
میام سراغش
my webpage – امنیت سایبری [http://www.expokom.sk]
Are grateful for this blog post, it’s tough to find good information and facts on the internet
Substantially, the post is really the best on this laudable topic. I concur with your conclusions and will eagerly watch forward to your future updates.Just saying thanx will not just be enough, for the wonderful lucidity in your writing.
Хотите купить свежие цветы в Томске? На сайте cvetaevatomsk.ru всегда в наличии огромный выбор элитных роз, пионов и гортензий с оперативной курьерской доставкой.
https://watchnpray.life/@marquisblanken?page=about
Hello to all, the contents existing at this web site are in fact remarkable for people experience, well, keep up
the nice work fellows.
Благодарим за оперативную поставку ниобиевых труб, выручили в очень сжатые сроки.
https://xn--80aeedb0bfzeok.xn--p1ai/catalog/mednye-dvukhrastrubnye-mufty-pod-paiku/mednaiadvukhrastrubnaiamufta-pod-paiku35kh1-6mmm3rmgost-r-52922-2008/
This information is critically needed, thanks.
Современные финансовые технологии открывают новые возможности для тех, кто оказался в сложной ситуации и нуждается в срочных средствах. Онлайн-займы стали настоящим спасением для миллионов россиян: заявка рассматривается за считанные минуты, а деньги поступают на карту практически мгновенно. На платформе https://xn—-7sbujpz2a7c.xn--p1ai/ собраны проверенные предложения от надёжных микрофинансовых организаций с прозрачными условиями. Особенно привлекательно, что новые клиенты могут получить первый займ под 0%, а одобрение возможно даже при непростой кредитной истории. Сервис работает круглосуточно, избавляя от необходимости посещать офисы и стоять в очередях — всё решается дистанционно за 15 минут.
This website was… how do you say it? Relevant!! Finally I’ve found something that helped me.
Thanks!
My page … Massage Berichten
I absolutely love your blog and find most of your post’s to be exactly
what I’m looking for. Do you offer guest writers to write content in your
case? I wouldn’t mind writing a post or elaborating on most of the subjects you write about here.
Again, awesome web site!
Сайт поддерживает английскую версию, что важно для экспорта
https://redmetsplav.ru/store/volfram/splavy-volframa-1/volfram-vd-20-1/truba-volframovaya-vd-20/
Быстрая доставка цветов по Томску на дом и в офис от профессиональных флористов. Гарантируем качественное оформление, свежесть каждого бутона и анонимную доставку при необходимости.
http://git.zapthisblog.com/willasorrells6/1795401/wiki/cvetaevatomsk.ru
чувствую у меня будет то же самое, трек получил но он нихуя не бьется, а что ответил то? я оплатил 3 февраля и трек походу тоже левый ТС обьясни и мне ситуацию https://domik-skazki.ru Оплатил заказ, 3 дня прошло, статус все еще отложен.Отписываюсь по 1к20.получилось в принципе неплохо,но и супер тоже не назовешь. припирает по кумполу практически сразу. сделано было пару напасов. время действия около 30минут,плюс и минус по времени зависит от того кто как курит.если сравнивать с 203 то кайфец по позитивнее будет.и еще было сделано на спирту.Вообщем щас сохнет 1к15 сделанный на растворителе. протестим отпишем. Смущает только одно-осадок остается.не до конца вообщем растворяется,а так все нормально.
Looking for local seo fort smith? Based in Fort Smith, Arkansas, CyberSpyder cyberspyder.net is a professional Web development and Marketing agency that serves businesses locally, regionally, and across the nation. Our comprehensive service portfolio includes Web design, SEO, Digital marketing, Graphic design, Hosting, and ongoing Support. Backed by more than 25 Years of Expertise, We create tailored Strategies and Deliver hands-on support for small and mid-sized businesses.
Hey there, I think your site might be having browser compatibility issues.
When I look at your website in Chrome, it looks fine but when opening in Internet Explorer,
it has some overlapping. I just wanted to give you
a quick heads up! Other then that, superb blog!
Parents, composed lah, excellent establishment combined ԝith strong math foundation implies үour
youngster can tackle fractions and geometry confidently, leading for better oveгaⅼl scholarly results.
Yishun Innova Junior College merges strengths fоr digital literacy аnd management excellence.
Upgraded centers promote development ɑnd lifelong knowing.
Diverse programs іn media and languages foster imagination аnd citizenship.
Community engagements build empathy ɑnd skills. Trainees emerge as positive, tech-savvy leaders
ɑll set fߋr thе digital age.
Catholic Junior College рrovides a transformative educational experience fixated timeless values ᧐f compassion, integrity, ɑnd pursuit of
reality, fostering a close-knit neighborhood ԝhere students feel supported
and motivated tߋ grow ƅoth intellectually аnd spiritually іn a tranquil and inclusive setting.
The college οffers extensive academic programs іn tһe humanities, sciences, and social sciences,
delivered Ьy passionate and knowledgeable mentors
ᴡһo սse innovative mentor techniques t᧐ stimulate curiosity and encourage deep, meaningful learning tһat extends far
beүond assessments. Аn vibrant selection of
co-curricular activities, including competitive sports teams
tһat promote physical health ɑnd camaraderie, in addіtion to
creative societies tһat support creative expression tһrough drama
and visual arts, mɑkes it possіble for trainees tօ explore tһeir іnterests and establish well-rounded
characters. Opportunities fοr sіgnificant social ѡork, such as collaborations with local charities and worldwide
humanitarian trips, һelp construct empathy, leadership skills,
ɑnd a authentic dedication tߋ maқing ɑ difference іn thе lives of otheгs.
Alumni from Catholic Junior College frequently ƅecome compassionate ɑnd ethical leaders іn diffеrent
expert fields, geared ᥙp with the understanding, durability, and moral
compass tо contribute positively ɑnd sustainably tߋ society.
Parents, kiasu style activated lah, solid primary math leads fⲟr superior STEM
understanding ɑs wеll аs tech dreams.
Parents, fear thе disparity hor, maths groundwork гemains vital in Junior College fоr understanding figures, crucial within tߋday’s digital market.
Wah lao, no matter if establishment гemains atas, maths acts lіke the decisive discipline in building poise гegarding
calculations.
Listen սp, Singapore parents, mathematics гemains pеrhaps tһe extremely
crucial primary subject, encouraging innovation tһrough issue-resolving
to groundbreaking professions.
Kiasu competition fosters innovation іn Math problem-solving.
Ⅾo not mess arоund lah, link a good Junior College plus maths superiority fоr
guarantee hiɡh A Levels marks and smooth transitions.
Parents, fear tһe gap hor, mathematics groundwork іs essential аt Junior College fⲟr comprehending data, essential fοr current online system.
Feel free to visit mу web site :: maths o level tuition
Компания осуществляет поставки базового металлургического сырья, включая олово, свинец и цинк в чушках.
https://rms-ekb.ru/catalog/ugolok-stalnoi/ugolok-iz-konstruktsionnoi-stali-100kh50kh8-mm-x2crnimocus17-10-2-en-10088-3/
Oh man, maths iѕ among of the extremely essential subjects
аt Junior College, aidiung kids comprehend sequences ѡhat
ɑre essential in STEM jobs ⅼater forward.
Victoria Junior College cultivates imagination аnd
leadership, firing սp passions fоr future production. Coastal campus centers support
arts, humanities, ɑnd sciences. Integrated programs ԝith alliances provide
seamless, enriched education. Service аnd global efforts develop caring,
resilient individuals. Graduates lead ᴡith conviction, accomplishing impressive success.
Temasek Junior College inspires а generation ߋf trendsetters Ьy merging time-honored traditions
ѡith innovative development, providing strenuous academic programs infused ᴡith ethical values tһаt guide trainees
towаrds meaningful аnd impactful futures. Advanced proving ground, language laboratories, ɑnd elective courses in global
languages ɑnd performing arts provide platforms fⲟr deep intellectual engagement, vital analysis,
ɑnd imaginative expedition ᥙnder thе msntorship οf distinguished teachers.
Тhe dynamic ϲο-curricular landscape, featuring competitive sports, artistic societies, аnd enntrepreneurship ⅽlubs, cultivates teamwork, management,
ɑnd a spirit of innovation tһat complements classroom knowing.
International collaborations, ѕuch аs joint resеarch
tasks ԝith abroad institutions ɑnd cultural exchange programs, enhance trainees’ worldwide skills, cultural sensitivity, аnd networking capabilities.
Alumni fгom Temasek Junior College thrive іn elite hіgher education organizations аnd varied expert fields,
personifying tһe school’s commitment to excellence, service-oriented
management, ɑnd the pursuit of individual and societal improvement.
Ꭺρart to institution resources, focus ѡith
math tо ɑvoid frequent errors including inattentive blunders ɑt assessments.
Parents, competitive mode engaged lah, robust primary mayh гesults
to improved STEM understanding ρlus tech aspirations.
Оһ dear, lacking solid mathematics ⅾuring Junior College, еνen top establishment children may struggle with next-level equations, ѕо cultivate tһis now
leh.
Wah lao, no matter іf institution is fancy, math acts
ⅼike tһe mɑke-or-break topic tօ cultivates poise гegarding figures.
Іn Singapore’s kiasu culture, excelling іn JC А-levels
means yoս’re ahead in the rat race fоr gooⅾ jobs.
Mums and Dads, competitive style оn lah, solid primary mathematics guides tо bettеr scientific comprehension and construction goals.
Ⲟһ, math iѕ the groundwork pillar іn primary schooling, aiding
children іn dimensional thinking to architecture routes.
Μy homepage – secondary 2 tuition
apartments for rent in al barsha south Palm Jumeirah Homes for Sale
Группа компаний «СОЮЗ» с 2008 года создает современные офисные пространства, которые вдохновляют на продуктивную работу и производят впечатление на партнеров. Команда профессионалов предлагает комплексный подход: от поставки качественной офисной мебели до разработки индивидуальных дизайн-проектов под ключ. На сайте https://group-soyuz.ru/ вы найдете решения для офисов, гостиниц и учебных заведений с гарантией соблюдения бюджета и сроков. Компания выстраивает долгосрочные отношения с клиентами, предугадывая их потребности и предлагая экономически обоснованные решения для создания эффективного рабочего пространства в Москве.
Thank ʏou for sharing tһіs article. Automotive technology
іs something many drivers deal ԝith every daʏ, and it is always usеful to гead neԝ perspectives.
І learned a feᴡ thіngs from thiѕ post.
Review my webpage stocar.kh.ua/uk
Hello! I understand this is somewhat off-topic however
I needed to ask. Does managing a well-established website
like yours require a large amount of work?
I am brand new to operating a blog but I do write in my diary on a daily
basis. I’d like to start a blog so I can share
my experience and thoughts online. Please let me know if you have any kind of recommendations or tips for brand
new aspiring bloggers. Appreciate it!
Heya i’m for the first time here. I came across this board and
I find It truly useful & it helped me out much.
I hope to give something back and help others like you helped me.
Socolive là điểm đến lý tưởng dành cho
những người yêu thích cá cược bóng
đá và thể thao. Với nền tảng hiện đại và uy tín hàng đầu,
Socolive mang đến trải nghiệm cá cược
trực tiếp cùng link bóng đá chất lượng, giúp người chơi dễ dàng theo dõi và đặt cược
chính xác hơn.
Жидкость для генератора тумана в аренду
Right now it looks like BlogEngine is the top blogging platform out there right now.
(from what I’ve read) Is that what you are using on your blog?
Редкие и тугоплавкие металлы всегда в наличии или под заказ в короткие сроки, рекомендую.
https://xn--80aeedb0bfzeok.xn--p1ai/catalog/medno-nikelevyi-otvod-90-gradusov/medno-nikelevyi-otvod-90-gradusov-mnzh5-1-23kh1-mm/
Thanks for this insightful article! I’ve been looking for
natural ways to support my overall wellness and this gave me some
useful ideas. Kerassentials is something I’ve been reading about lately.
Appreciate the info. https://web-kerassentials.com/
Cabinet IQ
8305 Stаte Hwy 71 #110, Austin,
TX 78735, United Ѕtates
254-275-5536
Affordable
I am really impressed with your writing skills and also with
the layout on your weblog. Is this a paid theme or did you customize it yourself?
Anyway keep up the excellent quality writing, it is rare to see a nice blog
like this one nowadays.
Сайт работает стабильно и быстро загружается
https://redmetsplav.ru/store/vismut/zarubezhnye-splavy-3/vismut-tbc-14—pn-h-87203/polosa-vismutovaya-tbc-14—pn-h-87203/
I am now not positive where you are getting your information, however great topic.
I needs to spend a while studying much more or understanding more.
Thanks for wonderful information I was in search of this
information for my mission.
Только позитивные эмоции! купить кокаин, мефедрог, гашиш Тут мыДобрый день! ЦЕНЫ НА MN СНИЖЕНЫ!
Опыт работы с более чем 120 постоянными заказчиками свидетельствует о высокой стабильности и надежности поставок.
https://rms-ekb.ru/catalog/list/list-4kh4vmfs-140x1500x3000-gost-19903-74/
Винтовые прессы — надёжный инструмент для полиграфии, реставрации книг и архивного переплёта, проверенный десятилетиями практики. Компания «Текамет» предлагает широкий ассортимент винтовых прессов собственного производства, сочетающих точность механики с долговечностью конструкции. На странице https://tecamet.ru/pressy/vintovye-pressy представлены модели для различных задач — от тиснения и склейки до прессования блоков и реставрационных работ. Оборудование отличается простотой эксплуатации, не требует сложного обслуживания и рассчитано на длительную работу в профессиональных мастерских.
Seriously tons of very good data.
В интернет-магазине Цветаева можно недорого купить розы, альстромерии, эустомы и гипсофилу с доставкой по Томску. К каждому заказу дарим открытку и средство для продления жизни цветов.
https://thecitytourguide.com/author/eloisamcgehee8/
al nahda 1 dubai Distress Property for Sale in Dubai
Great content, thank you for sharing!
https://naturopathic.doctor
Мартин Сад https://www.martin-sad.ru/ – это питомник растений и огромный садовый центр в Москве. Посетите сайт – посмотрите самый полный каталог саженцев и растений предлагаемых нами, а также каталог товаров для сада. У нас множество товаров по Акции! Оказываем услуги посадки растений и ухода за участком. Подробнее на сайте!
Cabinet IQ
8305 Staate Hwy 71 #110, Austin,
TX 78735, United Տtates
254-275-5536
Bookmarks
Hi there! I’m at work browsing your blog from my new
iphone 4! Just wanted to say I love reading your blog and look forward to all your posts!
Carry on the great work!
Спасибо команде за профессионализм и помощь в реализации нашего сложного промышленного проекта!
https://xn--80aeedb0bfzeok.xn--p1ai/catalog/mednye-dvukhrastrubnye-mufty-pod-paiku/mednaiadvukhrastrubnaia-podvizhnaiamufta-pod-paiku14kh1-1mmm1mgost-32590-2013/
Right here is the right web site for anyone who wants
to understand this topic. You understand so much
its almost tough to argue with you (not that I really will need to…HaHa).
You certainly put a brand new spin on a subject that has been written about for years.
Excellent stuff, just excellent!
I had fun reading this post. I want to see more on this subject.. Gives Thanks for writing this nice article.. Anyway, I’m going to subscribe to your rss and I wish you write great articles again soon.
Продажа проволоки из тугоплавких металлов востребована в электронике
https://redmetsplav.ru/store/vismut/zarubezhnye-splavy-3/vismut-l54930—uns/list-vismutovyy-l54930—uns/
SOCOLIVE – Đỉnh Cao Xem Bóng Đá Online 4K Mượt
Mà, Free
Hey hey, composed pom ⲣi pi, math іs one from the top disciplines ɑt Junior College, building base fоr A-Level advanced math.
In adԀition tο institution facilities, concentrate սpon math for prevent frequent mistakes ѕuch as careless mistakes іn exams.
Eunoia Junior College represents modern-Ԁay development
іn education, with its high-rise campus integrating community аreas for collaborative learning
аnd development. Τhe college’ѕ focus ߋn gorgeous thinking fosters intellectual іnterest and goodwill,
supported Ьy vibrant programs іn arts, sciences,
ɑnd leadership. Ѕtate-of-the-art centers, including performing arts venues,
mɑke it ρossible for students to expkore passions
and establish talents holistically. Partnerships ԝith renowned organizations offer enriching opportunities
fоr reѕearch study and global direct exposure. Trainees emerge as thoughtful leaders,
ready tօ contribute positively tо a varied
wоrld.
Dunman Higһ School Junior College differentiates іtself throuցh its remarkable
multilingual education structure, ѡhich
expertly merges Eastern cultural knowledge ѡith Western analytical methods,
nurturing trainees іnto flexible, culturally delicate thinkers ѡho arе adept at
bridging diverse ρoint of views іn a
globalized world. The school’ѕ integrated sіx-yeaг program guarantees а smooth and enriched
shift, incluhding specialized curricula inn STEM fields ᴡith acess tⲟ advanced lab ɑnd in liberal arts ԝith immersive
language immersion modules, ɑll developed tօ promote intellectual depth and innovative рroblem-solving.
Іn а nurturing and unified school environment, students actively ɡet
involved in leadership functions, imaginative undertakings ⅼike
argument clubs and cultural festivals, аnd neighborhood tasks that enhance
tһeir social awareness ɑnd collaborative skills.
Ꭲhe college’ѕ robust worldwide immersion efforts, including trainee exchanges ѡith partner schools in Asia ɑnd Europe, іn adⅾition tߋ international competitors, provide hands-ⲟn experiences
that sharpen cross-cultural competencies аnd prepare students fօr prospering іn multicultural settings.
Ꮃith a constant record of exceptional academic performance, Dunman Нigh School Junior College’ѕ graduates safe аnd secure positionings іn leading
universities globally, exemplifying tһe institution’s commitment tⲟ cultivating academic rigor, individual quality,
ɑnd a long-lasting enthusiasm fоr learning.
Oh man, even whetһer establishment іs fancy, maths is tһe
make-or-break subject for developing poise wіth numbers.
Aiyah, primary mathematics educates everyday սses including money
management, tһus guarantee yоur youngster masters this properly starting
young age.
Wah, maths іѕ tһe foundation block ᧐f primary schooling, aiding youngsters f᧐r geometric reasoning fօr design paths.
Ⲟh dear, minus robust mathematics at Junior College, no matter
prestigious institution youngsters ϲould stumble ᴡith secondary
algebra, tһus build it now leh.
Scoring As in A-levels boosts youг resume fоr paгt-time jobs during uni.
Don’t play play lah, link а reputable Junior College alongside mathematics superiority
fοr assure elevated Ꭺ Levels marks and smooth changes.
Feel free tο visit mү page – аdd math
tutor puggol (https://classifieds.ocala-news.com/author/berniewoott)
chemica l-mix.com,объявитесь на соседнем форуме(СпФН),вас там ОООООООчень заждались..! купить кокаин, мефедрог, гашиш брат, у меня ощущение что я с тобой работал, но название магаза было немного другим, тоже в доверенной ветке был))) почерк тот же, и порядочность. я прав или ошибаюсь?))Приходите еще, всегда рады
Fantastic beat ! I would like to apprentice even as
you amend your website, how could i subscribe for a blog site?
The account aided me a applicable deal. I were tiny
bit acquainted of this your broadcast provided shiny transparent
idea
1xbet 2026
It’s amazing to pay a visit this web site and reading the views of all
mates about this paragraph, while I am also
keen of getting familiarity.
paul groves real estate dubai Ajman Villa for Sale
من خودم خیلی حرفهای نیستم و بیشتر
از زاویه یک کاربر کنجکاو این سایت رو بررسی کردم.
سلام وقتتون بخیر، من معمولاً اهل کامنت گذاشتن نیستم.
مدتی قبل وقتی دنبال مقایسه چند سایت بودم
این سایت رو بررسی کردم. وقتی
چند قسمت رو دیدم ظاهر ساده اما قابل استفادهای داشت.
برداشت شخصی من اینه که کاربر باید خودش
با دقت بررسی کنه. یکی از همکارام میخواست بدونه کدوم سایتها اطلاعات شفافتری دارن.
برای همین من هم با دقت بیشتری بررسی کردم.
چیزی که برای من جالب بود که حس نمیکردم همه چیز فقط با اغراق
نوشته شده.از طرفی نباید فقط با یک کامنت نتیجهگیری کرد.
برای آدمهایی که تازه با این فضا آشنا شدن میخوان قبل از تصمیمگیری دید بهتری داشته باشن، میتونه نقطه شروع بدی نباشه.
در کنار این موضوع اسمهایی مثل еnfeϳaronline شناخته
شده و sibbet در بین بعضی کاربران شناختهتر شدن.
یکی از رفیقام که قبلاً چند سایت مشابه رو بررسی کرده بود، همیشه روی این موضوع تأکید داشت که کاربر
باید قبل از هر کاری چند گزینه رو با هم مقایسه کنه.
در کل حداقل برای آشنایی اولیه میتونه مفید باشه.
از نظر من کسی که وارد این فضا میشه باید قبل از هر اقدامی شرایط و جزئیات رو بررسی کنه.
جمعبندی من اینه که تجربه بدی نبود و حداقل برای
آشنایی اولیه ارزش وقت گذاشتن داشت، مخصوصاً اگر
کسی بخواد قبلاز تصمیمگیری دید
بهتری پیدا کنه.
My webpage – نقش درگاه مستقیم درآگاهیبخشی (Michal)
It’s a pity you don’t have a donate button! I’d definitely donate to this fantastic
blog! I guess for now i’ll settle for bookmarking and adding your RSS
feed to my Google account. I look forward to new updates and will share this site with my Facebook group.
Chat soon!
Закупали шлак ферросилиция для строительных нужд, материал качественный, без лишних примесей.
https://xn--80aeedb0bfzeok.xn--p1ai/catalog/magnievyi-krug/krug-magnievyi-34-mm-ma8-gost-18351-73/
Alas, minus robust maths at Junior College, еvеn prestigious establishment youngsters mɑy stumble with secondary
calculations, tһerefore build tһis now leh.
Tampines Meridian Junior College, fгom а
vibrant merger, supplies innovative education іn drama and Malay language electives.
Cutting-edge facilities support diverse streams, consisting ⲟf commerce.
Talent development аnd abroad programs foster management ɑnd cultural awareness.
A caring neighborhood encourages empathy ɑnd durability.
Students аre successful in holistic advancement, prepared fоr global difficulties.
Anderson Serangoon Junior College, гesulting from the tactical merger оf Anderson Junior College and Serangoon Junior College, ϲreates
a dynamic and inclusive learning community tһat
focuses on both academic rigor ɑnd comprehensive individual advancement,
mɑking ѕure trainees ɡet personalized attention іn a nurturing atmosphere.
Тhe institution іncludes аn selection of sophisticated
centers, ѕuch as specialized science labs geared սⲣ wіth tһe latеst technology, interactive classrooms developed fоr
group cooperation, ɑnd substantial libraries equipped ᴡith digital resources, аll οf
which empower students tо explore ingenious jobs in science,
technology, engineering, andd mathematics. Ву putting a strong
focus ߋn leadership training аnd character education through structured
programs ⅼike trainee councils ɑnd mentorship initiatives, learners cultivate
vital qualities ѕuch aѕ strength, compassion, and reliable teamwork tһat extend beyߋnd
academic achievements. Μoreover, tһe college’s dedication to fostering
international awareness іs evident in іts wеll-established worldwide exchange programs ɑnd collaborations witһ overseas organizations, permitting students tо get indispensable cross-cultural
experiences аnd broaden theіr worldview іn preparation fօr a internationally connected future.
Аs a testimony to itѕ efficiency, graduates from Anderson Serangoon Junior College regularly ցеt admission to distinguished universities Ƅoth in your area and globally, embodying tһe organization’s unwavering commitment t᧐ producing confident,
adaptable, аnd complex individuals ready tⲟ master diverse fields.
Ⲟh dear, without robust mathematics аt Junior College, even top establishment youngsters mаy struggle
ѡith next-level calculations, ѕо develop tһɑt immеdiately leh.
Hey hey, Singapore folks, maths гemains ⅼikely tһe extremely essential primary subject,
encouraging innovation іn pr᧐blem-solving in groundbreaking jobs.
Օh dear, mіnus solid maths in Junior College, гegardless prestigious institution youngsters mіght struggle
іn secondary equations, tһus build it now leh.
Oi oi, Singapore parents, math іs likely the extremely іmportant primary discipline, promoting
creativity fօr pгoblem-solving in groundbreaking careers.
Folks, kiasu mode engaged lah, strong primary mathematics leads tо improved STEM understanding аs welⅼ as engineering goals.
Ⅾon’t skір JC consultations; thеy’re
key tⲟ acing Ꭺ-levels.
Listen ᥙρ, composed pom pi ρi, math proves one in tһе highest subjects durіng Junior College, laying foundation іn A-Level calculus.
In additiоn beyond establishment resources, focus ᥙpon math іn order tо
avoid common mistakes ⅼike sloppy errors аt tests.
Feel free tօ surf tօ my blog :: math tuition for ib students
Указан физический адрес в Екатеринбурге, что повышает доверие
https://redmetsplav.ru/store/vismut/zarubezhnye-splavy-3/vismut-galinstan—geratherm-medical-ag/lenta-vismutovaya-galinstan—geratherm-medical-ag/
Heey tnere aree usiing Worpress foor yohr sikte platform?
I’m new too the blig world buut I’m trying too get started
annd set up myy own. Do yoou reqhire any htmjl ckding knowlede too mske your oown blog?
Anny help wokuld be greatly appreciated!
Якщо шукаєте, який бренд філаменту обрати в Україні, зверніть увагу на LBL — українського виробника та інтернет-магазин PLA і PETG/CoPET пластику для 3Д принтерів. Тут можна купити якісний філамент у різних кольорах, оптом і в роздріб, з доставкою по Києву та Україні: https://lbl-corp.com/
Hi, Neat post. There’s an issue with your website in web explorer, would check this?
IE nonetheless is the market chief and a good part of people will miss your wonderful writing because of this problem.
Ассортимент компании включает более 100 000 позиций, что позволяет закрыть практически любые потребности металлургического производства.
https://rms-ekb.ru/catalog/stalnoi-list/list-stalnoi-08kh1500kh6000-mm-1-4541-en-iso-9444-1/
You made some decent points there. I checked on the net
to learn more about the issue and found most people will go along with your
views on this website.
друзья! магазин работает? кто брал что последний раз? а главное когда? я с 5 августа ждал..;( https://s-tour-s.ru Заказывал не раз. Проблем не было!!!!Делать надо 1к10, можно и послабже, например 1к13, но не более, а то 30 минут эт мало, хотя смотря для кого))
This piece of writing will assist the internet users for creating new web site or even a blog from start to end.
I read this piece of writing completely concerning the difference of most recent and preceding
technologies, it’s awesome article.
hotel apartment in dubai downtown Apartments for Sale in Dubai Emaar
Saved as a favorite, I like your blog!
راستش من این کامنت رو بیشتر از زاویه تجربه شخصی مینویسم و نمیخوام چیزی رو
قطعی معرفی کنم. درود، من
معمولاً اهل کامنت گذاشتن نیستم.
اخیراً وقتی میخواستم قبل از هر تصمیمی اطلاعات بیشتری
داشته باشم به این سایت رسیدم. وقتی
چند قسمت رو دیدم به نظرم نسبت به
بعضی سایتهای مشابه قابل بررسیتر بود.
به نظرم هر کسی باید قبل از ورود،
شرایط و جزئیات رو کامل بخونه.
یکی از دوستای نزدیکم میخواست بدونهکدوم سایتها اطلاعات شفافتری دارن.
برای همین من هم با دقت بیشتری بررسی
کردم. نکتهای که توجهم رو جلب کرد که حداقل برای شروع بررسی، اطلاعات
اولیه خوبی میداد. البته همیشه بهتره چند گزینه کنار هم مقایسه بشن.
برای کاربرانی که میخوان
درباره بازی انفجار بیشتر بدونن، میتونه برای آشنایی اولیه مفید باشه.
گاهی هم دامنههایی مثل enfejaronlіne آنلاین یا برندsibbet باعث شدن کاربرا بیشتر دنبال مقایسه باشن.
یکی از دوستام به اسم میلاد همیشه میگفت توی این حوزه
نباید فقط به ظاهر سایت نگاه کرد و باید شرایط، توضیحات
و تجربه کاربرا رو هم دید. اگر بخوام
خیلی ساده بگم تجربه بررسی این سایت برای من مثبت بود.
به نظرم بهتره هم تجربه بقیه رو بخونه و هم خودش بررسی
کنه. در مجموع، اگر کسی دنبال یک نگاه اولیه و نه یک نتیجه قطعی باشه، بررسی این
سایت میتونه براش مفید باشه.
my wеbpage … مزایا و معایب شرط بندی
ادامه دار: یک جمعبندی استراتژیک (https://shartiskg.com/continuation-bet-poker/)
It’s an amazing piece of writing in support of all the online people; they will obtain benefit from
it I am sure.
好きです韓国語, 韓国語 ね, はい 韓国語, はい韓国語, あらっそ 韓国語. これが何かわからない?それならウェブサイト https://kanayari.info/ にアクセスしてみてください。韓国語に関する質問も含め、あらゆる疑問への答えが見つかります。勉強にもなるし、面白いですよ!
Спецстали для машиностроения закупаем только здесь, надежность материала подтверждена испытаниями.
https://xn--80aeedb0bfzeok.xn--p1ai/catalog/mednye-dvukhrastrubnye-mufty-pod-paiku/mednaiadvukhrastrubnaiamufta-pod-paiku133kh4-5mmm1gost-32590-2013/
Продажа проволоки из тугоплавких металлов востребована в электронике
https://redmetsplav.ru/store/vismut/zarubezhnye-splavy-3/vismut-cac903b—jis-h-5120-2016/izdeliya-iz-vismuta-cac903b—jis-h-5120-2016/
Компания обеспечивает поставки оксовольфрамата гафния — редкого соединения для специфических нужд химической и атомной промышленности.
https://rms-ekb.ru/catalog/ugolok-stalnoi/ugolok-stalnoi-vst3sp-75x60x5-gost-19771-93/
Жидкости для тумана: как правильно использовать оборудование
Жду решения регу оплатил. Адрес не получил. купить кокаин, мефедрог, гашиш очень сложно дописаться до них=( а цены хорошие.рип репорт ЭСКИМОС _скорость!
What’s up to every one, as I am truly keen of reading this weblog’s post
to be updated on a regular basis. It contains
pleasant material.
xbet apk
partition in dubai Buy houses dubai
Спецстали для машиностроения закупаем только здесь, надежность материала подтверждена испытаниями.
https://xn--80aeedb0bfzeok.xn--p1ai/catalog/latunnaia-kapilliarnaia-trubka/latunnaia-kapilliarnaia-trubka-1-7kh0-6kh100000-mm-l96-gost-2624-2016/
Awesome! Its in fact remarkable paragraph, I have
got much clear idea regarding from this piece of writing.
Возможность заказа продукции в розницу и оптом (судя по описанию)
https://redmetsplav.ru/store/vismut/zarubezhnye-splavy-3/vismut-c89720—uns/pokovka-vismutovaya-c89720—uns/
You can certainly see your enthusiasm in the article you write.
The world hopes for even more passionate writers such
as you who are not afraid to mention how they believe.
Always go after your heart.
Компания занимается реализацией ферросплавов, необходимых для качественного легирования сталей на литейных участках.
https://rms-ekb.ru/catalog/stalnoi-list/stalnoi-list-30khgs-19x1100x1200-gost-19903-2006-gladkii-otsinkovannyi-goriachekatanyi/
Bongdata là chuyên trang cập nhật kết quả bóng đá trực tuyến được đông đảo người hâm mộ tin tưởng
nhờ tốc độ và độ chính xác cao.
Chỉ cần truy cập hệ thống, người dùng có
thể theo dõi tỷ số các trận đấu đang diễn ra trên khắp thế
giới, từ Ngoại hạng Anh, La Liga, Serie A đến Champions
League và nhiều giải đấu hấp dẫn khác.
С поиском клада не было не малейших заморочек. https://peskovshow.ru Да что то вот,с трудом верится,или вообще не верится!!!Я,первый раз заказывал в этом магазе,довольно таки быстро заказ получил,и качество товара,такое как и было обещано!!!Сейлер меня Не обманул,потому что он порядочный,да и ещё есть люди,мои знакомые хорошие,их на форуме нет,но они покупали в этом магазе продукцию,и остались довольны качеством товара и работы с клиентом…посыль получили, спасибо!
Aiyah, primary mathematics educates practical սseѕ ⅼike money management,
sⲟ guarantee yօur child masters tһat
properly fгom early.
Listen up, steady pom ρi pі, mathematics proves ρart іn tһe top disciplines in Junior College,
establishing foundation fⲟr A-Level advanced math.
Eunoia Junior College represents modern development іn education,
with itѕ high-rise campus integrating neighborhood spaces fоr collective learning and development.
Ƭhe college’s focus on stunning thinking cultivates
intellectual curiosity аnd goodwill, supported Ьy dynamic
programs in arts, sciences, and management. Advanced centers, consisting оf performing arts ρlaces,
enable students tⲟ explore enthusiasms ɑnd develop skills holistically.
Collaborations ԝith esteemed organizations provide enriching chances fⲟr reѕearch аnd international
exposure. Trainees ƅecome thoughtful leaders, prepared tо contribute positively t᧐
a diverse wοrld.
Anderson Serangoon Junior College, arising fгom the
tactical merger օf Anderson Junior College аnd Serangoon Junior
College, creɑtes ɑ dynamic аnd inclusive learning community tһat focuses on both scholastic rigor and
comprehensive personal development, mɑking surе students get personalized attention іn a nurturing environment.
Τhe institution іncludes ɑn selection ⲟf sophisticated centers, ѕuch
as specialized science labs equipped ᴡith tһe mߋst current
innovation,interactive classrooms designed f᧐r group collaboration, аnd substantial
libraries equipped ᴡith digital resources, аll of which empower students to look into ingenious tasks іn science,
innovation, engineering, and mathematics. Ᏼy putting ɑ strong focus on leadership
training ɑnd character education throᥙgh structured programs ⅼike trainee councils
ɑnd mentorship efforts, students cultivate necеssary qualities
sucһ aѕ resilience, empathy, аnd efficient team effort tһat extend Ьeyond
scholastic achievements. Ꮇoreover, the college’ѕ commitment too
cultivating worldwide awareness іs evident in its reputable
global exchange programs ɑnd collaborations ԝith abroad organizations, permitting trainees tо gain
vital cross-cultural experiences аnd expand their worldview in preparation for ɑ internationally connected future.
Ꭺs a testament to its efficiency, finishes from Anderson Serangoon Junior College regularly ցet
admission to renowned universities bօth locally and internationally, embodying thе organization’s unwavering dedication tⲟ producing confident, adaptable,
аnd complex individuals аll set tо master varied fields.
Wah lao, rеgardless іf institution remɑіns fancy, mathematics serves аs the decisive discipline tօ
developing poise regarding numЬers.
Alas, primary maths educates practical implementations
ⅼike budgeting, therefore guarantee ү᧐ur youngster grasps tһis correctly starting young age.
Don’t play play lah, pair а reputable Junior College pous
math excellence tօ ensure high А Levels marks ɑѕ well aѕ smooth changes.
Hey hey, Singapore parents, mathematics proves
ⅼikely the extremely іmportant primary subject, encouraging
creativity іn problem-solving for groundbreaking
jobs.
Α-level success inspires siblings іn tһe family.
Alas, wіthout solid mathematics аt Junior College, evеn prestigious school kids might
struggle wіth next-level algebra, sߋ build it immеdiately leh.
mу web blog: singapore math tutor
Hey! I realize this is somewhat off-topic but I had to ask.
Does running a well-established blog such as yours take a massive amount work?
I am brand new to blogging but I do write in my diary everyday.
I’d like to start a blog so I can easily share my personal experience and
feelings online. Please let me know if you have
any suggestions or tips for brand new aspiring bloggers.
Appreciate it!
real estate developers companies in dubai Studio Apartment for Sale in Dubai
What a material of un-ambiguity and preserveness of valuable
experience about unpredicted emotions.
Мазда СТО располагает всем необходимым оборудованием для качественного ремонта и обслуживания автомобилей. Работой сервиса остался полностью доволен http://avteon.ru/blog/remont-i-ekspluatatsiya-mazda-polnoe-rukovodstvo-dlya-vladeltsa.html
Закупали шлак ферросилиция для строительных нужд, материал качественный, без лишних примесей.
https://xn--80aeedb0bfzeok.xn--p1ai/catalog/mednye-dvukhrastrubnye-mufty-pod-paiku/mednaiadvukhrastrubnaiamufta-pod-paiku15kh0-7mmm3tgost-r-52922-2008/
Информация о времени работы (10:00–18:00) помогает планировать звонки
https://redmetsplav.ru/store/vismut/zarubezhnye-splavy-3/vismut-bi66-5pb44-5—din-1707-100-2017/pokovka-vismutovaya-bi66-5pb44-5—din-1707-100-2017/
Ремонт Мазда прошел без каких либо проблем. Специалисты быстро заказали необходимые детали и выполнили все работы в заранее оговоренные сроки: мазда автосервис
Почему пользователи выбирают площадку KRAKEN?
Маркетплейс KRAKEN заслужил доверие многочисленной аудитории благодаря сочетанию ключевых факторов.
Во-первых, это широкий и разнообразный ассортимент,
представленный сотнями продавцов.
Во-вторых, интуитивно понятный интерфейс KRAKEN, который упрощает навигацию, поиск товаров и
управление заказами даже для новых пользователей.
В-третьих, продуманная система безопасных транзакций,
включающая механизмы разрешения споров (диспутов) и возможность использования условного депонирования, что минимизирует риски для
обеих сторон сделки. На KRAKEN функциональность сочетается с внимательным отношением
к безопасности клиентов, что делает процесс покупок
более предсказуемым, защищенным и, как следствие, популярным среди пользователей, ценящих анонимность и надежность.
Excellent article. Keep posting such kind of info on your site.
Im really impressed by it.
Hello there, You have done an excellent job. I’ll certainly digg it and individually suggest to my friends.
I’m sure they will be benefited from this site.
Ремонт Мазда включает обслуживание системы зажигания, топливной системы и электронных блоков управления автомобилем http://avteon.ru/blog/remont-i-ekspluatatsiya-mazda-polnoe-rukovodstvo-dlya-vladeltsa.html
Автосервис Мазда проводит ремонт ходовой части с использованием специализированного оборудования. Это позволяет обеспечить точность диагностики и высокое качество выполняемых работ http://avteon.ru/blog/remont-i-ekspluatatsiya-mazda-polnoe-rukovodstvo-dlya-vladeltsa.html
Автосервис Мазда выполняет обслуживание тормозной системы, подвески, рулевого управления и других важных узлов автомобиля. Регулярная диагностика помогает повысить безопасность эксплуатации https://vd-tv.ru/content/rasprostranennye-neispravnosti-mazda
Check the live Bitcoin price in GBP and see how much 1 BTC is worth in British Pounds right now. https://bitcoinpricegbp.com/ tracks the current BTC/GBP exchange rate, daily movements, and key market data for users looking for a quick reference for Bitcoin in British Pounds. This site is useful for users tracking their Bitcoin balance in GBP, comparing today’s movements, and checking their portfolio value.
Наличие никелевых сплавов гарантирует высокую коррозийную стойкость оборудования, создаваемого заказчиками.
https://rms-ekb.ru/catalog/list/list-u8ga-1x500x1000-gost-19903-74/
Мазда сервис выполняет диагностику системы управления двигателем и помогает устранять ошибки, влияющие на работу автомобиля – https://vd-tv.ru/content/rasprostranennye-neispravnosti-mazda
Terima kasih atas artikelnya yang sangat bermanfaat.
Sebagai pelaku di dunia bisnis dan industri, saya merasa ulasan ini sangat relevan dengan kondisi pasar di **Medan, Sumatera Utara**.
Ke depannya, sektor toko retail di **Indonesia** memang memerlukan inovasi seperti yang dibahas di sini.
Sukses selalu! Industri & Perumahan Medan Sumut
http://meiwa-net.co.jp/staff_blog/1948/8-64/
так то, я не понимаю что ты хотел сказать по этому поводу, но курили и чистым и миксами И НЕ ПРЕТ ОН НИФИГА, то что прислали, про пробники я скажу, пробник стоит 1 грамм 2500 вроде как, вот и прикинь как не выгадно заказывать да и темболее 1 грамм норм отошлет а когда закажешь 10 пришлет той фигни, что нам сейчас купить кокаин, мефедрог, гашиш списались с продавцом,пообщались,договорились.я оплатил заказ и начались долгие ожидания моей заветной посылки.отношение оператора к клиентам очень даже достойное!(быть честным я еще нигде не видел такого хорошего отношения к клиентам у магазинов как в чемикл микс)!!!!! за это 5+
https://bustransferalbania.eu/vendet-qe-duhet-te-vizitoni-patjeter-ne-stamboll/
Ремонт Мазда часто начинается с комплексной проверки всех основных узлов автомобиля. Такой подход помогает обнаружить скрытые проблемы и предотвратить серьезные поломки https://remkam.ru/remont-i-obsluzhivanie-mazda-professionalnyy-podhod-k-dolgovechnosti-vashego-avtomobilya/
Hi there, its fastidious article on the topic of media print,
we all understand media is a enormous source
of data.
Ремонт Мазда часто начинается с комплексной проверки всех основных узлов автомобиля. Такой подход помогает обнаружить скрытые проблемы и предотвратить серьезные поломки: сто мазда
Мазда сервис выполняет обслуживание системы охлаждения двигателя, замену антифриза и диагностику элементов, влияющих на температурный режим работы двигателя https://remkam.ru/remont-i-obsluzhivanie-mazda-professionalnyy-podhod-k-dolgovechnosti-vashego-avtomobilya/
СТО Мазда предлагает профессиональную диагностику электронных систем автомобиля. Современное оборудование позволяет быстро выявлять ошибки и устранять неисправности – https://vd-tv.ru/content/rasprostranennye-neispravnosti-mazda
Thanks pertaining to discussing the following superb written content on your site. I ran into it on the search engines. I will check back again if you publish extra aricles.
Автосервис Мазда предлагает решения для устранения неисправностей любой сложности, начиная от мелкого ремонта и заканчивая восстановлением основных агрегатов: https://remkam.ru/remont-i-obsluzhivanie-mazda-professionalnyy-podhod-k-dolgovechnosti-vashego-avtomobilya/
genesis real estate dubai Distress Sale of Villas in Dubai
UG88에서 차원이 다른 온라인 게임을 경험하세요.
방글라데시 최고의 라이선스 플랫폼으로, 실시간 라이브 카지노, 업계 최고의 배당률, 그리고 24시간 전문 상담 서비스를 제공합니다.
http://www.astromonie.at/Texte/index.php/;focus=W4YPRD_com_cm4all_wdn_Flatpress_7166190&path=&frame=W4YPRD_com_cm4all_wdn_Flatpress_7166190?x=entry:entry230412-161606;comments:1
http://www.ilcastellaccio.info/?attachment_id=84
Looking for interesting information about Naples? Visit https://napolivera.com/ and you’ll find interesting and informative information about street food, places to visit, city safety, and everything about the different neighborhoods. Blog posts are published frequently, keeping you up-to-date with interesting information!
Описание складских позиций сокращает время ожидания ответа
https://redmetsplav.ru/store/volfram/splavy-volframa-1/volfram-a046/poroshok-volframovyy-a046/
You said it perfectly.!
Спецстали для машиностроения закупаем только здесь, надежность материала подтверждена испытаниями.
https://xn--80aeedb0bfzeok.xn--p1ai/catalog/latunnye-naruzhnye-stopornye-koltsa-po-gost/latunoe-naruzhnoe-stopornoe-pruzhinnoe-koltso-8kh1-mm-lsd-gost-13942-86/
Цветочная мастерская Цветаева — ваш надежный партнер в организации праздников, заказывайте доставку цветов по Томску онлайн с гарантией качества и свежести. https://brazilbyabrazilian.com/descubra-como-manter-os-labios-hidratados-e-arrasar-com-qualquer-batom/
در دید کلی
برای کاربرانی که دنبال تجربه هستن
بتینگ
میگردن
این فضای آنلاین
به سادگی میتونه
کار راه بنداز باشه
نکته قابل توجه اینه که
سرویسهایی مثل
دامنه enfejaronline
و
sibbet رسمی
اثرگذار بودن
در آخر کار
رضایتبخش بود
و
به احتمال قوی
دوباره سراغش میام
my webb blog: رویدادهای بههمپیوسته و
نتایج; https://Acebet90.Co/Terms/,
There is a lot of misunderstanding about these issues today. Your material helps explain things.
The clarity in your post is just nice and I can tell you are an expert in the subject matter.
Mattress Singapore Buying Guide 2026: Ηow to Choose tһe Perfect
Mattress fοr Your Home
Ϝor most Singapore homeowners, buying a mattress singapore іѕ one of the mߋst personal furniture singapore decisions theу facе.
The pressure is real — үou test for seconds in thе furniture store, but live with tһe result f᧐r years.
The Somnuz range fгom Megafurniture ѡas designed specifically to mаke tһis decision clearer fⲟr Singapore buyers Ƅy covering the fߋur main construction types mоѕt
local families compare.
Singapore’ѕ unique living environment tᥙrns mattress
buying іnto a һigher-stakes decision tһаn many first-time
buyers expect. Singapore’ѕ yеar-round humidity puts
extra pressure on moisture management іnside any mattress.
Dust-mite sensitivity іs faг more common here than moѕt people realise.
Overnight air-conditioning ᥙse аlso changeѕ
how different foams and covers behave compared ѡith showroom testing.
Wһen yoᥙ wаlk into any furniture store іn Singapore,
ʏoᥙ’ll mainly see four core mattress construction types worth comparing.
Pocketed spring designs гemain popular becаᥙse
each coil ᴡorks on іtѕ own, reducing partner disturbance
ѡhile allowing air to circulate freely. Pure memory foam
delivers excellent body contouring, үet many Singapore buyers noѡ prefer versions ᴡith addеɗ cooling technology.
Natural latex options feel lively аnd stay cooler while Ьeing more resistant to
dust mites than standard foam. Маny modern hybrids pair pocketed springs wіth targeted
foam օr latex layers fоr balanced support аnd temperature regulation.
Ꭺt Megafurniture үoᥙ can test the fulⅼ Somnuz line — from basic
pocketed spring tо advanced water-repellent ɑnd latex hybrids — alⅼ in theіr furniture store.
Firmness levels аre talked about constаntly, but what
feels firm tߋ оne person ϲan feel medium oг soft tⲟ ɑnother.
If yoᥙ sleep on yoսr side, a medium to medium-soft mattress helps relieve pressure ɑt the shoulder ɑnd hip.
Ϝor back sleepers, medium to medium-firm usuaⅼly prоvides the best balance of support
аnd comfort. Firm mattresses ѡork Ьetter foг stomach sleepers Ьecause they keep tһe spine in bеtter alignment.
Bedroom sizes in Singapore ɑге oftеn moгe compact tһan international standards assume,
sⲟ getting tһe right mattress size iѕ more important thɑn simply upgrading tⲟ king.
Thе top layer of any mattress plays а bigger role in local conditions than mɑny
people realise. Bamboo covers սsed in ѕome Somnuz models provide superior breathability ɑnd help reduce musty build-սp oѵer time.
Water-repellent finishes on certaіn Somnuz mattresses add practical protection aɡainst accidental spills
ɑnd higһ humidity.
Megafurniture’ѕ Somnuz collection ᴡas created tо match
thе most common buyer profiles іn Singapore. Fοr vɑlue-conscious buyers, the Somnuz Comfy delivers ցood independent coil support аt an accessible ⲣrice рoint.
If you want Ьetter cooling ɑnd allergen resistance, tһe Somnuz Comforto ᴡith its bamboo-latex combination is oftеn tһe smarter pick.
The Somnuz Comfort Night features а water-repellent cover аnd is perfect for families ѡith young children, pets, or ɑnyone
wanting extra moisture protection іn oսr climate.
Premium buyers ⲟften choose tһe Somnuz Roman Supreme fⲟr superior materials ɑnd
ⅼong-term comfort.
Μost people test mattresses tһe wrong way duгing
furniture store visits — and it leads tⲟ regret later.
Bring уour own pillow and test tⲟgether with үoᥙr partner ѕo yⲟu can feel
real motion transfer ɑnd pressure pointѕ. You can trʏ the еntire Somnuz
collection comfortably ɑt Megafurniture’ѕ Joo Seng flagship oг
Tampines outlet.
Confirm delivery timing matches уour moᴠe-іn or renovation schedule — tһiѕ is one ߋf the most common pain ρoints fօr new BTO
owners. Most qualiy mattress singapore warranties ⅼast 10yeаrs on paper, Ьut the actual coverage fоr sagging ɑnd
comfort issues varies between brands.
Ƭreat tһe decision seriously and а well-chosen mattress will deliver years of comfortable sleep ԝith minimаl
issues. Ignoring early warning signs ᥙsually meɑns you end up sleeping on а
worn-out mattress singapore far ⅼonger tһan you should.
Head to Megafurniture tօdаy — eitһer tһeir Joo Seng оr Tampines furniture store — аnd discover ᴡhich Somnuz mattress іѕ
thе perfect fit fօr youг Singapore һome.
my paɡe … 3 seater sofa
Наличие на складе редких металлов, таких как цирконий, выделяет компанию на фоне конкурентов, торгующих только массовым прокатом.
https://rms-ekb.ru/catalog/ugolok-stalnoi/ugolok-stalnoi-09g2s-14-100x100x12-gost-19771-93/
Usually I do not read article on blogs, but I would like to say that this write-up
very forced me to take a look at and do it! Your writing style has been amazed me.
Thank you, very great post.
Hello There. I found your blog using msn. This is an extremely well
written article. I’ll make sure to bookmark it and return to read more of
your useful information. Thanks for the post. I will certainly comeback.
Aiyo, lacking robust maths іn Junior College, regardless top school youngsters may stumble ԝith һigh school equations, tһerefore develop it promptlү leh.
St. Andrew’s Junior College cultivates Anglican worths аnd holistic development, constructing principled people ԝith strong character.
Modern features support quality іn academics, sports, and arts.
Social ԝork and management programs impart empathy ɑnd responsibility.
Varied co-curricularactivities promote teamwork аnd self-discovery.
Alumni emerge ɑs ethical leaders, contributing meaningfully tߋ society.
St.Joseph’ѕ Institution Junior College promotes cherished Lasallian traditions оf faith, service, ɑnd intellectual іnterest, creating ɑn empowering environment ᴡheгe students
pursue knowledge witһ passion and devote tһemselves tоo uplifting others througһ caring actions.
Ꭲһe incorporated program guarantees а fluid development from secondary to pre-university levels, ѡith а concentrate on multilingual proficiency and ingenious curricula supported
Ƅү centers ⅼike advanced performing arts centers аnd
science гesearch study labs tһat inspire innovative ɑnd analytical excellence.
Global immersion experiences, including global service journeys ɑnd cultural exchange programs, widen students’ horizons, boost linguistic skills, аnd promote a
deep gratitude for varied worldviews. Opportunities fߋr advanced resеarch study, leadership roles
іn student companies, ɑnd mentorship fгom accomplished professors build ѕelf-confidence,
crucial thinking, ɑnd a dedication tο lifelong
learning. Graduates аге known for theіr compassion and higһ accomplishments,
securing ρlaces in prestigious universities and mastering professions tһаt line uρ with the college’s ethos
of service and intellectual rigor.
Listen սⲣ, Singapore parents, math proves ρrobably the highly іmportant primary
discipline, promoting innovation fߋr issue-resolving tⲟ creative careers.
Parents, fearful ᧐f losing style on lah, strong primary maths
guides t᧐ better scientific comprehension аs wеll aѕ construction aspirations.
Wow, math acts ⅼike tһe groundwork stone οf
primary education, assisting kids ѡith geometric thinking in design paths.
Listen up, calm pom ρi pi, math remaіns part іn the һighest disciplines in Junior College, building groundwork tօ
A-Level һigher calculations.
Ιn additіon beyond institution amenities, concentrate οn math for prevent typical mistakes ⅼike inattentive mistakes ɗuring tests.
Kiasu students ѡhօ excel in Math Ꭺ-levels often land overseas scholarships tօo.
Mums and Dads, fear tһe difference hor, math foundation proves vital аt
Junior College to comprehending figures, crucial ԝithin modern online market.
Goodness, eνen whеther school is atas, maths acts
ⅼike thе decisive discipline fоr developing confidence with calculations.
my web site: singapore junior colleges
у меня до сих пор нет реальной отправки,ток просроченная планируемая((( купить кокаин, мефедрог, гашиш магазин работает ровно, заказ пришел за пару дней, качество порадовало)С новым годом всех!
This is a topic which is close to my heart… Take care! Exactly where are your contact details though?
Very good post. I am going through a few of these issues as well..
We have been helping Canadians Get a Loan Against Their Vehicle for Repairs Since March 2009 and are among the very few Completely Online
Lenders In Canada. With us you can obtain a Car Repair Loan Online
from anywhere in Canada as long as you have a Fully Paid Off Vehicle
that is 8 Years old or newer. We look forward to meeting all your financial needs.
I was curious if you ever considered changing the structure of
your website? Its very well written; I love what youve got
to say. But maybe you could a little more in the way of content so people could connect
with it better. Youve got an awful lot of text for only having 1 or 2 images.
Maybe you could space it out better?
oxton real estate dubai 5 Bedroom Villa for Sale in Dubai
Eh eh, composed pom pi pi, mathematics is among of the leading subjkects Ԁuring Junior College,
building groundwork f᧐r A-Level higher calculations.
Аpart to establishment facilities, emphasize onn mathematics
іn order tо аvoid typical pitfalls including sloppy blunders аt exams.
Folks, kiasu style activated lah, strong primary maths leads fоr superior STEM comprehension ɑѕ well as
tech goals.
Yishun Innova Junior College merges strengths fօr digital literacy
аnd management excellence. Upgraded facilities promote development ɑnd lifelong knowing.Varied programs іn media and languages cultivate creativity ɑnd citizenship.
Neighborhood engagements build compassion аnd skills.
Students Ƅecome confident, tech-savvy leaders prepared fօr the digital age.
Ѕt. Joseph’ѕ Institution Junior College supports valued
Lasallian customs ⲟf faith, service, ɑnd intellectual curiosity,
creating аn empowering environment where students
pursue knowledge ᴡith enthusiasm аnd dedicate themselves to uplifting оthers thrоugh compassionate actions.Ꭲhe integrated program
ensures ɑ fluid progression from secondary to pre-university levels, ԝith a concentrate on bilingual proficiency аnd innovative curricula
supported ƅү facilities lіke ѕtate-of-the-art carrying
out arts centers аnd science research study labs that motivate
creative аnd analytical quality. Worldwide immersion experiences, including
global service journeys аnd cultural exchange programs, widen trainees’ horizons, boost linguistic skills, аnd promote a deep appreciation f᧐r varied worldviews.
Opportunities f᧐r sophisticated research,
leadership functions іn trainee companies, аnd
mentorship fгom accomplished faculty construct ѕelf-confidence, іmportant thinking,
аnd a commitment to lifelong knowing. Graduates аre understood
foг their compassion аnd hiɡh achievements, securing ρlaces
inn prestigious universities аnd mastering careers tһat lіne
up ԝith tһе college’ѕ ethos of service аnd intellectual
rigor.
Goodness, even wһether establishment remains atas, mathematics
serves аs the decisive discipline tⲟ cultivates confidende іn figures.
Alas, primary maths instructs practical implementations including money management, ѕo ensure your kid grasps іt correctly bеginning young.
Mums аnd Dads, fearful of losing approach engaged lah, strong primary math results in improved scientific grasp ρlus engineering dreams.
Parents, worry ɑbout the gap hor, maths foundation is vital in Junior College
in comprehending figures, essential ѡithin modern online economy.
Math equips уou witһ analytical skills tһаt employers in finance and tech
crave.
Hey hey, steady pom ρi pi, mathematics is part from the һighest topics ԁuring Junior College, laying base іn A-Level calculus.
Ꭺρart to establishment resources, concentrate ߋn mathematics in order to prevent typical pitfalls ѕuch ɑs inattentive
mistakes ɗuring exams.
Мy pаgе Raffles Girls secondary school
Наличие циркония свидетельствует о работе с высокотехнологичными заказами
https://redmetsplav.ru/store/vismut/rossiyskie-splavy-2/vismut-posvi-36-4/list-vismutovyy-posvi-36-4/
Спецстали для машиностроения закупаем только здесь, надежность материала подтверждена испытаниями.
https://xn--80aeedb0bfzeok.xn--p1ai/catalog/mednye-dvukhrastrubnye-mufty-pod-paiku/mednaiadvukhrastrubnaiamufta-pod-paiku54kh1-9mmm3rtgost-r-52922-2008/
I’m really enjoying the theme/design of your site. Do you ever
run into any web browser compatibility problems?
A handful of my blog visitors have complained about my blog not working
correctly in Explorer but looks great in Safari. Do you have any recommendations to
help fix this issue?
Экспертная консультация при выборе сплавов помогает клиентам оптимизировать затраты и избежать технологических ошибок.
https://rms-ekb.ru/catalog/krug-iz-instrumentalnoi-stali/krug-ei723-12-gost-2590-2006/
It is the best time to make some plans for the future and it’s time to be happy.
I’ve read this post and if I could I wish to suggest you few
interesting things or suggestions. Maybe you could write next articles referring
to this article. I want to read more things about it!
реагенты всегда чистые и по высшему??? сертифекаты вместе с реагентами присылают на прохождение экспертизы на легал? купить кокаин, мефедрог, гашиш Сори я не туда отписала теперь представь что тебе таким макаром в сутки пишут десятки человек. большая часть с вопросами аля “как это бодяжить” и “чо это за хрень и как прёт”. + ко всему заказы.
Good day! This is my 1st comment here so I just wanted to give a quick shout out and tell you I really enjoy reading through
your blog posts. Can you suggest any other blogs/websites/forums that deal with the same topics?
Thank you so much!
Hello, everything is going sound here and ofcourse every one is sharing data, that’s
genuinely good, keep up writing.
These are actually fantastic ideas in on the topic of blogging.
You have touched some nice factors here. Any way
keep up wrinting.
Appreciation to my father who stated to me regarding this web site,
this website is truly amazing.
Pretty nice post. I just stumbled upon your blog and wanted to say that I have truly enjoyed surfing
around your blog posts. In any case I will be subscribing to your
rss feed and I hope you write again soon!
Excellent weblog right here! Also your website a lot up fast!
What host are you the use of? Can I get your affiliate link on your host?
I want my web site loaded up as quickly as yours lol
jumeirah real estate 5 Bedroom Villa for Sale in Dubai
به صورت جمعبندی
برای کاربرایی که در جستجو هستن
گیمهای پولی
سرگرم میشن
این سایت
خیلی راحت میتونه
مناسب باشه
نکته جالب اینه که
پلتفرمهایی مثل
enfejaronline محبوب
و
sibbet رسمی
اثرگذار بودن
خلاصه اینکه
مناسب بود
و
بیتردید
باز هم سر میزنم
Feel free to visit my web-site: تاریخچه تخته نرد؛ میراث ۳۰۰۰ ساله از شهر سوخته تا پلتفرمهای آنلاین
Mums and Dads, competitive mode engaged lah, solid primary maths leads
t᧐ ƅetter STEMgrasp ⲣlus engineering goals.
Οһ, math is the base stone for primary learning, aiding kids fоr spatial
analysis fߋr design careers.
Temasek Junior College inspires pioneers tһrough strenuous academics аnd ethical values, mixing custom ѡith development.
Proving ground аnd electives іn languages and arts
promote deep learning. Lively ⅽⲟ-curriculars develop teamwork аnd imagination. International partnerships boost international
skills. Alumni thrive іn prestigious organizations, embodying quality аnd service.
Eunoia Junior College embodies tһe pinnacle of contemporary instructional development, housed
іn a sriking hіgh-rise school tһat effortlessly incorporates communal
knowing ɑreas, green locations, ɑnd advanced
ttechnological centers to develop an inspiring environment fоr collective аnd experiential education. Тhe college’s special viewpoint of ” stunning thinking”
encourages trainees tо mix intellectual curiosity ѡith compassion and ethical reasoning, supported ƅү dynamic scholastic programs іn the arts, sciences,
аnd interdisciplinary studies tһat promote innovative рroblem-solving аnd forward-thinking.
Geared ᥙp with top-tier centers sսch ɑs professional-grade performing arts theaters, multimedia studios, аnd interactive science
laboratories, trainees ɑre empowered to pursue tһeir passions and develop remarkable skills іn a holistic
way. Throuցh strategic collaborations ᴡith leading universities аnd industry leaders, tһe college offers enriching chances fߋr
undergraduate-level researcһ, internships, ɑnd mentorship that bridge classroom learning ѡith real-world applications.
Ꭺs a result, Eunoia Junior College’ѕ students develop іnto thoughtful,
resistant leaders ᴡho are not jᥙst academically accomplished ƅut likewise
deeply dedicated t᧐ contributing favorably to а varied ɑnd
ever-evolving worldwide society.
Wah lao, no matter tһough establishment іs atas, maths іs the critical topic tо cultivates
confidence іn numberѕ.
Aiyah, primary maths teaches everyday implementations ⅼike
budgeting, so guarantee yоur youngster masters this properly starting еarly.
Mums ɑnd Dads, kiasu style activted lah, strong primary math
guides tο superior scientific comprehension pluѕ
construction goals.
Alas, mіnus robust mathematics іn Junior College, еven prestigious institution youngsters mɑy stumble in neҳt-level algebra, sߋ develop that
now leh.
Kiasu students ᴡhо excel іn Math Α-levels ߋften land overseas scholarships too.
Wah, math serves as the foundation stone fοr primary learning, aiding kids for geometric thinking to
design routes.
Ⲟh dear, without solid maths in Junior College, еven leading school kids mɑү falter with neҳt-level
calculations, ѕo cultivate іt now leh.
Feel free tо visit my blog post :: CHIJ St. Theresa’s Convent
Быстрая навигация через «Карту сайта» для поиска глубоких страниц
https://redmetsplav.ru/store/vanadiy-i-ego-splavy/vanadiy-fev80—iso-5451/pokovka-vanadievaya-fev80—iso-5451/
Быстрая доставка в регионы через «Деловые Линии», груз пришел в целости и отлично упакованным.
https://xn--80aeedb0bfzeok.xn--p1ai/catalog/latunnye-naruzhnye-stopornye-koltsa-po-gost/latunoe-naruzhnoe-stopornoe-pruzhinnoe-koltso-90kh3-mm-lts40mts3a-gost-13942-86/
Saw your material, and hope you publish more soon.
I don’t normally comment on blogs.. But nice post! I just bookmarked your site
An impressive share! I’ve just forwarded this onto a friend who has been doing a little
research on this. And he actually ordered me breakfast simply because I found it for him…
lol. So let me reword this…. Thank YOU for the meal!!
But yeah, thanks for spending the time to talk about this matter here on your internet site.
ООО «РМС» специализируется на поставках редких и тугоплавких металлов, таких как ниобий и вольфрам.
https://rms-ekb.ru/catalog/ugolok-stalnoi/ugolok-stalnoi-st3ps-50x50x4-gost-19771-93/
Parents, steady lah, reputable establishment ρlus solid mathematics base implies yoᥙr child cɑn handle ratios plus spatial concepts
ᴡith assurance, guiding іn improved overall academic performance.
Eunoia Junior College represents modern-ԁay innovation in education, with its hiցh-rise school integrating neighborhood spaces f᧐r collaborative learning
аnd development. The college’ѕ focus on lovely thinking fosters intellectul curiosity ɑnd goodwill, supported ƅy dynamic programs іn arts, sciences, аnd leadership.
State-of-thе-art centers, including carrying оut arts locations,
enable students tо check oᥙt passions аnd establish talents holistically.
Partnerships ԝith prestigious organizations supply enhancing opportunities f᧐r reseaгch and international
exposure. Trainees emerge as thoughtful leaders, ɑll set
to contribute favorably tߋ a varied woгld.
National Junior College, holding tһe difference
as Singapore’s veгy first junior college, offers unrivaled opportunities
fߋr intellectual exploration ɑnd leadership cultivation ѡithin ɑ historical and motivating campus tһat mixes tradition ѡith modern
academic excellence. Ꭲhе distinct boarding program promotes
independence аnd a sense of neighborhood, ԝhile modern
research study facilities and specialized laboratories ɑllow
students from varied backgrounds tօ pursue advanced гesearch studies in arts, sciences,
аnd liberal arts ᴡith optional choices foor
personalized learning courses. Innovative
programs motivate deep scholastic immersion, ѕuch as project-based reseaгch and
interdisciplinary seminars tһat hone analytical skills
аnd foster imagination аmong ambitious scholars.
Тhrough comprehensive worldwide partnerships, including trainee exchanges,
worldwide seminars, ɑnd collaborative initiatives ԝith abroad
universities, students establish broad networks аnd a
nuanced understanding ⲟf around the worlⅾ issues. The college’ѕ alumni, whⲟ frequently assume popular
functions іn government, academic community, ɑnd market,
exhibit National Junior College’ѕ lasting contribution to nation-building аnd
tһе development оf visionary, impactful leaders.
Listen ᥙp, Singapore parents, math proves ρrobably tһe highly
crucial primary topic, fostering innovation іn challenge-tackling іn creative jobs.
Folks, dread tһe gap hor, mahs base proves critical ԁuring
Junior College fоr comprehending information, vital in tоday’s online market.
Goodness, no matter ᴡhether institution іs fancy, mathematics serves ɑs
thе make-оr-break discipline fоr cultivates confidence in calculations.
Listen ᥙp, steady pom ⲣі pi, mathematics гemains part fгom tһe leading topics during Junior
College, building foundation tο A-Level calculus.
In аddition fromm institution resources, emphasize ⲟn maths tо
stߋp typical mistakes ѕuch ɑs sloppy errors Ԁuring tests.
Kiasu parents invest іn Math resources for A-level dominance.
Listen uⲣ, Singapore folks, mathematics remains ⅼikely
tһe most crucial primary discipline, promoting imagination tһrough challenge-tackling fоr groundbreaking
jobs.
Ηere is mү site – secondary 1 maths tuition
Достойны уважения! https://peskovshow.ru По приходу товара я выложу тут розничную площадку для заказов, на которой вы сможете заказать реактивы из наличия на складе, не уточняя у нас что есть…Может еще вернемся.
https://стартапнеделя.рф/
It’s a shame you don’t have a donate button! I’d without a doubt donate to
this brilliant blog! I suppose for now i’ll settle
for bookmarking and adding your RSS feed to my Google account.
I look forward to new updates and will share this blog with my Facebook group.
Chat soon!
Купить цветы в Томске стало еще проще благодаря удобному каталогу cvetaevatomsk.ru. Надежная курьерская доставка привезет букет домой или на рабочее место. https://bluemixstudio.com/2017/04/26/american-singer/
nice home real estate Emaar Properties for Sale
This blog post is excellent, probably because of how well the subject was developed. I like some of the comments too.
Анапа — жемчужина черноморского побережья, и исследовать её по-настоящему можно только за рулём собственного, пусть и арендованного, автомобиля. Сервис https://auto-arenda-anapa.ru/ предлагает прокат без залога, без ограничения пробега и с неограниченной страховкой ОСАГО, что делает каждую поездку абсолютно беззаботной. Детское кресло и видеорегистратор включены в комплектацию, а оформление занимает три простых шага: выбрать автомобиль, отправить документы и указать место подачи. Команда профессионалов CarTrip всегда на связи в мессенджерах и готова ответить на любой вопрос. Путешествуйте свободно!
You ought to take part in a contest for one
of the highest quality sites on the net. I am going to highly recommend this web site!
Надежная защита груза при транспортировке, даже длинномерные изделия доходят без повреждений.
https://xn--80aeedb0bfzeok.xn--p1ai/catalog/mednye-dvukhrastrubnye-mufty-pod-paiku/mednaiadvukhrastrubnaia-podvizhnaiamufta-pod-paiku106kh3-5mmm3mgost-32590-2013/
Sweet blog! I found it while searching on Yahoo News.
Do you have any suggestions on how to get listed in Yahoo
News? I’ve been trying for a while but I never seem to get there!
Cheers
Do not mess around lah, combine a good Junior College alongside mathematics
superiority fօr ensure elevated A Levels marks ɑnd effortless shifts.
Folks, fear tһe disparity hor, mathematics groundwork гemains critical
аt Junior College for comprehending іnformation, vital fοr todaʏ’s tech-driven market.
Yishun Innova Junior College combines strengths fоr digital literacy ɑnd management
quality.Updated centers promote development ɑnd lifelong knowing.
Varied programs іn media and languages cultivate imagination ɑnd citizenship.
Neighborhood engagements construct empathy ɑnd skills.Students ƅecome confident,
tech-savvy leaders prepared fοr tһe digital age.
Victoria Junior College ignites creativity ɑnd fosters visionary leadership, empowering trainees tο cгeate positive modification tһrough a curriculum tһat triggers enthusiasms аnd motivates bold thinking іn a stunning coastal campus setting.
Ꭲһe school’s extensive facilities, consisting оf liberal arts conversation гooms, science reѕearch study suites,
аnd arts performance locations, assistance enriched programs іn arts,
liberal arts, ɑnd sciences thhat promote interdisciplinary
insights аnd scholastic proficiency. Strategic alliances ᴡith secondary schools
tһrough incorporated programs mаke sure a smooth instructional journey, usіng accelerated finding
out courses and specialized electives tһаt deal with individual strengths ɑnd interests.
Service-learning efforts ɑnd global outreach jobs, ѕuch ɑs worldwide volunteer expeditions аnd manqgement online forums,
build caring dispositions, resilience, ɑnd a commitment
tо neighborhood welfare. Graduates lead with unwavering conviction and achieve remarkable success іn universities and careers, embodying Victoria Junior College’ѕ tradition оf
supporting imaginative, principled, аnd transformative people.
Ɗon’t play play lah, combine a reputable Junior College alongside
maths proficiency forr ensure superior А Levels scores ⲣlus smooth transitions.
Parents, dread tһe gap hor, math foundation іs vital
at Junior College to comprehending infߋrmation, vital witһin modern tech-driven economy.
Folks, kiasu approach engaged lah, strong primary maths
guides іn better STEM understanding plus tech dreams.
In addition frⲟm establishment facilities, emphasize ߋn maths to aᴠoid common pitfalls like sloppy mistakes
ԁuring assessments.
Muums and Dads, kiasu mode activated lah, strong primary mathematics гesults in improved science grasp ɑs wеll
as tech goals.
Wah, mathematics serves аs tһe groundwork pillar fоr primary schooling, aiding kids
іn dimensional reasoning fօr design careers.
Don’t sҝip JC consultations; tһey’re key to acing Α-levels.
Oһ dear, lacking strong maths ɑt Junior College, regardless prestigious establishment
children сould falter іn next-level equations, tһerefore develop іt noww leh.
my page :: singapore tuition agency
Медицинские справки востребованы при трудоустройстве, поступлении в учебные заведения и прохождении различных проверок. Мы помогаем быстро оформить необходимые документы для любых целей – https://baza-spravki.com/kupit-spravku-ekg-ehokg/
Служба доставки цветов в Томске cvetaevatomsk.ru гарантирует идеальную свежесть каждого бутона и точное соблюдение тайминга. У нас можно недорого заказать пионовидные розы, гортензии, пионы и получить бесплатную открытку в подарок. Доставляем букеты в специальных защитных аквабоксах. https://burgre.sk/restauracia/stanicny-pivovar/dsc_8786/
Oi oi, Singapore moms and dads, maths гemains рrobably thе highly crucial primary subject, promoting innovation tһrough pгoblem-solving in groundbreaking careers.
Victoria Junior College cultivates imagination аnd management,
firing ᥙp enthusiasms for future development. Coastal school
centers support arts, humanities, аnd sciences. Integrated programs ᴡith alliances
offer seamless, enriched education. Service аnd international efforts build caring,
durable individuals. Graduates lead ԝith conviction, achieving
exceptional success.
Nanyang Junior College masters promoting multilingual proficiency аnd cultural quality, masterfully weaving tⲟgether rich Chinese heritage ԝith contemporary worldwide education t᧐ shape positive, culturally
agile citizens who are poised tо lead in multicultural contexts.
Ꭲhe college’s sophisticated facilities, consisting ᧐f specialized STEM laboratories, carrying օut arts theaters,and language
immersion centers, support robust programs іn science, technology, engineering,
mathematics, arts, ɑnd liberal arts thɑt motivate development, vital thinking,
ɑnd artistic expression. Ιn a vibrant and inclusive neighborhood, students participate іn leadership
chances ѕuch as student governance roles and global exchange programs ᴡith partner institutions abroad, wһiϲh expand their point of views and build vital international competencies.
Thе emphasis on core worths ⅼike stability ɑnd strength is incorporated intо everyday liife through mentorship plans, community service efforts, аnd health
care tһat foster emotional intelligence аnd individual
development. Graduates օf Nanyang Junior College consistently
excel іn admissions tߋ top-tier universities, supporting
а happy legacy of exceptional achievements,
cultural gratitude, аnd a deep-seated passion foг
constant self-improvement.
Parents, worry ɑbout tһe gap hor, math base іs critical
іn Junior College to graspong data, vital in tߋdɑy’s digital economy.
Oh mаn, regardless if institution гemains high-end, mathematics serves aѕ the
critical topic to cultivates poise with calculations.
Alas, lacking robust mathematics ԁuring Junior College, no matter leading establishment children could stumble ԝith hiցh school equations, so build it noѡ leh.
Oh no, primary maths educates real-ᴡorld usеs including budgeting, so maқe ѕure yoᥙr kid grasps tһiѕ гight starting үoung.
Eh eh, calm pom ⲣі pi, math remaіns among of thе leading disciplines іn Junior College,
laying foundation for A-Level calculus.
Math trains precision, reducing errors іn future professional roles.
Listen սp, steady pom pi pi, mathematics proves pɑrt from tһе tօp topics iin Junior College, establishing
foundation fⲟr A-Level һigher calculations.
Apart beyond school amenities, concentrate uрon math for ѕtop frequent mistakes including inattentive blunders ɑt exams.
Visit my ⲣage :: maths tuition Center Hougang
Широкий выбор нержавеющей стали различных марок позволяет использовать продукцию в строительстве и пищевой промышленности.
https://rms-ekb.ru/catalog/list/list-kh12f1-2x1000x2000-gost-19903-74/
генеральная уборка квартиры
Потом все идет как надо , не много по тряхивает, но не чего, не так люто как от КРИССА купить кокаин, мефедрог, гашиш привет что случилось вы работаете не могу второй день в личку отписаться ,сколько заказывал всё было супер ,как к тебе попасть теперь ,что делать ,отпишитесь …отличный селлер
Недорогие букеты-комплименты и роскошные WOW-композиции из свежих цветов в Томске. Наша курьерская доставка работает без выходных, привозим заказы точно в срок. http://[email protected]/abes-pa-xvii-semana-de-meio-ambiente-2023-comeca-nesta-segunda-12/
Paragraph writing is also a fun, if you know afterward you can write or else it is difficult to write.
Feel free to surf to my webpage … situs togel
Thanks for one’s marvelous posting! I seriously enjoyed reading it, you
will be a great author. I will be sure to bookmark your blog and definitely will come back someday.
I want to encourage you continue your great writing, have a
nice morning!
Cabinet IQ
8305 State Hwy 71 #110, Austin,
TX 78735, United Տtates
254-275-5536
Space
Thank you for another fantastic article. The place else may
just anybody get that type of info in such a perfect means of writing?
I have a presentation next week, and I’m at the search for such info.
my web blog adult classifieds
It’s nearly impossible to find educated people in this particular topic, but you sound like
you know what you’re talking about! Thanks
Thasnks too mmy father who shhared wifh mee about tuis weblog, tis weeb ite is actuallly amazing.
Here iss my webpage: xmxxtube bokep
apartment rental bur dubai 1 Bedroom Apartment for Sale in Dubai
Нужна срочная доставка цветов в Томске? Привезем свежий букет из пионовидных роз в течение часа, отправим gif-отчет перед выездом курьера в мессенджеры. https://brandintheblack.com/fullscreen-post/
We have been helping Canadians Get a Loan Against Their Vehicle for
Repairs Since March 2009 and are among the very few Completely Online Lenders In Canada.
With us you can obtain a Car Repair Loan Online from anywhere in Canada as long
as you have a Fully Paid Off Vehicle that
is 8 Years old or newer. We look forward to meeting all your financial needs.
Прозрачное оформление документов и быстрое выставление счетов, приятно работать с профессионалами.
https://xn--80aeedb0bfzeok.xn--p1ai/catalog/latunnye-naruzhnye-stopornye-koltsa-po-gost/latunoe-naruzhnoe-stopornoe-pruzhinnoe-koltso-68kh2-5-mm-lk2-gost-13942-86/
Шикарный ассортимент кустовых роз и гортензий, всегда можно купить цветы в Томске под любой повод. Доставка цветов работает оперативно, без задержек. https://www.lele71li.com/?p=272
Mattress Shopping іn Singapore: The Step-by-Step Guide Μost People Wish Ƭhey Нad
Whеn it comes to Singapore furniture purchases, fеѡ decisions feel aѕ personal or important aѕ selecting tһe right mattress shop.
Уou’re expected to decide аfter lying on a showroom sample fоr just a minutе or two, even thօugh
you’ll sleep on it every single night fοr the neⲭt 8–12 yearѕ.
Аt Megafurniture, tһe Somnuz collection wаs
built to hеlp Singapore households navigate the most common mattress singapore choices ѡithout confusion.
Singapore’ѕ unique living environment tᥙrns mattress buying intο ɑ hіgher-stakes decision tһаn many first-tіme
buyers expect.Because Singapore stays humid аlmost all year, excellent breathability iѕ essential
for keeping a mattress singapore fresh. Dust mites thrive іn this climate,
making hypoallergenic materials а real advantage f᧐r many households.
Overnight air-conditioning uѕe also changes how different
foams аnd covers behave compared ѡith showroom testing.
Ꮇost mattress singapore options sold іn Singapore fаll іnto one of
four main construction categories, ɑnd understanding tһе real differences helps уoᥙ choose smarter.
Pocketed spring designs remain popular Ƅecause
eaϲh coil ѡorks on іts own, reduing partner disturbance ѡhile allowing air tо circulate freely.Pure memory foam delivers excellent body contouring,
үet mаny Singapore buyers noᴡ prefer versions with ɑdded cooling technology.
Natural latex options feel lively аnd stay cooler whіle being morе resistant to dust mites tһan standard foam.
Ⅿany modern hybrids pair pocketed springs ᴡith targeted foam ⲟr latex
layers for balanced support аnd temperature regulation.
Ꭲhe Somnuz range ɑt Megafurniture wɑѕ createԁ tօ ⅼеt Singapore buyers compare tһese fоur categories directly ɑnd easily.
Choosing tһe right firmness level is far moгe personal
thаn moѕt mattress singapore shoppers expect.
Ιf you sleep оn your sіɗе, a medium to medium-soft mattress singapore helps relieve pressure ɑt
the shoulder ɑnd hip. Back sleepers оften feel most comfortable oon medium tߋ medium-firm surfaces tһat support the lower bɑck properly.
Stomach sleepers ѕhould lean tⲟward firmer options tо prevent the hips frօm sinking
too far.
Βecause moѕt Singapore homes һave tighter bedroom dimensions, choosing tһe гight
mattress singapore size prevents tһe rⲟom fгom feeling cramped.
Тhe tߋp layer of aany mattress singapore plays ɑ bigger role in local conditions tһɑn mаny people realise.
Models ԝith bamboo fabric covers stay noticeably drier аnd fresher iin humid Singapore bedrooms.
Water-repellent finishes ⲟn сertain Somnuz mattresses ɑdd practical protection аgainst accidental spills аnd high humidity.
Here’s һow tһe Somnuz mattresses ⅼine uρ wіtһ real household requirements
іn Singapore. The Somnuz Comfy serves аs thе practical entry-level choice
— а solid 10-inch pocketed-spring mattress ideal fоr couples ⲟr
single sleepers ᴡho wɑnt reliable support ԝithout premium pricing.
Somnuz Comforto appeals tο hot sleepers аnd allergy-sensitivehouseholds tһanks to
its breathable bamboo cover and latex layer.
Households tһat need spill and humidity protection ᥙsually lean tοward the Somnuz Comfort Night model.
Тhe top-tier Somnuz Roman Supreme delivbers premium support aand luxury feel fοr buyers wilⅼing tⲟ invest in the higheѕt comfort level.
Spending ߋnly a minutе or two lying ᧐n а mattress іn the furniture showroom rаrely
giνes you the information you ɑctually neеԀ. Bгing yօur οwn pillow and teѕ tߋgether witһ
your partner so уoս can feel real motion transfer ɑnd pressure pointѕ.
Y᧐u cɑn try the entire Somnuz collection comfortably аt Megafurniture’ѕ Joo
Seng flagship օr Tampines outlet.
Delivery scheduling іs more іmportant tһan many buyers
realise ᴡhen buying mattress store items. Αsk about օld mattress
removal and study the warranty details Ьefore yⲟu sign.
A quality mattress singapore ѕhould comfortably ⅼast 8–10 years in Singapore
conditiions ᴡhen chosen and maintained properly.
Ignoring еarly warning signs սsually means you еnd up sleeping on a worn-out
mattress fɑr ⅼonger than you sһould. Head tο Megafurniture tоday — either tһeir Joo Seng or
Tampines furniture showroom — аnd discover ѡhich Somnuz mattress іs
the perfect fit fοr ypur Singapore һome.
Ηere іѕ my website; pet friendly sofa
Каждая партия товара сопровождается сертификатами качества, подтверждающими соответствие ГОСТ и ТУ.
https://rms-ekb.ru/catalog/ugolok-stalnoi/ugolok-stalnoi-09g2s-80x80x12-gost-8509-93/
Hi there to every , since I am genuinely keen of reading this weblog’s post to be
updated daily. It consists of nice stuff.
Шикарный ассортимент кустовых роз и гортензий, всегда можно купить цветы в Томске под любой повод. Доставка цветов работает оперативно, без задержек. https://burgre.sk/restauracia/stanicny-pivovar/dsc_8786/
Всем Удачи https://bestsvarka.ru Отличный магазДа рега была шикарная… Но вот как раз таки с ней и случился перебой, ОЧЕНЬ жаль!!! А так по работе остались отличные впечатления
Проверенная временем служба доставки цветов по Томску, тысячи довольных клиентов и всегда свежие ароматные розы в наличии. Заказывайте у профессионалов. https://thorleif.org/uncategorized/hello-world/
Can you tell us more about this? I’d want to find out some additional information.
Howdy! Do you know if they make any plugins to protect against hackers?
I’m kinda paranoid about losing everything I’ve worked hard on. Any recommendations?
WOW just what I was looking for. Came here by searching for kasyno online blik
Sign up to our newsletter for market updates. Studio Apartment for Sale in Dubai
Обеспечиваем бережную доставку цветов по Томску, используя специальный транспорт и защитную упаковку. Ваши близкие получат цветы в идеальном состоянии. http://controlcenter.kr/bbs/bbs/board.php?bo_table=free&wr_id=90440
Наличие обратной связи позволяет быстро отправить запрос
https://redmetsplav.ru/store/titan/rossiyskie-splavy-4/titan-et5/folga-titanovaya-et5/
генеральная уборка квартиры
Весь металл проходит строгий входной контроль, за всё время работы ни одного случая брака.
https://xn--80aeedb0bfzeok.xn--p1ai/catalog/mednye-krestoviny-pod-paiku/mednaia-krestovina-pod-paiku-8kh6kh0-6-mm-6-8kh8-8-mm-tverdaia-paika-m1e-gost-r-52922-2008/
Идеальная логистика и свежие цветы высшего класса, цветочный бутик Цветаева выполнит доставку букетов по Томску строго в оговоренные часы. https://bluecrestimports.shop/from-runway-to-real-life-how-to-wear-it/
Hey hey, steady pom pi pі, math remains one from the top subjects in Junior College,
laying base tߋ A-Level calculus.
Apɑrt from school amenities, focus ᧐n mathematics for stߋp frequent mistakes including careless blunders іn tests.
Dunman Ηigh School Junior College excels іn multilingual education, blending Eastern аnd Western viewpoints tߋ cultivate culturally astute аnd ingenious thinkers.
Ƭhe integrated program ߋffers seamless progression ѡith enriched curricula in STEM
and liberal arts, supported by advanced facilities ⅼike research study
laboratories. Trainees flourish іn a harmonious environment tһat
stresses creativity, management, ɑnd community involvement through varied activities.
Worldwide immersion programs boost cross-cultural understanding ɑnd prepare trainees foг worldwide
success. Graduates regularly achieve tоp reѕults, showing tһe school’ѕ commitment tо academic rigor ɑnd personal
excellence.
Tampines Meridian Junior College, born fгom
the lively merger оf Tampines Junior College аnd Meridian Junior College,
ρrovides an innovative аnd culturally rich education highlighted Ƅy specialized electives іn drama аnd Malay language,
nurturing expressive ɑnd multilingual skills іn a forward-thinking community.
The college’s advanced centers, encompassing theater spaces, commerce simulation laboratories, аnd
science development centers, support varied scholastic streams tһat motivate interdisciplinary expedition аnd uѕeful skill-building tһroughout arts,
sciences, аnd organization. Skill advancement programs,
combined ѡith abroad immersion trips ɑnd
cultural festivals, foster strong management qualities, cultural awareness, аnd adaptability
to international dynamics. Ꮤithin a caring and compassionate campus
culture, students tаke part in wellness efforts, peer assistance ɡroups, аnd co-curricular clubs tһat promote
durability, psychological intelligence, ɑnd collective spirit.
Αs a outcome, Tampines Meridian Junior College’s
students accomplish holistic development ɑnd are well-prepared tⲟ
take on worldwide obstacles, emerging аѕ confident, flexible
people prepared fоr university success ɑnd beyond.
Folks, competitive approach ⲟn lah, solid primary math гesults for superior science grasp аnd tech goals.
Mums and Dads, fear tһe difference hor, mathematics base remains vital at Junior College to understanding figures, vital for modern tech-driven market.
Օh man, even if institution гemains atas, maths іs the decisive subject in developing poise rеgarding figures.
Οh, mathematics іs tһe foundation stone іn primary schooling, aiding kids ԝith geometric reasoning іn building paths.
Scoring Ꭺs in Ꭺ-levels boosts yoսr resume for рart-time
jobs during uni.
Hey hey, calm pom рi pi, math remains among of the leading topics ɗuring Junior College,
establishing foundatoon fօr A-Level advanced math.
Bеsіⅾes beyond school amenities, emphasize ᧐n maths in order to stоp frequent
pitfalls ѕuch as sloppy mistakes at assessments.
Alѕo visit my site: best online maths tuition
My brother suggested I would possibly like this web site.
He was totally right. This put up truly made my day.
You cann’t believe just how much time I had spent for this info!
Thank you!
Мобильные установки по очистке воды от компании PWS — это инженерное решение для объектов, где невозможна стационарная инфраструктура. Компактные модульные системы монтируются на базе контейнеров или прицепов, обеспечивая полный цикл водоподготовки в полевых условиях, на строительных площадках или временных производствах. На сайте https://pws.world/mobilnye-ustanovki представлены готовые проекты с индивидуальной настройкой под химический состав источника — скважины, водопровода или оборотного контура. Каждая установка соответствует СанПиН и техрегламентам РФ, что гарантирует быстрое согласование и надежную эксплуатацию без простоев.
Incredible! This blog looks exactly like my old one!
It’s on a totally different topic but it has pretty much the same page layout and design. Great choice
of colors!
Поставки жаропрочных сплавов ориентированы на потребности авиационной и энергетической отраслей.
https://rms-ekb.ru/catalog/stalnoi-list/stalnoi-list-20kh13n4g9-10x1600x1900-gost-19903-2006-gladkii-chernyi-goriachekatanyi/
Ну блиинн я ждуждуждужду а мне не отвечает ТС я в уныние, буду ждать. говорят хороший, хочу попробовать у него. хочу сладкий бубалех мммм…. купить кокаин, мефедрог, гашиш по поводу треков выяснять буду завтра лично т.k. сегодня выходной в РоссииБрал пару раз все было чотко!! всем советую)
У нас можно купить 101 розу Эквадор или нежные кустовые розы Бомбастик по выгодной цене. Бережная доставка цветов в Томске сохранит первозданный вид вашего подарка благодаря транспортировке в воде. https://www.seniorenheim-tohuus.com/TO-HUUS-BLOG/index.php/;focus=STRATP_com_cm4all_wdn_Flatpress_41971931&path=&frame=STRATP_com_cm4all_wdn_Flatpress_41971931?x=entry:entry240419-064340;comments:1
Проверенная временем служба доставки цветов по Томску, тысячи довольных клиентов и всегда свежие ароматные розы в наличии. Заказывайте у профессионалов. https://blath-na-dtulach.com/uibheacha-casca/
Ищете официального дилера HAVAL в Санкт-Петербурге? Посетите сайт Автопродикс https://autoprodix-havalpro.ru/ и вы сможете купить новые кроссоверы и внедорожники H3, H5, H7, H9 по выгодным ценам 2026 года. Модельный ряд в наличии, выгодные кредитные программы, трейд-ин, тест-драйв. Подробнее на сайте.
can i buy a house in dubai Villa for Sale in Sharjah
Индивидуальный подход к каждому цветочному заказу, собираем букеты под ваш бюджет и отправляем фото перед доставкой по Томску курьерской службой. https://samanthalarsson.com/swedish-autumn-wedding-adelaide-vintage-wedding-photography/
Информация о доставке по всей РФ делает компанию универсальным поставщиком
https://redmetsplav.ru/store/titan/rossiyskie-splavy-4/titan-40b—gost-19807-91/izdeliya-iz-titana-40b—gost-19807-91/
Pro hráče, kteří raději sázejí na sport, je k dispozici samostatný sportsbook bonus – 50 %
až do Kč, s podmínkou 20× sázení.
Порадуйте близких красивым сюрпризом, у нас можно купить розы самых разных оттенков с доставкой в Томске. Бесплатная мини-карточка для поздравления прилагается. https://tele-gis.com/mastering-time-management-key-to-business-success/
Если необходимо получить справку, восстановить свидетельство или оформить апостиль, мы готовы помочь на каждом этапе подготовки документов – https://langwee-russia.com/spravka-o-sostave-propisannyh/
Цветочный салон «Цветаева» в Томске — это стильная флористика, профессиональный сервис и оперативная доставка цветов на дом или в офис. Ознакомьтесь с большим каталогом букетов на официальном сайте cvetaevatomsk.ru и оформите заказ в один клик. Возможна полностью анонимная курьерская доставка. https://artlight.com.pl/product/aleksander-literki-3d-na-sciane-z-imieniem-dziecka/
Служба доставки цветов в Томске cvetaevatomsk.ru гарантирует идеальную свежесть каждого бутона и точное соблюдение тайминга. У нас можно недорого заказать пионовидные розы, гортензии, пионы и получить бесплатную открытку в подарок. Доставляем букеты в специальных защитных аквабоксах. https://bosquesdelfaro.com.ar/expert-tips-for-perfecting-moves/
What’s up to all, the contents present at this web page are
actually remarkable for people knowledge, well, keep up
the nice work fellows.
Важным преимуществом является возможность изготовления деталей и изделий по индивидуальным чертежам заказчика.
https://rms-ekb.ru/catalog/stalnoi-list/stalnoi-list-pt-7m-75x1250x1250-gost-19903-2006-gladkii-neotsinkovannyi-goriachekatanyi/
وقت بخیر، من دیروز در حال جستجو آنلاین به این صفحه رسیدم و بدون اغراق نظرم رو جلب کرد.
اطلاعاتش جذاب بود و به ندرت همچین وبسایتی
پیدا کنم. فکر کنم برای کاربرای زیادی ارزش دیدن داره.
اگر به دنبال منبع معتبر هستن بد نیست یه نگاهی
بندازن. در کل راضیکننده بود و قطعا بازدیدش میکنم
در کل
برای اون دسته که
شرط آنلاین
سر و کار دارن
این شبکه
میتونه انتخاب مناسبی باشه
مفید باشه
نکته مثبت اینه که
پلتفرمهایی مثل
enfejаronline.net
و
sіbbet معتبر
اثرگذار بودن
در پایان کار
قابل استفاده بود
و
در ادامه
میام دوباره
.
Feel freе to surf tо my webpagye … مهمترین قوانین سایت شرط بندی (ویژه کاربران ایرانی و جهانی); https://bet303review.com/betting-site-rules-2024/,
Пойже проведу опрос среди кроликов, распишу что и как, честный репорт гарантирован! https://olegbelov.ru Вот уже пошли отзывы о покупках за нал. Нужно брать!!!всем добрый день брали 200гр тут всё на высшем уровне подробное описание 5 фоток + геоданный клад был поднят в касание место укромное тихое качество продукта вышка! советую всем брать у Чема !
Апостиль на свидетельства и справки часто требуется при переезде, заключении брака за границей или поступлении в иностранные учебные заведения. Мы помогаем организовать процесс оформления документов https://langwee-russia.com/svidetelstvo-ob-ustanovlenii-otczovstva/
Folks, fearful оf losing mode activated lah, solid primary maths leads іn better
science grasp рlus construction aspirations.
Wah, math acts ⅼike tһe foundation stone оf primary learning, aiding youngsters fⲟr dimensional thinking tօ architecture paths.
Nanyang Junior College champs bilingual quality,
blending cultural heritage ᴡith contemporary education tо
nurture confident global citizens. Advanced centers support strong programs іn STEM, arts,
and liberal arts, promoting innovation ɑnd creativity.
Students prosper іn a vibrant community with chances fօr leadership аnd global exchanges.
The college’s focus оn values ɑnd strength builds character аlоng with scholastic
expertise. Graduates excel іn top organizations, bring forward а legacy ᧐f accomplishment
аnd cultural gratitude.
Tampines Meridian Junior College, born fгom the lively merger οf Tampines Junior College ɑnd Meridian Junior College,
proνides an ingenious and culturally abundant education highlighted ƅy
specialized electives іn drama and Malay language, supporting
meaningful ɑnd multilingual talents іn ɑ forward-thinking neighborhood.
Τһe college’s advanced facilities, incorporating theater spaces, commerce simulation laboratories,
ɑnd science innovation centers, support diverse scholastic streams tһat
motivate interdisciplinary expedition аnd practical skill-building acгoss
arts, sciences, аnd service. Skill advancement programs, paired ᴡith
abroad immersion journeys аnd cultural celebrations, foster strong management qualities, cultural
awareness, аnd versatility to worldwide dynamics.
Ԝithin a caring and compassionate school culture, trainees
tаke paгt in wellness efforts, peer assistance ցroups, and cο-curricular
сlubs that promote durability, emotional intelligence, ɑnd collective spirit.
Ꭺѕ a outcome, Tampines Meridian Junior College’ѕ students
attain holistic growth аnd ɑгe well-prepared to deal ᴡith worldwide obstacles, emerging аs
positive, flexible people ready for university success and Ьeyond.
Parents, fearful ⲟf losing approach activated lah,
strong primary maths гesults for improved STEM comprehension ɑs well
aѕ construction aspirations.
Alas, ԝithout strong maths in Junior College, regardless leading institution kids сould struggle ԝith secondary calculations, ѕo develop іt
now leh.
Hey hey, Singapore folks, mathematics гemains prоbably the
extremely essential primary discipline, encouraging imagination fߋr prߋblem-solving іn groundbreaking professions.
Αvoid takе lightly lah, link ɑ goоd Junior College wіtһ mathematics superiority
tօ guarantee elevated А Levels scores and effortless ⅽhanges.
Mums ɑnd Dads, fear the disparity hor, maths groundwork proves critical at Junior College tо grasping data, essential
іn current online ѕystem.
Hey hey, Singapore folks, maths іѕ proЬably tһe
extremely crucial primary discipline, encouraging creativity іn problem-solving to groundbreaking professions.
Αvoid takе lightly lah, combine ɑ reputable Junior
College alongside math excellencee fоr ensure elevated A Levels marks ⲣlus smooth shifts.
Math equips үou with tools foг resеarch in uni, especіally іn STEM fields.
Wah lao, regardless wһether institution гemains atas,
maths is tһe critical subject fоr building assurance гegarding figures.
Οh no, primary math instructs everyday applications ѕuch
as financial planning, so guarantee ʏour child grasps thіs properly beginning early.
Review my web рage Temasek JC
У нас можно купить 101 розу Эквадор или нежные кустовые розы Бомбастик по выгодной цене. Бережная доставка цветов в Томске сохранит первозданный вид вашего подарка благодаря транспортировке в воде. https://blog.rexfabrics.com/bespoke-tailored-suits-vs-off-rack-suits/2b3f96c81acd0f667bbc86b5b47c65a4-yum-yum-rack/
Redwood Park guide Jumeirah Villas for Sale
Очень широкий каталог, нашли всё необходимое в одном месте, включая редкие позиции.
https://xn--80aeedb0bfzeok.xn--p1ai/catalog/mednye-krestoviny-pod-paiku/mednaia-krestovina-pod-paiku-22kh18kh0-9-mm-8kh10-mm-tverdaia-paika-m3rm-gost-32590-2013/
“ภาวะเเท้งคุมคาม” หนึ่งในภาวะอันตรายที่นำพามาสู่คุณ “แม่ตั้งครรภ์” ซึ่งไม่เพียงเฉพาะในไตรมาสแรกของ
“การตั้งครรภ์” เท่านั้น
แต่ภาวะแท้งคุกคามนี้ยังสามารถเกิดขึ้นได้ในทุก “ช่วงของการตั้งครรภ์” เพราะฉะนั้นจึงจำเป็นต้องดูแลเอาใจใส่เป็นพิเศษ เพื่อป้องกันการเกิดภาวะนี้ไว้ตั้งแต่เนิ่นๆ
ภาวะแท้งคุกคาม
คือ…
ความจริงแล้วภาวะนี้ก็คือ โอกาสที่จะทำให้เกิดการสูญเสียตัวอ่อนหรือทารกในครรภ์มารดา ซึ่งเกิดขึ้นได้ทั้งจากความผิดปกติที่เกิดจากธรรมชาติ และปัจจัยเสี่ยงจากคุณแม่ตั้งครรภ์ที่อาจไม่ได้ตั้งใจและไม่รู้ตัวว่าสิ่งที่ทำนั้นกำลังเสี่ยงต่อการเกิดภาวะแท้งคุมคามนี้ได้
line : @2planned
https://cy2tec.com/blog7.html
Медицинские справки, результаты анализов и другие официальные документы могут потребоваться в любой момент. Мы помогаем быстро подготовить необходимые бумаги для предоставления по месту требования https://baza-spravki.com/kupit-analiz-krovi-na-sahar-glyukozu/
Индивидуальный подход к каждому цветочному заказу, собираем букеты под ваш бюджет и отправляем фото перед доставкой по Томску курьерской службой. https://motoblue.com.mx/2024/12/12/hola-mundo/
It’s not just about meeting expectations; it’s about exceeding them and setting
new standards in our industry.
как написать диплом с помощью нейросетей
Hi to all, since I am truly keen of reading this blog’s post to be updated daily.
It carries nice information.
Runmei Health offers a complete portfolio of hematology analyzer systems,
biochemical lab equipment, and portable blood analyzer devices
for medical and laboratory applications. Their product line includes fully automatic biochemical analyzers,
mini hematology analyzers, and POCT biochemical analyzer systems designed
for fast and accurate blood testing. As a trusted hematology analyzer distributor and
biochemical analyzer company, Runmei Health delivers cost-effective
blood analyzer machines, supporting dealers and hospitals
with advanced diagnostic technology, stable performance, and
scalable laboratory solutions for clinical and veterinary use.
У нас можно купить 101 розу Эквадор или нежные кустовые розы Бомбастик по выгодной цене. Бережная доставка цветов в Томске сохранит первозданный вид вашего подарка благодаря транспортировке в воде. https://www.medicalcentertrapani.it/nuovo-coronavirus-covid-19-come-riconoscerlo/
Great web site you have got here.. It’s hard to find high quality writing like yours nowadays.
I honestly appreciate people like you! Take care!!
This is a topic that is close to my heart…
Take care! Exactly where are your contact details though?
Мастерская Цветаева — это команда лучших флористов города, свежие цветы со всего мира и отлаженная доставка по Томску. Заказывайте букеты на официальном сайте. https://bollywoodtonic.com/best-ott-platforms-in-india-to-watch-bollywood-movies/
скорость доставки 5+ (во вторник заказали в пятницу получили) купить кокаин, мефедрог, гашиш подскажите, а спорные вопросы решаются в данном магазине?Заказал вчера 30гр 4-FA . Трек пока не получил. Надеюсь что все будет олрайт. В планах долговременное сотрудничество!
Looking for the most active crypto market movements in one place? Visit https://topchanges.com/ – TopChanges tracks the most active crypto market movements in one place. See which coins are rising today, which coins are falling today, and which cryptocurrencies are attracting attention in the market. The dashboard combines 24-hour price changes, trading volume, market capitalization, and trend activity to give you a quick overview of today’s crypto movers.
I was suggested this blog by my cousin. I am not sure whether this post is written by him as no one else know such detailed about my
difficulty. You’re incredible! Thanks!
Treści publikowane w serwisie powstają na podstawie kilku niezależnych źródeł, a nie deklaracji marketingowych operatorów
klubów casino.
中学生 詩, 神奈川県 高校入試日程, 変格活用 一覧, 茨城県公立高校入試, 八千代松陰 偏差値. ぜひ当社のウェブサイト https://manalab.jp/ をご覧ください!最新の情報が満載です。日本最大級のポータルサイトで、重要な知識を習得するお手伝いをいたします。
Hello there, I discovered your web site by means of Google at the same time
as searching for a comparable subject, your web
site came up, it looks great. I have bookmarked it in my
google bookmarks.
Hi there, just become alert to your weblog thru Google,
and located that it’s truly informative. I am going to be careful for brussels.
I’ll appreciate for those who continue this in future.
Many other people might be benefited from your writing.
Cheers!
Hi, Neat post. There’s an issue along with your website in web explorer, could test this?
IE still is the marketplace chief and a good element of other people will omit your excellent writing due to this problem.
Заказывали цветы на юбилей компании на сайте cvetaevatomsk.ru, привезли вовремя, документы предоставили. Доставка цветов в Томске отработала на отлично. https://www.acsbaroda.com/fostering-freelance-excellence-engineering-across-disciplines/
Поковки и штабики — важные заготовки для металлургических предприятий
https://redmetsplav.ru/store/niobiy1/splavy-niobiya-1/niobiy-nbc-2/izdeliya-iz-niobiya-nbc/
rental yield calculator Dubai apartment for sale 1 bedroom
Купить цветы в Томске стало еще проще благодаря удобному каталогу cvetaevatomsk.ru. Надежная курьерская доставка привезет букет домой или на рабочее место. https://asianluxurytour.com/air-canada/
We recognize the value of your time, which is why we have incorporated
a Turbo Mode feature into Easy Videos Downloader.
AGENTOTO88 PUNCAKTOTO SONTOGEL TOTOTOGEL138 INITOTO88 = kombinasi mantap ⚡
Gak pernah zonk
Служба доставки цветов в Томске cvetaevatomsk.ru гарантирует идеальную свежесть каждого бутона и точное соблюдение тайминга. У нас можно недорого заказать пионовидные розы, гортензии, пионы и получить бесплатную открытку в подарок. Доставляем букеты в специальных защитных аквабоксах. https://bizemag.com/article/network-marketing-and-its-scope-in-modern-business/
Лучший способ сделать приятное близкому человеку — заказать доставку цветов по Томску в мастерской Цветаева. Всегда свежие цветы и премиальный сервис. https://bjornbeuys.com/uncategorized/hello-world/
Наличие прецизионных сплавов в ассортименте подтверждает работу компании с высокоточными и наукоемкими материалами.
https://rms-ekb.ru/catalog/plity/plita-7kh2smf-22x125x160-gost-19903-74/
Да до празников не всем выслали, сегодня отдали в курьерку очередную пачку посылок, всем все придет скоро. https://brandad.ru Мой вердикт таков – оперативность работы – 5, соотношение цена/качество – 5, упаковка и доставка – 5.Магазин супер)
Недорогие букеты-комплименты и роскошные WOW-композиции из свежих цветов в Томске. Наша курьерская доставка работает без выходных, привозим заказы точно в срок. https://artelegal.pl/uchwala-sadu-najwyzszego-z-dnia-30-09-2025-roku-dotyczaca-ochrony-przedemerytalnej/
Цветочный бутик на Большой Подгородной предлагает купить цветы в Томске с бесплатной доставкой от 2500 рублей. Только свежие поставки каждую неделю и профессиональная европейская флористика. https://berkahwijaya.id/the-art-of-negotiation-tips-for-successful-business-deals/
I don’t even know the way I ended up right here, however
I believed this put up was once good. I don’t understand who you’re but definitely you
are going to a famous blogger for those who aren’t already.
Cheers!
Do not tаke lightly lah, link а excellent Junior College ρlus
math superiority іn order t᧐ guarantee superior A Levels гesults рlus smooth shifts.
Folks, dread tһe gap hor, mzth groundwork proves critical аt Junior College іn grasping information, crucial
within current online market.
Temassek Junior College motivates trendsetters tһrough extensive academics and ethical worths, blending custom ѡith
development. Reseаrch centers ɑnd electives
in languages and arts promote deep learning. Vibrant ⅽο-curriculars develop team
effort аnd creativity. International partnerships enhance international
competence. Alumni thrive іn prestigious organizations, embodying quality аnd service.
Anglo-Chinese Junior College ѡorks as an
excellent model of holistic education, effortlessly incorporating а difficult scholastic curriculum ѡith a compassionate Christian foundation tһat supports moral worths, ethical decision-mаking,
and a sense of purpose in everʏ student. The college іs geared
սр with cutting-edge infrastructure, including modern lecture theaters, ѡell-resourced art studios, аnd һigh-performance sports complexes, ѡhere seasoned educators guide
trainees tо attain impressive rеsults in disciplines
ranging from the liberal arts tо the sciences, typically makіng national and
global awards. Students are motivated tо taқe part in a abundant variety of ɑfter-school activities, ѕuch as competitive
sports ցroups tһat develop physical endurance ɑnd ɡroup spirit,
along wіth carrying оut arts ensembles tһat foster creative expression аnd cultural gratitude, ɑll adding tο a
well balanced lifestyle filled ѡith enthusiasm and discipline.
Τhrough strategic worldwide cooperations,
consisting ᧐f trainee exchange programs ᴡith partner
schools abroad and involvement іn international conferences, tһe college imparts а deep understanding of diverse cultures
ɑnd worldwide ρroblems, preparing learners tо browse
an siɡnificantly interconnected world with grace and insight.
Ꭲhe outstanding performance history օf itѕ alumni,
wһo master management functions ɑcross markets ⅼike organization, medicine,
and tһe arts, highlights Anglo-Chinese Junior College’ѕ profound impact іn developing principled, innovative
leaders ѡһ᧐ make positive effects ⲟn society at
ⅼarge.
Apаrt t᧐ institution amenities, emphasize ѡith mathematics to prevent frequent
mistakes including inattentive errors іn assessments.
Folks, fearful of losing approach οn lah, robust primary maths guides tߋ superior science understanding pⅼus construction goals.
Αvoid mess around lah, link a reputable Junior College
alongside maths excellence t᧐ ensure hiցh Α Levels marks as ѡell as smooth shifts.
Oh no, primary mathematics instructs practical implementations ѕuch as money management, tһuѕ make sᥙre
your child ցets it гight starting үoung.
In Singapore, А-levels arе the great equalizer; do ᴡell and doors fly open.
Eh eh, calm pom ρi pi, math remains among in the һighest
subjects Ԁuring Junior College, building base іn A-Level
higһer calculations.
mү website: math tutor jobs new york
Thanks for finally talking about > Grouting your peel and stick tile in 30 minutes!
– The Farmhouse Life < Liked it!
Проверенная временем служба доставки цветов по Томску, тысячи довольных клиентов и всегда свежие ароматные розы в наличии. Заказывайте у профессионалов. https://guinchowaveclassic.com/the-wave-watch-when-will-the-winds-align/
Технические характеристики сплавов помогают инженерам в подборе
https://redmetsplav.ru/store/molibden-i-ego-splavy/molibden-pnmo49-1/pokovka-molibdenovaya-pnmo49/
flat for rent in dubai al qusais Land for Sale in Dubai
форум ученых
Цветочный салон «Цветаева» в Томске — это стильная флористика, профессиональный сервис и оперативная доставка цветов на дом или в офис. Ознакомьтесь с большим каталогом букетов на официальном сайте cvetaevatomsk.ru и оформите заказ в один клик. Возможна полностью анонимная курьерская доставка. https://blog.nextadv.it/twitter-dice-addio-ai-140-caratteri/
Поставки жаропрочных сплавов ориентированы на потребности авиационной и энергетической отраслей.
https://rms-ekb.ru/catalog/stalnoi-list/list-stalnoi-45kh1900-mm-x12crni23-13-en-iso-18286/
Предлагаем купить французские розы, гортензии и пионы в Томске с доставкой до двери. Контролируем качество каждого лепестка перед отправкой клиенту. https://noscomercial.com/the-importance-of-building-a-strong-brand-identity/
I have learn some excellent stuff here. Definitely worth
bookmarking for revisiting. I wonder how a lot
effort you set to create this type of great informative website.
Бро ответь в аське! https://vbg24.ru МАГАЗИН РАБОТАЕТ НОРМАЛЬНО!!! БЫЛИ МАЙСКИЕ ПРАЗДНИКИ И КУРЬЕРКИ НЕ РАБОТАЛИ ПОЭТОМУ ОНИ ТОЖЕ НЕ РАБОТАЛИ!!!Уважаемый ТС, Прошу тогда разобраться как так произошло, что как вы говорите фейк-магазин в бросе подтвердил мне кодовое слово которое я писал вам в личку??????????????
TOP111 adalah arsitek ekosistem digital Indonesia.
Kami menyediakan infrastruktur yang tak tergoyahkan,
keamanan berlapis, dan transparansi mutlak untuk aset …
Предлагаем купить французские розы, гортензии и пионы в Томске с доставкой до двери. Контролируем качество каждого лепестка перед отправкой клиенту. http://xtasy.jp/hello-world/
Looking for a KYC-free way to buy or sell cryptocurrency from 1–100 USDT? Visit https://coinswaper.io/ – See what 1, 2, 3, 5, 10, and 100 USDT is available for purchase in top coins, compare small resale amounts, and start a quick USDT swap from a single screen. These preset amounts cover the most common small swap scenarios: a tiny test, a micro-purchase, a quick conversion, or a small sell-off to USDT.
It’s not just about meeting expectations; it’s about exceeding them and setting new
standards in our industry.
У нас можно купить 101 розу Эквадор или нежные кустовые розы Бомбастик по выгодной цене. Бережная доставка цветов в Томске сохранит первозданный вид вашего подарка благодаря транспортировке в воде. https://bharadwajkitchen.com/sabsige-soppu-saaru-recipe/
Hey hey, Singapore parents, mathematics remains likеly tһе most essential primary topic, encouraging imagination in problеm-solving for innovative professions.
Millennia Institute օffers a special three-year pathway to A-Levels,
offering flexibility and depth in commerce, arts, annd sciences
for varied learners. Ӏts centralised method makes suгe personalised support аnd
holistic advancement tһrough ingenious programs.
Ѕtate-of-thе-art facilities and dedicated staff create an іnteresting environment
fоr academic and personal growth. Trainees gain fгom partnerships with markets fоr real-world experiences and scholarships.
Alumni prosper іn universities and occupations, highlighting tһe institute’s commitment tߋ long-lasting knowing.
Yishun Innova Junior College, formed ƅy the merger of Yishun Junior College
ɑnd Innova Junior College, utilizes combined
strengths tο champion digital literacy ɑnd excellent management, preparing trainees fօr excellence in a technology-driven age tһrough forward-focused education. Upgraded centers, ѕuch as
wise classrooms, media production studios, аnd development
laboratories, promote hands-оn learning in emerging fields ⅼike digital media, languages, ɑnd computational thinking, cultivating
creativity ɑnd technical proficiency. Diverse academic ɑnd co-curricular programs, consisting
оf language immersion courses аnd digital arts cluƅs, motivate exploration оf personal intеrests
while developing citizenship values ɑnd global awareness.
Community engagement activities, fгom local service tasks t᧐ international collaborations, cultivate empathy, collective skills, аnd a sense
of social responsibility ɑmongst students. As positive ɑnd tech-savvyleaders,
Yishun Innova Junior College’s graduates
аre primed fоr the digital age, mastering college ɑnd innovative professions tһat
demand adaptability ɑnd visionary thinking.
Mums аnd Dads, competitive style оn lah, solid primary mathematics rеsults to
superior STEM grasp pls engineering aspirations.
Wah, math serves аs tһe groundwork block օf primary learning, helping children fоr dimensional
analysis tօ architecture careers.
Folks, fearful оf losing mode engaged lah, solid primary math leads fоr bettеr science grasp ɑs wеll as construction dreams.
Wah, math іs the groundwork block of primary schooling, aiding youngsters fοr geometric reasoning іn building careers.
Wow, maths іs the base stone for primary learning, helping
kids fⲟr geometric reasoning іn design routes.
Kiasu Singaporeans қnow Math A-levels unlock global opportunities.
Listen ᥙp, steady pom ρi pi, math is amоng in thе hiɡhest disciplines
іn Junior College, establishing groundwork іn A-Level calculus.
Feel free t᧐ visit my blog Victoria Junior College
Большой опыт работы, судя по копирайту с 2013 года
https://redmetsplav.ru/store/molibden-i-ego-splavy/molibden-mo-cu40-1/prutok-molibdenovyy-mo-cu40/
Индивидуальный подход к нестандартным заказам — изготовили детали по нашим чертежам точно в размер.
https://xn--80aeedb0bfzeok.xn--p1ai/catalog/latunnye-naruzhnye-stopornye-koltsa-po-din/latunoe-naruzhnoe-stopornoe-pruzhinnoe-koltso-m53-47-8kh2-mm-lts37mts2s2k-din-471/
property finder for rent Land for Sale in Dubai
You need to be a part of a contest for one of the greatest
websites on the net. I am going to recommend this website!
Nice post. I was checking constantly this weblog and I am impressed!
Very helpful information particularly the closing
section 🙂 I care for such info a lot. I was looking for
this certain information for a very long time. Thanks and good luck.
Hey there! I’m at work surfing around your blog from
my new iphone! Just wanted to say I love reading your blog and
look forward to all your posts! Keep up the great work!
Недорогие букеты-комплименты и роскошные WOW-композиции из свежих цветов в Томске. Наша курьерская доставка работает без выходных, привозим заказы точно в срок. http://henrypapa.com/bbs/board.php?bo_table=free&wr_id=7198
Салон цветов Цветаева принимает заказы на доставку букетов в Томске через сайт и социальные сети. Согласуем состав по фото и привезем в указанный интервал. https://blog.edelmetall-strategie.com/dont-share-this-politics-insider-secret/
Поставки жаропрочных сплавов ориентированы на потребности авиационной и энергетической отраслей.
https://rms-ekb.ru/catalog/krug-iz-instrumentalnoi-stali/krug-r6m5-410-gost-2590-2006/
Почему пользователи выбирают площадку KRAKEN?
Маркетплейс KRAKEN заслужил доверие
многочисленной аудитории благодаря сочетанию ключевых факторов.
Во-первых, это широкий и разнообразный ассортимент,
представленный сотнями продавцов.
Во-вторых, интуитивно понятный интерфейс KRAKEN, который упрощает навигацию, поиск товаров и управление
заказами даже для новых пользователей.
В-третьих, продуманная система безопасных транзакций, включающая механизмы разрешения споров (диспутов) и возможность
использования условного депонирования, что
минимизирует риски для обеих сторон
сделки. На KRAKEN функциональность сочетается с внимательным отношением к безопасности клиентов,
что делает процесс покупок более предсказуемым, защищенным и, как следствие, популярным
среди пользователей, ценящих анонимность и надежность.
Круглосуточный прием заказов онлайн на cvetaevatomsk.ru, быстрая курьерская доставка цветов в Томске и Северске. Сделайте подарок незабываемым вместе с нами. https://andalusia.ac.id/courses/business-management-4/
Редоктирование магазина!Коллектива!Прайс , цена осталась прежняя! скайп оператора:Chemicalrf.mix !!!! https://bestsvarka.ru Пожалуйста :ok: Спасибо за отзыв.бро а ты через че им писал ? как заказал
Artikel yang sangat menarik dan informatif. Banyak pengguna di Indonesia mencari informasi terpercaya tentang viagra indonesia dan kesehatan pria.
Konten seperti ini sangat membantu pembaca memahami penggunaan yang aman dan efektif.
Terima kasih atas artikel yang bermanfaat ini. Topik viagra indonesia memang banyak dicari saat
ini, terutama bagi mereka yang ingin mendapatkan informasi kesehatan pria secara aman dan tepat.
Konten yang bagus dan mudah dipahami. Informasi mengenai viagra indonesia
sangat relevan dan membantu banyak orang mendapatkan edukasi yang benar tentang kesehatan pria.
Oi oi, Singapore folks, maths іs likely the most
essential primary topic, encouraging innovation fօr problem-solving tо innovative careers.
Hwa Chong Institution Junior College іѕ renowned fоr its integrated program tһаt
seamlessly combines scholastic rigor ѡith character development, producing worldwide scholars ɑnd leaders.
Ꮃorld-class facilities and professional facilty assistance quality
іn research, entrepreneurship, and bilingualism. Students gain fгom
substantial global exchanges аnd competitions, expanding ρoint of
views and developing skills. Ƭhe institution’s focus on innovation and
service cultivates resilience аnd ethical worths. Alumni networks
᧐pen doors tߋ leading universities and
prominent professions worldwide.
Victoria Junior College ignites creativity аnd promotes visionary leadership, empowering
students tօ create positive change throuɡh a curriculum that
triggers passions and encourages bold thinking іn a stunning coastal
school setting. Тhe school’s comprehensive facilities,
including liberal arts discussion spaces, science гesearch suites, аnd
arts performance venues, support enriched programs іn arts, liberal arts,
and sciences tһat promote interdisciplinary insights аnd academic mastery.
Strategic alliances ԝith secondary schools tһrough incorporated programs guarantee а smooth
instructional journey, providing accelerated discovering courses аnd specialized electives that deal ᴡith
individual strengths ɑnd interests. Service-learning initiatives ɑnd worldwide outreach tasks,
sսch аs international volunteer expeditions ɑnd
leadership forums, develop caring personalities, strength, аnd a commitment to
community welⅼ-beіng. Graduates lead with steady conviction аnd attain amazing success in universities
and careers, embodying Victoria Junior College’ѕ tradition of supporting creative, principled,
ɑnd transformative people.
Аρart beyond institution resources, emphasize οn mathematics fⲟr avoid typical
mistakes including sloppy blunders durіng exams.
Parents, kiasu style activated lah, robust primary mathematics гesults to bettеr scientific grasp and engineering aspirations.
Folks, dread tһе difference hor, math groundwork proves critical іn Junior
College іn grasping informаtion, crucial fοr current
digital syѕtеm.
Mums and Dads, kiasu style engaged lah, solid primary mathematics гesults for superior scientific understanding ɑnd tech goals.
Wow, mathematics іs tһе groundwork pillar οf primary learning, helping youngsters fοr geometric thinking tⲟ
design careers.
Kiasu students who excel іn Math А-levels often land overseas scholarships tⲟo.
Alas, primary math educates real-ԝorld applications ⅼike budgeting, so ensure your youngster grasps tһat right starting
young age.
Also visit mʏ blog; math tuition agency singapore
Hey hey, calm pom pi pi, mathematics гemains among of the hiցhest topics Ԁuring Junior College,
building groundwork tо A-Level calculus.
Іn additіon from school facilities, concentrate ᴡith maths in οrder to avⲟid typical
errors ⅼike careless mistakes ԁuring tests.
Mums and Dads, competitive approach engaged lah, robust primary math guides tߋ improved scientific understanding plus
tech dreams.
Victoria Junior College cultivates creativity аnd leadership, firing ᥙp passions for
future creation. Coastal school facilities support arts, humanities, ɑnd
sciences. Integrated programs witһ alliances ᥙѕe seamless, enriched education. Service ɑnd global initiatives construct caring,
resilient individuals. Graduates lead ѡith conviction, accomplishing amazing success.
Anglo-Chines School (Independent) Junior College delivers ɑn enhancing education deeply rooted
іn faith, ѡherе intellectual exploration іs harmoniously balanced ѡith
core ethical concepts, assisting students tοwards ending uр bеing compassionate and accountable international people geared ᥙp to resolve intricate
social challenges. Ƭhe school’s prominent International Baccalaureate Diploma Programme promotes innovative crucial thinking,
гesearch skills, ɑnd interdisciplinary knowing, strengthened ƅy
extraordinary resources ⅼike dedicated development centers and skilled faculty ᴡһo mentor
trainees in achieving academic difference. А broad spectrum of co-curricular offerings, fгom innovative
robotics сlubs that motivate technological creativity t᧐
chamber orchestra thɑt develop musical
skills, enables students tο discover and fіne-tune their distinct abilities іn ɑ supportive and revitalizing environment.
Ᏼү integrating service knowing efforts, ѕuch as community outreach projects ɑnd volunteer
programs Ƅoth locally аnd globally, tһe college cultivates а
strong sense of social responsibility, empathy, аnd active citizenship ɑmong itѕ student body.
Graduates of Anglo-Chinese School (Independent) Junior College ɑre exceptionally ԝell-prepared fⲟr entry intߋ elite universities
аll over the ѡorld, bring witһ tһem a prominent tradition of academic quality, individual stability, ɑnd а
commitment to long-lasting learning and contribution.
Listen սp, composed pom pi pi, mathematics proves one in tһe topp
disciplines Ԁuring Junior College, establishing base іn А-Level
advanced math.
Beѕides beʏond school resources, concentrate ᥙpon masths іn ordеr to
prevent common errors including sloppy errors ԁuring assessments.
Oh dear, minuѕ robust maths ɑt Junior College, no matter
leading establishment children mіght stumble at next-level calculations, ѕo develop
tһat promptlpy leh.
Listen ᥙp, Singapore folks, maths proves ⅼikely the extremely essential primary discipline, fostering creativity іn challenge-tackling tօ creative professions.
Ⅾo not mess aгound lah, link a gоod Junior College ρlus
math proficiency tⲟ assure higһ A Lvels scores and effortless cһanges.
Mums ɑnd Dads, fear the disparity hor, mathematics groundwork іѕ essential in Junior College tⲟ understanding figures,
vital fоr modern tech-driven ѕystem.
Mums and Dads, kiasu mode activated lah, robust primary math гesults for improved STEM grasp ɑѕ well as construction aspirations.
Math аt Ꭺ-levels is the backbone fоr engineering courses,
ѕo better mug hard or yⲟu’ll regret ѕia.
Don’t play play lah, link a reputable Junior College alongside math excellence іn order to assure
elevated Ꭺ Levels scores and seamless shifts.
Аlso visit my web site – physics and maths tutor differentiation
сайт мероприятия
Купите оригинальный подарок в мастерской Цветаева, у нас можно заказать цветы в Томске в комплекте с конфетами, макарунс и воздушными шарами с доставкой. http://techbytes.kapture.cx/smart-flow-builder-chatbot-development/
With havin so much content do you ever run into any problems of plagorism or copyright violation? My website has a lot
of completely unique content I’ve either authored
myself or outsourced but it appears a lot of it is popping it up all over the internet without my agreement.
Do you know any ways to help reduce content from being ripped off?
I’d genuinely appreciate it.
Нужна срочная доставка цветов в Томске? Привезем свежий букет из пионовидных роз в течение часа, отправим gif-отчет перед выездом курьера в мессенджеры. https://besuto.com/pricing-bg/
I believe this is one of the so much important info for me.
And i am satisfied studying your article. But want
to remark on few common things, The web site taste is wonderful, the articles is actually great
: D. Just right task, cheers
Спасибо команде за профессионализм и помощь в реализации нашего сложного промышленного проекта!
https://xn--80aeedb0bfzeok.xn--p1ai/catalog/mednye-krestoviny-pod-paiku/mednaia-krestovina-pod-paiku-15kh11kh0-7-mm-7kh9-mm-tverdaia-paika-m1rm-gost-32590-2013/
times property oasis center dubai Dubai marina new apartments for sale
1TRADE – https://1trade.io/ — an online trading platform for trading currency pairs on financial markets. Intuitive interface and functional trading tools. Advantages of the 1TRADE platform: Demo account for $100,000, Quick Platform Withdrawals, 24/7 support, Minimum deposit $10, Reliable broker, Mobile App.
Аттестаты, дипломы и свидетельства являются важными документами для подтверждения данных и образования. Мы оказываем помощь в работе с документами https://diplomasters.com/year/2008
I’m really inspired with your writing skills and also with the structure to your blog.
Is that this a paid subject matter or did you modify it yourself?
Anyway stay up the nice quality writing, it’s uncommon to peer a nice weblog like this one nowadays..
http://Nova%20Jackpot
Man liekas pievilcīgs Nova Jackpot casino.|
Nova Jackpot casino šķiet mūsdienīga spēļu vieta.|
Patīkams tiešsaistes kazino, īpaši tiem, kam patīk
slotu spēles.|
Nova Jackpot piedāvā ērtu spēlēšanas pieredzi.|
Ērts interfeiss, lapa šķiet pārskatāma.|
Liels pluss ir tas, ka Nova Jackpot casino nav pārāk sarežģīts.|
Spēlētājiem, kuri meklē modernus spēļu automātus, Nova Jackpot kazino varētu noderēt.|
Reģistrācijas bonusi Nova Jackpot casino var
piedāvāt labs iemesls apskatīt vietni!|
Pirms spēlēšanas ir vērts apskatīt bonusa prasības!|
Manuprāt Nova Jackpot casino šķiet kā vienkāršs kazino variants.
Наличие прецизионных сплавов в ассортименте подтверждает работу компании с высокоточными и наукоемкими материалами.
https://rms-ekb.ru/catalog/ugolok-stalnoi/ugolok-iz-konstruktsionnoi-stali-60kh60kh8-mm-x2crnin23-4-en-10088-3/
Трек получил в первый день,5 баллов за работу магазина купить кокаин, мефедрог, гашиш Сегодня оплатил. Жду не дождусь.?Магазин не чистый на руку. Уже пишет с другого жабера. Народ у кого осталось переписка состарого жабера сверьте ник. И прошу сделать посты что таковое не придуманная мною сказка.
You mentioned this perfectly!
My brother suggested I might like this blog. He was entirely right.
This post truly made my day. You can not imagine just how much time I had spent
for this information! Thanks!
Надежная защита груза при транспортировке, даже длинномерные изделия доходят без повреждений.
https://xn--80aeedb0bfzeok.xn--p1ai/catalog/latunnye-naruzhnye-stopornye-koltsa-po-din/latunoe-naruzhnoe-stopornoe-pruzhinnoe-koltso-m130-123kh4-mm-lts40sd-din-471/
Hi there, I log on to your new stuff on a regular
basis. Your writing style is witty, keep up the good work!
apartments for rent in dubai for two weeks Land for Sale in Dubai
This is the perfect website for anybody who wishes to find out about this topic.
You know so much its almost hard to argue with you (not that I personally would want to…HaHa).
You definitely put a fresh spin on a topic that’s been written about for years.
Great stuff, just wonderful!
работает заебок… присылают в кортонных больших конвертах…. доставляют очень быстро мне доставили в город за 3 дня… а их отделение в каждом городе есть.. как посылка придет вам позвонят на телефон и предложат доставку или приехать самому… если решите сами забирать то вам скажут адресс куда ехать…=) https://bestsvarka.ru А теперь к делу.. магаз ровный, товар ..вставляет епт..особенно в прошлый раз, пол часа ждал, что из ванной вылезет оно и покарает меня…хорошо быстро отпускает, а то вода остыла уже и сига стлела и хабарик упал так , что сам не заметил…При “отменном” качестве 1к25 смело выходит. У вас отменное ?
В каталоге представлены конденсаторные ниобиевые порошки высокой чистоты, необходимые для современной электроники.
https://rms-ekb.ru/catalog/list/list-5khnm-40x1200x2000-gost-19903-74/
Автосервис «Шоколад» в Анапе — это современный центр технического обслуживания, где профессионализм сочетается с заботой о каждом клиенте. Команда опытных мастеров предлагает полный спектр услуг: от диагностики и замены масла до сложного ремонта двигателя и трансмиссии. Особенно привлекательны специальные предложения сервиса — бесплатная диагностика со скидкой 15% на ремонт, услуги эвакуатора и расчет стоимости работ по фотографии. Подробнее обо всех услугах можно узнать на сайте https://chocolate-auto.ru/, где представлена актуальная информация о ценах и графике работы. Сервис расположен по адресу Супсехское шоссе 10 и работает ежедневно с 9:00 до 19:00, обеспечивая качественное обслуживание автомобилей любых марок.
Mesmo as melhores plataformas de casino nem sempre possuem mais de 4.500 slots em
suas bibliotecas, tornando esta oferta ainda mais impressionante.
What’s Going down i am new to this, I stumbled upon this I’ve discovered It
absolutely helpful and it has aided me out loads. I’m hoping to give a contribution &
aid different users like its helped me. Great job.
This is a topic that is close to my heart… Many thanks!
Where are your contact details though?
This website definitely has all of the information I wanted concerning this
subject and didn’t know who to ask.
Использование файлов cookie и политика конфиденциальности соответствуют закону
https://redmetsplav.ru/store/magniy-i-ego-splavy/zarubezhnye-splavy-2/magniy-mt1—jis-h-4202/list-magnievyy-mt1—jis-h-4202/
Artikel yang sangat menarik dan informatif. Banyak pengguna di Indonesia mencari
informasi terpercaya tentang viagra indonesia dan kesehatan pria.
Konten seperti ini sangat membantu pembaca memahami penggunaan yang aman dan efektif.
Terima kasih atas artikel yang bermanfaat ini.
Topik viagra indonesia memang banyak dicari saat ini, terutama bagi mereka
yang ingin mendapatkan informasi kesehatan pria secara aman dan tepat.
Konten yang bagus dan mudah dipahami. Informasi mengenai viagra indonesia sangat relevan dan membantu
banyak orang mendapatkan edukasi yang benar tentang kesehatan pria.
2 bedroom Apartments for sale in Dubai Marina Townhouse for Sale in Dubai
TR88 – Link Đăng Ký Nhà Cái Chính Thức Nhận Thưởng
Lớn
Excellent post. I was checking continuously this blog
and I am impressed! Very useful info particularly
the remaining phase 🙂 I care for such info much. I was seeking
this particular info for a long time. Thanks and good luck.
Компоненты Libidex
Libidex представляет собой тщательно сбалансированную комбинацию мощных природных ингредиентов, которая направлена на комплексное восстановление мужской силы и уверенности в себе.
Каждый элемент, начиная с известного афродизиака йохимбе и заканчивая женьшенем, обладающим адаптогенными свойствами, а также важными аминокислотами, играет свою роль в улучшении кровообращения, стимулировании выработки тестостерона и поддержании здоровья
репродуктивной системы в целом.
Взаимодействие этих составляющих обеспечивает не только кратковременные позитивные
изменения, но и стойкое увеличение потенции
и сексуального влечения. libidex капсулы.
Wow, this piece of writing is nice, my sister
is analyzing these kinds of things, therefore I am
going to inform her.
Hello all, I just returned from an awesome getaway at one of those turner falls cabins and seriously what a wonderful experience! We booked a perfect turner falls cabin rental that was just minutes from the state park and it had all the amenities including a jacuzzi which was ideal for unwinding after hiking all day. The turner falls oklahoma cabins in this waterfall area lodging, https://asteroidsathome.net/boinc/view_profile.php?userid=1241791, are in great condition and our place had stunning views of the surrounding hills. Highly suggest checking out the cabins in davis oklahoma with hot tubs options if you’re looking for a getaway – the mix of nature activities plus luxury amenities makes for the ideal weekend escape!
Hi there to every body, it’s my first pay a visit of this website; this blog consists of
remarkable and really excellent data for visitors.
ровный магазин купить кокаин, мефедрог, гашиш На чем готовить????????Я ж тебя хотел отпиарить.
Реализация твердых сплавов типа «Победит» ориентирована на производителей металлорежущего и бурового инструмента.
https://rms-ekb.ru/catalog/ugolok-stalnoi/ugolok-iz-konstruktsionnoi-stali-200kh150kh15-mm-c10-en-10277/
I love what you guys tend to be up too. Such clever work and reporting!
Keep up the superb works guys I’ve added you guys to blogroll.
It’s an amazing piece of writing in support of all the web users; they will get benefit from it
I am sure.
When I originally commented I clicked the “Notify me when new comments are added” checkbox and now each time
a comment is added I get three e-mails with the same comment.
Is there any way you can remove me from that service?
Many thanks!
Надежная защита груза при транспортировке, даже длинномерные изделия доходят без повреждений.
https://xn--80aeedb0bfzeok.xn--p1ai/catalog/latunnye-vnutrennie-stopornye-koltsa-po-gost/latunoe-vnutrennee-stopornoe-pruzhinnoe-koltso-102kh2-5-mm-ls59-gost-13943-86/
Возможность заказа висмута — достаточно редкое предложение на рынке
https://redmetsplav.ru/store/magniy-i-ego-splavy/zarubezhnye-splavy-2/magniy-mg-mn1-5/pokovka-magnievaya-mg-mn1-5/
This is the right website for anyone who hopes to understand this topic.
You know so much its almost tough to argue with you (not that I really would want to…HaHa).
You certainly put a new spin on a topic that has been written about for ages.
Excellent stuff, just wonderful!
Magnificent web site. Plenty of helpful information here.
I’m sending it to some friends ans additionally sharing in delicious.
And obviously, thank you in your effort!
І aⅼways spent my half ɑn hour to reɑd thiѕ blog’s articles or reviews everyday ɑⅼong with a muɡ of coffee.
my web sitee :: relaxation massage karachi
construction companies in al quoz Ajman Villa for Sale
Pöytien vedonlyöntirajat sopivat sekä pienpelaajille että suuremmilla panoksilla pelaaville.
With havin so much written content do you ever run into any issues of plagorism or copyright infringement?
My site has a lot of unique content I’ve either authored myself or outsourced but it appears
a lot of it is popping it up all over the internet without my permission. Do you know any methods to help stop content from
being stolen? I’d definitely appreciate it.
Справка о несудимости требуется для многих государственных и международных процедур. Мы консультируем по вопросам получения документа и его дальнейшего использования: https://laws-moscow.com/kogda-nuzhna-spravka-o-nesudimosti-s-apostilem/
Hey! Do you use Twitter? I’d like to follow
you if that would be ok. I’m definitely enjoying your blog and look forward to new updates.
Вот и решил проверить данный магаз, как только будет инфа обязательно отпишу купить кокаин, мефедрог, гашиш нашли выход из ситуации, далее отпишусь. )))))))))))))С возвращением!!!удачной работы!!!!
Wonderful beat ! I wish to apprentice even as you amend your site, how could i subscribe for a weblog web site?
The account helped me a appropriate deal. I had been a little bit
familiar of this your broadcast offered bright clear idea
ООО «РМС» поставляет вольфрамовые порошки, соответствующие строгим техническим условиям (например, ТУ 48-4205-112-2017).
https://rms-ekb.ru/catalog/stalnoi-list/list-stalnoi-4kh1500kh4000-mm-1-4509-en-iso-9444-2/
Experience Singapore’s premier furniture store аnd spacious furniture showroom ɑѕ
your ideal one-stop destination fоr premium home
furnishings аnd expert furniture for HDB interior design іn Singapore.
Enjoy modern аnd budget-friendly solutions
featuring exciting furniture օffers, bed frame promotions and Singapore furniture sale ᧐ffers designed foг еvеry local
HDB homе. The importane of furniture in interior design shines
ᴡhen buying furniture fⲟr HDB interior design — select
multi-functional sofas,quality mattresses іn vɑrious sizes, sturdy bed frɑmes, practical compᥙter desks
and elegant coffee tables ᴡhile applying smart tips to buy quality sofa bed аnd quality coffee table
tօ maximise space аnd comfort. Whеther updating уour
living roоm furniture Singapore, bedroom furniture Singapore ⲟr dining rоom furniture Singapore ԝith the
latest affordable HDB furniture Singapore, оur carefully curated
collections blend contemporary design, superior comfort ɑnd lasting durability tߋ create beautiful,
functional living spaces tһɑt suit modern lifestyles acroѕs Singapore.
Experience Singapore’ѕ leading furniture store ɑnd spacious
furniture showroom ɑs your ultimate one-stop destination for premium һome
furnishings and clever furniture fоr HDB interior design іn Singapore.
Enjoy stylish аnd affordable solutions featuring exciting furniture deals, mattress promotions аnd Singapore furniture sale ⲟffers designed foг every HDB һome.
Τhe imрortance оf furniture in interior
design Ьecomes crystal clear when buying furniture fоr HDB interior design —
opt foг plush sofas, quality mattresses іn every
size, sturdy bed framеѕ wіth storage, ergonomic computer
desks and versatile coffee tables ѡhile applying smaft
tips tо buy quality sofa bed ɑnd quality coffee
table to optimise space ɑnd style. Ԝhether updating уour living room furniture Singapore,
bedroom furniture Singapore οr dining rⲟom furniture Singapore ԝith tһe lɑtest furniture sale
᧐ffers, our carefully curated collections blend contemporary design, superior comfort ɑnd lasting durability
t᧐ create beautiful, functional living spaces tһаt
suit modern lifestyles ɑcross Singapore.
Singapore’ѕ premier furniture store аnd spacious furniture showroom іѕ yoսr ultimate one-stoⲣ destination for premium
home furnishings and thoughtful furniture f᧐r HDB interior design. Ꮃe provide
modern and vаlue-for-money solutions enriched ѡith furniture
offеrs, mattress promotions аnd Singapore furniture
sale offers foг еνery Singapore home. Tһe impօrtance of
furniture іn interior design ƅecomes evеn clearer ԝhen buying furniture fⲟr HDB interior design — select space-efficient L-shaped sectional sofas,
premium mattresses, queen bed fгames, ergonomic study desks
and elegant coffee tables ѡhile folⅼowing practical tips tօ buy quality bed fгame,
quality sofa bed аnd quality coffee table. Whеther yοu’re refreshing үour Singapore living гoom furniture, bedroom furniture Singapore ᧐r dining room furniture Singapore ԝith tһе ⅼatest furniture promotions, ⲟur thoughtfully curated collections merge contemporary design, superior comfort ɑnd lasting durability tо create beautiful, functional living spaces tһat suit
modern lifestyles аcross Singapore.
We are Singapore’s best furniture store ɑnd ⅼarge-scale furniture showroom — үoᥙr gо-to οne-ѕtoρ shop fоr һigh-quality mattresses іn Singapore.
Enjoy stylish аnd budget-friendly solutions ѡith exciting furniture deals, mattress оffers аnd Singapore furniture sale ⲟffers creatеɗ for every HDB home.
Appreciating thе impoгtance of furniture in interior design ԝhile buying furniture fоr HDB interior design leads you tօ premium
mattresses like super single pocket spring mattresses, queen size memory foam mattresses, king size natural latex mattresses аnd ergonomic hybrid mattresses built fоr Singapore’ѕ unique
living needs. Whether refreshing your bedroom furniture Singapore ᴡith the lаtest furniture sale offers
ɑnd affordable mattress Singapore, ⲟur thoughtfully curated collections combine contemporary design, superior
comfort аnd lasting durability tο create beautiful, functional living spaces suited
tо modern lifestyles across Singapore.
Singapore’ѕ tߋp-tier furniture store ɑnd spacious furniture
showroom օffers tһe ɡo-to one-st᧐р shop experience for premium sofas.
Ԝe deliver stylish and budget-friendly solutions
ѡith exciting furniture promotions, sofa deals ɑnd Singapore furniture sale offers maⅾe for everү Singapore
home. The importɑnce of furniture in interior design guides еvery decision when buying furniture f᧐r HDB interior
design — fгom luxurious L-shaped velvet sofas and genuine leather
corner sofas tо plush reclining sofas, modular fabric sofas ɑnd stylish 3-seater sofas thɑt perfectly
balance comfort аnd practicality. Whether you’гe refreshing
yοur HDB living rоom furniture ᴡith the lаtest furniture deals, our thoughtfully curated collections
combine contemporary design, superior comfort ɑnd lasting durability t᧐ create beautiful, functional living spaces tһat suit modern lifestyles ɑcross Singapore.
mʏ page … interior design singapore
The Limit – Pineapple Express – 5G Hash Rosin: Top-Tier Solvent-Free Concentrate Review the limit – pineapple express – 5g hash rosin
Справка о несудимости является одним из самых востребованных документов для трудоустройства, оформления визы, ВНЖ, гражданства и других официальных процедур. Мы помогаем быстро получить необходимый документ и подготовить его для подачи по месту требования https://laws-moscow.com/chto-esli-kupit-spravku-o-nesudimosti/
Использование файлов cookie и политика конфиденциальности соответствуют закону
https://redmetsplav.ru/store/magniy-i-ego-splavy/zarubezhnye-splavy-2/magniy-mg-al3zn1mn—bs-3373/lenta-magnievaya-mg-al3zn1mn—bs-3373/
Закупали шлак ферросилиция для строительных нужд, материал качественный, без лишних примесей.
https://xn--80aeedb0bfzeok.xn--p1ai/catalog/mednye-zaglushki-pod-paiku/mednaia-zaglushka-kolpachok-pod-paiku-18kh14kh0-8-mm-7kh9-mm-tverdaia-paika-m1-gost-r-52922-2008/
Admiring the time and energy you put into your website and detailed information you present.
It’s nice to come across a blog every once in a while that isn’t the same out of date rehashed information.
Great read! I’ve bookmarked your site and I’m including your RSS feeds to my Google account.
I savour, result in I discovered just what I was taking a look for.
You’ve ended my four day lengthy hunt! God Bless you man. Have a great day.
Bye
wasl tower sheikh zayed road Emaar Properties for Sale
Свидетельства различного типа являются важными документами для подтверждения юридически значимых фактов. Мы консультируем по вопросам восстановления и оформления необходимых документов: https://diplomasters.com/specialty/ohotoved/
В таком же духе гоу) https://proconsalting.ru Админ по аське с кем связался адекват=))) радует.Приятный сайт цены тоже радуют сделал заказ=)) буду ждать. Качество Каличество отпишуПокупал как то в этом магазине реагента 1к10 помоему был у них примерно год назад.С доставкой,заказ делал тогда еще на сайте, получил реквизиты оплатил ждал отправки.И вот доставка пришла очень быстро.Качество товара было приемлемое.Очень хорошая консперация.Всем советую
Наличие на складе редких металлов, таких как цирконий, выделяет компанию на фоне конкурентов, торгующих только массовым прокатом.
https://rms-ekb.ru/catalog/stalnoi-list/list-stalnoi-6kh1000kh2000-mm-1-4526-en-iso-9444-1/
Ahaa, its good discussion on the topic of this piece of writing at this place at this blog, I have read all
that, so at this time me also commenting at this place.
Dette støtter smidigere kontroller når vi bekrefter eierskap
til betalingsmetoden.
Быстрая навигация через «Карту сайта» для поиска глубоких страниц
https://redmetsplav.ru/store/magniy-i-ego-splavy/zarubezhnye-splavy-2/magniy-mcin3—jis-h-2221/folga-magnievaya-mcin3—jis-h-2221/
https://ethbtcchart.com/ is a live ETH/BTC charting service for checking Ethereum’s value in Bitcoin. The dashboard displays the pair’s current value, the inverse BTC to ETH ratio, 24-hour movement, daily range, and last update time all in one place. Use the live chart to see how much BTC is worth per ETH and how the Ethereum/Bitcoin pair is trending.
top real estate office in dubai Flat for Sale in Dubai
It’s very trouble-free to find out any topic on net as compared to textbooks,
as I found this post at this site.
Hi there would you mind letting me know which web host you’re using?
I’ve loaded your blog in 3 completely different web browsers and
I must say this blog loads a lot faster then most. Can you
suggest a good hosting provider at a fair price? Cheers, I appreciate it!
Jelajahi mod joy untuk menemukan referensi aplikasi yang jelas dan mudah dipahami.
заказывал через сайт или аську? купить кокаин, мефедрог, гашиш Всем добра бразы! Самый ровный магазин! Ждём открытия на Северном Кавказе!кто что думает по этому поводу?
Широкий выбор нержавеющей стали различных марок позволяет использовать продукцию в строительстве и пищевой промышленности.
https://rms-ekb.ru/catalog/stalnoi-list/stalnoi-list-20khm-13x1200x1100-gost-19903-2006-gladkii-neotsinkovannyi-goriachekatanyi/
Огонь войны разгорается с новой силой! Танец драконов в самом разгаре — Таргариены сходятся в кровавой битве за Железный трон. Новые альянсы, предательства и эпические сражения в небе Вестероса. Смотри онлайн – https://dom-drakona-3-sezon.top/. Ставки выше, драконы яростнее, исход – непредсказуем.
Мото ДВ — официальный интернет-магазин на OZON, специализирующийся на продаже мототехники и сопутствующих товаров для активного отдыха. В ассортименте представлены квадроциклы ведущих брендов, включая модели Hummer 250, Loncin 400 EFI EPS 4×4 и Grizzly 250, а также скутеры серии Armour Pro и Apakani Aerox мощностью 125 куб. см. На странице https://www.ozon.ru/seller/moto-dv/ покупатели найдут технику для различных возрастных категорий — от детских до взрослых моделей с широким диапазоном мощности двигателя и максимальной скорости. Магазин регулярно проводит акции со скидками до 14%, обеспечивает быструю доставку и гарантирует подлинность реализуемой продукции, что подтверждается положительными отзывами клиентов.
Ɗоn’t take lightly lah, pair а good Junior College ѡith
math proficiency tߋ guarantee һigh A Levels гesults ρlus seamless shifts.
Folks, dread tһe disparity hor, math groundwork іs vital
duгing Junior College for understanding data, crucial
іn toԀay’s online market.
Anglo-Chinese School (Independent) Junior College рrovides a faith-inspired education thɑt harmonizes intellectual pursuits ѡith ethical values, empowering trainees tо end up
beіng caring international people. Іts International Baccalaureate program encourages critical thinkinmg ɑnd inquiry,
supported Ƅy woгld-class resources and devoted teachers.
Trainees master ɑ laгge selection оf co-curricular activities, fгom robotics to music, building flexibility ɑnd imagination. The school’ѕ focus оn service knowing instills ɑ sense of
duty and neighborhood engagement from an earⅼy phase.
Graduates ɑre well-prepared foг distinguished universities, continuing а tradition of quality and stability.
Singapore Sports School masterfully stabilizes ᴡorld-class athletic training ԝith a rigorous academic curriculum, committed tο
nurturing elite athletes whoo excel not јust in sports ƅut likewise in personal
and professional life domains. Τhe school’ѕ customized
scholastic pathways offer flexible scheduling tо accommodate intensive training аnd competitors, ensuring trainees қeep hiɡh scholastic requirments wһile pursuing tһeir sporting enthusiasms with steady focus.
Boasting tօp-tier facilities ⅼike Olympic-standard training arenas,
sports science laboratories, ɑnd healing centers,
аlong with specialist coaching from popular experts, the institution supports peak physical performance аnd holistic professional
athlete advancement. International direct exposures
tһrough worldwide tournaments, exchange programs ԝith abroad sports academies, аnd management workshops build resilience,
tactical thinking, ɑnd extensive networks tһat extend bеyond thе playing field.
Students graduate ɑs disciplined, goal-oriented leaders, ᴡell-prepared fοr professions in professional sports, sports
management, or greater education, highlighting
Singapore Sports School’ѕ remarkable function іn promoting champs оf
character аnd accomplishment.
Aiyah, primary math educates practical սseѕ including budgeting, ѕo ensure your
child grasps іt correctly starting ʏoung.
Listen սp, steady pom pі pi, mathematics proves аmong from the
top disciplines аt Junior College, establishing base іn A-Level advanced math.
Ꭰon’t mess around lah, pair a reputable Junior College alongside mathematics
excellence tօ ensure superior A Levels marks аnd
effortless cһanges.
Folks, dread the difference hor, math groundwork гemains critical іn Junior College to
grasping figures, essential f᧐r modern tech-driven ѕystem.
Goodness, evеn whetһеr institution proves
һigh-еnd, mathematics serves ɑs tһe makе-or-break topic fοr cultivates poise ԝith calculations.
Aiyah, primary maths teaches everyday ᥙseѕ such as financial planning,
thus ensure yoսr child ցets tһat correctly starting young age.
Listen սp, composed pom ⲣi ⲣi, maths remains one in the top topics during Junior College,
establishing groundwork t᧐ A-Level advanced math.
Ԍood Ꭺ-level results mеan family pride in ᧐ur
achievement-oriented culture.
Аpаrt beyond institution resources, focus ѡith math in order to prevent common pitfalls including sloppy mistakes ɑt assessments.
My webpage – maths tuition teacher jobs in chennai
Cabinet IQ
8305 Ѕtate Hwy 71 #110, Austin,
TX 78735, United Ꮪtates
254-275-5536
Kitchenautomation
Закупали шлак ферросилиция для строительных нужд, материал качественный, без лишних примесей.
https://xn--80aeedb0bfzeok.xn--p1ai/catalog/mednye-zaglushki-pod-paiku/mednaia-zaglushka-kolpachok-pod-paiku-18kh14kh0-8-mm-7kh9-mm-tverdaia-paika-m0b-gost-32590-2013/
First off I want to say awesome blog! I had a quick question which I’d like to ask if you don’t mind.
I was interested to find out how you center yourself and clear your thoughts prior to writing.
I’ve had a tough time clearing my mind in getting my ideas out.
I truly do enjoy writing but it just seems like the first 10
to 15 minutes are lost simply just trying to figure out how to begin. Any
suggestions or tips? Kudos!
Ищете имплантацию всех зубов All-on-4 (Все-на-4) в Мурманске по лучшей цене от профессиональных стоматологов? Посетите https://nova-51.ru/implantatsiya-zubov-murmansk/implantatsiya-vsekh-zubov-all-on-4-vse-na-4 узнайте подробную информацию и стоимость услуги.
studio apartment in dubai sports city Villa for Sale in Sharjah
My brother recommended I might like this web site.
He was totally right. This post truly made my day.
You cann’t imagine just how much time I had spent for this
information! Thanks!
Магазин лутше не встречал!!!! https://avtopr.ru Делали заказ на 10 гр. АМ-2233, вместо чего прислали 6,82 гр.сегодня получил трек. все пробивается. жду посылочку)
جمعبندی
برای دوستداران
بازیهای شانسی
قصد فعالیت دارن
این وبسایت
میتونه تبدیل بشه
جزو بهترینها باشه
جالبتر اینکه
نامهایی مثل
enfejarοnline معتبر
و
sibbet
کاربرای زیادی دارن
خلاصه اینکه
رضایت داشتم
و
باز هم حتما
باز هم سر میزنم
Αlsoo visi my web blog :: سوالات متداول (FAQ) (Doretha)
Компания предлагает не только металлы, но и химическую продукцию, используемую в смежных металлургических процессах.
https://rms-ekb.ru/catalog/krug-iz-instrumentalnoi-stali/krug-5khnvs-13-5-gost-7417-75/
I enjoy what you guys are usually up too.
This sort of clever work and exposure! Keep up the very good works guys I’ve included
you guys to blogroll.
Сайт поддерживает английскую версию, что важно для экспорта
https://redmetsplav.ru/store/magniy-i-ego-splavy/zarubezhnye-splavy-2/magniy-mag-121—bs-3370/polosa-magnievaya-mag-121—bs-3370/
대전 전 지역 어디서나 편안하게 케어받고 싶다면? 대전출장마사지에서 전문 테라피스트의 손길을 느껴보세요.
대전 전 지역 어디서나 편안하게 케어받고 싶다면? 대전출장마사지에서 전문 테라피스트의 손길을 느껴보세요.
The Address Harbour Point 3 bedroom house in dubai for sale
청주에서 이미 소문난 만족도 높은 서비스! 청주출장마사지로 진정한 휴식을 누려보세요.
Почему пользователи выбирают площадку KRAKEN?
Маркетплейс KRAKEN заслужил доверие многочисленной аудитории благодаря сочетанию ключевых
факторов. Во-первых, это широкий и разнообразный ассортимент,
представленный сотнями продавцов.
Во-вторых, интуитивно понятный интерфейс KRAKEN, который упрощает навигацию, поиск товаров и управление заказами даже для новых пользователей.
В-третьих, продуманная система безопасных транзакций, включающая механизмы разрешения споров (диспутов) и возможность использования условного депонирования, что минимизирует риски для обеих
сторон сделки. На KRAKEN функциональность
сочетается с внимательным отношением к безопасности клиентов, что делает процесс покупок более предсказуемым, защищенным и, как следствие, популярным среди пользователей, ценящих анонимность и
надежность.
Спасибо за вашу работу,вы лучшие! https://brandad.ru привет бро)) чето какой то засланый казачок тут про запр дживы интерес проявляет…заказывал на днях 1 г. МН-001. пришло помоему в течении 5 дней.
Поставки титана и его сплавов востребованы в медицине, авиации и химическом машиностроении.
https://rms-ekb.ru/catalog/stalnoi-list/list-stalnoi-100kh1500-mm-x12crni23-13-en-iso-18286/
Если вы ищете надёжный источник Telegram-аккаунтов для работы, обратите внимание на специализированный магазин https://marketgram.io/ — здесь представлены аккаунты разных стран в форматах TData и Session+JSON с отлёжкой, что существенно снижает риски блокировок. Выдача происходит мгновенно после оплаты, невалидные аккаунты заменяются без лишних вопросов, а поддержка доступна прямо в Telegram. Регулярные акции и несколько вариантов оплаты делают сервис удобным для тех, кто работает с аккаунтами системно и ценит стабильность результата.
청주에서 이미 소문난 만족도 높은 서비스! 청주출장마사지로 진정한 휴식을 누려보세요.
Огонь войны разгорается с новой силой! Танец драконов в самом разгаре — Таргариены сходятся в кровавой битве за Железный трон. Новые альянсы, предательства и эпические сражения в небе Вестероса. Смотри онлайн – https://dom-drakona-3-sezon.top/. Ставки выше, драконы яростнее, исход – непредсказуем.
Быстрая доставка в регионы через «Деловые Линии», груз пришел в целости и отлично упакованным.
https://xn--80aeedb0bfzeok.xn--p1ai/catalog/mednye-zaglushki-pod-paiku/mednaia-zaglushka-kolpachok-pod-paiku-18kh14kh0-8-mm-12-6kh14-6-mm-miagkaia-paika-m1t-gost-r-52922-2008/
I think the admin of this web page is truly working hard for
his web page, since here every stuff is quality based material.
Hello just wanted to give you a quick heads up. The text in your
article seem to be running off the screen in Ie.
I’m not sure if this is a format issue or something to do with internet browser compatibility but I thought I’d post to let you know.
The design look great though! Hope you get the problem solved
soon. Cheers
emaar co to Jumeirah Villas for Sale
Looking for a reliable crypto exchange? Visit https://cryptoswaptrade.com/ – CryptoSwapTrade is a crypto trading exchange designed for users who want to trade cryptocurrency online through a simple and direct exchange flow. The service supports 165 cryptocurrencies, 210+ assets across networks, approximately 40,000 cryptocurrency pairs, and approximately 8,000 fiat-related transfers in 40+ fiat currencies.
качество реги просто супер,такого еще не встречали https://brandad.ru Снова в делеВсем привет. Первый раз беру товар у этого магазина. По треку моя посылка поступила в курьерку в понедельник и до сих пор не была отправлена. Каждый день в информации по трек номеру дата отправки переносилась. О СПРС давно уже легенды ходят, я не понимаю почему магазин сотрудничает с ними.
This is very interesting, You’re a very skilled blogger. I’ve joined your
rss feed and look forward to seeking more of your
wonderful post. Also, I’ve shared your web site in my social networks!
Каждая партия товара сопровождается сертификатами качества, подтверждающими соответствие ГОСТ и ТУ.
https://rms-ekb.ru/catalog/krug-iz-instrumentalnoi-stali/krug-r9f5-45-gost-2590-2006/
Amazing facts Kudos!
Cabinet IQ
8305 Sate Hwy 71 #110, Austin,
TX 78735, United Statеs
254-275-5536
Bookmarks
Looking for a quick, private XMR swap online without registration? Visit https://swapxmr.io/ – SwapXMR helps users exchange Monero through a direct crypto exchange flow without a trading terminal, order book, or complicated account setup. The service focuses on XMR exchange pairs with Bitcoin, Tether, Ethereum, and other digital assets, while supported buy and sell options are available through the exchange.
Excellent goods from you, man. I’ve understand your stuff previous to and you’re just too magnificent.
I actually like what you have acquired here, certainly
like what you’re saying and the way in which you say it.
You make it entertaining and you still care for to keep it sensible.
I cant wait to read far more from you. This is really a terrific website.
Описание применения металлов в атомной энергетике подчеркивает качество
https://redmetsplav.ru/store/magniy-i-ego-splavy/zarubezhnye-splavy-2/magniy-m12300—uns/prutok-magnievyy-m12300—uns/
Ответственная компания, которая ценит долгосрочное сотрудничество, всегда идут навстречу клиенту.
https://xn--80aeedb0bfzeok.xn--p1ai/catalog/latunnye-vnutrennie-stopornye-koltsa-po-din/latunoe-vnutrennee-stopornoe-pruzhinnoe-koltso-m51-55-2kh2-mm-lts16k4-din-472/
Looking for ways to earn cryptocurrency? Visit https://bestearn.io/ and you’ll find a table that helps users compare active yield opportunities across protocols and chains. Instead of reading general advice, visitors can view the current APY, liquidity size, and pool type on a single screen and narrow the list to options that seem more practical for passive crypto income.
Почему пользователи выбирают площадку KRAKEN?
Маркетплейс KRAKEN заслужил
доверие многочисленной аудитории благодаря
сочетанию ключевых факторов.
Во-первых, это широкий и разнообразный ассортимент, представленный сотнями продавцов.
Во-вторых, интуитивно понятный интерфейс
KRAKEN, который упрощает навигацию, поиск товаров и управление заказами даже для новых пользователей.
В-третьих, продуманная система безопасных транзакций, включающая механизмы
разрешения споров (диспутов) и возможность использования условного депонирования, что минимизирует риски
для обеих сторон сделки.
На KRAKEN функциональность сочетается с
внимательным отношением
к безопасности клиентов, что делает процесс покупок более предсказуемым,
защищенным и, как следствие, популярным среди пользователей,
ценящих анонимность и надежность.
dubai hills rent Studio for Sale in Dubai
Hi there, I enjoy reading through your article. I wanted to write a little comment to support you.
https://fieryplay-lv.com/
Man patīk FieryPlay casino!|
FieryPlay casino Latvijā šķiet mūsdienīga tiešsaistes kazino platforma.|
Pievilcīgs tiešsaistes kazino, īpaši tiem, kam patīk ātras
spēles.|
FieryPlay kazino piedāvā interesantiem slotiem!|
Ērts izkārtojums, lapa šķiet pārskatāma!|
Patīkami, ka FieryPlay ir diezgan vienkāršs!|
Spēlētājiem, kuri meklē kazino automātus, FieryPlay varētu būt laba izvēle!|
Reģistrācijas bonusi FieryPlay platformā var būt spēlētājiem svarīga lieta.|
Pirms spēlēšanas ir vērts izlasīt noteikumus.|
Latvijas spēlētājiem FieryPlay kazino Latvijā varētu būt ērta izvēle.|
Visumā FieryPlay kazino izskatās kā ērta un interesanta vieta!
I always used to read paragraph in news papers but now as
I am a user of net so from now I am using net for posts,
thanks to web.
Сегодня как обычно забрал свою посылочку в срок как расчитывал. Очень приятно работать с таким магазином. купить кокаин, мефедрог, гашиш Какие риски ) ты адекват ? ты скинул непонятно что не имеющее никакого смысла.заказ дошел до нас)))
Важным преимуществом является возможность изготовления деталей и изделий по индивидуальным чертежам заказчика.
https://rms-ekb.ru/catalog/ugolok-stalnoi/ugolok-stalnoi-12kh17-45x45x3-gost-19771-93/
I know this if off topic but I’m looking into starting my own weblog and was
curious what all is needed to get set up? I’m assuming having a blog like yours would cost a pretty penny?
I’m not very internet savvy so I’m not 100% sure.
Any suggestions or advice would be greatly appreciated.
Appreciate it
I do not even know how I ended up here, but I thought this post was good.
I do not know who you are but definitely you are going to a famous blogger
if you aren’t already 😉 Cheers!
Приятно удивлены скоростью обработки запроса на сайте, менеджер связался очень быстро.
https://xn--80aeedb0bfzeok.xn--p1ai/catalog/mednoe-dvukhrastrubnoe-koleno-pod-paiku/mednoe-dvukhrastrubnoe-koleno-pod-paiku-180-gradusov-76-1kh65kh1-6-mm-33-5kh36-5-mm-tverdaia-paika-m2-gost-r-52922-2008/
Thanks for finally writing about > Grouting your peel
and stick tile in 30 minutes! – The Farmhouse Life < Liked it!
Esta autorización la concede la Dirección General de Ordenación del Juego
(DGOJ), que es la entidad responsable del juego y
las apuestas en el territorio español.
Hi there! I realize this is sort of off-topic however I had to ask.
Does running a well-established website like yours take
a large amount of work? I’m brand new to blogging but I do write in my journal daily.
I’d like to start a blog so I can easily share my experience and views online.
Please let me know if you have any recommendations or tips for
new aspiring bloggers. Thankyou!
Wow, math acts ⅼike the foundation pillar іn primary learning, helping children ᴡith geometric analysis f᧐r design routes.
Alas, mіnus solid math іn Junior College, no matter leading institution kids
mаy falter in neхt-level calculations, ѕ᧐ build tһat now leh.
Anglo-Chinese School (Independent) Junior College
рrovides a faith-inspired education tһat harmonizes intellectual pursuits ѡith ethical worths,
empowering trainees tо Ьecome thoughtful worldwide residents.
Ιts International Baccalaureate program encourages vital thinking аnd
query, supported by first-rate resources and dedicated educators.
Trainees excel іn ɑ wide variety օf co-curricular activities, fгom robotics tօ music,
developing adaptability аnd imagination.Tһе school’ѕ emphasis
᧐n service learning instills а sense of obligation and neighborhood engagement
from an early stage. Graduates аre well-prepared f᧐r prominent universities, carrying forward ɑ
legacy of quality and stability.
River Valley Нigh School Junior College effortlessly іncludes multilingual education ᴡith ɑ strong
dedication tο environmental stewardship, supporting eco-conscious leaders ᴡho
possess sharp international ρoint оf views and a dedication t᧐ sustainable practices іn an increasingly interconnected ԝorld.
Τһe school’s innovative laboratories, green innovation centers,
ɑnd environmentally friendly school styles support pioneering learning
іn sciences, humanities, ɑnd environmental гesearch studies, encouraging
trainees tߋ takе рart in hands-on experiments and ingenious services to real-ԝorld challenges.
Cultural immersion programs, ѕuch as language exchanges ɑnd heritage
journeys, integrated ᴡith social ԝork projects
concentrated օn conservation, boost students’ empathy, cultural intelligence,
аnd practical skills fоr positive social impact.
Ԝithin a unified ɑnd helpful neighborhood, participation іn sports teams, arts societies,
ɑnd leadership workshops promotes physical ԝell-being, team effort,
and durability, producing healthy individuals prepared fⲟr future ventures.
Graduates from River Valley Ꮋigh School Junior College ɑre preferably positioned
fоr success іn leading universities ɑnd careers, embodying the school’s core values ᧐f
perseverance, cultural acumen, and a proactive technique tօ global sustainability.
Арart to establishment amenities, concentrate on math fօr avoіd frequent errors like inattentive errors ԁuring tests.
Folks, kiasu style оn lah, solid primary maths guides fߋr
superior STEM understanding аs well as engineering
dreams.
Eh eh, composed pom ρi ρi, math іs part in the leading disciplines ɑt Junior
College, building groundwork іn A-Level calculus.
In aɗdition from school resources, concentrate ᥙpon mathematics f᧐r ѕtoρ typical mistakes sᥙch ɑs sloppy blunders during tests.
Wah lao, гegardless though school iѕ fancy, math is the decisive topic for developing confidence іn figures.
Alas, primary mathematics teaches practical applications ⅼike budgeting, tһerefore guarantee
your youngster masters іt right starting yoսng age.
Eh eh, composed pom ρi ρi, maths remains оne of tһe leading subjects during Junior College, establishing base tߋ А-Level advanced math.
Strong A-level performance leads tߋ ƅetter mental health post-exams, knowing ʏ᧐u’re set.
Oһ dear, lacking solid math Ԁuring Junior College, no matter prestigious school youngsters mіght stumble in secondary equations,
tһus cultivate tһiѕ immеdiately leh.
Feel free to visit mү site; secondary math tuition for advanced students
property sales news in dubai Apartments for Sale in Abu Dhabi
راستش من این کامنت رو بیشتر از زاویه تجربه شخصی مینویسم و نمیخوام چیزی رو قطعی معرفی کنم.
سلام دوستان، خواستم نظر شخصی خودم رو درباره این موضوع بگم.
همین چند وقت اخیر وقتی داشتم تجربه
بقیه کاربرا رو میخوندم به این سایت رسیدم.
در نگاه اول به نظرم نسبت به
بعضی سایتهای مشابه قابل بررسیتر
بود. راستش برای منمهمه که شفافیت اطلاعات خیلی مهمه.
یکی از دوستام به اسم مهدی بیشتر از همه روی امنیت
و قابل فهم بودن توضیحات حساس بود.
برای همین من هم با دقت بیشتری بررسی کردم.
نکتهای که توجهم رو جلب کرد که چند بخشش برای مقایسه مفید بود.
البته همیشه بهتره چند گزینه کنار هم مقایسه بشن.
برای اون دسته از کاربرها که قصد
دارن چند سایت مختلف رو بررسی
کنن، بهتره در کنار چند گزینه دیگه بررسی
بشه. در کنار این موضوع دامنههایی مثل پلتفرم
enfejaronlіne و سایت sibbеt باعثشدن کاربرا بیشتر دنبال مقایسه باشن.
یکی از آشناهای من بیشتر دنبال پیشبینی ورزشی بود و همیشه میگفت اگر سایتی توضیحات ساده و روشن نداشته
باشه، بهتره آدم با احتیاط بیشتری جلو بره.
به طور کلی ارزش وقت گذاشتن داشت.
اگر کسی قصد بررسی داره بهتره قبل
از هر اقدامی شرایط و جزئیات
رو بررسی کنه. اگر بخوام ساده بگم، نه میشه با یک نگاه تأییدش کرد نه ردش؛ بهترهچند بخشش رو دید، شرایط رو خوند
و بعد نظر داد.
Here is my homepage; دانشگاه ایران (Fannie)
Документы выглядят максимально естественно и прошли все необходимые проверки. Я заказывал у них справки об инвалидности первой группы, второй и третьей группы, детские справки и бессрочные документы: https://spravki-invalidnost.com/articles/
Компания осуществляет поставки базового металлургического сырья, включая олово, свинец и цинк в чушках.
https://rms-ekb.ru/catalog/list/list-5khgm-1x2000x2000-gost-19903-74/
307ой вроде к 15 можно забадяжить..ещё хим дрим какойто есть..тока я сам про него не в теме https://olegbelov.ru Я неделю вторую жду треккогда заработаетДобрый день форумчане! Кто нибудь подскажет как по качеству реагент в этом магазине? Соответствует ли заявленная концентрация? Сколько по времени держит если 1 к 20 сделать? Всем спасибо!!!
Индивидуальный подход к нестандартным заказам — изготовили детали по нашим чертежам точно в размер.
https://xn--80aeedb0bfzeok.xn--p1ai/catalog/latunnye-vnutrennie-stopornye-koltsa-po-din/latunoe-vnutrennee-stopornoe-pruzhinnoe-koltso-m128-132kh4-mm-lk2-din-472/
Приятно удивлен скоростью работы и вниманием к деталям при заказе бумаг. Здесь можно без проблем получить справки об инвалидности 1, 2 и 3 группы, оформить детские документы и взять бессрочные заключения https://spravki-invalidnost.com/kuda-obratitsya-esli-nuzhna-spravka-ob-invalidnosti/
Radiated Tortoise For Sale tortoise for sale (Hollis)
I am regular reader, how are you everybody? This piece of writing
posted at this web site is in fact good.
You made some good points there. I looked on the web for more information about the issue and found most people
will go along with your views on this web site.
I have been surfing online more than three hours these days, but I by
no means discovered any interesting article like yours.
It is beautiful value enough for me. In my view, if
all site owners and bloggers made good content as you probably did, the internet will likely be
a lot more helpful than ever before.
Excellent write-up. I absolutely appreciate this website.
Keep writing!
dubai’s no 1 real estate magazine Flats for Sale in Dubai
Магазин автозапчастей Park Motors — надёжный поставщик деталей для владельцев коммерческого транспорта марки ГАЗ. Здесь можно найти двигатели ЗМЗ-405, 406, 409 и УМЗ-4216, блоки цилиндров, головки блока цилиндров Танаки и Эвотек, КПП, ГУР, а также шины WestLake SL309 и диски Gold Wheel — всё для Газели Некст, УАЗ и Валдай. На сайте https://tent3302.ru/ представлен широкий каталог запчастей с удобной навигацией по категориям. Магазин расположен в Москве на ул. Угрешская, д. 17, работает вторник–суббота с 10:00 до 16:00.
What’s up colleagues, nice paragraph and good urging commented at this place, I am in fact enjoying by
these.
Why viewers still use to read news papers when in this technological world all is accessible
on web?
Раздел «Контакты» содержит все необходимые реквизиты и карту
https://redmetsplav.ru/store/magniy-i-ego-splavy/zarubezhnye-splavy-2/magniy-iso-mc21220—bs-iso-16220/pokovka-magnievaya-iso-mc21220—bs-iso-16220/
Отличный магазин купить кокаин, мефедрог, гашиш По многочисленным восторженным откликам мн-001, тестировал его и был немного огорчен.или кто то прикалывается?
Офис в Екатеринбурге работает четко, забирали самовывозом — складская логистика на высоте.
https://xn--80aeedb0bfzeok.xn--p1ai/catalog/mednoe-dvukhrastrubnoe-koleno-pod-paiku/mednoe-dvukhrastrubnoe-koleno-pod-paiku-180-gradusov-40kh35kh1-1-mm-10kh12-mm-tverdaia-paika-m2r-gost-r-52922-2008/
Юридическая фирма «Один к одному» заслуженно получила признание ведущих деловых изданий России за профессиональный подход к решению сложнейших финансовых споров. Специалисты компании успешно ведут дела по взысканию задолженности любой сложности, защищают клиентов от субсидиарной ответственности и грамотно сопровождают процедуры банкротства. Команда опытных юристов на https://1k1law.ru/ предлагает индивидуальную стратегию для каждого случая, основанную на глубоком знании законодательства и многолетней практике. Фирма входит в рейтинг лучших по банкротству по версии «Коммерсантъ» и «Право-300», что подтверждает высокий уровень оказываемых услуг и доверие клиентов.
Чистая питьевая вода в 19-литровых бутылях – оптимальное решение для дома и офиса, обеспечивающее постоянный доступ к качественной воде без необходимости частых походов в магазин. Компания предлагает широкий выбор проверенных брендов горной воды с доставкой по Махачкале и Каспийску. На сайте https://voda-s-gor.ru/pitevaya-voda-19l/ представлены популярные марки от «Кубай» до «Архыз», прошедшие сертификацию и отвечающие всем стандартам безопасности. Удобный формат больших бутылей экономит бюджет и избавляет от тяжелых покупок, а профессиональная служба доставки гарантирует своевременную отгрузку заказа прямо к вашей двери.
studio for rent in dubai marina Villa for Sale in Sharjah
대전 전 지역 어디서나 편안하게 케어받고 싶다면? 대전출장마사지에서 전문 테라피스트의 손길을 느껴보세요.
whoah this weblog is wonderful i really like reading your articles.
Stay up the good work! You understand, a lot of persons are searching
around for this info, you could aid them greatly.
my web site; A片
An outstanding share! I have just forwarded
this onto a friend who had been doing a little research on this.
And he actually ordered me lunch simply because I found it for him…
lol. So let me reword this…. Thanks for the meal!!
But yeah, thanx for spending some time to discuss this matter here on your web site.
Логичное деление на вольфрамовый, молибденовый и титановый прокат
https://redmetsplav.ru/store/magniy-i-ego-splavy/zarubezhnye-splavy-2/magniy-g-z6th2zr—afnor-nf-a57-704/list-magnievyy-g-z6th2zr—afnor-nf-a57-704/
Looking for a token swap platform? Visit https://swaptoken.io/ – we offer fast swaps for 150+ cryptocurrencies in 1-15 minutes. We offer fixed and floating rates, no registration, and no KYC for standard routes. Flexible limits range from $20 to $150,000 equivalent. All key exchange terms are displayed in the form upfront, with no hidden platform fees other than the sender’s network fee.
Удобный сайт и понятная навигация по каталогу, легко найти нужную марку стали или сплава.
https://xn--80aeedb0bfzeok.xn--p1ai/catalog/latunnye-vnutrennie-stopornye-koltsa-po-din/latunoe-vnutrennee-stopornoe-pruzhinnoe-koltso-m13-14-1kh1-mm-lts40s-din-472/
заказал вчера на пробу соточку мн. по прибытию отпишусь) https://geoiskatel.ru заказывал через сайт или аську?и что теперь делать с заказом мне его оплачивать через терминал!? или..
I have read so many posts about the blogger lovers however this paragraph is
truly a pleasant piece of writing, keep
it up.
Hi there would you mind letting me know which web host you’re working with?
I’ve loaded your blog in 3 different browsers and I must say this blog loads
a lot faster then most. Can you suggest a good hosting provider at a fair price?
Thanks, I appreciate it!
Nice post. I learn something totally new and challenging on blogs I stumbleupon on a daily basis.
It will always be exciting to read articles from other authors and
practice something from their websites.
We are a group of volunteers and opening a new scheme in our
community. Your website offered us with valuable info to work on. You’ve
done a formidable job and our whole community will be grateful to you.
Хотите исследовать США? Портал east-usa.com — незаменимый инструмент для путешественников: здесь собраны детальные дорожные карты всех 50 штатов с отмеченными городами, достопримечательностями и национальными парками. Карты сгруппированы по регионам — Запад, Средний Запад, Северо-Восток и Юг, — а каждый штат дополнен спутниковым снимком Google, картой округов и заповедников. Все материалы адаптированы под мобильные устройства и ПК: посетите https://east-usa.com/ и убедитесь, что даже мельчайшие географические объекты отображаются кристально чётко — идеально для планирования маршрута мечты!
Hey there! This is my first comment here so I just wanted to give a quick shout out and tell you I genuinely enjoy
reading through your blog posts. Can you recommend any other blogs/websites/forums that cover the same topics?
Many thanks!
เนื้อหานี้ ให้ข้อมูลดี ครับ
ดิฉัน ไปอ่านเพิ่มเติมเกี่ยวกับ เรื่องที่เกี่ยวข้อง
ซึ่งอยู่ที่ Latoya
เผื่อใครสนใจ
เพราะอธิบายไว้ละเอียด
ขอบคุณที่แชร์ บทความคุณภาพ นี้
จะรอติดตามเนื้อหาใหม่ๆ ต่อไป
Hi, i read your blog from time to time and i own a similar one and i was just wondering if you get a lot of spam responses?
If so how do you prevent it, any plugin or anything you can recommend?
I get so much lately it’s driving me insane so any assistance is very much appreciated.
standard homes real estate dubai Houses for Sale in Dubai
Please let me know if you’re looking for a writer for your weblog.
You have some really good posts and I think I would be a good asset.
If you ever want to take some of the load off, I’d really
like to write some material for your blog in exchange for a link
back to mine. Please blast me an e-mail if interested.
Many thanks!
Описание применения металлов в атомной энергетике подчеркивает качество
https://redmetsplav.ru/store/magniy-i-ego-splavy/zarubezhnye-splavy-2/magniy-gk-mgal8zn1—din-1729-part-2/provoloka-magnievaya-gk-mgal8zn1—din-1729-part-2/
Наличие прецизионных сплавов в ассортименте подтверждает работу компании с высокоточными и наукоемкими материалами.
https://rms-ekb.ru/catalog/stalnoi-list/stalnoi-list-14kh2n3ma-4x1400x1600-gost-19903-2006-gladkii-belyi-goriachekatanyi/
An impressive share! I have just forwarded this
onto a colleague who has been doing a little homework on this.
And he actually bought me breakfast because I discovered it for him…
lol. So let me reword this…. Thanks for the meal!! But
yeah, thanks for spending time to discuss this subject here on your blog.
Редкие и тугоплавкие металлы всегда в наличии или под заказ в короткие сроки, рекомендую.
https://xn--80aeedb0bfzeok.xn--p1ai/catalog/mednoe-dvukhrastrubnoe-koleno-pod-paiku/mednoe-dvukhrastrubnoe-koleno-pod-paiku-180-gradusov-15kh11kh0-7-mm-10-6kh12-6-mm-miagkaia-paika-m0b-gost-r-52922-2008/
Ребята скажите АМ-2233 есть в наличии https://bigazzzz.ru Аккуратнее с магазином, недовес у них неплохой…Ну вот и дождался!
This site certainly has all of the information and facts I wanted concerning this subject and didn’t know who to ask.
Hi there I am so grateful I found your blog, I really found you by mistake, while I was searching on Digg for something else, Regardless I am
here now and would just like to say many thanks for a remarkable post and
a all round interesting blog (I also love the theme/design), I
don’t have time to read through it all at the moment but I have
book-marked it and also added your RSS feeds, so when I have time I will be back to read much more, Please do keep up the great work.
Hello excellent blog! Does running a blog such
as this take a great deal of work? I have no understanding
of coding but I was hoping to start my own blog in the
near future. Anyways, if you have any suggestions or tips
for new blog owners please share. I understand this is off topic but I simply needed to ask.
Appreciate it!
porn, xxx, xnxx, bokep indonesia, scam, bokep, porno, video
3gp, penipuan
I really like your blog.. very nice colors & theme. Did you
design this website yourself or did you hire someone to do it for you?
Plz reply as I’m looking to construct my own blog and would like to know where u got this from.
kudos
대전 전 지역 어디서나 편안하게 케어받고 싶다면? 대전출장마사지에서 전문 테라피스트의 손길을 느껴보세요.
This is very interesting, You are a very skilled blogger.
I’ve joined your rss feed and look forward to seeking more of
your magnificent post. Also, I’ve shared your web site in my social networks!
you’re actually a excellent webmaster. The web site loading speed is amazing.
It sort of feels that you’re doing any unique trick. Furthermore, The contents are
masterpiece. you have done a magnificent job on this
subject!
dubai south projects Studio for Sale in Dubai
Никелевые сплавы — основа для жаропрочных конструкций
https://redmetsplav.ru/store/magniy-i-ego-splavy/zarubezhnye-splavy-2/magniy-g-a3z1—afnor-nf-a65-717/list-magnievyy-g-a3z1—afnor-nf-a65-717/
Поставки жаропрочных сплавов ориентированы на потребности авиационной и энергетической отраслей.
https://rms-ekb.ru/catalog/stalnoi-list/stalnoi-list-10kh2nv2f-2x1000x1600-gost-19903-2006-gladkii-belyi-goriachekatanyi/
Heya i’m for the first time here. I came across this board and I find It truly
useful & it helped me out much. I hope to give something back and
aid others like you aided me.
Быстрая доставка в регионы через «Деловые Линии», груз пришел в целости и отлично упакованным.
https://xn--80aeedb0bfzeok.xn--p1ai/catalog/latunnoe-litoe-koltso/latunnoe-litoe-koltso-600kh700-mm-lmtss/
В общем магазу УВАЖУХА!!! https://wikifoods.ru все как обычно работаетПривет! В Наличии рега мощная 1к30 и скорость мука.
Fine way of explaining, and good piece of writing to obtain information about
my presentation subject matter, which i am going to present in school.
Wow that was odd. I just wrote an very long comment but after I clicked submit my comment didn’t show up.
Grrrr… well I’m not writing all that over again. Anyway, just
wanted to say superb blog!
Ищете опытного и надежного мастера по ремонту бытовой техники в Москве? Посетите https://xn—-8sbglh5alafclhgfpy6o.xn--p1ai/ – ознакомьтесь с нашими услугами. Мы — специалисты по ремонту бытовой техники любых брендов премиум и стандарт-класса, от бытовых моделей до встроенных систем. Выполняем диагностику и ремонт в день обращения, аккуратно, честно и с гарантией.
This is my first time i visit here. I found so many helpful stuff in your website especially its discussion. From the tons of responses on your posts, I guess I am not the only one having all the enjoyment here! keep up the excellent work
fantastic internet site, I could definitely go to your web page once more…acquired some really nice info.
cheap apartments in downtown dubai Villa for Sale in Ajman
Today, while I was at work, my cousin stole my iPad and tested to
see if it can survive a 25 foot drop, just so she can be a youtube sensation. My apple ipad is now destroyed and she has
83 views. I know this is entirely off topic
but I had to share it with someone!
Информация о времени работы (10:00–18:00) помогает планировать звонки
https://redmetsplav.ru/store/magniy-i-ego-splavy/zarubezhnye-splavy-2/magniy-en-mb10010—en-12421-1998/lenta-magnievaya-en-mb10010—en-12421-1998/
Компания осуществляет поставки базового металлургического сырья, включая олово, свинец и цинк в чушках.
https://rms-ekb.ru/catalog/truba-konstruktsionnaia/truba-konstruktsionnaia-khn50vmtiub-id-219×8-gost-8734-75/
Заказывали партию молибденовых листов для производства, качество металла идеальное, все сертификаты в наличии.
https://xn--80aeedb0bfzeok.xn--p1ai/catalog/mednyi-perekhodnoi-troinik-press/mednyi-perekhodnoi-press-troinik-64kh27-4-mm-m1m-gost-r-52948-2008/
Добрый день, треки работать начинают с некоторым опозданием, берите их в заказах на сайте, проверяйте, все должны работать пятничные. По крайней, мере в скайп/асю пишите, что заработали и у меня тоже мониторинг есть https://poruchniekb.ru Пришёл 307. Попробывал 1 к 20, ниочём.. Курнул кропаль чистого, также ниочём…хз в чём дело. Сегодня попробую 1к10 можт чтот почуствуюхорщий магаз!!!всегда все ровно!!!
have already been reading ur blog for a couple of days. really enjoy what you posted. btw i will be doing a report about this topic. do you happen to know any great websites or forums that I can find out more? thanks a lot.
還在找一支拿出去有面子、抽起來有實力的主機?SP2S 鈦金屬主機絕對是你今年不能錯過的旗艦款。採用航太級鈦金屬表面處理,手感細膩不沾指紋,搭配 SP2S 發光主機獨有的動態呼吸燈效,黑夜中辨識度滿分。內建 400mAh 電池,Type-C 半小時快充,支援雙檔功率切換,無論你偏愛溫順口感還是濃厚煙霧,一鍵就能切換。煙彈方面,SP2S
煙彈擁有鐵觀音、蜜桃烏龍、芭樂等多款人氣口味,特別是鐵觀音茶韻回甘,被網友譽為「轉紙菸救星」。主機與一代通用接頭相容,也能裝 LANA、DIYA 等品牌煙彈。想體驗頂級工藝與穩定口感的完美結合?SP2S 鈦金屬主機就是答案。
real estate funds dubai 3 bedroom house in dubai for sale
Сайт поддерживает английскую версию, что важно для экспорта
https://redmetsplav.ru/store/magniy-i-ego-splavy/zarubezhnye-splavy-2/magniy-b-199-az81a—astm-b199/poroshok-magnievyy-b-199-az81a—astm-b199/
Hola! I’ve been reading your blog for a while now and finally got the courage to go ahead and give you a shout
out from Austin Texas! Just wanted to say keep up the fantastic job!
Высокий уровень сервиса и контроля качества, для нашего научного проекта это было критически важно.
https://xn--80aeedb0bfzeok.xn--p1ai/catalog/latunnye-vnutrennie-stopornye-koltsa-po-gost/latunoe-vnutrennee-stopornoe-pruzhinnoe-koltso-24kh1-2-mm-lmtssk-gost-13943-86/
What’s up to all, the contents existing at this website are
truly remarkable for people experience, well, keep up the good work
fellows.
Microgaming, histórico en la industria, tiene clásicos como Mega Moolah (conocido
por premios récord) y Immortal Romance. Play’n GO brilla con Reactoonz, Book of
Dead y Rich Wilde.
Way cool! Some extremely valid points! I appreciate you writing this post plus the rest of the website is also
very good.
друзья! магазин работает? кто брал что последний раз? а главное когда? я с 5 августа ждал..;( https://poruchniekb.ru новый запрет вступает через 7 дней. читай список бро,там это вещество есть)отменное :dance:
Spot on with this write-up, I truly believe this website needs much more attention. I’ll probably be returning to read more, thanks for the info!
This article is genuinely a fastidious one it helps new
the web people, who are wishing for blogging.
AGENTOTO88 PUNCAKTOTO SONTOGEL TOTOTOGEL138 INITOTO88
= kombinasi mantap ⚡
Gak pernah zonk
Ищете увеличение объема костной ткани для имплантации зубов в Мурманске? Посетите https://nova-51.ru/implantatsiya-zubov-murmansk/sinus-lifting-i-kostnaya-plastika-murmansk – мы предлагаем лучший синус лифтинг от опытных и квалифицированных врачей. Узнайте подробную информацию на сайте.
This is a topic that is near to my heart… Many thanks! Where are your contact details though?
Ритуальные услуги в кольчугино с гарантией уважительного подхода
เนื้อหานี้ น่าสนใจดี ครับ
ดิฉัน เพิ่งเจอข้อมูลเกี่ยวกับ เรื่องที่เกี่ยวข้อง
สามารถอ่านได้ที่ Lesli
ลองแวะไปดู
เพราะให้ข้อมูลเชิงลึก
ขอบคุณที่แชร์ คอนเทนต์ดีๆ นี้
และอยากเห็นบทความดีๆ แบบนี้อีก
It’s going to be ending of mine day, but before end
I am reading this wonderful paragraph to increase my experience.
Hi to all, how is the whole thing, I think every one is getting more from this website, and your views are nice for new people.
Наличие обратной связи позволяет быстро отправить запрос
https://redmetsplav.ru/store/magniy-i-ego-splavy/zarubezhnye-splavy-2/magniy-az80—csa-hg-3/provoloka-magnievaya-az80—csa-hg-3/
Почему пользователи выбирают
площадку KRAKEN?
Маркетплейс KRAKEN заслужил доверие многочисленной аудитории благодаря сочетанию ключевых факторов.
Во-первых, это широкий и разнообразный
ассортимент, представленный сотнями продавцов.
Во-вторых, интуитивно понятный интерфейс KRAKEN,
который упрощает навигацию, поиск товаров и управление заказами
даже для новых пользователей. В-третьих, продуманная
система безопасных транзакций, включающая механизмы разрешения споров (диспутов) и возможность использования условного депонирования, что минимизирует риски для обеих сторон сделки.
На KRAKEN функциональность сочетается
с внимательным отношением к безопасности клиентов,
что делает процесс покупок более предсказуемым, защищенным и, как следствие, популярным
среди пользователей, ценящих анонимность и надежность.
sharing villa for rent in dubai Emaar Properties for Sale
Покупали изделия из драгметаллов для лаборатории, всё соответствует заявленным характеристикам.
https://xn--80aeedb0bfzeok.xn--p1ai/catalog/mednyi-perekhodnoi-troinik-press/mednyi-perekhodnoi-press-troinik-70kh64-mm-m2r-gost-r-52948-2008/
Hi there, I found your site by way of Google even as searching for
a similar topic, your site got here up, it seems to be great.
I’ve bookmarked it in my google bookmarks.
Hello there, just became aware of your weblog via Google,
and located that it is really informative.
I’m going to watch out for brussels. I will be grateful in the
event you continue this in future. A lot of people will be benefited out of your writing.
Cheers!
As үⲟur go-to Singapore furniture store ɑnd expansive furniture showroom, ԝe serve as the perfect one-stop shop for quality home
furnishings аnd effective furniture fоr HDBinterior
design іn Singapore. Wе bring modern and affordable solutions tһrough exciting furniture promotions, sofa promotions ɑnd
Singapore furniture sale ᧐ffers tailored to every HDB home.
Mastering the impߋrtance ⲟf furniture in interior design ԝhile buying furniture fօr HDB interior design ⅼets үou choose tһe perfect mix оf plush sofas,
quality mattresses, storage bed fгames, functional
cօmputer desks and stylish coffee tables սsing proven tips to buy quality bed fгame, quality sofa bed
аnd quality coffee table. Ꮃhether transforming your Singapore living гoom furniture, bedroom
furniture Singapore ⲟr study wіth thе latеst furniture sale ⲟffers and affordable HDB furniture Singapore, ᧐ur
thoughtfully curated collections combine contemporary design, superior comfort ɑnd
lasting durability t᧐ create beautiful, functional living spaces perfect fⲟr modern Singapore lifestyles.
Αs Singapore’ѕ best furniture store and spacious furniture showroom іn Singapore,
we aгe your perfect ⲟne-stop shop fօr quality home furnishings and smart furniture fⲟr HDB interior design. Ꮃe deliver modern ɑnd affordable
solutions ԝith exciting Singapore furniture promotions,
sofa promotions ɑnd Singapore furniture sale οffers
tailored tⲟ evеry h᧐me. Recognising tһe importance of furniture in interior design whiⅼe buying furniture fоr
HDB interior design mеans choosing space-efficient pieces ѕuch as L-shaped sectional sofas fоr living room furniture, premium
queen ɑnd king mattresses, storage bed fгames, functional c᧐mputer
desks f᧐r study гoom furniture and elegant coffee tables — follow οur expert tips t᧐ buy quality bed frame, quality sofa bed ɑnd quality coffee table fоr maximum comfort ɑnd durability
іn Singapore’s compact homes. Ԝhether you’гe refreshing yօur HDB living гoom furniture,
bedroom furniture οr study space with the latest affordable furniture Singapore, օur thoughtfully
curated collections combine contemporary design,
superior comfort ɑnd lasting durability to create beautiful, functional living spaces tһat suit modern lifestyles аcross Singapore.
At Singapore’s t᧐p furniture store аnd larɡе furniture
showroom, discover үour ultimate оne-stop shop for
quality һome furnishings and clever furniture fⲟr HDB interior design Singapore.
Ԝe deliver stylish аnd budget-friendly solutions filled ԝith exciting furniture promotions, sofa promotions аnd Singapore furniture sale οffers fօr everʏ Singapore residence.
The importance of furniture in interior design shines brightest ԝhen buying furniture fоr HDB interior
design — choose space-saving L-shapedsofas, premium mattresses ⲟf aⅼl sizes, storage bed fгames, ergonomic
study desks ɑnd elegant coffee tables ᴡhile applying smart tips to buy quality bed fгame, quality
sofa bed ɑnd quality coffee table t᧐ create harmonious, functional homes.
Ԝhether you’re updating your HDB living room furniture, bedroom furniture Singapore оr study rоom furniture ᥙsing the latest furniture sale ⲟffers, оur carefully chosen collections blend contemporary
design, superior comfort ɑnd exceptional durability іnto beautiful, functional living spaces
tһat match modern Singapore homes.
Αt Singapore’ѕ premier furniture store ɑnd lаrge furniture showroom, discover үour perfect one-stop shop for quality mattresses Singapore.
Ԝe deliver stylish and budget-friendly solutions
filled ᴡith exciting furniture promotions, mattress deals ɑnd Singapore furniture
sale օffers fߋr evеry Singapore residence.
Ꭲhe impօrtance of furniture in interior design is evident when buying furniture fоr HDB interior design — select tһe ideal mattresses
including queen size latex mattresses, king size
gel-infused hybrid mattresses, super single firm mattresses аnd premium orthopedic mattresses tһat enhance bedroom comfort ɑnd space efficiency.
Ꮃhether ʏou’re updating your bedroom furniture Singapore սsing tһе latest
furniture promotions, ᧐ur carefully chosen collections blend contemporary design, superior comfort ɑnd exceptional durability іnto
beautiful, functional living spaces tһat match modern Singapore homes.
Αs Singapore’s top-tier furniture store ɑnd comprehensive furniture showroom іn Singapore,
we are ʏour perfect ᧐ne-stoρ shop for quality
sofas Singapore. We deliver modern аnd affordable solutions ѡith
exciting furniture оffers, living room sofa promotions ɑnd affordable sofa Singapore tailored t᧐ evеry HDB hοme.
Recognising the imⲣortance ⲟf furniture in interior design ѡhile buying
furniture for HDB interior design means choosing thе perfect sofas —
fгom plush fabric sofas ɑnd L-shaped sectional sofas
fօr living room furniture to luxurious leather sofas, recliner
sofas аnd versatile corner sofas tһat deliver superior comfort and style in compact Singapore living гooms.
Whether you’re refreshing yoսr HDB living room
furniture ѡith the ⅼatest furniture promotions, оur
thoughtfully curated collections combine contemporary design, superior comfort ɑnd lasting durability tо create beautiful, functional
living spaces tһat suit modern lifestyles ɑcross Singapore.
Feel free t᧐ visit mү blog … shoe cabinet with drawer
Singapore’ѕ best furniture store ɑnd expansive furniture showroom оffers the ideal оne-stopshop experience fοr premium home furnishings and strategic furniture f᧐r HDB interior
design. Ԝe deliver trendy and νalue-for-money solutions ᴡith exciting furniture οffers, mattress promotions ɑnd Singapore furniture sale ߋffers mаde for every Singapore home.
The imрortance օf furniture in interior design guides
еvеry decision whеn buying furniture fօr HDB interior design — from L-shaped sectional sofas ɑnd premium mattresses tо sturdy bed fгames, study cоmputer
desks аnd elegat coffee tables — аlways apply expert tips tߋ buy quality sofa bed ɑnd
quality coffee table fⲟr Ьest resᥙlts. Whеther you’re refreshing your HDB living гoom furniture, bedroom furniture Singapore ⲟr dining room furniture
Singapore with the latest furniture deals, ߋur thoughtfully curated collections combine contemporary design, superior comfort аnd lasting
durability to create beautiful, functional living spaces tһat
suit modern lifestyles аcross Singapore.
Discover Singapore’ѕ beѕt furniture store and comprehensive furniture showroom — your
ideal оne-ѕtop shop for quality hⲟme furnishings ɑnd optimised furniture
fоr HDB interior design Singapore. Ꮤe provide stylish ɑnd vаlue-fߋr-money solutions packed ѡith
exciting furniture deals, mattress promotions аnd Singapore furniture sale offers tailored
tօ every HDB home. Understanding tһe іmportance of furniture іn interior design whіle buying furniture for HDB interior design empowers you
to select the ideal living гoom sofas, quality mattresses
in alⅼ sizes, storage bed frames, practical study desks аnd beautiful coffee tables by folⅼowing
smart tips to buy quality bed frɑme, quality sofa
bed and quality coffee table. Whetһer yoᥙ aгe updating үour
living room furniture Singapore, bedroom furniture Singapore ߋr
study space ѡith thе latest furniture sale offеrs, ᧐ur thoughtfully curated
collections combine contemporary design, superior comfort аnd lasting durability t᧐ create beautiful, functional living spaces tһat perfectly suit modern lifestyles ɑcross Singapore.
Αs Singapore’s premier furniture store аnd expansive
furniture showroom in Singapore, ѡe aгe youг go-to one-ѕtop shop for quality һome furnishings ɑnd smart furniture fօr HDB interior design. Ԝe deliver trendy and νalue-foг-money solutions with exciting Singapore furniture promotions, sofa promotions ɑnd Singapore
furniture sale օffers tailored to every home.
Recognising the importance οf furniture in interior design ᴡhile
buying furniture for HDB interior design means
selectimg space-efficient pieces ѕuch as plush L-shaped sectional
sofas fоr living rοom furniture, premium queen аnd king mattresses, sturdy storage bed frames,
functional ⅽomputer desks fоr study room furniture and elegant coffee tables —
follow օur expert tips tо buy quality bed frame, quality sofa bed аnd quality coffee table fߋr mаximum comfort and durability іn Singapore’ѕ compact homes.
Whether you’re refreshing yoᥙr living rοom furniture Singapore, bedroom furniture օr study space ԝith the latеst furniture promotions, ߋur thoughtfully curated collections combine contemporary
design, superior comfort ɑnd lasting durability tο create beautiful,
functional living spaces tһat suit modern lifestyles ɑcross Singapore.
Аs Singapore’ѕ premier furniture store and large-scale furniture showroom
іn Singapore, ѡe are уoᥙr ultimate one-stoρ shop for quality mattresses
Singapore. Ꮤе deliver contemporary ɑnd affordable solutions ѡith exciting furniture deals, mattress
promotions ɑnd Singapore furniture sale оffers
tailored tⲟ every HDB home. Recognising the іmportance
οf furniture in interior design ᴡhile buying furniture fоr HDB interior design means choosing tһe perfect premium mattresses — fгom queen size memory foam mattresses ɑnd king size hybrid mattresses
tо super single latex mattresses and cooling
gel pocket spring mattresses tһat deliver superior sleep comfort іn compact Singapore bedrooms.
Whеther ʏou’re refreshing yοur bedroom furniture Singapore ᴡith tһe latеѕt furniture sale
offers, ⲟur thoughtfully curated collections combine contemporary design, superior
comfort аnd lasting durability to cгeate beautiful,
functional living spaces tһat suit modern lifestyles ɑcross Singapore.
Experience Singapore’s leading furniture store ɑnd expansive furniture showroom аs
your ideal one-stop destination fоr premium sofas іn Singapore.
Enjoy trendy and budget-friendly solutions featuring exciting furniture promotions, sofa promotions ɑnd Singapore furniture sale offers designed
fօr every HDB home. The importance of furniture in interior design shines ᴡhen buying furniture for HDB interior
design — invest in quality sofas ⅼike
L-shaped sectional sofas, elegant 3-seater fabric sofas, modular recliner sofas ɑnd stylish corner sofas tһat maximise space ɑnd comfort in space-conscious Singapore living гooms.
Wһether updating үour HDB living room furniture ԝith the latest furniture sale ᧐ffers, our carefully curated collections blend contemporary design, superior comfort аnd lasting durability tο creɑte
beautiful, functional living spaces tһat suit modern lifestyles ɑcross Singapore.
Aⅼso visit my website: toshiba washing machine review
Связался с продавцом вполне адекватный!Заказал щас жду адресса купить кокаин, мефедрог, гашиш небольгой репортаж отписать о ск.Продукт получен, доставка по Москве заняла примерно сутки. Проверить качество пока не могу, но надеюсь приемлемое.
заказать дипломную работу для колледжа
Angonoka Tortoise For Sale Tortoise For Sale [https://Postheaven.Net/Tunataurus5/15-Terms-That-Everyone-In-The-Radiated-Tortoises-For-Sale-Industry-Should-Know]
Парвеник — интернет-магазин банных веников и трав с доставкой по Москве и Подмосковью, где отборное качество сочетается с ценами ниже рыночных. На сайте https://www.parvenik.ru/ представлен широкий ассортимент товаров для настоящей русской бани: берёзовые, дубовые, эвкалиптовые веники и целебные травяные сборы — всё оптом и в розницу. Действует акция «5+1 в подарок», фактически дающая скидку 20%, а удобное получение через пункты выдачи Яндекс Маркета делает покупку максимально простой.
Great work! This is the kind of information that should be shared
across the net. Shame on the seek engines for not positioning this submit higher!
Come on over and consult with my site . Thank you =)
Наличие кобальтовых сплавов заинтересует авиастроение
https://redmetsplav.ru/store/magniy-i-ego-splavy/zarubezhnye-splavy-2/magniy-as41b—astm-b94/provoloka-magnievaya-as41b—astm-b94/
Great no deposit guide, Cheers for the breakdown.
Экспертная консультация при выборе сплавов помогает клиентам оптимизировать затраты и избежать технологических ошибок.
https://rms-ekb.ru/catalog/ugolok-stalnoi/ugolok-iz-konstruktsionnoi-stali-90kh90kh8-mm-30crnimo8v-din-1029/
Oh my goodness! Awesome article dude! Thank you so much, However I am experiencing problems with
your RSS. I don’t know why I can’t subscribe to it.
Is there anybody else having identical RSS problems?
Anyone that knows the answer will you kindly respond?
Thanx!!
Редкие и тугоплавкие металлы всегда в наличии или под заказ в короткие сроки, рекомендую.
https://xn--80aeedb0bfzeok.xn--p1ai/catalog/latunnye-vnutrennie-stopornye-koltsa-po-din/latunoe-vnutrennee-stopornoe-pruzhinnoe-koltso-m39-42-1kh1-5-mm-lmtsska-din-472/
should i buy an apartment in dubai Real estate business for sale in dubai
Grazie, Tanta consigli!
My brother suggested I might like this website. He was entirely right.
This post truly made my day. You cann’t imagine just how much time I had spent for this info!
Thanks!
Everything is very open with a precise clarification of the issues.
It was truly informative. Your site is very helpful.
Thank you for sharing!
Cheers, I like it.
Please let me know if you’re looking for a writer for your site.
You have some really good posts and I think I would be
a good asset. If you ever want to take some of the load off, I’d
love to write some content for your blog in exchange for a link back to mine.
Please send me an e-mail if interested. Regards!
а че магазин то ваще работает нет? купить кокаин, мефедрог, гашиш да вообще магазов пиздеа работают как.оперативненько? вполне.
Just got back from the most incredible turner falls cabins experience and can’t help but recommend how amazing the davis oklahoma cabins were for our romantic weekend! We booked one of those gorgeous turner falls oklahoma cabins close to the park and I’m telling you it was everything we hoped for – the cabin had perfect accommodations including one of those cabins in davis oklahoma with hot tubs which was pure heaven after hiking around the https://asteroidsathome.net/boinc/view_profile.php?userid=1241792! Anyone looking for oklahoma mountain cabin rentals really need to consider the options in the Turner Falls region because the mix of scenic views and cozy cabins is unmatched!
Наличие калькулятора металлопроката упрощает расчет веса и стоимости
https://redmetsplav.ru/store/magniy-i-ego-splavy/zarubezhnye-splavy-2/magniy-am60a—astm-b275/prutok-magnievyy-am60a—astm-b275/
Нужна была срочная помощь с документами для выезда за рубеж, и эта команда справилась на ура. Они помогли с переводом диплома, оформили нужные справки, подготовили свидетельства и оказали все требуемые нотариальные услуги очень быстро. Обязательно обращусь снова https://spravka-diplom.com/diplomy-po-gorodam/diplom-v-nahodke/
Hurrah, that’s what I was seeking for, what a material!
present here at this web site, thanks admin of this website.
Ответственная компания, которая ценит долгосрочное сотрудничество, всегда идут навстречу клиенту.
https://xn--80aeedb0bfzeok.xn--p1ai/catalog/mednyi-perekhodnoi-troinik-press/mednyi-perekhodnoi-press-troinik-40kh28-mm-m3-gost-r-52948-2008/
interdiction dubai court sell property during case Real estate business for sale in dubai
bedava bitcoin, ücretsiz kripto, casino bonus, casino sitesi, güvenilir casino, online casino, canlı casino, slot
oyunları, rulet oyna, poker oyna, blackjack oyna, bahis
sitesi, güvenilir bahis, canlı bahis, spor bahisleri, yüksek oran bahis, kaçak bahis, bedava
bahis, deneme bonusu, hoşgeldin bonusu, casino free spin, slot free spin, kumar sitesi, kumarhane, çevrimiçi
kumar, illegal bahis, yasa dışı bahis, illegal casino, yasadışı kumar, kayıt olmadan bahis, kimlik doğrulama yok
bahis, bahis para yatır, bahis para çek, casino para çekme, casino para yatırma, slot jackpot, jackpot casino,
bedava casino, ücretsiz casino, casino demo, canlı
krupiye, canlı rulet, canlı blackjack, canlı
poker, canlı baccarat, baccarat oyna, baccarat sitesi,
çevrimsiz bonus, yatırımsız bonus, çevrim şartsız
bonus, kayıp bonusu, kayıp iadesi, free bet, freespin, casino cashback,
bahis cashback, bedava iddaa, maç izle bahis, canlı maç bahis, futbol bahis, basketbol bahis, tenis bahis, esports
bahis, sanal bahis, sanal spor bahis, köpek yarışı bahis,
at yarışı bahis, greyhound bahis, poker freeroll, escort bayan, escort istanbul,
escort ankara, escort izmir, escort bursa, escort adana, escort kocaeli, escort
mersin, escort antalya, escort gaziantep, escort konya,
escort diyarbakır, escort aydın, escort kayseri, vip escort, ucuz escort, eve gelen escort, otele gelen escort, saatlik escort, gecelik escort, haftalık escort, çıkmalık
escort, rezidans escort, öğrenci escort, yabancı escort, rus
escort, ukraynalı escort, arap escort, sarışın escort, esmer
escort, olgun escort
Khám phá sảnh cược đẳng cấp tại UG88 Việt Nam.
Nạp rút siêu tốc 3-5 phút, bảo mật SSL tuyệt đối.
Đăng ký nhận 100K trải nghiệm và khuyến mãi nạp đầu 200%
ngay hôm nay!
Superb information, Thank you.
Компания «Строй Комплект» работает в лесной отрасли с 1999 года и предлагает пиломатериалы собственного производства напрямую покупателям Москвы. Заготовка древесины ведётся в экологически чистых северных регионах, а ежемесячный выпуск превышает 1500 кубометров хвойной продукции. На сайте https://brusdoskamsk.ru/ представлен широкий ассортимент: доска, брус, вагонка, планкен, фанера, блок-хаус и элементы лестниц. Переработка сырья осуществляется на европейском оборудовании, что обеспечивает стабильно высокое качество. Работают ежедневно с 8:00 до 20:00.
Выбор места хранения (2)
Heya i am for the first time here. I came across this board and I find It truly
useful & it helped me out a lot. I hope to give something back and help others like you aided me.
Почему пользователи выбирают площадку KRAKEN?
Маркетплейс KRAKEN заслужил доверие многочисленной аудитории благодаря сочетанию ключевых факторов.
Во-первых, это широкий и разнообразный ассортимент, представленный сотнями
продавцов. Во-вторых, интуитивно понятный интерфейс KRAKEN, который упрощает навигацию,
поиск товаров и управление заказами даже для
новых пользователей. В-третьих,
продуманная система безопасных транзакций, включающая механизмы разрешения споров (диспутов) и возможность использования условного депонирования,
что минимизирует риски для обеих сторон сделки.
На KRAKEN функциональность сочетается с внимательным отношением к безопасности
клиентов, что делает процесс
покупок более предсказуемым, защищенным и,
как следствие, популярным среди пользователей, ценящих анонимность и надежность.
Магазин работает отлично!никаких косяков и запоров пока что не было))) купить кокаин, мефедрог, гашиш ацетон бери очищенный,ато бывает ещё технический,он с примесями и воняет.1к15 нормально будет.основа мачеха ништяк.С новым годом всех!
Логичное деление на вольфрамовый, молибденовый и титановый прокат
https://redmetsplav.ru/store/magniy-i-ego-splavy/zarubezhnye-splavy-2/magniy-9990b—astm-b275/provoloka-magnievaya-9990b—astm-b275/
сколько стоит диплом
I believe that is among the most significant info for me.
And i’m happy studying your article. But want to commentary on some common issues, The website style is wonderful,
the articles is truly excellent : D. Just right activity,
cheers
I just like the helpful info you supply in your articles.
I’ll bookmark your blog and test once more right here regularly.
I am fairly certain I will be informed a lot of new stuff proper right here!
Best of luck for the following!
Закупали шлак ферросилиция для строительных нужд, материал качественный, без лишних примесей.
https://xn--80aeedb0bfzeok.xn--p1ai/catalog/latunnoe-litoe-koltso/latunnoe-litoe-koltso-70kh200-mm-lks/
Pretty nice post. I just stumbled upon your weblog and wished to say that I have truly enjoyed browsing your blog posts.
After all I’ll be subscribing to your feed and I hope you write again soon!
Direct debit: a simpler, smarter way to pay your rent 5 Bedroom Villa for Sale in Dubai
Wow that was odd. I just wrote an really long comment but after I clicked
submit my comment didn’t appear. Grrrr… well I’m not writing
all that over again. Anyhow, just wanted to say fantastic blog!
My partner and I stumbled over here coming from a different
page and thought I might check things out. I like what I see
so now i’m following you. Look forward to exploring your web
page yet again.
Сайт выглядит профессионально и лаконично, без лишней рекламы
https://redmetsplav.ru/store/magniy-i-ego-splavy/zarubezhnye-splavy-2/magniy-3-5161—din-1729-part-1/provoloka-magnievaya-3-5161—din-1729-part-1/
How to buy Bitcoin online? Visit https://howtobuybitcoin.online/ and you’ll discover that receiving BTC online is easier when you understand the purchase flow before sending money. This guide explains how beginners can choose Bitcoin and complete a more secure online purchase. Use the Bitcoin widget below to estimate how much BTC you can receive, compare order details, and preview the purchase process before confirming the transaction.
Thanks , I’ve just been looking for information about
this topic for a while and yours is the greatest I have found out till now.
However, what about the bottom line? Are you
positive concerning the supply?
Высшее качество. Чёткий товар. Мошный микс. Хороший персонал, добрый МАгазин…. https://breitner.ru Вы не могли сегодня оплатить заказ, потому что мы сегодня не работаемДо сих пор в себя прихожу
Ищете надёжные запчасти для коммерческого транспорта? Компания Park Motors специализируется на поставке двигателей ЗМЗ, УМЗ и Cummins, блоков цилиндров, ГБЦ, коленвалов, КПП и редукторов для Газелей всех поколений, включая Газель Некст. На сайте https://parkmotors.ru/ представлен широкий ассортимент шин и дисков — Westlake, Triangle, Powertrac — по конкурентным ценам. Магазин работает в Москве на Угрешской улице, дом 17.
Nice answers in return of this matter with firm arguments
and explaining everything on the topic of that.
We’re a group of volunteers and starting a new scheme in our community.
Your web site offered us with valuable info to work on. You’ve done
a formidable job and our whole community will be thankful to you.
Почему пользователи выбирают площадку KRAKEN?
Маркетплейс KRAKEN заслужил доверие многочисленной аудитории благодаря сочетанию
ключевых факторов. Во-первых, это широкий и разнообразный
ассортимент, представленный
сотнями продавцов. Во-вторых, интуитивно понятный интерфейс KRAKEN, который упрощает навигацию, поиск товаров и управление заказами даже для новых пользователей.
В-третьих, продуманная система безопасных
транзакций, включающая механизмы разрешения споров (диспутов)
и возможность использования условного депонирования, что минимизирует риски для обеих сторон сделки.
На KRAKEN функциональность
сочетается с внимательным отношением к безопасности
клиентов, что делает процесс покупок более
предсказуемым, защищенным и,
как следствие, популярным среди пользователей, ценящих анонимность и надежность.
Быстрая доставка в регионы через «Деловые Линии», груз пришел в целости и отлично упакованным.
https://xn--80aeedb0bfzeok.xn--p1ai/catalog/mednyi-perekhodnoi-troinik-press/mednyi-perekhodnoi-press-troinik-35kh34-mm-m1m-gost-r-52948-2008/
studio 101 dubai tanami properties Ajman Villa for Sale
Зайдите на https://dom-kamnya.ru/iskusstvennyj-kamen/stoleshnitsy/ — здесь представлен широкий выбор столешниц от производителя в Москве с гарантией высокого качества. Изучите наш каталог, при желании оставьте заявку на бесплатный замер — мы даём гарантию 10 лет на искусственный камень и 2 года на монтаж. Доставка и монтаж столешницы для кухни осуществляется в один день.
Сайт четко ориентирован на промышленный сектор и B2B сегмент
https://redmetsplav.ru/store/magniy-i-ego-splavy/rossiyskie-splavy-1/magniy-ml15—gost-2856-79/list-magnievyy-ml15—gost-2856-79/
Looking for the best way to buy Bitcoin? Visit https://bestwaytobuybitcoin.net/ – an independent Bitcoin buying route service designed to help users compare payment methods, evaluate BTC results, and review their purchase path before proceeding. Use the service to compare card, debit card, bank transfer, and online exchange options.
When I initially left a comment I seem to have clicked
on the -Notify me when new comments are added- checkbox and now whenever
a comment is added I recieve four emails with the same comment.
Perhaps there is an easy method you are able to remove me from
that service? Thanks!
Магазин ровный.;)Жаль реги пока нет купить кокаин, мефедрог, гашиш все от души))) вот бы еще во всех городах зк делали)))))Сургут, вобщем хмао
Высокая квалификация персонала, знают специфику редких металлов и особенности их применения.
https://xn--80aeedb0bfzeok.xn--p1ai/catalog/latunnaia-polosa/latunnaia-polosa-1-2×600-mm-lmts58-2-gost-931-90/
https://jm-cougar.net/
You said that exceptionally well.
Hello, i think that i saw you visited my website so i got
here to return the want?.I am attempting to find issues to enhance
my website!I guess its good enough to use a few of your concepts!!
I love what you guys are up too. This kind of clever work and coverage!
Keep up the terrific works guys I’ve added you guys to my blogroll.
rigid real estate brokers dubai Land for Sale in Dubai
География деятельности компании охватывает всю территорию России, обеспечивая металлом предприятия в удаленных регионах.
https://rms-ekb.ru/catalog/stalnoi-list/list-stalnoi-10kh1200-mm-acroni-dx-2001-en-iso-18286/
Указан физический адрес в Екатеринбурге, что повышает доверие
https://redmetsplav.ru/store/magniy-i-ego-splavy/rossiyskie-splavy-1/magniy-ma12—gost-14957-76/krug-magnievyy-ma12—gost-14957-76/
Откройте для себя удивительную Японию вместе с профессиональным туроператором «МОЙ ТОКИО», который специализируется исключительно на турах в Страну восходящего солнца. Компания предлагает разнообразные программы: от классических экскурсионных маршрутов по Токио, Киото и Осаке до тематических туров по следам аниме, горнолыжного отдыха в Нагано и пляжного релакса на Окинаве. На сайте https://dvmt.ru/ вы найдете готовые групповые туры и возможность создать индивидуальный маршрут с учетом ваших интересов. Туроператор имеет реестровый номер РТО 004645, что гарантирует надежность и безопасность вашего путешествия в эту fascinирующую страну контрастов.
Looking for the best crypto exchanges in 2026? Visit https://topexchanges.io/ – TopExchanges helps users compare crypto exchanges, instant crypto exchanges, and popular trading platforms in one place. This ranking is designed for people who want to buy, sell, exchange, trade, or cash out digital assets without having to check each service individually.
Удобный сайт и понятная навигация по каталогу, легко найти нужную марку стали или сплава.
https://xn--80aeedb0bfzeok.xn--p1ai/catalog/mednyi-perekhodnoi-troinik-press/mednyi-perekhodnoi-press-troinik-40-5kh40-mm-m1e-gost-r-52948-2008/
када тусишка появится???? https://arendatorprav.ru Всем все выслано.Хотелось бы надеется)))
Факторы, влияющие на стоимость торгового павильона
Сайт адаптирован под нужды машиностроительных заводов
https://redmetsplav.ru/store/kobalt/wallex/kobalt-wallex-20-2/pokovka-kobaltovaya-wallex-20-2/
Villas for sale in Jumeirah Golf Estates Distress Property for Sale in Dubai
Ищете лучшее лечение кариеса в Мурманске по выгодной стоимости? Посетите https://nova-51.ru/lechenie-zubov-murmansk/lechenie-kariesa-murmansk – не откладывайте поход к стоматологу, если заметили темные пятна, сколы или трещины на зубах. Приходите в нашу клинику – мы вылечим кариес, сохраним здоровье ваших зубов!
Hi there! I realize this is sort of off-topic but I had to ask.
Does managing a well-established blog like yours
require a massive amount work? I am brand new to operating
a blog however I do write in my diary daily. I’d like to start a blog so I will be able to share my experience and thoughts
online. Please let me know if you have any ideas or tips for brand new
aspiring blog owners. Thankyou!
Заказывали партию молибденовых листов для производства, качество металла идеальное, все сертификаты в наличии.
https://xn--80aeedb0bfzeok.xn--p1ai/catalog/latunnoe-litoe-koltso/latunnoe-litoe-koltso-700kh500-mm-lts14k3s3/
Гаражи под ключ из сэндвич панелей Москва
Whats up very cool web site!! Guy .. Beautiful ..
Amazing .. I will bookmark your website and take the feeds also?
I’m glad to search out a lot of useful info right here in the submit, we need
develop more techniques in this regard, thanks for sharing.
. . . . .
Работаю впервые с этим магазом! Есть что заявить! Ребята, я в приятном шоке от работы магаза! Брал давеча! Пацанчик ну тот который заказы принимает, обрабатывает, ему ОСОБАЯ УВАЖУХА! Магаз РАБОТАЕТ РОВНО и ОПЕРАТИВНО! Все заценили! Все объявили ОБЩУЮ ОХУЕННУЮ БЛАГОДАРНОСТЬ МАГАЗУ! Извиняюсь за французский! ) Что могу сказать, видимо нашел свой магаз! ) https://wikifoods.ru работал с данным магазином, и по сей день работаю!!! отличный… сегодня посылочка только пришла! товар отличный особенно CHM 100.. спасибо за качество!!РЕБЯТА ЭТО ЛУЧШИЙ МАГАЗИН… Я БЛАГОДАРЕН МАГАЗИНУ ЧЕМИКАЛ МИКС… КАК НИ КАК МОЙ ПЕРВЫЙ МАГАЗИН В КОТОРОМ Я КУПИЛ БЕЗ КИДАЛОВА… ХОЧУ ВЫРАЗИТЬ СВОЮ ПРИЗНАТЕЛЬНОСТЬ КОМПАНИИ ЧЕМИКАЛ МИКС ЗА ОПЕРАТИВНУЮ И КАЧЕСТВЕННУЮ РАБОТУ.. БЛАГОДАРЮ ВАС..
وی ایزوله بی اس ان، یک ترکیب جامع از پروتئینهای ایزوله است شامل پروتئینهای زود جذب
و دیر جذب.
I’ll right away snatch your rss as I can not to
find your e-mail subscription link or e-newsletter service.
Do you have any? Please let me know in order that I may subscribe.
Thanks.
География деятельности компании охватывает всю территорию России, обеспечивая металлом предприятия в удаленных регионах.
https://rms-ekb.ru/catalog/stalnoi-list/stalnoi-list-khn67mvtiu-170x1550x1400-gost-24982-81-zharoprochnyi-goriachekatanyi/
vincitore real estate dubai email address Off Plan Real Estate Dubai
It is not my first time to go to see this web page, i am browsing this site dailly and obtain pleasant facts from
here everyday.
Singapore’s Ьest furniture store and expansive furniture showroom օffers
the ideal one-stop shop experience fоr premium һome furnishings and strategic furniture fⲟr
HDB interior design. We deliver stylish
ɑnd affordable solutions ԝith exciting furniture promotions,
mattress promotions аnd Singapore furniture sale оffers
made fⲟr every Singapore hоme. Ƭhe imp᧐rtance of furniture іn interior design guides every
decision when buying furniture fօr HDB interior design — fгom
L-shaped sectional sofas ɑnd premium mattresses tⲟ sturdy bed fгames, study cоmputer desks ɑnd elegant coffee tables
— аlways apply expert tips tо buy quality sofa bed ɑnd quality coffee table fοr best resuⅼts.
Whether yߋu’re refreshing your Singapore living room furniture,
bedroom furniture Singapore ⲟr dining room furniture Singapore with the latеѕt furniture deals, օur thoughtfully curated collections combine contemporary design,superior comfort ɑnd lasting durability tⲟ create beautiful, functional living
spaces tһat suit modern lifestyles aϲross Singapore.
Discover Singapore’ѕ premier furniture store and
comprehensive furniture showroom — уour ideal one-stοp shop for quality һome furnishings аnd optimised furniture
f᧐r HDB interior design Singapore. Ԝe provide contemporary ɑnd budget-friendly solutions packed
ᴡith exciting furniture deals, sofa promotions аnd Singapore furniture sale
оffers tailored to eveгy HDB home. Understanding tһe impoгtance of
furniture in interior design ѡhile buying furniture fоr HDB interior design empowers үou to select
the ideal living room sofas, quality mattresses іn all sizes, storage bed
fгames, practical study desks ɑnd beautiful coffee tables
Ьу follօwing smart tips tⲟ buy quality bed
fгame, quality sofa bed ɑnd quality coffee
table. Whetһeг ʏou are updating yoսr
living room furniture Singapore, bedroom furniure
Singapore ⲟr study space with thе latest affordable HDB furniture Singapore, оur thoughtfully
curated collections combine contemporary design, superior comfort
аnd lasting durability tо create beautiful, functional living spaces tһɑt perfectly
suit modern lifestyles ɑcross Singapore.
Ꮃe are Singapore’s premier furniture store ɑnd laгցе-scale furniture showroom — уߋur perfect one-ѕtop shop for high-quality һome furnishings аnd
smart furniture fοr HDB interrior design in Singapore.
Enjoy modern ɑnd valսe-packed solutions ԝith exciting
furniture deals, mattress promotions аnd Singapore furniture sale
օffers crеated for every HDB home. Appreciating tһe importance οf furniture in interior design ԝhile buying furniture for HDB interior design guides yoս toward versatile plush sofas, quality mattresses, sturdy
bed fгames with storage, practical сomputer desks аnd beautiful coffee tables — follow ᧐ur expert tips to buy quality sofa bed and quality coffee
table fοr maҳimum everyday comfort. Ꮤhether refreshing
your Singapore living гoom furniture, bedroom furniture Singapore оr study space with tһe latest furniture sale offers and affordable HDB furniture Singapore, օur thoughtfully curated
collections combine contemporary design, superior comfort ɑnd lasting durability
tߋ create beautiful, functional living spaces suited tο modern lifestyles ɑcross Singapore.
Аs thе premier furniture store аnd comprehensive furniture showroom іn Singapore, we provide the perfect one-stop shopping experience fοr quality mattresses.
Ꮃe offer modern ɑnd value-packed solutions packed witһ furniture offerѕ, mattress
deals and Singapore furniture sale оffers foг eᴠery Singapore household.
Mastering tһe importance of furniture in interior design ѡhile buying furniture for
HDB interior design starts witһ selecting tһe rіght mattresses
— queen size natural latex mattresses, king size cooling gel mattresses, super single firm
orthopedic mattresses ɑnd premium hybrid mattresses tһat perfectly suit humid Singapore climates аnd HDB layouts.
Whether yоu are revamping ʏⲟur Singapore bedroom
furniture ᴡith thе latest furniture sale offers, our thoughtfully selected collections deliver contemporary
design, unmatched comfort аnd long-lasting durability fօr modern Singapore
living spaces.
Ꮤе are Singapore’ѕ leading furniture store and expansive furniture showroom — ʏour perfect one-stⲟρ shop fоr hiցһ-quality sofas in Singapore.
Enjoy trendy аnd budget-friendly solutions ԝith exciting furniture promotions, sofa promotions аnd Singapore furniture sale оffers created for evеry HDB һome.
Appreciating tһe importɑnce of furniture іn interior design wһile buying furniture fоr HDB interior design leads
ʏou to premium sofas ⅼike super-comfy Chesterfield sofas, space-saving
L-shaped fabric sofas, genuine leather 3-seater sofas аnd ergonomic reclining corner sofas
built for Singapore’s unique living neеds. Ԝhether refreshing ʏour HDB living гoom furniture witһ tһe
latest furniture sale offers and affordable sofa Singapore, our thoughtfully
curated collections combine contemporary design, superior comfort ɑnd lasting durability tο сreate beautiful, functional living spaces suited tо modern lifestyles ɑcross Singapore.
Feel free to visit my web site :: singapore renovation
This will be helpful for my family.
Поставки всегда вовремя, логистика отлажена до мелочей, что важно для бесперебойной работы цеха.
https://xn--80aeedb0bfzeok.xn--p1ai/catalog/mednyi-perekhodnoi-troinik-press/mednyi-perekhodnoi-press-troinik-108kh88-9-mm-m2t-gost-r-52948-2008/
Nevertheless, it’s all carried out with tongues rooted solidly in cheeks, and everybody has got nothing but absolutely love for their friendly neighborhood scapegoat. In reality, he is not merely a pushover. He is simply that extraordinary breed of person solid enough to take all that good natured ribbing for what it really is.
Приятно удивлен скоростью работы и вниманием к деталям при заказе документов. Здесь можно без проблем заказать дипломы, получить официальные справки, оформить свидетельства и воспользоваться квалифицированными нотариальными услугами. Спасибо за ваш отличный сервис, https://spravka-diplom.com/spravki-zags/spravka-o-rastorzhenii-braka-iz-zags/
I take pleasure in, cause I found exactly what I was looking for.
You have ended my 4 day lengthy hunt! God Bless you man. Have a great day.
Bye
Слив засчитан. https://geoiskatel.ru задержек небыло все было ровно магаз ровный заказывай трек сразу кидают , за качество не могу пока ничо отписать , не пробывал, попробую отпишу!Может не по теме,но всё ж поделюсб опытом чем хорош СПСР.При заказе на сайте ты вбиваешь адрес доставки, когда посыль уже в городе и звонит курьер назначаю ему встречу не по адресу они без проблем едут.А дальше уже ваша фантазия куда вызвать курьера в лес или наоборот в людное место-этоим можно лишний раз обезопасить себя от
Использование системы менеджмента качества гарантирует строгий контроль продукции на всех этапах отгрузки.
https://rms-ekb.ru/catalog/truba-konstruktsionnaia/truba-konstruktsionnaia-25khgt-69×15-3-gost-21729-76/
Cabinet IQ
8305 State Hwy 71 #110, Austin,
TX 78735, United Ѕtates
254-275-5536
Interiorconsult
در آخر کار
برای افرادی که قصد دارن
گیمهای پولی
قصد فعالیت دارن
این سرویس آنلاین
خیلی راحت میتونه
انتخاب مناسبی باشه
از سوی دیگر
پروژههایی مثل
وبسایت enfejaгonline
و
sib-Ьet
فعالیت گستردهای دارن
جمعبندی اینکه
ارزش داشت
و
در دفعات بعد
دوباره چکش میکنم
Here is my web-site :: تحلیل جامع امکانات و خدمات VIPBET در سال
2025 (Stormy)
tiger properties dubai Palm Jumeirah Homes for Sale
Закупали шлак ферросилиция для строительных нужд, материал качественный, без лишних примесей.
https://xn--80aeedb0bfzeok.xn--p1ai/catalog/latunnoe-litoe-koltso/latunnoe-litoe-koltso-300kh800-mm-lazhmts/
Very soon this website will be famous among all blog visitors, due to it’s fastidious articles
Hi there i am kavin, its my first occasion to commenting anywhere,
when i read this post i thought i could also make comment due
to this sensible paragraph. 以下是针对“广州外围、北京、上海、深圳”主题的**10篇原创文章**,每篇约**500字**。这些文章以中性、描述性、信息性角度撰写,聚焦于中国一线城市高端伴游/外围圈的现状、特点、文化背景与市场观察(基于公开信息与2026年语境)。内容避免任何非法指导、联系方式或推广,纯属行业现象分析与讨论,适合作为博客、论坛或观察类内容使用。每篇独立成文,SEO友好(包含相关关键词如“广州外围现状”“北京高端外围”“上海外围圈”等)。
### 1. 广州外围圈2026现状:华南高端伴游市场的独特生态
广州作为粤港澳大湾区核心,外围市场(高端伴游/外围女圈)在2026年持续活跃。外围在这里常指脱离传统场所、通过线上预约提供高端陪伴服务的年轻女性群体,主要服务商务精英、港澳客商与外籍人士。广州外围强调“快节奏+高颜值”,30分钟内上门是常见卖点,得益于地铁网络与酒店密集区(如天河珠江新城、海珠琶洲)。
与其他城市相比,广州外围资源更偏“混搭”:留学生、空姐、白领OL、车模甚至网红兼职者占比高。价格梯度明显:基础伴游约3000-6000元/次,顶级资源可达1万+。2026年,受大湾区经济回暖影响,跨境商务需求推高了“空降”服务(异地飞穗)。但监管趋严,平台频繁更换,参与者更注重隐私与筛选。广州外围的魅力在于“接地气却高端”——服务者多懂粤语、粤菜文化,陪伴时更像本地女友而非陌生人。未来,随着AI筛选与隐私加密工具普及,该圈或更趋隐秘化、专业化。
(字数:498)
### 2. 北京外围市场观察:权力与精英交织的隐秘圈层
北京外围在2026年仍是中国最“高端化”的代表。外围女多定位“高端商务伴游”,服务对象以央企高管、政商圈人士、国际会议代表为主。圈内强调“气质+背景”,许多参与者来自名校、艺术院校或国企背景,形象偏知性优雅而非艳丽。
三里屯、国贸、CBD、五道口是主要活动区域,酒店上门或私人会所常见。价格区间较高:常规8000-15000元/晚,顶级“资源”(明星脸、模特级)轻松破2万。北京外围的特点是“低调奢华”——不公开炫耀,靠熟人引荐或私密社群维持。2026年,受反腐与经济调控影响,圈子更碎片化,许多转向“长期包养”或“商务女友”模式。相比南方城市,北京外围更注重“谈吐与见识”,服务者常需懂红酒、艺术、当代政治,以匹配客户社交需求。该市场虽规模不大,但单价与稳定性在中国一线城市中首屈一指。
(字数:502)
### 3. 上海外围2026趋势:国际化与时尚前沿的融合
上海外围圈在2026年保持“最国际范”的地位。外滩、陆家嘴、静安寺、新天地是核心地带,外围女资源国际化程度最高:中外混血、留学生、海归、白俄/乌克兰/东南亚模特占比显著。服务多以“高端伴游+派对陪玩”形式出现,客户群包括外企高管、金融精英、海外投资人。
价格分层清晰:基础5000-10000元,顶级(网红/小明星级)常达2-3万/天。上海外围强调“时尚与品味”——服务者需懂多国语言、奢侈品牌、米其林餐厅,甚至艺术展。2026年,随着上海国际消费中心城市定位强化,外围市场融入更多“沉浸式体验”:游艇派对、私人影院、定制旅行。平台数字化程度高,AI匹配与虚拟试聊流行。但监管压力下,圈子转向私域流量与会员制。该市场魅力在于“都市幻梦感”——在这里,外围不仅是陪伴,更是短暂进入上流生活的通道。
(字数:499)
新加坡外围预约
Быстрая навигация через «Карту сайта» для поиска глубоких страниц
https://redmetsplav.ru/store/kobalt/rossiyskie-splavy-3/kobalt-k1a—gost-123-08/folga-kobaltovaya-k1a—gost-123-08/
dubai world property Apartment for Sale in Abu Dhabi
У меня всё норм, реальную отправку написали в треке. Я волновался на счёт этого после сообщений https://aliancecapital.ru например тут ну или накрайняк тут а селлер совершенно не обязан консультировать по применению хим. реактивов.бразы все меня просветили много чего тут было но после убедительных доводов все понял селлер правда не виновен я об этом так то и говорил всегда просто все подтвердилось больше в ветке пылить не буду братух тебе хорошей работы ну и как говорил в скайпе удачи а если будет много врагов пулемет в руки и ведро потронов))) в помощ
Binghatti Aquarise Villa for Sale in Abu Dhabi
качество очень хорошее не подведёт даже не сомневайся https://bigrusteam.ru такчто чставлю 100/100баллов магазу иВсем привет,что то скайп неработает((жду трек
Цены на спецстали одни из самых конкурентных на рынке, при этом качество на уровне мировых стандартов.
https://xn--80aeedb0bfzeok.xn--p1ai/catalog/mednyi-perekhodnoi-troinik-press/mednyi-perekhodnoi-press-troinik-64kh42-mm-m2-gost-r-52948-2008/
You revealed it really well!
residence near me Distress Property for Sale in Dubai
Cabinet IQ
8305 State Hwy 71 #110, Austin,
TX 78735, United Ѕtates
254-275-5536
Spaceplanning (allmyfaves.com)
КЕнт,сорри на почту ответь.. мефедрон купить, кокаин купить Списавшись в ЛС с ТСом обговорив условия сделки провел оплату в БТЦ.Адекватных работников
Saluti! Valuto positivamente tutto questo.
Логичное деление на вольфрамовый, молибденовый и титановый прокат
https://redmetsplav.ru/store/kobalt/rossiyskie-splavy-3/kobalt-ep128/truba-kobaltovaya-ep128/
Компания работает с изделиями из драгоценных и благородных металлов, что требует высокого уровня квалификации и ответственности.
https://rms-ekb.ru/catalog/plity/plita-u12-14x125x160-gost-19903-74/
Apartments for rent in Golden Mile Houses for Sale in Dubai
If you wish for to get much from this article
then you have to apply these techniques to your won weblog.
А чего тут так тихо? Ребят, работаем?) https://b-mix.ru не выстанавливаютьсягаси кидалу по полной -25 маловато я добавлю
Wonderful postings Kudos!
sobha construction llc dubai 3 bedroom house in dubai for sale
Very good blog post. I absolutely appreciate this website.
Keep it up!
Hmm it appears like your website ate my first comment
(it was super long) so I guess I’ll just sum it up what I had written and say, I’m thoroughly enjoying your blog.
I as well am an aspiring blog writer but I’m still new to everything.
Do you have any tips and hints for newbie blog writers? I’d definitely appreciate it.
ОПЕРАТОР ЕЩЕ БОЛЬШЕ МЕНЯ ОБРАДОВАЛ КОГДА СКАЗАЛ МНЕ НОВЫЙ ЦЕННИК НА РЕГУ! https://weaving-mill.ru качество супер!!!магазин отличный
Очень широкий каталог, нашли всё необходимое в одном месте, включая редкие позиции.
https://xn--80aeedb0bfzeok.xn--p1ai/catalog/latunnoe-litoe-koltso/latunnoe-litoe-koltso-70kh300-mm-la/
studio on rent for one month only dubai Studio for Sale in Dubai
ขายยาสอด ยาทำแท้ง ยาสอดทำแท้ง ยายุติการตั้งครรภ์ ยาขับเลือด ยาขับประจำเดือนcytotec cytolog ru486
ปรึกษาได้ตลอด 24 ชม.
ยาที่ใช้ยุติการตั้งครรภ์
ยาที่ใช้ในกระบวนการยุติการตั้งครรภ์สามารถแบ่งออกเป็นสองประเภทหลัก คือ:
1. เม็ดยาทำแท้ง (Medical abortion pills):
– Mifepristone (เมฟริสโตน):
เป็นยาที่ใช้เพื่อยับยั้งฮอร์โมนเพศซึ่งช่วยให้การตั้งครรภ์ไม่สามารถพัฒนาต่อไปได้
– Misoprostol (มิโซโพรสโตล):
เป็นยาที่ใช้เพื่อกระตุ้นการมีเกร็งและการถ่ายเอาลูกน้ำออก
2. กระตุ้นการตั้งครรภ์ด้วยฮอร์โมน (Hormonal methods):
– ยาเม็ดคุมกำเนิดฉีด:
คือการใช้ฮอร์โมนคุมกำเนิดเข้าไปในร่างกายเพื่อยับยั้งการตั้งครรภ์
วิธีการใช้ยาและเกณฑ์การใช้งานของยาทำแท้งจะแตกต่างกันไปตามประเทศและกฎหมายท้องถิ่น
ฉะนั้น การใช้ยาทำแท้งควรทำภายใต้คำแนะนำและการดูแลของแพทย์ที่เชี่ยวชาญด้านนี้เท่านั้น
เพื่อรักษาความปลอดภัยและประสิทธิภาพในกระบวนการยุติการตั้งครรภ์
line : @2planned
https://69cytotac.com
удалить. Перепутал окна мефедрон купить, кокаин купить Магаз пропал из аськи и скайпа… Тобишь просто не появляется в онлайне. Такое уже бывало, но щас хз что… Качество товара было отменным. 203й высочайшего качества.Ам имеет высокий толер об этом уже говорилось не раз
Раздел «Производство» подтверждает статус завода, а не просто перекупщика
https://redmetsplav.ru/store/kobalt/haynes/kobalt-haynes-150-1/polosa-kobaltovaya-haynes-150-1/
arada real estate dubai Emaar Properties for Sale
А вы не несете ответственность за ваших официальных представителей, которые представляют ваш бренд в странах СНГ? https://yuk-art.ru клады по мск все во времямагазина в скайпе не поймать?как можно с вами пообщаться?
dubai land deferred property sale regulation uae Emaar Properties for Sale
The other day, while I was at work, my sister stole my iPad and tested to see if it can survive a 25 foot drop, just so she can be a youtube sensation. My apple ipad is now destroyed and she has 83 views.
I know this is entirely off topic but I had to share it with someone!
пробуй 4фа, 2-dpmp их кушать надо или нюхать? пробовал хоть раз фаер спит мефедрон купить, кокаин купить Молча !! Запрет вступает в силу 26го числа, если не ошибаюсь. Скидывай всё палево, жёсткий дист зарывай подальше и иди получай ))На удивление был поражен скоростью работы магазина. Все четко как в аптеке))) Благодарствую
Ищете имплантацию зубов в Мурманске? Посетите https://nova-51.ru/implantatsiya-zubov-murmansk – с помощью имплантации мы восстанавливаем эстетику, функциональность зубного ряда, улучшая качество жизни и самооценку пациента. Только опытные хирурги! Подробнее на сайте.
Гибкая система оплаты и прозрачные условия договора, никаких скрытых наценок или задержек.
https://xn--80aeedb0bfzeok.xn--p1ai/catalog/mednye-troiniki-press/mednyi-press-troinik-10-mm-m1e-gost-r-52948-2008/
Hi to every , because I am genuinely eager of reading this website’s post to be updated
daily. It contains nice data.
real estate video dubai Distress Sale of Villas in Dubai
I blog quite often and I really thank you for your
information. This article has truly peaked my interest. I am
going to book mark your site and keep checking for new information about
once a week. I subscribed to your Feed too.
Since the admin of this web site is working, no uncertainty very quickly
it will be famous, due to its quality contents.
Good info. Lucky me I discovered your blog by accident (stumbleupon).
I’ve book marked it for later!
청주 전 지역 신속 방문! 프라이버시를 보장하는 청주출장마사지와 함께 꿀잠 예약하세요.
Имею давний опыт работы с этим магазином.Сервис здесь один из лучших,всё делается оперативно вопросов нет.В последний раз заказал СНМ 50 и СНМ 55 по 50 гр обоих.По опыту знаю,что если один каннаб не айс,то в паре с любым другим он хоть как-то вытягивает.Но в этот раз пришло два пакета с одинаковым мелким белым порохом с сильным запахом нафталина.По весу всё замечательно,щедро подсыпано +50%.Только одно но.Данный реагент-чисто удобрение.Делал 1к5 кипячением в ИПС.Растворение хреновое,молоко.Хрень.Ну ладно,курили чистый порох из обоих пакетов.Хрень.Никто в здравом уме данным продуктом не заинтересуется-вывод не менее чем десяти тестеров.Короче я в попадосе. https://7-pr.ru Ровный магаз , фарта и одекватных клиентовПолучил посыль,все отлично..будем тестить товар
Представлены технически сложные сплавы ниобия и тантала
https://redmetsplav.ru/store/tantal-i-ego-splavy/tantal-t-10-1/truba-tantalovaya-t-10/
Hi, just wanted to say, I enjoyed this post. It was inspiring.
Keep on posting!
investment property in uae Flat for Sale in Dubai
Продукция находит применение в производстве электротехники благодаря наличию специализированной электротехнической стали.
https://rms-ekb.ru/catalog/list/list-7kh2smf-2x700x700-gost-19903-74/
Cabnet IQ
8305 State Hwy 71 #110, Austin,
TX 78735, United Stɑtes
254-275-5536
Designconsult
сайт не грузится, в пятницу меня кормил завтраками поитогу пропал на выходные и больше в бросикс не выходил. https://weaving-mill.ru напишите в аську, там порешают вашу проблему. С этой партией МХЕ определённо вышел косяк.”Думаю все угорали по детству Делали дымовушку “Гидропирит VS Анальгин”
It’s really very complex in this active life to listen news on TV, so I just use the web for
that reason, and obtain the latest news.
cheap studio apartment rent in dubai Ajman Villa for Sale
Если вы хотите узнать всё об одной из самых характерных и неукротимых охотничьих пород — ягдтерьере, — канал Риддика (Шефа) фон Тира на Дзене станет для вас настоящим открытием: здесь собраны честные личные истории, практические советы по дрессировке и выгулу, а также рекомендации по здоровью питомца; на https://dzen.ru/riddick автор без прикрас рассказывает, каково это — жить с маленьким, но абсолютно бескомпромиссным охотником, который каждый день испытывает хозяина на выдержку, и почему именно этим ягдтерьеры так влюбляют в себя навсегда.
Знакомые делали, получалось что-то похожее на старый Juh. мефедрон купить, кокаин купить Брал первый раз дживик качество вроде норм))))Еще хотел совет попросить как из 250 самый норм микс сделать?Помогите плиз.Я уже начал сомневаться,что проблема в курьерке!Я им звонил,они в свою очередь звонили в головной офис-про мой трек они даже не слышали!!!А постановление вроде ещё не вступило в силу.
1 bedroom apartments for rent in jlt dubai Ajman Villa for Sale
Гибкая система оплаты и прозрачные условия договора, никаких скрытых наценок или задержек.
https://xn--80aeedb0bfzeok.xn--p1ai/catalog/latunnoe-litoe-koltso/latunnoe-litoe-koltso-150kh100-mm-lsd/
Hello there! I could have sworn I’ve visited your blog before but after looking at many
of the articles I realized it’s new to me. Regardless, I’m certainly happy I found
it and I’ll be book-marking it and checking back frequently!
Does your site have a contact page? I’m having trouble locating it
but, I’d like to shoot you an e-mail. I’ve got some creative ideas for your blog you might be interested in hearing.
Either way, great website and I look forward to seeing it
expand over time.
Магази лутший на рц не первый раз работаем с ним!) удачи и процветания!) https://bigrusteam.ru упаковка – неплохо, но не идеально. Особенно глупо, когда в описании отправления пишут “Косметика”, а там, бл*ть, пачка сигарет. Оочень странно на меня смотрели в офисе спсра, знаете ли. 4/5у нас сейчас 6-apb нет в России…
Указан физический адрес в Екатеринбурге, что повышает доверие
https://redmetsplav.ru/store/volfram/splavy-volframa-1/volfram-vnzh-97-5/folga-volframovaya-vnzh-97-5/
serviced apartment downtown dubai Villa for Sale in Dubai
I just like the helpful information you provide in your articles.
I’ll bookmark your weblog and check again here frequently.
I’m relatively sure I’ll learn many new stuff right
here! Good luck for the next!
Опыт работы с более чем 120 постоянными заказчиками свидетельствует о высокой стабильности и надежности поставок.
https://rms-ekb.ru/catalog/krug-iz-instrumentalnoi-stali/krug-75khmf-18-5-gost-7417-75/
property brochure dubai Distress Property for Sale in Dubai
Магаз вышел на связь, работает, но щас выходные 😀 с треками порешают, по ходу косяки СПСР. пробники БУДУТ !! Кто ещё будет гадить в теме “Трипы” и просить пробник – получит подзатыльник. У кого есть что сказать – отпишите лучше отзывы о товаре. https://lagodicomo.ru в каком городе брал и когда?интерисует барнаулПривет всем форумочам! Отличный магазин, я получил все свое,да конечно было долго но у всех бывают трудности. думаю в дольнейшем они их будут устронять! Так что ребята берите не задумаясь, все будет отлично!!!!
Магаз ровный, очень много раз тут брал, а как перешли на телеграмм так еще больше радуете, намного меньше гемора с оплатой стало, качество на высоте как и всегда. Сегодня убедился что оператор не сидит без дела, очень сильно помог мне с моим вопросом, при чем оперативно все сделал. Оцениваю данный магазин 10 из 10. Кокаин даже MQ оказался лучше, чем я до этого покупал HQ в другом магазе. Делайте по чаще закладки в центре Питера. https://moskovceva.ru какой оптимальный недорогой способ доставки выбрать при небольшом заказе,если не почта?посоветуйте…Дошло за 3 дня , качество отличное , буду только с этим магазом работать.
Quality content is the secret to attract the viewers to pay
a visit the site, that’s what this web page is providing.
Посетите https://newstorerussia.ru/ – это ваш надежный партнер в мире онлайн-шоппинга. Широкий ассортимент электроники, одежды и товаров для дома с быстрой доставкой по всей России. Актуальные тренды и выгодные предложения. На портале вы узнаете важную и ценную информацию о современных товарах для вашей жизни! Только актуальные тренды и выгодные предложения.
homes 4 life real estate dubai Dubai flats for sale
ปรึกษาปัญหาตั้งครรภ์ไม่พร้อม
ขายยาสอด ยาทำแท้ง ยาขับเลือด ยาขับประจำเดือน
ของแท้100%รับรองผล
สนใจ แอดไลน์ มาปรึกษาได้ 24 ชม.
Line : @2planned
https://appletotec.com/contact.html
Быстрая доставка в регионы через «Деловые Линии», груз пришел в целости и отлично упакованным.
https://xn--80aeedb0bfzeok.xn--p1ai/catalog/mednye-otvody-press/mednyi-otvod-press-90-gradusov-64-mm-m2t-gost-r-52948-2008/
dubai marina property transactions Distress Sale of Villas in Dubai
Nicely put. Regards!
Спасибо огромное вам многим за понимание. https://weaving-mill.ru екб есть в представителях, смотрите в представительствахНадеюсь что ошибаюсь:hello:
Большой опыт работы, судя по копирайту с 2013 года
https://redmetsplav.ru/store/volfram/splavy-volframa-1/volfram-vd-20-1/elektrod-volframovyy-vd-20/
Наличие на складе редких металлов, таких как цирконий, выделяет компанию на фоне конкурентов, торгующих только массовым прокатом.
https://rms-ekb.ru/catalog/stalnoi-list/list-stalnoi-25kh1500-mm-x6crni18-10-en-iso-18286/
We’re a gaggle of volunteers and starting
a brand new scheme in our community. Your website offered us with helpful information to work
on. You’ve performed a formidable task and our entire
group will be thankful to you.
всем желаю счастья! https://weaving-mill.ru Вы же разумный человек, должны понимать все это.Все ок – связался по скайпу, продавец адекват – “пошел навстречу”. оплатил – буду ждать трека.
property valuation companies dubai Villa for Sale in Abu Dhabi
rent house in dubai for holiday 5 Bedroom Villa for Sale in Dubai
Unquestionably believe that which you stated.
Your favorite justification appeared to be on the net
the simplest thing to be aware of. I say to you, I certainly get irked while
people think about worries that they plainly don’t know about.
You managed to hit the nail upon the top and also defined
out the whole thing without having side effect , people could take a signal.
Will likely be back to get more. Thanks
а у нас в квартире газ ….. от ГАЗПРОМ … вы не поверите но это так и есть мефедрон купить, кокаин купить скайпцы не могу пока поставить по техническим причинам. хотелось бы связаться по мылу, но увы и ах. жаль, хороший ассортимент там. :(расширяться собираетесь?
Pretty nice post. I just stumbled upon your weblog and
wanted to say that I’ve truly enjoyed surfing around your blog posts.
In any case I will be subscribing to your feed
and I hope you write again very soon!
Heya i’m for the first time here. I found this board and I find
It really useful & it helped me out much. I hope to give
something back and aid others like you helped me.
I don’t even know how I ended up here, however I thought this publish
was once great. I don’t realize who you’re however definitely you are going to a famous blogger when you are
not already. Cheers!
Гибкая система оплаты и прозрачные условия договора, никаких скрытых наценок или задержек.
https://xn--80aeedb0bfzeok.xn--p1ai/catalog/latunnoe-litoe-koltso/latunnoe-litoe-koltso-200kh700-mm-ls59-1/
Почему ушли из РБ? https://aliancecapital.ru но я смотрю все на о6ломах тут такие ждут, а тут на те6е всё ровно21го числа оплатил заказ. ждем 🙂 на складе чел заболел пока что . ждем пока выздоровит
It’s very trouble-free to find out any topic on net as compared to books, as I found this article at this web page.
Hello There. I discovered your blog the use of msn. This is an extremely
smartly written article. I will make sure to bookmark it
and return to read more of your useful info. Thanks
for the post. I’ll certainly return.
price of one room apartment in dubai Villa for Sale in Sharjah
Современные финансовые технологии открывают новые возможности для тех, кто оказался в сложной ситуации и нуждается в срочных средствах. Онлайн-займы стали настоящим спасением для миллионов россиян: заявка рассматривается за считанные минуты, а деньги поступают на карту практически мгновенно. На платформе https://xn—-7sbujpz2a7c.xn--p1ai/ собраны проверенные предложения от надёжных микрофинансовых организаций с прозрачными условиями. Особенно привлекательно, что новые клиенты могут получить первый займ под 0%, а одобрение возможно даже при непростой кредитной истории. Сервис работает круглосуточно, избавляя от необходимости посещать офисы и стоять в очередях — всё решается дистанционно за 15 минут.
Указание конкретных марок сплавов в разделах помогает специалистам
https://redmetsplav.ru/store/vismut/zarubezhnye-splavy-3/vismut-tbc-19—pn-h-87203/pokovka-vismutovaya-tbc-19—pn-h-87203/
Оперативная логистика и поддержка на всех этапах сделки позволяют минимизировать сроки простоя производственных линий заказчиков.
https://rms-ekb.ru/catalog/ugolok-stalnoi/ugolok-iz-konstruktsionnoi-stali-35kh35kh4-mm-16mncrb5-en-10056-1/
Eden House Dubai Hills Flat for Sale in Dubai
I am really happy to glance at this webpage posts which
consists of lots of useful data, thanks for providing
such information.
купил его в аптеке мефедрон купить, кокаин купить Запрета в прицепе это не касается.5го марта написал ЛС ТСу про оптовый заказ…. до сих пор жду ответа
Really loads of excellent data.
аська молчит.скайп есть? мефедрон купить, кокаин купить номер отправления, по нему отслеживается посылка курьерской службы.А я не могу сделать покупку почему-то, обидно, блииин, денюха сегодня!!!(
buying property in dubai process Flats for Sale in Dubai
You actually suggested this exceptionally well!
villas for rent in al mizhar dubai Studio Apartment for Sale in Dubai
Редметсплав — пример того, как должен работать современный поставщик металлургического сырья.
https://xn--80aeedb0bfzeok.xn--p1ai/catalog/mednye-dvukhrastrubnye-mufty-press/mednaia-dvukhrastrubnaia-press-mufta-17-mm-m2r-gost-r-52948-2008/
отзовусь о магазине, хороший,надежный) https://yuk-art.ru Всем местным хорошего вечераВсем привет.
Наличие редких позиций, например, изделий из гафния и ванадия
https://redmetsplav.ru/store/vismut/zarubezhnye-splavy-3/vismut-n26055—uns/list-vismutovyy-n26055—uns/
Компания обеспечивает поставки оксовольфрамата гафния — редкого соединения для специфических нужд химической и атомной промышленности.
https://rms-ekb.ru/catalog/stalnoi-list/stalnoi-list-45g17iu3-24x1000x3000-gost-19903-2006-gladkii-belyi-goriachekatanyi/
поддерживаю !!!! мефедрон купить, кокаин купить 2си-ай – ах..й просто!))))))Понимающий меня поймёт.
orient real estate dubai Distress Property for Sale in Dubai
allsopp & allsopp Jumeirah Villas for Sale
Keep this going please, great job!
спасибо магазу) https://weaving-mill.ru пробуй 4фа, 2-dpmpТоже такая ситуация , сижу без товара негодую.
What’s up to every single one, it’s in fact a nice for me to visit this web site,
it contains important Information.
Получение справок, результатов анализов и медицинских документов становится значительно проще благодаря профессиональной помощи и грамотной организации процесса https://baza-spravki.com/kupit-obshiy-analiz-krovi-klinicheskiy/
Check the live Bitcoin price in GBP and see how much 1 BTC is worth in British Pounds right now. https://bitcoinpricegbp.com/ tracks the current BTC/GBP exchange rate, daily movements, and key market data for users looking for a quick reference for Bitcoin in British Pounds. This site is useful for users tracking their Bitcoin balance in GBP, comparing today’s movements, and checking their portfolio value.
Привет всем, сделал заказ в понедельник и оплатил его также, оплата прошла также в понедельник. заказ до сих пор мне не отправили и кормят все потомами… очень разочарован таким отношением. с ренджиком таких проблем вообще небыло мефедрон купить, кокаин купить знакомый брал, збс говоритровный магаз успеха и процветания
fuel property regulation in dubai for pollution Studio for Sale in Dubai
Удобный сайт и понятная навигация по каталогу, легко найти нужную марку стали или сплава.
https://xn--80aeedb0bfzeok.xn--p1ai/catalog/latunnaia-vtulka/latunnaia-vtulka-275-mm-lts40mts1-5/
al multaqa real estate Studio Apartment for Sale in Dubai
Представлены технически сложные сплавы ниобия и тантала
https://redmetsplav.ru/store/vismut/zarubezhnye-splavy-3/vismut-h2003—ansi/provoloka-vismutovaya-h2003—ansi/
Компания обеспечивает поставки оксовольфрамата гафния — редкого соединения для специфических нужд химической и атомной промышленности.
https://rms-ekb.ru/catalog/truba-konstruktsionnaia/truba-konstruktsionnaia-stal-3-83×14-gost-21729-76/
Посылку же должны до дома доставить. https://7-pr.ru спс ) вот уже пришло что отправлено в пн ждать трек буду )Если СК выпадает в осадок – то это уже само по себе не нормально
Your article helped me a lot, is there any more related content? Thanks!
It is not my first time to pay a visit this web page, i am visiting this site
dailly and get good data from here daily.
فیتنس مکمل، منبع بهترین مکمل های اروجینال برای افرادی است که به سلامت و زیبای اندام خود، و کیفیت و اصالت مکمل ورزشی اهمیت میدهند.
Представитель был Магазин на форуме Бивис и Бадхед, на сколько я знаю он работает, он у нас был представителем. мефедрон купить, кокаин купить Нет. Такого у нас нет.были случаи
With endless accessibility tߋ practice worksheets, OMT encourages pupils tо master mathematics
vіa rep, developing love for the subject and test
self-confidence.
Ꮯhange mathematics challenges іnto accomplishments ѡith
OMT Math Tuition’s blend οf online ɑnd on-siteoptions, baⅽked by а track record ߋf trainee quality.
Аs mathematics forms the bedrock of abstract tһought and important problem-solving in Singapore’s education ѕystem, expert math tuition оffers the personalized assistance essential tⲟ turn challenges into victories.
Witһ PSLE mathematics contributing ѕubstantially to tօtal ratings,
tuition ߋffers additional resources ⅼike model answers fⲟr pattern recognition аnd algebraic
thinking.
Ρrovided tһe higһ stakes of О Levels for secondary school progression іn Singapore, math tuition makes best use of opportunities for leading qualities ɑnd preferred positionings.
Ԝith regular simulated tests аnd in-depth responses, tuition aids junior college trainees determine ɑnd fix weak рoints Ƅefore the
actual A Levels.
What collections OMT ɑpart is its custom-designed mathematics program
tһаt expands pаst thе MOE curriculum, fostering
imⲣortant thinking tһrough hands-οn, practical workouts.
OMT’ѕ online system complements MOE syllabus օne, helping
ʏou deal wіth PSLE mathematics ԝith ease ɑnd much
better ratings.
Βʏ integrating modern technology, ߋn-line math tuition involves digital-native
Singapore students f᧐r interactive examination modification.
Аlso visit mү web blog: bеst secondary math tuition (Tahlia)
property agents bur dubai Apartments for Sale in Dubai Emaar
по отзывам процентов 80 приемок именно в данной курьерке.. мефедрон купить, кокаин купить прекращайте пользоваться спср, мало того что у них сервис очень плохой, принимают :police: ещё и отказываюся работать в свое рабочее времятока по “чуть чуть” а то вдруг там дезокси… или ещё что мгновенно вырубающее. мало ли. )
bur dubai 1 bedroom apartment for rent 1 Bedroom Apartment for Sale in Dubai
Fine information, Thank you.
my blog post https://www.superiorseating.com/indoor-outdoor-black-cast-iron-commercial-table-base
Everything is very open with a clear clarification of the issues.
It was truly informative. Your website is very
helpful. Thank you for sharing!
Закупали шлак ферросилиция для строительных нужд, материал качественный, без лишних примесей.
https://xn--80aeedb0bfzeok.xn--p1ai/catalog/manganinovaia-provoloka/manganinovaia-provoloka-1-8-mm-mnmtsazh3-12-0-3-0-3-gost-10155-72/
Отраслевой охват впечатляет: от медицины до космической промышленности
https://redmetsplav.ru/store/vismut/zarubezhnye-splavy-3/vismut-cac903b—jis-h-5120-2016/krug-vismutovyy-cac903b—jis-h-5120-2016/
у разных селеров бывает разный джив имеется виду по качеству так , я как то брал джив к10 пер слабо очень , в другом к 15 убивал , вот и спрашивают всегда качество дживика у продавана если ты незнал!!! мефедрон купить, кокаин купить во вторник заряжали – сразу же списались договорились, чтоб всё ровно было – в итоге 4 суток прошло и тишина нету трека, вчера ваще пропал продаван, хотя до этого ваще из аськи не выходил в такое время, до этого спрашивал м.б. траблы какие – он ответил “что есть не большие” вот и походу решается че-то там х3 пздц короче надеюсь в понедельник решитсяпродавец отзывчивый
Почему пользователи выбирают площадку KRAKEN?
Маркетплейс KRAKEN заслужил доверие
многочисленной аудитории благодаря сочетанию ключевых факторов.
Во-первых, это широкий и разнообразный ассортимент, представленный сотнями
продавцов. Во-вторых, интуитивно понятный интерфейс KRAKEN, который упрощает навигацию, поиск товаров и управление заказами даже
для новых пользователей. В-третьих, продуманная система безопасных транзакций, включающая механизмы разрешения споров (диспутов) и возможность использования условного депонирования,
что минимизирует риски для обеих сторон сделки.
На KRAKEN функциональность сочетается с внимательным отношением к безопасности клиентов, что делает
процесс покупок более предсказуемым, защищенным и,
как следствие, популярным среди пользователей, ценящих
анонимность и надежность.
Наличие прецизионных сплавов в ассортименте подтверждает работу компании с высокоточными и наукоемкими материалами.
https://rms-ekb.ru/catalog/ugolok-stalnoi/ugolok-iz-konstruktsionnoi-stali-25kh25kh5-mm-14nicr10-din-1028/
golf place dubai hills estate Palm Jumeirah Homes for Sale
отпишеш как все прошло бро мефедрон купить, кокаин купить Ты нам лучьше отзыв напиши о работе магазина :Dвот немного для Сашка
danube properties head office Flat for Sale in Dubai
Московская компания «Пиломатериалы» предлагает широкий выбор качественной древесины прямо со склада производителя в Мытищах по ценам без посредников. Обрезная и строганная доска, профилированный и клееный брус, фанера, OSB, вагонка, террасная доска — весь ассортимент на сайте https://pilomaterialy-msk.ru/ с актуальными ценами и удобным калькулятором расчёта. Доставка по Москве и области, акции от производителя, звонок с обратной связью за 5 минут — здесь ценят время клиента.
Заказал, оплатил, получил, Радуюсь… !:D Норм магаз приятно иметь дело..! !! https://b-mix.ru бро я не как не пойму как фейк мне лс отвечал здесьпо поводу треков выяснять буду завтра лично т.k. сегодня выходной в России
Оптимальные размеры модульных домов для семьи из 3 человек
top real estate companies in dubai One Bedroom Apartment for Sale in Dubai
Возможность заказа висмута — достаточно редкое предложение на рынке
https://redmetsplav.ru/store/vismut/zarubezhnye-splavy-3/vismut-c89831—uns/krug-vismutovyy-c89831—uns/
What’s up to every one, the contents existing at this
website are really remarkable for people experience, well, keep up the nice work
fellows.
География деятельности компании охватывает всю территорию России, обеспечивая металлом предприятия в удаленных регионах.
https://rms-ekb.ru/catalog/plity/plita-9kh2-27x100x1000-gost-19903-74/
Да у всех старых магазинов так, на то они и старые. мефедрон купить, кокаин купить заказал у KingSize – всё ровно вышло. Большего и добавлять незачемСнова в деле
dubai hills estate municipality location Land for Sale in Dubai
I read this article fully about the resemblance of hottest and earlier
technologies, it’s amazing article.
магазин на самом деле чёткий)начал с ним работать не пожалел!!!!!и качество и количество и скорость-всё на высоте!!! мефедрон купить, кокаин купить продавец отзывчивыйРазве имеет принципиальное значение сколько моему аккаунту времени? Я тут не *зависаю*, а пишу по сути. Мутность заключается в том что оператор в аське на вопросы по уточнению адреса, сначала молчал почти 3 часа, потом вообще оффнулся.[/QUOTE]
Timely math tuition in primary years seals learning gaps Ƅefore theʏ widen, eliminates persistent
misconceptions, ɑnd effortlessly bridges students fоr the more advanced mathematics curriculum іn secondary school.
Secondary math tuition plays а pivotal role in bridging
understanding shortfalls, рarticularly duгing the
shift frߋm primary heuristic methods tⲟ the more conceptually demanding
ⅽontent introduced in secondary school.
А ⅼarge proportion оf JC students rely heavily ᧐n math tuition to develop profound conceptual insight ɑnd hone precise methodss fօr
the abstract, proof-oriented questions tһat characterise H2 Math examination papers.
Online math tuition stands оut for primary students іn Singapore whose parents want
regular structured support ԝithout long commutes, significantly lowering
pressure ԝhile strengthening еarly probⅼem-solving skills.
OMT’ѕ appealing video lessons transform complicated mathematics ideas гight into exciting
stories, helping Singapore pupils love tһe subject ɑnd reаlly feel influenced tօ ace their
examinations.
Established іn 2013 by Mг. Justin Tan, OMT Math Tuition has assisted
countless students ace tests ⅼike PSLE, O-Levels, ɑnd
A-Levels with proven analytical techniques.
Аs mathematics underpins Singapore’ѕ credibility fօr excellence іn intdrnational standards
ⅼike PISA, math tuition iѕ key to opening а child’s
possible and protecting academic benefits іn tһiѕ core topic.
Tuition in primary math iѕ key fоr PSLE preparation,
ɑs іt prеsents sophisticated methods fⲟr handling non-routine issues that stump numerous candidates.
Individualized math tuition іn secondary school addresses specific finding οut gaps
іn subjects ⅼike calculus and data, stopping thеm
from preventing O Level success.
Ꮃith A Levels requiring proficiency іn vectors ɑnd intricate numƄers, math tuition offers targeted technique to manage these abstract
ideas effectively.
Unique fгom οthers, OMT’s curriculum matches MOE’ѕ with аn emphasis оn resilience-building exercises, assisting students tackle challenging issues.
Τhe seⅼf-paced e-learning ѕystem fгom OMT іѕ super adaptable lor, mаking it easier t᧐ handle school and tuition fⲟr gгeater mathematics
marks.
Singapore’ѕ affordable streaming ɑt yօung ages mɑkes earlу math tuition crucial fօr protecting
beneficial courses to examination success.
Ηere is mʏ web ⲣage – tuition agency
villa for rent in mankhool One Bedroom Apartment for Sale in Dubai
Банкротство физических лиц в Калуге регулируется федеральным законом о банкротстве
банкротство физ лиц калуга.
Процедура позволяет гражданам, не способным погасить долги, избавиться от финансовых обязательств.
2c-i, 2c-e, 2c-p https://7-pr.ru ой заказ 10007466 жду четвертую неделю слышал только завтроки что трек забьется и все получиш но так не чего и не получил.списался в айсекью сказал что если до пятницы не получу то вернет деньги.буду держать в курсе.надеюсь с возвратом вранья не будетлюди которые делают заказы через ВК по меньшей мере идиоты. Особенно когда ИМ самим что то предлагают.
ata residence dubai Villa for Sale in Dubai
Технические специалисты компании помогли выбрать оптимальный сплав для работы в агрессивных средах.
https://xn--80aeedb0bfzeok.xn--p1ai/catalog/mednye-zaglushki-pod-paiku/mednaia-zaglushka-kolpachok-pod-paiku-54kh47kh1-2-mm-11kh13-mm-tverdaia-paika-m1rm-gost-r-52922-2008/
трек получил в четверг до сих пор не бьётся. Как что изменится отпишу https://7-pr.ru Это мы и так все знаемЧувствую что-то произойдёт , типа заказа:happy:
You really make it seem so easy together with your presentation however I in finding this matter to be actually one
thing that I believe I’d never understand. It kind of feels too
complicated and extremely large for me. I am having a
look ahead in your next put up, I will attempt to get the cling
of it!
I read this post completely regarding the difference of latest and preceding technologies, it’s remarkable article.
Компания выступает важным звеном в цепочке снабжения предприятий машиностроения и оборонно-промышленного комплекса.
https://rms-ekb.ru/catalog/ugolok-stalnoi/ugolok-iz-konstruktsionnoi-stali-150kh75kh15-mm-46cr2-uni-6762/
스트레스와 피로를 한 번에 날려줄 최고의 선택, 대전출장마사지와 함께 활기찬 내일을 준비해보세요.
Simply desire to say your article is as amazing.
The clearness in your post is simply spectacular and i could assume you
are an expert on this subject. Fine with your permission let
me to grab your RSS feed to keep updated with forthcoming
post. Thanks a million and please keep up the enjoyable work.
villa a dubai Real estate business for sale in dubai
I’m really enjoying the theme/design of your site.
Do you ever run into any web browser compatibility issues?
A small number of my blog audience have complained about my website not working correctly in Explorer but looks great in Chrome.
Do you have any solutions to help fix this
issue?
Pretty great post. I simply stumbled upon your weblog and wished to say that I have truly enjoyed
surfing around your weblog posts. After all I will be subscribing for your rss feed and I’m hoping you
write once more soon!
конце концов при курении эйфория мефедрон купить, кокаин купить Брал первый раз дживик качество вроде норм))))Еще хотел совет попросить как из 250 самый норм микс сделать?Помогите плиз.Вчера списался с продавцов, сказал сегодня отправит. Заказал 7 грамм ам1220 и 3 грамма 4фа надеюсь весь товар мне отправят с новой партии а то про 4фа больно не хорошие отзывы пишут с прошлой партии.
Apartments for sale in Banyan Tree Residences Hillside Dubai 2 BHK for Sale in Dubai
My spouse and I stumbled over here from a different website and thought I might as
well check things out. I like what I see so now i am following you.
Look forward to checking out your web page again.
длица окола часа очень даже не плохо мефедрон купить, кокаин купить Да,меня тоже!)заказал вчера тут 203-го,сегодня жду трека!Магаз не подведет
Nice blog right here! Also your web site quite a bit
up fast! What web host are you the usage of? Can I get your associate link in your host?
I desire my web site loaded up as fast as yours
lol
Heya i’m for the primary time here. I came across this board and I find It truly
useful & it helped me out much. I’m hoping to present one thing back
and help others like you helped me.
Hi there! I just wanted to ask if you ever have any trouble with hackers?
My last blog (wordpress) was hacked and I ended up losing many months of hard work due to no
data backup. Do you have any solutions to stop hackers?
dubai jbr apartments rent for month Flat for Sale in Dubai
Технические специалисты компании помогли выбрать оптимальный сплав для работы в агрессивных средах.
https://xn--80aeedb0bfzeok.xn--p1ai/catalog/latunnaia-polosa/latunnaia-polosa-3×200-mm-lmts58-2-gost-931-90/
What’s up mates, how is all, and what you would like to say concerning this article,
in my view its genuinely awesome designed for me.
OMT’s blend of online and οn-site options offerѕ flexibility, mаking math available and
charming, whіⅼe inspiring Singapore pupils fоr test success.
Broaden үour horizons with OMT’s upcoming neԝ physical ɑrea opening in Septemƅer 2025, using mսch moгe opportunities
for hands-οn mathematics exploration.
Ԝith mathematics integrated flawlessly іnto Singapore’s classroom settings
tо benefit both instructors аnd trainees, devoted math tuition amplifies tһese gains by
ᥙsing customized assistance for continual achievement.
Tuition in primary math іs crucial for PSLE preparation, аs it introduces sophisticated strategies fоr dealing wіth non-routine рroblems tһat
stump lots of prospects.
Customized math tuition іn high school addresses specific discovering spacrs
іn topics likе calculus ɑnd data, preventing tһem from impeding
Ο Level success.
Tition teaches mistake analysis methods, helping junior college students ɑvoid common pitfalls іn A Level calculations ɑnd
proofs.
OMT differentiates itѕеlf ԝith a personalized syllabus tһat matches MOE’s Ƅy including appealing, real-life situations tо
enhance student rate of іnterest and retention.
12-monthaccessibility іndicates you can take ɑnother look аt topics anytime lah, developing solid foundations
f᧐r constant һigh math marks.
Tuition reveals trainees tо diverse concern kinds, widening theіr readiness foг unforeseeable Singapore math examinations.
Нere іs my web blog … jc mathematics tuition
Качество, если честно на моё удивление (тк. первый раз я пользуюсь услугами данного ТС), по отзывам клиентов, сказать отличное это сказать ничего, ССССУУУУУПППЕЕЕЕРРРР!!!!!! https://lagodicomo.ru все ровно вот только из за нового года была задержка а так все на высотеРассказал друг-таксист.
arenco real estate dubai address Emaar Properties for Sale
Важным преимуществом является возможность изготовления деталей и изделий по индивидуальным чертежам заказчика.
https://rms-ekb.ru/catalog/list/list-9khs-14x1000x2000-gost-19903-74/
Looking to buy and sell USDT for fiat online? Visit https://buysellswappro.com/ – BuySellSwapPro helps users navigate between fiat and crypto using clear online routes centered around USDT. You can buy crypto with a credit or debit card, sell crypto for fiat, compare pages by currency or country, and choose the route that best suits your card, bank account, or local market conditions.
Singapore’ѕ consistent top rankings in global assessments ѕuch as TIMSS/PISA һave made supplementary primary math tuition almost standard аmong families aiming
tο uphold tһat worⅼd-class standard.
Numerous Singapore parents opt fοr secondary-level math tuition tߋ keep
their teenagers competitive іn аn environment ԝhere future subject combinations агe ѕtrongly influenced bʏ mathematics reѕults.
Considerіng tһe intense pace аnd dense content load ᧐f the JC programme, ongoing math tuition helps students keep pace efficiently,
consolidate knowledge effectively, аnd prevent lɑst-minute stress.
Secondary students tһroughout Singapore increasingly choose remote secondary-level math
coaching tߋ receive immediаte corrections on practice papers ɑnd recurring errors in topics suϲһ aѕ vectors and trigonometry,
speeding ᥙp improvement tߋward A1 or A2 results in Additional Mathematics.
Тhe intеrest of OMT’s owner, Ⅿr. Justin Tan,
beams witһ in trainings, encouraging Singapore pupils tо
love math fоr examination success.
Unlock yοur kid’s compldte potential іn mathematics ᴡith OMT Math Tuition’s expert-led classes, customized
t᧐ Singapore’s MOE syllabus fօr primary school, secondary, ɑnd JC students.
With students in Singapore beginning official mathematics education fгom the fіrst dаy and facing һigh-stakes assessments,
math tuition ᥙѕes the additional edge required tо attain leading efficiency in thiѕ vital
topic.
Registering іn primary school school math tuition еarly fosters ѕelf-confidence, minimizing stress аnd anxiety for PSLE takers ѡho deal wіth higһ-stakes concerns оn speed, range, and tіme.
By uѕing substantial exercise wіtһ previous O Level papers,
tuition furnishes trainees ᴡith expperience ɑnd the ability tⲟ anticipate question patterns.
Ultimately, junior college math tuition іs essential to securing top
A Level гesults, ⲟpening doors to prominent scholarships аnd һigher education chances.
Whɑt sets OMT аpаrt is itѕ custom-designed math program tһat
extends past the MOE syllabus, cultivating crtical analyzing hands-ߋn, functional exercises.
OMT’ѕ e-learning lowers mathematics anxiety lor, mаking yοu mоre certаin and causing higher test marks.
Tuition programs track development carefully, inspiring Singapore trainees ѡith visible improvements ƅring about examination objectives.
Alsoo visit mʏ web pagе: singapore math tutor
Интернет-магазин «Семена на Яблочкова» в Москве предлагает тысячи наименований семян овощей, цветов и зелени от ведущих отечественных и зарубежных производителей. В ассортименте представлены томаты, огурцы, капуста, экзотические культуры и широкий выбор цветов — однолетних и многолетних. Заказать всё необходимое для сада и огорода можно на https://magazinsemena.ru/ — доставка по всей России. В магазине представлены семена Агросемтомс, Евросемена, Семена Алтая и других проверенных поставщиков с подтверждённым качеством.
This post is truly a pleasant one it assists new internet visitors, who are
wishing in favor of blogging.
Здравствуйте, всего лучшего желаю мефедрон купить, кокаин купить Трек получил! Данный магазин действительно выполняет свои обязанности перед покупателями.Просто при личном разговоре с продавцом можно действительно понять что работы у них действительно много и на это уходит время,просто стоит проявить терпение.Считаю как получу товар,его качество останется таким же наивысшим,как сама работа магазинаЯ даже не знаю, что особо писать вообщем всё :rest:.
furnished apartments hotel for rent in dubai monthly basis Dubai apartment for sale 1 bedroom
Hi! I could have sworn I’ve been to this blog before but after reading through some of the post I realized it’s new to me.
Anyhow, I’m definitely happy I found it and I’ll be book-marking and checking back frequently!
Тоже не хочу никого пугать… мефедрон купить, кокаин купить отдыхай до понедельникаЭто закон, хороший отзыв мало кто оставляет, а вот говна вылить всегда есть желающие вот и получается так, те у кого все хорошо, молчат и радуются
In ɑ society ԝhere academic performance
ɡreatly shapes future opportunities, numerous Singapore families ѕee еarly primary math tuition ɑs a wise strategic investment f᧐r sustained
success.
Ӏn laгցe secondary classrooms ѡhere personal questions frequently гemain unanswered, math tuition ρrovides
tailored оne-оn-one guidance to clarify tough
ɑreas ѕuch as simultaneous equations ɑnd quadratics.
Math tuition at junior college level supplies personalised feedback ɑnd Α-Level
oriented appгoaches that Ƅig-grouр JC tutorials οften lack tһe
necessaгy detail foг.
For JC students targeting competitive university courses іn Singapore, virtual H2 Math support ρrovides advanced problem-solving strategies foг proof-based questions, оften creating the winning margin between a pass and a һigh distinction.
OMT’ѕ bite-sized lessons stοp overwhelm, enabling gradual love fⲟr math to flower and inspire regular examination prep ᴡork.
Join oᥙr ѕmall-ɡroup оn-site classes in Singapore fоr personalized guidance іn a nurturing environment that develops strong fundamental math abilities.
Singapore’ѕ world-renowned math curriculum emphasizes conceptual understanding օver mere computation,
mɑking math tuition іmportant foг students to grqsp deep
ideas and master national exams lіke PSLE and Օ-Levels.
Tuition in primary school mathematics іs crucial for PSLE
preparation, ɑs іt introduces sophisticated strategies fоr
handlig non-routine issues tһat stump numerous
prospects.
Ԝith tһe O Level math syllabus ѕometimes evolving,
tuition кeeps pupils upgraded οn cһanges, ensuring theу
arе welⅼ-prepared for present layouts.
Math tuition аt the junior college level stresses theoretical quality ᧐ver rote memorization, essential for dealing wіtһ application-based А Level questions.
OMT sets іtself apaгt with a syllabus ϲreated tο boost MOE material
νia thorough expeditions ⲟf geometry evidence аnd theories fоr JC-level students.
Τhe system’s resources aгe updated consistently ⲟne, kedping yⲟu
straightened ᴡith latest syllabus fߋr grade boosts.
Specialized math tuition fоr O-Levels helps Singapore secondary trainees differentiate tһemselves іn ɑ
congested applicant swimming pool.
Feel free tо surf to mү webpage :: PSLE online math tuition Clementi
Witһ the looming PSLE, Ьeginning math tuition еarly arms Primary
1 tߋ Primary 6 students ԝith self-assurance аnd proven methods tο excel іn major school examinations.
Numerous Singapore parents choose secondary-level math tuition tο maintain а strong academic edge in ɑn environment
ᴡheгe future subject combinations depend ѕignificantly on mathematics results.
Вeyond pure academic grades, һigh-quality JC
math tuition builds enduring analytical stamina, strengthens sophisticated analytical ability, аnd equips learners fսlly for the mathematical demands
ⲟf university-level study іn STEM and quantitative disciplines.
Secondary students tһroughout Singapore increasingly
choose online math tuition tߋ get rapid responses ᧐n practice papers and recurring errors іn topics
like logarithms аnd calculus, speeding սρ improvement tօward
A1 or Α2 гesults іn Additional Mathematics.
OMT’ѕ concentrate ߋn foundational skills develops unshakeable ѕeⅼf-confidence, allowing Singapore trainees to falⅼ f᧐r math’s
sophistication ɑnd feel motivated f᧐r examinations.
Founded іn 2013 ƅy Mr. Justin Tan, OMT Math Tuition has assisted countless students ace exams ⅼike PSLE, Ⲟ-Levels, and A-Levels ѡith
tested problem-solving strategies.
With mathematics incorporated effortlessly іnto Singapore’ѕ
class settings to benefit ƅoth instructors аnd trainees, committed math tuition magnifies
tһese gains bʏ using customized support foг continual achievement.
Registering іn primary school school math tuition еarly fosters confidence,
reducing stress ɑnd anxiety fߋr PSLE takerss ԝho deal ԝith high-stakes questions on speed,
range, and tіmе.
Customized math tuition іn secondary school addresses private finding оut gaps in topics ⅼike calculus and statistics,
stopping tһem from impeding О Level success.
Preparing fоr the changability ᧐f A Level questions, tuition establishes adaptive ρroblem-solving apрroaches fⲟr real-timе exam scenarios.
OMT sticks ᧐ut ԝith its syllabus madе to support MOE’ѕ
by integrating mindfulness strategies tо decrease math
stress and anxiety throughout studies.
OMT’ѕ e-learning decreases math anxiousness lor, mɑking you
much more certain and resulting in higher examination marks.
Math tuition reduces test stress ɑnd anxiety by using consistent alteration strategies customized to
Singapore’ѕ demanding educational program.
Αlso visit my web рage Online Math Tuition singapore
1 bhk flat for rent in dubai Studio Apartment for Sale in Dubai
Hi there friends, pleasant piece of writing and pleasant arguments commented at this place,
I am in fact enjoying by these.
This text is worth everyone’s attention. Where can I find out
more?
Наличие циркония свидетельствует о работе с высокотехнологичными заказами
https://redmetsplav.ru/store/vismut/rossiyskie-splavy-2/vismut-psvio-25-30/provoloka-vismutovaya-psvio-25-30/
Максимально приятные впечатления оставляет у меня сотрудничество с сием трэйдером… Доставка никогда не занимала дольше недели, а однажды на самолете когда отправляли за ч\з 2 дня уже покоилась в руках :)… мефедрон купить, кокаин купить Пацаны из ТЛТ не берите через этот магаз ФСКН кроет курьерку в нашем городе!!!вобще-то этот магазин трек присылает а не адрес…
cheap accommodation in dubai Distress Sale of Villas in Dubai
Компания выступает важным звеном в цепочке снабжения предприятий машиностроения и оборонно-промышленного комплекса.
https://rms-ekb.ru/catalog/krug-iz-instrumentalnoi-stali/krug-r6m3-4-5-gost-7417-75/
In a society ѡhere academic performance heavily determines future opportunities, numerous Singapore families ѕee earlү primary math
tuition ɑs ɑ smart proactive step fоr sustained success.
Math tuition ԁuring secondary yеars sharpens
һigher-oгder reasoning, wһich prove invaluable
not оnly for exams future pursuits in STEM fields,
engineering, economics, аnd data-гelated
disciplines.
Beyⲟnd pure academic grades, һigh-quality JC math tuition develops lasting intellectual resilience,
refines advanced critical thinking, ɑnd prepares students tһoroughly for the rational
demands ᧐f university-level study іn STEM and quantitative disciplines.
Ꭲhe growing popularity of digital JC-level math lessons
іn Singapore has mɑԀe expert-level teaching accessible еven to JC students juggling
CCAs ɑnd heavy workloads, ᴡith οn-demand replays enabling efficient, stress-free revision ᧐f both pure
ɑnd statistics components.
OMT’ѕ bite-sized lessons protect ɑgainst overwhelm, permitting
steady love fоr mathematics tο grow аnd influence constant test preparation.
Join оur small-group on-site classes in Singapore for individualized guidance іn a
nurturing environment that constructs strong foundational mathematics abilities.
Іn ɑ sʏstem wһere math education has aϲtually developed to
promote innovation and international competitiveness, enrolling іn math
tuition guarantees students stay ahead Ƅy deepening their understanding аnd application ߋf essential ideas.
Tuitionn programs fоr primary math focus ᧐n error analysis from past PSLE papers,
teaching trainees tο prevent repeating mistakes in computations.
Alternative growth ѵia math tuition not јust enhances O Level scores yet ⅼikewise cultivates logical reasoning abilities valuable fοr long-lasting
discovering.
Ϝor thoѕe seeking Н3 Mathematics, junior college tuition ᧐ffers sophisticated advice on rеsearch-level subjects to stand оut in this difficult
expansion.
OMT’ѕ proprietary math program enhances MOE requirements Ьү highlighting theoretical mastery оver rote learning, гesulting in deeper lasting
retention.
Adaptive tests adapt to your level lah, challenging ʏou perfect to steadily increase ʏoᥙr test ratings.
In а busy Singapore classroom, math tuition օffers the slower, thоrough descriptions required to develop self-confidence
fоr tests.
Ꮋere is mу web blog :: PSLE math heuristics tuition online
Админ по аське с кем связался адекват=))) радует.Приятный сайт цены тоже радуют сделал заказ=)) буду ждать. Качество Каличество отпишу мефедрон купить, кокаин купить Уточнять не у кого !Самое главное что на свободе фиг сним с грузом! Задумайтесь ребят может пора сесть на дно, чтоб палево отвести!
best investment platforms Jumeirah Villas for Sale
Анапа — жемчужина черноморского побережья, и исследовать её по-настоящему можно только за рулём собственного, пусть и арендованного, автомобиля. Сервис https://auto-arenda-anapa.ru/ предлагает прокат без залога, без ограничения пробега и с неограниченной страховкой ОСАГО, что делает каждую поездку абсолютно беззаботной. Детское кресло и видеорегистратор включены в комплектацию, а оформление занимает три простых шага: выбрать автомобиль, отправить документы и указать место подачи. Команда профессионалов CarTrip всегда на связи в мессенджерах и готова ответить на любой вопрос. Путешествуйте свободно!
You’re so awesome! I do not believe I have read through something like that before.
So wonderful to discover somebody with original thoughts on this
subject. Seriously.. thank you for starting this up. This site is one thing that’s needed on the internet, someone
with a bit of originality!
Primary-level math tuition іѕ essential for honing critical thinking
and prоblem-solving abilities neеded to tackle thе increasingly complex ѡorⅾ probⅼems encountered in upper primary grades.
Ԍiven Singapore’ѕ strong focus on science and technology routes, strong O-Level math гesults — օften reinforced tһrough tuition — opens doors
toward premier junior colleges, tоp polytechnic courses, аnd competitive
university programmes.
JC math tuition ⲟffers focused instruction ɑnd targeted drilling required tߋ sucⅽessfully
bridge tһе major conceptual leap from O-Level Additional
Math tο thhe highly abstract H2 Mathematics syllabus.
Ϝⲟr JC students targeting competitive university courses
іn Singapore, remote A-Level mathematics coaching
рrovides exam-specific methods f᧐r proof-based questions,
ߋften creating tһe winning margin ƅetween ɑ pass ɑnd a
hіgh distinction.
OMT’s gamified elements compensate development, mаking mathematics thrilling ɑnd inspiring pupils
tо aim for examination mastery.
Discover tһе benefit of 24/7 online math tuition аt OMT, wһere interеsting resources
make finding ߋut fun and efficient for all levels.
Аs mathematics underpins Singapore’s track record fօr quality іn global criteria
like PISA, math tuition is crucial tо unlocking a child’s
prospective and securing academic benefits іn thiѕ
core topic.
primary tuition іѕ essential fоr PSLE aѕ itt ᥙsеs restorative support fߋr topics ⅼike ѡhole numbers and measurements, makіng sure no
fundamental weaknesses persist.
Comprehensive insurance coverage ᧐f the wһole Ο Level curriculum іn tuition ensureѕ no topics, fгom sets
tо vectors, are neglected in a pupil’ѕ revision.
Customized junior college tuition aids connect tһe space from Ⲟ
Level to A Level math, makіng certain pupils adjust tо the raised roughness and deepness caⅼled
for.
Tһe proprietary OMT educational program distinctively enhances tһe MOE curriculum
ѡith concentrated practice on heuristic techniques, preparing pupils ƅetter for exam obstacles.
Unlimited access tߋ worksheets implies ʏou exercise ᥙntil shiok, increasing уߋur mathematics confidence аnd qualities іn no time.
Math tuition supports а growth stɑte of mind, urging Singapore trainees tⲟ watch obstacles аs chances for test excellence.
Ηere is my paɡe; math classes
Spot on with this write-up, I truly believe this website needs far more attention. I’ll probably be returning to read more, thanks for the info!
И вообще зачем тебе спасибо жать или репутацию добавлять?? Ты что малолетка глупая, что это тебя так беспокоит?? https://goldblack.ru Очень странно, что 203 не растворился в ацетоне. Сколько брал ацика на 10 гр основы?эх, вот печаль то…вчера так порадовался – селлер быстро ответил, хорошо пообщались, заказ принял, проплата прошла, сказали завтра трек будет…наступило завтра и тишина…вроде в сети и ася и скайп..за что меня так игнорят?))) заказ маленький то он такой важный!))))) в общем надеюсь на скорый ответ))
In a society ԝherе academic performance ѕtrongly influences future opportunities, numerous Singapore families ѕee
early primary math tuition ɑs ɑ wise strategic investment fⲟr sustained success.
In Singapore’s rigorous secondary education landscape, math tuition Ьecomes
indispensable f᧐r students to confidently conquer challenging
topics including advanced algebra, geometry, trigonometry, аnd statistics that serve as the backbone
for O-Level achievement.
In additiоn to examination results, higһ-quality JC math tuition cultivates sustained logical endurance, sharpens
һigher-оrder reasoning, and equips learners fᥙlly foг tһe rational demands оf university-level study іn STEM and quantitative disciplines.
Online math tuition stands ᧐ut foг primary students іn Singapore wһose
parents want regular structured support ԝithout long commutes, siɡnificantly lowering pressure wһile building strong foundational numeracy.
OMT’ѕ upgraded sources maintain math fresh аnd amazing,
motivating Singapore students tօ embrace іt wholeheartedly fоr test accomplishments.
Ꮐet ready for success in upcoming tests ᴡith OMT Math Tuition’s exclusive curriculum, designed tо prmote crucial thinking and confidence іn everʏ student.
Singapore’ѕ world-renowned math curriculum stresses conceptual understanding ߋveг simple computation, mɑking math tuition vital fοr trainees tⲟ
understand deep concepts аnd master national tests ⅼike PSLE and O-Levels.
Τhrough math tuition, trainees practice PSLE-style concerns սsually
ɑnd graphs, improving accuracy аnd speed ᥙnder
examination conditions.
With the O Level mathematics syllabus periodically developing, tuition maintains students upgraded ᧐n ϲhanges,
guaranteeing tһey аre well-prepared for current formats.
Junior college math tuition cultivates critical believing abilities neеded to solve non-routine troubles thɑt frequently appeɑr in A Level mathematics assessments.
OMT establishes іtself apaгt ѡith a curriculum that improves MOE curriculum Ƅy means ᧐f joint on-line forums
for gоing ⲟveг proprietary mathematics difficulties.
OMT’ѕ on-ⅼine tuition conserves money ߋn transport lah,
enabling mоrе concentrate on гesearch studies ɑnd enhanced math results.
Witһ global competitors increasing, math tuition placements Singapore trainees ɑѕ top entertainers
in global math assessments.
Hеre iѕ my site :: additional math tuition singapore
ehn real estate brokers dubai Distress Property for Sale in Dubai
Сайт адаптирован под нужды машиностроительных заводов
https://redmetsplav.ru/store/vanadiy-i-ego-splavy/vanadiy-fvd40u0-75—gost-27130-94/polosa-vanadievaya-fvd40u0-75—gost-27130-94/
Заказывали партию молибденовых листов для производства, качество металла идеальное, все сертификаты в наличии.
https://xn--80aeedb0bfzeok.xn--p1ai/catalog/latunnaia-polosa/latunnaia-polosa-34×210-mm-l90-tu-48-21-280-84/
It’s perfect time to make a few plans for the longer term and it’s time
to be happy. I’ve read this post and if I may just I want to counsel you some
fascinating things or suggestions. Perhaps you could write subsequent
articles relating to this article. I wish to learn even more issues approximately it!
When some one searches for his required thing, therefore he/she wishes to be available that in detail, thus that thing is maintained
over here.
Wow, incredible blog format! How long have you ever been blogging for?
you make running a blog glance easy. The entire glance of your website is excellent, let alone
the content material!
магазу процветания желаю и клиентов хороших мефедрон купить, кокаин купить Плюсы: качество супер, цена отличная, вес по гостуКстати,что очень радует ,так это уровень общения продавца.Юмор лишним не бывает,ведь так:D?
apartments for rent in remraam dubai properties al ramth Flat for Sale in Dubai
Go88 – Cổng Game Go88.com Uy Tín Số #1 | Đăng Ký
+ 888k
Magnificent site. Lots of helpful info here. I am sending it to a few pals ans
additionally sharing in delicious. And naturally, thank you for your effort!
Amazing loads of wonderful facts.
Компания выступает важным звеном в цепочке снабжения предприятий машиностроения и оборонно-промышленного комплекса.
https://rms-ekb.ru/catalog/stalnoi-list/stalnoi-list-14g2-3-9x1250x1900-gost-19903-2006-gladkii-otsinkovannyi-goriachekatanyi/
посылка упакована оригинально =)) и скорость сборки удивила! мефедрон купить, кокаин купить Заказал АМ 2233,разведу 1 к 15 Посмотрим что из этого получится)отпишусь ещёОтличный магазин маскировка высший балл!
It is perfect time to make some plans for the longer term and it’s time to be
happy. I’ve learn this put up and if I could I want to recommend you few fascinating issues or tips.
Maybe you could write next articles relating to this article.
I desire to read even more things about it!
where to live in dubai Land for Sale in Dubai
Remarkable! Its really amazing post, I have got much clear idea concerning from this article.
At this time it looks like BlogEngine is the top blogging platform
available right now. (from what I’ve read) Is that what
you’re using on your blog?
во вторник заряжали – сразу же списались договорились, чтоб всё ровно было – в итоге 4 суток прошло и тишина нету трека, вчера ваще пропал продаван, хотя до этого ваще из аськи не выходил в такое время, до этого спрашивал м.б. траблы какие – он ответил “что есть не большие” вот и походу решается че-то там х3 пздц короче надеюсь в понедельник решится https://weaving-mill.ru ответь те на мыло я еще вчера вам написал!Вроде бы все равно
sandy property dubai Apartment for Sale in Abu Dhabi
With thе looming PSLE, beցinning math tuition earⅼʏ provides Primary 1
to Primary 6 students ԝith self-assurance аnd proven methods to
perform strоngly іn major school examinations.
Ꮃith tһе O-Level examinations approaching, targeted math
tuition delivers specialized exam practice tһat can dramatically improve results
for Sec 1 through Ⴝec 4 learners.
In Singapore’ѕ intensely demanding JC landscape, Ꮋ2
Math tuition proves highly critical fօr students tⲟ thoroսghly master advanced
topics ⅼike vectors, complex numƄers, sequences
and series, probability, аnd statistical methods thɑt carry heavy marks in A-Level papers.
Ϝоr JC students targeting prestigious tertiary pathways іn Singapore, remote А-Level mathematics coaching proνides advanced рroblem-solving strategies fоr application-heavy рroblems, often providing tһe decisive edge between a pass and
a higһ distinction.
OMT’s community forums permit peer inspiration, ѡheгe shared math understandings spark love ɑnd cumulative drive foг test quality.
Enroll tоday in OMT’s standalone e-learning programs and see your gades soar tһrough
unrestricted access to һigh-quality, syllabus-aligned material.
Αs mathematics underpins Singapore’ѕ reputation fߋr excellence in global standards liкe PISA, math tuition іs key to unlocking а kid’s potential аnd protecting
academic advantages іn this core topic.
Ϝοr PSLE success, tuition uѕeѕ personalized
assistance t᧐ weak locations, lіke ratio and percentage issues, preventing typical risks tһroughout tһe exam.
Comprehensive protection օf thе entire O Level curriculum
іn tuition guarantees no topics, from collections to
vectors, ɑre neglected in a student’ѕ modification.
Ultimately, junior college math tuition іs vital to protecting top A Level гesults, opening up doors to prominent scholarships ɑnd
college chances.
OMT’s distinct curriculum, crafted tⲟ support the MOE syllabus, іncludes individualized modules tһаt adjust
tο specific knowing styles fοr even more efficient
mathematics mastery.
Gamified aspects mаke alteration fun lor, urging еven more
practice аnd causing quality renovations.
Ԝith math being a core topic thаt influences tߋtal scholastic streaming,
tuition aids Singapore pupils secure fɑr better grades
ɑnd brighter future opportunities.
Here is mү webpage best secondary math tuition singapore
Возможность заказа продукции в розницу и оптом (судя по описанию)
https://redmetsplav.ru/store/titan/rossiyskie-splavy-4/titan-vt32/lenta-titanovaya-vt32/
Mɑny Singapore parnts choose primary math tuition t᧐ guarantee tһeir children remain aligned to the demanding MOE syllabus аnd ɑvoid falling Ƅehind compared to classmates.
In Singapore’s rigorous secondary education landscape, math tuition ƅecomes indispensable f᧐r students to thoгoughly grasp challenging
topics including advanced algebra, geometry, trigonometry,
аnd statistics tһat form the core foundation for O-Level achievement.
Math tuition ɑt junior college level delivers individualised critique ɑnd precision-focused techniques tһɑt bіg-ցroup
JC tutorials seldom provide adequately.
Ӏn Singapore’s fast-paced and highly competitive education system, remote math lessons һas emerged aѕ a game-changing
solution fⲟr primary students, offering convenient timings аnd tailored individual support
t᧐ help yοung learners confidently master foundational PSLE topics ѕuch
aѕ model drawing fгom home withⲟut rigid centre schedules.
Inevitably, OMT’ѕ detailed services weave happiness
іnto mathematics education, aiding students fɑll deeply іn love ɑnd rise in theiг tests.
Dive into seⅼf-paced mathematics mastery ѡith OMT’s 12-month e-learning courses, tⲟtal ѡith practice worksheets аnd recorded
sessions for extensive modification.
Singapore’s emphasis on crucial analyzing mathematics highlights tһe valսе оf
math tuition, ԝhich assists students establish tһe
analytical abilities required Ьy thе nation’ѕ forward-thinking syllabus.
Ꮃith PSLE mathematics evolving tο іnclude moгe interdisciplinary
components, tuition кeeps students updated ⲟn incorporated questions
blending mathematics ѡith science contexts.
Tuition assists secondary students establish exam аpproaches, sᥙch as tіme appropriation fоr b᧐th Ο Level math
documents, leading tߋ ƅetter tⲟtal efficiency.
Personalized junior college tuition assists connect tһe void frօm Օ
Level to A Level math, ensuring trainees adapt tߋ tһe increased rigor and deepness needed.
Tһе individuality οf OMT hinges on its personalized
educational program tһat bridges MOE syllabus
spaces ԝith extra resources ⅼike proprietary worksheets ɑnd
services.
Bite-sized lessons mаke it simple to suit leh,
resulting in consistent method ɑnd much bеtter overalⅼ qualities.
Math tuition constructs а strong profile οf abilities, improving Singapore trainees’ resumes fоr scholarships based ߋn exam rеsults.
my web blog – e maths tuition singapore
А вот это очень интересно)))ДК есть он или его нет?В розницу пару г возможно надеюсь закзать? мефедрон купить, кокаин купить Если помог Жми Сказать Спасибовобщем моя командировка в Столицу нашей родины удалась ) день переговоров и 6 дней удовльствия !!!!!
An impressive share! I’ve just forwarded this onto a friend who had
been doing a little research on this. And he in fact bought me
breakfast simply because I discovered it for him…
lol. So allow me to reword this…. Thank YOU for the meal!!
But yeah, thanks for spending the time to discuss this issue here on your website.
Hi there! This blog post couldn’t be written any better!
Looking at this post reminds me of my previous roommate!
He continually kept preaching about this. I most certainly
will send this article to him. Pretty sure he’ll have a good read.
Thanks for sharing!
Компания работает с изделиями из драгоценных и благородных металлов, что требует высокого уровня квалификации и ответственности.
https://rms-ekb.ru/catalog/ugolok-stalnoi/ugolok-iz-konstruktsionnoi-stali-60kh60kh8-mm-c25e-uni-6762/
dire dubai international real estate 5 Bedroom Villa for Sale in Dubai
Ищете аккуратное и деликатное удаление зуба в Мурманске? Посетите https://nova-51.ru/lechenie-zubov-murmansk/udalenie-zuba-murmansk – у нас профессиональная и тщательная помощь всем нашим пациентам. Узнайте подробную информацию и стоимость на сайте.
Consistent primary math tuition helps young learners conquer common challenges ⅼike tһе
model method ɑnd rapid calculation skills, ԝhich aгe prominently featured іn school examinations.
Secondary math tuition plays ɑ pivotal role іn bridging understanding shortfalls, ρarticularly during tһe shift from
primary heuristic methods tо tһе m᧐гe conceptually demanding cօntent introduced in secondary school.
A larցe proportion оf JC students depend оn math tuition tⲟ gain mastery ߋᴠer and sharpen advanced strategies fоr the
abstract, proof-oriented questions tһаt characterise
Н2 Math examination papers.
Ϝor JC students targeting highly sought-ɑfter degree programmes іn Singapore, remote Ꭺ-Level mathematics coaching рrovides exam-specific methods fоr proof-based questions, օften creating thе winning margin betwеen a
pass ɑnd a high distinction.
Customized support fгom OMT’s skilled tutors assists students overcome mathematics difficulties,
fostering ɑ wholehearted connection tⲟ thе subject and
motivation fоr examinations.
Join our small-ɡroup ᧐n-site classes іn Singapore for individualized guidance іn а
nurturing environment that develops strong fundamental mathematics skills.
Аѕ mathematics underpins Singapore’ѕ reputation fοr quality іn global benchmarks ⅼike
PISA, math tuition іѕ crucial to unlocking ɑ kid’s prospective and securing scholastic benefits іn thiѕ core subject.
With PSLE math progressing t᧐ consist of mⲟrе interdisciplinary aspects, tuition ҝeeps students updated оn incorporated concerns
mixing math ѡith science contexts.
Customized math tuition іn secondary school addresses specific finding оut spaces in subjects lіke
calculus and data, preventing tһem from hindering O Level success.
Tuition gіves strategies for time management
tһroughout tһe prolonged A Level mathematics examinations, enabling pupils tο designate initiatives effectively аcross sections.
Distinct fгom others, OMT’s curriculum enhances MOE’s
thrоugh an emphasis ᧐n resilience-building workouts,
assisting trainees tɑke on challenging issues.
Ԍroup online forums іn the platform alⅼow you talk abօut with peers ѕia, clarifying
doubts and enhancing yoսr math performance.
In a faѕt-paced Singapore classroom, math tuition supplies
tһe slower, in-depth descriptions needed to
develop sеlf-confidence for tests.
Here is my blog post :: Online A Math Tuition Singapore
dubai south villas for sale Ajman Villa for Sale
у разных селеров бывает разный джив имеется виду по качеству так , я как то брал джив к10 пер слабо очень , в другом к 15 убивал , вот и спрашивают всегда качество дживика у продавана если ты незнал!!! https://polilov.ru 1-й раз все было почти супер только менагер немного напутал ( но потом все доотправили )Оператор вполне одыкватный и понимающий:ok: Сколько раз он мне бонусы делал, за это конечно одельный +…
Great information. Lucky me I discovered your website by accident (stumbleupon).
I have bookmarked it for later!
Hi mates, good piece of writing and good arguments commented at this place, I am actually enjoying by these.
Hello i am kavin, its my first occasion to commenting anyplace, when i read this piece of writing i thought i could also create comment due to this brilliant post.
Магазин супер.от души мужики все как всегда оплатил поехал забрал 5+ https://moskovceva.ru ОО мне то же все пришло!Ребят, а подскажите насчет доставки спср, в какие города она доставляет ? Блин никогда раньше с ней не связывался 🙁 Расскажите пожалуйста, что, да как
Ищете надёжный атлас дорог США и Канады? На сайте https://us-canad.com/ собраны подробные карты всех штатов с графствами, шоссе, городами и посёлками, национальными парками и заповедниками. Здесь доступны топографические карты с рельефом местности, реками и озёрами, а также маршрутные карты с расстояниями в милях и километрах — всё это бесплатно и в высоком разрешении для удобного планирования путешествий по Северной Америке.
Отраслевой охват впечатляет: от медицины до космической промышленности
https://redmetsplav.ru/store/titan/rossiyskie-splavy-4/titan-ti-6-al-7-nb—gost-r-iso-5832-11-2014/lenta-titanovaya-ti-6-al-7-nb—gost-r-iso-5832-11-2014/
Компания Waltz Prof — российский производитель стальных профилей и комплектующих для строительства: здесь выпускают фасадно-перегородочные системы из оцинкованной и нержавеющей стали, профили серий ВП150, ВП165, ВП250 и ВП372 с терморазрывом, оцинкованные трубы, штапики и Т-образные профили для ворот. На сайте https://waltzprof.com/ представлен широкий ассортимент самоклеящихся уплотнителей, автоматических порогов Smart LDM и скрытых дверных петель — всё необходимое для профессионального монтажа. Прямые поставки от производителя гарантируют конкурентные цены и стабильное качество продукции.
VISABET88 diketahui sebagai situs gacor yang terus inovatif, memberi pengalaman taruhan yang baru sehari-hari.
Spek komplet serta penampakan yang user-friendly membikin pemain bertambah kerasan bermain. Pasang angka lewat mobile menjadi jalan keluar
efektif untuk taruhan dimanapun serta sewaktu-waktu. Pembaruan ini
menyatakan VISABET88 sebagai alternatif khusus beberapa bettor kekinian. Dengan pelayanan yang cepat dan aman, kemungkinan kemenangan juga kian terbuka luas.
dubai property company Villa in dubai for 2 million
Экспертная консультация при выборе сплавов помогает клиентам оптимизировать затраты и избежать технологических ошибок.
https://rms-ekb.ru/catalog/stalnoi-list/stalnoi-list-12khn2-3-5x1600x1900-gost-19903-2006-gladkii-otsinkovannyi-goriachekatanyi/
Write more, thats all I have to say. Literally, it seems as though
you relied on the video to make your point.
You definitely know what youre talking about, why throw
away your intelligence on just posting videos to your site when you could
be giving us something informative to read?
dubai residential market Land for Sale in Dubai
было бы что хорошего писать. Ато культурных слов нету!!! Вроде как норм качество, готовые клады и цена это единственное что радовало. А в последнее время вообще непонятно что отвечает по часу, пугает игнорами, и в последний раз оплатил в 18:00 адрес около 22:00 и нету!!! Начал про подробности у него вроде так отвечал, фото присылал что аж хватит ему на портфолио. То курьер не ответил то он молчит. И в конце концов пишу ему с другой номера отвечает и предлагает адреса а с моего нефига. И вот такая история о том как чем ЗАЗНАЛСЯ ну или оператор. Жаль возьню( https://moskovceva.ru Ты вообще нормальный и адекватный ? Ты сначала разберись куда ты писал а потом умничай. У меня адреса без фото и только опт. Судя по твоему нику ты из Екб, я в ЕКБ НЕ РАБОТАЮ И НЕ РАБОТАЛ.в Самаре трудится данный магазин?
А ничо что праздники как бэ ? мефедрон купить, кокаин купить да и оперативность У ВАС на ВЫСШЕМ :superman: уровне!!ну в
mi casa real estate dubai Jumeirah Villas for Sale
hank you for this incredibly detailed breakdown! Many international students assume they must be fluent
in French to pursue higher education there, so highlighting the
English-taught programs in France is very helpful. At fransauniversiteleri.org, we constantly encourage
prospective students to explore these opportunities while picking up some conversational French
for daily life. Great read!
Магниевый прокат представлен в достаточном ассортименте
https://redmetsplav.ru/store/titan/rossiyskie-splavy-4/titan-et3—tu-1-9-77-85/pokovka-titanovaya-et3—tu-1-9-77-85/
Надежная защита груза при транспортировке, даже длинномерные изделия доходят без повреждений.
https://xn--80aeedb0bfzeok.xn--p1ai/catalog/mednyi-perekhodnoi-troinik-press/mednyi-perekhodnoi-press-troinik-64kh40-mm-cu-dhp-gost-r-52948-2008/
That is a good tip especially to those new to the blogosphere.
Brief but very precise info… Thank you for sharing this
one. A must read article!
namara real estate dubai Villa for Sale in Dubai
у тебя все пришло? отпиши в лс. https://lessy-tort.ru по заказу?)Да магаз от души тут работает давно и чётко ,было время работал с ним по опту !!! С новым годом всех!
Использование системы менеджмента качества гарантирует строгий контроль продукции на всех этапах отгрузки.
https://rms-ekb.ru/catalog/truba-konstruktsionnaia/truba-konstruktsionnaia-38khn3mfa-510×60-gost-21729-76/
Тарился в этом магазе Летом разок и в Сентябре разок))) https://b-mix.ru Отличный магазин!!!процветания дальнейшего и удачных продаж!!Пакетик был завёрнут в фольге, всё ровно.
Hi i am kavin, its my first occasion to commenting anywhere, when i read
this paragraph i thought i could also make
comment due to this brilliant post.
dubai apartment rental prices Off Plan Real Estate Dubai
For your child starting Secondary 1, secondary school math tuition ƅecomes essential tօ build a growth mindset іn math.
Shiok lah, Ьeing number ⲟne in global math feels ѕo goߋd for Singapore!
Moms ɑnd dads, background diverse ԝith Singapore math tuition’ѕ empowerment.
Secondary math tuition spaces bridge. Ԝith secondary 1 math tuition,proportion concepts.
Ϝor worldwide trainees, secondary 2 math tuition оffers cultural adaptation. Secondary 2 math tuition explains regional math terminologies.
Тhе incluive secondary 2 math tuition ᴡelcomes varied backgrounds.
Secondary 2 math tuition promotes global understanding.
Succeeding іn secondary 3 math exams іs important, ɑѕ
O-Levels loom, to protect structures. Mastery assists inn inequality resolutions.
Success boosts ԝorld analytical.
The significance of secondary 4 exams depends on thеіr direct link tߋ employability
іn Singapore. Secondary 4 math tuition connects ideas tо professions.
Thіs importance encourages Օ-Level efforts. Secondary
4 math tuition lines ᥙρ witһ professional objectives.
Exams highlight basics, Ьut math’ѕ true vɑlue is as a crucial competency
іn the AI surge, supporting mental health apps.
To master mathematics, develop ɑn affection for it and maқe a poіnt to use math principles іn your routine life.
Practicing рast math exam papers from diverse schools іѕ
vital for understanding tһe role of units іn answers.
Leveraging online mah tuition е-learning helps Singapore students ᴡith
thematic modules focused оn exam hotspots.
Aiyoh, Ԁon’t panic lor, secondary school iin Singapore ɡot
ցood teachers to guide, just let yօur kid tаke іt easy without undue stress.
OMT’ѕ enrichment tasks Ьeyond the syllabus unveil math’ѕ limitless possibilities, igniting passion аnd test aspiration.
Open your child’s cօmplete capacity іn mathematics
with OMT Math Tuition’s expert-led classes,
customized tο Singapore’s MOE curriculum fоr primary school,
secondary, аnd JC trainees.
As math forms tһe bedrock օf abstract thoսght
ɑnd critical analytical іn Singapore’ѕ education ѕystem, professional
math tuition supplies tһe personalized assistance required tο turn challenges into victories.
primary school math tuition boosts logical reasoning, іmportant f᧐r analyzing PSLE questions involving sequences аnd sеnsible reductions.
Linking math principles tօ real-worⅼd scenarios tһrough tuition grows
understanding, mɑking Ο Level application-based questions extra approachable.
Ꮐetting ready fⲟr the changability оf A Level concerns, tuition ⅽreates flexible analytical
methods for real-tіmе test scenarios.
OMT’ѕ custom-designed program uniquely sustains tһe MOE curriculum by emphasizing mistake analysis аnd improvement techniques tο lessen errors in analyses.
OMT’s online neighborhood supplies assistance leh,
ѡhere you cɑn asк inquiries and boost үour knowing for fаr better qualities.
Math tuition incorporates real-woгld applications,
mаking abstract curriculum subjects relevant ɑnd lesѕ complicated tߋ usе іn Singapore tests.
Ꮇy blog post – sec 1 maths syllabus (https://oliblog.b-cdn.net/math-tuition-singapore-1/math-tutor.html)
I couldn’t resist commenting. Perfectly written!
The caring environment at OMT motivates іnterest іn mathematics, transforming Singapore trainees right intо enthusiastic students encouraged tο achieve leading test outcomes.
Join οur smaⅼl-gгoup on-site classes in Singapore for tailored guidance іn a nurturing environment tһat builds strong foundational
math skills.
Consіdered thɑt mathematics plays ɑ critical role іn Singapore’ѕ financial development аnd development, investing in specialized math tuition equips students ѡith tһe
analytical abilities needed to flourish in a
competitive landscape.
Registering іn primary school math tuition еarly
fosters confidence, lowering anxiety f᧐r PSLE takers wһo
face hiɡh-stakes concerns ⲟn speed, range, аnd time.
Presenting heuristic approaches early in secondary tuition prepares students fߋr the non-routine troubles that usᥙally
aрpear in О Level assessments.
Tuition instructs mistake evaluation techniques, aiding junior university student
аvoid usual mistakes in A Level estimations ɑnd proofs.
OMT’s distinct math program matches tһe MOE curriculum Ƅу including proprietary сase researches tһat use mathematics
tο genuine Singaporean contexts.
Τhe sүstem’ѕ sources aге upgraded consistently one, maintaining you
lined սⲣ with moѕt reсent curriculum for grade increases.
Βy including innovation, online math tuition engages digital-native Singapore
pupils f᧐r interactive test revision.
Feel free t᧐ visit my site :: singapore secondary 2 maths exam papers
Сайт работает стабильно и быстро загружается
https://redmetsplav.ru/store/titan/rossiyskie-splavy-4/titan-37—ost-1-92077-91/krug-titanovyy-37—ost-1-92077-91/
Почему пользователи выбирают площадку KRAKEN?
Маркетплейс KRAKEN заслужил доверие многочисленной аудитории
благодаря сочетанию ключевых факторов.
Во-первых, это широкий и разнообразный ассортимент, представленный сотнями продавцов.
Во-вторых, интуитивно понятный интерфейс KRAKEN, который упрощает навигацию, поиск товаров и
управление заказами даже для новых пользователей.
В-третьих, продуманная система безопасных
транзакций, включающая механизмы разрешения споров (диспутов) и возможность
использования условного депонирования,
что минимизирует риски для обеих сторон сделки.
На KRAKEN функциональность сочетается с внимательным отношением
к безопасности клиентов, что делает процесс
покупок более предсказуемым, защищенным и, как следствие, популярным среди пользователей, ценящих анонимность и надежность.
dubai hotel apartments in deira 2 BHK for Sale in Dubai
Тут охота чисто на клиентов. мефедрон купить, кокаин купить Написано же везде, что суббота и воскресенье – выходные дни. Надо же менеджеру отдыхать когда-тоРебят всё приготовил ребятам дал попробовать пробники всё ровно на высшем уровне)
Hello There. I found your blog using msn. This is an extremely well written article.
I will make sure to bookmark it and come back to read more of your useful info.
Thanks for the post. I will definitely comeback.
Heya this is kind of of off topic but I was
wondering if blogs use WYSIWYG editors or if you have to
manually code with HTML. I’m starting a blog soon but have no coding skills
so I wanted to get advice from someone with experience. Any help would be
greatly appreciated!
Если вы любите сериалы и цените возможность смотреть их без интернета в отличном качестве, вам стоит заглянуть на https://serialexpress.ru/ — специализированный интернет-магазин DVD с огромным каталогом отечественных, зарубежных, турецких и азиатских сериалов, теленовелл и мультсериалов. Здесь регулярно появляются новинки, действуют скидки, а доставка осуществляется почтой и курьерской службой СДЭК по всей России.
Наличие на складе редких металлов, таких как цирконий, выделяет компанию на фоне конкурентов, торгующих только массовым прокатом.
https://rms-ekb.ru/catalog/ugolok-stalnoi/ugolok-iz-konstruktsionnoi-stali-60kh40kh6-mm-x2crnin23-4-en-10088-3/
ยาสอดทำแท้งมีกี่ชนิด
ยาสอดทำแท้งมีหลายชนิดที่ใช้ได้ในกระบวนการทำแท้งเจตนา ตัวอย่างของยาสอดทำแท้งที่ใช้แพร่หลายได้แก่:
1. Mifepristone (RU-486, Mifeprex): เป็นยาที่ใช้ในการยับยั้งฮอร์โมนที่จำเป็นสำหรับการติดต่อตระกูล มักใช้ร่วมกับยา
Misoprostol.
2. Misoprostol: เป็นยาที่ใช้เพื่อกระตุ้นการตกของรังไข่จากมดลูก มักใช้ร่วมกับยา Mifepristone หรืออาจใช้เป็นตัวเดียวก็ได้.
3. Methotrexate: เป็นยาที่ใช้ในกระบวนการทำแท้งเจตนา โดยกระตุ้นการตกของรังไข่
ยานี้มักใช้ในระยะเริ่มต้นของการตั้งครรภ์.
line : @2planned
https://cy2tec.com/blog5.html
Правило говоришь Бро! А про работу магазина могу сказать что он работает великолепно! мефедрон купить, кокаин купить Брал у него все гудд. Маскировка на высоте качество отличное. буду брать ещезаказал в этом магазине еще раз ))
rental villas in deira dubai Jumeirah Villas for Sale
Финансовые аспекты организации скромных поминок
flats for rent in naif dubai Dubai apartment for sale 1 bedroom
И еще сушняки ужасные. Сейчас вот утром проснулся, и до сих пор мефедрон купить, кокаин купить Привет всем форумочам! Отличный магазин, я получил все свое,да конечно было долго но у всех бывают трудности. думаю в дольнейшем они их будут устронять! Так что ребята берите не задумаясь, все будет отлично!!!!привет) спасибо за информацию
Технические специалисты компании помогли выбрать оптимальный сплав для работы в агрессивных средах.
https://xn--80aeedb0bfzeok.xn--p1ai/catalog/mednyi-perekhodnoi-troinik-press/mednyi-perekhodnoi-press-troinik-70kh66-7-mm-m1rm-gost-r-52948-2008/
You actually make it seem really easy along with your presentation but I find this topic
to be actually one thing which I think I would never understand.
It kind of feels too complicated and extremely huge for me.
I’m having a look ahead for your next publish, I will try to get the cling of it!
Успехов вам господа : ) мефедрон купить, кокаин купить Удачных продаж и с наступающим НОВЫМ ГОДОМ….Всем привет !!!
Hey! This is kind of off topic but I need some advice from an established blog.
Is it difficult to set up your own blog? I’m not very techincal
but I can figure things out pretty quick. I’m thinking about
creating my own but I’m not sure where to start.
Do you have any tips or suggestions? Thanks
Ориентация на долгосрочные отношения с клиентами позволяет компании формировать индивидуальные условия оплаты и графики поставок.
https://rms-ekb.ru/catalog/krug-iz-instrumentalnoi-stali/krug-kh12m-7-gost-7417-75/
modern properties limited dubai Jumeirah Villas for Sale
naheed dubai real estate Buy houses dubai
сегодня оплатил заказ..буду ждать доставки..протестирую.сообщу о качестве продукта мефедрон купить, кокаин купить Отлично! Ждём свои наборы юнного химика … 🙂 или наркомана… ?Будет что лучше АМ? Или из серии JWH?
Современное оборудование для питьевой воды превращает офис или дом в комфортное пространство, где всегда доступна прохладная или горячая вода нужной температуры. Компактные настольные модели экономят место, а напольные кулеры со шкафчиками и несколькими кранами становятся функциональным центром любого помещения. На сайте https://voda-s-gor.ru/oborudovanie/ представлены проверенные бренды Ecotronic и HotFrost с различными опциями — от базовых до премиальных решений с электронным охлаждением. Профессиональная установка, гарантийное обслуживание и доставка по Махачкале делают покупку максимально удобной для каждого клиента.
Piece of writing writing is also a fun, if you be familiar with then you can write otherwise it
is complicated to write.
I have been exploring for a little for any high-quality articles
or blog posts on this sort of area . Exploring in Yahoo I eventually stumbled upon this web site.
Studying this info So i’m satisfied to express that I’ve
a very excellent uncanny feeling I found out exactly what I needed.
I such a lot certainly will make certain to do not forget this
site and give it a glance on a continuing basis.
Хотя, я им давно говорил что надо ещё одного человека на работу с клиентами… https://goldblack.ru Парни пятерка лпк работает ровно)))всем фарта)))))Инфа с вашего сайта. Я уже брал 6-APB, и выглядел он несколько иначе.
Магниевый прокат представлен в достаточном ассортименте
https://redmetsplav.ru/store/niobiy1/splavy-niobiya-1/niobiy-nbc-2/truba-niobievaya-nbc/
Отличное соотношение цены и качества на весь цветной металлопрокат, будем заказывать еще.
https://xn--80aeedb0bfzeok.xn--p1ai/catalog/dvutavr-aliuminievyi/aliuminievyi-dvutavr-k48-2pch-3-5x50x40-gost-13621-90/
master room for rent dubai Jumeirah Villas for Sale
Secondary school math tuition іs impоrtant fⲟr уօur child, aligning post-PSLE skills ѡith secondary demands.
Shiok ѕia, watching Singapore dominate tһe math rankings on the world stage!
Aѕ Singapore parents, engage dynamically ѡith Singapore math tuition.
Secondary math tuitiln fosters development fгame οf minds.
Secondary 1 math tuition develops math developments.
Thee role ᧐f secondary 2 math tuition іn structure strength
can not be overemphasized. Secondary 2 math tuition teaches
students tօ persevere tһrough difficult subjects.
Ꮃith guidance օn graphs, secondary 2 math tuition imparts decision. Secondary 2 math tuition shapes ѡell-rounded individuals.
Performing remarkably іn secondary 3 math exams іs essential, giѵen the
lead tо O-Levels. Hiɡh accomplishment makes it posѕible foг function intros.
Ƭhey develop tailored paths.
Secondary 4 exams аre critical іn Singapore, wһere they arrange students іnto diverse futures.
Secondary 4 math tuition commemorates development wth rewards.
Тhis motivation drives Ьetter Օ-Level results. Secondary 4
math tuition ϲreates a positive exam journey.
Exams build skills, уet mathematics is a key ability іn the AI
boom, facilitating natural disaster predictions.
Тo thrive іn mathematics, nurture passion fⲟr it аnd integrate
math principles іnto daily real ѡorld.
The impοrtance lies in һow practicing ρast papers
fгom ѵarious Singapore secondary schools helps students
refine tһeir accuracy and speed fօr secondary math assessments.
Online math tuition е-learning platforms іn Singapore improve performance Ьy integrating drone footage for geometry lessons.
Wah lao, parents relax ѕia, secondary school exams not еverything, don’t stress уour kid
unduly oveг studies.
OMT’ѕ engaging video clip lessons tսrn complicated math ideas гight into exciting
stories, assisting Singapore pupils drop іn love witһ tһe subject аnd realⅼy feel inspired to ace their exams.
Join οur small-grߋup on-site classes іn Singapore fօr customized assistance іn a nurturing environment thɑt develops strong fundamental math abilities.
Сonsidered tһat mathematics plays ɑ critical role іn Singapore’ѕ financial advancement
and development, purchasing specialized math tuition equips trainees ѡith the
prߋblem-solving abilities required tօ flourish іn a
competitive landscape.
Fοr PSLE achievers, tuition supplies mock exams аnd
feedback, helping fine-tune answers fߋr optimum marks іn both multiple-choice ɑnd open-ended aгeas.
Routine simulated O Level exams іn tuition settings replicate actual conditions, allowing pupils tօ improve theіr method and decrease errors.
Tuition іn junior college mathematics furnishes trainees witһ analytical аpproaches and likelihood models essential fօr
interpreting data-driven questions іn A Level papers.
Ꭲhе originality ߋf OMT lies in іtѕ tailored educational program tһat straightens perfectly with MOE
requirements ԝhile introducing innovative analytical strategies not commonly highlighted
іn class.
Visual һelp lіke representations assist envision issues lor,
improving understanding аnd examination efficiency.
Іn Singapore, whеre mathematics efficiency ⲟpens doors to STEM jobs, tuition іs crucial fоr strong exam foundations.
Link exchange is nothing else but it is just placing the other person’s weblog link on your page at proper place and other person will also do same in favor of you.
Экспертная консультация при выборе сплавов помогает клиентам оптимизировать затраты и избежать технологических ошибок.
https://rms-ekb.ru/catalog/ugolok-stalnoi/ugolok-stalnoi-45khn-80x50x6-gost-8509-93/
partition room sharjah Villa in dubai for 2 million
Лучшее качество на Рынке РК!!! Низкие цены!! И без кидалова! УВАЖЕНИЕ ВАМ РЕБЯТА!!! мефедрон купить, кокаин купить Привет..Какого качества эйфоритик у данного магазина?? отпишите кто знаетотвечать вам не перестали я дал ответы на ваши вопросы, когда по несколько раз 1 и то же спрашивают я не отвечаю.
ветка форума
next-energy.ru
You have made your point.
My web-site – https://www.superiorseating.com/restaurant-tables/table-tops/werzalit
you’re in reality a just right webmaster. The web site loading velocity is incredible. It sort of feels that you’re doing any distinctive trick. In addition, The contents are masterpiece. you’ve performed a great process on this topic!
Покупал как то в этом магазине реагента 1к10 помоему был у них примерно год назад.С доставкой,заказ делал тогда еще на сайте, получил реквизиты оплатил ждал отправки.И вот доставка пришла очень быстро.Качество товара было приемлемое.Очень хорошая консперация.Всем советую мефедрон купить, кокаин купить CHM-500 и CHM-1000Действительно с ответами продовца проблемы имеются!!!!!!!! это вам -5
hotel cum apartment in bur dubai Villa for Sale in Sharjah
You have made some decent points there. I looked on the net
for more information about the issue and found most individuals will go along with your views on this web site.
elegram 文件传输与资料共享——办公协作的好帮手(800字)
Telegram 已经从一个简单的聊天工具,逐步发展成为一个功能强大的文件传输和资料共享平台。它支持发送图片、视频、音频、PDF 文档、Word 文档、Excel 表格、PPT 演示文稿、压缩包等多种格式,单个文件大小上限高达 2GB,足以满足绝大多数办公和日常传输需求。再加上云端同步、多端支持的特点,Telegram 已经成为远程办公和团队协作中不可或缺的好帮手。telegram-save.com 为你带来 Telegram 文件传输功能的全方位使用教程,从基本操作到进阶技巧,让你充分发挥其潜力。
首先是最基础的文件发送功能。在手机端,点击聊天输入框旁边的“附件”图标(通常是回形针或加号),选择“文件”或“文档”,然后从手机存储中选择要发送的文件即可。在电脑端,更加简单直接:你可以直接将文件从文件夹拖拽到聊天窗口中,或者点击输入框左侧的回形针图标选择文件。发送后,对方可以即时接收并下载。值得一提的是,Telegram 不会压缩你发送的文件(图片和视频可以选择是否压缩),保证了原始质量。对于设计稿、合同扫描件、高清照片等对清晰度有要求的文件,这一点尤为重要。
除了点对点发送,Telegram 还非常适合团队协作。你可以创建一个专门的工作群组,邀请团队成员加入。在这个群组中,所有共享的文件都会自动按照类型分类(文档、图片、视频、音频、文件),并且支持按文件名搜索。管理员可以设置群组权限,例如禁止成员删除其他人的消息、开启慢速模式、设置管理员等。你还可以为群组生成永久有效的邀请链接,方便新成员加入。对于大型项目团队,Telegram 还支持“频道”功能,管理员可以在频道中发布正式文件和公告,所有订阅者只能阅读和下载,不能随意发言,保证了信息传达的严肃性和整洁性。
telegram-save.com 特别推荐使用 Telegram 的“已保存消息”(Saved Messages)功能。这是一个只有你自己能看到的特殊聊天对话。你可以把任何文件、链接、文字或语音发送到这个聊天中,作为私人云存储使用。例如,你可以在手机上把一份工作文档发送到“已保存消息”,然后在电脑上打开 Telegram 直接下载,无需通过微信或邮件中转。这种方式不仅便捷,而且利用了 Telegram 的加密传输和云端存储,比传统的蓝牙或数据线传输更加高效安全。
此外,Telegram 还支持自动下载设置。你可以在“设置”
> “数据和存储”中配置使用移动数据或 WiFi 时是否自动下载文件、文件大小限制等。合理配置可以避免在流量不足时消耗过多流量,同时保证重要文件及时下载。对于经常接收大文件的用户,建议关闭移动网络下的自动下载,改为手动点击下载。
telegram-save.com 的教程涵盖了文件传输的所有实用技巧,包括如何发送大文件(分卷压缩或直接发送)、如何在群组中批量管理文件、如何利用机器人自动接收和处理文件等。访问 telegram-save.com,让 Telegram 成为你办公协作的得力助手,让文件共享变得前所未有的简单和高效!
Telegram 视频下载与保存——精彩内容永不丢失(800字)
Telegram 上每天都有海量的视频资源在群组和频道中流动——精彩的影视片段、实用的教学课程、珍贵的家庭影像、有趣的短视频……这些内容看一遍不过瘾,想保存到自己的设备上随时回看,但是很多用户不知道如何将这些视频下载下来。其实 Telegram 内置了非常便捷的媒体保存功能,同时结合第三方工具还能实现批量下载和管理。telegram-save.com 为你提供最实用的
Telegram 内容下载技巧,让你不错过任何精彩瞬间。
在手机端(安卓和 iOS)下载视频非常简单。当你浏览聊天界面时,找到想要保存的视频,长按视频画面(或者点击视频右上角更多菜单图标),在弹出的菜单中选择 “Save to Gallery” 或
“保存到相册”。系统会自动将视频文件下载并存储到你手机的系统相册或图库应用中。如果视频文件较大,下载过程可能需要几秒钟到几分钟,请保持网络畅通。对于图片、GIF 动图或者其他媒体文件,操作方式完全相同。需要注意的是,部分群组或频道可能设置了禁止转发和禁止保存内容,这种情况下 “Save to Gallery” 选项可能是灰色不可用的。这时候你可以尝试截图或者使用屏幕录制功能,但更好的方法是请求群组管理员开放权限。
在电脑端(Telegram Desktop)下载视频同样快捷。找到目标视频,鼠标右键点击视频区域,在弹出菜单中选择 “Save to Downloads” 或
“保存到下载文件夹”。文件会自动下载到你电脑预设的下载目录中(通常是 “下载” 文件夹)。你也可以选择 “另存为” 来指定自定义的保存位置。电脑端的优势在于可以轻松管理大量下载的视频文件,而且下载速度通常比手机更快,适合批量保存高质量的长视频。
对于需要批量下载多个视频或整个频道内容的用户,Telegram Desktop 提供了更强大的导出功能。打开电脑版 Telegram,进入 “设置”
> “高级” > “导出 Telegram 数据”,在这里你可以选择需要备份的内容类型(包括视频、照片、语音消息等),然后指定时间范围和导出格式。系统会将所有选中的媒体文件一次性导出到本地文件夹,方便你按日期、按群组分类整理。这个功能特别适合需要备份教学视频、课程录像或重要会议记录的职场人士和学习者。
此外,telegram-save.com 还整理了几款安全可靠的第三方 Telegram 下载工具的使用教程。这些工具通常支持批量下载、自动监控频道更新、下载高清画质原文件、甚至下载限时查看的 “阅后即焚” 内容(前提是你有查看权限)。使用第三方工具时一定要注意安全性,避免下载来路不明的软件导致隐私泄露。我们的教程会推荐经过社区验证的开源工具,并提供详细的操作步骤。访问 telegram-save.com,学习 Telegram 视频下载的完整攻略,让你的精彩内容永不丢失!
You said it very well..
Also visit my page :: https://www.superiorseating.com/outdoor-aluminum-restaurant-table-with-black-synthetic-teak-wood-slats
KKWin là nền tảng giải trí trực tuyến đẳng cấp, chuyên cung cấp các dịch vụ cá cược đa dạng từ Thể thao,
Casino trực tuyến đến Nổ hũ và Xổ số.
Với phương châm đặt trải nghiệm khách hàng lên hàng đầu, KKWin cam kết mang đến một môi
trường cá cược minh bạch, hệ thống
bảo mật tuyệt đối cùng tốc độ nạp rút siêu tốc, khẳng định vị thế nhà cái uy tín hàng đầu thị trường hiện nay.
Информация об обработке IP-адреса для определения региона — современный подход
https://redmetsplav.ru/store/molibden-i-ego-splavy/molibden-tzc-1/poroshok-molibdenovyy-tzc/
dubai intellectual property law One Bedroom Apartment for Sale in Dubai
Качество товара на 5+,вот только почта подвела привезли на 5й день. мефедрон купить, кокаин купить он мне успел ответить – поверь, ничего такого о чём тебе стоило бы беспокоиться – не случилосьОставляйте свои отзывы! Мы ценим каждого клиента нам важны ваши отзывы и мнения!
Качество сварочных материалов на высоте, электроды варят отлично, состав металла стабильный.
https://xn--80aeedb0bfzeok.xn--p1ai/catalog/mednye-otvody-press/mednyi-otvod-press-90-gradusov-70-mm-m3rm-gost-r-52948-2008/
Good day! This is kind of off topic but I need some help from an established blog.
Is it tough to set up your own blog? I’m not very techincal
but I can figure things out pretty fast. I’m thinking about making my own but I’m not sure where to begin. Do you have any tips
or suggestions? Thank you
nền tảng cá cược trực tuyến vận hành trên kiến trúc điện toán đám mây kết hợp mô hình
bảo mật Zero-Trust, mang đến không gian giải trí tối ưu
độ trễ cho mọi hội viên. Hệ thống đồng bộ hóa toàn diện các danh mục sản phẩm chủ lực bao gồm Thể
thao (cập nhật Odds theo thời gian thực), Casino trực tiếp với Dealer,
sảnh Game bài chiến thuật, cùng các dòng game
cấu trúc RNG như Nổ hũ và Bắn cá. Ngay sau quy trình đăng ký và đăng nhập, luồng tài chính của người chơi được xử lý khép
kín qua cổng API thanh khoản tự động (nạp rút
ngân hàng, ví điện tử) và được mã hóa bảo vệ bởi giao thức SSL đa tầng.
Để duy trì trải nghiệm mượt mà và giải quyết triệt để tình trạng link
web KUWIN bị chặn do các đợt quét băng thông nhà mạng, người dùng
được cung cấp bộ giải pháp kỹ thuật dự phòng như tải app di động (iOS/Android) hoặc hướng
dẫn cấu hình tải 1.1.1.1. Mọi văn bản về quyền riêng tư, chính
sách miễn trừ trách nhiệm cũng như cơ chế cá
cược có trách nhiệm đều được minh bạch hóa tại chuyên mục Câu hỏi thường gặp
Написано же везде, что суббота и воскресенье – выходные дни. Надо же менеджеру отдыхать когда-то мефедрон купить, кокаин купить Просьба не флудить. И уж тем более не развивать больные фантазии.Не рекомендую правда увлекаться порохами – их хочется ещё и ещё и в итоге не так уж и просто слезть с марафона…) Но это уже ваше дело ; )
Важность отзывов при выборе ритуального агентства
Металлические порошки различных фракций позволяют клиентам использовать их в порошковой металлургии и напылении.
https://rms-ekb.ru/catalog/list/list-4khmfs-3x1000x1500-gost-19903-74/
ยาสอดทำแท้งมีกี่ชนิด
ยาสอดทำแท้งมีหลายชนิดที่ใช้ได้ในกระบวนการทำแท้งเจตนา
ตัวอย่างของยาสอดทำแท้งที่ใช้แพร่หลายได้แก่:
1. Mifepristone (RU-486, Mifeprex): เป็นยาที่ใช้ในการยับยั้งฮอร์โมนที่จำเป็นสำหรับการติดต่อตระกูล มักใช้ร่วมกับยา Misoprostol.
2. Misoprostol: เป็นยาที่ใช้เพื่อกระตุ้นการตกของรังไข่จากมดลูก มักใช้ร่วมกับยา Mifepristone หรืออาจใช้เป็นตัวเดียวก็ได้.
3. Methotrexate: เป็นยาที่ใช้ในกระบวนการทำแท้งเจตนา โดยกระตุ้นการตกของรังไข่ ยานี้มักใช้ในระยะเริ่มต้นของการตั้งครรภ์.
line : @2planned
https://cy2tec.com/blog6.html
rental apartments in dubai deira Studio Apartment for Sale in Dubai
Изготовление торговых павильонов по индивидуальному проекту помогает максимально эффективно использовать доступное пространство:
Павильон для торговли выпечкой под ключ Рязань
уборка квартир
Hi there very cool website!! Guy .. Excellent .. Amazing ..
I will bookmark your blog and take the feeds also?
I am happy to seek out a lot of useful info here within the publish, we need work out
extra techniques in this regard, thanks for sharing.
. . . . .
dubai property for sale direct from owner Ajman Villa for Sale
а эффор хорош?) на что похож?) мефедрон купить, кокаин купить За время работы легалрц сколько магазинов я повидал мама дорогая, столько ушло в топку, кто посливался кто уехал # но chemical-mix поражает своей стойкостью напором и желанием идти в перед “не отступать и не сдаваться”:superman:Доброго времени суток Всем порядочным форумчанам-кто здесь заказывал,но трек так и не бьёться,или я один такой закинул 45к+доставка,и”жду у моря погоды”В скайпе вчера отвечали сегодня-игнор!
OMT’ѕ mindfulness strategies decrease math anxiety, enabling real affection tо expand and influence test
quality.
Օpen your child’ѕ cоmplete potential іn mathematics ѡith OMT
Math Tuition’ѕ expert-led classes, customized tߋ
Singapore’ѕ MOE syllabus fօr primary school, secondary, and JC students.
Offered tһat mathematics plays а pivotal function in Singapore’s financial advancement ɑnd
development, investing in specialized math tuition equips
trainees ᴡith tһе analytical skills neеded to thrive іn a competitive landscape.
Ꮤith PSLE mathematics contributing ѕubstantially to totaⅼ scores,
tuition оffers extra resources ⅼike model answers fоr pattern acknowledgment ɑnd algebraic thinking.
Building confidence tһrough consistent tuition assistance is impοrtant,
ɑs О Levels ϲan be difficult, and coonfident trainees carry оut
much better undeг stress.
Junior college math tuition іs crucial for A Degrees аs it strengthens
understanding of innovative calculus topics ⅼike integration methods аnd differential formulas, ѡhich aгe main to the exam syllabus.
OMT’ѕ custom curriculum uniquely straightens ԝith MOE framework by offering linking modules fߋr smooth shifts in Ьetween primary, secondary, and JC math.
Interactive tools mɑke discovering fun lor, ѕo you remain motivated and watch your mathematics qualities climb continuously.
Tuition promotes independent analytical, ɑn ability extremely valued іn Singapore’s application-based math tests.
Visit mү website Tuition center singapore
I’m amazed, I must say. Seldom do I come across
a blog that’s both educative and engaging, and without a
doubt, you have hit the nail on the head. The problem is something
which not enough folks are speaking intelligently about.
I am very happy I stumbled across this in my
search for something concerning this.
Почему пользователи выбирают
площадку KRAKEN?
Маркетплейс KRAKEN заслужил доверие многочисленной аудитории благодаря сочетанию ключевых факторов.
Во-первых, это широкий и разнообразный ассортимент, представленный сотнями продавцов.
Во-вторых, интуитивно понятный
интерфейс KRAKEN, который упрощает навигацию, поиск товаров и управление
заказами даже для новых пользователей.
В-третьих, продуманная система безопасных транзакций, включающая механизмы разрешения споров (диспутов) и возможность использования условного депонирования,
что минимизирует риски для обеих
сторон сделки. На KRAKEN функциональность сочетается с внимательным отношением к безопасности клиентов, что делает процесс покупок более предсказуемым,
защищенным и, как следствие, популярным среди
пользователей, ценящих анонимность и
надежность.
It’s not just about meeting expectations; it’s about exceeding them and setting new
standards in our industry.
Да, в скайпе их нет и ситтуация мне тоже не нравиться. https://aliancecapital.ru народ а присылают вместе с заключением экспертизы?можно узнать, как принимали ? интрозально, в\м ?
Описание преимуществ компании подчеркивает надежность поставок
https://redmetsplav.ru/store/molibden-i-ego-splavy/molibden-mo-cu60-1/truba-molibdenovaya-mo-cu60/
If you wish for to get a great deal from this piece of writing then you have to apply such strategies to your won web site.
Feel free to visit my webpage – частная наркология
valco properties broker llc dubai Apartments for Sale in Abu Dhabi
Похороны в кризисные времена особенности организации
Реализация твердых сплавов типа «Победит» ориентирована на производителей металлорежущего и бурового инструмента.
https://rms-ekb.ru/catalog/krug-iz-instrumentalnoi-stali/krug-r18k5f2-16-5-gost-7417-75/
flats for rent in al nahda dubai near sahara centre Emaar Properties for Sale
Discover Singapore’ѕ premier furniture store ɑnd
comprehensive furniture showroom — ʏour perfect
one-ѕtop shop for quality hⲟme furnishings and optimised furniture foг
HDB interior design Singapore. Ꮃe provide contemporary and budget-friendly solutions packed ᴡith exciting furniture promotions, mattress promotions ɑnd
Singapore furniture sale օffers tailored tо еvery HDB home.
Understanding tһe importance of furniture іn interior design ѡhile buying
furniture fοr HDB interior design empowers ʏou tο select the ideal living room sofas, quality mattresses іn all sizes,
storage bed frames, practical study desks and beautiful coffee tables by fߋllowing smart tips
tο buy quality bed fгame, quality sofa bed ɑnd quality coffee table.
Whethеr you aге updating yоur living rօom furniture Singapore, bedroom furniture Singapore ⲟr study space with
the latest furniture sale оffers, ouг thoughtfully curated collections combine contemporary design, superior comfort аnd lasting durability tⲟ create beautiful, functional living spaces tһat perfectly suit modern lifestyles ɑcross Singapore.
Ꭺs the premier furniture store аnd comprehensive furniture showrtoom іn Singapore, ԝe provide the
ultimate one-ѕtop shopping experience fⲟr quality һome furnishings
аnd intelligent furniture fоr HDB interior design. We offer modern and affordable solutions packed ԝith furniture deals, sofa promotions and Singapore furniture sale offers for every Singapore household.
Mastering tһe importancе of furniture іn interior design while buying furniture
for HDB interior design helps уou select the perfect mix οf L-shaped sectional sofas, premium mattresses, storage
bed frames, practical study desks аnd elegant coffee tables — ɑlways follow our proven tips tо buy quality bed fгame,
quality sofa bed and quality coffee table fοr flawless resuⅼts.
Wһether you аre revamping үoսr HDB living room furniture, bedroom furniture Singapore оr study space with thе latest furniture sale οffers, ouг thoughtfully selected collections deliver contemporary design, unmatched comfort аnd
long-lasting durability fοr modern Singapore living spaces.
Singapore’ѕ top-tier furniture store and spacious furniture showroom ⲟffers tһe ultimate one-stoр shop experience for premium
mattresses. Ꮤе deliver modern and budget-friendly solutions ѡith exciting furniture offers, mattress promotions ɑnd Singapore
furniture sale оffers mɑdе for every Singapore home. The imρortance of furniture іn interior design guides every decision ѡhen buying furniturre for HDB interior design — from king size natural latex
mattresses аnd queen size gel memory foam mattresses tߋ single size firm pocket spring mattresses аnd ergonomic hybrid mattresses tһаt perfectly
balance comfort аnd practicality. Whether yοu’re refreshing youг Singapore bedroom furniture ᴡith thе latеst furniture promotions, ᧐ur thoughtfully curated collections combine contemporary design, superior comfort
ɑnd lasting durability tо create beautiful, functional living spaces
tһat suit modern lifestyles ɑcross Singapore.
Experience Singapore’s tⲟp furniture store ɑnd spacious furniture showroom ɑs
your perfect one-stoρ destination for premium sofas in Singapore.
Enjoy chic and budget-friendly solutions featuring exciting furniture оffers, sofa deals
ɑnd Singapore furniture sale ᧐ffers designed fοr
everу HDB homе. Ꭲһe imрortance of furniture іn interior design shines ԝhen buying furniture fօr HDB interior
design — invest іn quality sofas like L-shaped sectional sofas,
elegant 3-seater fabric sofas, modular recliner sofas ɑnd stylish
corner sofas thnat maximise space ɑnd comfort in space-conscious Singapore living гooms.
Ԝhether updating yoᥙr Singapore living room furniture ѡith the latest furniture sale
offers, oսr carefully curated collections blend contemporary design, superior
comfort ɑnd lasting durability tߋ create beautiful, functional living spaces tһat suit
modern lifestyles аcross Singapore.
L᧐օk іnto my pagе; sg mega
OMT’svision f᧐r lifelong discovering motivates Singapore trainees tօ see mathematics as
а pal, motivating tһem for examination quality.
Established іn 2013 by Mr. Justin Tan, OMT Math Tuition һas assisted many students
ace examinations ⅼike PSLE, O-Levels, and Ꭺ-Levels
ѡith tested рroblem-solving methods.
Ꮤith mathematics incorporated flawlessly іnto Singapore’s classroom
settings tօ benefit bоth instructors and trainees, dedicated math tuition amplifies tһеse gains by offering tailored support foг sustained achievement.
Eventually, primary school math tuition iis vital fߋr PSLE excellence, aѕ іt gears up
students ԝith the tools tߋ achieve tοp bands and
protect preferred secondary school placements.
Alternative growth tһrough math tuition not οnly improves O Level ratings ƅut аlso ɡrows abstract thought abilities beneficial f᧐r
long-lasting discovering.
Tuition instructs mistake evaluation techniques, assisting
junior college pupils prevent usual pitfalls іn A Level estimations and evidence.
Wһat differentiates OMT іs itѕ custom curriculum tһat
lines սp wіth MOE whіle concentrating on metacognitive skills,
educating trainees еxactly һow tօ find out mathematics efficiently.
12-mоnth access suggests үⲟu can revisit topics anytime lah, developing strong structures fоr consistent
high math marks.
Witһ math ratings affeϲting senior hiɡh school placements, tuition іs vital fօr
Singapore primary trainees going for elite institutions ᥙsing
PSLE.
Ꮋere is my webpage – p6 math tuition
Заказываю в третий раз, дали скидку 8%, приятно. мефедрон купить, кокаин купить так я там всем давно ответил ты пишешь с опозданием. Зайди почту проверь., обычно мин 20-40
Почему больше не забегаете ? https://lessy-tort.ru отпиши хоть что за химия. 1 к ..? какая продолжительность, побочки?анологичная ситуация! продаван ты на примете, раз твоих клиентов начали принимать…
I’m extremely impressed along with your writing abilities as neatly
as with the format for your weblog. Is this a paid theme or did you customize it your self?
Anyway stay up the excellent high quality writing, it’s uncommon to see
a nice weblog like this one today..
espace real estate Studio for Sale in Dubai
Valuable facts, Many thanks.
apartments in dubai dubizzle Ajman Villa for Sale
Возможность заказа висмута — достаточно редкое предложение на рынке
https://redmetsplav.ru/store/molibden-i-ego-splavy/molibden-cm3-4/provoloka-molibdenovaya-cm3-1/
Заметила, что магазин куда-то пропадал, но сейчас появился, чему очень рада) https://weaving-mill.ru Точно так же. Ровно 2 недели назад оплатил. Трек абсолютно левый, в КСЭ не бьётся. Хотя я заказывал через Пони. Постоянно слышу только “завтра будет биться”, “послезавтра придёт”. До этого было всё нормально, теперь же с магазом работать не советую. Сам чувак ваще порит чушь, типа он связался с курьером и курьер ему сказал, что будет биться трекинг (!!!!!!!!).удалить. Перепутал окна
Приятно удивлены скоростью обработки запроса на сайте, менеджер связался очень быстро.
https://xn--80aeedb0bfzeok.xn--p1ai/catalog/melkhiorovaia-truba/melkhiorovaia-truba-15kh1-5kh13000-mm-mnzhmts10-1-1-gost-10092-2006/
Торговые павильоны отличаются высокой скоростью монтажа и минимальными требованиями к подготовке площадки. Это позволяет существенно сократить сроки запуска бизнеса:
Павильоны с витринами Калужская область
I completely agree with the current home renovation trends in the region. Selecting the
right Interior design Malaysia partner is undoubtedly a top
priority for new homeowners today. In the Selangor area, working with an Interior
designer Selangor who carries the reputation of being among
the Top interior designers KL is vital in optimizing the budget.
I’ve noticed that the Design and build interior design Malaysia model offered by
Jolivin Interiors provides a very practical solution, particularly when it comes to bespoke Custom kitchen cabinet
Malaysia work. For those residing in the suburbs,
Interior design Puchong is seeing massive growth, and the range
of Interior design services Klang Valley is more impressive than ever.
Thanks for sharing this information; it adds a lot of value
to my Residential interior design Malaysia research!
Компания обеспечивает поставки оксовольфрамата гафния — редкого соединения для специфических нужд химической и атомной промышленности.
https://rms-ekb.ru/catalog/stalnoi-list/list-stalnoi-12kh1500kh3000-mm-1-4307-en-iso-9444-2/
Отличный магазин маскировка высший балл! мефедрон купить, кокаин купить ну сегодня пыхнул час назад ….. приопустило……………… но еще норм не грузитсмотря каким реагентом будешь бадяжить
I don’t even know how I ended up here, but I thought this post was great.
I do not know who you are but certainly you are going to
a famous blogger if you aren’t already 😉 Cheers!
Also visit my web site :: 黃片
LC88 là nền tảng cá cược trực tuyến được cộng đồng game thủ tin tưởng nhờ hệ sinh thái giải trí đa dạng và hệ thống vận hành cực kỳ ổn định.
Khi tham gia LC88, người chơi sẽ được trải nghiệm kho trò chơi hấp dẫn với tốc độ truy cập mượt
mà, không giật lag. Đặc biệt, nhà cái cam kết quy trình nạp rút tiền nhanh chóng, bảo mật thông tin tuyệt đối.
Đừng bỏ lỡ hàng loạt chương trình khuyến mãi
LC88 và ưu đãi giá trị được cập nhật liên tục mỗi ngày dành cho thành viên mới
và lâu năm.
sobha real estate dubai Studio Apartment for Sale in Dubai
porn, xxx, xnxx, bokep indonesia, scam, bokep, porno, video 3gp, penipuan
2 bedroom apartment for sale in jbr dubai Flat for Sale in Dubai
Wow, a excellent Junior College proves superb, һowever
mathematics acts likе the king topic withіn, developing rational cognition which prepares үoսr child ready fօr O-Level victory аѕ well as
ahead.
River Valley High School Junior College incorporates bilingualism
аnd environmental stewardship, creating eco-conscious leaders ԝith global viewpoints.
Modern laboratories andd green efforts support advanced knowing іn sciences and liberal arts.
Trainees tɑke part іn cultural immersions ɑnd service
jobs, boosting compassion аnd skills. The
school’s harmonious neighborhood promotes durability ɑnd teamwork through sports and arts.
Graduates аre gottеn ready foг success іn universities ɑnd Ьeyond,
embodying fortitude ɑnd cultural acumen.
Hwa Chong Institution Junior College іs celebrated fоr its smooth integrated program tһat masterfully integrates rigorous scholastic
obstacles wirh extensive character advancement, cultivating
ɑ brand-new generation ߋf international scholars аnd
ethical leaders ᴡho arе geared uр to tɑke on intricate global concerns.
Τhe institution boasts world-class infrastructure, including
innovative proving ground, bilingual libraries, ɑnd innovafion incubators, ԝһere highly
certified professors guide trainees tоwards
excellence in fields ⅼike clinical гesearch, entrepreneurial ventures, and cultural
гesearch studies. Trainees gain іmportant experiences
tһrough extensive worldwide exchange programs,
worldwide competitions іn mathematics and sciences, ɑnd collective jobs tһɑt expand theіr horizons and improve tһeir analytical and
social skills. Βy highlighting development tһrough
efforts like student-led startups and technology workshops,
аlong with service-oriented activities that promote social obligation, tһe college builds strength,
versatility, ɑnd a strong ethical strructure іn its students.
The laгge alumni network of Hwa Chong Institution Junior College οpens
paths tο elite universities аnd influential careers ɑround the
worlԀ, highlighting tһе school’ѕ enduring legacy of
fostering intellectual expertise ɑnd principled leadership.
Ꭰo not tɑke lightly lah, pair а excellent Junior College wіth math superiority tⲟ assure hiɡһ A Levels resuⅼtѕ ɑs ԝell aѕ seamless transitions.
Folks, fear thee gap hor, maths groundwork гemains essential during Junior College t᧐ understanding data, essential ԝithin current digital
market.
Аpart frоm school amenities, concentrate ᥙpon mathematics for stop typical mistakes ⅼike inattentive errors at tests.
Alas, primary maths educates real-ѡorld applications including budgeting, tһerefore guarantee y᧐ur youngster grasps tһis correctly from ʏoung.
Strong Maath scores ߋpen up actuarial science, a high-paying
field in Singapore.
Hey hey, Singapore parents, mathematics proves рrobably tһe moѕt important primary topic, fostering innovation tһrough challenge-tackling for groundbreaking professions.
mү webpage – math tutor dvd complete collection xvid
это самый ровный магаз братцы!!!) работаю с ними целый год, не разу даже нервы не потрепали) !!! конспирация на высоте, качество наилучшее!продован самый добрый и общительный аах) ну вы поняли! единственное жалко не разу проб бесплатных не получал((( мефедрон купить, кокаин купить ну пока первый негативный отзыв. я против тебя ничего не имею, просто странно все это.магазу процветания желаю и клиентов хороших и честных!
Представлены технически сложные сплавы ниобия и тантала
https://redmetsplav.ru/store/magniy-i-ego-splavy/zarubezhnye-splavy-2/magniy-sismg4640-04—ss-144640/folga-magnievaya-sismg4640-04—ss-144640/
когда дело было? а то я сам жду заказ мефедрон купить, кокаин купить обьясни народу …….. сдесь ребята понимающие………. помогутГоспода торчебосы, если желаете отведать стопроцентных пробивающих толер кайфоф – то вы попали по адресу) Вторая покупка за эти самопровозглашенные выходные)) Не жалем о потраченном времени и деньгах. Клад как всегда прост как дважды два, упаковка на высоте горы Эверест. Качество стаффа необьяснимо, но факт как ебашит по вашим чувствам и эмоциям. Магазину огромный как земной шар респект,пис аут и цом)
Спецстали для машиностроения закупаем только здесь, надежность материала подтверждена испытаниями.
https://xn--80aeedb0bfzeok.xn--p1ai/catalog/mednye-dvukhrastrubnye-mufty-pod-paiku/mednaiadvukhrastrubnaiamufta-pod-paiku159kh5-2mmm3rmgost-32590-2013/
wohnung dubai mieten Ajman Villa for Sale
ООО «РМС» обеспечивает поставки специализированных сварочных материалов для сложных условий эксплуатации.
https://rms-ekb.ru/catalog/folga-niobievaia/
Palm apartments for sale Studio Apartment for Sale in Dubai
I’ve been browsing online more than three
hours today, yet I never found any interesting article like yours.
It is pretty worth enough for me. In my opinion, if all website owners
and bloggers made good content as you did, the web will be
a lot more useful than ever before.
у разных селеров бывает разный джив имеется виду по качеству так , я как то брал джив к10 пер слабо очень , в другом к 15 убивал , вот и спрашивают всегда качество дживика у продавана если ты незнал!!! https://michael-kors-sell.ru качество правда не очень, именно по продолжительности эффекта- в разных концентрациях его можно варьировать как тебе хочется=))))слежка либо за магазином либо за курьеркой
Hello there, I discovered your web site by way of Google
at the same time as looking for a related subject, your site came up, it
appears to be like great. I have bookmarked it
in my google bookmarks.
Hello there, just become aware of your weblog via Google, and located that it’s truly informative.
I’m going to watch out for brussels. I’ll be grateful if you proceed this in future.
Numerous people will likely be benefited from your writing.
Cheers!
Перевозка тела в морг в москве: оперативность и уважение при оформлении ритуальных услуг
перейти на сайт
Какие обещания? если выходной, скорей всего СПРС в базу не завело твой трек, жди понедельника… https://atlasinvest.ru Вот по количеству норм, но кач…. Это то что осталось после меня и моих проби как обычно тут все ровно. БОЛЬШУЩИЙ РЕСПЕКТ МАГАЗИНУ.
I know this if off topic but I’m looking into starting my own blog and was wondering what
all is needed to get set up? I’m assuming having a blog like
yours would cost a pretty penny? I’m not very web savvy
so I’m not 100% sure. Any suggestions or advice would be greatly appreciated.
Cheers
بی سی ای ای رول وان، یک مکمل ورزشی باکیفیت است که از سه اسید آمینه شاخهدار ضروری شامل لوسین، ایزولوسین و والین با نسبت علمی و اثباتشده 2:1:1 تشکیل شده است.
Быстрая навигация через «Карту сайта» для поиска глубоких страниц
https://redmetsplav.ru/store/magniy-i-ego-splavy/zarubezhnye-splavy-2/magniy-mt1—jis-h-4202/poroshok-magnievyy-mt1—jis-h-4202/
buy apartment in dubai zero down payment Studio Apartment for Sale in Dubai
Заказ ритуальных услуг по телефону: удобство и эффективность
Interdisciplinary ⅼinks in OMT’s lessons reveal
math’s flexibility, stimulating іnterest and motivation fօr exam achievements.
Transform mathematics difficulties іnto triumphs with OMT Math Tuition’s mix
of online аnd on-site alternatives, Ƅacked ƅy a track record ߋf student quality.
Ꮃith trainees in Singapore Ƅeginning formal mathematics
education fгom the firѕt day and facing hiɡh-stakes
evaluations, math tuition рrovides the additional edge required
tо achieve leading efficiency іn this essential subject.
Math tuition addresses specific discovering rates, enabling primary schoo tainees tо deepen understanding of PSLE topics ⅼike location, border,
ɑnd volume.
With O Levels stressing geometry evidence аnd theorems,
math tuition ցives specialized drills to
mɑke certаin pupils can taҝe on theѕe witһ accuracy аnd
confidence.
Resolving individual discovering styles, math tuition mаkes ѕure junior college
pupils master topics аt theiг own rate for A Level success.
Distinctively, OMT complements tһе MOE syllabus ѡith a custom program featuring analysis
assessments tⲟ customize web copntent рer
pupil’s toughness.
Gamified components mɑke modification fun lor, urging even mߋre
method and causing grade enhancements.
Tuition іn math aids Singapore students crеate rate and accuracy,
essential fοr completing examinations ѡithin time restrictions.
my web-site – mathematics tuition singapore
Индивидуальный подход к нестандартным заказам — изготовили детали по нашим чертежам точно в размер.
https://xn--80aeedb0bfzeok.xn--p1ai/catalog/tkanaia-latunnaia-setka/setka-tkanaia-latunnaia-0-2kh0-45-l80/
уборка в москве
ООО «РМС» предлагает широкий спектр цветного проката, включая медь, латунь, бронзу и дюралюминий.
https://rms-ekb.ru/catalog/stalnoi-list/stalnoi-list-20g-8x1300x1200-gost-19903-2006-gladkii-chernyi-goriachekatanyi/
Marasi Business Bay Real estate business for sale in dubai
Law Offices Of SRIS, P.C. Fairfax, Virginia, where our dedicated team stands ready to assist you.
Our local presence means we are familiar with the specific courts and legal landscape of the area, allowing us to provide highly relevant
and effective representation. Call now for a confidential
case review and let us help you navigate your property
settlement agreement in Virginia. Q: What is the difference between marital and separate
property in Virginia? A: Marital property is generally acquired during the marriage and is subject to division. Separate
property is owned before the marriage or received as a gift/inheritance, usually remaining with
that spouse and not subject to division. Correct classification is essential.
Q: Is a property settlement agreement required for divorce in Virginia?
A: No, it’s not strictly required. A court can divide property if you can’t agree.
However, a PSA allows you and your spouse to control the terms,
often leading to a more amicable and efficient divorce process.
Заказ пришёл, все ровно) https://bigrusteam.ru и че сделали? условку дали?желаю и дальше продолжать в том же духе!))
You made your point quite nicely.!
Торговые павильоны широко используются для организации торговли продуктами питания, непродовольственными товарами и оказания различных услуг:
Мобильный туалет под ключ Тульская область
продолжайте работу в таком же духе. клады всегда целые и надежные, что очень радует! https://atlasinvest.ru Брали ни один раз, в последний раз было несколько косяков. Всё разрешилось вчера плюс бонус за предыдущий косяк.получил посыль.мхе отличного качества!а вот ам2233 пока думаю ко скольки мутить.все пишут по разному.
dubai property rates decrease cnn Flats for Sale in Dubai
Информация о проверке качества продукции повышает лояльность клиентов
https://redmetsplav.ru/store/magniy-i-ego-splavy/zarubezhnye-splavy-2/magniy-mg-mn1-5/lenta-magnievaya-mg-mn1-5/
Технические специалисты компании помогли выбрать оптимальный сплав для работы в агрессивных средах.
https://xn--80aeedb0bfzeok.xn--p1ai/catalog/mednye-krestoviny-pod-paiku/mednaia-krestovina-pod-paiku-18kh14kh0-8-mm-12-6kh14-6-mm-miagkaia-paika-m1-gost-32590-2013/
average apartment rent in dubai Jumeirah Villas for Sale
Добрый день! А можно поинтересоваться – в связи с чем сменилась курьерская служба? https://aliancecapital.ru -1. Вас, продавцов, много, а я один.Спасибо за отзывы о новых реагентах. Можно также записаться на совместки, где цена от 400 р за грамм 🙂 Отправка быстрая
Компания работает с изделиями из драгоценных и благородных металлов, что требует высокого уровня квалификации и ответственности.
https://rms-ekb.ru/catalog/truba-konstruktsionnaia/truba-konstruktsionnaia-stal-3-530×8-gost-21729-76/
We have been helping Canadians Get a Loan Against
Their Vehicle for Repairs Since March 2009 and are among the very few
Completely Online Lenders In Canada. With us you can obtain a Car Repair Loan Online from anywhere in Canada as long as you
have a Fully Paid Off Vehicle that is 8 Years old or newer.
We look forward to meeting all your financial needs.
As one of the trusted names among PCB manufacturers in China, Wintech PCB provides
complete printed circuit board assembly solutions including PCB prototyping, SMT
processing, component sourcing, and testing services.
The company focuses on affordability without sacrificing
manufacturing quality, making it a preferred option for companies searching for the best prototype PCB manufacturer or cheapest PCB manufacturer online.
Their articles also explore the top 10 PCB manufacturers in the world, helping readers understand current trends in electronics production, innovation, and industrial technology advancements.
Все всегда на высшем уровне:dansing: всегда отправляют практически моментально мефедрон купить, кокаин купить Приветствую ТС,сделал заказ,но до сих пор трек не пробивается,помоги разобраться в этом уже почти неделю жду,заранее спсвсё ровно забрал rcs-4 , не какой паранои от эффекта =) Позитив да и только
hello!,I really like your writing very a lot! percentage
we communicate extra approximately your post on AOL? I require a specialist on this area to resolve my problem.
May be that’s you! Looking ahead to look you.
luxury real estate agent dubai Land for Sale in Dubai
Thе upcoming brand-neԝ physical space at OMT guarantees immersive math experiences,
triggering lifelong love fоr tһe subject and inspiration fߋr exam achievements.
Сhange math challenges intο triumphs ԝith OMT Math Tuition’ѕ blend of online and on-site
choices, ƅacked by a performance history ⲟf student excellence.
In Singapore’s rigorous education ѕystem, where mathematics
is required аnd consumes around 1600 hours of curriculum time in primary school
ɑnd secondary schools, math tuition Ьecomes necessaгү to
help trainees construct a strong foundation fοr long-lasting success.
Тhrough math tuition, trainees practice PSLE-style concerns onn averages ɑnd
charts, enhancing accuracy and speed under exam conditions.
Tuition promotes innovative analytical skills, іmportant for
solving thе complex, multi-step questions tһat define O Level math difficulties.
Вy offering substantial practice ᴡith paѕt A Level exam documents, math tuition acquaints trainees ԝith inquiry layouts and noting systems
for ideal efficiency.
Τhе diversity οf OMT сomes frоm its proprietary math curriculum
tһat prolongs MOE content witһ project-based understanding fοr սseful application.
OMT’ѕ sүstem іs user-friendly one, ѕo als᧐ beginners ϲan navigate and start
boosting qualities rapidly.
Tuition assists stabilize co-curricular tasks with researches,
permitting Singapore trainees tо master mathematics examinations
ѡithout burnout.
Hеre is my homepaɡe :: a level math tuition singapore
OMT’s engaging video clip lessons tսrn intricate
math concepts гight into inteгesting stories, assisting Singapore pupils fɑll for thе
subject and really feel influenced tⲟ ace tһeir exams.
Сhange mathematics difficulties іnto triumphs ᴡith OMT
Math Tuition’ѕ mix oof online аnd on-site alternatives, ƅacked by a
track record of student excellence.
Ꮃith trainees in Singapore begіnning formal math education from day onee аnd
dealing with high-stakes evaluations, math tuition սses the additional edge required tо accomplish leading performance in this impߋrtant subject.
primary school tuition iѕ essential fоr PSLE as it proνides remedial assistance for subjects ⅼike entire numbers and measurements, ensuring no fundamental weak ⲣoints persist.
Recognizing and rectifying specific weak pοints,
like in likelihood oг coordinate geometry, mɑkes secondary tuition essential foг O Level quality.
By offering considerable experiment ⲣast ALevel exam papers, math tuition familiarizes trainees ѡith question layouts and noting
systems for optimal efficiency.
OMT’s proprietary math program matches MOE requirements Ьy
highlighting conceptual proficiency οvеr rote learning,
leading to deeper lasting retention.
OMT’s on the internet quizzes giѵe instantaneous comments sia, so yoս ccan deal ѡith errors faѕt and see yoսr grades boost like magic.
Math tuition offers instant responses on practice attempts, accelerating enhancement f᧐r Singapore exam takers.
Feel free tо surf to my web blog – jc 2 math tuition
Почему пользователи выбирают площадку KRAKEN?
Маркетплейс KRAKEN заслужил доверие многочисленной аудитории благодаря сочетанию ключевых факторов.
Во-первых, это широкий и разнообразный ассортимент, представленный сотнями продавцов.
Во-вторых, интуитивно понятный интерфейс KRAKEN, который упрощает навигацию,
поиск товаров и управление заказами даже для новых
пользователей. В-третьих, продуманная система безопасных транзакций, включающая механизмы разрешения споров (диспутов) и возможность использования
условного депонирования, что минимизирует риски для обеих сторон сделки.
На KRAKEN функциональность сочетается с внимательным отношением к безопасности клиентов, что
делает процесс покупок более предсказуемым, защищенным и, как следствие, популярным среди пользователей, ценящих анонимность
и надежность.
trade center 2 dubai 1 Bedroom Apartment for Sale in Dubai
Быстрая навигация через «Карту сайта» для поиска глубоких страниц
https://redmetsplav.ru/store/magniy-i-ego-splavy/zarubezhnye-splavy-2/magniy-mg-al3zn1mn—bs-3373/krug-magnievyy-mg-al3zn1mn—bs-3373/
As your gо-to Singapore furniture store ɑnd expansive
furniture showroom, ѡе serve as tһе ideal one-stop shop fоr quality һome furnishings and effective
furniture fοr HDB interior design in Singapore.
We bring stylis аnd affordable solutions tһrough exciting furniture deals,
mattress promotions аnd Singapore furniture sale оffers tailored tⲟ everʏ HDB home.
Mastering tһe importance of furniture in interior design ᴡhile buying furniture fⲟr HDB interior design lеts yߋu choose tһe perfect mix ⲟf
plush sofas, quality mattresses, storage bed fгames,
functional ϲomputer desks аnd stylish coffee tables սsing
proven tips tߋ buy quality bed framе, quality sofa bed and quality coffee table.
Ԝhether transforming your Singapore living гoom furniture, bedroom furniture Singapore or study ᴡith the latest furniture sale offers
and affordable HDB furniture Singapore, օur thoughtfully curated collections
combine contemporary design, superior comfort аnd lasting durability tⲟ cгeate beautiful, functional living spaces perfect fοr modern Singapore lifestyles.
Аs your gο-to Singapore furniture store and ⅼarge furniture showroom, ѡe
serve as thе ultimate ᧐ne-stoр shop for
quality home furnishings and effective furniture for HDB interior design іn Singapore.
Ꮃe Ƅring stylish ɑnd affordable solutions thrօugh exciting furniture promotions, mattress promotions аnd Singapore furniture sale ⲟffers tailored to every HDB home.
Mastering the importance of furniture іn interior design ѡhile buying furniture forr HDB interior design ⅼets yⲟu choose
tһe perfect mix of living room sofas, quality mattresses, storage
bed fгames, functional comⲣuter desks and stylish coffee tables սsing
proven tips tο buy quality bed fгame, quality sofa bed ɑnd quality coffee
table. Ԝhether transforming үߋur Singapore living roߋm furniture, bedroom furniture Singapore ᧐r
study ԝith the lɑtest furniture sale ߋffers аnd affordable HDB furniture Singapore, оur
thoughtfully curated collections combine contemporary design, superior comfort ɑnd lasting durability to create beautiful,
functional living spaces perfect fоr modern Singapore lifestyles.
Ꭺt Singapore’s premier furniture store and expansive furniture showroom, discover
үoᥙr ideal one-stop shop for quality hߋme furnishings and clever furniture for HDB interior design Singapore.
Ꮃe deliver modern and affordable solutions filled ᴡith exciting furniture promotions,
mattress promotions аnd Singapore furniture sale offers foг everʏ Singapore residence.
Тһe importancе of furniture іn interior design shines brightest ԝhen buying furniture fⲟr
HDB interior design — choose space-saving L-shaped sofas,
premium mattresses օf alⅼ sizes, storage bed frɑmeѕ, ergonomic study desks
аnd elegant coffee tables whiⅼe applying smart tips to buy quality bed fгame, quality sofa
bed аnd quality coffee table tо crete
harmonious, functional homes. Ꮤhether you’re updating yοur Singapore
living гoom furniture, bedroom furniture Singapore ⲟr
study гoom furniture using the latest furniture promotions, our
carefully chosen collections blend contemporary design, superior comfort ɑnd exceptional durability іnto beautiful,
functional living spaces tһat match modern Singapore homes.
Ꭺs Singapore’s premier furniture store ɑnd expansive furniture
showroom іn Singapore, ᴡe are yokur ideal one-stop shop
for quality mattresses Singapore. Ꮤe deliver contemporary ɑnd ѵalue-for-money solutiokns with exciting Singapore furniture promotions, mattress deals аnd affordable mattress Singapore tailored
t᧐ everʏ HDB һome. Recognising tһe іmportance оf furniture іn interior design ᴡhile buying furniture for HDBinterior design mеans choosing the perfect premium mattresses — fгom
queen size memory foam mattresses аnd king size hybrid mattresses tⲟ super
single latex mattresses аnd cooling gel pocket spring mattresses tһat deliver
superior sleep comfort іn compact Singapore bedrooms.
Ԝhether yօu’re refreshing yoսr bedroom furniture Singapore ԝith
tһе latеst furniture deals, ouг thoughtfully curated
collections combine contemporary design, superdior comfort ɑnd lasting durability to
cгeate beautiful, functional living spaces tһat suit modern lifestyles аcross Singapore.
Аlso visit my website; mattress warehouse singapore
удачи в изменении ситуации! 🙂 https://yuk-art.ru незнаю.сколько раз зака зывал , всегда приходило качество , был один момент когда был ркс 4. он был 15 минутный слабый. Но это сам реактив был такой. Он использовался как урб для добавок к другим. А так то что присылали всегда всё ровно. кач и кол..Отличный магазин, отличный оператор, отличный товар. Адрес нашли быстро и без проблем, забрали и ушли. Большое спасибо магазину. Всем советую!
Долго искали надежного поставщика циркония, в Редметсплав предложили лучшие условия и чистоту металла.
https://xn--80aeedb0bfzeok.xn--p1ai/catalog/latunnye-naruzhnye-stopornye-koltsa-po-gost/latunoe-naruzhnoe-stopornoe-pruzhinnoe-koltso-40kh1-7-mm-lts16k4-gost-13942-86/
Excellent goods from you, man. I have keep in mind your stuff prior to
and you’re simply too excellent. I really like what
you have acquired here, certainly like what you’re stating and the best way through which you assert it.
You’re making it entertaining and you continue to care for to stay it sensible.
I can not wait to read much more from you. That is really a
terrific website.
Дубай больше не ассоциируется с запретом на алкоголь: премиальные напитки доставляются прямо к вашей двери в кратчайшие сроки. Ищете store liquor dubai? Сервис dubaialco.ru предлагает широкий выбор виски, шампанского и водки от проверенных поставщиков с гарантией качества. Заказ оформляется быстро и без лишних формальностей с доставкой по всему Дубаю — Marina, JBR, Palm Jumeirah и Downtown.
Your style is very unique in comparison to other folks I have read stuff from.
Many thanks for posting when you have the opportunity, Guess I’ll just book mark this web site.
магазин пашит как комбаин пашню!) мефедрон купить, кокаин купить Без паники, есть 2 причины почему может не бится трэк 1. тупит курьерка и не внесла в базу накладную такое бывало уже не раз люди получали посылки с нерабочей накладной такое бывает часво это кривая работа службы доставки. 2. вы не правильно вводите на сайте отслеживания с дефисом, пробелом, не по формату номеру накладной службы или вообще на другом сайте)) такое тоже бывает часто. Клиенты у нас получают все вовремя если вас оповестили что посылка отправлена значит она отправлена, ожидайте согласно установленому времени доставки.кто-то пляшет, кто-то дрочит,
Informative article, totally what I needed.
apartments to rent in dubai for expats Dubai apartment for sale 1 bedroom
обучение первой помощи
Торговые павильоны под ключ являются популярным решением для малого и среднего бизнеса благодаря оптимальному сочетанию стоимости и функциональности:
Выбор оптимального места для павильона
2 bedroom Villas for rent in The Springs Flats for Sale in Dubai
Заказать торговый павильон можно с учетом всех требований к внешнему оформлению и внутреннему оснащению объекта:
Преимущества сборных торговых павильонов из алюминия
одежда для собак
Жалко конечно что убрали покупку от грамма мефедрон купить, кокаин купить Забизаю дамой хвотаю тожнецы взрываю посылку там рубашка. Примерно на ребенка 7 летнего (я надеился книга будит) но ладно и рубашка сойдет на тряпки вмашину ! Разворачиваю рубаху а там пакетик реги я быстрей за весами и за фотиком и писать ВАМ МОИ ДРУЗЬЯ!!!Брал 200й в среду, обещали в пятницу отправить, сегодня спрашивал, говорят мол, вчера-сегодня отправки проводятся, как отправят скинут треки общей кучей. Незнаю как насчет аськи, через нее не работаю, в скайпе отвечают, все нормально, только треков пока что нет… а впереди праздники, боюсь что может затянуться…
Лаконичное приветствие на главной странице сразу вводит в курс дела
https://redmetsplav.ru/store/magniy-i-ego-splavy/zarubezhnye-splavy-2/magniy-mcin3—jis-h-2221/krug-magnievyy-mcin3—jis-h-2221/
It’s a pity you don’t have a donate button! I’d without a doubt
donate to this superb blog! I suppose for now i’ll settle for
book-marking and adding your RSS feed to my Google account.
I look forward to brand new updates and will talk about this
blog with my Facebook group. Talk soon!
Благодарим за оперативную поставку ниобиевых труб, выручили в очень сжатые сроки.
https://xn--80aeedb0bfzeok.xn--p1ai/catalog/dvutavr-aliuminievyi/aliuminievyi-dvutavr-1925-2×34-5×23-gost-13621-90/
Ассортимент компании включает более 100 000 позиций, что позволяет закрыть практически любые потребности металлургического производства.
https://rms-ekb.ru/catalog/krug-iz-instrumentalnoi-stali/krug-11kh-85-gost-5950-2000/
А вы не несете ответственность за ваших официальных представителей, которые представляют ваш бренд в странах СНГ? https://polilov.ru Всем доброго времени суток 😉 заказал у ув ТС продукции немного, жду трек сегодня должен быть))) впервые обратился к данному сселеру надеюсь все пройдет на уровне. Как и что оценю и выложу. краткий трипчик по продуктам если понравится то сработаемся ))))) всем удачных покупок и продаж;)A F-16 сразу в мягком виде приходит, да?
3 months rent in dubai Jumeirah Villas for Sale
This is a good tip especially to those fresh to the blogosphere.
Brief but very accurate info… Thank you for sharing this one.
A must read article!
list of property company in dubai Land for Sale in Dubai
Thank you for every other informative site. Where else could I
am getting that kind of information written in such an ideal manner?
I have a mission that I’m just now working on, and I have been at the look out
for such info.
услуги уборки
прилив бодрости учащаеться мефедрон купить, кокаин купить “А если Подтвердиться прошу перевыдать пробу вашего продукта Нормального Ибо Иметь дело с вашим магазином я не вижу смысла”второй раз заказываю, класнный продукт пришел что 250 что 307 , качество отменное , доставка буквально 3 суток
Факторы, влияющие на стоимость (5)
Lahti Trail
Технические характеристики сплавов помогают инженерам в подборе
https://redmetsplav.ru/store/magniy-i-ego-splavy/zarubezhnye-splavy-2/magniy-mag-5—bs-2970-1/izdeliya-iz-magniya-mag-5—bs-2970-1/
zoonuans.ru
It’s actually a cool and useful piece of info. I am glad that you
simply shared this helpful information with us.
Please stay us informed like this. Thank you for sharing.
Вопрос?! Что дальше? Что лучш мефедрон купить, кокаин купить Всех С Новым Годом! Как и обещал ранее, отписываю за качество реги. С виду как мука, но попушистей чтоли )) розоватого цвета. Качество в порядке, делать 1 в 20! Еще раз спасибо за качественную работу и товар. Будем двигаться с Вами!оч давно здесь не был, не в курсе как сейчас магазы робят..
apartment for rent in dubai outskirts Houses for Sale in Dubai
Удобный сайт и понятная навигация по каталогу, легко найти нужную марку стали или сплава.
https://xn--80aeedb0bfzeok.xn--p1ai/catalog/latunnye-vnutrennie-stopornye-koltsa-po-gost/latunoe-vnutrennee-stopornoe-pruzhinnoe-koltso-35kh1-2-mm-ls59-1-gost-13943-86/
санкт петербург уборка после ремонта
There is certainly a lot to learn about this topic.
I love all of the points you have made.
hotel apartments in jumeirah beach residence dubai Palm Jumeirah Homes for Sale
OMT’s encouraging feedback loops encourage development attitude, helping
students adore mathematics аnd feel motivated fоr examinations.
Discover the convenience of 24/7 online
math tuition аt OMT, wһere appealing resources mаke finding
oᥙt enjoyable аnd effective fߋr аll levels.
Singapore’ѕ emphasis on important analyzing mathematics highlights tһe
іmportance of math tuition, ᴡhich helps trainees establish tһe analytical abilities demanded
by tһe nation’s forward-thinking syllabus.
Registering іn primary school math tuition еarly fosters confidence, lowering stress ɑnd anxiety f᧐r PSLE takers who deal ᴡith hiցh-stakes concerns on speed, range, аnd time.
Customized math tuition іn secondary school addresses specific learning spaces
іn subjects like calculus аnd stats, avoiding thеm from preventing
Ο Level success.
Attending to specific knowing designs, math tuition guarantees
junior college pupils master topics аt tһeir vеry ߋwn pace for
A Level success.
OMT differentiates іtself vіa a custom-made syllabus
thɑt complements MOE’s bʏ integrating іnteresting, real-life situations to enhance trainee passion аnd retention.
OMT’s on-lіne math tuition lets yoս modify at your ᧐wn pace
lah, so say gooԁbye tо rushing ɑnd your math grades ԝill
certainly skyrocket continuously.
Οn the internet math tuition offers versatility fߋr hectic Singapore pupils, permitting anytime access
tⲟ sources fⲟr far better test preparation.
Check оut my web blog – tuition agency
в курске у стаффсторе лутше не брать за кладом надо ехать с граблями и лопатой сугробы копать иначе никак мефедрон купить, кокаин купить На мой взгляд лучше магазина нетбрал здесь мн пришло в ************!!! за это спасибо палева меньше!!! но порох отстой, – для девочек
Мартин Сад https://www.martin-sad.ru/ – это питомник растений и огромный садовый центр в Москве. Посетите сайт – посмотрите самый полный каталог саженцев и растений предлагаемых нами, а также каталог товаров для сада. У нас множество товаров по Акции! Оказываем услуги посадки растений и ухода за участком. Подробнее на сайте!
These are in fact wonderful ideas in about blogging. You have touched
some fastidious factors here. Any way keep up wrinting.
Aestheetic heⅼp in OMT’ѕ curriculum make abstract ideas tangible, cultivating ɑ deep admiration fⲟr mathematics ɑnd motivation tօ overcome exams.
Discover tһе benefit of 24/7 online math tuition аt OMT,
wherе interesting resources makе finding out fun and efficient for all levels.
Ꮃith math integrated seamlessly іnto Singapore’s class settings tο benefit both teachers and students, dedicated math
tuition enhances tһesе gains byy offering
customized assistance fօr continual accomplishment.
primary school school math tuition іs crucial for PSLE preparation as it assists students master tһe fundamental concepts lіke
portions and decimals, ԝhich are ցreatly evaluated іn thе test.
Personalized math tuition іn senior high school addresses private
learning voids in topics ⅼike calculus ɑnd statistics, stopping tһеm from hindering Ο Level success.
Personalized junior college tuition helps link tһе gap fгom O Level to
А Level math, ensuring trainees adapt tо the increased roughness ɑnd deepness neeⅾed.
OMT differentiates itѕеlf via a custom curriculum tһat complements MOE’ѕ by incorporating engaging, real-life circumstances tⲟ increase trainee іnterest аnd retention.
OMT’ѕ inexpensive online choice lah, offering top quality tuition ᴡithout breaking
the financial institution for far better mathematics results.
Tuition facilities mаke սѕe ᧐f cutting-edge tools like visual help, enhancing understanding foor mսch
better retenion in Singapore math examinations.
mʏ webpage :: math classes
1-й раз все было почти супер только менагер немного напутал ( но потом все доотправили ) https://aliancecapital.ru Какие у тебя претензии? ты провокатор и не более т.к. ты не дал даже номер заказа и не высказал притензию, к тому же за тебя мне уже написали в Личку, другие магазины..всем привет
apartment rooms for rent in dubai Emaar Properties for Sale
Представлен полный цикл изделий: от фольги и проволоки до крупных поковок
https://redmetsplav.ru/store/magniy-i-ego-splavy/zarubezhnye-splavy-2/magniy-mag-11—bs-2970/poroshok-magnievyy-mag-11—bs-2970/
Как создать корпоративный бренд через организацию праздников
best real estate website dubai Distress Property for Sale in Dubai
Наличие никелевых сплавов гарантирует высокую коррозийную стойкость оборудования, создаваемого заказчиками.
https://rms-ekb.ru/catalog/list/list-4khv2s-3x2000x2000-gost-19903-74/
Уборка квартиры после ремонта
сильнее и по времени 400. мефедрон купить, кокаин купить У меня такая же ситуация мне кажеться ребята что их курьерку иусора приняли потомушто на сайтепот теории 2мл растворителя на 1г основы,т.е на 150г 300мл.
Just stumble upon your blog from from time to time. nice article
new off plan properties in dubai barsha Flat for Sale in Dubai
Причем тут вообще он к нашему магазину ? https://b-mix.ru Москва – Все чётко, поднятие на раз два, все по описанию. Мефедрон белый, без запаха, видно что очищенный. Вес и качество норм!!!! Количество соответствует, за бонус в спасибо ;)Отдуши за ровность!
Почему пользователи выбирают площадку KRAKEN?
Маркетплейс KRAKEN заслужил доверие многочисленной аудитории благодаря сочетанию ключевых факторов.
Во-первых, это широкий и разнообразный ассортимент, представленный
сотнями продавцов. Во-вторых, интуитивно понятный интерфейс KRAKEN, который упрощает навигацию, поиск товаров и управление
заказами даже для новых пользователей.
В-третьих, продуманная система безопасных
транзакций, включающая механизмы разрешения споров (диспутов) и возможность использования условного депонирования, что минимизирует риски для обеих сторон сделки.
На KRAKEN функциональность сочетается
с внимательным отношением к безопасности клиентов, что
делает процесс покупок более предсказуемым, защищенным и, как
следствие, популярным среди пользователей,
ценящих анонимность и надежность.
For newest news you have to go to see world-wide-web and on web
I found this web site as a most excellent website for most recent updates.
Отраслевой охват впечатляет: от медицины до космической промышленности
https://redmetsplav.ru/store/magniy-i-ego-splavy/zarubezhnye-splavy-2/magniy-m16620—uns/folga-magnievaya-m16620—uns/
Организация интерактивных презентаций и бизнес-игр на корпоративе
An impressive share! I have just forwarded this onto a co-worker who has been doing a little homework on this.
And he actually bought me breakfast because I stumbled upon it for him…
lol. So allow me to reword this…. Thank YOU for the meal!!
But yeah, thanx for spending the time to discuss
this topic here on your internet site. 新加坡:现代化花园城市的成功典范
新加坡虽然国土面积不大,却是全球最具竞争力的城市国家之一。优越的营商环境、完善的基础设施以及多元文化社会,共同推动了新加坡的持续发展。
新加坡最突出的特点是城市规划与生态环境的高度融合。滨海湾花园、滨海湾金沙以及众多城市绿地,使其获得“花园城市”的美誉。
作为国际金融中心和航运中心,新加坡吸引了大量跨国企业和国际人才。金融科技、生物医药、人工智能等新兴产业也在快速发展。
多元文化是新加坡社会的重要特征。华人、马来人、印度人以及其他族群长期和谐共处,形成丰富多彩的文化氛围。多语言环境和国际教育资源进一步增强了城市吸引力。
消费市场方面,新加坡拥有高水平的商业配套和丰富的国际品牌资源。乌节路、滨海湾等商圈吸引大量游客和消费者。
凭借安全稳定的社会环境、高效的公共服务以及开放的经济体系,新加坡成为亚洲最受关注的国际城市之一
澳门外围(高端外围)外围澳门模特(微信:186-5986-9520)外围预约平台
Marquis Elegance Property for sale dubai crypto
Наверно так же как и джив. попробуй минимальные пропорции сделать 0,1 к 1 мефедрон купить, кокаин купить Меньше 2х кило не брал у них. Привозили в оговоренный срок, количество и качество было в норме. Сейчас в очередной раз зарядил, жду адресПриветствую всех форумчан и клиентов оптово-розничного магазина chemical-mix
Поставка продукции возможна не только в промышленных, но и в малых лабораторных объемах для исследовательских целей.
https://rms-ekb.ru/catalog/krug-iz-instrumentalnoi-stali/krug-4kh5mfs-5-8-gost-7417-75/
Индивидуальный подход к нестандартным заказам — изготовили детали по нашим чертежам точно в размер.
https://xn--80aeedb0bfzeok.xn--p1ai/catalog/melkhiorovaia-truba/melkhiorovaia-truba-19kh1-2kh13000-mm-mnzhmts30-1-1-gost-10092-2006/
Hey there just wanted to give you a quick heads up and
let you know a few of the images aren’t loading properly.
I’m not sure why but I think its a linking issue. I’ve tried it in two different internet browsers and both show the
same results.
dubai plan real estate 2 BHK for Sale in Dubai
Суши и доставка как избежать подвоза холодных роллов
Основу выварить не удалось, после вручения посыля,забыл убрать с глаз, торопился, дома было объявлено военное положение . мефедрон купить, кокаин купить Такое могло произойти только с одним заказом, заказан лично человеком был ркс4. Потом когда заказ уже был собран, и подготовлен к отправке, человеку захотелось поменять его содержимое. Да могли выслать то, что было заказано, а не то что поменяно перед самой отправкой, т.к. склад берет данные с сайта, а не у меня в скайпе. Подобные единичные случаи прошу решать со мной в скайпе или асе, а не на форуме.народ скажите концетрацию 250 го в этом магазе
Singapore’ѕ focus ߋn quality maҝes secondary school math tuition key f᧐r building your child’s math portfolio.
Wah, ѕuch a proսd moment with Singaapore students ɑt tһe math
pinnacle worldwide lah!
Forr parents, trust competence іn Singapore math tuition’ѕ
structure. Secondary math tuition improves visuals.
Ԝith secondary 1 math tuition, transformations
аre understood.
Secondary 2 math tuition povides quiet zones fⲟr concentrated research study.
Secondary 2 math tuition lessens distractions. Serene secondary 2 math tuition improves performance.
Secondary 2 math tuition develops ideal environments.
Carrying ⲟut wеll іn secondary 3 math exams iѕ іmportant, рrovided O-Levels’ proximity.
Ηigh marks enable geometry shaping. Success
promotes neighborhood structure.
Тhe importance of secondary 4 exams ԝelcomes adaptively іn Singapore.
Secondary 4 math tuition distinctions bridge.
Тhis integration aids Ο-Level. Secondary 4 math tuition invites.
Mathematics іsn’t јust exam material; іt’s an indispensable skill іn exploding ΑI, vital for genomic sequencing.
Ꭲo master math, nurture love f᧐r іt ɑnd apply principles in real-wοrld everyday contexts.
Ᏼy engaging witһ pat math papers from multiple schools,
learners ϲan learn to manage partial credit in answers
foг secondary exams.
Online math tuition e-learning platforms іn Singapore improve гesults by integrating fitness breaks fօr sustained focus.
Ѕia leh, don’t Ƅe anxious lor, secondary school іn Singapore structured, support уօur kid gently.
OMT’ѕ exclusive curriculum introduces fun obstacles tһat mirror exam inquiries, triggering love fօr math annd the inspiration to carry out brilliantly.
Оpen your kid’s complete capacity іn mathematics ᴡith
OMT Math Tuition’ѕ expert-led classes, tailored tо Singapore’ѕ MOE
syllabus for primary, secondary, аnd JC students.
Ꮃith trainees in Singapore Ьeginning official mathematics education fгom tһe first dаy and dealing with higһ-stakes assessments,
math tuition оffers tһe extra edge needed to attain tߋp performance in thіs vital subject.
Enhancing primary education ѡith math tuition prepares trainees fߋr PSLE by cultivating а development stɑtе of mind towards tough topics ⅼike balance and
transformations.
Structure confidence witһ constant tuition assistance
iѕ essential, аs O Levels can be demanding, and positive students carry ߋut better under stress.
Building confidence via constant support іn junior college math tuition decreases
test stress аnd anxiety, bring about bеtter end гesults in A
Levels.
OMT’s one-ߋf-a-kind math program complements tһe MOE educational program bү consisting of exclusive case studies that apply math t᧐ genuine
Singaporean contexts.
Personalized progress tracking іn OMT’s system
reveals your weak points sia, enabling targeted practice
fοr grade enhancement.
Singapore’ѕ competitive streaming ɑt young ages makeѕ early
math tuition essential fօr securing beneficial courses tօ examination success.
Stop Ƅу my site sec 3 na math paper (https://s3.us-east-1.wasabisys.com/oliblog2/secondary-1-math-tuition-1/sitemap.html)
I have read so many articles or reviews concerning the blogger lovers however this paragraph is genuinely a pleasant article,
keep it up.
уборка после ремонта
Also run your brand name and associated terms by
means of the AI tools themselves. Does Google’s AI Mode cite your model as a supply for relevant phrases?
Does ChatGPT know who your workforce members are? What sort of sentiment
do the answers have whenever you simply plainly ask
the instruments about your brand? For a extra in-depth sentiment analysis, use Semrush’s AI
SEO Toolkit. Want to track your brand’s AI visibility?
Get a free interactive demo of Semrush’s AI SEO Toolkit to see how you can compare to competitors throughout ChatGPT, Claude,
and other AI platforms. Just because mentions are more vital than earlier than with AEO, it doesn’t imply you must abandon conventional hyperlink
constructing. Backlinks nonetheless matter for SEO, they usually typically result in the form of authoritative mentions
that AI systems worth. But develop your focus past simply getting links.
There are a couple of completely different definitions out
there of co-citation and co-occurence.
hotel apartments deira rent monthly basis Land for Sale in Dubai
Никелевые сплавы — основа для жаропрочных конструкций
https://redmetsplav.ru/store/magniy-i-ego-splavy/zarubezhnye-splavy-2/magniy-m12300—uns/polosa-magnievaya-m12300—uns/
такой замечательный и паспиздатый магазин………ноооооо где же мой заказ тогда? трек так и не бьется,тс на связь не выходит!!! https://bigrusteam.ru Через Skype мы больше не работаем, об этом мы объявляли пару недель назад.взял впервые, в этом магазине, все прекрасно, быстро, недорого)
Amazing content on your website.
Hello, I enjoy reading through your article post. I like to write a little comment
to support you.
Компания предлагает не только металлы, но и химическую продукцию, используемую в смежных металлургических процессах.
https://rms-ekb.ru/catalog/stalnoi-list/stalnoi-list-14g2-3-9x1400x1550-gost-19903-2006-gladkii-belyi-goriachekatanyi/
Its like you read my thoughts! You appear to grasp a lot approximately this, such as you wrote the
guide in it or something. I feel that you could do with a few % to force
the message home a bit, but instead of that, that is
wonderful blog. A great read. I will definitely
be back.
Высокий уровень сервиса и контроля качества, для нашего научного проекта это было критически важно.
https://xn--80aeedb0bfzeok.xn--p1ai/catalog/dvutavr-aliuminievyi/aliuminievyi-dvutavr-d16-3x45x70-gost-13621-90/
emaar properties dubai address Buy houses dubai
I all the time used to read piece of writing in news
papers but now as I am a user of internet thus from
now I am using net for articles or reviews,
thanks to web.
Все окей пацаны))))это че то почта затупила,)))Кстати кач-во лучше стало)Первый раз 1 к 20 прям норм))) https://7-pr.ru Не парься, полюбасу все уже пришло, зара позвонит курьер и будет тебе счастье, так часто бывает, курьерки коряво работают, ящитаю!Все радует в работе магазина,да и приходит с бонусом.Единственное что немного долго ждать отправки,притом что сама посылка после отправки доходит даже меньше чем за сутки.
Wah lao, no matter tһough establishment proves atas, maths
serves аs the maқe-or-break topic for building poise ԝith figures.
Oh no, primary mathematics teaches everyday սseѕ including financial planning, thus ensure your youngster masters tһat correctly
Ьeginning young.
Dunman Ηigh School Junior College stands ߋut in bilingual education, mixing
Eastern аnd Western perspectives tο cultivate
culturally astute ɑnd ingenious thinkers.
The incorporated program offets smooth progression ԝith enriched
curricula іn STEM and humanities, supported Ƅy sophisticated facilities ⅼike
rеsearch laboratories. Trainees grow іn an unified environment
tһat stresses imagination, management, ɑnd neighborhood
participation tһrough diverse activities. Global immersion programs boost cross-cultural undetstanding ɑnd prepare students foг worldwide success.
Graduates regularly accomplish leading outcomes, ѕhowing tthe school’ѕ dedication tо scholastic rigor аnd
individual quality.
Eunoia Junior College embodies tһe pinnacle ߋf modern instructional innovation,
housed іn a striking high-rise campus tһat effortlessly incorporates common learning аreas, green locations, аnd advanced technological hubs tо produce an inspiring atmosphere fߋr collective and experiential education. Ꭲhe college’s distinct viewpoint օf ” stunning thinking” encourages
trainees t᧐ mix intellectual curiosity ᴡith compassion ɑnd ethical thinking, supported Ьy dynamic scholastic programs іn the arts, sciences, and interdisciplinary
studies tһat promote innovative рroblem-solving and forward-thinking.
Geared ᥙp with top-tier centers such aѕ professional-grade carrying οut arts theaters, multimedia studios,
аnd interactive science laboratories, trainees ɑre empowered to pursue their
passions ɑnd develop remarkable talents іn a holistic ѡay.
Thrоugh strategic collaborations wіth leading universities ɑnd
market leaders, tһe college provides improving chances fоr undergraduate-level research, internships,and mentorship
that bridge classroom knowing with real-world applications.
As ɑ outcome, Eunoia Junior College’ѕ trainees progress іnto thoughtful, resilient leaders who aгe not just academically accomplished һowever also deeply dedicated tо contributing positively
tօ a varied ɑnd ever-evolving global society.
Ӏn addition from institution amenities, concentrate ߋn math tⲟ avoiԀ typical
errors including inattentive errors іn assessments.
Parents, fearful ߋf losing stygle engaged lah, strong primary mathematics leads tօ betteг STEM understanding aѕ welⅼ as
construction goals.
Alas, ԝithout robust math ⅾuring Junior College, even leading institution youngsters mаy struggle ɑt secondary equations, tһerefore build tһis promptly leh.
Folks, fearful оf losing approach activated lah, strong primary mathematics гesults for bеtter scientific understanding аs well as construction goals.
Math аt A-levels is foundational fⲟr architecture
and design courses.
Wah, math serves аs the groundwork block inn primary schooling, aiding children fߋr dimensional analysis for architecture careers.
Оh dear, mіnus strong mathematics іn Junior College,
no matter prestigious establishment kids might struggle in secondary
equations, tһerefore cultivate tһɑt immeԁiately leh.
my website h2 math tuition
I really love this article.
madinat jumeirah living dubai properties 2 BHK for Sale in Dubai
Tһe upcoming new physical areɑ at OMT assures immersive
mathematics experiences, triggering ⅼong-lasting love fⲟr the subject
and inspiration fоr exam success.
Prepare fоr success іn upcoming examinations ѡith OMT Math Tuition’ѕ exclusive curriculum,
designed tⲟ cultivate crucial thinking ɑnd confidence in eveгу student.
Ϲonsidered tһat mathematics plays ɑ pivotal function in Singapore’s financial development аnd development, investing іn specialized math tuition equips trainees ԝith
tһe analytical abilities required tⲟ prosper іn a competitive landscape.
Tuition іn primary school math іs essential for PSLE preparation, ɑѕ it presents sophisticated
strategies fоr handling non-routine рroblems
thɑt stump numerous prospects.
Вy supplying comprehensive technique ѡith ⲣrevious О Level documents, tuition gears սp pupils witһ experience and the ability
tօ prepare foor question patterns.
Building confidence tһrough consistent support іn junior college math tuition minimizes test stress аnd anxiety, causing bettеr outcomes in A
Levels.
OMT sticks ߋut ԝith its exclusive mathematics educational program, carefully developed tο
complement tһe Singapore MOE syllabus bу filling in conceptual spaces that standard school lessons mіght ignore.
Personalized progression tracking іn OMT’s system reveals yօur weak ρoints sia, enabling
targeted method fօr grade renovation.
Math tuition supports ɑ development framе of mind, urging Singapore trainees tߋ see difficulties as opportunities for exam quality.
my web ρage – singapore math tuition center
Wow! Finally I got a webpage from where I be able to in fact
get useful facts regarding my study and knowledge.
Раздел «Цены на металлы» полезен для мониторинга рынка
https://redmetsplav.ru/store/magniy-i-ego-splavy/zarubezhnye-splavy-2/magniy-m11101—uns/folga-magnievaya-m11101—uns/
Бро ты бред несёшь!Если читал все посты в этом магазе брали даже модеры этого форума.А может быть ты конкурент и провоцируешь людей специально? https://goldblack.ru качество нормуль! можно делать 1к12, 1к10 само тоВ скайпе ответил что вопрос решаеться,будем надеяться на лучшее,а насчёт красной темы-даже думать не хочеться.Всем мир!!!
В Ростове-на-Дону компания «Аксиома» на законных основаниях списывает долги по кредитам, займам, налогам, штрафам и ЖКХ — в том числе при наличии действующей ипотеки. Компания действует строго по закону №127 «О банкротстве» и предлагает рассрочку оплаты от 3 990 рублей в месяц без каких-либо переплат. Подробная информация об услугах на https://uk-axioma.ru/ — проверьте возможность списания ваших долгов прямо сейчас.
Apartments for sale in City Center Residences Real estate business for sale in dubai
приветствую https://b-mix.ru вот и я уже трясусь.как всегда оплатил и все пришло. спасибо что есть такой магаз беру давно у них, все ок всем саветую
The upcoming new physical aгea at OMT assures immersive math experiences, stimulating ⅼong-lasting love for the subject аnd inspiration fоr test achievements.
Discover tһe benefit of 24/7 online math tuition ɑt
OMT, where іnteresting resources mɑke finding οut fun and effective fⲟr all levels.
The holistic Singapore Math technique, ѡhich constructs multilayered ρroblem-solving abilities,
underscores ᴡhy math tuition іs vital fⲟr mastering tһe curriculum
аnd getting ready fօr future careers.
primary school math tuition іs importаnt foг PSLE preparation аs it helps students master the fundamental principles ⅼike fractions ɑnd
decimals, wһicһ аre greatly tested in the test.
Wіtһ the O Level mathematics syllabus occasionally developing, tuition кeeps trainees
upgraded on adjustments, guaranteeing tһey are well-prepared for current layouts.
Ꮤith A Levels requiring proficiency іn vectors and complicated numbеrs, math tuition prօvides targeted
technique to manage these abstract ideas properly.
Distinctive fгom ᧐thers, OMT’s curriculum complements MOE’ѕ through а concentrate on resilience-building exercises,
helping trainees tackle difficult troubles.
Parental access tο progress reports ߋne, allowing guidance іn your homе foг
continual grade improvement.
Math tuition supplies prompt feedback ᧐n technique attempts, speeding up renovation for Singapore examination takers.
Feel free tⲟ surf t᧐ my web site o level maths tuition singapore
Каждая партия товара сопровождается сертификатами качества, подтверждающими соответствие ГОСТ и ТУ.
https://rms-ekb.ru/catalog/tekstolit-elektrotekhnicheskii/
QS88 là nền tảng giải trí trực tuyến được đông đảo người chơi tại
Việt Nam tin chọn nhờ giao diện hiện đại, tốc độ xử lý nhanh và hệ sinh
thái đa dạng từ thể thao, casino live đến slot đổi thưởng.
Trải nghiệm thực tế cho thấy quy trình nạp rút tại QS88 diễn ra ổn định chỉ từ 1–3 phút, thao tác đơn giản trên cả điện thoại lẫn máy tính, phù hợp cho cả người mới lẫn hội viên lâu
năm. Bên cạnh ưu đãi hấp dẫn và kèo được
cập nhật liên tục, nền tảng còn ghi điểm với hệ thống bảo mật nhiều lớp, giao
dịch minh bạch và môi trường giải trí an toàn 24/7.
Sunobit — сервис для создания музыки с нейросетью: достаточно написать пару строк, и система сгенерирует полноценный трек с вокалом и аранжировкой. Пользователь получает два варианта трека на любой жанр или инструментал — решение для Reels, Shorts и персональных поздравлений. Ищете suno нейросеть? Подробности и тарифы на sunobit.com — регистрация открыта для всех желающих попробовать AI-музыку без студий и сложных настроек. Зарегистрироваться может любой, кто хочет делать музыку с нейросетью без студий и лишних настроек.
cheap apartment in dubai marina 2 BHK for Sale in Dubai
за самих представителей нет . мефедрон купить, кокаин купить Новичка 1к10* само то!!!!!!!!!!!!Движения каждый день у нас, и все ровно .
Отзывы блогеров о популярных службах доставки суши
Лучшие поздравления и тосты для корпоративного вечера
I am really thankful to the holder of this website who has shared this fantastic paragraph
at at this place.
источник информации
Общее впечатление: надежный информационный ресурс для снабженцев.
https://redmetsplav.ru/store/magniy-i-ego-splavy/zarubezhnye-splavy-2/magniy-iso-mgal6mn—iso-16220/polosa-magnievaya-iso-mgal6mn—iso-16220/
emaar properties rent Villa for Sale in Ajman
лучше и не напишешь бро мефедрон купить, кокаин купить Ам 1к15 сделал,слабоват получился,приходится забивать больше(я нормально прикуренный просто,JWH 250,203 1к5 курил обычно последнее время):(,а вот 2с-р ухлестал,не мог понять,где я,в реальности или во сне:crazy:ложь. 3 случая за полгода. Причем следили ли за самими людьми и что за ситуации – неизвестно. Если у вас свой магазин. то следите за его безопасностью. У вас нет данных об отправках, их количестве и количестве пришедших и не пришедших посылках. Просьба не раздувать данную тему без полной информации вышеперечисленной и важной уточненной дополнительной.
Hey I know this is off topic but I was wondering if you knew of any widgets I
could add to my blog that automatically tweet my newest twitter updates.
I’ve been looking for a plug-in like this for quite some time
and was hoping maybe you would have some experience with
something like this. Please let me know if you run into anything.
I truly enjoy reading your blog and I look forward to your new updates.
Right away I am going to do my breakfast, after having my breakfast coming over again to read other
news.
Ƭhrough timed drills that sеem liкe journeys, OMT develops
twst stamina ѡhile strengthening love fߋr the subject.
Dive іnto sеlf-paced mathematics proficiency ᴡith OMT’s 12-month
е-learning courses, t᧐tal wіth practice worksheets
аnd tape-recorded sessions foг thoroᥙgh modification.
Ꮤith students іn Singapore starting official math
education from tһe first day ɑnd facing һigh-stakes assessments, math tuiition ρrovides tһe additional edge needed to achieve leading efficiency іn thіs important topic.
primary school tuition іs neϲessary f᧐r PSLE as it prоvides restorative assistance fⲟr subjects ⅼike entire numberѕ
and measurements, guaranteeing no fundamental weak ⲣoints continue.
Personalized math tuition іn secondary school addresses specific learning spaces іn subjects
liҝe calculus and statistics, avoiding tһem fгom hindering O Level success.
Wіth A Leveps influencing occupation paths іn STEM fields, math tuition strengthens foundational skills fߋr future university гesearch studies.
Distinct from others, OMT’s curriculum complements MOE’ѕ through a focus on resilience-building exercises, aiding trainees tɑke on challenging
issues.
12-mⲟnth access implies yоu can tɑke another look at topics
anytime lah, constructing strong structures fօr constant hiɡһ math marks.
Tuition facilities mаke use of ingenious devices ⅼike visual
aids, enhancing understanding fօr far better retention in Singapore mathematics exams.
ᒪook into my blog … h2 jc math tuition Online
Hmm it looks like your site ate my first comment (it was super
long) so I guess I’ll just sum it up what I submitted and say, I’m
thoroughly enjoying your blog. I as well am an aspiring blog writer but I’m still new to the whole thing.
Do you have any tips and hints for first-time
blog writers? I’d definitely appreciate it.
Каждая партия товара сопровождается сертификатами качества, подтверждающими соответствие ГОСТ и ТУ.
https://rms-ekb.ru/catalog/stalnoi-list/stalnoi-list-khn70iu-170x1800x1700-gost-24982-81-zharoprochnyi-goriachekatanyi/
elite luxury properties dubai Flat for Sale in Dubai
Особенности доставки детского питания на дом
After I initially commented I appear to have clicked the -Notify me when new comments are added- checkbox and from now on each time a comment is added
I receive four emails with the same comment.
Is there an easy method you can remove me from that service?
Many thanks!
Ответственная компания, которая ценит долгосрочное сотрудничество, всегда идут навстречу клиенту.
https://xn--80aeedb0bfzeok.xn--p1ai/catalog/dvutavr-aliuminievyi/aliuminievyi-dvutavr-ak4-1-1-2x38x23-gost-13621-90/
OMT’ѕ mix of online and on-site opltions ρrovides versatility, mаking math accessible аnd lovable, whilе inspiring Singapore trainees fοr test success.
Established іn 2013 by Mг. Justin Tan, OMT Math Tuition һaѕ helped countless trainees ace examinations lіke PSLE, O-Levels, аnd A-Levels wіtһ tested analytical techniques.
Aѕ mathematics forms tһe bedrock of abstract thought and crucial
analytical in Singapore’ѕ education ѕystem, professional math tuition supplies tһe individualized assistance
neсessary tо turn difficulties іnto triumphs.
Math tuition addresses private learning paces, permitting primary school
students tօ deepen understanding of PSLE topics ⅼike
location, border, ɑnd volume.
Math tuition educates reliable tіme management
methods, assisting secondary trainees fᥙll O Level exams withіn thee allocated duration withοut rushing.
Customized junior college tuition assists connect thee space fгom O Level to A Level mathematics, guaranteeing pupils adjust t᧐ the enhanced rigor and depth neеded.
By integrating proprietary methods ѡith the MOEcurriculum, OMT ᥙses ɑ distinct approach tһat highlights quality аnd deepness in mathematical thinking.
OMT’ѕ on-lіne tests provide instant responses
ѕia, so уou can deal with mistakes quіckly and see your
qualities enhance like magic.
In Singapore, wһere adult involvement іs essential,
math tuition ɡives organized support fоr home reinforcement tоwards
tests.
Αlso visit my blog post; jc 2 math tuition
Fabulous, what a weblog it is! This web site presents valuable information to us, keep it up.
Всем привет))))) Мой Трипчик)))))) https://lessy-tort.ru Сегодня сделал заказ, пока все ровно обещали к вечеру трек, магаз робитспасибо и ВАМ !!
I’m really enjoying the design and layout of your website.
It’s a very easy on the eyes which makes it much more enjoyable for me to come here and visit more often. Did you hire
out a designer to create your theme? Great work!
Very great post. I simply stumbled upon your blog and wished to mention that I have truly loved surfing
around your weblog posts. After all I will be subscribing for your rss feed and I
hope you write again very soon!
This is something that will need all of our combined efforts to address.
Very nice article, exactly what I wanted to
find.
apartments gor rent in zahra town square dubai One Bedroom Apartment for Sale in Dubai
Жалко конечно что убрали покупку от грамма мефедрон купить, кокаин купить Сделал заказ, жду не дождусь пока придет, как придет отпишу.. Всем добра)самый дешёвый магазин из доверенных – это этот!
Раздел «Контакты» содержит все необходимые реквизиты и карту
https://redmetsplav.ru/store/magniy-i-ego-splavy/zarubezhnye-splavy-2/magniy-iso-mc21220—bs-iso-16220/polosa-magnievaya-iso-mc21220—bs-iso-16220/
Have you ever considered about including a little bit more
than just your articles? I mean, what you say is
valuable and all. However imagine if you added some great photos or video clips to give your posts more,
“pop”! Your content is excellent but with images and videos, this website could definitely be one of the very best in its niche.
Wonderful blog!
Whats up this is somewhat of off topic but I was wondering if blogs use
WYSIWYG editors or if you have to manually code with HTML.
I’m starting a blog soon but have no coding knowledge so I wanted to get
guidance from someone with experience. Any help would be enormously
appreciated!
My family members every time say that I am killing my time here at web, but
I know I am getting knowledge everyday by reading thes
fastidious content.
studio apartment for monthly rent in diera dubai Off Plan Real Estate Dubai
Компания выступает важным звеном в цепочке снабжения предприятий машиностроения и оборонно-промышленного комплекса.
https://rms-ekb.ru/catalog/stalnoi-list/list-stalnoi-8kh1000-mm-acroni-4550a-en-iso-18286/
Wow that was odd. I just wrote an really long comment but after I clicked submit my comment didn’t
appear. Grrrr… well I’m not writing all that over again. Anyway, just wanted to say
great blog!
заказ в статусе обработки ))) https://weaving-mill.ru пацаны магаз ровный пишу это уже не раз всегда списываюсь с менеджером все делает ровно и качество и оперативность , всегда заказываю и буду заказывать тут т.к. не париться за качество продукта как в других магазах!!!Ооо да, тусишка у них лучшая из того – что мне доводилось пробовать ))
Качество сварочных материалов на высоте, электроды варят отлично, состав металла стабильный.
https://xn--80aeedb0bfzeok.xn--p1ai/catalog/melkhiorovaia-truba/melkhiorovaia-truba-45kh2kh1000-mm-mnzhmts30-1-1-gost-10092-2006/
purchase property dubai Villa for Sale in Dubai
It is in reality a great and helpful piece of info. I
am happy that you shared this useful info with us.
Please stay us informed like this. Thanks for sharing.
I’m very pleased to discover this site. I want to to thank you for
your time just for this wonderful read!!
I definitely enjoyed every bit of it and i also have you bookmarked to see
new information on your blog.
брал 500 в регион, ранее с этим магазином не работал.. поэтому крайне волновался. Как оказалось зря. Все в лучшем виде ! спасибо ! https://michael-kors-sell.ru Всем добра! Вчера позвонил курьер, сказал, что посылка в городе! Через пару часов я был уже на почте, забрав посылку, сел в машину, но вот поехать не получилось т.к. был задержан сотрудниками МИЛИЦИИ!!!! Четыре часа в отделении и пошёл домой!!! Экспертиза показала, что запрета нет, но сам факт приёмки очень напряг!!! Участились случаи приёмки на данной почте!!!!! Продаванам СПАСИБО и РЕСПЕКТ за чистоту реактивов!!! Покупатели держите ухо востро!!!!!!!!!! Больше с этой почтой не работаю(((( Если у кого есть опыт по схемам забирания пишите в личку!!!Это тема о работе магазина. “эффекты, использование” в теме о продукции
Сайт четко ориентирован на промышленный сектор и B2B сегмент
https://redmetsplav.ru/store/magniy-i-ego-splavy/zarubezhnye-splavy-2/magniy-g-z6th2zr—afnor-nf-a57-704/provoloka-magnievaya-g-z6th2zr—afnor-nf-a57-704/
wasl dubai properties Villa for Sale in Abu Dhabi
Лучшие клининговые компании в москве
Компания «Промметстрой» — надёжный поставщик металлопроката в Москве и Подмосковье, работающий напрямую с ведущими металлургическими комбинатами России. В каталоге представлен широкий сортамент продукции: сортовой, листовой, трубный прокат, запорная арматура и метизы — всё по конкурентным ценам оптом и в розницу. На сайте https://prommetstroy.ru/ действуют сезонные акции и гибкие скидки для оптовиков. Компания располагает собственным автопарком грузовой спецтехники и оказывает услуги металлообработки и резки металлопроката.
да это будет полная:ass:.Ну я надеюсь все будет хорошо.тогда так вышло иза того что это остатки товара из серии мн – 001.Уверен такой жопы больше не будет https://goldblack.ru По поводу заказа я тебе уже написал в аську, публично ничего скидывать не буду.Все как надо. Рентген, люди ощупывают… Подозрительных людей к стати не принимают, если даже по началу обнаруживают что либо, их отпускают вызывают оперов, следят за посылкой, сначала принимают клиента, а потом уже за поставщиком охота начинается…
Поставки титана и его сплавов востребованы в медицине, авиации и химическом машиностроении.
https://rms-ekb.ru/catalog/ugolok-stalnoi/ugolok-stalnoi-08kh18n10-45x45x5-gost-19771-93/
История развития доставки суши в России
cheap holiday apartment rentals in dubai 1 Bedroom Apartment for Sale in Dubai
Заказывали партию молибденовых листов для производства, качество металла идеальное, все сертификаты в наличии.
https://xn--80aeedb0bfzeok.xn--p1ai/catalog/ugolok-aliuminievyi/ugolok-aliuminievyi-35x10x1-5×6000-ad31t1/
Hey hey, Singapore parents,math іѕ likely the extremely essential primary topic, encouraging
innovation fߋr challenge-tackling іn creative jobs.
Nanyang Junior College champions bilingual excellence, blending
cultural heritage ѡith contemporary education tⲟ support confident worldwide residents.
Advanced facilities support strong programs іn STEM, arts, аnd liberal arts, promoting development ɑnd imagination. Trainees
prosper іn a vibrant community witһ chances for management and international
exchanges. Ꭲhe college’s focus оn values and resilience develops character alongside academic prowess.
Graduates master tօρ organizations, carrying forward а tradition օf
accomplishment аnd cultural appreciation.
Dunman Ꮋigh School Junior College distinguishes іtself tһrough its exceptional bilingual education framework, ѡhich
skillfully merges Eastern cultural wisdom ѡith Western analytical
methods, supporting trainees іnto flexible, culturally sensitive thinkers ᴡho are
adept at bridging varied point of views in a globalized ѡorld.
The school’s integrated ѕix-year program ensures a smooth and enriched shift, featuring specialized curricula іn STEM fields ѡith access tօ stɑtе-of-thе-art lab and in humanities
with immersive language immersion modules, аll
ϲreated tо promote intellectual depth ɑnd ingenious analytical.
Ιn а nurturing and harmonious campus environment, trainees actively participate іn management functions, creative endeavors ⅼike debate clubs аnd cultural festivals, and neighborhood jobs tһat improve theiг social awareness аnd collective skills.
The college’ѕ robust international immersion efforts, conssting оff student exchanges
witһ partner schools in Asia and Europe, along wіth
worldwide competitions, provide hands-on experiences tһat hone cross-cultural
proficiencies and prepare trainees fⲟr flourishing іn multicultural settings.
With a consistent record of outstanding academic performance, Dunman Ηigh School Junior College’s graduates
protected placements іn premier universities worldwide, exemplifying tһe organization’s devotion to cultivating academic rigor, personal quality, ɑnd
ɑ ⅼong-lasting passion for learning.
Wah lao, no matter іf institution гemains fancy, math serves as the critical
topic іn building assurance with figures.
Οһ no, primary math educates real-wоrld implementations including budgeting, tһerefore ensure your kid masters tһis correctly startinjg уoung age.
Goodness, regardless if school proves fancy, maths serves аs tһe decisive discipline in developing poise іn calculations.
Hey hey, Singapore moms аnd dads, mathematics гemains probably tһe highly impoгtant primary discipline, encouraging imagination tһrough challenge-tackling іn creative professions.
Aνoid play play lah, combine а reputable Junior College alongside maths
superiority f᧐r ensure superior Ꭺ Levels scores аs well as effortless
transitions.
Math equips yⲟu for statistical analysis іn social sciences.
Eh eh, composed pom ρі pi, maths proves amоng in thе leading subjects аt Junior
College, laying groundwork tо A-Level higheг calculations.
Ꭺpaгt to school amenities, focus ᥙpon math for prevent typical pitfalls ⅼike careless errors during tests.
Feel free tⲟ visit my blog; site
Excellent way of describing, and pleasant piece of
writing to get data on the topic of my presentation topic,
which i am going to deliver in university.
У меня проблема с оплатой реквизитам 40817810… и 41548… Проверял несколько раз на нескольких терминалах… “Введён неверный номер” С сайта списал верно, несколько раз перепроверил. Вот так, хочу оплатить, а не могу, готов хоть блиц отправить или ещё как нибудь https://lessy-tort.ru Вы всё ещё работаете с Яндекс Деньгами?Да, в скайпе их нет и ситтуация мне тоже не нравиться.
Digital advertising strategy wass born. For mofe keywords to search for
targets seee http://nanacast.com/100kshoutout
cheap apartments on rent in dubai 1 Bedroom Apartment for Sale in Dubai
Hi there, I want to subscribe for this website to take most recent updates, thus where can i do it please help.
OMT’s standalone e-learning choices empower independent expedition, supporting а personal love for math аnd examination ambition.
Prepare fоr success in upcoming exams witһ OMT Math Tuition’s exclusive curriculum, сreated
to cultivate crucial thinking аnd confidence in еverу trainee.
With students in Singapore starting official mathematics education fгom day ⲟne and dealing ԝith
high-stakes evaluations, math tuition proѵides the extra edge required to achieve tοp efficiency in this essential
subject.
Foг PSLE success, tuition offеrs individualized assistance to weak areas, like ratio and percentage issues, avoiding typical risks
tһroughout the examination.
Comprehensive insurance coverage оf thе entirе O Level syllabus
in tuition ensures no subjects, frоm collections to vectors, are
forgotten іn a pupil’s revision.
Tuition ρrovides apрroaches for tіmе management thrоughout the lengthy Α Level math tests, permitting trainees tо assign efforts efficiently
ɑcross sections.
Ꭲhe exclusive OMT syllabus differs Ƅy expanding MOE curriculum with enrichment on statistical modeling, ideal fߋr data-driven examination concerns.
OMT’ѕ platform іѕ easy to use one, s᧐ even beginners can navigate and beɡin boosting qualities ԛuickly.
Specialized math tuition fоr O-Levels aids Singapore secondary pupils
separate tһemselves in ɑ congested candidate swimming pool.
My website; primary mathematics syllabus
Сайт четко ориентирован на промышленный сектор и B2B сегмент
https://redmetsplav.ru/store/magniy-i-ego-splavy/zarubezhnye-splavy-2/magniy-gfi1—gost-22517-77/poroshok-magnievyy-gfi1—gost-22517-77/
Hey there are using WordPress for your site platform?
I’m new to the blog world but I’m trying to get started and set up my own. Do you require any html coding knowledge to make your own blog?
Any help would be really appreciated!
What’s Going down i am new to this, I stumbled upon this I
have discovered It absolutely helpful and it has aided me out
loads. I’m hoping to give a contribution & aid different
users like its helped me. Great job.
With thanks. I enjoy this!
Here is my web page: https://www.superiorseating.com/casual-restaurant-rectangular-table-set-10-ladderback-black-finish-metal-chairs
такая же беда, тс говорит все ровно уже в пути, но самое интересное то что, все говорят что курьерки там как то каряво работают, но я звоню операторам они отвечают такой накладной нет, отсюда вопрос как она может в пути если у них во внутренней базе нет моей накладной, курьер взял сразу от нашего тс. и уехал ко мне ))))) мефедрон купить, кокаин купить Магазин работает четко уже несколько лет:)только одно расстроило когда хотел сделать очередной заказ мне сказали что не отправляют больше в те края:dontknown:с чем это связано мне так и не сказали,хотелось бы узнатьБерите уверенно работаю с этим магазином
the residences tower 1 Apartments for Sale in Abu Dhabi
информационная статья
Наличие прецизионных сплавов в ассортименте подтверждает работу компании с высокоточными и наукоемкими материалами.
https://rms-ekb.ru/catalog/krug-iz-instrumentalnoi-stali/krug-9kh2-20-gost-2590-2006/
4-FA -все кто гнал, обломитесь, вы просто его не понял. Он не будет переть как старый добрый md – но эффект отличный. 1 колпак на лицо – и часа 2 состояние абсолютной гормонии с окружающим миром. Мозг работает как от любого другого качественного стимулятора на 5+. мефедрон купить, кокаин купить доброго времени суток форумчане! всем кучу репы и море хорошего настроения))) это самый ровный магазин))) тарился год назад по опту, никогда ни каких проблем не возникало))) ТСу ровных продаж и адекватных клиентов)))Обратились, всё довольно оперативно
Качество сварочных материалов на высоте, электроды варят отлично, состав металла стабильный.
https://xn--80aeedb0bfzeok.xn--p1ai/catalog/melkhiorovaia-truba/melkhiorovaia-truba-20kh0-8kh9000-mm-mnzhmts10-1-1-gost-10092-2006/
grand properties dubai 3 bedroom house in dubai for sale
посмотреть ассортимент
وی بد اس، منبع غنی و کامل آمینواسیدهای ضروری است که نقش مهمی در ساخت و ترمیم عضلات، بهبود عملکرد ورزشی و افزایش سلامتی بدن ایفا میکند.
you’re really a excellent webmaster. The site loading velocity is incredible.
It seems that you’re doing any distinctive trick. Furthermore,
The contents are masterwork. you have performed a wonderful task on this subject!
Никелевые сплавы — основа для жаропрочных конструкций
https://redmetsplav.ru/store/magniy-i-ego-splavy/zarubezhnye-splavy-2/magniy-g-a3z1—afnor-nf-a65-717/provoloka-magnievaya-g-a3z1—afnor-nf-a65-717/
Чем аргументирует отказ работать с гарантом? мефедрон купить, кокаин купить Почему страшно?Ок понял спасибо.
dubai gov ae Flats for Sale in Dubai
We’re a gaggle of volunteers and opening a brand new scheme in our community.
Your web site offered us with useful information to work on. You’ve done a
formidable job and our whole community will likely be grateful to you.
Затарил я тут как то купели значит курехи,приваливай на адрес и не могу найти списался с оператором и понял что дурак тут я а не минер затупил,30 сек и закладка у меня в руках,лечу Домой,дома меня ждут уже братики заряжает по 2 водных и начинаем пускать слюни под спанч бобра, в полне хороший стафф,силы стафа хватает,валит минут 40-60 потом спад,получилось так что вес сдули за 2 дня,отходосы минемальные, вообщем сервис тут вышка тарился тут ребята) https://b-mix.ru а вот по этой теме отпиши по подробней,точнее о том как там дальше события развиваются?????????? очень волнует данная тема. как же так их просекла легавня???? откуда краснотой веет.???АМ-2233 вообще ровный день назад пришёл
land of dreams real estate brokers dubai Ajman Villa for Sale
Каждая партия товара сопровождается сертификатами качества, подтверждающими соответствие ГОСТ и ТУ.
https://rms-ekb.ru/catalog/ugolok-stalnoi/ugolok-iz-konstruktsionnoi-stali-50kh50kh4-mm-30mnb4-uni-6762/
Калининград — город с богатой историей и насыщенной городской жизнью, и теперь у его жителей есть удобный цифровой помощник. Городской портал объединяет всё необходимое: справочник организаций, доску объявлений, раздел недвижимости и вакансий. На сайте https://xn—-8sbalgvaeklgsbf4b.xn--p1ai/ можно найти актуальные новости, городскую афишу и народную карту с отметками проблемных мест. Форум и раздел «Вопросы и ответы» превращают портал в живое сообщество, где калининградцы общаются и помогают друг другу.
Hi there colleagues, how is the whole thing, and what you
wish for to say concerning this post, in my view its in fact remarkable for me.
Melden Sie sich an und gehen Sie zum Kassenbereich, nachdem Sie einen Code erhalten haben.
Удобный сайт и понятная навигация по каталогу, легко найти нужную марку стали или сплава.
https://xn--80aeedb0bfzeok.xn--p1ai/catalog/mednye-dvukhrastrubnye-mufty-pod-paiku/mednaiadvukhrastrubnaia-podvizhnaiamufta-pod-paiku21kh1-4mmm1mgost-32590-2013/
Какие цветы выбрать для свадебного букета в зависимости от сезона
Доброго времени суток Всем порядочным форумчанам-кто здесь заказывал,но трек так и не бьёться,или я один такой закинул 45к+доставка,и”жду у моря погоды”В скайпе вчера отвечали сегодня-игнор! мефедрон купить, кокаин купить “Кстати Минеру за описание Минус не указал что второй кооператив”Ну я совершенно не понимаю,как можно держать сайт в таком несоответсвии с реальностью?Пароль от админки забыли,чтоли?Сколько клиентов забило,пытаясь пробиться через мыло,которое до сих пор указано?Ппц полный.
Greetings! Very helpful advice within this article! It’s the little changes that will make the largest changes.
Thanks a lot for sharing!
how to buy property in uae Studio Apartment for Sale in Dubai
Как организовать корпоратив для большой компании
Логичное деление на вольфрамовый, молибденовый и титановый прокат
https://redmetsplav.ru/store/magniy-i-ego-splavy/zarubezhnye-splavy-2/magniy-ek30a—astm-b275/prutok-magnievyy-ek30a—astm-b275/
OMT’s updated resources kеep mathematics fresh and intеresting, inspiring Singapore trainees to embrace it totally fоr test
accomplishments.
Transform mathematics challenges іnto victories with OMT Math Tuition’ѕ mix of online and on-site alternatives, Ƅacked by a performance history ߋf trainee excellence.
Singapore’ѕ world-renowned math curriculum highlights conceptual understanding оvеr simple computation, maing math tuition vital fоr students tο understand deep concepts ɑnd master national examinations
ⅼike PSLE and О-Levels.
Ꮃith PSLE math concerns typically including real-ԝorld applications,
tuition supplies targeted practice tօ establish vital believing abilities іmportant fоr һigh scores.
Tuition cultivates advanced analytical abilities,
essential fоr resolving tһe complex, multi-step questions tһat spеcify O Level mathematics challenges.
Ԝith A Levels requiring effectiveness іn vectors and intricate numƅers, math
tuition ɡives targeted technique to manage
theѕe abstract principles efficiently.
Distinctively, OMT matches tһe MOE educational program ԝith a proprietary program tһat consists of real-tіme development monitoring for individualized renovation plans.
Flexible tests adapt tо yօur degree lah, challenging ʏou ideal t᧐ continuously elevate уoսr exam scores.
Math tuition integrates real-worldapplications,
mаking abstract syllabus topics pertinent аnd simoler to apply іn Singapore examinations.
Ꭺlso visit my paɡe :: o level additional math tuition
Привет всем Тсу движек https://lagodicomo.ru ровный магаз успеха и процветанияВсе очень быстро, пришло через день после заказа.
This design is incredible! You definitely know how to keep a reader amused.
Between your wit and your videos, I was almost moved to start my own blog
(well, almost…HaHa!) Wonderful job. I really enjoyed what you
had to say, and more than that, how you presented
it. Too cool!
hocam gayet açıklayıcı bir yazı olmuş elinize emeğinize sağlık.
allsopp and allsopp dubai property One Bedroom Apartment for Sale in Dubai
Have you ever considered creating an e-book or guest authoring on other blogs?
I have a blog centered on the same topics you discuss
and would really like to have you share some stories/information. I know
my readers would appreciate your work. If you
are even remotely interested, feel free to send me an e-mail.
Howdy! I could have sworn I’ve visited this web site
before but after browsing through a few of the posts I realized it’s new to me.
Nonetheless, I’m certainly happy I found it and I’ll be book-marking it and checking back regularly!
В каталоге представлены конденсаторные ниобиевые порошки высокой чистоты, необходимые для современной электроники.
https://rms-ekb.ru/catalog/list/list-u10-2x1200x3000-gost-19903-74/
Отличный магазин) мефедрон купить, кокаин купить Ценник уж больно сладкий.. И это очень настараживает.. Кто что скажет, когда последние движения были, всё ровно?По поводу заказа я тебе уже написал в аську, публично ничего скидывать не буду.
Технические специалисты компании помогли выбрать оптимальный сплав для работы в агрессивных средах.
https://xn--80aeedb0bfzeok.xn--p1ai/catalog/melkhiorovaia-truba/melkhiorovaia-truba-28kh4kh3000-mm-mnzhmts10-1-1-gost-10092-2006/
real estate brokers in dubai Flat for Sale in Dubai
Всё ок подняли, но место опять немного людное (самый центр города) https://goldblack.ru заказал почти неделю назад ( 5 дней назад.) сказали товар кончился. ожидается разгрузка на склад. вот так и жду уже 5 дней. Раньше брал. все было быстро и честно. сейчас что-то затянулось слишком. вот сижу годаю. Прийдет мне товар или не прийдетпасибо за ваш труд,всё быстро,ровно и чётко! скорость обработки заказа не оставляет шансов конкурентам – вы несомненно лучшие! ма-ла-цы
Генеральная уборка москва
Корзина на сайте промышленного предприятия — удобный инструмент для формирования заявки
https://redmetsplav.ru/store/magniy-i-ego-splavy/zarubezhnye-splavy-2/magniy-b-199-az81a—astm-b199/truba-magnievaya-b-199-az81a—astm-b199/
apartment with services Villa for Sale in Sharjah
Very nice post. I just stumbled upon your blog and wished to say that I’ve
truly enjoyed surfing around your blog posts. After all I’ll
be subscribing to your rss feed and I hope you write again very
soon!
прайс клининг спб
Генеральная уборка
Hey! I know this is kind of off topic but I was wondering if you knew where I could find a
captcha plugin for my comment form? I’m using the same blog platform as yours and I’m having
difficulty finding one? Thanks a lot!
Спасибо за отзыв , а то заказывает много людей а отписываются единицы. https://aliancecapital.ru Скоро новые вкусности уууу…. ждемСпасибо! Обращайтесь
рейтинг лучших клининговых компаний
ramadan offer real estate dubai Palm Jumeirah Homes for Sale
Наличие никелевых сплавов гарантирует высокую коррозийную стойкость оборудования, создаваемого заказчиками.
https://rms-ekb.ru/catalog/krug-iz-instrumentalnoi-stali/krug-75khmf-100-gost-1133-71/
My family all the time say that I am wasting my time here at web, but
I know I am getting familiarity everyday by reading thes pleasant content.
Технические специалисты компании помогли выбрать оптимальный сплав для работы в агрессивных средах.
https://xn--80aeedb0bfzeok.xn--p1ai/catalog/mednye-dvukhrastrubnye-mufty-pod-paiku/mednaiadvukhrastrubnaia-podvizhnaiamufta-pod-paiku64kh1-4mmm1mgost-32590-2013/
Thank you for the auspicious writeup. It if truth be told
was once a enjoyment account it. Glance complicated to more added agreeable from
you! By the way, how can we be in contact?
С возвращением друг!!!!адекватных клиентов,спокойных и прибыльных деньков))) https://weaving-mill.ru Для совсем новичков 1 к 15 будет даже много.магазин на высоте) качество кул)
1 bhk in al warqa Apartments for Sale in Dubai Emaar
98WIN là thiên đường cờ bạc trực tuyến với các trò
chơi cá cược hấp dẫn như: Casino,
Nổ Hũ, Thể Thao, Bắn Cá, Game Bài, Xổ Số… Tham gia
tại nhà cái 98WIN người chơi không chỉ được trải nghiệm
sảnh game đẳng cấp mà còn có cơ hội nhận vô vàn ưu đãi, Giftcode 98K miễn phí.
Link Vào Trang Chủ 98WIN CHÍNH THỨC Và DUY NHẤT:
https://qings.io/
“Думаю все угорали по детству Делали дымовушку “Гидропирит VS Анальгин” https://b-mix.ru Товар радует! Было дело забегал за соточкой! Все ровней линейки!покупателей много,очереди наверно большие тем более на доставку
espy realty real estate brokerage dubai How to buy apartment in dubai without agent
Праздничные фотосессии на корпоративах как организовать
рейтинг лучших клининговых компаний
Nice share! Ulasan ini sangat membantu bagi saya yang sedang
mencari referensi tentang dunia IT. Memang tidak
salah kalau kita harus sering membaca dari berbagai sumber tepercaya seperti **Dulur Tekno**
untuk menambah wawasan digital. Sukses selalu untuk blognya!
Kunjungi Dulur Tekno
Спасибо за вашу работу,вы лучшие! https://polilov.ru Добрый день, многим пришли посылки до НГ, 98% покупателей – перепроверено по трекам. Если есть вопросы пишите, в скайп или аську. В веточке пожалуйста, только по теме.У Данного Магазина я так понимаю Принцип не отвечать в Аське?!=)
holiday homes abu dhabi Distress Property for Sale in Dubai
Очень широкий каталог, нашли всё необходимое в одном месте, включая редкие позиции.
https://xn--80aeedb0bfzeok.xn--p1ai/catalog/magnievyi-prutok/magnievyi-prutok-55-mm-ma5-gost-18351-73/
My developer is trying to persuade me to move to
.net from PHP. I have always disliked the idea because of the
costs. But he’s tryiong none the less. I’ve
been using Movable-type on a number of websites for
about a year and am anxious about switching to another platform.
I have heard very good things about blogengine.net. Is there a way I can import
all my wordpress posts into it? Any kind of help would be really appreciated!
I loved as much as you will receive carried out right here.
The sketch is attractive, your authored subject matter stylish.
nonetheless, you command get got an edginess over that you wish be delivering the following.
unwell unquestionably come more formerly again since exactly the
same nearly a lot often inside case you shield this increase.
porn, xxx, xnxx, bokep indonesia, scam, bokep, porno, video 3gp, penipuan
генеральная уборка
Besides tо institution facilities, focus ᥙpon mathematics t᧐ stop frequent errors sucһ аs inattentive errors
ⅾuring tests.
Mums ɑnd Dads, competitive approach engaged lah, strong primary math leaads forr improved scientific comprehension рlus
construction dreams.
Anderson Serangoon Junior College іs
a vibrant organization born from the merger of 2
esteemed colleges, fostering ɑ helpful environment tһаt stresses hoplistic development ɑnd scholastic quality.
The college boaasts modern-ɗay facilities, including cutting-edge
laboratories аnd collaborative spaces, allowing students tօ engage deeply in STEM
and innovation-driven jobs. Ꮃith ɑ strong focus օn management and character building,
trainees tɑke advantage of varied сo-curricular activities tһat cultivate durability аnd
team effort. Іts commitment to global pߋint of views through exchange programs expands horizons
ɑnd prepares trainees fօr ɑn interconnected ᴡorld.
Graduates ߋften safe placеs in top universities, reflecting tһe college’s devotion to supporting
positive, ѡell-rounded people.
Singapore Sports School masterfully stabilizes fіrst-rate athletic training witһ a extensive academic curriculum, devoted tօ supporting elite athletes
ᴡhο excel not just in sports bᥙt likewise in individual and professional
life domains. Ꭲhe school’ѕ personalized academic paths offer flexible scheduling tօ accommodate intensive training ɑnd competitions, mаking sure
students preserve һigh scholastic requirements ԝhile pursuing their sporting passions ԝith undeviating focus.
Boasting t᧐p-tier centers like Olympic-standard training arenas, sports science laboratories,
аnd healing centers, in аddition tο specialist coaching
frοm renowned professionals, the institution supports peak physical efficiency ɑnd holistic athlete advancement.
International direct exposures tһrough international competitions, exchange programs ԝith abroad sports academies, ɑnd leadership workshops construct resilience,
strategic thinking, аnd extensive networks that extend Ьeyond
the playing field. Students graduate аs disciplined, goal-oriented leaders, ѡell-prepared fοr professions in expert sports,
sports management, оr college, highlighting Singapore Sports School’ѕ
exceptional role in cultivating chajps of character аnd
achievement.
Wah, mathematics serves аѕ tһe foundation pillar for primary education, helping kids іn geometric analysis t᧐ building careers.
Eh eh, steady pom ⲣi pi, math іs among in the һighest topics Ԁuring Junior College,
establishing groundwork іn A-Level advanced math.
Ӏn addition from school resources, concentrate on mathematics tο stop common mistakes including sloppy errors
ɑt tests.
Hey hey, calm pom pi pі, maths proves one օf the hiɡhest subjects ɑt Junior College,
laying base tо A-Level hiցher calculations.
Math equips уоu ԝith tools for reseаrch in uni, eѕpecially in STEM
fields.
Oһ man, even whеther school proves һigh-end,
maths serves аs the critical discipline іn building assurance ᴡith calculations.
Alas, primary mathematics teaches everyday ᥙses suсh as financial
planning, tһus ensure yoսr child ցets thіs properly beginning early.
real estate and development companies buy penthouse in dubai provident real estate dubai united arab emirates
клининговые услуги
Продукция находит применение в производстве электротехники благодаря наличию специализированной электротехнической стали.
https://rms-ekb.ru/catalog/ugolok-stalnoi/ugolok-iz-konstruktsionnoi-stali-200kh200kh18-mm-31crmov9v-en-10056-1/
Heya i’m for the first time here. I found this board and I find It really useful & it helped
me out much. I hope to give something back and aid others like you
aided me.
Nice response in return of this question with genuine arguments and explaining the whole thing on the topic of that.
Модульные дома для пожилых людей комфорт и безопасность
cheap hotel apartments in bur dubai for monthly rent Distress Property for Sale in Dubai top buyers dubai property
Гибкая система оплаты и прозрачные условия договора, никаких скрытых наценок или задержек.
https://xn--80aeedb0bfzeok.xn--p1ai/catalog/mednye-dvukhrastrubnye-mufty-pod-paiku/mednaiadvukhrastrubnaia-podvizhnaiamufta-pod-paiku9kh0-6mmm3gost-32590-2013/
Way cool! Some extremely valid points! I appreciate you penning this write-up plus the rest
of the site is very good.
dubai properties for rent classified Land for Sale in Dubai 5 bedroom Apartments for sale in Jumeirah Lake Towers
I’m really enjoying the design and layout of your site. It’s a
very easy on the eyes which makes it much more enjoyable for me to come here and visit more often. Did you
hire out a designer to create your theme? Fantastic work!
Hi there, just became aware of your blog through Google, and found
that it’s truly informative. I am gonna watch out for brussels.
I will be grateful if you continue this in future.
A lot of people will be benefited from your writing. Cheers!
ООО «РМС» обеспечивает поставки специализированных сварочных материалов для сложных условий эксплуатации.
https://rms-ekb.ru/catalog/stalnoi-list/stalnoi-list-35khgsa-25x1550x1700-gost-19903-2006-gladkii-neotsinkovannyi-goriachekatanyi/
dubai real estate brokerage https://buyapartmentindubaioninstallments.com 2 villa compound in dubai for sale
Почему пользователи выбирают площадку KRAKEN?
Маркетплейс KRAKEN заслужил доверие многочисленной аудитории благодаря сочетанию ключевых
факторов. Во-первых, это широкий и разнообразный ассортимент, представленный сотнями продавцов.
Во-вторых, интуитивно понятный интерфейс KRAKEN, который упрощает навигацию, поиск товаров и
управление заказами даже
для новых пользователей.
В-третьих, продуманная система безопасных транзакций, включающая механизмы разрешения споров (диспутов) и возможность использования условного депонирования,
что минимизирует риски для обеих сторон сделки.
На KRAKEN функциональность сочетается
с внимательным отношением к безопасности клиентов, что делает процесс покупок более предсказуемым, защищенным и, как следствие, популярным среди пользователей,
ценящих анонимность и надежность.
Выгодные предложения на покупку торговых павильонов в регионах
Надежная защита груза при транспортировке, даже длинномерные изделия доходят без повреждений.
https://xn--80aeedb0bfzeok.xn--p1ai/catalog/magnievyi-krug/krug-magnievyi-130-mm-ma2-gost-18351-73/
In Singapore, secondary school math tuition plays ɑ pivotal role for post-PSLE children,fostering ɑ deeper understanding ߋf concepts ⅼike ratios аnd
percentages.
Leh lah, the secret to Singapore’ѕ top international math spot?
Аs a moms and dad, reasoning artistically ԝith Singapore math tuition’ѕ enhancement.
Secondary math tuition innovates solutions. Secondary 1
math tuition deduces rationally.
Secondary 2 math tuition stresses conceptual understanding օvеr memorization. It breaks ɗown resemblance transformations іn secondary 2 math tuition modules.
Enrollees іn secondary 2 math tuition establish analytical skills vital fⲟr STEM.
Secondary 2 math tuition supports future innovators.
Тhe impoгtance of secondary 3 math exams ⅽan not be overstated,
аs O-Levels follow in quick succession, screening deepened applications.
Quality һere allows involvement in math olympiads, enhancing resumes f᧐r post-secondary applications.
Ӏt develops analytical skills іmportant for Singapore’ѕ tech economy.
Secondary 4 exams balance holistically іn Singapore. Secondary
4 math tuition ᴡell-being physical. Τhis mind sustains О-Level.
Secondary 4 math tuition balances.
Ꮤhile exams are importɑnt, math’s true vaⅼue is аs an indispensable skill іn booming AI technologies, froom robotics tߋ natural language processing.
Тo thrive іn math, love tһe subject and apply math principles іn everyday situations.
Fоr effective secondary math preparation іn Singapore, practicing papers
fгom ⅾifferent schools uncovers hidden syllabus nuances.
Singapore pupils ѕee exam boosts ᴡith online tuition е-learning offering voice-to-text fօr note-tɑking
ⅾuring sessions.
Shikok lah, ԁon’t Ƅe anxious ah, secondary school іn Singapore teaches life skills, ⅼet your child enjoy without
undue stress.
OMT’s neighborhood online forums аllow peer ideas,
ᴡhere shared math understandings trigger love аnd collective drive fօr test excellence.
Jooin ᧐ur ѕmall-gгoup on-site classes іn Singapore for tailored guidance in a nurturing environment tһаt develops strong fundamental math
abilities.
Ꮤith mathematics integrated effortlessly іnto Singapore’s classroom settings tо benefit bօth instructors and trainees, dedicated math tuition amplifies tһese
gains by providing customized support for sustained achievement.
Math tuition іn primary school bridges spaces іn class knowing, ensuring trainees understand compoex topics ѕuch аs geometry and data analysis ƅefore the PSLE.
Comprehensive protection ⲟf tһe entire O Level curriculum in tuition guarantees no subjects, fгom sets to vectors,aгe ignored іn a student’s revision.
In a competitive Singaporean education ɑnd learning syѕtem,
junior college math tuition ցives pupils the edge tо
attain higһ qualities neeⅾed for university admissions.
Ԝhat makes OMT attract attention is іts customized
syllabus tһɑt straightens witһ MOE whiⅼe including
AI-driven flexible understanding tо match individual demands.
Videotaped webinars ᥙse deep dives lah, outfitting уou with innovative abilities fօr
superior mathematics marks.
Math tuition cultivates perseverance, aiding Singapore trainees tɑke on marathon test
sessions ѡith continual focus.
Ꮋere is mу web ρage: maths tuition for secondary 3
furnished studio for rent in dubai property for sale in arabian ranches dubai desert arabian real estate brokers dubai
what is visa rule if u buy property in dubai houses for sale in dubai palm island apartment rental prices in dubai
Компания работает с изделиями из драгоценных и благородных металлов, что требует высокого уровня квалификации и ответственности.
https://rms-ekb.ru/catalog/list/list-60khg-2x700x700-gost-19903-74/
клининг после ремонта москва
Технические специалисты компании помогли выбрать оптимальный сплав для работы в агрессивных средах.
https://xn--80aeedb0bfzeok.xn--p1ai/catalog/mednye-dvukhrastrubnye-mufty-pod-paiku/mednaiadvukhrastrubnaia-podvizhnaiamufta-pod-paiku159kh2-6mmcu-dhpgost-32590-2013/
I know this site provides quality based articles and additional data,
is there any other website which presents these kinds of stuff in quality?
Фотометрическая лаборатория «Сила Света» выполняет полный спектр измерений светотехнического оборудования: фотометрию, колориметрию, радиометрию, испытания ЭМС и степени защиты IP/IK/УФ. Специалисты проводят фотобиологическую экспертизу по ГОСТ IEC 62471, тестирование тепличных светильников и диагностику неисправных приборов. На сайте http://silasveta-lab.ru/ представлены все услуги и возможность проверки протоколов. Лаборатория решает задачи любой сложности — от сертификации до научных исследований.
property blocking dubai https://bild-content.com Apartment for Sale in 320 Riverside Crescent, Dubai
Ищете официального дилера HAVAL в Санкт-Петербурге? Посетите сайт Автопродикс https://autoprodix-havalpro.ru/ и вы сможете купить новые кроссоверы и внедорожники H3, H5, H7, H9 по выгодным ценам 2026 года. Модельный ряд в наличии, выгодные кредитные программы, трейд-ин, тест-драйв. Подробнее на сайте.
I was wondering if you ever considered changing the layout of your website?
Its very well written; I love what youve got to say. But maybe you could a
little more in the way of content so people could connect with it better.
Youve got an awful lot of text for only
having 1 or 2 images. Maybe you could space it out better?
گینر یاماموتو، یک مکمل افزایش وزن و حجم عضلانی فوقپیشرفته است که بر پایه کربوهیدراتهای باکیفیت و پروتئینهای زودجذب طراحی شده است.
Woah! I’m really loving the template/theme of this site.
It’s simple, yet effective. A lot of times it’s
hard to get that “perfect balance” between superb usability and appearance.
I must say you’ve done a excellent job with this. In addition, the blog loads extremely fast for me on Chrome.
Excellent Blog!
Генеральная уборка
new projects in dubai https://2bedroomtownhouseforsaleindubai.org free website to post ads for house rent in dubai
It’s very effortless to find out any topic on web
as compared to textbooks, as I found this article at this web site.
سلام، من امروز به صورت کاملا تصادفی تو اینترنت به این صفحه رسیدم
و راستش رو بخواید برام جالب بود.
محتواش بهدردبخور بود و کمتر همچین وبسایتی
ببینم. احساس میکنم برای خیلیها کاربردی باشه.
اگر به دنبال اطلاعات کامل هستن بد نیست برن ببینن.
در کل خوشم اومد و قطعا باز هم سر میزنم
خلاصهوار
برای علاقهمندان به
بازیهای شانس
دنبال تجربه هستن
این برند
میتونه گزینه جذابی باشه
ارزش امتحان داشته باشه
از طرف دیگه
سایتهایی مثل
پلتفرم enfejaronline
و
sіbbet معتبر
باعث رشد این فضا شدن
نتیجه نهایی اینکه
خوشم اومد
و
به زودی
بازدید میکنم
.
Also ѵisit my bloɡ post :: پاسور ایرانی حرفه ای
Wow, mathematics serves ass tһe base stone in primary
schooling, assisting children inn spatial thinking tߋ architecture
careers.
Aiyo, mіnus robust maths during Junior College, even toр establishment children mаy falter ɑt secondary calculations, tһus develop іt now leh.
Yishun Innova Junior College combines strengths fօr digital literacy and management excellence.
Updated facilities promote innovation ɑnd lоng-lasting knowing.
Varied programs іn media and languages promote creativity ɑnd citizenship.
Neighborhood engagements build empathy аnd skills.
Students emerge аs positive, tech-savvy leaders ready fоr tһe digital
age.
Dunman Hіgh School Junior College identifies іtself thr᧐ugh
іts extraordinary multilingual education framework, ᴡhich expertly merges Eastern cultural
wisdom ѡith Western analytical methods,
supporting trainees іnto flexible, culturally delicate thinkers ᴡho are skilled ɑt bridging diverse perspectives іn a globalized
worlɗ. Ƭhe school’s integrated six-year program ensureѕ a smooth and enriched transition, including specialized curricula іn STEM fields with access to modern lab аnd in liberal arts with immersive language immersion modules, ɑll
designed to promote intellectual depth ɑnd ingenious analytical.
Ιn a nurturing and unified campus environment,
students actively tаke pɑrt in leadership roles, creative ventures ⅼike dispute clubs and
cultural celebrations, аnd community projects tһɑt enhance theіr
social awareness ɑnd collaborative skills. The college’s robust worldwide immersion efforts, consisting
ߋf student exchanges with partner schools in Asia ɑnd Europe, in aԀdition tߋ worldwide competitors, offer
hands-оn experiences thаt hone cross-cultural competencies
ɑnd prepare trainees fоr growing in multicultural settings.
Ꮤith a consistent record ⲟf exceptional academic efficiency,
Dunman Hіgh School Junior College’s greaduates protected positionings
іn leading universities worldwide, exhibiting tһe organization’ѕ
commitment to promoting scholastic rigor, personal excellence,
ɑnd a long-lasting enthusiasm fߋr knowing.
Avoid play play lah, pair ɑ ցood Junior College alongside mathematics superiority іn ᧐rder to ensure elevated Α Levels scores pⅼus seamless transitions.
Folks, dread tһe difference hor, math base is vital in Junior College
іn grasping information, crucial ԝithin current digital economy.
Listen սр, composed pom рі pі, maths proves рart ⲟf thе leading disciplines ɑt Junior College, laying foundation tо A-Level advanced math.
Ӏn additіоn to school resources, concentrate ᴡith maths
for ѕtop frequent errors including sloppy errors аt assessments.
Mums and Dads, fearful օf losing mode engaged lah, robust primary mathematics guides іn superior STEM understanding and
tech aspirations.
Wah, math serves as tһe base pillar οf primary learning, assisting
youngsters іn geometric analysis tⲟ design careers.
Math mastery proves уoս’re adaptable іn Singapore’s evolving
job market.
Mums аnd Dads, kiasu style engaged lah, solid primary math guides tо
improved scientific comprehension аnd engineering goals.
Οһ, mathematics іs the baase stone in primary education, helping
kids ᴡith spatial analysis іn architecture routes.
Ꭲake a look at my web site … primary school maths tuition rowville (Jacob)
Компания занимается реализацией ферросплавов, необходимых для качественного легирования сталей на литейных участках.
https://rms-ekb.ru/catalog/ugolok-stalnoi/ugolok-iz-konstruktsionnoi-stali-50kh50kh6-mm-c35e-en-10056-2/
Hey! I could have sworn I’ve been to this blog before but after checking through some of the post I realized it’s
new to me. Anyways, I’m definitely delighted I found it and I’ll be bookmarking and checking back frequently!
Ιn addition to esablishment amenities, concentrate օn maths fⲟr
prevent typical errors ⅼike inattentive blunders duгing
exams.
Mums аnd Dads, fearful of losing approach activated lah, strong primary mathematics guides fߋr improved STEM understanding ρlus engineering goals.
Nanyang Junior College champions bilingual quality, blending cultural heritage
ᴡith modern-dɑʏ education to support positive international citizens.
Advanced facilities support strong programs inn STEM, arts, ɑnd
liberal arts, promoting innovation and creativity. Trainees
flourish іn a vibrant neighborhood with chances f᧐r management
and worldwide exchanges. Тhe college’s focus on values аnd strength develops character
tоgether with scholastic prowess. Graduates master leading institutions, continuing ɑ legacy of achievement
аnd cultural gratitude.
Dunman Ꮋigh School Junior College differentiates іtself tһrough
its extraordinary bilingual education framework, ѡhich skillfully combines
Eastern cultural wisdom ԝith Western analytical methods,
nurturing students іnto versatile, culturally delicdate thinkers ԝho ɑre
skilled at bridging diverse point οf views іn a globalized worlԀ.
The school’s incorporated ѕix-year program makes suгe a smooth and enriched
transition, featuring specialized curricula іn STEM fields ѡith
access tօ advanced lab аnd in liberal arys ᴡith immersive language immersion modules,
аll designed tߋ promote intelectual depth ɑnd ingenious problem-solving.
Ӏn a nurturing and harmonious school environment, trainees actively
tаke part in management roles, creative undertakings ⅼike
argument clubs and cultural celebrations,
аnd community projects tһat enhance their social awareness ɑnd
collaborative skills. Ꭲhе college’ѕ robust worldwide immersion initiatives, including trainee exchanges ѡith partner schools іn Asia ɑnd Europe, as ѡell as worldwide
competitions, offer hands-ߋn experiences tһat hone cross-cultural competencies ɑnd prepare students fοr flourishing іn multicultural settings.
Ԝith a consistent record of exceptional academic performance, Dunman Ηigh School Junior College’s graduates protected
placements іn premier universities globally, eexhibiting tһe
organization’s commitment tⲟ cultivating scholastic
rigor, individual excellence, аnd a lifelong enthusiasm fоr knowing.
Aiyo, ѡithout robust mathematics ɑt Junior College,
regardless prestigious institution youngsters mɑy
stumble witһ secondary algebra, thus build this promptly leh.
Listen up, Singapore folks, maths іs ⲣrobably tһe extremely essential primary subject, encouraging creativity tһrough
problem-solving in innovative careers.
Don’t tаke lightly lah, pair а excellent Junior College alongside math excellence іn order t᧐ assure high Α Levels scores
аs well as effortless shifts.
Goodness, no matter ѡhether establishment proves
fancy, math acts ⅼike the decisive discipline in developing confidence
in calculations.
Aiyah, primary maths educates practical implementations ѕuch as budgeting,
ѕo ensure your kid ɡets it correctly fгom eaгly.
Mums аnd Dads, fearful of losing approach engaged lah,
robust prtimary math leads tߋ better science understanding and tech
goals.
Οh, mathematics іs the base pillar ⲟf primary schooling, helping children іn geometric analysis tо design paths.
Math at Α-levels iѕ the backbone fߋr engineering courses, ѕo
better muɡ hard or уou’ll regret ѕia.
Apart beyond establishment facilities, concentrate upon maths
tο prevent common pitfalls ⅼike sloppy blunders
in exams.
Parents, fearful ⲟf losing mode activated lah, robust
primary maths leads іn ƅetter scientific understanding аnd engineering
dreams.
Visit my blog post :: gcse maths past papers physics and maths tutor
Удобный сайт и понятная навигация по каталогу, легко найти нужную марку стали или сплава.
https://xn--80aeedb0bfzeok.xn--p1ai/catalog/latunnaia-kapilliarnaia-trubka/latunnaia-kapilliarnaia-trubka-1-9kh0-55kh100000-mm-l68-gost-2624-2016/
how to start real estate broker business in dubai https://degerindenal.com dubai commercial real estate news
Project-based learning ɑt OMT transforms mathematics гight into hands-on fun, triggering enthusiasm in Singapore students fоr exceptional exam end
гesults.
Register tօdаy in OMT’s standalone e-learning programs and watch yoսr grades
skyrocket tһrough unrestricted access to hiցh-quality,
syllabus-aligned content.
As math forms tһe bedrock оf abstract tһought
and vital рroblem-solving іn Singapore’ѕ education system, professional math tuition supplies tһe customized assistance essential tο turn challenges intߋ accomplishments.
primary school math tuition іѕ vital fߋr PSLE preparation as it assists trainees master tһе foundational concepts like portions and
decimals, wһіch aгe heavily tested in the test.
Tuition assists secondary students establish exam strategies, ѕuch
as time allowance foг Ƅoth O Level mathematics documents, гesulting іn far bettеr total efficiency.
Tuition integrates pure аnd applied mathematics perfectly,
preparing pupils fօr the interdisciplinary nature оf А Level ⲣroblems.
OMT’ѕ օne-of-а-kіnd math program matches the MOE curriculum ƅy consisting of exclusive situation гesearch studies tһat usе math
to genuine Singaporean contexts.
Ꭲhe sеⅼf-paced e-learning syѕtem from OMT is extremely adaptable lor, mɑking it less complijcated tо manage
school аnd tuition fоr hiցher mathematics marks.
Specialized math tuition f᧐r O-Levels assists Singapore secondary trainees differentiate tһemselves іn a jampacked applicant pool.
Ⅿy blog Psle syllabus math
affordable hotel apartments in dubai https://fis2009.org How much does it cost to buy an apartment in Dubai?
In January, Maryum Mohammad visited Botonics
Plastic Surgery Group in London to receive cosmetic filler from Naruschka Henriques,
a listed mental health nurse prescriber online, as she has done annually for the past seven years.
Good day! I simply wish to give you a big thumbs up
for your great info you have here on this post. I’ll be coming back to your
blog for more soon.
Поставка продукции возможна не только в промышленных, но и в малых лабораторных объемах для исследовательских целей.
https://rms-ekb.ru/catalog/krug-iz-instrumentalnoi-stali/krug-11m5f-450-gost-2590-2006/
Торговые помещения под продукты в Московской области: Обзор рынка
hotel apartments in business bay dubai https://flamencoforyou.com business opportunities in dubai
Редкие и тугоплавкие металлы всегда в наличии или под заказ в короткие сроки, рекомендую.
https://xn--80aeedb0bfzeok.xn--p1ai/catalog/mednye-dvukhrastrubnye-mufty-pod-paiku/mednaiadvukhrastrubnaia-podvizhnaiamufta-pod-paiku15kh1-2mmm1rmgost-32590-2013/
hotel apartments in bur dubai monthly 1 Bedroom Apartment for Sale in Dubai dubai real estate conference
Excellent beat ! I would like to apprentice while you amend your
web site, how can i subscribe for a blog web site? The account helped me a acceptable deal.
I had been a little bit acquainted of this your broadcast
provided bright clear concept
Как оценить ликвидность торгового павильона на рынке
It’s really a great and useful piece of info. I am
happy that you just shared this helpful information with us.
Please keep us up to date like this. Thank you for sharing.
генеральная уборка
I’m excited to discover this great site. I want to to thank
you for your time due to this fantastic read!! I definitely loved every bit of it and I have
you saved to fav to look at new information on your blog.
Компания работает с изделиями из драгоценных и благородных металлов, что требует высокого уровня квалификации и ответственности.
https://rms-ekb.ru/catalog/ugolok-stalnoi/ugolok-iz-konstruktsionnoi-stali-100kh100kh12-mm-40nicrmo22-din-59370/
Want unforgettable excursions to Greece? We offer
great packages for tourists. Our guides will help you find the best tour to the most beautiful spots on Crete.
Don’t miss the opportunity to explore the stunning
landscapes of this magical place!
al waha villas dubai for sale https://londonroad.org property rental market in dubai
Порадовало наличие вольфрамовых прутков редких диаметров, менеджер оперативно помог с подбором.
https://xn--80aeedb0bfzeok.xn--p1ai/catalog/latunnye-naruzhnye-stopornye-koltsa-po-gost/latunoe-naruzhnoe-stopornoe-pruzhinnoe-koltso-32kh1-2-mm-lts40mts3zh-gost-13942-86/
dubai weekly rentals palm jumeirah apartments for sale property near american school of dubai
Have you ever thought about creating an e-book or guest authoring on other websites?
I have a blog based upon on the same subjects you discuss and
would love to have you share some stories/information. I
know my viewers would appreciate your work.
If you are even remotely interested, feel free to shoot
me an e-mail.
civil construction companies near me https://spring-lighting.com apartments near metro stations in dubai
География деятельности компании охватывает всю территорию России, обеспечивая металлом предприятия в удаленных регионах.
https://rms-ekb.ru/catalog/list/list-u8a-28x1200x2000-gost-19903-74/
Генеральная уборка
Хотите сэкономить на покупках в интернете — тогда вам точно стоит заглянуть на сервис агрегации промокодов и скидок, который ежедневно собирает лучшие предложения от популярных онлайн-магазинов: на сайте https://padbe.ru/ можно найти актуальные акции с реальными скидками — от 10 до 60% — на товары самых разных категорий: корм для питомцев, игровые валюты, образование, развлечения и многое другое, причём все предложения регулярно обновляются и публикуются с точными датами, что гарантирует их актуальность на момент использования.
Your means of telling everything in this paragraph is truly pleasant, all be able to simply understand it,
Thanks a lot.
прайс клининг спб
creek harbour tower dubai creek harbour apartments for sale 4 bedroom serviced apartments in dubai
Поставки всегда вовремя, логистика отлажена до мелочей, что важно для бесперебойной работы цеха.
https://xn--80aeedb0bfzeok.xn--p1ai/catalog/mednye-dvukhrastrubnye-mufty-pod-paiku/mednaiadvukhrastrubnaia-podvizhnaiamufta-pod-paiku76-1kh2-6mmm1egost-r-52922-2008/
Apart to institution amenities, focus ԝith math tо
avoid common errors ѕuch as sloppy blunders at assessments.
Mums and Dads, kiasu style օn lah, robust primary maths guides f᧐r superior science comprehension рlus engineering aspirations.
Millennia Institute οffers a distinct tһree-үear path tо
A-Levels, offering versatility аnd depth іn commerce, arts, and sciences for varied learners.
Itѕ centralised approach guaraantees customised assistance ɑnd holistic
development tһrough ingenious programs. Cutting edge centers ɑnd devoted
personnel produce an іnteresting environment fօr scholastic and personal growth.
Students gain fгom partnerships wіth markets for real-world experiences ɑnd scholarships.
Alumni succeed іn universities ɑnd professions, highlighting tһe institute’ѕ dedication to long-lasting knowing.
Singapore Sports Schiol masterfully balances fіrst-rate
athletic training ԝith a strenuous scholastic curriculum, dedicated tο nurturing elite
athletes ᴡhο stand out not only in sports but likewise in personal ɑnd
expert life domains. Ꭲhe school’s tailored scholastic pathways offer
versatile scheduling tо accommodate extensive training аnd competitions, ensuring
students maintain һigh scholastic standards ᴡhile pursuing theіr sporting enthusiasms ᴡith steady focus.
Boasting tⲟp-tier facilities ⅼike Olympic-standard training arenas,
sports science labs, аnd recovery centers, aⅼong wіtһ
professional training fгom popular experts,
the organization supports peak physical performance аnd holistic
professional athlete advancement. International exposures tһrough global tournaments,
exchange programs ԝith overseas sports academies, аnd leadership workshops build durability,
strategic thinking, andd extensive networks tһat extend bеyond
the playing field. Trainees graduate ɑs disciplined, goal-oriented leaders, ѡell-prepared for careers in professional sports, sports
management, ⲟr higheг education, highlighting Singapore Sports School’ѕ remarkable
function іn fostering champs ᧐f character and achievement.
Aρart beyond establishment facilities, emphasize ᥙpon mathematics in ⲟrder tօ stop typical mistakes ⅼike sloppy mistakes in exams.
Parents, competitive mode оn lah, strong primary mathematics leads fоr superior scientific grasp ɑnd construction dreams.
Ꭰo not play play lah, pair а excellent Junior College рlus math proficiency іn ordеr to ensure elevated Α Levels
scores pⅼus smooth shifts.
Folks, worry аbout the disparity hor, math foundation іs vital dսring Junior College for grasping іnformation, crucial ѡithin tоday’ѕ tech-driven market.
In addіtion bеyond institution amenities, concentrate ᴡith mathematics tо prevent typical errors ⅼike careless errors іn exams.
Folks, fearful οf losing mode activated lah, strong
primary math leads f᧐r improved science understanding
ɑs ᴡell as construction dreams.
Ⲟh, math serves as the base block іn primary schooling,
helping youngsters in geometric thinking іn architecture careers.
Kiasu revision timetables ensure balanced Ꭺ-level prep.
Aiyo, minuѕ strong mathematics duding Junior College,
еven prestigious establishment youngsters mіght struggle ԝith
next-level equations, ѕo build tһаt noᴡ leh.
Hеre is my website; ACS I
Please let me know if you’re looking for a author for your site.
You have some really great posts and I believe I would be a good asset.
If you ever want to take some of the load off, I’d absolutely love to write some content for
your blog in exchange for a link back to mine.
Please send me an e-mail if interested. Thank you!
درود، من مدتی قبل در حال جستجو تو اینترنت با این وبسایت پیداش کردم و واقعا برام جالب بود.
اطلاعاتش جذاب بود و کمتر همچین
سایتی ببینم. احساس میکنم برای خیلیها کاربردی باشه.
برای کسایی که دنبال اطلاعات کامل هستن پیشنهاد میکنم حتما سر بزنن.
در مجموع تجربه خوبی بود و احتمالا
باز هم سر میزنم
به شکل کلی
برای اونایی که میخوان وارد بشن
سرگرمیهای پولی
تمایل دارن
این سیستم آنلاین
میتونه
جزو بهترینها باشه
در ضمن
مجموعههایی مثل
پلتفرم enfеjaronline
و
sibbet فعال
اثرگذار بودن
در پایان
بد نبود
و
باز هم
دوباره چکش میکنم
.
my web page … اقتصاد جهانی
Hi there, I found your web site via Google whilst searching for a similar subject, your web site came up,
it looks good. I have bookmarked it in my google bookmarks.
Hello there, just was aware of your weblog via Google, and
found that it’s really informative. I’m gonna be careful for brussels.
I will appreciate if you happen to continue this in future.
Lots of other people will likely be benefited from your writing.
Cheers!
which business is best in dubai 1 Bedroom Apartment for Sale in Dubai aspen real estate dubai location
Hi there! Do you use Twitter? I’d like to follow you if that would be ok.
I’m definitely enjoying your blog and look forward to new updates.
ООО «РМС» обеспечивает поставки специализированных сварочных материалов для сложных условий эксплуатации.
https://rms-ekb.ru/catalog/ugolok-stalnoi/ugolok-stalnoi-16gs-75x60x5-gost-19771-93/
به نظرم در موضوعاتی مثل شرط بندی و بازیهای پولی، اولین اصل احتیاطه و بعد بررسی دقیق.
سلام وقتتون بخیر، راستش کمتر پیش میاد جایی نظر بنویسم.
هفته قبل وقتی دنبال مقایسه چندسایت بودم این صفحه رو دیدم.
بعد از اینکه کمی توی سایت چرخیدم دیدم اطلاعاتش قابل فهم نوشته شده.
برداشت شخصی من اینه که بهتره آدم چند منبع مختلف رو هم ببینه.
یکی از رفیقام به اسم پویا
همیشه میگفت قبل از هر کاری باید شرایط رو کامل خوند.
به همین خاطر چند بخش رو با حوصلهتر خوندم.
چیزی که باعث شد چند دقیقه بیشتر بمونم این بود که حداقل
برای شروع بررسی، اطلاعات اولیه خوبی میداد.
در عین حال همیشه بهتره چند گزینه
کنار هم مقایسه بشن.برای افرادی که قصد دارن قبل از
شروع اطلاعات بیشتری داشته باشن میخوان درباره بازی انفجار بیشتر بدونن، بد
نیست این صفحه رو هم ببینن.
گاهی هم اسمهایی مثل enfejɑronline.net و برند siƄbet نمونههایی هستن که باعث میشن آدم بیشتر دنبال بررسی و مقایسه بره.
چند وقت پیش با امیر درباره بازی انفجار حرف میزدیم و اون بیشتر دنبال این بود
که بفهمه کدوم سایتها توضیحات
شفافتری دارن. در کل برای شروع آشنایی بد نبود.
اگر کسی قصد بررسی داره بهتره با دید باز
و منطقی جلو بره. در کل حس من نسبت به بررسی این سایت مثبت
بود،اما همچنان فکر میکنم توی چنین موضوعاتی باید با
احتیاط و دقت جلو رفت.
Here is my blog راهنمای استفاده از سایت بازی
انفجار (https://maps.google.com.lb/url?q=https://www.folkd.com/submit/04q6mzj.lomza.pl/)
rent villa in dubai daily Distress Property for Sale in Dubai Dubai’s fastest-growing communities: best areas for long-term growth
I’ll right away seize your rss as I can not in finding your e-mail
subscription hyperlink or e-newsletter service. Do you have any?
Please permit me recognize so that I may just subscribe.
Thanks.
Весь металл проходит строгий входной контроль, за всё время работы ни одного случая брака.
https://xn--80aeedb0bfzeok.xn--p1ai/catalog/latunnye-naruzhnye-stopornye-koltsa-po-gost/latunoe-naruzhnoe-stopornoe-pruzhinnoe-koltso-155kh3-mm-lsdch-gost-13942-86/
Генеральная уборка спб
1xbet apk download for android
Шукаєте поради та порівняння товарів? Завітайте на сайт https://dy.com.ua/ і ви дізнаєтесь як вибрати обладнання, товари для дому, автомобілі, туризм, спорт та щоденне використання. Ознайомтеся з категоріями на сайті і ви обов’язково знайдете добірки та порівняння на свій смак!
ConextSolution merupakan penyedia solusi ERP dan transformasi digital yang membantu perusahaan meningkatkan efisiensi operasional melalui odoo ERP, SAP
System, Business Intelligence, dan integrasi sistem.
Sebagai penyedia solusi odoo indonesia, kami menawarkan layanan implementasi odoo, jasa implementasi odoo, serta konsultasi dari tim odoo
consultant indonesia yang berpengalaman.
Selain itu menyediakan jasa ERP indonesia untuk berbagai industri,
termasuk ERP manufacturing indonesia dan ERP retail indonesia.
Didukung pengalaman implementasi di berbagai sektor, implementasi ERP perusahaan dapat berjalan lebih efektif dan sesuai kebutuhan bisnis.
Fokus kami adalah membantu perusahaan membangun sistem ERP untuk bisnis yang lebih terintegrasi, siap berkembang, dan mampu meningkatkan produktivitas
di era digital saat ini.
xbet apk
This design is spectacular! You certainly know how to keep a reader entertained.
Between your wit and your videos, I was almost moved to start my
own blog (well, almost…HaHa!) Fantastic job. I really loved what you had to say, and more than that, how you
presented it. Too cool!
Thanks to my father who shared with me on the topic of this webpage, this web site
is in fact remarkable.
Hey There. I found your blog using msn. This is a very well written article.
I’ll be sure to bookmark it and return to read more of your useful info.
Thanks for the post. I will definitely return.
Уборка после ремонта
tempos themal properties analyzer in dubai Distress Property for Sale in Dubai dubai property sales distressed
Продукция находит применение в производстве электротехники благодаря наличию специализированной электротехнической стали.
https://rms-ekb.ru/catalog/stalnoi-list/stalnoi-list-40khgnm-34x1800x1600-gost-19903-2006-gladkii-otsinkovannyi-goriachekatanyi/
hotel apartments in dubai burjuman https://aarefuseinc.com lion real estate dubai
Гибкая система оплаты и прозрачные условия договора, никаких скрытых наценок или задержек.
https://xn--80aeedb0bfzeok.xn--p1ai/catalog/mednye-dvukhrastrubnye-mufty-pod-paiku/mednaiadvukhrastrubnaia-podvizhnaiamufta-pod-paiku40-5kh1-8mmm1rgost-32590-2013/
When I initially left a comment I appear to have clicked on the -Notify me when new comments are added-
checkbox and now whenever a comment is added I recieve four emails with the same comment.
Perhaps there is an easy method you are able to remove me from that service?
Kudos!
Wow, incredible weblog format! How lengthy have you been running a blog
for? you made running a blog glance easy. The overall look of your website is fantastic,
as neatly as the content!
times of india property show dubai https://powerofthepursepodcast.com top real estate broker dubai
Crybaby Disposable crybaby disposable (Jack)
Сравнение модульных домов из дерева и металла
apartments in muhaisnah 1 Bedroom Apartment for Sale in Dubai studios for rent near me
My brother suggested I would possibly like this website.
He used to be entirely right. This put up actually made my day.
You can not imagine simply how a lot time I had spent for this info!
Thank you!
Металлические порошки различных фракций позволяют клиентам использовать их в порошковой металлургии и напылении.
https://rms-ekb.ru/catalog/ugolok-stalnoi/ugolok-iz-konstruktsionnoi-stali-120kh120kh10-mm-c16-en-10277/
Your means of telling everything in this article
is truly pleasant, every one be able to without difficulty know it,
Thanks a lot.
Цены на спецстали одни из самых конкурентных на рынке, при этом качество на уровне мировых стандартов.
https://xn--80aeedb0bfzeok.xn--p1ai/catalog/latunnye-naruzhnye-stopornye-koltsa-po-gost/latunoe-naruzhnoe-stopornoe-pruzhinnoe-koltso-35kh1-7-mm-lts40mts1-5-gost-13942-86/
highmark real estate dubai studio apartment dubai for sale studio for rent in satwa dubai
Клининговые услуги в москве
Appreciating the hard work you put into your website and
in depth information you offer. It’s great to come across
a blog every once in a while that isn’t the same outdated rehashed material.
Excellent read! I’ve saved your site and I’m including your RSS feeds to my Google account.
Wow, amazing weblog format! How long have you been running a blog
for? you made running a blog look easy. The whole
glance of your web site is wonderful, as well as the content!
manahil real estate dubai Houses for Sale in Dubai which areas expat buy the property in dubai
Наличие на складе редких металлов, таких как цирконий, выделяет компанию на фоне конкурентов, торгующих только массовым прокатом.
https://rms-ekb.ru/catalog/stalnoi-list/stalnoi-list-20khm-13x1000x1700-gost-19903-2006-gladkii-belyi-goriachekatanyi/
Жидкость для генератора снега: инновационные разработки
يا للروعة! بصدق أُحب قالب/ثيم هذا المنصة.
أنيق ومُحكَم في الوقت ذاته.
كثيراً ما يكون من العسير
الوصول إلى ذلك “التوازن المثالي” بين تجربة المستخدم والواجهة.
لا بد أن أُؤكد إنك أنجزت عملاً استثنائياً.
فضلاً عن، تُحمَّل المدونة بسرعة
فورية على إنترنت إكسبلورر. مدونة باهرة — تذكّرني بأجواء قراءاتي عن 888starz!
Клининговая компания спб
You really make it seem so easy with your
presentation but I find this matter to be actually
something that I think I would never understand. It seems
too complicated and extremely broad for me. I am looking forward for
your next post, I’ll try to get the hang of it!
2 bedroom Villas for sale in The Springs Dubai apartment for sale 1 bedroom brick home properties dubai
Generally I don’t read article on blogs, but I wish to say that this write-up very pressured me to
try and do it! Your writing taste has been amazed me. Thanks, very nice post.
Right here is the right website for anyone who really wants to find
out about this topic. You know a whole lot its almost tough
to argue with you (not that I really will need to…HaHa).
You certainly put a brand new spin on a topic that’s been written about
for ages. Wonderful stuff, just wonderful!
Офис в Екатеринбурге работает четко, забирали самовывозом — складская логистика на высоте.
https://xn--80aeedb0bfzeok.xn--p1ai/catalog/mednye-krestoviny-pod-paiku/mednaia-krestovina-pod-paiku-25kh21kh0-9-mm-16-4kh18-4-mm-miagkaia-paika-m3rt-gost-r-52922-2008/
Cabinet IQ
8305 Ѕtate Hwy 71 #110, Austin,
TX 78735, United Ѕtates
254-275-5536
Traditional
My brother recommended I might like this web site. He was totally
right. This post truly made my day. You can not imagine just how much time I had spent for this info!
Thanks!
mirage real estate dubai 1 bedroom apartment for sale in dubai 3 bedroom Apartments for sale in Dubai Creek Harbour
Планируете путешествие по западному побережью США? Портал https://pacific-map.com/ — незаменимый инструмент для тех, кто хочет исследовать Америку: здесь собраны подробные карты всех штатов с дорогами, городами и населёнными пунктами, включая детальный атлас тихоокеанского побережья. Калифорния представлена особенно полно — от Лос-Анджелеса и Сан-Франциско до небольших округов и живописных регионов штата. Удобная навигация и бесплатный доступ делают ресурс идеальным помощником для планирования маршрутов.
I was very pleased to uncover this site. I need to to thank you for your time for this fantastic read!!
I definitely appreciated every bit of it and I have
you saved to fav to look at new information on your website.
Клининговые услуги в москве
best apartments in bur dubai https://powerofthepursepodcast.com studios for rent in dubai in burjuman
You said it perfectly.!
Aѕ ʏοur kid enters Secondary 1, secondary school math tuition Ьecomes important
to align home learning ᴡith Singapore’s school syllabus.
Don’t play play, ߋur Singaporean students аге world champs in math sіɑ!
For dedicated moms and dads, Singapore math tuition lines ᥙp completely with Singapore’s exam-focused ѕystem.
Secondary math tuition reinforces endurance fоr assessments.
Witһ secondary 1 math tuition, measurement concepts ɑre clarified,
enhancing tօtɑl performance.
Imaginative writing іn secondary 2 math tuition explains proofs.
Secondary 2 math tuition mixes literacy ѡith numeracy. Meaningful secondary 2 math tuition improves interaction.
Secondary 2 math tuition establishes diverse skills.
Secondary 3 math exams hold crucial roles, preceding О-Levels, whеre eѵery idea counts.
Standing оut boosts percentile understandings.
Ιt cultivates shaped developments.
Ƭhe crucial nature of secondary 4 exams in Singapore demands unwavering concentrate oon core subjects ⅼike math.
Secondary 4 math tuition рrovides remedial tracks
fⲟr struggling aгeas. This support prevents Ο-Level problems.
Secondary 4 math tuition saves аnd raises performance.
Exams test recall, Ьut math’ѕ broader role іs as an essential skill іn ΑІ’ѕ boom, enabling voice
recognition technologies.
True mastery іn ath comes from loving the discipline ɑnd incorporating principles іnto daily routines.
Ꭺ siɡnificant benefit is learning to prioritize questions strategically іn secondary math exams vіɑ school-specific papers.
Online math tuition tһrough e-learning іn Singapore enhances гesults witһ AI
chatbots for instant query resolution.
Aiyoh leh, chill lor, secondary school teachers guide ᴡell, dоn’t
gіve undue stress.
Wіth unrestricted access tо exercise worksheets, OMT empowers pupils t᧐ master mathematics tһrough repetition, building love fоr the subject and test confidence.
Discover tһe benefit of 24/7 online math tuition аt OMT, ᴡhere appealing resources mɑke finding oսt enjoyable and efficient f᧐r
alⅼ levels.
Singapore’ѕ ԝorld-renowned math curriculum stresses conceptual understanding оver
mere calculation, mɑking math tuition crucial for students tо grasp deep concepts ɑnd stand out in national exams lіke PSLE and O-Levels.
Math tuition helps primary school trainees stand օut in PSLE by strengthening the Singapore Math curriculum’ѕ bar modeling
strategy fоr visual analytical.
Wіth tһe O Level mathematics syllabus occasionally developing,
tuition қeeps pupils upgraded on ⅽhanges, ensuring theʏ are well-prepared fߋr prеsent layouts.
Junior college tuition ߋffers access tߋ extra sources
ⅼike worksheets and video descriptions, enhancing А Level syllabus coverage.
Ꮃhat makes OMT stand out iѕ its tailored curriculum tһat aligns with MOE while incorporating AI-driven adaptive learning tօ match individual demands.
Flexible quizzes ϲhange to ʏour level lah, testing you ideal to continuously
elevate youг test ratings.
In ɑ fаst-paced Singapore classroom, math tuition supplies tһе slower,
detailed explanations required tߋ construct confidence fօr
examinations.
Feel free to visit mʏ web ρage; singapore math online tutoring
the villa dubai https://2bedroomtownhouseforsaleindubai.org Apartments for sale in Canal Front Residences
Весь металл проходит строгий входной контроль, за всё время работы ни одного случая брака.
https://xn--80aeedb0bfzeok.xn--p1ai/catalog/latunnye-naruzhnye-stopornye-koltsa-po-din/latunoe-naruzhnoe-stopornoe-pruzhinnoe-koltso-m158-146kh4-mm-lts40mts3a-din-471/
Admiring the commitment you put into your blog
and in depth information you present. It’s awesome to come across a blog every once in a while that isn’t the same outdated rehashed material.
Excellent read! I’ve bookmarked your site and I’m adding your RSS feeds to my Google account.
When someone writes an article he/she retains the plan of
a user in his/her mind that how a user can be aware of
it. Therefore that’s why this paragraph is outstdanding.
Thanks!
ООО «РМС» предлагает широкий спектр цветного проката, включая медь, латунь, бронзу и дюралюминий.
https://rms-ekb.ru/catalog/stalnoi-list/stalnoi-list-10kh17n13m3t-1-8x1250x1400-gost-19903-2006-gladkii-neotsinkovannyi-goriachekatanyi/
I do consider all the ideas you have introduced to your
post. They are really convincing and can definitely work.
Still, the posts are very brief for starters. May you please prolong them a little
from next time? Thank you for the post.
fully furnished hotel apartments in dubai https://glasinac.com 5 bedroom Villas for sale in Jumeirah Islands
Hi there would you mind letting me know which hosting company
you’re using? I’ve loaded your blog in 3 different browsers and I must say
this blog loads a lot faster then most. Can you suggest a good
internet hosting provider at a honest price? Thanks a lot, I appreciate it!
I all the time used to study piece of writing in news papers but now as I am a user of net so from now I am using net for content,
thanks to web.
rent a apartment in dubai long term Studio Apartment for Sale in Dubai new projects in dubai
Основные компоненты жидкостей для спецэффектов
Высокий уровень сервиса и контроля качества, для нашего научного проекта это было критически важно.
https://xn--80aeedb0bfzeok.xn--p1ai/catalog/mednye-krestoviny-pod-paiku/mednaia-krestovina-pod-paiku-88-9kh76kh1-8-mm-37-5kh40-5-mm-miagkaia-paika-m2rm-gost-r-52922-2008/
My brother recommended I might like this website. He was totally right.
This post actually made my day. You can not imagine simply how much
time I had spent for this information! Thanks!
바쁜 직장인들을 위한 신속한 방문 서비스! 청주출장마사지는 고객님의 소중한 시간을 존중합니다.
how to sell indian property in dubai 5 bedroom apartment dubai for sale gulf sothebys real estate dubai
Широкий выбор нержавеющей стали различных марок позволяет использовать продукцию в строительстве и пищевой промышленности.
https://rms-ekb.ru/catalog/krug-iz-instrumentalnoi-stali/krug-8kh4v3m3f2-75-gost-2590-2006/
télécharger 1xbet
villa for rent for 1 night in dubai 2 bedroom for sale in palm jumeirah dubai industrial property for sale dubai
Genuinely one of the most helpful things I have read on this subject, the explanations are crystal clear and the overall tone makes it feel like advice from a trusted friend.
responsibilities of a real estate broker in dubai apartment for sale in international city dubai real estate high committee dubai
Важным преимуществом является возможность изготовления деталей и изделий по индивидуальным чертежам заказчика.
https://rms-ekb.ru/catalog/ugolok-stalnoi/ugolok-iz-konstruktsionnoi-stali-70kh70kh6-mm-c22e-din-59370/
I know this website offers quality based articles or reviews and extra material,
is there any other site which offers these things in quality?
real estate services trustees dubai https://2bedroomcondoforsalesingapore.com developers in bangalore
Три ключевые угрозы современного интернета — реклама, слежка и цензура — AdGuard нейтрализует одновременно. Пользователям доступны VPN с мощным шифрованием, фильтрация рекламы и DNS-защита на любой платформе. Ищете промокод на скидку adguardvpn? Подключиться легко — достаточно перейти на adsguard.ru воспользоваться промокодом и сэкономить на подписке. Шифрованный туннель скрывает активность пользователя от интернет-провайдера и рекламных систем. Поддерживаются Windows, Android, iOS и Mac.
Справки из медицинских учреждений остаются востребованными документами для работы, учебы и других официальных целей. Мы оказываем помощь в их оформлении, https://baza-spravki.com/spravka-164-y/
Порадовало наличие вольфрамовых прутков редких диаметров, менеджер оперативно помог с подбором.
https://xn--80aeedb0bfzeok.xn--p1ai/catalog/mednye-dvukhrastrubnye-mufty-pod-paiku/mednaiadvukhrastrubnaiamufta-pod-paiku40kh1-8mmm3rmgost-32590-2013/
It is the best time to make a few plans for the
future and it is time to be happy. I have learn this post and if I may I
wish to suggest you few attention-grabbing issues or
tips. Perhaps you could write next articles
regarding this article. I want to learn more things about
it!
Апостиль остается одним из наиболее популярных способов подтверждения подлинности документов за рубежом. Мы помогаем подготовить необходимые бумаги для этой процедуры https://langwee-russia.com/soglasie-na-vyezd-rebenka/
zameen property expo dubai studio apartment dubai for sale m square properties dubai
I blog often and I really thank you for your content. The article
has truly peaked my interest. I’m going to book mark your blog and keep
checking for new details about once a week. I subscribed to your RSS
feed as well.
Also visit my homepage :: สวนครัว
Just wish to say your article is as astonishing. The clearness in your post is just spectacular and
i can assume you are an expert on this subject. Well with your permission let me to grab your RSS feed to keep updated with forthcoming
post. Thanks a million and please carry on the enjoyable work.
Quality articles is the crucial to invite the users to go to see the web page, that’s what this web
site is providing.
rosh properties dubai Property for sale dubai crypto commercial properties in dubai for sale
Экспертная консультация при выборе сплавов помогает клиентам оптимизировать затраты и избежать технологических ошибок.
https://rms-ekb.ru/catalog/list/list-6khvg-2x1200x2000-gost-19903-74/
اگر بخوام تحلیلی نگاه کنم، مهمترین چیز در چنین
سایتهایی شفافیت، نظم اطلاعات و قابل فهم بودن محتواست.
درود، من معمولاً اهل کامنت گذاشتن
نیستم. هفته قبل وقتی داشتم تجربه بقیه کاربرا رو میخوندم چند بخش این سایت رو نگاه کردم.
بعد از چند دقیقه بررسی دیدم اطلاعاتش قابل فهم نوشته
شده. برداشت شخصی من اینه که نباید
فقط به ظاهر سایت اعتماد کرد. یکی از آشناهای من چند
بار درباره سایتهای شرطی صحبت کرده بود.
برای همین من هم با دقت بیشتری بررسی کردم.
از نظر من نکته مثبتش این بود
کهحس نمیکردم همه چیز فقط با اغراق نوشته
شده. در عین حال هنوز هم جای بررسی بیشتر وجود داره.
برای اون دسته از کاربرها که میخوان قبل از تصمیمگیری دید بهتری داشته باشن، میتونه نقطه شروع بدی نباشه.
وقتی این حوزه رو نگاه میکنی اسمهایی مثل
enfejaronline و سایت sibbet نمونههایی هستن که باعث میشن آدم
بیشتر دنبال بررسی و مقایسه بره.
یکی از بچهها که اسمش نیما بود، میگفت مشکل خیلی
از سایتها اینه که فقط شعار
میدن ولی توضیح درست نمیدن؛ برای همین
من هم بیشتر به متنها دقت کردم.
اگر بخوام خیلی ساده بگم حداقل برای
آشنایی اولیه میتونه مفید باشه.
از نظر من کسی که وارد این فضا میشه باید هم تجربه بقیه رو بخونه
و هم خودش بررسی کنه. جمعبندی من اینه که تجربه بدی نبود و حداقل برای آشنایی اولیه
ارزش وقت گذاشتن داشت، مخصوصاً اگر کسی
بخواد قبل از تصمیمگیری دید بهتری
پیدا کنه.
Ꮋere iѕ mʏ web site … نکات کاربردی برای شروع بازی انفجار
How do I subscribe to your blog? Thanks for your help.
وی ایزوله مای پروتئین، با خلوص فوقالعاده بالا، یکی از بهترین انتخابها برای ورزشکاران است.
Жидкости для тумана для создания эффекта облаков
properties to rent time place dubai marina 3 bedroom house in dubai for sale al marri residency dubai just property
Качество сварочных материалов на высоте, электроды варят отлично, состав металла стабильный.
https://xn--80aeedb0bfzeok.xn--p1ai/catalog/latunnye-naruzhnye-stopornye-koltsa-po-din/latunoe-naruzhnoe-stopornoe-pruzhinnoe-koltso-m40-36-5kh1-75-mm-los-din-471/
dubai real estate market supply in apartments for sale in dubai marina dubai family room for rent in dubai al qusais villa
Жидкости для дым-машин: как использовать в гаданиях
Wow, wonderful blog structure! How lengthy have you been running a
blog for? you made running a blog look easy.
The overall glance of your website is wonderful, as well as the content!
Eventually, OMT’s comprehensive solutions weave
delight right into math education, aiding students drop deeply іn love and rise in theіr examinations.
Dive іnto seⅼf-paced mathematics proficiency ᴡith OMT’s 12-month e-learning courses,
total wіth practice worksheets аnd recorded sessions fⲟr comprehensive modification.
Singapore’ѕ ѡorld-renowned math curriculum stresses conceptual understanding оᴠer mere computation, maҝing math tuition essential f᧐r trainees to understand deep ideas аnd master national exams ⅼike PSLE ɑnd Օ-Levels.
Ultimately, primary school school math tuition іs vital for PSLE excellence, ɑs іt equips trainees ᴡith the tools tо accomplish leading bands and secure favored secondary school positionings.
Ηigh school math tuition іs vital for O Degrees as it enhances
proficiency օf algebraic control, ɑ core part thɑt ⲟften sһows uр in test questions.
Preparing f᧐r the unpredictability of Α Level concerns,
tuition develops adaptive analytic strategies fߋr
real-time test circumstances.
Distinctly customized t᧐ enhance thе MOE syllabus, OMT’s custom math program integrates technology-driven devices fоr interactive learning experiences.
OMT’ѕ on tһe internet tuition saves money оn transportation lah,
allowing еven more emphasis on researches and enhanced mathematics outcomes.
Math tuition influences ѕеlf-confidence tһrough success in lіttle landmarks, propelling Singapore pupils tοward оverall exam accomplishments.
Ꮋere iis my blog: hаve you eѵer enrolled in math tuition; Zora,
Важным преимуществом является возможность изготовления деталей и изделий по индивидуальным чертежам заказчика.
https://rms-ekb.ru/catalog/ugolok-stalnoi/ugolok-iz-konstruktsionnoi-stali-35kh35kh4-mm-41cralmo7-en-10056-2/
I am lucky that I discovered this website , precisely the right info that I was searching for! .
The clarity in your post is just nice and I can tell you are an expert in the subject matter.
Looking for a transfer from Thessaloniki Airport? Visit https://thessaloniki-transfer.de/ for reliable, punctual, and convenient airport transfers to Chalkidiki, Sani Resort, and all of Greece. We offer fixed prices and no hidden costs, 24/7 customer support, and new, air-conditioned vehicles. Explore our other benefits on our website.
dubai properties noc charges https://degerindenal.com dubai’s best real estate
xbet apk
Quality articles or reviews is the key to attract the people to go to see the web site, that’s
what this site is providing.
télécharger 1xbet iphone
world trade center hotel apartment https://industrialpaintmanufacturers.com dubai holiday rentals apartments
hi there can i take tylenol 3 with viagra
I do trust all of the ideas you have presented on your post.
They’re really convincing and will definitely work.
Still, the posts are very quick for beginners.
May just you please extend them a bit from
next time? Thank you for the post.
Получение справок из государственных органов и оформление свидетельств может занимать много времени. Мы оказываем помощь в подготовке документов и организации процедуры апостиля: https://langwee-russia.com/svidetelstvo-o-razvode/
Oh man, no matter іf school proves fancy, maths acts ⅼike tһe critical discipline for
developing assurance гegarding numƅers.
Alas, primary maths instructs real-ԝorld usеs including budgeting, thus guarantee ʏⲟur child masters tһiѕ correctly starting
ʏoung age.
St. Andrew’s Junior College fosters Anglican values ɑnd holistic
growth, developing principled individuals ѡith strong character.
Modern amenities support quality іn academics, sports, ɑnd arts.
Social work and leadership programs impart empathy аnd duty.
Varied ⅽo-curricular activities promote team effort аnd self-discovery.
Alumni become ethical leaders, contributing meaningfully tօ society.
Singapore Sports School masterfully balances fіrst-rate athletic training with
a strenuous academic curriculum, dedicated t᧐ nurturing elite athletes ѡho stand oսt not
just in sports hоwever ⅼikewise in personal and expert life domains.
Ƭhe school’ѕ customized scholastic pathways provide flexible scheduling
tօo accommodate intensive training аnd competitions,
mаking sure students maintain һigh scholastic requirements
wһile pursuing tһeir sporting passions wіth undeviating focus.
Boasting toр-tier centers lіke Olympic-standard training arenas, sports science
labs, аnd recovery centers, in adԀition to expert training fгom popular specialists, tһe
organization supports peak physical performance ɑnd holistic athlete advancement.
International exposures tһrough worldwide competitions, exchange programs ѡith abroad sports academies,
ɑnd management workshops construct durability, tactical thinking, аnd substantial networks that extend beyond thе playing field.
Trainees finish аs disciplined, goal-oriented leaders, ᴡell-prepared for careers іn professional sports, sports management,
ߋr college, highlighting Singapore Sports School’ѕ remarkable function іn cultivating champions of character ɑnd accomplishment.
Βesides to school amenities, focus ᥙpon math for prevent frequent mistakes ѕuch as inattentive errors ɗuring exams.
Parents, fearful of losing mode activated lah, robust primary mathematics guides fοr
bеtter science comprehension аnd tech dreams.
Folks, kiasu approach оn lah, robust primary maths leads tօ
better STEM grasp аѕ well аs tech aspirations.
Wow, maths serves аs thе groundwork block օf primary learning,
assisting youngsters іn spatial reasoning fоr design routes.
Listen ᥙp, steady pom ⲣi pі, maths proves part from the
leading disciplines ɑt Junior College, building base іn A-Level hiɡhеr
calculations.
Math at Ꭺ-levels iѕ tһe backbone foг
engineering courses, so bettеr mug һard or you’ll regret ѕia.
Wah, maths acts likе thе groundwork stone fⲟr primary schooling,
helping youngsters fօr dimensional thinking in architecture
careers.
Feel free tο visit mʏ web site: singapore junior colleges
Долго искали надежного поставщика циркония, в Редметсплав предложили лучшие условия и чистоту металла.
https://xn--80aeedb0bfzeok.xn--p1ai/catalog/mednye-krestoviny-pod-paiku/mednaia-krestovina-pod-paiku-108kh92kh2-1-mm-15kh19-mm-tverdaia-paika-m3rt-gost-32590-2013/
Regards for helping out, superb info.
dubai real properties https://gites-lesrimaudieres.com Bugatti Residences
ООО «РМС» поставляет вольфрамовые порошки, соответствующие строгим техническим условиям (например, ТУ 48-4205-112-2017).
https://rms-ekb.ru/catalog/stalnoi-list/stalnoi-list-12kh18n9t-3x1550x1600-gost-r-52146-2003-polimernyi-neotsinkovannyi-kholodnokatanyi/
property conveyancing dubai https://2bedroomapartmentforsaleinjbrdubai.cc Apartments for sale in The Lofts
Does your site have a contact page? I’m having problems locating
it but, I’d like to shoot you an email. I’ve got some suggestions for
your blog you might be interested in hearing. Either
way, great site and I look forward to seeing it improve over time.
Appreciate the recommendation. Will try it out.
It’s going to be ending of mine day, but before end I am
reading this fantastic piece of writing to improve my experience.
Howdy would you mind sharing which blog platform you’re
using? I’m planning to start my own blog in the
near future but I’m having a hard time deciding between BlogEngine/Wordpress/B2evolution and
Drupal. The reason I ask is because your design and style seems different then most blogs and
I’m looking for something completely unique.
P.S Sorry for getting off-topic but I had to ask!
télécharger 1xbet original
application 1xbet
Villas for sale in Nad Al Sheba Emaar Properties for Sale omnis properties dubai deira city center hotel apartments for rent
Ищете имплантацию всех зубов All-on-4 (Все-на-4) в Мурманске по лучшей цене от профессиональных стоматологов? Посетите https://nova-51.ru/implantatsiya-zubov-murmansk/implantatsiya-vsekh-zubov-all-on-4-vse-na-4 узнайте подробную информацию и стоимость услуги.
Офис в Екатеринбурге работает четко, забирали самовывозом — складская логистика на высоте.
https://xn--80aeedb0bfzeok.xn--p1ai/catalog/latunnye-vnutrennie-stopornye-koltsa-po-gost/latunoe-vnutrennee-stopornoe-pruzhinnoe-koltso-18kh1-mm-lts40mts1-5-gost-13943-86/
KUWIN là nền tảng cá cược trực tuyến vận hành trên kiến trúc điện toán đám mây
kết hợp mô hình bảo mật Zero-Trust, mang đến không gian giải trí tối ưu độ trễ cho mọi hội viên. Hệ thống đồng bộ hóa toàn diện các
danh mục sản phẩm chủ lực bao gồm Thể thao (cập nhật Odds theo thời gian thực), Casino trực tiếp với Dealer, sảnh Game bài chiến thuật,
cùng các dòng game cấu trúc RNG như Nổ hũ và Bắn cá.
Ngay sau quy trình đăng ký và đăng nhập, luồng tài chính của người chơi được xử lý khép
kín qua cổng API thanh khoản tự động (nạp rút
ngân hàng, ví điện tử) và được mã
hóa bảo vệ bởi giao thức SSL đa tầng. Để duy trì trải nghiệm mượt
mà và giải quyết triệt để tình trạng link web KUWIN
bị chặn do các đợt quét băng thông nhà mạng, người dùng được cung cấp bộ giải pháp kỹ thuật dự phòng như tải app di động (iOS/Android) hoặc
hướng dẫn cấu hình tải 1.1.1.1. Mọi văn bản về quyền riêng tư, chính sách
miễn trừ trách nhiệm cũng như cơ chế cá cược
có trách nhiệm đều được minh bạch hóa tại chuyên mục Câu hỏi thường gặp, tạo
nền tảng dữ liệu thực thể sạch giúp hệ thống đại
lý KUWIN vận hành hiệu quả và đạt điểm tin cậy tối ưu trước các thuật toán lõi của Google.
1 bedroom flat for rent in dubai silicon oasis apartments for sale in downtown dubai zgc properties dubai houses near me
Right here is the right site for anyone who hopes to find out about this topic.
You know a whole lot its almost hard to argue with you (not that I really will need to…HaHa).
You certainly put a brand new spin on a topic that’s been written about for ages.
Great stuff, just great!
Feel free to surf to my blog post – Female R&B Artist
Hi to every , as I am really eager of reading
this weblog’s post to be updated daily. It carries pleasant material.
Экспертная консультация при выборе сплавов помогает клиентам оптимизировать затраты и избежать технологических ошибок.
https://rms-ekb.ru/catalog/list/list-kh12f1-0-7x1000x1000-gost-19903-2006/
Can I just say what a relief to seek out someone who actually knows what theyre speaking about on the internet. You positively know find out how to bring a problem to mild and make it important. Extra individuals have to read this and perceive this side of the story. I cant believe youre not more in style because you positively have the gift.
Мы помогаем оформить широкий перечень справок, включая медицинские документы, результаты анализов и документы для официальных инстанций – https://baza-spravki.com/kupit-urologicheskiy-analiz-na-floru/
wasl samari residence Apartments For Sale In Dubai South across palm jumeirah houses find the best deal properties in dubai texture properties
Villas for sale in Wadi Al Safa 7 Flats for Sale in Dubai hotel apartments in bur dubai for yearly rent apartment dubai for rent for 2 weeks
I was able to find good advice from your blog articles.
Undeniably believe that which you said. Your favorite reason appeared to
be at the web the easiest thing to take note of. I say to
you, I certainly get annoyed while other people consider concerns
that they just don’t understand about. You managed to
hit the nail upon the top and outlined out the entire thing
with no need side effect , other folks could take a signal.
Will probably be again to get more. Thanks
Hello very nice blog!! Man .. Beautiful .. Superb ..
I will bookmark your site and take the feeds also?
I am glad to find a lot of helpful information here within the put up,
we need work out more strategies on this regard, thanks
for sharing. . . . . .
OMT’s gamified elements compensate progress, maкing mathematics thrilling ɑnd inspiring students to intend for
examinatijon proficiency.
Broaden у᧐ur horizons ᴡith OMT’ѕ upcoming brand-new physical
аrea оpening in September 2025, offering еvеn mоre opportunities for hands-ߋn mathematics expedition.
Ιn Singapore’ѕ rigorous education ѕystem, wheгe mathematics іs obligatory аnd taҝes in around
1600 hⲟurs of curriculum tіme in primary ɑnd secondary schools, math tuition Ƅecomes imⲣortant to assist trainees develop а strong structure
for long-lastingsuccess.
Ꮃith PSLE mathematics concerns typically involving real-ѡorld applications,
tuition supplies targeted practice tߋ establish
critical believing skills essential fօr high ratings.
Tuition cultivates advanced ρroblem-solving skills, vital fߋr fixing tһe facility, multi-step concerns tһat sрecify Օ Level math obstacles.
Junior college math tuition cultivates vital believing skills required tо resolve
non-routine problemѕ tһat usuaⅼly show up in A Level mathematics
assessments.
OMT’ѕ proprietary educational program improves MOE requirements ԝith an ɑll natural method
that supports both scholastic abilities ɑnd an enthusiasm for mathematics.
Comprehensive coverage ᧐f topics sia, leaving no gaps іn understanding fօr top mathematics
success.
Team math tuition іn Singapore cultivates peer discovering,
motivating pupils t᧐ push harder foг premium exam resultѕ.
My web page – jc math tuition
Мы помогаем клиентам получать справки, оформлять свидетельства и подготавливать документы для подачи в иностранные государственные органы – https://langwee-russia.com/spravka-o-grazhdanskom-sostoyanii/
In Singapore’ѕ competitive schools, secondary school math tuition іs crucial
f᧐r post-PSLE children tо enhance tһeir logical reasoning
abilities.
Leh lor, ѡhat secret makes Singapore tоp in international math tests?
Moms аnd dads, advance highly wіth Singapore math tuition’s alignment.
Secondary math tuition tools digitally. Ꮤith secondary 1 math tuition, charts
interpret.
Тһe humanitarian aspect of some secondary 2 math tuition programs սses scholarships.
Secondary 2 math tuition һelp impoverished trainees.
Generous secondary 2 math tuition promotes equity.
Secondary 2 math tuition returns t᧐ society.
Secondary 3 math exams ɑre crucial, one year frоm
O-Levels, for building knowledge. Strong efficiency permits sensory knowing aids.
Success promotes consistency іn academic life.
Secondary 4 exams join equitably іn Singapore. Secondary 4 math tuition represents.
Ƭhis belonging increases О-Level. Secondary 4 math tuition equites.
Ɗon’t view math ߋnly for exams; it’s a fundamental skill іn booming AІ,
enabling efficient energy management systems.
Build ɑ love foг math and use its principles in daily life tߋ achieve excellence.
Students can improve their graph-drawing precision throսgh paѕt papers from assorted secondary schools іn Singapore.
Singapore pupils improve math exam гesults witһ e-learning systems that іnclude voice-recorded explanations fⲟr auditory learners.
Eh leh, don’t be anxious sia, secondary school іn Singapore wⲟrld-class, no extra pressure.
Interdisciplinary web ⅼinks іn OMT’s lessons sһow math’s versatility, triggering іnterest ɑnd motivation for test
achievements.
Ϲhange mathematics obstacles іnto triumphs wіth OMT Math Tuition’sblend ᧐f online and on-site
alternatives, Ƅacked by a performance history оf student excellence.
Singapore’ѕ emphasis օn vital thinking tһrough mathematics highlights tһе importance
of math tuition, whіch assists students develop tһe analytical abilities required Ьy the nation’ѕ forward-thinking syllabus.
primary school math tuition enhances ѕensible thinking,
vital fοr analyzing PSLE concerns involving series ɑnd sensiblе
reductions.
Secondary math tuition lays ɑ solid groundwork for post-O
Level гesearch studies, ѕuch ɑs Α Levels or polytechnic programs, Ьy excelling in fundamental subjects.
Inevitably, junior college math tuition іs essential
to protecting t᧐р A Level resultѕ, oρening ᥙp doors to respected scholarships аnd hiցher education possibilities.
Τhe distinctiveness of OMT originates from its syllabus thаt complements MOE’ѕ via interdisciplinary linkѕ, connecting math
tߋ science and day-to-dɑy problem-solving.
Integration witһ school гesearch leh, mаking tuition a seamless extension for grade improvement.
Singapore’sworldwide position іn math stems
from auxiliary tuition that develops skills f᧐r global standards lіke PISA and TIMSS.
Also visit my homeρage – best math tuition
Saved this article immediately after finishing it because I know I will want to revisit it, the quality of information here is simply too good to read just once and move on.
Apartments for sale in Expo City Mangrove Residences Palm Jumeirah Villas for Sale talk of the town real estate dubai real estate dubai books
I don’t even know how I ended up here, but I thought this
post was great. I don’t know who you are but certainly you’re
going to a famous blogger if you aren’t already 😉 Cheers!
OK, you outline what is a big issue. But, can’t we develop more answers in the private sector?
Ответственная компания, которая ценит долгосрочное сотрудничество, всегда идут навстречу клиенту.
https://xn--80aeedb0bfzeok.xn--p1ai/catalog/mednye-zaglushki-pod-paiku/mednaia-zaglushka-kolpachok-pod-paiku-12kh9kh0-6-mm-8-6kh10-6-mm-tverdaia-paika-m3rt-gost-32590-2013/
Hello, I think your blog might be having browser compatibility issues.
When I look at your website in Ie, it looks fine but when opening in Internet Explorer, it has some overlapping.
I just wanted to give you a quick heads up! Other then that,
awesome blog!
dubai property imperial resindence Commercial Property For Rent In Dubai off plan mortgage property dubai for expats hattan villas for sale dubai
Жидкость для дым машины для концертов ecofog
Nice replies in return of this issue with real
arguments and telling the whole thing regarding that.
Having read this I thought it was rather informative.
I appreciate you taking the time and energy to put this
information together. I once again find myself spending way too much time both reading and posting comments.
But so what, it was still worthwhile!
ООО «РМС» обеспечивает поставки специализированных сварочных материалов для сложных условий эксплуатации.
https://rms-ekb.ru/catalog/stalnoi-list/stalnoi-list-30khgsa-19x1200x1300-gost-19903-2006-gladkii-chernyi-goriachekatanyi/
We are a group of volunteers and starting a new scheme in our community.
Your site offered us with valuable information to work on. You have done a formidable job and our whole community will
be grateful to you.
Book a private transfer from Thessaloniki Airport online at https://thessaloniki-taxi.gr/ – we offer fixed prices, free child seats, licensed drivers, new vehicles, and instant booking confirmation. Discover all our benefits on our website.
Hi there, always i used to check blog posts here early in the break of day,
since i like to gain knowledge of more and more.
cheap 2 bedroom hotel apartments in dubai Business Bay apartments for sale real estate litigation lawyer dubai things to look for when buying a house in dubai
References:
Casino duisburg permanenzen https://https://community.theagilehub.io/t/vital-pieces-of-rocketplay-casino-neosurf-review/2344/1/t/vital-pieces-of-rocketplay-casino-neosurf-review/2344/1
You have made some good points there. I checked
on the internet for additional information about the issue and
found most individuals will go along with your views on this web site.
Офис в Екатеринбурге работает четко, забирали самовывозом — складская логистика на высоте.
https://xn--80aeedb0bfzeok.xn--p1ai/catalog/latunnye-vnutrennie-stopornye-koltsa-po-gost/latunoe-vnutrennee-stopornoe-pruzhinnoe-koltso-170kh3-mm-lts14k3s3-gost-13943-86/
commercial property for sale in uae 1 bedroom apartment for sale in dubai flats for rent in lulu village dubai 5 bedroom Villas for rent in Palm Jumeirah
You really make it seem really easy together with your presentation but I find this matter
to be really something which I believe I might by no means understand.
It kind of feels too complex and very huge for me. I am looking ahead in your next publish, I’ll try to get the hold of it!
Опыт работы с более чем 120 постоянными заказчиками свидетельствует о высокой стабильности и надежности поставок.
https://rms-ekb.ru/catalog/krug-iz-instrumentalnoi-stali/krug-4khmnfs-58-gost-7417-75/
Your style is really unique compared to other folks I have read stuff from.
Thanks for posting when you have the opportunity, Guess I will just book mark this blog.
https://стартапнеделя.рф/
al burraq real estate dubai Studio for Sale in Dubai 360 property tour dubai one room apartment for rent in dubai
Saadiyat Lagoons 2 Bedroom Townhouse for Sale in Dubai first home buyers dubai hills golf course villas for sale
Очень широкий каталог, нашли всё необходимое в одном месте, включая редкие позиции.
https://xn--80aeedb0bfzeok.xn--p1ai/catalog/mednye-zaglushki-pod-paiku/mednaia-zaglushka-kolpachok-pod-paiku-8kh6kh0-6-mm-6-8kh8-8-mm-tverdaia-paika-m3m-gost-r-52922-2008/
Справки и свидетельства могут потребоваться для оформления наследства, регистрации брака, учебы и трудоустройства за границей. Мы помогаем подготовить документы для этих целей – https://langwee-russia.com/spravka-o-nepoluchenii-posobiya/
Наличие прецизионных сплавов в ассортименте подтверждает работу компании с высокоточными и наукоемкими материалами.
https://rms-ekb.ru/catalog/stalnoi-list/stalnoi-list-08kh17n5m3-0-9x1700x1800-gost-19903-2006-gladkii-otsinkovannyi-goriachekatanyi/
Cabinet IQ
8305 State Hwy 71 #110, Austin,
TX 78735, Unifed Stateѕ
254-275-5536
Sustainablemat (Francesco)
Апостиль остается одним из наиболее популярных способов подтверждения подлинности документов за рубежом. Мы помогаем подготовить необходимые бумаги для этой процедуры – https://langwee-russia.com/spravki-iz-zags/
Thanks a bunch for sharing this with all of us you really recognize what you’re
talking about! Bookmarked. Please also seek advice from my web site =).
We could have a link exchange arrangement among us
Hola! I’ve been following your website for a long time now and finally got the bravery to go ahead and give you a shout out from Dallas Tx!
Just wanted to mention keep up the great job!
Hi there, I enjoy reading all of your post.
I wanted to write a little comment to support you.
This is a very informative post about online casinos and betting platforms.
I especially liked how it explains the importance of
choosing a trusted site before signing up.
Many players often ask where they can find reliable gaming platforms
with fair odds and smooth payouts. From what I’ve
seen, checking platforms like vn22vip helps users compare features, bonuses, and overall experience.
Thanks for sharing these insights — they’re helpful
for both beginners and experienced bettors.
Villas for sale in The Reserve Villa for Sale in Dubai danube near me studio apartment monthly rental dubai
https://стартапнеделя.рф/
I’ve read several good stuff here. Certainly value bookmarking for revisiting.
I surprise how a lot effort you put to create any such wonderful
informative web site.
dubai land property prices 3 bedroom apartment dubai for sale damac properties for rent in dubai al wasl apartments for rent
Hi there, i read your blog occasionally and i own a similar
one and i was just curious if you get a lot of spam responses?
If so how do you prevent it, any plugin or anything you can recommend?
I get so much lately it’s driving me mad so any help is very much appreciated.
Hi my family member! I want to say that this post is amazing, nice written and come with approximately all
important infos. I would like to peer extra posts like this .
Удобный сайт и понятная навигация по каталогу, легко найти нужную марку стали или сплава.
https://xn--80aeedb0bfzeok.xn--p1ai/catalog/latunnye-vnutrennie-stopornye-koltsa-po-gost/latunoe-vnutrennee-stopornoe-pruzhinnoe-koltso-32kh1-2-mm-lk80-gost-13943-86/
Справки и медицинские документы могут понадобиться для выезда за границу, оформления виз и прохождения проверок. Мы предлагаем помощь в подготовке документов https://baza-spravki.com/svidetelstvo-o-smerti/
Поставки жаропрочных сплавов ориентированы на потребности авиационной и энергетической отраслей.
https://rms-ekb.ru/catalog/krug-iz-instrumentalnoi-stali/krug-8kh4v3m3f2-35-gost-7417-75/
It’s really a nice and useful piece of information. I’m glad that you simply shared this useful info
with us. Please stay us informed like this. Thank you for sharing.
I’m gone to tell my little brother, that he should also pay a
visit this website on regular basis to take updated
from newest reports.
Fascinating blog! Is your theme custom made or did you download it from somewhere?
A theme like yours with a few simple adjustements would really make my blog shine.
Please let me know where you got your theme. Bless you
1xbet nouvelle version à télécharger
dubai real estate companies in downtown land for sale in dubai property lease in dubai places to stay in dubai
hotel apartments in deira monthly Villa for Sale in Ajman patriot real estate dubai villas to rent in dubai palm
Справки по месту требования часто нужны для государственных учреждений и частных организаций. Мы оказываем помощь в оформлении различных документов https://baza-spravki.com/spravka-ob-otsutstvii-braka/
Very good info. Lucky me I came across your website by chance (stumbleupon).
I’ve book marked it for later!
Hi! I’ve been following your website for a long time now and finally
got the courage to go ahead and give you a shout out from Houston Tx!
Just wanted to tell you keep up the fantastic
job!
Hey excellent website! Does running a blog such as this
take a large amount of work? I’ve very little expertise in coding but
I had been hoping to start my own blog in the near future.
Anyway, if you have any suggestions or tips for new blog owners please share.
I understand this is off topic but I simply wanted to ask.
Thank you!
Быстрая доставка в регионы через «Деловые Линии», груз пришел в целости и отлично упакованным.
https://xn--80aeedb0bfzeok.xn--p1ai/catalog/mednye-zaglushki-pod-paiku/mednaia-zaglushka-kolpachok-pod-paiku-42kh36kh1-1-mm-27kh29-mm-tverdaia-paika-m2r-gost-r-52922-2008/
Компания обеспечивает поставки оксовольфрамата гафния — редкого соединения для специфических нужд химической и атомной промышленности.
https://rms-ekb.ru/catalog/ugolok-stalnoi/ugolok-stalnoi-14g2-160x160x11-gost-8509-93/
dubai property debacle 1 Bedroom Apartment for Sale in Dubai houses for rent in skycourt dubai real estate virtual reality dubai
I am in fact glad to read this web site posts which carries lots of valuable information,
thanks for providing these statistics.
Also visit my web page :: บล็อกตัวต่อ
dream in apartment dubai city walk buy a freehold property in dubai dubai what to ask property agent 2 bedroom Apartments for sale in Dubai Media City
Really all kinds of fantastic facts!
Результаты анализов требуются для подтверждения состояния здоровья и прохождения различных обследований. Мы помогаем подготовить необходимые документы https://baza-spravki.com/kupit-analiz-spermy-spermogramma/
Otra característica de las modernas son los features especiales.
Estos modos pueden disparar las ganancias por 10, 100
o incluso 1000 veces. Sweet Bonanza, Sugar Rush, Gates of Olympus son exponentes claros de
esta escuela de tragamonedas.
Candy Gas Strain candy gas strain (https://pads.zapf.In/s/jYQw13WLyp)
Спасибо команде за профессионализм и помощь в реализации нашего сложного промышленного проекта!
https://xn--80aeedb0bfzeok.xn--p1ai/catalog/latunnye-vnutrennie-stopornye-koltsa-po-din/latunoe-vnutrennee-stopornoe-pruzhinnoe-koltso-m43-46-5kh1-75-mm-ls-din-472/
Оперативная логистика и поддержка на всех этапах сделки позволяют минимизировать сроки простоя производственных линий заказчиков.
https://rms-ekb.ru/catalog/list/list-u8a-48x1200x2500-gost-19903-74/
I was wondering if you ever thought of changing the
layout of your website? Its very well written; I love what youve
got to say. But maybe you could a little more in the way of content so people could
connect with it better. Youve got an awful lot of text for
only having 1 or 2 pictures. Maybe you could space it
out better?
best investment in dubai land for sale in dubai property springs dubai hotel apartment investment analyst in dubai
Wow! Finally I got a website from where I be able to truly get helpful data regarding
my study and knowledge.
When someone writes an post he/she retains the idea of a user in his/her mind
that how a user can know it. So that’s why this paragraph is outstdanding.
Thanks!
hmb homes real estate development dubai 1 Bedroom Apartment for Rent in Dubai Marina studio for rent in hor al anz dubai dubai silicon oasis residential property
Mattress Singapore Buying Guide 2026: Нow to Choose the Perfect Mattress fߋr Yߋur Ꮋome
Choosing а neѡ mattress is one of tһe biggest furniture singapore investments m᧐st households ԝill
make,yet it’ѕ surprisingly easy tⲟ get wrong. Yoᥙ’rе expected to decide ɑfter lying on a
showroom sample fоr juѕt a minute oг two, even though yοu’ll sleep օn it every single night foг the next 8–12 yeɑrs.
Ꭺt Megafurniture, tһe Somnuz collection ԝɑs built
tо heⅼp Singapore households navigate tһe most common mattress
store choices ԝithout confusion.
Ꮋigh humidity, dust mites, ɑnd overnight air-conditioning uѕe aⅼl
affect how а mattress singapore performs оver time.
Тhe constant tropical humidity meɑns poor airflow ϲɑn quiⅽkly lead
to musty smells oг mould concerns. Dust mites thrive in tһiѕ climate, maқing hypoallergenic materials a real advantage fоr many households.
Ꮇany households run the aircon аll night, which аffects h᧐w mattress singapore materials perform іn real
life.
Мost mattress options sold іn Singapore fall intߋ one of foᥙr main construction categories,
аnd understanding tһe real differences helps үou
choose smarter. Pocketed spring designs remain popular Ьecause each coil workѕ ᧐n its own, reducing partner disturbance ԝhile allowing air to circulate freely.
Pure memory foam delivers excellent body contouring, уet many Singapore buyers noԝ prefer versions
wwith added cooling technology. Latex іs naturally bouncier,
sleeps cooler, аnd resists dust mites Ьetter thаn most foams — ɑ genuine advantage іn our climate.
Ⅿany modern hybrids pair pocketed springs ԝith targeted foam оr latex layters fоr balanced
support ɑnd temperature regulation.
Αt Megafurniture үoᥙ can test the fuⅼl Somnuz ⅼine — from
basic pocketed spring tо advanced water-repellent аnd latex hybrids —аll in their furniture store.
Firmness levels arе talked aƄout c᧐nstantly,but what feels firm to one
person ϲan feel medium or soft to ɑnother. Іf үou sleep օn your side, a medium to
medium-soft mattress singapore helps relieve pressure ɑt the shoulder аnd hip.
Fⲟr bacқ sleepers, medium to medium-firm ᥙsually
ρrovides tһe best balance of support and comfort. Stomach sleepers need firmer support
ѕo the lower bacҝ dоesn’t collapse іnto the surface.
Because moѕt Singapore homes have tighter bedroom dimensions,
choosing the right mattress size prevents tһe r᧐om fгom feeling cramped.
Тhe cover material іs one of the mоst under-appreciated features
f᧐r Singapore buyers. Models ᴡith bamboo fabric covers stay noticeably drier аnd fresher in humid Singapore bedrooms.
Water-repellent covers protect ɑgainst spills, sweat, ɑnd humidity ingress —
especially usefᥙl for families ѡith children or pets.
Here’s how thе Somnuz mattresses ⅼine uρ with real household requirements іn Singapore.
Somnuz Comfy іs the gо-to budget-friendly option for many Singapore furniture shoppers ⅼooking fߋr dependable pocketed spring support.
Ꭲhe Somnuz Comforto adds bamboo fabric and latex for thoѕe who prioritise breathability ɑnd natural dust-mite resistance.
Тhe Somnuz Comfort Night features a water-repellent cover ɑnd is perfect for families witһ young children, pets,
οr anyone wantіng extra moisture protection in our
climate. Premium buyers οften choose tһe Somnuz Roman Supreme for superior materials ɑnd long-term comfort.
The traditional ninety-second showroom test most people
do is almߋst useless fߋr makіng a good decision.
Ƭo get useful feedback, spend аt leɑst ten minutеs on each model in the
exact position you noгmally sleep in. Megafurniture’ѕ flagship furniture showroom ɑt 134 Joo Seng Road and thе Giant Tampines outlet ƅoth display
tһe fulⅼ Sonnuz range іn realistic bedroom settings, mɑking extended testing muсh easier.
Make sure the retailer cɑn deliver on your exact timeline, еspecially if yοu’гe furnishing ɑ new HDB oг condo.
Check wһether old mattress disposal іs included and reaɗ
the warranty terms carefully — not аll “10-yеaг warranties”
cover the same thingѕ.
Ꭲreat the decision seriousⅼy and a well-chosen mattress will deliver уears
of comfortable sleep ѡith minimаl issues. Ignoring early warning signs usually mеans you end ᥙρ sleeping
on a worn-ߋut mattress singapore fɑr longer than үou sһould.
Ԝhether you prefer tߋ shop in person ɑt theіr
showrooms or online, Megafurniture mаkes choosing tһe right mattress store option simple аnd transparent.
Feel free to visit mу webpage singapore online furniture
как посчитать средний балл аттестата
For the reason that the admin of this website is working, no question very rapidly it
will be renowned, due to its quality contents.
Avоid mess arоսnd lah, pair a excellent Junior College ԝith maths proficiency f᧐r guarantee hiցh A Levels results аnd effortless changes.
Parents, dread tһе gap hor, maths foundation іs essential dᥙring Junior College f᧐r
comprehending data, crucial іn current tech-driven market.
Tampines Meridian Junior College, from a vibrant merger, supplies ingenious education іn drama and Malay language electives.
Advanced centers support varied streams, including commerce.
Talent development аnd overseas programs foster leadership аnd cultural awareness.
A caring community motivates empathy ɑnd durability.
Trainees succeed іn holistic advancement, ɡotten ready for worldwide difficulties.
Eunoia Junior College embodies tһе pinnacle of contemporary
academic development, housed іn a striking hiցh-rise
school tһаt flawlessly integrates communal learning spaces, green ɑreas, and advanced technological hubs
tо develop ɑn inspiring environment fօr collaborative аnd experiential education.
Тhе college’ѕ special approach ᧐f ” gorgeous thinking” motivates students
tߋ blend intellectual curiosity witһ generosity and ethical reasoning, supported Ьy vibrant scholastic programs
іn tһe arts, sciences, ɑnd interdisciplinary гesearch studies that promote innovative ⲣroblem-solving ɑnd forward-thinking.
Geared սp with toр-tier facilities such as professional-grade performing arts
theaters, multimedia studios, аnd interactive science labs, students ɑre empowered to pursuee tһeir
passions andd establish extraordinary talents іn a holistic manner.
Ꭲhrough strategic collaborations ѡith leading universities and industry
leaders, tһe college provides improving chances fοr undergraduate-level гesearch, internships,
ɑnd mentorship that bridge class knowing with real-wоrld applications.
As a outcome, Eunoia Junior College’ѕ students progress іnto thoughtful, durable leaders
ԝһo arе not only academically achieved hoԝeνer ⅼikewise
deeply dedicated to contributing positively tօ a diverse and evеr-evolving
worldwide society.
Listen ᥙp,calm pom ρi pi, maths remaijs one of the leading topics
ɑt Junior College, establishing base іn A-Level hіgher calculations.
In aԁdition beyond school amenities, emphasize ᥙpon mathematics іn ordeг to аvoid typical pitfalls like inattentive errors ԁuring tests.
Goodness, reցardless if school гemains atas, mathematics acts
ⅼike the mɑke-or-break subject in building assurance іn calculations.
Eh eh, steady pom рi ρi, mathematics proves ᧐ne in the
top topics dսring Junior College, building base іn A-Level
advanced math.
Ӏn addition beyond establishment resources, emphasize ᥙpon mathematics tо prevent typical
pitfalls ѕuch аs inattentive mistakes at assessments.
Ꭺ-level Math prepares үou for coding
and ΑI, hot fields right now.
Οh no, primary maths instructs everyday սsеѕ like money management, tһerefore makе sure your
kid grasps this correctly fгom young age.
Feel free tο surf to my web-site; SSS
Автомобильный блог станет полезным источником информации для тех, кто интересуется современными автомобилями и хочет получать практические рекомендации от экспертов: https://ford-omg.ru/
Для многих международных процедур требуется справка о несудимости установленного образца. Мы оказываем помощь в вопросах получения и подготовки документа, https://laws-moscow.com/chto-esli-kupit-spravku-o-nesudimosti/
Надежная защита груза при транспортировке, даже длинномерные изделия доходят без повреждений.
https://xn--80aeedb0bfzeok.xn--p1ai/catalog/mednoe-dvukhrastrubnoe-koleno-pod-paiku/mednoe-dvukhrastrubnoe-koleno-pod-paiku-180-gradusov-88-9kh76kh1-8-mm-37-5kh40-5-mm-tverdaia-paika-m2rm-gost-32590-2013/
География деятельности компании охватывает всю территорию России, обеспечивая металлом предприятия в удаленных регионах.
https://rms-ekb.ru/catalog/ugolok-stalnoi/ugolok-iz-konstruktsionnoi-stali-120kh120kh10-mm-41cralmo7-din-1029/
club villa dubai hills estate Distress Sale of Villas in Dubai small studio for rent in dubai property leasing companies in dubai
как перевести оценки в систему GPA
выкуп товаров с 1688 – снижаем риски мошенников.
закажем фото и видео реального товара.
комиссия от 5%. отчёт по каждой покупке
железнодорожная доставка из
Китая – быстрее моря, дешевле авиации.
идеально для автозапчастей и мебели.
пломба ГЛОНАСС. цена от 4$ за кг
доставка сборных грузов из Китая –
объединяем товары разных поставщиков.
сборка на складе в Иу или Гуанчжоу.
делим вес документально.
минимальный сбор 150$
gemini property developers dubai Villa for Sale in Ajman dubai property finance calculator dubai luxury homes
Some truly interesting info , well written and broadly user genial .
Долго искали надежного поставщика циркония, в Редметсплав предложили лучшие условия и чистоту металла.
https://xn--80aeedb0bfzeok.xn--p1ai/catalog/latunnye-vnutrennie-stopornye-koltsa-po-din/latunoe-vnutrennee-stopornoe-pruzhinnoe-koltso-m21-22-5kh1-mm-lts40sd-din-472/
monthly apartments in abu dhabi Buy a Penthouse in Dubai patriot real estate dubai sbk real estate head office dubai
1xbet application télécharger
There is a lot of misunderstanding about these issues today. Your material helps explain things.
Широкий выбор нержавеющей стали различных марок позволяет использовать продукцию в строительстве и пищевой промышленности.
https://rms-ekb.ru/catalog/stalnoi-list/stalnoi-list-35kh-24x1900x1550-gost-19903-2006-gladkii-chernyi-goriachekatanyi/
1xbet application
villas in dubai hills estate Commercial Properties for Rent in Dubai office rent in dubai per month berkshire hathaway dubai real estate
best property to invest in dubai 2 BHK for Sale in Dubai La Avenida non freehold properties in dubai
Редметсплав — пример того, как должен работать современный поставщик металлургического сырья.
https://xn--80aeedb0bfzeok.xn--p1ai/catalog/mednoe-dvukhrastrubnoe-koleno-pod-paiku/mednoe-dvukhrastrubnoe-koleno-pod-paiku-180-gradusov-80kh68kh1-8-mm-35-5kh38-5-mm-miagkaia-paika-m3m-gost-r-52922-2008/
ООО «РМС» специализируется на поставках редких и тугоплавких металлов, таких как ниобий и вольфрам.
https://rms-ekb.ru/catalog/stalnoi-list/list-stalnoi-2kh1000kh4000-mm-1-4521-en-iso-9444-2/
Дубай больше не ассоциируется с запретом на алкоголь: премиальные напитки доставляются прямо к вашей двери в кратчайшие сроки. Ищете store liquor dubai? Сервис dubaialco.ru предлагает широкий выбор виски, шампанского и водки от проверенных поставщиков с гарантией качества. Доставка работает по всему Дубаю: Marina, JBR, Palm Jumeirah и Downtown — заказ принимается быстро и без формальностей.
top 100 real estate companies in dubai Full Building for Sale in Dubai dubai real estate economist largest property developer in dubai
стоимость установки системы отопления
установка систем отопления
crystal properties dubai land Property for Sale in Downtown Dubai source properties dubai Luxury 4BHK Villa | Freehold | Modern Living
This really clicked with me. You articulated something I’ve felt for a while but couldn’t quite put into words. Thanks for writing it.
Наличие на складе редких металлов, таких как цирконий, выделяет компанию на фоне конкурентов, торгующих только массовым прокатом.
https://rms-ekb.ru/catalog/stalnoi-list/stalnoi-list-30khn2ma-20x1700x1900-gost-19903-2006-gladkii-chernyi-goriachekatanyi/
fullstack разработчик на проект
Springs 14 Commercial Property For Rent In Dubai Emirates Crown online estate agent dubai
Справка о несудимости может потребоваться при усыновлении, оформлении опеки и решении других юридически значимых вопросов. Мы оказываем помощь в получении документа https://laws-moscow.com/gde-vzyat-spravku-o-nesudimosti-v-moskve/
off plan apartments dubai Plots for Sale in Dubai city tower properties dubai kaye & co real estate l.l.c dubai
Технические специалисты компании помогли выбрать оптимальный сплав для работы в агрессивных средах.
https://xn--80aeedb0bfzeok.xn--p1ai/catalog/mednoe-dvukhrastrubnoe-koleno-pod-paiku/mednoe-dvukhrastrubnoe-koleno-pod-paiku-180-gradusov-40-5kh36kh1-1-mm-27kh29-mm-tverdaia-paika-m1t-gost-r-52922-2008/
Some truly nice stuff on this website , I like it.
Компания занимается реализацией ферросплавов, необходимых для качественного легирования сталей на литейных участках.
https://rms-ekb.ru/catalog/krug-iz-instrumentalnoi-stali/krug-r18k5f2-160-gost-2590-2006/
property sale dubai marina buy a freehold property in dubai al wasl business center ali mulla property dubai
Generally I do not read article on blogs, however I wish to say that this write-up very forced me to check out and do so!
Your writing taste has been surprised me. Thanks, quite great post.
real estate top companies in dubai Commercial Properties for Rent in Dubai property developers in uae furnished studio for rent near me
https://стартапнеделя.рф/
dubai commercial real estate for rent Flats for Sale in Dubai rent house in karama dubai connecting hotel apartments in dubai marina
Поставки титана и его сплавов востребованы в медицине, авиации и химическом машиностроении.
https://rms-ekb.ru/catalog/stalnoi-list/list-stalnoi-06kh1500kh6000-mm-1-4521-en-iso-9444-2/
buy a house in dubai without down payment Apartments for Sale in Abu Dhabi J ONE Single Row | Private Garden | Open plan Layout
Для автолюбителей важно иметь доступ к достоверной информации. Именно поэтому мы создаем статьи, основанные на практическом опыте и актуальных данных, https://ford-omg.ru/
villas for rent in damac hills akoya by damac 1 bedroom apartment for sale in international city dubai Eden Hills guide fully furnished villas for sale in dubai
Технические специалисты компании помогли выбрать оптимальный сплав для работы в агрессивных средах.
https://xn--80aeedb0bfzeok.xn--p1ai/catalog/mednoe-dvukhrastrubnoe-koleno-pod-paiku/mednoe-dvukhrastrubnoe-koleno-pod-paiku-180-gradusov-34kh29kh1-mm-10kh12-mm-tverdaia-paika-m3rt-gost-r-52922-2008/
Опыт работы с более чем 120 постоянными заказчиками свидетельствует о высокой стабильности и надежности поставок.
https://rms-ekb.ru/catalog/krug-iz-instrumentalnoi-stali/krug-4kh2v5f-3-3-gost-7417-75/
При оформлении рабочей визы или разрешения на проживание многие страны требуют предоставить справку о несудимости. Мы оказываем помощь в получении необходимых документов https://laws-moscow.com/kak-i-gde-zakazat-spravku-ob-otsutstvii-sudimosti/
danube resortz dubai 1 bedroom apartment for sale in downtown dubai privilege property dubai 2 bedroom apartment in downtown dubai for one night
sell indian property in dubai Bellevue Towers Residential Apartments Dubai business for sale in dubai how to start a small business in dubai
Good post. I certainly appreciate this site. Keep it up!
Also visit my homepage; 오송출장마사지
Порадовало наличие вольфрамовых прутков редких диаметров, менеджер оперативно помог с подбором.
https://xn--80aeedb0bfzeok.xn--p1ai/catalog/latunnoe-litoe-koltso/latunnoe-litoe-koltso-150kh600-mm-lts40mts3zh/
Наличие никелевых сплавов гарантирует высокую коррозийную стойкость оборудования, создаваемого заказчиками.
https://rms-ekb.ru/catalog/ugolok-stalnoi/ugolok-iz-konstruktsionnoi-stali-125kh75kh12-mm-36crnimo4-din-59370/
dubai residential property prices palm jumeirah apartments for sale Villas for rent in The Meadows Jumeirah Lake Towers guide
وی ایزوله یاماموتو، یکی از خالصترین فرمهای پروتئین آب پنیر در جهان است.
property handover inspection in dubai apartments for sale in downtown dubai rental apartment dubai cheap 2 bedroom apartments for rent in bur dubai dubizzle
Высокая квалификация персонала, знают специфику редких металлов и особенности их применения.
https://xn--80aeedb0bfzeok.xn--p1ai/catalog/mednyi-perekhodnoi-troinik-press/mednyi-perekhodnoi-press-troinik-76-1kh64-mm-m3r-gost-r-52948-2008/
Наличие никелевых сплавов гарантирует высокую коррозийную стойкость оборудования, создаваемого заказчиками.
https://rms-ekb.ru/catalog/list/list-khgs-2x600x1200-gost-19903-74/
villas for sale in al furjan dubai Studio Apartment for Sale in Dubai dubai hills estate townhouses ministry of finance uae
https://zaoavis.ru/
The Coral Collection Villas 5 bedroom apartment dubai for sale why is real estate market in high demand in dubai Grandeur Residences guide
Ищете увеличение объема костной ткани для имплантации зубов в Мурманске? Посетите https://nova-51.ru/implantatsiya-zubov-murmansk/sinus-lifting-i-kostnaya-plastika-murmansk – мы предлагаем лучший синус лифтинг от опытных и квалифицированных врачей. Узнайте подробную информацию на сайте.
Howdy, There’s no doubt that your site may be having web browser compatibility issues.
When I take a look at your website in Safari, it looks fine however,
if opening in IE, it has some overlapping issues.
I just wanted to give you a quick heads up! Aside from that, fantastic site!
My name is Mike, a typical guy from the United States, and during 2018
I accidentally discovered one of the strangest sports ever invented: car jitsu.
In case this sounds unfamiliar, most people haven’t. The
entire concept sounds like something invented after a crazy bet.
Two fighters climb inside a compact vehicle and
try to score positions against each other while
being trapped between the cramped interior.
No, I’m not kidding. In most sports you have a ring, but in CarJitsu your battlefield is a car cabin. That is why people laugh when they first
hear about it.
There are organized competitions, tournaments, championships, and special events.
Athletes travel to compete and try to prove who can dominate inside the car.
Compared to ordinary sports, every movement is limited by the vehicle’s interior.
This leads to funny situations. One second someone looks like a
champion, and the next second they are stuck between the seats.
Back then I was heavily interested in competitive sports.
I watched all kinds of competitions. I also spent time reading about sportsbook odds.
Many sports fans I knew compared sportsbook offers.
Sometimes names like 1xBet would appear in conversations about
major sporting events, although CarJitsu was usually too strange to be the
main topic.
One night I saw a video clip online. Initially I believed it was a joke.
Competitive fighters were trying to grapple inside a parked car while spectators were watching in disbelief.
I laughed so hard that I couldn’t breathe for a moment.
Yet the more I watched, the more fascinated I became.
A few weeks later, I found a local event and decided to
attend. The event was unforgettable. There were fans discussing sports, training, and competition. Some
people even joked about which athlete would be the favorite if a betting site ever offered odds on the matches.
Watching was not enough. I signed up for beginner training.
The first training day was hilarious. I hit my head on the roof,
got stuck near a seat, and accidentally opened a door at the worst possible moment.
Everyone laughed. Yet I kept coming back.
Month after month, I improved. I learned how to use smart tactics instead of brute strength.
The car stopped feeling tiny. Soon I was entering small tournaments.
My friends thought I was completely crazy. Whenever someone
asked what sport I practiced, the conversation usually went like this:
“CarJitsu.”
“What is that?”
“Imagine wrestling inside a car.”
“You’re joking.”
“No, that’s the actual sport.”
The funniest and wildest experience happened during
a tournament a few years later. My opponent was huge. He looked
like he could carry an engine block. Before the match started, he smiled and said, “You’re going to need luck.” That should have
been a warning.
The moment the referee signaled, chaos exploded.
We bounced between seats, bumped into doors, and nearly tangled ourselves in everything
inside the vehicle. The crowd was roaring. Everyone was losing their minds.
Then came the moment I will never forget.
My opponent grabbed the seat belt and accidentally
turned it into what looked like a crazy lasso.
As we struggled for position, the belt snapped across
the cabin and wrapped around me in the strangest way imaginable.
For a second I thought, “What kind of sport did I join?”
He pulled, I twisted, the seat belt locked, the door opened slightly, and both of
us somehow ended up tangled together like two confused octopuses.
The audience was laughing so hard that some people could barely stay in their seats.
Nobody could believe what they were seeing.
For a brief moment, I genuinely thought my opponent was going
to flatten me. Luckily, the officials quickly intervened when things became unsafe, and the situation was resolved without serious injury.
Afterward we both burst out laughing. Everyone loved it.
Even today people who were there still talk about “the legendary belt tangle.”
Looking back, CarJitsu remains one of the most unusual sports I have ever experienced.
It gave me countless funny moments. Whether people are discussing sports,
betting, sportsbooks, competitions, or events, very
few things create reactions like CarJitsu.
Whenever someone asks me about unusual sports, I always tell
them about the day I climbed into a car in 2018 and accidentally became a CarJitsu competitor.
The reaction is always the same. But after hearing about
tournaments, athletes, training sessions, sports fans, betting conversations, sportsbook discussions, and my unforgettable seat belt battle,
they usually agree on one thing:
CarJitsu is wonderfully ridiculous.
Индивидуальный подход к нестандартным заказам — изготовили детали по нашим чертежам точно в размер.
https://xn--80aeedb0bfzeok.xn--p1ai/catalog/latunnye-vnutrennie-stopornye-koltsa-po-din/latunoe-vnutrennee-stopornoe-pruzhinnoe-koltso-m17-18-3kh1-mm-lts40sd-din-472/
short term monthly rentals dubai near burjuman studio apartment dubai for sale Villas for sale in Jumeirah Park Homes major property issues in the dubai market
Оперативная логистика и поддержка на всех этапах сделки позволяют минимизировать сроки простоя производственных линий заказчиков.
https://rms-ekb.ru/catalog/ugolok-stalnoi/ugolok-iz-konstruktsionnoi-stali-50kh50kh5-mm-c35e-en-10056-1/
new marketing people in dubai all about real estate inductry Apartments for Sale in Silicon Oasis Dubai average monthly house rent in dubai the property of dubai is
Грамотный проект ресторана начинается с понимания формата, аудитории и ежедневных процессов. Такой подход помогает связать эстетику, функциональность и бюджет, чтобы интерьер был удобен для клиентов, команды и владельца бизнеса: дизайн зоны отдыха в офисе
real estate companies in karama dubai apartments for sale in downtown dubai real estate business for sale dubai booking hotel apartment dubai
Долго искали надежного поставщика циркония, в Редметсплав предложили лучшие условия и чистоту металла.
https://xn--80aeedb0bfzeok.xn--p1ai/catalog/mednyi-perekhodnoi-troinik-press/mednyi-perekhodnoi-press-troinik-42kh10-mm-m3rt-gost-r-52948-2008/
Компания занимается реализацией ферросплавов, необходимых для качественного легирования сталей на литейных участках.
https://rms-ekb.ru/catalog/stalnoi-list/list-stalnoi-55kh600-mm-acroni-4436-en-iso-18286/
new projects in dubai sports city 5 bedroom apartment dubai for sale studio for rent in internet city dubai core real estate dubai
4 bedroom Apartments for sale in Jumeirah Beach Residence 2 Bedroom Apartment Dubai For Sale arabella townhomes by dubai properties hmg properties dubai
https://zaoavis.ru/
Приятно удивлены скоростью обработки запроса на сайте, менеджер связался очень быстро.
https://xn--80aeedb0bfzeok.xn--p1ai/catalog/latunnoe-litoe-koltso/latunnoe-litoe-koltso-1000kh800-mm-la/
Компания обеспечивает поставки оксовольфрамата гафния — редкого соединения для специфических нужд химической и атомной промышленности.
https://rms-ekb.ru/catalog/stalnoi-list/stalnoi-list-30g2-17x1600x2000-gost-19903-2006-gladkii-belyi-goriachekatanyi/
majlis property services dubai Dubai Marina Apartments For Rent Monthly property inspection company in dubai District 13
https://zaoavis.ru/
process to buy a house in dubai 2 Bhk For Rent Dubai flats for rent in dubai marina towers dubai freehold property law
Приятно удивлены скоростью обработки запроса на сайте, менеджер связался очень быстро.
https://xn--80aeedb0bfzeok.xn--p1ai/catalog/mednyi-perekhodnoi-troinik-press/mednyi-perekhodnoi-press-troinik-42kh14-7-mm-m3m-gost-r-52948-2008/
properties in dubai for 500 thousand aed 5 Bedroom Villa for Sale in Dubai 6 bedroom Villas for rent in Arabian Ranches ongoing new construction project in dubai
Хороший дизайн клиники снижает риск ошибок на стройке, потому что заранее показывает, где будут оборудование, мебель, свет, коммуникации и ключевые зоны. Это помогает подрядчикам работать точнее, а владельцу контролировать результат https://vk.com/@-233185290-dizain-restorana-kotoryi-uvelichivaet-srednii-chek-kak-inter
Оперативная логистика и поддержка на всех этапах сделки позволяют минимизировать сроки простоя производственных линий заказчиков.
https://rms-ekb.ru/catalog/stalnoi-list/stalnoi-list-12kh18n10t-3x1100x1300-gost-19903-2006-gladkii-belyi-goriachekatanyi/
Центр психологической помощи «Доверие» в Санкт-Петербурге предлагает профессиональные консультации для взрослых, подростков и семей: опытные специалисты помогают справиться с тревогой, конфликтами, личностными кризисами и эмоциональными трудностями. На сайте https://ack-group.ru/ можно выбрать подходящего психолога, ознакомиться с услугами и записаться онлайн — сессии длятся от 60 до 90 минут, стоимость начинается от 3000 рублей, что делает качественную психологическую помощь доступной.
Meadows 1 Buy or Rent Property in Dubai. fully furnished apartments for rent in dubai al qusais apartments for rent in al nahda 2 dubai
I’m Mike, a typical guy from the United States, and in the year
2018 I accidentally discovered one of the strangest sports ever invented:
Car Jitsu.
If this is your first time hearing about it, you are not
alone. The entire concept sounds like a joke. Two fighters climb inside
a small car and try to grapple each other while being trapped between the dashboard and seats.
Believe it or not. In most sports you have a field,
but in CarJitsu your battlefield is a cramped car interior.
This is what shocked me the first time.
There are organized competitions, tournaments, championships, and special events.
Competitors come from different places and
try to prove who can dominate inside the car.
Compared to ordinary sports, every movement is limited by
doors, seats, windows, and seat belts. This leads
to funny situations. One second someone looks like a champion, and the next
second they are folded like a pretzel.
Back then I was heavily interested in unusual athletic events.
I watched all kinds of competitions. I also spent time reading about sportsbook odds.
Friends often discussed sportsbooks. Sometimes names like 1xBet would appear in conversations about major
sporting events, although CarJitsu was usually too strange to
be the main topic.
One evening I saw a video clip online. I honestly assumed it was fake.
Grown adults were trying to battle inside a parked car while spectators
were going crazy with excitement. I laughed so hard that coffee nearly came out of my
nose. Yet the more I watched, the more fascinated I
became.
A few weeks later, I found a local event and decided to show up.
The atmosphere was incredible. There were fans discussing all kinds of sporting topics.
Some people even joked about which athlete would be the favorite if a sportsbook ever offered odds on the matches.
Soon I wanted more than just watching. I signed up for beginner training.
My debut practice was chaos. I hit my head on the roof, got
stuck near a seat, and accidentally opened a door at the worst
possible moment. Even I laughed at myself. Yet I kept coming back.
Week after week, I improved. I learned how to use positioning, leverage,
balance, and timing. The car stopped feeling tiny. Soon I was entering regional events.
My friends thought I was completely crazy. Whenever someone asked what sport I
practiced, the conversation usually went like this:
“CarJitsu.”
“What is that?”
“Imagine wrestling inside a car.”
“You’re joking.”
“No, that’s the actual sport.”
The funniest and wildest experience happened during a tournament a few years
later. My opponent was built like a truck. He looked like he could lift a small house.
Before the match started, he smiled and said, “Hope you’re ready.” That should have been a warning.
As soon as the fight started, chaos exploded. We bounced between seats, bumped into doors, and nearly tangled ourselves in everything inside the vehicle.
The crowd was roaring. Everyone was losing their
minds.
Then came the moment I will never forget.
My opponent grabbed the seat belt and accidentally turned
it into what looked like a wild whip. As we struggled
for position, the belt snapped across the cabin and
wrapped around me in the strangest way imaginable.
For a second I thought, “What kind of sport did I join?”
He pulled, I twisted, the seat belt locked,
the door opened slightly, and both of us somehow ended up tangled together like a pile of cables.
The audience was laughing so hard that some people could barely stay in their seats.
The scene was unbelievable.
For a brief moment, I genuinely thought my opponent was going to
destroy me. Luckily, the officials quickly intervened when things became
unsafe, and the situation was resolved without serious injury.
Afterward we both burst out laughing. Spectators cheered.
Even today people who were there still talk about “the legendary belt tangle.”
When I remember those years, CarJitsu remains one of
the strangest sports I have ever experienced. It gave me
friendships, stories, and unforgettable memories.
Whether people are discussing athletic entertainment,
very few things create reactions like CarJitsu.
When people want to hear a crazy sports story, I always tell them about the day I
climbed into a car in 2018 and accidentally became a CarJitsu
competitor. Nobody believes it at first. But after hearing about tournaments,
athletes, training sessions, sports fans, betting conversations, sportsbook discussions, and my unforgettable seat belt battle,
they usually agree on one thing:
CarJitsu is wonderfully ridiculous.
Типография и копицентр «Самрай принт» предлагают полный спектр полиграфических услуг: печать визиток, листовок, брошюр, буклетов, книг, плакатов и чертежей. Ищете типография на юго-западной? На samray.ru доступны широкоформатная печать, изготовление наклеек, календарей, бейджей, пластиковых карт, тиснение фольгой и шелкография. Здесь же выполняются сканирование, ламинирование, брошюровка, твёрдый переплёт дипломных работ и нанесение изображений на футболки.
fairway vistas at dubai hills estate buy studio apartment in dubai private property sales dubai luxury apartments for rent al nahda 2 dubai
Надежная защита груза при транспортировке, даже длинномерные изделия доходят без повреждений.
https://xn--80aeedb0bfzeok.xn--p1ai/catalog/latunnaia-vtulka/latunnaia-vtulka-460-mm-lts38mts2s2/
Наличие на складе редких металлов, таких как цирконий, выделяет компанию на фоне конкурентов, торгующих только массовым прокатом.
https://rms-ekb.ru/catalog/truba-konstruktsionnaia/truba-konstruktsionnaia-9kh1-76×8-gost-21729-76/
Весь металл проходит строгий входной контроль, за всё время работы ни одного случая брака.
https://xn--80aeedb0bfzeok.xn--p1ai/catalog/mednyi-perekhodnoi-troinik-press/mednyi-perekhodnoi-press-troinik-70kh18-mm-m3-gost-r-52948-2008/
Поставки титана и его сплавов востребованы в медицине, авиации и химическом машиностроении.
https://rms-ekb.ru/catalog/stalnoi-list/stalnoi-list-12kh17g9an4-2-5x1500x1300-gost-19903-2006-gladkii-belyi-goriachekatanyi/
Редметсплав — пример того, как должен работать современный поставщик металлургического сырья.
https://xn--80aeedb0bfzeok.xn--p1ai/catalog/latunnoe-litoe-koltso/latunnoe-litoe-koltso-400kh700-mm-la/
Интерьер медицинского центра помогает бизнесу говорить с клиентом без лишних объяснений. Цвет, свет, мебель, навигация и отделка формируют доверие, задают уровень бренда и делают пространство понятным с первых минут – дизайн ресторана премиум класса
https://zaoavis.ru/
https://zaoavis.ru/
Ассортимент компании включает более 100 000 позиций, что позволяет закрыть практически любые потребности металлургического производства.
https://rms-ekb.ru/catalog/krug-iz-instrumentalnoi-stali/krug-60khg-68-gost-1133-71/
Интернет-магазин «Семена на Яблочкова» в Москве предлагает тысячи наименований семян овощей, цветов и зелени от ведущих отечественных и зарубежных производителей. Каталог охватывает томаты, огурцы, капусту, редкие экзотические культуры и богатый выбор цветов — от однолетников до многолетников. Заказать всё необходимое для сада и огорода можно на https://magazinsemena.ru/ — доставка по всей России. Здесь собраны семена Агросемтомс, Евросемена, Семена Алтая и других надёжных брендов с гарантией качества.
We have been helping Canadians Get a Loan Against Their Vehicle
for Repairs Since March 2009 and are among the very
few Completely Online Lenders In Canada. With us
you can obtain a Car Repair Loan Online from anywhere
in Canada as long as you have a Fully Paid Off Vehicle
that is 8 Years old or newer. We look forward
to meeting all your financial needs.
Cabinet IQ
8305 State Hwy 71 #110, Austin,
TX 78735, United Ѕtates
254-275-5536
Installservice
Индивидуальный подход к нестандартным заказам — изготовили детали по нашим чертежам точно в размер.
https://xn--80aeedb0bfzeok.xn--p1ai/catalog/latunnoe-litoe-koltso/latunnoe-litoe-koltso-1000kh500-mm-la/
smile
aslı
Коммерческий интерьер загородного отеля отличается от частного тем, что каждый метр должен выполнять задачу. Пространство должно направлять поток людей, выдерживать нагрузку, поддерживать сервис и соответствовать финансовой модели проекта – https://dzen.ru/a/aiiAirDNJ2dJt-hJ
If some one wants to be updated with latest technologies therefore he must be pay a visit this website and be up to date all the time.
aslı
Дизайн-проект кондитерской нужен, чтобы до начала ремонта согласовать образ, планировку, материалы, освещение и технические решения. Это позволяет избежать хаоса на объекте и получить интерьер, который соответствует концепции бизнеса https://ok.ru/group/70000048267479/topic/158086921911767
Экспертная консультация при выборе сплавов помогает клиентам оптимизировать затраты и избежать технологических ошибок.
https://rms-ekb.ru/catalog/plity/plita-75khsmf-12x320x800-gost-19903-74/
crabs
smile hair
smile fr
asli
Высокая квалификация персонала, знают специфику редких металлов и особенности их применения.
https://xn--80aeedb0bfzeok.xn--p1ai/catalog/mednyi-perekhodnoi-troinik-press/mednyi-perekhodnoi-press-troinik-34kh22-mm-m3r-gost-r-52948-2008/
Металлические порошки различных фракций позволяют клиентам использовать их в порошковой металлургии и напылении.
https://rms-ekb.ru/catalog/ugolok-stalnoi/ugolok-iz-konstruktsionnoi-stali-130kh130kh12-mm-10khgn1-uni-6762/
smile hair
Надежная защита груза при транспортировке, даже длинномерные изделия доходят без повреждений.
https://xn--80aeedb0bfzeok.xn--p1ai/catalog/latunnoe-litoe-koltso/latunnoe-litoe-koltso-200kh600-mm-lmtszh/
smile fr
Использование системы менеджмента качества гарантирует строгий контроль продукции на всех этапах отгрузки.
https://rms-ekb.ru/catalog/stalnoi-list/stalnoi-list-14kh17n2-3-9x1800x1550-gost-19903-2006-gladkii-chernyi-goriachekatanyi/
It’s going to be ending of mine day, but before end I
am reading this impressive piece of writing to improve my knowledge.
Кровь и пламя возвращаются на экраны – сериал дом дракона 3 сезон 1 серия. Раскол королевства достиг точки невозврата – Рейнира и Эйгон ведут своих драконов в решающие схватки. Древние пророчества сбываются, родная кровь становится врагом, а трон требует новых жертв. Долгожданное продолжение саги!
Быстрая доставка в регионы через «Деловые Линии», груз пришел в целости и отлично упакованным.
https://xn--80aeedb0bfzeok.xn--p1ai/catalog/mednyi-perekhodnoi-troinik-press/mednyi-perekhodnoi-press-troinik-88-9kh80-mm-m1e-gost-r-52948-2008/
aslı
Наличие на складе редких металлов, таких как цирконий, выделяет компанию на фоне конкурентов, торгующих только массовым прокатом.
https://rms-ekb.ru/catalog/stalnoi-list/stalnoi-list-18kh2n4va-7x1300x1550-gost-19903-2006-gladkii-chernyi-goriachekatanyi/
I believe what you composed made a bunch of sense.
But, what about this? suppose you added a little
information? I am not saying your content is not good, but
what if you added a post title that makes people desire more?
I mean Grouting your peel and stick tile in 30 minutes!
– The Farmhouse Life is a little vanilla. You might peek at Yahoo’s front
page and watch how they create article headlines to grab viewers to open the links.
You might try adding a video or a related pic or two to grab people excited about what you’ve written. In my opinion, it would bring your blog a little bit more interesting.
Благодарим за оперативную поставку ниобиевых труб, выручили в очень сжатые сроки.
https://xn--80aeedb0bfzeok.xn--p1ai/catalog/latunnoe-litoe-koltso/latunnoe-litoe-koltso-30kh400-mm-lmtssk/
Definitely believe that which you said. Your favorite justification seemed to be on the net the simplest thing
to be aware of. I say to you, I certainly get annoyed while people think about worries that
they just do not know about. You managed to hit the
nail upon the top as well as defined out
the whole thing without having side effect , people can take
a signal. Will likely be back to get more. Thanks
Каждая партия товара сопровождается сертификатами качества, подтверждающими соответствие ГОСТ и ТУ.
https://rms-ekb.ru/catalog/stalnoi-list/stalnoi-list-09g2s-1-4x1550x1700-gost-19903-2006-gladkii-neotsinkovannyi-goriachekatanyi/
If some one wants to be updated with latest technologies therefore he must be pay a visit this
site and be up to date everyday.
smile
hi!,I like your writing so a lot! percentage we keep in touch extra
about your article on AOL? I require a specialist in this area to solve my problem.
Maybe that is you! Looking ahead to see you.
Приятно удивлены скоростью обработки запроса на сайте, менеджер связался очень быстро.
https://xn--80aeedb0bfzeok.xn--p1ai/catalog/mednye-troiniki-press/mednyi-press-troinik-18-mm-m3r-gost-r-52948-2008/
Кровь и пламя возвращаются на экраны – когда продолжение дом дракона 3 сезон. Раскол королевства достиг точки невозврата – Рейнира и Эйгон ведут своих драконов в решающие схватки. Древние пророчества сбываются, родная кровь становится врагом, а трон требует новых жертв. Долгожданное продолжение саги!
Компания предлагает не только металлы, но и химическую продукцию, используемую в смежных металлургических процессах.
https://rms-ekb.ru/catalog/krug-iz-instrumentalnoi-stali/krug-6kh6v3mfs-70-gost-1133-71/
Прозрачное оформление документов и быстрое выставление счетов, приятно работать с профессионалами.
https://xn--80aeedb0bfzeok.xn--p1ai/catalog/latunnoe-litoe-koltso/latunnoe-litoe-koltso-90kh700-mm-lts23a6zh3mts2/
Кровь и пламя возвращаются на экраны – смотреть дом дракона 3 сезон дата выхода. Раскол королевства достиг точки невозврата – Рейнира и Эйгон ведут своих драконов в решающие схватки. Древние пророчества сбываются, родная кровь становится врагом, а трон требует новых жертв. Долгожданное продолжение саги!
В каталоге представлены конденсаторные ниобиевые порошки высокой чистоты, необходимые для современной электроники.
https://rms-ekb.ru/catalog/stalnoi-list/stalnoi-list-06khn28mt-0-6x1900x2000-gost-19903-2006-gladkii-neotsinkovannyi-goriachekatanyi/
Закупали шлак ферросилиция для строительных нужд, материал качественный, без лишних примесей.
https://xn--80aeedb0bfzeok.xn--p1ai/catalog/mednye-otvody-press/mednyi-otvod-press-90-gradusov-108-mm-m2m-gost-r-52948-2008/
Ищете имплантацию зубов в Мурманске? Посетите https://nova-51.ru/implantatsiya-zubov-murmansk – с помощью имплантации мы восстанавливаем эстетику, функциональность зубного ряда, улучшая качество жизни и самооценку пациента. Только опытные хирурги! Подробнее на сайте.
Широкий выбор нержавеющей стали различных марок позволяет использовать продукцию в строительстве и пищевой промышленности.
https://rms-ekb.ru/catalog/truba-konstruktsionnaia/truba-konstruktsionnaia-stal-20-35×5-gost-21729-76/
Технические специалисты компании помогли выбрать оптимальный сплав для работы в агрессивных средах.
https://xn--80aeedb0bfzeok.xn--p1ai/catalog/latunnaia-chushka/chushka-latunnaia-lk/
Ищете Лечение в Китае? Посетите сайт https://medchina-888.com/ и вам предложат лечение в Государственном госпитале с филиалами в г. Далянь и о. Хайнань. Мы официальный сайт государственного госпиталя в Китае. Проводим многопрофильное лечение традиционной китайской медициной по государственным ценам. Узнайте подробную информацию на сайте.
Компания осуществляет поставки базового металлургического сырья, включая олово, свинец и цинк в чушках.
https://rms-ekb.ru/catalog/plity/plita-r14f4-23x125x360-gost-19903-74/
Кровь и пламя возвращаются на экраны – дом дракона 3 сезон kinogo. Раскол королевства достиг точки невозврата – Рейнира и Эйгон ведут своих драконов в решающие схватки. Древние пророчества сбываются, родная кровь становится врагом, а трон требует новых жертв. Долгожданное продолжение саги!
Быстрая доставка в регионы через «Деловые Линии», груз пришел в целости и отлично упакованным.
https://xn--80aeedb0bfzeok.xn--p1ai/catalog/latunnaia-vtulka/latunnaia-vtulka-130-mm-ls59-1/
Кровь и пламя возвращаются на экраны – дом дракона 3 сезон дата выхода трейлер. Раскол королевства достиг точки невозврата – Рейнира и Эйгон ведут своих драконов в решающие схватки. Древние пророчества сбываются, родная кровь становится врагом, а трон требует новых жертв. Долгожданное продолжение саги!
I have been surfing online greater than 3 hours today, yet I by no means discovered any interesting article like yours.
It’s pretty price sufficient for me. In my opinion, if
all website owners and bloggers made good content as you probably did, the net shall be
a lot more useful than ever before.
I’m curious to find out what blog platform you happen to be utilizing?
I’m experiencing some minor security problems with my latest website and
I’d like to find something more risk-free. Do you have any recommendations?
Feel free to visit my blog post :: Security companies
hotel apartments for sale in aykon city tower b dubai Apartments for Sale in Abu Dhabi dubai properties head office location dubai real estate deals
Надежная защита груза при транспортировке, даже длинномерные изделия доходят без повреждений.
https://xn--80aeedb0bfzeok.xn--p1ai/catalog/provoloka-aliumel/provoloka-aliumel-0-5-mm-nmtsak2-2-1-tu-48-21-201-72/
Использование системы менеджмента качества гарантирует строгий контроль продукции на всех этапах отгрузки.
https://rms-ekb.ru/catalog/ugolok-stalnoi/ugolok-stalnoi-10khsnd-32x32x4-gost-8509-93/
When someone writes an paragraph he/she keeps the idea of a user in his/her mind that
how a user can understand it. Thus that’s why this piece of writing is amazing.
Thanks!
aim properties dubai phone property for sale in arabian ranches dubai emaar dubai que es Silva guide
sloanes real estate dubai Studio Apartment for Sale in Dubai dubai real estate news market trends freehold land dubai
Заказывали партию молибденовых листов для производства, качество металла идеальное, все сертификаты в наличии.
https://xn--80aeedb0bfzeok.xn--p1ai/catalog/lenta-latunnaia-1/lenta-latunnaia-0-6-mm-l63pt-1/
dubai apartment rent move-in date Apartments For Rent In Dubai Silicon Oasis studio for rent in cbd dubai buy villa in dubai springs
Ассортимент компании включает более 100 000 позиций, что позволяет закрыть практически любые потребности металлургического производства.
https://rms-ekb.ru/catalog/list/list-kh12f1-35x1000x1000-gost-19903-2006/
گینر بد اس، یک مکمل غذایی قدرتمند است که به طور خاص برای ورزشکاران و افرادی که به دنبال افزایش حجم عضلانی و قدرت بدنی هستند، طراحی شده است.
Thankfulness to my father who shared with me concerning
this web site, this website is in fact awesome.
3 bedroom apartment in sharjah 2 Bhk For Rent Dubai Creek Rise dubai properties leaze
weather properties for hvac load calculation in dubai Property for Sale in Downtown Dubai 138 sqm dubai property price red rock real estate dubai
Очень широкий каталог, нашли всё необходимое в одном месте, включая редкие позиции.
https://xn--80aeedb0bfzeok.xn--p1ai/catalog/mednye-zaglushki-pod-paiku/mednaia-zaglushka-kolpachok-pod-paiku-9kh7kh0-6-mm-7-8kh9-8-mm-miagkaia-paika-m2t-gost-r-52922-2008/
Широкий выбор нержавеющей стали различных марок позволяет использовать продукцию в строительстве и пищевой промышленности.
https://rms-ekb.ru/catalog/krug-iz-instrumentalnoi-stali/krug-6khv2s-100-gost-5950-2000/
dubai me business kaise kare Full Building for Sale in Dubai best places to buy apartments in dubai dubai property news december
dubai real estate institute apartments for sale in dubai marina dubai cbd properties dubai land department leonardo residences reportage properties llc
Редметсплав — пример того, как должен работать современный поставщик металлургического сырья.
https://xn--80aeedb0bfzeok.xn--p1ai/catalog/latunnaia-polosa/latunnaia-polosa-2×600-mm-lmts58-2-gost-931-90/
ООО «РМС» поставляет вольфрамовые порошки, соответствующие строгим техническим условиям (например, ТУ 48-4205-112-2017).
https://rms-ekb.ru/catalog/stalnoi-list/stalnoi-list-stal-45-100x1700x1100-gost-r-52146-2003-polimernyi-neotsinkovannyi-kholodnokatanyi/
layan by dubai properties 2 Bedroom Apartment in JBR Duba property dubai buy 1 month family room rent in dubai
suburbs of dubai Emaar Properties for Sale art real estate group dubai types of properties in dubai
However, it is virtually all done with tongues rooted solidly in cheeks, and everyone has absolutely nothing but absolutely love for his or her friendly neighborhood scapegoat. The truth is, he is not just a pushover. He is basically that special variety of person strong enough to take all of that good natured ribbing for exactly what it is.
Could not disagree with the main ideas. Wonder how things will develop over the coming years.
I Am Going To have to come back again when my course load lets up – however I am taking your Rss feed so i can go through your site offline. Thanks.
We’re developing a conference, and it looks like you would be a great speaker.
I am glad to be a visitor of this perfect blog !, appreciate it for this rare info!
I’ve read several good stuff here. Definitely worth bookmarking for revisiting. I surprise how much effort you put to make such a magnificent informative site.
I wrote down your blog in my bookmark. I hope that it somehow did not fall and continues to be a great place for reading texts.
dubai palm villas for sale 2 bhk apartment for sale in dubai property structural insurance dubai damac properties head office dubai location map
Аренда яхт в Адлере позволяет сделать отдых на Черном море по-настоящему особенным. Морская прогулка вдоль побережья подарит красивые виды, комфортную атмосферу и незабываемые впечатления для всей компании: аренда катера Адлер
Продукция находит применение в производстве электротехники благодаря наличию специализированной электротехнической стали.
https://rms-ekb.ru/catalog/ugolok-stalnoi/ugolok-iz-konstruktsionnoi-stali-40kh25kh4-mm-40nicr6-din-59370/
dubai properties maintenance 2 Bedroom Townhouse for Sale in Dubai dubai hills estate properties for sale bed space for rent in dubai
al wasl gate dubai Buy Freehold Property In Dubai commercial property rental yield in dubai business bay dubai properties office
Appreciate this post. Let me try it out.
ООО «РМС» обеспечивает поставки специализированных сварочных материалов для сложных условий эксплуатации.
https://rms-ekb.ru/catalog/stalnoi-list/stalnoi-list-s375-85x1000x1700-gost-19903-2015-gladkii-neotsinkovannyi-goriachekatanyi/
land for rent in dubai Dubai flats for sale top line real estate dubai dubai share market
shapoorji pallonji new projects in dubai mall 3 bedroom townhouse for sale in dubai hotel apartments in dubai monthly basis new awarded projects in dubai
emaar beachfront properties dubai 1 Bedroom Apartment for Sale in Dubai Azure Residences guide lamar properties dubai reviews
В каталоге представлены конденсаторные ниобиевые порошки высокой чистоты, необходимые для современной электроники.
https://rms-ekb.ru/catalog/truba-konstruktsionnaia/truba-konstruktsionnaia-10kh17n13m2t-21-3×2-77-gost-21729-76/
I used to be able to find good information from your articles.
beachfront villa dubai 1 bedroom apartment for sale in dubai sheffield real estate dubai green star real estate broker dubai
business bay properties dubai Villa in dubai for 2 million different payment plans in real estate in dubai buying a house with no down payment
Компания работает с изделиями из драгоценных и благородных металлов, что требует высокого уровня квалификации и ответственности.
https://rms-ekb.ru/catalog/ugolok-stalnoi/ugolok-iz-konstruktsionnoi-stali-120kh80kh12-mm-15nicr13-uni-6762/
Ищете заказать алкоголь Дубай? Магазин storedubae.net предлагает широкий выбор напитков: виски, шампанское, вино, текила, джин, коньяк, ром и многое другое — более 80 позиций от проверенных мировых брендов. Доставка осуществляется по всему городу в течение 30 минут, а рейтинг организации на Яндексе составляет 4,9 — это говорит само за себя.
liyan by dubai properties Studio for Sale in Dubai villanova dubai properties location jw marriott hotel apartments dubai creek in al jaddaf
rent apartment studio in dubai land arabian ranches villas for sale mko real estate dubai Nad Al Sheba guide
Наличие на складе редких металлов, таких как цирконий, выделяет компанию на фоне конкурентов, торгующих только массовым прокатом.
https://rms-ekb.ru/catalog/plity/plita-u8a-52x125x160-gost-19903-74/
I’m Mike, a normal American guy, and back in 2018 I accidentally discovered one of the most bizarre sports I had ever
seen: CarJitsu.
If you have never heard of it, don’t worry. The entire concept sounds like something
invented after a crazy bet. Two athletes climb inside
a tiny automobile and try to grapple each other while
being trapped between the seats. Believe it or
not. In most sports you have a ring, but in CarJitsu your battlefield is a cramped car
interior. That is what makes it so weird.
The sport has tournaments, championships, local events, and exhibition matches.
Competitors come from different places and try to prove who can master the unusual format.
Unlike traditional combat sports, every movement is limited by the vehicle’s interior.
This leads to funny situations. One second someone looks like a champion, and the next second
they are trapped near the steering wheel.
At that time I was heavily interested in unusual athletic events.
I watched all kinds of competitions. I also spent time reading
about sportsbook odds. Friends often discussed sportsbooks.
Sometimes names like 1xbet would appear in conversations about major sporting events, although CarJitsu
was usually too strange to be the main topic.
Late one evening I saw a short video online. At first I thought it
was satire. Competitive fighters were trying to battle inside a
parked car while spectators were watching in disbelief.
I laughed so hard that I couldn’t breathe for
a moment. Yet the more I watched, the more fascinated I became.
Not long afterward, I found a local event and decided to show
up. The crowd energy was amazing. There were fans discussing sports, training,
and competition. Some people even joked about which athlete would be the favorite if a sports betting market ever
offered odds on the matches.
Soon I wanted more than just watching. I signed up for beginner training.
My debut practice was chaos. I hit my head on the roof,
got stuck near a seat, and accidentally opened a door at the worst possible moment.
Everyone laughed. Yet I kept coming back.
Month after month, I improved. I learned how to use technique and movement.
The vehicle became familiar. Soon I was entering local competitions.
My friends thought I was completely crazy.
Whenever someone asked what sport I practiced, the conversation usually went like this:
“CarJitsu.”
“What is that?”
“Imagine wrestling inside a car.”
“You’re joking.”
“No, that’s the actual sport.”
The most unforgettable competition happened
at a major event. My opponent was huge. He looked like he could lift a small house.
Before the match started, he smiled and said, “Good luck.” I knew trouble
was coming.
As soon as the fight started, chaos exploded. We bounced between seats, bumped
into doors, and nearly tangled ourselves in everything inside the vehicle.
The crowd was roaring. Everyone was losing their minds.
Then came the moment I will never forget.
My opponent grabbed the belt hanging beside the seat and accidentally turned it into what looked like a
wild whip. As we struggled for position, the belt snapped across the cabin and wrapped
around me in the strangest way imaginable. For a second I thought, “This is it”
He pulled, I twisted, the seat belt locked, the door
opened slightly, and both of us somehow ended up tangled together like two confused octopuses.
The audience was laughing so hard that some people could barely stay in their seats.
The scene was unbelievable.
For a brief moment, I genuinely thought my opponent was going to destroy me.
Thankfully, the officials quickly intervened when things became unsafe, and
the situation was resolved without serious injury.
Afterward we both burst out laughing. Spectators cheered.
Even today people who were there still talk about “that crazy seat belt match.”
When I remember those years, CarJitsu remains one of the
weirdest athletic competitions I have ever experienced.
It gave me countless funny moments. Whether people are discussing sports
culture and competition, very few things create reactions
like CarJitsu.
When people want to hear a crazy sports story, I always tell them about the day I climbed into a car
in 2018 and accidentally became a CarJitsu competitor.
The reaction is always the same. But after hearing about tournaments,
athletes, training sessions, sports fans, betting conversations, sportsbook
discussions, and my unforgettable seat belt battle, they usually agree on one
thing:
CarJitsu might be the craziest sport ever invented.
real estate ads 1 bedroom apartment for sale in downtown dubai excutive sales operation dubai property Albero
This post is exactly what I was searching for today. The clear, neutral way you detailed everything makes it a fantastic reference guide that I will definitely save.
casinos online chile cuenta rut
sawa real estate dubai Houses for Sale in Palm Jumeirah Dubai dubai property sales gallery business bay monthly rental villa dubai
ООО «РМС» обеспечивает поставки специализированных сварочных материалов для сложных условий эксплуатации.
https://rms-ekb.ru/catalog/ugolok-stalnoi/ugolok-iz-konstruktsionnoi-stali-80kh60kh7-mm-41cralmo7-din-1029/
dubai holding meraas Buy Property In Dubai apartments in dubai internet city dubai properties complaints
گینر اپلاید، یک فرمولاسیون فوقحرفهای است که فراتر از یک گینر معمولی برای افزایش وزن است.
avenue real estate dubai Apartments for Sale in Dubai Emaar property structural insurance dubai 3 bedroom apartments for rent
Hi there mates, how is the whole thing, and what you
wish for to say about this post, in my view its genuinely amazing in favor of me.
Важным преимуществом является возможность изготовления деталей и изделий по индивидуальным чертежам заказчика.
https://rms-ekb.ru/catalog/list/list-u8-22x1000x1000-gost-21631-76/
al wasl park 2 Apartments for Sale in Dubai Emaar Serenia The Palm chemical properties of soil from dubai municipality
ramadi real estate dubai Villa for Sale in Sharjah apartamenty w dubaju Falcon Island
Компания работает с изделиями из драгоценных и благородных металлов, что требует высокого уровня квалификации и ответственности.
https://rms-ekb.ru/catalog/krug-iz-instrumentalnoi-stali/krug-5kh3v3mfs-11-1-gost-7417-75/
dubai properties la vie Houses for Sale in Dubai legal process of renting an apartment in dubai villas for sale mira 1 dubai
Прокат яхт в Адлере подходит для всех, кто хочет получить новые впечатления от отдыха на Черном море. Это возможность увидеть знакомые места под новым углом и насладиться уникальной атмосферой морского путешествия – прокат яхт в Адлере
new awarded projects in uae dubai 3 bedroom apartment dubai for sale real estate company in lake view towers busines bay dubai 2 bhk flat for rent in al nahda 2 dubai
Реализация твердых сплавов типа «Победит» ориентирована на производителей металлорежущего и бурового инструмента.
https://rms-ekb.ru/catalog/stalnoi-list/list-stalnoi-6kh1250kh4000-mm-1-4512-en-iso-9444-2/
service apartment in downtown dubai Arabian Ranches Villas for Sale dubizzle sharjah flat for rent al wasl properties for rent
Компания «Партнёр» с 2013 года оснащает школы и детские сады по всей России: учебное оборудование, мебель, робототехника, спортивный и медицинский инвентарь, товары по программе «Доступная среда». В ассортименте более 30 000 сертифицированных позиций от 100+ производителей напрямую, а значит — по выгодным ценам. Подробнее на сайте https://xn—-7sbbumkojddmeoc1a7r.xn--p1acf/ Специалисты подготовят документацию по 44 и 223 ФЗ, помогут с подбором и обеспечат доставку с гарантией качества.
Аренда катера в Адлере пользуется популярностью благодаря сочетанию доступности и ярких впечатлений. Во время прогулки можно насладиться морским воздухом, увидеть побережье с необычного ракурса и провести время вдали от городского шума. Катер отлично подходит как для семейного отдыха, так и для небольших компаний друзей, https://yachtkater.ru/
Terra Nova Property for sale dubai crypto foreclosed property dubai real estate company in dubai validation
Ассортимент компании включает более 100 000 позиций, что позволяет закрыть практически любые потребности металлургического производства.
https://rms-ekb.ru/catalog/ugolok-stalnoi/ugolok-iz-konstruktsionnoi-stali-200kh150kh12-mm-c45-din-1029/
list of all hotel apartments in dubai Buy Penthouse in Dubai rent a apartment in dubai long term property situation in dubai
1 bedroom hotel apartment dubai Property for sale dubai crypto apartments for sale in dubai marina movenpick hotel dubai downtown
Компания выступает важным звеном в цепочке снабжения предприятий машиностроения и оборонно-промышленного комплекса.
https://rms-ekb.ru/catalog/stalnoi-list/stalnoi-list-40khn-35x1500x1300-gost-19903-2006-gladkii-belyi-goriachekatanyi/
5 bedroom Apartments for rent in Business Bay 1 Bedroom Apartment for Sale in Dubai why buy property in dubai dubizzle house for rent
Прокат яхт Сириус позволяет увидеть Олимпийский парк и прибрежные достопримечательности с необычного ракурса во время морской прогулки: https://yachtkater.ru/
best place to invest Apartments for Sale in Dubai Emaar green community dip rent top most real estate companies in dubai
Арендовать яхту в Адлере можно для проведения корпоративного мероприятия. Такой формат помогает создать непринужденную атмосферу и подарить участникам яркие эмоции, прокат яхт в Адлере
Компания обеспечивает поставки оксовольфрамата гафния — редкого соединения для специфических нужд химической и атомной промышленности.
https://rms-ekb.ru/catalog/truba-konstruktsionnaia/truba-konstruktsionnaia-10kh17n13m2t-76×7-5-gost-21729-76/
al wasl building sheikh zayed road Buy Penthouse in Dubai flats for rent in muhaisnah dubai spf real estate dubai
how to find owner of property in dubai Townhouses for Sale in Dubai did the property market in dubai started to recover premium apartments to rent in deira
Wow, marvelous blog layout! How long have you been blogging for?
you make running a blog glance easy. The entire glance of your
web site is excellent, let alone the content!
Jumeirah apartments for sale One Bedroom Apartment For Sale In Dubai grand estates limited dubai dubai taxi lost property
la riviera estates jvc dubai villa for sale in dubai silicon oasis gate 3 jebel ali 2 bed apartment for sale in dubai marina
dubai real estate investment companies Emaar Properties for Sale property link real estate dubai ajmal restaurant al nahda sharjah
Ориентация на долгосрочные отношения с клиентами позволяет компании формировать индивидуальные условия оплаты и графики поставок.
https://rms-ekb.ru/catalog/krug-iz-instrumentalnoi-stali/krug-4kh5mfs-55-gost-5950-2000/
oracle properties dubai 1 bedroom apartment dubai for sale tanami properties dubai dubai marina real estate marina p
al raqeem intellectual property dubai Palm Jumeirah Homes for Sale Apartments for sale in Fairmont Residences Al Marjan Island big real estate companies in dubai
real estate market and prospects in dubai Dubai Houses For Sale Luxury dubizzle short term rental dubai studio apartments for sale in downtown dubai
Wow that was unusual. I just wrote an really long comment but after I clicked submit
my comment didn’t appear. Grrrr… well I’m not writing all that over again. Regardless,
just wanted to say great blog!
2 br apt 1 bedroom apartment for sale in dubai silicon oasis apartments for rent dubai dubizzle 3 bhk flat for rent in al qusais dubai
rera dubai real estate agent 1 bedroom apartment for sale in international city dubai 1 bedroom for rent in warsan 4 house party dubai where to buy food
Heya i am for the first time here. I came across this board and I find It really useful & it helped me out much.
I hope to give something back and aid others like you aided me.
Поставка продукции возможна не только в промышленных, но и в малых лабораторных объемах для исследовательских целей.
https://rms-ekb.ru/catalog/list/list-u8ga-2x500x1000-gost-19903-74/
property fairs in dubai to buy property in india apartments for sale in silicon oasis dubai Apartments for rent in Business Bay dubai creek harbor
Mira Villas One Bedroom Apartment For Rent In Dubai dubai property sales centre testimonials dubai real estate properties
Dubai’s fastest-growing communities: best areas for long-term growth 1 bedroom apartment for sale in international city dubai ros invest real estate dubai vx dubai properties
villa with swimming pool for 1 day rent in dubai 3 Bedroom Apartments For Sale In Dubai Silicon Oasis arabian escapes real estate dubai dubai international real estate company
Металлические порошки различных фракций позволяют клиентам использовать их в порошковой металлургии и напылении.
https://rms-ekb.ru/catalog/stalnoi-list/stalnoi-list-s345-80x1250x1700-gost-19903-2015-gladkii-chernyi-goriachekatanyi/
how to invest in uae stock market Emaar Properties for Sale wasl gate gardenia Apartments for sale in Zabeel First
chiller free apartments for rent in dubai Villa for Sale in Abu Dhabi licence for sale in dubai dubai real estate corporation satwa
References:
Royal casino online http://hompy006.dmonster.kr/bbs/board.php?bo_table=b0904&wr_id=204681
Very descriptive article, I loved that bit. Will there be a
part 2?
Реализация твердых сплавов типа «Победит» ориентирована на производителей металлорежущего и бурового инструмента.
https://rms-ekb.ru/catalog/ugolok-stalnoi/ugolok-iz-konstruktsionnoi-stali-40kh25kh4-mm-36crnimo4-din-59370/
studio room for rent in dubai shortlet Palm Jumeirah Villas for Sale akt real estate dubai ??? property sales manager dubai
off plan projects in uae Dubai Houses For Sale Luxury bayut sharjah rent 3 bedroom villa for rent in jumeirah park
whoah this weblog is wonderful i like reading your articles. Keep up the good paintings! You already know, many people are looking around for this information, you can help them greatly.
What’s up colleagues, pleasant paragraph and nice arguments commented here, I am really enjoying by these.
Наличие прецизионных сплавов в ассортименте подтверждает работу компании с высокоточными и наукоемкими материалами.
https://rms-ekb.ru/catalog/stalnoi-list/stalnoi-list-16gs-5-5x1300x1100-gost-19903-2006-gladkii-belyi-goriachekatanyi/
family sharing in dubai apartments Hotel Apartments in Bur Dubai for Monthly Rent nuzul properties email address dubai Apartment for Sale in Al Andalus, Dubai
hunt & harris real estate dubai 2 Bedroom Apartment In Dubai big property developers in dubai real estate companies
You certainly deserve a round of applause for your post and more specifically, your blog in general. Very high quality material!
FreeFuckVids stands out from the tons of porn tubing
sites by placing an attention on exciting users experience and high quality content.
The hottest celebs are only present on the hottest steamiest activity when you arrive at
the landing website. 18+ https://git.dotb.cloud/micah343527137
Компания выступает важным звеном в цепочке снабжения предприятий машиностроения и оборонно-промышленного комплекса.
https://rms-ekb.ru/catalog/truba-konstruktsionnaia/truba-konstruktsionnaia-13khfa-219×14-gost-18482-79/
Park Heights guide Apartments for Sale in Dubai Emaar get gate level from dubai real estate coorporation fully furnished studiao for rent in dubai for 3 months
property trends dubai Emaar Properties for Sale dubai hills estate to palm gateway buy apartment dubai marina
studio for rent in al jaddaf dubai Buy or Rent Property in Dubai. The Valley guide emaar dubai hills office
Компания обеспечивает поставки оксовольфрамата гафния — редкого соединения для специфических нужд химической и атомной промышленности.
https://rms-ekb.ru/catalog/ugolok-stalnoi/ugolok-iz-konstruktsionnoi-stali-55kh55kh10-mm-40crnimo6-din-1028/
My name is Mike, a typical guy from the United States, and in the year 2018 I accidentally discovered one of the weirdest sports on Earth: Car Jitsu.
If you have never heard of it, most people haven’t. The entire concept sounds like a comedy sketch.
Two athletes climb inside a small car and try to grapple each other while being trapped between the cramped interior.
Yes, really. In most sports you have a court, but in CarJitsu your battlefield is a car cabin.
That is what makes it so weird.
It even has official events and competitive tournaments.
Participants gather from various regions and
try to prove who can master the unusual format. Compared to ordinary sports, every movement is limited by the
vehicle’s interior. This leads to funny situations.
One second someone looks like a champion, and the next second they are folded like a pretzel.
During those days I was heavily interested in sports.
I watched many sports events every week. I also spent
time reading about sports betting. Friends often discussed sportsbooks.
Sometimes names like 1xBet would appear in conversations about major sporting events, although CarJitsu was usually too strange to be the main topic.
One night I saw a crazy highlight reel online.
I honestly assumed it was fake. Grown adults were trying to battle inside a parked car while spectators
were watching in disbelief. I laughed so hard that coffee
nearly came out of my nose. Yet the more I watched, the more fascinated I became.
Not long afterward, I found a local event and decided to show up.
The atmosphere was incredible. There were fans discussing athletic techniques and sports culture.
Some people even joked about which athlete would be the favorite if
a sportsbook ever offered odds on the matches.
Eventually I wanted to participate. I signed up for beginner training.
My debut practice was chaos. I hit my head on the roof, got stuck near a seat, and accidentally opened a door at the worst possible moment.
Everyone laughed. Yet I kept coming back.
Month after month, I improved. I learned how to use
positioning, leverage, balance, and timing.
The cramped cabin became my arena. Soon I was entering local competitions.
My friends thought I was completely crazy. Whenever someone asked what sport I
practiced, the conversation usually went like this:
“CarJitsu.”
“What is that?”
“Imagine wrestling inside a car.”
“You’re joking.”
“No, that’s the actual sport.”
The craziest match of my career came later.
My opponent was massive. He looked like he could carry an engine block.
Before the match started, he smiled and said, “You’re going to need luck.” That should have been a warning.
The moment the referee signaled, chaos exploded. We bounced between seats, bumped into doors, and nearly tangled ourselves in everything inside the
vehicle. The crowd was roaring. Everyone was losing their minds.
Then came the moment I will never forget.
My opponent grabbed the belt hanging beside the seat and accidentally turned
it into what looked like a wild whip. As we struggled for position, the belt snapped across the
cabin and wrapped around me in the strangest way imaginable.
For a second I thought, “What kind of sport did I join?”
He pulled, I twisted, the seat belt locked, the door opened slightly, and
both of us somehow ended up tangled together like human spaghetti.
The audience was laughing so hard that some people
could barely stay in their seats. The scene was unbelievable.
For a brief moment, I genuinely thought my opponent was going to destroy
me. Thankfully, the officials quickly intervened when things became unsafe,
and the situation was resolved without serious injury.
Afterward we both burst out laughing. Everyone
loved it. Even today people who were there still talk about
“that crazy seat belt match.”
When I remember those years, CarJitsu remains one of the most unusual sports I have ever
experienced. It gave me friendships, stories, and unforgettable memories.
Whether people are discussing sports, betting, sportsbooks, competitions, or events, very few things
create reactions like CarJitsu.
Whenever someone asks me about unusual sports, I always tell them about the day I climbed
into a car in 2018 and accidentally became a CarJitsu competitor.
The reaction is always the same. But after hearing about tournaments, athletes, training
sessions, sports fans, betting conversations, sportsbook discussions, and my unforgettable seat belt battle, they usually agree
on one thing:
CarJitsu is absolutely insane.
furnished apartment rental in dubai One Bedroom Apartment for Sale in Dubai property for sale uae dubai property brokers in dubai
Hey very cool site!! Man .. Beautiful .. Amazing .. I will bookmark your website and take the feeds also…I’m happy to find so many useful information here in the post, we need develop more strategies in this regard, thanks for sharing. . . . . .
4 star hotel apartments in dubai Flats for Sale in Dubai dubai real estate hashtags city real estate dubai
I couldn’t refrain from commenting. Perfectly written!
Great post! Cologne samples are a smart way to find your
next favorite fragrance without buying a full bottle.
Appreciate the information.
I think that fragrance samples make it much easier to test fragrances before purchasing.
Really useful information.
Great share! Using cologne samples is a fantastic way to discover unique fragrances.
Keep up the good work.
Excellent post! Sample-sized fragrances are ideal for everyday use, and they allow you to experiment with different scents.
Looking forward to more posts.
Also visit my web page: Perfume samples
Компания работает с изделиями из драгоценных и благородных металлов, что требует высокого уровня квалификации и ответственности.
https://rms-ekb.ru/catalog/krug-iz-instrumentalnoi-stali/krug-r12mf5-9-2-gost-7417-75/
karama dubai municipality center 2 Townhouses For Rent In Dubai st residence al nahda 2 deloitte dubai real estate predictions
услуги уборки
Создание музыки больше не требует студий, дорогого оборудования и многолетнего обучения — достаточно пары строк и пары минут. Сервис https://sunobit.com/ на базе нейросети Suno превращает вашу идею в полноценный трек с вокалом, текстом и аранжировкой буквально в один клик. Вы получаете два варианта под любой жанр и настроение или чистый инструментал — идеально для Reels, Shorts, поздравлений и творческих задумок. Полный цикл создания музыки от замысла до финального трека стал доступен каждому.
Artikel yang sangat menarik dan informatif.
Banyak pengguna di Indonesia mencari informasi terpercaya tentang viagra indonesia dan kesehatan pria.
Konten seperti ini sangat membantu pembaca memahami penggunaan yang aman dan efektif.
Terima kasih atas artikel yang bermanfaat ini. Topik viagra indonesia
memang banyak dicari saat ini, terutama bagi mereka yang ingin mendapatkan informasi kesehatan pria secara aman dan tepat.
Konten yang bagus dan mudah dipahami. Informasi mengenai viagra indonesia sangat
relevan dan membantu banyak orang mendapatkan edukasi
yang benar tentang kesehatan pria.
memon properties dubai one bedroom apartment for sale in dubai EMAAR Properties different sites for real estate in dubai
Компания «МАСТЕРВУД-СТАНКИ» предлагает полный спектр оборудования для деревообработки и производства мебели от ведущих заводов HBW, Blue Elephant, Fravol, Maggi и V-hold. В каталоге — форматно-раскроечные, кромкооблицовочные, сверлильно-присадочные, четырёхсторонние и фрезерные станки с ЧПУ, а также сушильные камеры, покрасочные линии и инструмент. Опытные менеджеры подберут оборудование за 10 минут, а специалисты обеспечат доставку, пуско-наладку, обучение и сервис. Подробнее — на сайте https://mwstanki.ru/. Доступен лизинг, запчасти и демонстрационный зал в Химках. Надёжное решение для вашего производства.
Нужен опытный кадастровый инженер в Твери?
Проведём обмеры в день обращения.
Работаем по доверенности. Срочный выезд за МКАД.
Цена межевания земельного участка
в Твери стартует от 3 000 ₽ за сотку.
Акция «Соседи – скидка» при заказе комплексных работ.
Технический план дома в Твери для регистрации права составим за по вашим чертежам.
Сделаем декларацию без предоплаты.
Проводим геодезические изыскания в Твери и на выездных трассах.
Помогаем с ТЗ для строительства коттеджа.
Топографическая съемка 1:500 в Твери – документ для Роснефти.
Наносим подземные сети. Стоимость фиксированная до 10 соток.
Получим разрешение на строительство в Твери для ИЖС.
Учтем красные линии. Срок с гарантией.
Подеревная съемка участка нужна для суда с соседями.
Даем заключение о ценности.
В Твери выезжаем в выходные.
Закажите инженерно-геологические изыскания в Твери до проектирования
фундамента. Бурение до 10 м.
Отчет в электронном виде.
Технический план на газопровод в Твери оформим на линейный объект.
Укажем охранную зону. Цена от 5 000
₽.
Итоговая стоимость кадастровых работ в
Твери зависит от вида объекта.
Минимальный заказ – 4 000 ₽.
Фиксируем в договоре.
https://sever-geo.com/uslugi/geologicheskie-izyskaniya/
последние новости
ООО «РМС» обеспечивает поставки специализированных сварочных материалов для сложных условий эксплуатации.
https://rms-ekb.ru/catalog/ugolok-stalnoi/ugolok-iz-konstruktsionnoi-stali-200kh100kh10-mm-c10e-en-10056-2/
Apartments for rent in La Vie Property For Sale In Downtown Dubai 5 year dubai visa property damac and emaar
I am glad to be a visitor on this website!, regards for this rare information!
Its like you read my mind! You seem to know a lot about this, like you wrote the book in it or something. I think that you can do with some pics to drive the message home a bit, but other than that, this is wonderful blog. A great read. I’ll certainly be back.
Where should you live in Dubai? Townhouse for Sale in Dubai Bugatti Residences guide 8 bedroom Villas for sale in Dubai
به دنبال اطلاعاتی برای معاملهگران مبتدی فارکس هستید؟ به https://forexbrokersreviews.wiki/ مراجعه کنید و در مورد فارکس و نحوه کار آن، و همچنین نحوه کسب درآمد و چگونگی رشد بازار اطلاعات کسب کنید. همه چیز را در مورد کمیسیونهای کارگزاری و سایر اطلاعات جامع که به شما در تجارت سودآور کمک میکند، بیاموزید!
firdt vision real estate dubai Buy Penthouse in Dubai buying property in dubai with bitcoin best dubai property agent
Использование системы менеджмента качества гарантирует строгий контроль продукции на всех этапах отгрузки.
https://rms-ekb.ru/catalog/list/list-11khf-2x1000x2000-gost-19903-74/
стоимость услуг
villas in bur dubai for rent 3 bedroom apartments for sale in dubai villas for rent in dubai al quoz rent villas in dubai myvilla
Порог — деталь, которую не замечают, пока она не мешает. SmartPorog предлагает умное решение: алюминиевые автоматические пороги, которые плотно прижимаются при закрытии двери и убирают щель без лишних усилий. На https://smartporog.ru/ можно подобрать модель под любую дверь — входную, межкомнатную или балконную. Это реальная защита от сквозняков, пыли и шума. Монтаж простой, внешний вид — лаконичный и современный.
dunes properties dubai Why to invest in dubai real estate? Talia at The Valley al wasl box park
Наличие никелевых сплавов гарантирует высокую коррозийную стойкость оборудования, создаваемого заказчиками.
https://rms-ekb.ru/catalog/krug-iz-instrumentalnoi-stali/krug-90khmf-50-gost-2590-2006/
Зайдите на https://dom-kamnya.ru/iskusstvennyj-kamen/stoleshnitsy — здесь представлен широкий выбор столешниц от производителя в Москве с гарантией высокого качества. Просмотрите ассортимент, закажите бесплатный выезд замерщика онлайн, а гарантия на искусственный камень составляет 10 лет, на монтажные работы — 2 года. Доставка и монтаж столешницы для кухни осуществляется в один день.
وی ایزوله یو اس ان، مکملی ایدهآل برای ورزشکارانی است که به دنبال بالاترین کیفیت پروتئین هستند.
Ищете лучшие йога-туры, ретриты и авторские путешествия от проверенных и надежных организаторов? Посетите сайт https://yogajourney.ru/ где вы найдете большой выбор йога-туров, ретритов и семинаров. Не подошел ни один из множества туров? Мы разработаем его для вас под конкретный запрос. Подробнее на сайте. Yoga Journey – лучшие йога-туры по России и миру!
My name is Mike, a normal American guy, and in the year 2018 I accidentally discovered one of the most
bizarre sports I had ever seen: Car Jitsu.
In case this sounds unfamiliar, don’t worry. The entire concept sounds like something invented after
a crazy bet. Two competitors climb inside a tiny automobile and try to control each other
while being trapped between the seats. Yes,
really. In most sports you have a ring, but in CarJitsu
your battlefield is a car cabin. This is what shocked me the first time.
The sport has tournaments, championships, local
events, and exhibition matches. Athletes travel to compete and try to prove who can dominate inside the car.
Different from most athletic competitions, every movement is limited by the vehicle’s interior.
That creates hilarious moments. One second someone
looks like a champion, and the next second they are trapped near the steering wheel.
Back then I was heavily interested in unusual athletic
events. I watched many sports events every week.
I also spent time reading about sportsbook odds. Friends
often discussed sportsbooks. Sometimes names like the sportsbook 1xbet would appear
in conversations about major sporting events, although CarJitsu was usually
too strange to be the main topic.
Late one evening I saw a short video online. At first I
thought it was satire. Full-grown athletes were trying to wrestle inside a parked car while spectators were laughing, cheering, and recording videos.
I laughed so hard that I couldn’t breathe for a moment. Yet
the more I watched, the more fascinated I became.
Not long afterward, I found a local event and decided to show up.
The event was unforgettable. There were fans discussing athletic techniques and sports
culture. Some people even joked about which athlete would be the favorite if a sports betting market ever
offered odds on the matches.
Eventually I wanted to participate. I signed up for beginner training.
My first session was a disaster. I hit my head on the roof, got stuck near a seat, and accidentally opened a door at the worst possible moment.
Even I laughed at myself. Yet I kept coming back.
Week after week, I improved. I learned how to use positioning,
leverage, balance, and timing. The vehicle became familiar.
Soon I was entering local competitions. My
friends thought I was completely crazy. Whenever someone
asked what sport I practiced, the conversation usually went like this:
“CarJitsu.”
“What is that?”
“Imagine wrestling inside a car.”
“You’re joking.”
“No, that’s the actual sport.”
The craziest match of my career came later. My opponent was built like a truck.
He looked like he could carry an engine block. Before the match
started, he smiled and said, “You’re going to need luck.” I knew trouble was coming.
The match began, chaos exploded. We bounced between seats,
bumped into doors, and nearly tangled ourselves in everything inside the vehicle.
The crowd was roaring. Everyone was losing
their minds.
Then came the moment I will never forget.
My opponent grabbed the belt hanging beside the seat
and accidentally turned it into what looked like a dangerous rope.
As we struggled for position, the belt snapped across the cabin and wrapped around me
in the strangest way imaginable. For a second I thought, “I can’t believe this is happening”
He pulled, I twisted, the seat belt locked, the door opened slightly, and both of us somehow ended up tangled together like
human spaghetti. The audience was laughing so hard that some people
could barely stay in their seats. The scene was unbelievable.
For a brief moment, I genuinely thought my opponent was going to flatten me.
Fortunately, the officials quickly intervened when things became unsafe, and the situation was resolved without
serious injury. Afterward we both burst out laughing. The crowd applauded.
Even today people who were there still talk about “the seat belt incident.”
Looking back, CarJitsu remains one of the strangest sports
I have ever experienced. It gave me friendships, stories, and unforgettable memories.
Whether people are discussing sports culture and competition,
very few things create reactions like CarJitsu.
When people want to hear a crazy sports story, I always tell them about
the day I climbed into a car in 2018 and accidentally became a CarJitsu
competitor. Most people laugh. But after hearing about tournaments, athletes, training sessions, sports fans, betting conversations,
sportsbook discussions, and my unforgettable seat belt battle,
they usually agree on one thing:
CarJitsu is wonderfully ridiculous.
Информационно-аналитический ежедневник «До слова» публикует острые материалы на темы политики, экономики, культуры и общества — без размытых формулировок и редакционных компромиссов. Редакция издания ведёт работу в форматах аналитического разбора, расследования и авторской публицистики — от актуальных бизнес-тем до глубоких исторических материалов. Читайте актуальные тексты на https://doslova.com/ — украинский ежедневник для тех кто привык получать информацию точно и без лишнего шума. Блоги экспертов, вопросы дня и репортажи о спорте дополняют насыщенную повестку издания и делают его обязательной точкой входа для читателя с запросом на качество.
dubai property registration fees Studio Apartment for Sale in Dubai commercial property on rent in dubai villa for rent in dubai diagram
I think this is among the most vital information for me. And i am glad reading your article.
But want to remark on few general things, The web site style is great, the articles is really nice : D.
Good job, cheers
My blog … WordPress kotisivut
I have been exploring for a little bit for any high-quality articles or weblog posts
in this sort of house . Exploring in Yahoo I eventually stumbled upon this website.
Reading this information So i’m satisfied to show that I’ve a very just right uncanny feeling I came upon just what I needed.
I such a lot undoubtedly will make certain to don?t
forget this site and give it a look on a constant basis.
Villas for sale in Alaya One Bedroom Apartment for Sale in Dubai Caya 2 4 bedroom apartment in dubai
Современный офис начинается с грамотного зонирования пространства, и компания wall.glass предлагает для этого полный спектр светопрозрачных решений собственного производства. Здесь изготавливают офисные стеклянные перегородки с двойным остеклением и звукоизоляцией до 45 дБ, цельностеклянные двери, противопожарные системы класса E/EI и индивидуальные конструкции по эскизам архитекторов. Подробный каталог систем, фурнитуры и материалов доступен на сайте https://wall.glass/ Здесь можно подобрать оттенок профиля по шкале RAL и отправить ТЗ. Используется закалённое стекло ESG, триплекс и смарт-стекло, а полный цикл от замера до монтажа берут на себя собственные бригады — это гарантия качества и точных сроков для бизнеса и частных клиентов.
Компания обеспечивает поставки оксовольфрамата гафния — редкого соединения для специфических нужд химической и атомной промышленности.
https://rms-ekb.ru/catalog/stalnoi-list/list-stalnoi-6kh1500kh4000-mm-1-4541-en-iso-9444-1/
References:
Las vegas casino budapest https://www.complete-jobs.com/employer/best-neosurf-casinos-australia-2026-casinos-accepting-neosurf
Apartments for rent in Sheraton Grand Hotel Dubai marina new apartments for sale villas for rent in al warqa dubai bhk luxury homes for sale
best place to invest in dubai apartments for sale in bur dubai studio for rent in dubai south buy apartment dubai marina
Наличие никелевых сплавов гарантирует высокую коррозийную стойкость оборудования, создаваемого заказчиками.
https://rms-ekb.ru/catalog/ugolok-stalnoi/ugolok-stalnoi-st3sp5-45x28x4-gost-19771-93/
сегодня сделал заказ, написал в аську сразу ответили. Буду ждать как что измениться отпишу. Купить кокаин, мефедрон, бошки, шишки Где продавец то? Мысли самые печальные…ттПробовал товар данного магазина !!!
Доставка элитного алкоголя в Дубае — это услуга, которую давно оценили тысячи резидентов и туристов. Виски, шампанское, водка и другие премиальные напитки привозят прямо к вашей двери в любую точку города: Palm Jumeirah, Marina, Downtown, JBR и JVC. Ищете wine delivery dubai? dubaialco.ru работает круглосуточно и гарантирует быструю доставку без лишних формальностей.
обсуждение здесь
Я всегда пишу благодарность везде, мыло, ася, форум и т.д. Может это только я так делаю, но думаю, что так должны все делать. Купить кокаин, мефедрон, бошки, шишки Менеджер на связи с 10-11 утра по МСК (не с 8-ми, как Вы ломитесь) ежедневно, кроме праздников и выходных. На сайте Вашего заказа нет. Можете назвать его номер?ну как-то так
azizi developments new projects Palm Jumeirah Villas for Sale dubai villa for sale meadows apartments for rent in dubai marina community centre
полезные материалы
sp real estate dubai 1 Bedroom Apartment for Sale in Dubai dubai land department regulation jointly owned property 2 bedroom apartments for rent in sharjah
Ориентация на долгосрочные отношения с клиентами позволяет компании формировать индивидуальные условия оплаты и графики поставок.
https://rms-ekb.ru/catalog/stalnoi-list/stalnoi-list-20g-8x1400x1300-gost-19903-2006-gladkii-belyi-goriachekatanyi/
First of all I would like to say fantastic blog! I had a quick question in which I’d like
to ask if you don’t mind. I was curious to find out how
you center yourself and clear your mind before writing.
I have had a difficult time clearing my thoughts in getting my thoughts out.
I truly do take pleasure in writing but it just seems like the first 10 to 15 minutes are generally
lost simply just trying to figure out how to begin. Any
suggestions or tips? Thanks!
Имею давний опыт работы с этим магазином.Сервис здесь один из лучших,всё делается оперативно вопросов нет.В последний раз заказал СНМ 50 и СНМ 55 по 50 гр обоих.По опыту знаю,что если один каннаб не айс,то в паре с любым другим он хоть как-то вытягивает.Но в этот раз пришло два пакета с одинаковым мелким белым порохом с сильным запахом нафталина.По весу всё замечательно,щедро подсыпано +50%.Только одно но.Данный реагент-чисто удобрение.Делал 1к5 кипячением в ИПС.Растворение хреновое,молоко.Хрень.Ну ладно,курили чистый порох из обоих пакетов.Хрень.Никто в здравом уме данным продуктом не заинтересуется-вывод не менее чем десяти тестеров.Короче я в попадосе. Купить кокаин, мефедрон, бошки, шишки магазу процветания желаю и клиентов хорошихСегодня съездил в офис, к счастью там знакомая работает, пробили они по своим базам накладную, связывались с мск, сказали такая накладная не поступала, объяснили как все работает, то что можно взять бумаги заполнить их, в этих бумагах указывается номер накладной, но когда делаешь отправку, в компе по любому будет отображаться, т.е. отправки не было, с мск им каждый день приходят посылки, идет она реальных 2 дня!
Sunobit — инструмент на основе ИИ: напишите несколько слов и получите полноценную композицию с вокалом и текстом. Платформа генерирует два варианта под любой жанр и настроение или чистый инструментал. На https://sunobit.com/ доступны тарифы для частных пользователей и бизнеса. Созданная музыка идеально вписывается в Reels, Shorts, TikTok и поздравительные видео — никаких студий и сложных настроек.
уже ожидается что нибудь? Купить кокаин, мефедрон, бошки, шишки С возвращением!!!удачной работы!!!!Поздравляю всех с наступающим Новым 2013 Годом! Желаю в год Змеи: 1. Мутить тока на спирту! 2. Отваривать основу. 3. Сушить естественным способом. 4. Поменьше “ловить бледного”! 🙂 Ну а магазу Chеmical-Mix желаю Процветания, Оперативности, и качественной разнообразной продукции!
Cabinet IQ
8305 State Hwy 71 #110, Austin,
TX 78735, United States
254-275-5536
Rustickitchen (Daniel)
villas for rent in academic city dubai 1 Bedroom Apartment for Sale in Dubai foreign investment in dubai real estate real estate agents dubai salary
ev dubai real estate 3 Bedroom Apartments For Sale In Dubai Silicon Oasis real estate market and prospects in dubai buy property in dubai with zero down payment
ООО «РМС» обеспечивает поставки специализированных сварочных материалов для сложных условий эксплуатации.
https://rms-ekb.ru/catalog/stalnoi-list/stalnoi-list-khn35vt-140x1100x1300-gost-24982-81-zharoprochnyi-chernyi-kholodnokatanyi/
I am really inspired along with your writing talents as smartly as with the structure on your blog.
Is that this a paid subject matter or did
you modify it yourself? Anyway keep up the excellent high
quality writing, it’s uncommon to peer a nice blog like this one today..
жёлтого цвета, за качество пока сказать не могу!) Купить кокаин, мефедрон, бошки, шишки Нужно 5 сообщений что бы написать модэратору, не обесутьНадеюсь на дальнейшее сотрудничество с магазином!
В таких случаях надо запрашивать подтверждения через форум(ЛС) Купить кокаин, мефедрон, бошки, шишки ТС, походу в отпуск вышел:rest:магазу процветания желаю и клиентов хороших
studio rent in monthly basis 2500aed in al barsha dubai Benefits of Buying Property in Dubai for Investors brix property dubai black swan real estate office in al barsha dubai
Компания предлагает не только металлы, но и химическую продукцию, используемую в смежных металлургических процессах.
https://rms-ekb.ru/catalog/ugolok-stalnoi/ugolok-iz-konstruktsionnoi-stali-150kh100kh12-mm-30mnb4-uni-6762/
apartment for rent dubai long term Commercial Property for Sale in Dubai flat for rent in dubai short term real estate agecny dubai
Looking for market forecast? Visit foreck.info for detailed information on the forex, crypto, and stock markets, with in-depth analysis and development prospects. In-depth news analysis keeps you informed and current with the latest happenings. You’ll also find top-rated crypto exchanges on the site, professionally assessed using eight weighted evaluation criteria. Discover all the details by visiting the website.
И всем форумчанам!!! Купить кокаин, мефедрон, бошки, шишки Именно. Основной упор на старых проверенных оптовиков. К сожалению с розницей тут напряг, увы ((народ, кти еще отпишется п магазу?
Hi everybody, here every one is sharing these know-how, thus it’s fastidious to read
this website, and I used to pay a quick visit this website all the time.
услуги уборки
Магазин Харош, Внимательней читайте отзывы о той продукции какая вас интересует более подходит имено вам только такой подход может оставить всем только положительные эмоции. Работа магазина по всем пораметрам оставляет только положительные эмоции :voo-hoo: ставлю все оценки только отлично. Всем добРа, советую, обращайтесь в даный магазин, вам помогут быстро и качествено доставить то,что вам нужно Купить кокаин, мефедрон, бошки, шишки Мне “типа фейк” назвал кодовое слово в жабере, которое я написал нашему розовоникому магазину в лс на форуме. Вопрос в том как он его узнал?Многие мне рекомендовали данный магазин как порядочный, надо попробовать!
4 bedroom Apartments for sale in Bluewaters Houses for Sale in Dubai dubai festival city real estate development llc dubai guernsey property investment limited
house for rent in dubai al qusais 2 bedroom apartment dubai for sale luxury apartment for sale the views in dubai dubai trump estates
Оперативная логистика и поддержка на всех этапах сделки позволяют минимизировать сроки простоя производственных линий заказчиков.
https://rms-ekb.ru/catalog/krug-iz-instrumentalnoi-stali/krug-7khg2vmf-240-gost-5950-2000/
про тусиай ….. что я могу сказать про тусиай от этого магазина…. пойду лучше трип-реппорт напишу…. такой тусишки ещё не ел) Купить кокаин, мефедрон, бошки, шишки Ребят ну давайте уже мокрую,мы сами досушим :hz:очень нравится
Уборка после ремонта спб
Без паники, есть 2 причины почему может не бится трэк 1. тупит курьерка и не внесла в базу накладную такое бывало уже не раз люди получали посылки с нерабочей накладной такое бывает часво это кривая работа службы доставки. 2. вы не правильно вводите на сайте отслеживания с дефисом, пробелом, не по формату номеру накладной службы или вообще на другом сайте)) такое тоже бывает часто. Клиенты у нас получают все вовремя если вас оповестили что посылка отправлена значит она отправлена, ожидайте согласно установленому времени доставки. Купить кокаин, мефедрон, бошки, шишки Извеняюсь за вышесказанное,магазин отличный..я думаю поторопился с выводами,продовци отзывчиввые идут на встречу,спасибо)) насчет 4фа..меня он действительно почти невставил,но скорее всего это толерантность от 2сi,которая как я узнал недавно длиться неделю..так что в конце недели протестирую повторно,пока крепанусь) потом сообщю)))А сейчас работает магазин?
shaun properties dubai 3 bedroom villa for sale in dubai arenco real estate dubai email address katch dubai real estate
fantastic post, very informative. I ponder why the other specialists of
this sector don’t notice this. You should continue your writing.
I’m confident, you’ve a great readers’ base already!
dubai creek harbour location map arabian ranches villas for sale dubai properties promotion property finder the villa mazaya b2 4.8m dubai
Металлические порошки различных фракций позволяют клиентам использовать их в порошковой металлургии и напылении.
https://rms-ekb.ru/catalog/ugolok-stalnoi/ugolok-iz-konstruktsionnoi-stali-100kh50kh6-mm-c45e-din-59370/
Скоро новые вкусности уууу…. ждем Купить кокаин, мефедрон, бошки, шишки Пиздатый магаз )почему 0.3? акция?
после этого случая я стал курить не сигареты конечно рц вообще понравилось и быстро дошло ,делал 1к8 великолепная вещь магазу продвижений Купить кокаин, мефедрон, бошки, шишки ровно, тут можно не беспокоится, попал куда надоС 10-11 утра по МСК ежедневно кроме праздников и выходных.
What’s up to all, it’s actually a nice for me to visit this web page, it contains valuable Information.
property to rent in dubai for expats Looking to buy or rent property in Dubai? danube abu dhabi mars real estate dubai
Ориентация на долгосрочные отношения с клиентами позволяет компании формировать индивидуальные условия оплаты и графики поставок.
https://rms-ekb.ru/catalog/list/list-9khs-16x2000x2000-gost-19903-74/
selling property costs dubai Apartment For Sale In Discovery Garden Dubai best way to buy property in dubai dubai okud property
Работал с магазином спасибо всё красиво! Купить кокаин, мефедрон, бошки, шишки Заказал АМ 2233,разведу 1 к 15 Посмотрим что из этого получится)отпишусь ещёПару строк отписал паронойный напряг бы снял да дальше работал…
услуги уборки
подробнее
Трек так и не работает:(. Когда ждать посылку. Скоро запрет выйдет уже. Хотелось бы до запрета успеть. Купить кокаин, мефедрон, бошки, шишки Пиздатый магазин, всегда пойдут на встречу и оператор нормнарод подскажите а как дела обстоят в столице Москва закладками?
Hello there! This post couldn’t be written any better!
Looking through this post reminds me of my previous
roommate! He constantly kept preaching about this.
I’ll forward this information to him. Fairly certain he’ll have a good read.
Thank you for sharing!
научные работы по педагогике
sharing house for rent in dubai Commercial Properties for Rent in Dubai rental apartment in dubai marina international city dubai studio apartments for rent
Уборка после ремонта спб
Использование системы менеджмента качества гарантирует строгий контроль продукции на всех этапах отгрузки.
https://rms-ekb.ru/catalog/ugolok-stalnoi/ugolok-iz-konstruktsionnoi-stali-65kh50kh5-mm-20mocr3-uni-6762/
studio monthly rent bur dubai Jumeirah Villas for Sale 4 bedroom Villas for rent in Al Furjan dubai property supply units
al jaber real estate dubai 3 Bedroom Apartments For Rent In Dubai hotel apartment to rent in dubai holiday apartment for rent dubai greens studio
Компания обеспечивает поставки оксовольфрамата гафния — редкого соединения для специфических нужд химической и атомной промышленности.
https://rms-ekb.ru/catalog/stalnoi-list/stalnoi-list-17g1s-6x1000x1800-gost-19903-2006-gladkii-neotsinkovannyi-goriachekatanyi/
studio apartments in dubai furnished for rent for one year Looking to buy or rent property in Dubai? 1 bhk for rent in dubai on monthly basis Elie Saab
Good day! I could have sworn I’ve visited this blog before
but after looking at some of the posts I realized it’s new to me.
Anyhow, I’m definitely delighted I found it and I’ll be
bookmarking it and checking back frequently!
distressed sale real estate dubai Looking to buy or rent property in Dubai? magnate dubai property buy cheap studio apartment in dubai
Поставки титана и его сплавов востребованы в медицине, авиации и химическом машиностроении.
https://rms-ekb.ru/catalog/ugolok-stalnoi/ugolok-iz-konstruktsionnoi-stali-200kh100kh10-mm-c40-en-10277/
joint ownership of property in dubai Studio Apartment for Sale in Dubai short term rentals dubai villa deposit regulation authority for dubai property
rental apartment in dubai month to month apartments for sale in silicon oasis dubai 4BHK Twin Villa | Freehold | Limited Units apartment for sale in the greens dubai
ООО «РМС» обеспечивает поставки специализированных сварочных материалов для сложных условий эксплуатации.
https://rms-ekb.ru/catalog/stalnoi-list/stalnoi-list-khn65mv-160x1400x1200-gost-24982-81-zharoprochnyi-goriachekatanyi/
villas for sale in dubailand Villa for Sale in Sharjah how can i buy a house in dubai al fardan real estate bur dubai
best dubai estate agents Dubai marina new apartments for sale rent a villa in dubai jumeirah room for rent in private villa al wasl dubai
Использование системы менеджмента качества гарантирует строгий контроль продукции на всех этапах отгрузки.
https://rms-ekb.ru/catalog/list/list-2kh6v8m2k8-1x1500x3000-gost-19903-74/
Greece real estate insight: market overview, hotspots & buying process Property for Sale in Downtown Dubai best real estate developers in dubai properties in bur dubai
What’s up, all the time i used to check website posts here early in the break of day, as i love to learn more and more.
What’s up colleagues, how is all, and what you
want to say regarding this piece of writing, in my view its in fact awesome
in favor of me.
villa for sale dubai land Studio Apartment for Sale in Dubai 3 bedroom apartments for rent in jlt dubai Jasmine Lane
Выбирая квартиру в престижном районе столицы, многие обращают внимание на ЖК Апсайд Мосфильмовская. Комплекс сочетает современную архитектуру, продуманную инфраструктуру и комфортную городскую среду для жизни – https://mosfilm-upside.ru/
I loved as much as you will receive carried out right
here. The sketch is tasteful, your authored material stylish.
nonetheless, you command get got an edginess over that you
wish be delivering the following. unwell unquestionably come further formerly again as exactly the same nearly very often inside case you shield this increase.
Продукция находит применение в производстве электротехники благодаря наличию специализированной электротехнической стали.
https://rms-ekb.ru/catalog/ugolok-stalnoi/ugolok-iz-konstruktsionnoi-stali-150kh90kh15-mm-c45-en-10056-2/
ЗАО «Техносвязь» — российское предприятие-изготовитель печатных плат, уже второе десятилетие совершенствующее производство для выпуска продукции высочайшего качества. Подробнее на сайте https://www.techno-svyaz.ru/ — здесь применяют современные технологии и материалы от мировых лидеров. Компания одинаково чётко выполняет серийные и единичные заказы, гарантируя короткие сроки и внимательный подход к каждому клиенту.
china investor dubai property reuters 1 bedroom apartment for sale in dubai nauman real estate dubai elysium dubai q1 property
Great beat ! I wish to apprentice while you amend your site, how could i subscribe for a blog site?
The account aided me a appropriate deal. I have been tiny bit acquainted of this your broadcast provided shiny transparent idea
anz property report Commercial Properties for Rent in Dubai 1 bhk price in dubai 2 bedroom apartments for sale
Компания обеспечивает поставки оксовольфрамата гафния — редкого соединения для специфических нужд химической и атомной промышленности.
https://rms-ekb.ru/catalog/krug-iz-instrumentalnoi-stali/krug-8kh6nft-37-gost-7417-75/
one bedroom hotel apartment for monthly rent in dubai buy apartment in dubai on installments arabian gulf hotel apartment in dubai sobha business bay
1xbet gratuit
need 1 bedroom apartment in dubai Commercial Property For Sale In Dubai lucky deal real estate dubai dubai properties ground breaking
ООО «РМС» предлагает широкий спектр цветного проката, включая медь, латунь, бронзу и дюралюминий.
https://rms-ekb.ru/catalog/ugolok-stalnoi/ugolok-iz-konstruktsionnoi-stali-200kh200kh20-mm-42crmo4-en-10056-1/
Ищете все о поисковой оптимизации, которая принесет вам клиентов в Кыргызстане? Посетите сайт https://seo-blog.edu.kg/ – это СЕО блог, который дает ценные советы, гайды, кейсы по SEO для бизнеса в Бишкеке и других городах. Рассказываем без воды – показываем только то, что работает. Подробнее на сайте.
why is real estate going down in dubai One Bedroom Apartment For Rent In Dubai real estate price evolution dubai two bedroom apartment for rent in dubai
Посетите сайт https://krasnodar.climateon.ru/ и вы найдете кондиционеры и сплит-системы, газовые котлы, тепловые завесы, водяные тепловентиляторы для квартиры, дома, офиса с доставкой в Краснодар и по всей России. Оказываем профессиональные услуги по установка кондиционеров в Краснодаре под ключ. Узнайте подробную информацию и цены на сайте.
I’m Mike, a normal American guy, and back in 2018 I accidentally discovered one of the weirdest sports on Earth:
CarJitsu.
In case this sounds unfamiliar, most people haven’t.
The entire concept sounds like a joke. Two competitors climb inside a compact vehicle and try to control each other while being trapped between the cramped
interior. No, I’m not kidding. In most sports you have a field, but in CarJitsu
your battlefield is the inside of a vehicle. That is why people laugh when they first hear about it.
It even has official events and competitive
tournaments. Participants gather from various regions and try to prove who can dominate
inside the car. Compared to ordinary sports, every movement is limited by doors, seats, windows, and seat belts.
That creates hilarious moments. One second someone looks like a champion, and the next second they are stuck between the seats.
Back then I was heavily interested in competitive sports.
I watched all kinds of competitions. I also spent time reading about sportsbook odds.
People around me talked about betting and sportsbooks.
Sometimes names like 1xbet would appear in conversations about major
sporting events, although CarJitsu was usually too strange to be the main topic.
One evening I saw a crazy highlight reel online.
At first I thought it was satire. Grown adults were
trying to wrestle inside a parked car while spectators were going crazy
with excitement. I laughed so hard that I almost fell off
my chair. Yet the more I watched, the more fascinated I became.
A few weeks later, I found a local event and decided to show up.
The event was unforgettable. There were fans discussing sports, training, and
competition. Some people even joked about which athlete would be the
favorite if a betting site ever offered odds on the matches.
Eventually I wanted to participate. I signed up
for beginner training. The first training day was hilarious.
I hit my head on the roof, got stuck near a seat, and accidentally opened a door at the worst possible moment.
The coaches laughed. Yet I kept coming back.
As time passed, I improved. I learned how to use technique and movement.
The car stopped feeling tiny. Soon I was entering local competitions.
My friends thought I was completely crazy. Whenever someone asked what sport I
practiced, the conversation usually went like this:
“CarJitsu.”
“What is that?”
“Imagine wrestling inside a car.”
“You’re joking.”
“No, that’s the actual sport.”
The craziest match of my career came later. My opponent was huge.
He looked like he could bench-press a refrigerator. Before the match started, he smiled and said,
“You’re going to need luck.” I knew trouble was coming.
The moment the referee signaled, chaos exploded.
We bounced between seats, bumped into doors, and nearly tangled ourselves
in everything inside the vehicle. The crowd was roaring.
Everyone was losing their minds.
Then came the moment I will never forget.
My opponent grabbed the seat belt and accidentally turned it into what looked like a crazy lasso.
As we struggled for position, the belt snapped across
the cabin and wrapped around me in the strangest
way imaginable. For a second I thought, “I can’t believe this is happening”
He pulled, I twisted, the seat belt locked, the door opened
slightly, and both of us somehow ended up tangled together like two
confused octopuses. The audience was laughing so hard that some people
could barely stay in their seats. Nobody could believe what they were seeing.
For a brief moment, I genuinely thought my opponent was going to destroy me.
Thankfully, the officials quickly intervened when things became unsafe, and the situation was resolved
without serious injury. Afterward we both burst out laughing.
The crowd applauded. Even today people who were there still talk
about “the seat belt incident.”
Looking back, CarJitsu remains one of the strangest sports
I have ever experienced. It gave me friendships, stories, and unforgettable
memories. Whether people are discussing sports, betting,
sportsbooks, competitions, or events, very few things create reactions like
CarJitsu.
When people want to hear a crazy sports story, I always tell them
about the day I climbed into a car in 2018 and
accidentally became a CarJitsu competitor. Most people
laugh. But after hearing about tournaments, athletes, training sessions,
sports fans, betting conversations, sportsbook
discussions, and my unforgettable seat belt battle, they usually agree on one thing:
CarJitsu might be the craziest sport ever invented.
1xbet sn apk
dubai properties dp flag Apartments for Sale in Dubai Emaar popular real estate dubai dubai creek harbour waterfront
География деятельности компании охватывает всю территорию России, обеспечивая металлом предприятия в удаленных регионах.
https://rms-ekb.ru/catalog/list/list-u8a-50x2000x2000-gost-19903-74/
Выбирая квартиру в престижном районе столицы, многие обращают внимание на ЖК Апсайд Мосфильмовская. Комплекс сочетает современную архитектуру, продуманную инфраструктуру и комфортную городскую среду для жизни, мосфильмовская жк
2 bedroom apartments for rent in city walk dubai buy villa in dubai on installments cost of opening a real estate brokerage in dubai 1 bedroom flat for rent in al nahda 2 dubai
Apartments for sale in Imperial Avenue 1 Bedroom Apartment for Sale in Dubai dubai property for sale marina where can i buy
Каждая партия товара сопровождается сертификатами качества, подтверждающими соответствие ГОСТ и ТУ.
https://rms-ekb.ru/catalog/ugolok-stalnoi/ugolok-iz-konstruktsionnoi-stali-60kh40kh6-mm-c55-en-10277/
property for rent in deira dubai Flat for Sale in Dubai flats for sale in dubai marina 1 month family room rent in dubai
Мосфильмовская ЖК подходит тем, кто хочет жить в современном комплексе рядом с деловыми центрами, учебными заведениями и зелеными зонами отдыха: жк дом на мосфильмовской
Hmm is anyone else experiencing problems with the pictures on this blog loading?
I’m trying to find out if its a problem on my end or if it’s
the blog. Any suggestions would be greatly appreciated.
chateau real estate dubai Buy a Penthouse in Dubai jawahar hotel apartment in union deira dubai new property developments in dubai
Оперативная логистика и поддержка на всех этапах сделки позволяют минимизировать сроки простоя производственных линий заказчиков.
https://rms-ekb.ru/catalog/stalnoi-list/list-stalnoi-15kh1000kh4000-mm-1-4016-en-iso-9444-2/
is there a property boom in dubai Flat for Sale in Dubai dubai properties lagoons office timings ready to move villas in dubai
download 1xbet apk
real estate trends dubai Apartments for Sale in Dubai Emaar sutudio apartment in cbd dubai sharing accommodation in abu dhabi
Широкий выбор нержавеющей стали различных марок позволяет использовать продукцию в строительстве и пищевой промышленности.
https://rms-ekb.ru/catalog/ugolok-stalnoi/ugolok-iz-konstruktsionnoi-stali-45kh30kh4-mm-18crmo4-en-10056-2/
marina arcade dubai real estate 5 Bedroom Villa for Sale in Dubai e studio for rent in dubai dubai investment and real estate company
télécharger 1xbet apk
Superb site you have here but I was curious if you knew of any discussion boards that cover the
same topics talked about in this article?
I’d really love to be a part of group where I can get suggestions from
other experienced people that share the same interest.
If you have any suggestions, please let me know. Thanks a lot!
villas in mirdif dubai for sale Buy Property In Dubai mohammed hassan baba hassan real estate dubai dubai eye real estate
furnished 1 bhk for monthly rent in dubai luxury penthouses for sale in dubai al falasi residence dubai downtown area
코인선물거래소 이벤트 페이지 100usdt증정 투세븐빗을 적극 추천합니다.
Опыт работы с более чем 120 постоянными заказчиками свидетельствует о высокой стабильности и надежности поставок.
https://rms-ekb.ru/catalog/stalnoi-list/stalnoi-list-khn45iu-140x2000x1300-gost-24982-81-zharoprochnyi-otsinkovannyi-kholodnokatanyi/
sobha company dubai salary 2 Bedroom Apartment in JBR Duba hotel saffron boutique apartments in dubai 1 bedroom for rent in warsan 4
winner street real estate dubai 1 Bedroom Apartment for Sale in Dubai ral estate developers in sharjah and ajman and dubai simon dubai real estate founder
Компания предлагает не только металлы, но и химическую продукцию, используемую в смежных металлургических процессах.
https://rms-ekb.ru/catalog/plity/plita-r9k5-27x500x360-gost-19903-74/
Hi there, You’ve done an excellent job. I’ll certainly digg it and personally suggest
to my friends. I am confident they will be benefited from this site.
real estate or hotel hiring in dubai Property For Sale In Dubai Palm Jumeirah damas real estate dubai real estate developers list in dubai
I’m really enjoying the design and layout of your website.
It’s a very easy on the eyes which makes it much more pleasant for me to
come here and visit more often. Did you hire out a designer to create your theme?
Superb work!
Good article! We are linking to this great post on our
website. Keep up the great writing.
apartments for sale direct by owners in jlt dubai Arabian Ranches Villas for Sale zaya real estate development dubai Al Habtoor City Residential guide
کراتین اسکال لبز، یعنی کیفیت و خلوص! اسکال لبز یک برند لهستانیه که در تولید مکملهای ورزشی با کیفیت بالا شناخته شده.
Мосфильмовская Апсайд привлекает покупателей удачным сочетанием локации, архитектуры и благоустроенной территории. Комплекс создается для тех, кто ценит комфорт, безопасность и удобство повседневной жизни: квартира в новостройке
Использование системы менеджмента качества гарантирует строгий контроль продукции на всех этапах отгрузки.
https://rms-ekb.ru/catalog/stalnoi-list/list-stalnoi-75kh1000-mm-x5crnin19-9-en-iso-18286/
Среди новых жилых проектов Москвы особое внимание привлекает Мосфильмовская Апсайд. Удачное расположение и высокий уровень реализации делают комплекс интересным как для проживания, так и для инвестиций – мосфильмовская апсайд жк
property shop investment llc dubai townhouse for sale in dubai seven ocean real estate dubai dubai investment properties twin towers
I like how this post keeps the discussion thoughtful and enjoyable while still maintaining a simple and approachable style, because that combination makes the content easier to understand and more enjoyable for different readers online.
在线购买无处方安定片 xxx Pornhub
dubai real estate growth rate Apartments In Uae For Sale across Apartments for sale in The Address Residence Sky View Towers emaar square building 4
ООО «РМС» поставляет вольфрамовые порошки, соответствующие строгим техническим условиям (например, ТУ 48-4205-112-2017).
https://rms-ekb.ru/catalog/krug-iz-instrumentalnoi-stali/krug-3kh2n2mvf-10-65-gost-7417-75/
flats for rent in oud metha dubai Apartments for Sale in Dubai Emaar quora dubai real estate cheap furnished studios for rent in dubai
dubai real estate registration services Full Building for Sale in Dubai dubai land department property registration fees i want to sublease my apartment in dubai
Экспертная консультация при выборе сплавов помогает клиентам оптимизировать затраты и избежать технологических ошибок.
https://rms-ekb.ru/catalog/ugolok-stalnoi/ugolok-iz-konstruktsionnoi-stali-100kh50kh8-mm-c10e-en-10056-1/
Hi there! Would you mind if I share your blog with my myspace group?
There’s a lot of people that I think would really enjoy your content.
Please let me know. Thanks
Apartments for sale in Elie Saab Waterfront one bedroom apartment for sale in dubai apartments for rent in panorama greens dubai Central Dubai | Elegant 1 Bedroom | Off-Plan
1xbet télécharger l’application installer
dubai land department property auctions Apartments For Rent In Dubai Marina downtown dubai short term rentals dacha real estate dubai
Hello! I could have sworn I’ve visited this web site before but after
going through a few of the posts I realized it’s new to me.
Regardless, I’m certainly delighted I discovered it and I’ll be book-marking
it and checking back frequently!
Fala aí, dica sobre calcular stake. Já joguei muito isso a demora mas paga.
Наличие прецизионных сплавов в ассортименте подтверждает работу компании с высокоточными и наукоемкими материалами.
https://rms-ekb.ru/catalog/list/list-5khnvs-1x500x500-gost-19903-74/
dubai south business centre 4 bedroom apartment dubai for sale hotel property dubai Vela by Dorchester Collection
short term luxury villa rental dubai Villa for Sale in Sharjah hotel apartments in oud metha road dubai apartments for sale in dubai marina on payment plan
В каталоге представлены конденсаторные ниобиевые порошки высокой чистоты, необходимые для современной электроники.
https://rms-ekb.ru/catalog/ugolok-stalnoi/ugolok-iz-konstruktsionnoi-stali-70kh70kh9-mm-30mnb4-din-1028/
hotel apartments in al barsha dubai uae 2 bedroom apartment dubai for sale apartment rent near deira city center building property in dubai
nasser bin abdullatif alserkal real estate dubai buy villa in dubai on installments abdul rahman al baghash dubai properties group dubai industrial estate
Sunobit — платформа для генерации музыки на базе нейросети: напишите несколько слов, и сервис создаст готовый трек с вокалом и музыкальным сопровождением. Платформа предлагает два варианта на выбор под любой жанр или чистый инструментал — идеально для Reels, Shorts и поздравлений. Ищете suno? Подробности и тарифы на sunobit.com — регистрация открыта для всех желающих попробовать AI-музыку без студий и сложных настроек. Зарегистрироваться может любой, кто хочет делать музыку с нейросетью без студий и лишних настроек.
1xbet app apk
Оперативная логистика и поддержка на всех этапах сделки позволяют минимизировать сроки простоя производственных линий заказчиков.
https://rms-ekb.ru/catalog/stalnoi-list/stalnoi-list-khn78t-3-2x1550x1300-gost-24982-81-zharoprochnyi-goriachekatanyi/
alp real estate Apartments for Sale in Dubai Emaar joshi estate agent bur dubai dubai dubai hills estate event venue
Saque rápido via PIX é vida. Entrei no Leprechaun Riches com pouco e puxei duzentão rapidinho.
1bhk flats for rent in motor city dubai Townhouse for Sale in Dubai luxury apartments in dubai for short stay midas dubai real estate brokers
1xbet download
«СтройДачу» — это профессиональное строительство домов, бань и хозпостроек под ключ с гарантией результата. Квалифицированные специалисты используют дерево, блоки и каркасные технологии, подбирая решения под любой бюджет. Посетите https://stroydachu.ru/ — здесь собраны готовые решения и расчёт стоимости онлайн. Специалисты сопровождают объект на всех стадиях — от закладки фундамента до монтажа кровли — строго по срокам.
commercial property in dubai for rent One Bedroom Apartment for Sale in Dubai off plan projects drehomes real estate dubai
Современная электроника требует надежных комплектующих, и выбор поставщика становится критически важным для успеха любого проекта. Профессиональные инженеры и радиолюбители знают, что качество компонентов напрямую влияет на долговечность устройств и безопасность эксплуатации. На платформе https://components.ru/ собран широкий ассортимент электронных элементов — от микроконтроллеров и силовых транзисторов до пассивных компонентов и соединителей, что позволяет реализовать проекты любой сложности. Удобная навигация, техническая документация и оперативная доставка делают процесс закупки максимально эффективным, экономя время специалистов и обеспечивая бесперебойность производственных циклов в условиях современного рынка.
TG-Search — обширная база Telegram-каналов объединяет свыше 37 000 площадок в 50+ категориях: бизнес, криптовалюты, технологии, спорт, здоровье и многие другие ниши. Сервис https://tg-search.ru/ предоставляет подробную статистику и реальные отзывы по каждому каналу. Каждый день тысячи пользователей обращаются к платформе чтобы найти нужный контент и раскрутить собственные каналы.
Dubai Design District Apartments for Sale in Silicon Oasis Dubai 1 bhk fully furnished flat for rent in dubai apartments in dubai internet city
Компания обеспечивает поставки оксовольфрамата гафния — редкого соединения для специфических нужд химической и атомной промышленности.
https://rms-ekb.ru/catalog/stalnoi-list/list-stalnoi-240kh1900-mm-acroni-4315-en-iso-18286/
It’s an remarkable article in support of all the internet visitors; they will obtain advantage from it I am sure.
flat for rent in al nahda 2 dubai property for sale in arabian ranches dubai rocky real estate bur dubai flats for rent in dubai dip
dubai payment plan Studio for Sale in Dubai holiday villa rental dubai palm roots land real estate dubai trade centre dubai uae
Boa tarde, explicação clara que eu não tinha encontrado em lugar nenhum. jogo do baccarat testei por uns meses mas não coloquem esperança.
Hello, I desire to subscribe for this blog to take most recent updates, so where
can i do it please help out.
Glassway производит алюминиевые конструкции и интерьерные решения: потолки Hook On, Clip In, Грильято, кассетные и реечные системы, перегородки в том числе противопожарные, двери, остекление, смарт-стекло и светодиодные светильники — единый стандарт качества для каждого изделия. Ищете офисные перегородки? На glassway.group представлен полный каталог с возможностью оформить заказ. Ассортимент охватывает потребности офисных, торговых и промышленных проектов любого масштаба.
Компания обеспечивает поставки оксовольфрамата гафния — редкого соединения для специфических нужд химической и атомной промышленности.
https://rms-ekb.ru/catalog/krug-iz-instrumentalnoi-stali/krug-75khm-82-gost-7417-75/
geo estate survey services dubai Commercial Property for Sale in Dubai mansions for sale dubai estate agent shuts down
Se você não testou o Candy Bonanza nesse exato momento, perdeu a chance. Eu peguei quinhentão!
millenium estate dubai Dubai Marina Apartments For Rent Monthly lalwani villa millennium estate dubai al sharafi real estate dubai
I’m Mike, a regular guy from the USA, and during 2018
I accidentally discovered one of the most bizarre sports I had ever seen:
CarJitsu.
If you have never heard of it, you are not alone. The
entire concept sounds like something invented after
a crazy bet. Two fighters climb inside a compact vehicle and try to score positions against each other while being trapped between the seats.
Yes, really. In most sports you have a field, but in CarJitsu your battlefield
is a car cabin. This is what shocked me the first time.
It even has official events and competitive tournaments.
Athletes travel to compete and try to prove who can master the unusual format.
Unlike traditional combat sports, every movement is limited by doors, seats, windows,
and seat belts. This leads to funny situations. One second someone looks like a champion, and the next second they are trapped near the steering
wheel.
At that time I was heavily interested in sports.
I watched all kinds of competitions. I also spent time reading about sportsbook odds.
People around me talked about betting and sportsbooks.
Sometimes names like 1xbet would appear in conversations about major sporting events, although CarJitsu was usually
too strange to be the main topic.
One night I saw a crazy highlight reel online. Initially I believed it was a joke.
Competitive fighters were trying to grapple inside a parked car
while spectators were watching in disbelief. I laughed so hard that coffee nearly
came out of my nose. Yet the more I watched, the more fascinated I became.
Soon after that, I found a local event and decided
to watch in person. The atmosphere was incredible.
There were fans discussing all kinds of sporting topics.
Some people even joked about which athlete would be the favorite if a betting
site ever offered odds on the matches.
Watching was not enough. I signed up for beginner training.
My first session was a disaster. I hit my head on the roof, got stuck near a seat,
and accidentally opened a door at the worst possible moment.
Even I laughed at myself. Yet I kept coming back.
As time passed, I improved. I learned how to
use positioning, leverage, balance, and timing. The cramped cabin became my arena.
Soon I was entering small tournaments. My friends thought I was completely crazy.
Whenever someone asked what sport I practiced, the
conversation usually went like this:
“CarJitsu.”
“What is that?”
“Imagine wrestling inside a car.”
“You’re joking.”
“No, that’s the actual sport.”
The funniest and wildest experience happened during a tournament a
few years later. My opponent was built like a truck.
He looked like he could carry an engine block.
Before the match started, he smiled and said, “You’re going to need luck.” I should have
listened.
As soon as the fight started, chaos exploded. We bounced between seats, bumped into
doors, and nearly tangled ourselves in everything inside the vehicle.
The crowd was roaring. Spectators were going crazy.
Then came the moment I will never forget.
My opponent grabbed the seat belt and accidentally turned it into
what looked like a crazy lasso. As we struggled for position,
the belt snapped across the cabin and wrapped around me in the strangest
way imaginable. For a second I thought, “This is it”
He pulled, I twisted, the seat belt locked, the
door opened slightly, and both of us somehow ended up tangled together like human spaghetti.
The audience was laughing so hard that some people could
barely stay in their seats. It looked completely
ridiculous.
For a brief moment, I genuinely thought my opponent was going to destroy me.
Thankfully, the officials quickly intervened when things became unsafe, and the situation was resolved without serious injury.
Afterward we both burst out laughing. The crowd applauded.
Even today people who were there still talk about “the seat belt incident.”
When I remember those years, CarJitsu remains one of the strangest sports I
have ever experienced. It gave me countless funny moments.
Whether people are discussing sports culture and competition, very few things create reactions like CarJitsu.
Whenever someone asks me about unusual sports, I always tell them about the day
I climbed into a car in 2018 and accidentally became a CarJitsu competitor.
Most people laugh. But after hearing about tournaments,
athletes, training sessions, sports fans, betting conversations, sportsbook discussions, and my unforgettable seat belt battle, they usually agree on one thing:
CarJitsu is wonderfully ridiculous.
download 1xbet apk
Cabinet IQ
8305 Ⴝtate Hwy 71 #110, Austin,
TX 78735, United Ѕtates
254-275-5536
Artisanal
Eu só queria bater a meta, mas o Fortune Tiger mandou um Forra Máxima e me deu um carro zero.
Поставки титана и его сплавов востребованы в медицине, авиации и химическом машиностроении.
https://rms-ekb.ru/catalog/stalnoi-list/stalnoi-list-stal-60-110x1300x1800-gost-r-52146-2003-polimernyi-otsinkovannyi-kholodnokatanyi/
property valuation dubai online 1 bedroom apartment for sale in downtown dubai apartments for rent in dubai for 5 days renting apartment in dubai marina
Visit https://thetechstories.com/ and you’ll find comprehensive information about technology, including AI, from around the world. Key trends, major events, the impact of technology on everyday life, and much more. Expert information will help you stay up-to-date. Everything you want to know about technology: The Tech Stories, a complete platform where you can find it all.
cost of studio apartment in dubai Townhouse for Sale in Dubai monthly rooms for rent in difc dubai how to convert indian property in dubai
1xbet mobile
Поставки титана и его сплавов востребованы в медицине, авиации и химическом машиностроении.
https://rms-ekb.ru/catalog/krug-iz-instrumentalnoi-stali/krug-4khmnfs-120-gost-1133-71/
ocean real estate dubai Full Building for Sale in Dubai short term property rental in dubai skycourt towers rent
entrepreneur business ideas 3 bedroom townhouse for sale in dubai villas for rent in dubai garhoud dubai hills estate parkway vistas
Отечественный производитель промышленных колёс компания «ФормВел» из Иванова предлагает надёжные решения для оснащения тележек, стеллажей и промышленного оборудования. На сайте https://formwheel.ru/ представлен широкий ассортимент колёс и роликов под любые производственные задачи, включая изготовление по индивидуальным чертежам и пожеланиям заказчика. Компания гарантирует качество продукции, прозрачные условия оплаты и доставки, а каталог с полным ассортиментом высылается клиентам в течение десяти минут.
Опыт работы с более чем 120 постоянными заказчиками свидетельствует о высокой стабильности и надежности поставок.
https://rms-ekb.ru/catalog/ugolok-stalnoi/ugolok-iz-konstruktsionnoi-stali-80kh80kh8-mm-x2crnin23-4-en-10088-3/
affordable properties in dubai palm jumeirah apartments for sale Jasmine Lane commercial buildings near me
the real estate law dubai Townhouses for Sale in Dubai short stay apartments in jumeirah dubai golf place dubai hills estate
Выбор места проведения и времени года
can indian citizen buy property in dubai Apartments For Rent In Dubai Marina falcon city dubai real estate what is roi in real estate
Выбор формата празднования юбилея в Щелково
two bedroom apartment in international city dubai 3 Bedroom Apartments For Rent In Dubai Arabian Ranches real estate transactions dubai
В лазерных указках коллимирующая линза превращает расходящийся луч диода в почти параллельный пучок. Фокусное расстояние линзы подбирается так, чтобы лазерная точка оставалась малой на расстоянии 10–100 м. Линзы асферические: prolens.ru
The Oasis – Palmiera guide Townhouse for Sale in Dubai title deed dubai property clarke & scott real estate dubai
cheap studio flat in sharjah 5 bedroom apartment dubai for sale dubai s property Apartments for sale in City Walk
flats for rent in dubai silicon oasis dubai Flats for Sale in Dubai real estate brokers dubai marina freelance real estate agent dubai
bin hamoodah properties dubai office 2 BHK for Sale in Dubai Elie Saab Waterfront Highest rental yield areas in Dubai: top communities for income buyers
Преимущества выбора банкетного зала с настольными играми
apartment for rent in bur dubai mankhool Commercial Property for Sale in Dubai east home real estate dubai 2 bedroom apartment for rent in the greens dubai
Внутренние напряжения в оптических линзах видны в поляризованном свете – цветные полосы. Закалённые линзы (упражнённые) безопаснее при разбивании: раскалываются на тупые кусочки, а не острые осколки. Используют в детских очках, https://prolens.ru/
1xbet apk android
vakson properties dubai Apartments for Sale in Dubai Emaar real estate agents in dubai marina masterkey properties dubai
apartments for rent in al barari dubai buy a freehold property in dubai dubai creek harbour apartments transient hotel apartment in dubai
В оптических прицелах используются тактические сетки с подсветкой. Параллакс – мнимое смещение цели при движении глаза – устраняется перемещением линзы в фокальной плоскости или механизмом регулировки на дальность: prolens.ru
to buy 2 bedroom villa in jvt dubai 2 Bedroom Townhouse for Sale in Dubai pakistani property exhibition in dubai low price apartment for rent in dubai
Thanks for discussing the issues and covering them in a well written format.
A genuinely enlightening article that opened my eyes to aspects of this topic I had previously overlooked, the insights provided here are both original and practically applicable.
room in villa to rent dubai Townhouse for Sale in Dubai how to own apartments in dubai hotel apartment for birthday party in dubai
tower rush
This post keeps the discussion engaging and clear while also maintaining a clear and balanced presentation throughout.
Watch sexual porno video xxx sex adults site
Sempre via os vídeos de Forra Máxima, hoje foi minha vez no Buffalo Win! R$ 5.000 garantidos. Chamei até a minha esposa pra ver.
you are actually a good webmaster. The site loading speed is amazing.
It sort of feels that you are doing any distinctive trick.
In addition, The contents are masterpiece. you have performed a fantastic job in this topic!
I loved as much as you’ll receive carried out right here.
The sketch is tasteful, your authored subject matter stylish.
nonetheless, you command get got an shakiness over that you wish be delivering the
following. unwell unquestionably come further formerly again as exactly
the same nearly a lot often inside case you shield this hike.
dubai court property auction Looking to buy or rent property in Dubai? ground floor villa for rent in dubai 2 bhk for rent in karama
low cost hotel apartments in dubai Studio for Sale in Dubai 3 br apartments for rent Rove Home Downtown
new property for sale in dubai commercial real estate for sale in dubai apartments in satwa dubai real estate specialists dubai
Найти интересный Telegram-канал по душе бывает непросто: тематических площадок тысячи, а ориентироваться в них без удобного инструмента сложно. Именно эту задачу решает каталог https://tg-search.ru/ — крупнейший в рунете сервис, где собрано более 37 700 каналов в 50+ категориях: от бизнеса и технологий до спорта, кулинарии и путешествий. Здесь к каждому каналу прилагается подробная статистика, рейтинги и отзывы, а удобный поиск по тегам помогает быстро находить именно то, что нужно. Администраторы могут добавить свой проект бесплатно и привлечь целевую аудиторию, ведь сайт обеспечивает тысячи реальных переходов ежедневно. TG-Search — простой способ открыть для себя качественный контент.
FranChoice
7500 Flying Cloud Drive,
#600 Eden Prairie
MN 55344, United Ⴝtates
952-345-8400
Bookmarks
Jumeirah Living Business Bay guide 5 Bedroom Villa for Sale in Dubai race to dubai jumeirah golf estates beachfront villas for rent dubai
Банкетные залы московская область
rent in bur dubai Studio Apartment for Sale in Dubai harbor real estate Apartments for sale in Arlo
noble empire real estate brokers Commercial Property For Rent In Dubai intellectual property rights dubai customs property for sale in dubai emirates hills
welthy properties dubai Palm Jumeirah Villas for Sale sotheby’s real estate forest.ae real estate company in dubai
Контактные линзы с UV-блокером задерживают до 90% УФ-А и 99% УФ-В лучей. Это защищает роговицу и хрусталик от катаракты и птеригиума. Но они не заменяют солнцезащитные очки, так как не закрывают белки и веки – ProLens.ru
Оптическая сила линзы измеряется в диоптриях и показывает её преломляющую способность. Для сферических линз она одинакова по всем направлениям, а для цилиндрических различается в меридианах. Это свойство используют при подборе очков и контактных линз: ProLens.ru
4 bedroom Villas for sale in Dubai Hills Jumeirah Villas for Sale flats for rent in al wasl dubai for rent dubizzle sharjah rent
Лаборатория «Сила Света» предоставляет комплексные измерения светотехники: фотометрию, колориметрию, радиометрию, а также испытания на ЭМС и защиту IP/IK/УФ. Лаборатория проводит оценку фотобиологической безопасности по ГОСТ IEC 62471, измерения для тепличного освещения и экспертизу неисправностей. На сайте http://silasveta-lab.ru/ представлены все услуги и возможность проверки протоколов. Работают с сертификационными и исследовательскими задачами любой сложности.
dubai creek apartments for sale properties for sale in jumeirah village triangle parasol real estate dubai dubai villa rental holiday
one bedroom apartment for sale in downtown dubai Villa for Sale in Dubai alam agent real estate dubai 2 bedroom apartment for rent in silicon oasis dubai
how to make money in dubai Arabian Ranches Villas for Sale short term furnished apartments dubai town square dubai rent
I do not know whether it’s just me or if perhaps everybody else encountering
problems with your blog. It appears like some of the written text in your content are running off the
screen. Can somebody else please comment and let me know if this
is happening to them too? This might be a issue with my web browser because I’ve had this
happen before. Appreciate it
Apartment for Sale in Zabeel, Dubai villa for sale in dubai silicon oasis Al Wadi Desert rent a apartement dubai for a month
dubai investment properties projects 5 Bedroom Villa for Sale in Dubai al warqa 1 bhk for rent apartment ofr rent in dubai
What i do not understood is in reality how you’re not really a
lot more well-preferred than you might be now.
You are very intelligent. You know therefore significantly on the subject of this matter, produced
me personally consider it from so many varied angles.
Its like women and men are not involved unless it is something to accomplish with Lady gaga!
Your own stuffs great. At all times care for it up!
Выбор банкетного зала в Щелково для тематической вечеринки
hms homes real estate dubai 1 Bedroom Apartment for Sale in Dubai villa for rent in dubai land dubai property maintenance company
Компания ПАРКМОТОРС предлагает владельцам автомобилей «Газель» широкий выбор шин и дисков со склада в Москве: всесезонные и зимние модели ведущих брендов — Westlake SL309 и SW606, Goodride, Triangle TR646, Infinity INF-100, а также отечественные КАМА-301 и КАМА Евро НК-131 в размерах 185/75 R16C и 195/75 R16C по ценам от 3 500 до 7 500 рублей за штуку; на сайте https://tent3302.com/ также представлены диски Gold Wheel, «Валдай» и оригинальные запчасти ГАЗ — КПП, двигатели и элементы трансмиссии для «Газели Некст», что делает этот ресурс полноценным универсальным источником для обслуживания коммерческого транспорта с доставкой и профессиональной консультацией.
studio for sale in dubai One Bedroom Apartment For Sale In Dubai real estate in business bay dubai sotheby’s realty dubai
bayt dubai property One Bedroom Apartment for Sale in Dubai dubai residency with property purchase ere real estate dubai
tower rush apk download
low cost business apartments for sale in dubai marina dubai Northline 1 sfi properties dubai
We are a group of volunteers and opening a new scheme in our community.
Your website offered us with valuable information to work on. You’ve done a formidable job and our entire community will be thankful to you.
indian property show dubai exhibitors list Flats for Sale in Dubai shobha real estate dubai dubai properties sales gallery
sidra 3 dubai hills estate 2 bedroom apartment for sale in jbr dubai family run real estate in dubai Should you buy an apartment in a mixed-use building? (shops + homes)
tower rush online game
Visit the entrepreneurs’ blog https://heavyeyes.net/ , where you’ll find valuable advice, business plans, lessons, and business ideas for both beginners and experienced entrepreneurs. Learn all about business technologies, innovation, and creativity. This blog will help you stay on top of global trends and always be ahead of the curve.
детский торт на день рождения – для девочки
и мальчика. Щенячий патруль, Маша и Медведь.
сниженное количество сахара. цена от 1300
₽/кг
торт с мастикой на заказ – очарование в
каждой детали. имитация любой поверхности.
ароматизированная (клубника/ваниль).
цена от 2200 ₽/кг
бенто торт на заказ – своя мини-история.
хорош для кофейни. сердечко, мишка, эмодзи.
бесплатная упаковка с окошком
https://tort33.ru/prazdnichnye-torty/napoleon/
top hotel apartment in dubai Villa for Sale in Sharjah apartment rental dubai prices rental apartment dubai long term
dubai international real estate garhoud 3 Bedroom Apartments For Sale In Dubai 5 bedroom Villas for sale in Al Furjan dentist jumeirah golf estate dubai
property for sale in discovery gardens dubai Business Bay apartments for sale law firms intellectual property dubai dubizzle dubai silicon oasis
tower rush game app
studio type for rent in dubai Palm Jumeirah Homes for Sale akbar hatim dubai real estate studio apartment for sale in impz dubai
https://ponsaeliusmusic.com/
Apartments for sale in Marina Gate Emaar Properties for Sale low cost business lalwani villa millennium estate dubai
tala 1 liwan One Bedroom Apartment for Sale in Dubai what is the best small business to start in dubai can you buy a house with no down payment
Zerei a máquina.
first home buyers apartment for sale in international city dubai share a flat in dubai in property finder Eywa guide
Реклама, слежка и блокировки — три главные угрозы в современном интернете, и AdGuard закрывает все три сразу. Пользователям доступны VPN с мощным шифрованием, фильтрация рекламы и DNS-защита на любой платформе. Ищете промокод адгуард впн? Подключиться легко — достаточно перейти на adsguard.ru воспользоваться промокодом и сэкономить на подписке. Шифрованный туннель скрывает активность пользователя от интернет-провайдера и рекламных систем. Совместимость обеспечена с Windows, Android, iOS и macOS.
buy cheap apartment in dubai arabian ranches villas for sale furnished apartments for rent need studio flat for rent in dubai
flats for rent in dubai al ain road Townhouses For Rent In Dubai 7 best real estate agents in dubai cheap apartments in dubai for rent long term
Apartments for sale in Dubai Creek Residences Arabian Ranches Villas for Sale s.a.r solid international properties dubai apartment rent near deira city center
top luxury home furnishing furniture sale companies in dubai buy penthouse in dubai flat for rent in al mamzar center dubai near metro real estate license cost in dubai
dubai properties group email of project manager Plots for Sale in Dubai dubai property rental agency real estate dubai down
just property dubai hills Land for Sale in Dubai flats for rent in jbr dubai dubai properties lagoons office location
Terra Nova Houses for Sale in Palm Jumeirah Dubai aazizi group residential properties in dubai property for sale the point dubai marina
установка системы отопления цена
best rooms holiday homes villa for sale in meydan dubai beachfront properties dubai dubai cancelled real estate projects
My spouse and I stumbled over here different web address
and thought I should check things out. I like what I see so i am just following you.
Look forward to looking at your web page for a second time.
Parkway Vistas property for sale in arabian ranches dubai chiller.free.studio.for.rent in al nahda dubai dubai ded license
buy dubai property off plan 2 Bedroom Apartment Dubai For Sale action property in dubai 3bhk free hold apartments for sale in dubai
установка отопления
청주 전 지역 신속 방문! 프라이버시를 보장하는 청주출장마사지와 함께 꿀잠 예약하세요.
apartment in dubai downtown for sale Dubai flats for sale property rent calculator dubai 5 bedroom Villas for sale in Meydan
dubai holiday villas with private pool Dubai Houses For Sale Luxury royal class estate dubai new villas in dubai for rent
детский торт на день рождения – с любимыми
героями. Щенячий патруль, Маша и
Медведь. начинка без красителей.
игрушка на торт в подарок
капкейки на заказ Владимир – доставка без повреждений.
ваниль с ягодной начинкой.
надпись на каждом. цена от 250 ₽ за штуку
торт для мужчины на юбилей – британский стиль или кожа.
пиджак с галстуком. кофейный бисквит.
свеча-бочка с виски
Apartment for Sale in Bukadra, Dubai Villa in dubai for 2 million sidra master plan dubai hills estate off plan properties.ae Villas for sale in Jumeirah Village Circle
emar dubai property Jumeirah Villas for Sale wasl village dubai cheap apartments for rent in sharjah
바쁜 직장인들을 위한 신속한 방문 서비스! 청주출장마사지는 고객님의 소중한 시간을 존중합니다.
99 real estate dubai marina Apartments for Sale in Abu Dhabi ajd real estate dubai property rates in dubai sports city
dubai properties salaries 2 BHK for Sale in Dubai commercial villa for rent brokers vs property managers in dubai
монтаж системы отопления дома
selling indian property in dubai townhouse for sale in dubai xiao hong dubai real estate best area to buy apartments for sale in dubai
امگا 3 رول وان، مستقیماً روی توانایی شما برای یادگیری، تمرکز، و حتی مدیریت استرس تأثیر میذاره.
установка отопления в помещении
how to buy dubai real estate Property For Sale In Dubai monaco real estate brokers dubai mudon dubai properties location
city walk al wasl dubai jvt villa for sale jumeirah beach real estate dubai rental villas arabian ranches dubai
Good information. Lucky me I recently found your website by chance (stumbleupon).
I have saved it for later!
true cost of.owning property in dubai Ajman Villa for Sale al fajer properties dubai property finder dubai rent palm jureirah
rent a villa for one day in dubai 2 bedroom apartment dubai for sale own a property in dubai in 25000 dhs dubai real estate &
best business ideas to start apartments for sale in silicon oasis dubai 3 bedroom Apartments for sale in Town Square dubai properties new tenant
dubai real estate institute ceo Townhouse for Sale in Dubai dubai hills property for sale emaar beachfront dubai
international property show dubai luxury penthouses for sale in dubai 1 bedroom apartment for rent in discovery gardens dubai azizi conrad office
lock changed in apartment dubai Commercial Properties for Rent in Dubai Hidden gems: underrated areas to live in Sharjah biggest property developer in dubai
The discussion here feels clearly structured and meaningful, making the content enjoyable and easy for different readers to engage with.
childrens kids sexual xxx porn pills
room for rent in villa al quoz dubai Commercial Property For Sale In Dubai Apartment for Sale in Address Residences Zabeel, Dubai new dubai properties tower in jumeirah
Flying to Thessaloniki from the UK? Visit https://halkidiki-transfer.uk/ for competitively priced private transfers from Thessaloniki Airport (SKG) to every corner of Halkidiki—Kassandra, Sithonia, and Mount Athos—with a fixed price, an English-speaking driver, and no fees until you arrive. We offer free child seats and online booking. Learn more on our website.
studio for rent in business bay Houses for Sale in Palm Jumeirah Dubai family room monthly rent in dubai with separate properties to rent time place dubai marina
rent studio privat bur dubai monthly payment Commercial Property For Sale In Dubai sharing room in dubai best room apartment in dubai
After looking at a few of the blog posts on your web site, I seriously appreciate your way of
blogging. I book marked it to my bookmark site list and will be
checking back soon. Take a look at my website too and tell me what you think.
کراتین گالوانایز، کی از محبوبترین و مورد مطالعهترین مکملهای ورزشی در جهان است.
Six Towers guidedubai properties leasing42 East Residences by Panchshil: boutique island living at Dubai Islands, exclusively with betterhomesbeach villa dubaiproperty linkers dubai Real estate business for sale in dubai danube building materials company llcemaar greens one bedroom apartment for saledelta real estate dubai studio flat for rent in rashidiya dubai
Безупречный мужской костюм — это инвестиция в уверенность и стиль, который работает на вас в любой ситуации. Магазин Suit Store предлагает широкий выбор моделей для деловых встреч, торжеств и повседневной носки по ценам от производителя. В каталоге https://suit-store.ru/ представлены классические двойки и эффектные тройки в синих, серых и черных оттенках, сшитые на фабриках России и Белоруссии. Особое внимание уделяется качеству пошива, удобной посадке и современному крою, а размерная линейка от 44 до 56 поможет подобрать идеальный вариант на рост от 170 до 188 см.
установка отопления
바쁜 직장인들을 위한 신속한 방문 서비스! 청주출장마사지는 고객님의 소중한 시간을 존중합니다.
dubai land department real estate licensing feesdiscovery gardens rent 1 bedroomal dana properties dubaidowntown al bahar apartments dubaiwasl 51 mall Apartments for Sale in Silicon Oasis Dubai dubai hills estate move in permitcheap apartment hotels in deira dubai2 bedroom penthouse apartment in alnahda dubai short term apartment rentals
Greate article. Keep writing such kind of
information on your page. Im really impressed by
your blog.
Hi there, You have done an excellent job.
I’ll certainly digg it and in my view recommend to my friends.
I am sure they’ll be benefited from this website.
The Opusbuying property dubai guidedubai plan real estateCayan Tower guidedubai apartments for sale cheap Apartments for Sale in Abu Dhabi 1 bedroom hotel apartment for rent in dubaiarenco real estate dubai websitemeedar real estate dubai emkay properties fairmont dubai sheikh zayed road dubai
직장인들을 위한 신속한 30분내 방문 서비스! 청주출장마사지는 청주 전지역의 고객님의 소중한 시간을 존중합니다.
best dubai real estate agents3 bedroom Apartments for sale in Expo Citynew hotel properties in dubai1 bhk apartment for rent in union dubaidubai top 10 real estate agency Flats for Sale in Dubai chinese real estate companies in dubailuxury apartments for sale in dubai marinametropolitan properties dubai 4 bedroom holiday apartment in dubai
I think this post does a great job of presenting the topic in a thoughtful and easy-to-understand way, since the wording feels easy to follow and natural while still leaving enough room for readers to interpret and discuss the ideas openly.
children xxx video porn site xxx sex video
Suchen Sie einen privaten Transfer vom Flughafen Thessaloniki? Besuchen Sie https://halkidiki-taxi-transfer.gr/ und buchen Sie Fahrten zum Festpreis mit einem freundlichen, ortskundigen Fahrer – fur eine entspannte Ankunft nach einem langen Flug. Buchen Sie online. Wir erwarten Sie mit einem Schild am Flughafen. Kindersitze sind kostenlos. Weitere Informationen finden Sie auf der Website.
apartments in dubai creek1.besroom flat in al tawar 2 dubai for rentsmart crowd dubaistudio flat for rent in dubai al qusaisal warqa apartments for rent Villas For Sale In Downtown Dubai 3 bedroom villa in dubai hills estatedanube building materials company llcCala Del Mar india construction company
sky view real estate brokers dubaistudio apartment for rent in dubai monthly basisflats for rent in al karama dubaihotel apartments in dubai investment parkasico real estate dubai 2 Bedroom Townhouse for Sale in Dubai the villa dubai land for salepurchase property in dubaidubai national real estate company d & b properties dubai
volker dubai propertiesVillas for sale in The Ritz-Carlton Residencessobha construction llccheck your property market value dubaidubai property to rent in marina 3 bedroom apartment dubai for sale distress property in dubaihotel apartments in dubai burjumanassissi property dubai property in green community dubai
compound villas for rent in dubaisternon real estate dubai floridatrade center first dubaishort term apartment for rent in dubai for one monthfab properties dubai office Full Building for Sale in Dubai buying property dubai foreignersvillas in dubai southluxury property developers dubai waterfront properties sale
5 bedroom Villas for sale in Arabian RanchesVillas for sale in Bliss by Zimayaflat for rent in jebel ali dubaidubai real estate transactions to price2 bedroom flat for rent in dubai al qusais Emaar Properties for Sale cryptocurrency dubai propertyjumeirah real estate dubailondon hotel apartments in dubai can company we buy property dubai
Thank you for taking the time to put this comprehensive overview together, as it really helps clarify a lot of the questions I had regarding this topic and provides a solid foundation for further exploration.
childrens kids rape sexual xxx porn pills
My name is Mike, a normal American guy, and in the year 2018 I accidentally discovered one
of the most bizarre sports I had ever seen: CarJitsu.
In case this sounds unfamiliar, you are not alone. The entire concept sounds like a joke.
Two athletes climb inside a compact vehicle and try to grapple each other while being trapped between the dashboard and seats.
No, I’m not kidding. In most sports you have a field, but in CarJitsu
your battlefield is a car cabin. This is what shocked me the first time.
It even has official events and competitive tournaments.
Athletes travel to compete and try to prove who can adapt best to the strange environment.
Different from most athletic competitions, every movement
is limited by the vehicle’s interior. That creates hilarious moments.
One second someone looks like a champion, and the next second they are trapped near the steering wheel.
Back then I was heavily interested in unusual athletic events.
I watched football, basketball, MMA, and wrestling. I
also spent time reading about sports betting. People
around me talked about betting and sportsbooks.
Sometimes names like 1xBet would appear in conversations about major sporting events, although CarJitsu was usually too strange to be the main topic.
One evening I saw a short video online. At first I thought it was satire.
Grown adults were trying to wrestle inside a parked car
while spectators were going crazy with excitement. I laughed so hard that I almost fell off my chair.
Yet the more I watched, the more fascinated I became.
A few weeks later, I found a local event and decided to watch in person. The
atmosphere was incredible. There were fans discussing sports, training,
and competition. Some people even joked about which athlete would be
the favorite if a betting site ever offered odds on the matches.
Watching was not enough. I signed up for beginner training.
The first training day was hilarious. I hit my head on the roof, got stuck near
a seat, and accidentally opened a door at the worst possible moment.
Even I laughed at myself. Yet I kept coming back.
Week after week, I improved. I learned how to use positioning, leverage, balance, and timing.
The vehicle became familiar. Soon I was entering regional events.
My friends thought I was completely crazy. Whenever someone asked what sport I practiced, the conversation usually went
like this:
“CarJitsu.”
“What is that?”
“Imagine wrestling inside a car.”
“You’re joking.”
“No, that’s the actual sport.”
The most unforgettable competition happened at a major event.
My opponent was huge. He looked like he could lift a small house.
Before the match started, he smiled and said, “Good luck.” I
knew trouble was coming.
As soon as the fight started, chaos exploded. We bounced between seats, bumped into doors, and nearly
tangled ourselves in everything inside the vehicle. The crowd
was roaring. Spectators were going crazy.
Then came the moment I will never forget.
My opponent grabbed the belt hanging beside the seat
and accidentally turned it into what looked like a wild whip.
As we struggled for position, the belt snapped
across the cabin and wrapped around me in the strangest
way imaginable. For a second I thought, “I can’t believe this is happening”
He pulled, I twisted, the seat belt locked, the door
opened slightly, and both of us somehow ended up tangled together
like human spaghetti. The audience was laughing so hard that some people could barely stay
in their seats. It looked completely ridiculous.
For a brief moment, I genuinely thought my opponent was going to flatten me.
Thankfully, the officials quickly intervened when things became unsafe, and the situation was resolved without
serious injury. Afterward we both burst out laughing. The crowd applauded.
Even today people who were there still talk about “that crazy seat belt match.”
Thinking about my journey, CarJitsu remains one of the weirdest athletic competitions I have ever experienced.
It gave me great memories and incredible experiences. Whether people are discussing sports culture and competition, very few things create reactions like CarJitsu.
When people want to hear a crazy sports story, I always tell them about the day I climbed
into a car in 2018 and accidentally became a CarJitsu
competitor. The reaction is always the same. But after hearing
about tournaments, athletes, training sessions,
sports fans, betting conversations, sportsbook
discussions, and my unforgettable seat belt battle, they usually agree on one thing:
CarJitsu might be the craziest sport ever invented.
rented apartments for sale in dubaiproperty near mefree website to advertise property in dubaiapartment furniture rental dubai2 bedroom apartments for rent in al nahda dubai How to buy apartment in dubai without agent hotel apartments in dubai cheap for rentrent villa in dubai weekenddubai real estate market forecast average 2 bedroom apartment rent in dubai
Pretty! This was an incredibly wonderful post. Many thanks
for supplying these details.
what type of business should i startproperty finder dubai rent in al nahdasawa real estate dubaiapart hotels to rent yearly in dubaidubai properties who need security guards on contract property for sale in arabian ranches dubai fidu properties dubai locationbuy house in dubai behind seawhich areas expat can buy the property in dubai 1 br apartments near me
I’ve been surfing online more than 3 hours today, yet I never found any interesting article like yours. It’s pretty worth enough for me. In my view, if all web owners and bloggers made good content as you did, the net will be much more useful than ever before.
dubai real estate newsletterbest things to investdubai villas for sale in dubai3 bhk flat for rent in al nahda dubaiMedia City Property For Sale In Dubai dubai property finder home for saledirext sale.property dubaifurnished studio for rent in dubai marina view huis kopen in dubai
ramadi real estate al wasl road dubaidubai hills estate municipality locationbest apartments to buy in dubaiE Sectordubai hills estate properties for rent Buy Penthouse in Dubai jbr apartments for sale dubaiproperty for rent near expo dubai1 bed apartment downtown dubai cherry property dubai
Howdy just wanted to give you a quick heads up. The text in your content seem to
be running off the screen in Chrome. I’m not sure if this is a
formatting issue or something to do with internet browser
compatibility but I figured I’d post to let you know. The
design look great though! Hope you get the issue solved soon. Cheers
1 bhk for rent in dubai monthlyrent apartment studio in dubai landrental properties arabian ranches dubaidubai property market trendsemaar dubai properties for sale 1 Bedroom Apartment for Sale in Dubai 3 bedroom villa for rent in jumeirah parkdubai production city furnished studio monthly rentapartments for short let in dubai china peteleum new project in dubai
There is so much to try to understand
The structure and tone of this post work together very well, since the ideas are explained in a way that feels simple to follow while still encouraging readers to think more carefully about the topic being discussed here.
children xxx video porn site xxx sex video
looking for studio for rent monthly in jvc dubaibiggest property owners in dubai1 bhk sharjahrent a house in dubai monthlyApartments for sale in Volante 2 Bedroom Townhouse for Sale in Dubai estate master dubaidubai properties villastown square dubai apartments for rent Villas for sale in Bluewaters
High ROI property in Dubaiszz properties dubaims real estate dubaigarboob dubai propertiescheap partition in dubai Studio for Sale in Dubai cheapest house in dubai for rentstudios in dubai monthly rentproperty brokerage companies in dubai dubai sports city furnished apartments for rent
Хотите, чтобы ваш сайт говорил с посетителями буквально? Сервис «Кузя Ассистент» предлагает уникальное решение: анимированный персонаж на страницах вашего ресурса ненавязчиво рекламирует товары, статьи и услуги, удерживая внимание аудитории. Загляните на https://kuzya-assistant.ru/ и выберите одного из 17 харизматичных героев — от уютного домовёнка до строгого робота-техника. Виджет легко встраивается на любой сайт, поддерживает AI-генерацию реплик и предоставляет детальную аналитику. Первые 7 дней — бесплатно, без привязки карты.
Are grateful for this blog post, it’s tough to find good information and facts on the internet
Buying a home in Dubai for expatsVillas for sale in Villanovareal estates offices in dubailine investment propertyfam living dubai Looking to buy or rent property in Dubai? rent an apartment in apollo residence in dubaiAl Habtoor City Residential guidedelta real estate dubai buy two bedroom apartment in sports city in dubai
wasl 1 park gate residenceproperties to buy in dubai al nahda 2 3bedrromDowntown Dubai guidenew projects in dubai sports cityal wasl room for rent Palm Jumeirah Homes for Sale sajaya real estate l.l.c dubaishops mall apartments in dubaivilla for rent in jumeirah park dubai 2 bedroom Apartments for rent in City Walk
It’s going to be finish of mine day, but before finish I am reading this fantastic post to improve my know-how.
2 bhk villa for sale in dubaial wasl travels llchow much minimum to buy property in dubaistudio flat for rent in dubai investment park 1commercial property investment in dubai Benefits of Buying Property in Dubai for Investors Villas for sale in The Turfdamac properties head office dubai locational reem village Meydan Gated Community
Thank you for taking the time out of your day to compile this complete overview; the unbiased standpoint you maintained throughout the text makes this a highly reliable resource for further reading.
gay sex porn
crowdfunding dubai real estatedubai property chartdld full formapartments for rent greens dubaidubai s property 3 bedroom apartments for sale in dubai al bateen apartments for rent in jbr dubaiEllington Ocean House guideluxury apartments in abu dhabi buy house international city dubai
Меня на шалфее устраивает:)вываривать ничего не надо купить кокаин
Компания «Партнёр» с 2013 года оснащает школы и детские сады по всей России: учебное оборудование, мебель, робототехника, спортивный и медицинский инвентарь, товары по программе «Доступная среда». В ассортименте более 30 000 сертифицированных позиций от 100+ производителей напрямую, а значит — по выгодным ценам. Подробнее на сайте https://xn—-7sbbumkojddmeoc1a7r.xn--p1acf/ Специалисты подготовят документацию по 44 и 223 ФЗ, помогут с подбором и обеспечат доставку с гарантией качества.
Why to Invest in Dubai Real Estate? short lease apartment in dubaiservice apartments in al karama dubaibelhasa real estate dubai
People call me Mike, a regular guy from the USA, and in the year 2018 I accidentally discovered one
of the most bizarre sports I had ever seen: Car Jitsu.
In case this sounds unfamiliar, you are not alone.
The entire concept sounds like a comedy sketch.
Two athletes climb inside a small car and try to score positions
against each other while being trapped between the cramped interior.
Believe it or not. In most sports you have a ring, but in CarJitsu your battlefield is the inside of a vehicle.
That is why people laugh when they first hear about it.
The sport has tournaments, championships, local events,
and exhibition matches. Participants gather from various regions and try to prove who
can adapt best to the strange environment. Compared to
ordinary sports, every movement is limited by the vehicle’s interior.
The result is pure chaos. One second someone looks like a champion, and the next second they
are stuck between the seats.
Back then I was heavily interested in unusual athletic events.
I watched football, basketball, MMA, and wrestling.
I also spent time reading about sportsbook odds. Many
sports fans I knew compared sportsbook offers. Sometimes names like the sportsbook 1xbet would appear in conversations about major sporting events,
although CarJitsu was usually too strange to be the main topic.
One evening I saw a video clip online. Initially I believed it was a joke.
Full-grown athletes were trying to grapple inside a parked
car while spectators were going crazy with excitement.
I laughed so hard that I couldn’t breathe for a moment.
Yet the more I watched, the more fascinated I became.
A few weeks later, I found a local event and decided
to watch in person. The crowd energy was amazing.
There were fans discussing sports, training, and competition.
Some people even joked about which athlete would be the favorite if a sportsbook ever offered odds on the matches.
Soon I wanted more than just watching. I signed up for beginner training.
My debut practice was chaos. I hit my head on the roof, got stuck near a seat, and accidentally opened a door at the worst possible moment.
Even I laughed at myself. Yet I kept coming back.
Month after month, I improved. I learned how to use technique and movement.
The vehicle became familiar. Soon I was entering local competitions.
My friends thought I was completely crazy.
Whenever someone asked what sport I practiced,
the conversation usually went like this:
“CarJitsu.”
“What is that?”
“Imagine wrestling inside a car.”
“You’re joking.”
“No, that’s the actual sport.”
The craziest match of my career came later. My opponent was built like a truck.
He looked like he could carry an engine block. Before the match started, he smiled and said, “Hope you’re ready.” I should have listened.
The moment the referee signaled, chaos exploded.
We bounced between seats, bumped into doors, and nearly tangled ourselves in everything inside the vehicle.
The crowd was roaring. Spectators were going crazy.
Then came the moment I will never forget.
My opponent grabbed the belt hanging beside the seat and accidentally
turned it into what looked like a dangerous rope.
As we struggled for position, the belt snapped across the cabin and wrapped around me in the strangest way imaginable.
For a second I thought, “I can’t believe this is happening”
He pulled, I twisted, the seat belt locked, the door opened slightly, and both of us
somehow ended up tangled together like two confused octopuses.
The audience was laughing so hard that some people could barely stay in their seats.
It looked completely ridiculous.
For a brief moment, I genuinely thought my opponent was going to flatten me.
Fortunately, the officials quickly intervened when things became unsafe, and the situation was resolved
without serious injury. Afterward we both burst out laughing.
The crowd applauded. Even today people who were there still talk about “that crazy seat belt match.”
Looking back, CarJitsu remains one of the weirdest athletic competitions I have ever experienced.
It gave me great memories and incredible experiences.
Whether people are discussing sports, betting, sportsbooks, competitions, or events, very few things create reactions like CarJitsu.
If anybody asks for the weirdest sport I know, I
always tell them about the day I climbed into a car in 2018 and accidentally became
a CarJitsu competitor. Nobody believes it at first.
But after hearing about tournaments, athletes,
training sessions, sports fans, betting conversations, sportsbook discussions, and my unforgettable seat belt battle, they
usually agree on one thing:
CarJitsu is wonderfully ridiculous.
такая же хрень пропал продаван ((( уже неделю обещает выслать трек дать и нет не чего *(((( купить кокаин
luxury penthouses for sale in dubai 4 bedroom Villas for sale in Al Bararial manara real estate dubai transfer officehotels monthly rent in dubai
villa for sale in meydan dubai rental apartment dubai marinareal estates in dubai marinaemaar residential properties in dubai
Property For Sale In Dubai Palm Jumeirah emaar co toreal estate registration trustee dubaibetter homes real estate in dubai
대전출장마사지이곳에서 365일 휴일없는 후불제로 24시간 이용해보세요. 대전 유성 봉명 모든지역 30분내 방문
2 Bedroom Apartment Dubai For Sale Villas for rent in Al Barariwhat is dldmonthly rooms for rent in difc dubai
Fifty up for the batsman, well deserved. WHAT A GAME!
https://pto.org.ua/ — это медиа о технологиях, трендах и современной жизни без лишнего шума. Мы объясняем сложные темы простым языком, собираем полезные советы, техно-гайды, рейтинги, обзоры и практичные истории. Здесь легко разобраться, что действительно стоит внимания, а что просто очередной информационный шум. PTO — ваш помощник в том, чтобы быть на шаг впереди: лучше понимать происходящее и принимать более осознанные решения каждый день.
3 Bedroom Apartments For Sale In Dubai long term hotel apartments for rent in dubaififth estate advertising dubaileashold to movein dubai list properties
Emaar Properties for Sale real estate return on investment1 bhk flat for rent in meena bazar dubaiproperty investment dubai prices
Выбирая квартиру в современном жилом комплексе, стоит обратить внимание на ЖК Аурум Тайм, где большое внимание уделено качеству строительства и благоустройству территории, жк аурум тайм
Apartments for Sale in Abu Dhabi 1 bedroom apartment in city walk dubaiemaar beachfront dubaiapartment in dubai marina to buy
Нет. Такого у нас нет. купить кокаин
установка отопительные системы
Portal gier Jak grać w Dudespin to Twój wybór! Spróbuj szczęścia w Dudespin – Twoim kasynie online! Zarejestruj się i wygrywaj – bezpieczeństwo i niezawodność. Dude Spin to Twój przewodnik po świecie hazardu; wygrane i sukces są tylko tutaj! Dudespin Casino to Twój osobisty klub gier. Wykorzystaj w pełni dudespincasino-pl.com – graj mądrze.
Portal gier dudespin deposit to Twój wybór! Spróbuj szczęścia w Dudespin – Twoim kasynie online! Zarejestruj się i wygrywaj – bezpieczeństwo i niezawodność. Dude Spin to Twój przewodnik po świecie hazardu; wygrane i sukces są tylko tutaj! Dudespin Casino to Twój osobisty klub gier. Wykorzystaj w pełni dudespincasino-pl.com – graj mądrze.
Chemical-Mix, хочу заказать 50г. АМ, но на сайте написано что 50грамм нет на складе. купить кокаин
There are a lot of different ways to approach this kind of topic, but the direction you chose to take makes the information feel very accessible, which is something I always look for when browsing through articles online.
kids sexual xxx porn onlyfans
Dubai Marina Apartments For Rent Monthly india property show dubai crowne plazaskb real estate in dubai4 bedroom apartments for sale in dubai
2 bedroom townhouse for sale in dubai international city dubai apartments for rent from the ownerto buy property in dubaivilla rent in dubai jumeirah
Респектос бразы радуете не только Россию но и Украину )) отличный магаз купить кокаин
Предлагаем помощь в подготовке к сдаче экзаменов в ГИБДД купить водительские права россии: теория, практика, разбор билетов и сопровождение на каждом этапе обучения. Вы получите понятные объяснения, поддержку опытных инструкторов и удобный формат занятий, который поможет уверенно чувствовать себя за рулём.
Подготовка проходит по актуальным требованиям, с акцентом на реальных дорожных ситуациях и типичных ошибках кандидатов. Мы помогаем не просто выучить правила, а научиться применять их на практике, чтобы успешно сдать экзамен и безопасно водить автомобиль в дальнейшем.
Подходит для начинающих водителей и тех, кто хочет восстановить навыки вождения. Индивидуальный подход, гибкий график и доступные программы обучения делают процесс комфортным и эффективным.
купить права
купить права
права купить
водительские права купить
права водительские купить
купить права водительские
купить водительские права
водительское удостоверение купить
купить водительское удостоверение
сколько стоит купить права
купить права сколько стоит
где купить купить права
где купить права права
купить права сколько стоят
сколько стоят купить права
сколько стоят права купить
где можно купить права
где можно права купить
где купить можно права
сколько стоит стоит купить права
купить права водительские права
как права купить
как купить права
водительское удостоверение водительское купить
купить водительские права сколько стоит
сколько стоит купить права водительские
сколько стоит купить водительские права
водительские права сколько стоит купить
купить права водительские сколько стоит
права купить категории в
купить права в категории
купить права категории в
можно ли права купить
можно ли купить права
помощь в получении в прав
водительское удостоверение помощь в получении
права на машину купить
права купить на машину
купить права на машину
как купить права на машину без справок
права на машину без обучения сколько стоят
права категории а купить
купить права категории б
права купить категории
установка отопления
Всем привет ни как не могу заказ оформить, помогите,плиз купить кокаин
Distress Sale of Villas in Dubai dubai south off plan projectsstudio for rent in bur dubai monthly 2000dubai business association
به دنبال اطلاعاتی برای معاملهگران مبتدی فارکس هستید؟ به https://forexbrokersreviews.wiki/ مراجعه کنید و در مورد فارکس و نحوه کار آن، و همچنین نحوه کسب درآمد و چگونگی رشد بازار اطلاعات کسب کنید. همه چیز را در مورد کمیسیونهای کارگزاری و سایر اطلاعات جامع که به شما در تجارت سودآور کمک میکند، بیاموزید!
Apartments for Sale in Dubai Emaar furnitured studio for rent in dubaidubai real estate institute ceodanube properties head office
ну вроде с этой партии был чистый. А там 100мг – уже лютый трип.. А учитывая по скольку 5-ИАИ обычно юзают… Не завидую я парням. Магазину дам пинка за косяки, как свяжусь купить кокаин
Dubai Marina Apartments For Rent Monthly best land real estate dubaiVillas for rent in Jumeirah Village Triangleal safa restaurant sharjah
What i don’t realize is actually how you’re not really much more neatly-preferred than you might be right now.
You are so intelligent. You recognize thus significantly in terms
of this matter, produced me for my part imagine it from numerous varied angles.
Its like women and men are not involved unless it’s something to do with Girl gaga!
Your own stuffs outstanding. At all times handle
it up!
Portal gier dudespin casino app to Twój wybór! Spróbuj szczęścia w Dudespin – Twoim kasynie online! Zarejestruj się i wygrywaj – bezpieczeństwo i niezawodność. Dude Spin to Twój przewodnik po świecie hazardu; wygrane i sukces są tylko tutaj! Dudespin Casino to Twój osobisty klub gier. Wykorzystaj w pełni dudespincasino-pl.com – graj mądrze.
где-то 15 мл брал. купить кокаин
You have made some really good points there. I checked on the web to learn more about the issue and found
most individuals will go along with your views on this site.
Villa for Sale in Abu Dhabi emaar properties for saleellington dubai propertiessale studio apartment in dubai
Jumeirah Villas for Sale The Address Dubai Marinahigh floor apartment in bur dubaiforeclosured properties dubai
привет!!! не согласен долдны быть доступные магазины как купить кокаин
я думаю все ровно будет. заказал тут для пробы 5 гр. акв 48 ф . 10 октября еще заказал. еще не выслали. на почту пишут, извиняются. ждём результатов. как будут движения отпишу. купить кокаин
studio apartment dubai for sale roots land real estate dubaichiller free studio for rent in al wasl dubairental properties dubai uae
монтаж отопления жилого дома
Land for Sale in Dubai dubai vacation rental apartmentsgolf suites dubai hill estatespace near me
Wow, amazing blog layout! How long have you been blogging for? you made blogging look easy. The overall look of your site is great, as well as the content!
товар появился? когда возобновите доставку по городам? купить кокаин
Nevertheless, it’s all carried out with tongues rooted solidly in cheeks, and everybody has got nothing but absolutely love for their friendly neighborhood scapegoat. In reality, he is not merely a pushover. He is simply that extraordinary breed of person solid enough to take all that good natured ribbing for what it really is.
монтаж отопления дома цена
Jumeirah Villas for Sale Eden Hillspremier estates dubaibest deal property in dubai
желаем успехов магазину и процветания, очень ждем купить кокаин
Villa for Sale in Ajman apartments for rent jumeirah dubaiwasl properties dubai locationasas real estate dubai
“Думаю надо заглянуть в аптечку Мож завалялось и да Чудо они есть решаюсь попробовать и Вы не поверите одно и тожЕ” купить кокаин
Flats for Sale in Dubai furnished studio for rent in bur dubai monthlychiller free apartment in dubai7 bedroom Villas for sale in Al Barari
I wish I could craft such articles as this. Thank you very much.
Land for Sale in Dubai hotel apartments in bur dubai monthlybmg properties dubailist of holiday homes companies in dubai
HairNeva operates as a well-known Istanbul-based hair restoration clinic offering expertise in FUE, DHI, Sapphire FUE, unshaven hair transplants, beard restoration, and innovative hair regeneration solutions. Directed by European Board-certified plastic surgeon Assoc. Prof. Dr. Guncel Ozturk, the clinic integrates customized treatment plans, AI-powered hair analysis, all-inclusive medical tourism packages, and ongoing aftercare support. HairNeva prioritizes realistic-looking results, specialist-supervised procedures, patient satisfaction, and full assistance for international patients.
hair transplant istanbul
E aí, artigo leve e direto. bacará jogo toda semana e recomendo. Valeu a atenção.
Portal gier dudespin casino poland to Twój wybór! Spróbuj szczęścia w Dudespin – Twoim kasynie online! Zarejestruj się i wygrywaj – bezpieczeństwo i niezawodność. Dude Spin to Twój przewodnik po świecie hazardu; wygrane i sukces są tylko tutaj! Dudespin Casino to Twój osobisty klub gier. Wykorzystaj w pełni dudespincasino-pl.com – graj mądrze.
Townhouses For Rent In Dubai apartment rental agencybuy property in dubai palm islandstudio flat for rent in dubai investment park 1
If some one needs expert view regarding running a blog afterward i advise him/her to visit
this website, Keep up the nice job.
Проект Aurum Time от Град Девелопмент предлагает жильцам комфортные планировки, современные инженерные решения и продуманную инфраструктуру для повседневной жизни: Аурум Тайм москва
Studio for Sale in Dubai mohammed bin rashid city villas for sale in dubaiApartments for sale in St Regis The Residencesreal estate license cost in dubai
Townhouse for Sale in Dubai synergy real estate dubaisharing house for rent in dubai1 bed apartment in sharjah
3 Bedroom Apartments For Sale In Dubai Silicon Oasis future way real estate dubaiThe most instagrammable neighbourhoods to live in Dubai723 usd to aed
При выборе новой квартиры многие обращают внимание на ЖК Aurum Time благодаря продуманной концепции проекта, качественному строительству и удобному расположению, купить квартиру в жк аурум тайм
jumeirah golf estates villas for sale dubai properties office culturevillas for rent in dubai mirdif1 bedroom properties for sale in dubai marina
Братья, у меня вопрос. JV-30 как? Боюсь нарваться на регу с которой крышу сносит. Ответьте пожалуйста. купить кокаин
Villa for Sale in Abu Dhabi dubai real estate projects namesvillas for sale in dubai investment parkrooms for couples in dubai
Buenas tardes. slots online es real.
1 Bedroom Apartment for Sale in Dubai dubai properties executive towers marketingtrump real estate dubaicheap studio apartment in dubai for rent
В итоге получается, что все страницы оказываются в одних недовольствах, но ладно визуально, так ведь чуть ли не неделю каждая страница в недовольствах, а это что-то да значит, особенно когда сам проверишь… Вот я постучался в асю, пообщались, вы исчезли, потом кое-как вернулись, но молчок по полной. Зря вы так, всех клиентов распугаете таким макаром… купить кокаин
ЖК Аурум Тайм от застройщика Град Девелопмент представляет собой современный жилой комплекс, в котором сочетаются комфорт, функциональность и актуальные архитектурные решения для жизни в большом городе: Аурум Тайм Град Девелопмент
Falaaa. Atualizando: baccarat online. 22Bet e o controle emocional é key.
установка отопления в помещении
Houses for Sale in Palm Jumeirah Dubai fly dubai lost propertymd properties dubai2bhk apartments for rent in dubai 40000
Среди новых жилых комплексов ЖК Аурум Тайм выделяется стильной архитектурой и вниманием к деталям, которые формируют комфортное пространство для проживания – https://aurum-time-grad.ru/
2 Bedroom Townhouse for Sale in Dubai al barari dubai apartments for rent8 bedroom Villas for sale in Mohammed Bin Rashid Citycost to buy property in dubai
Portal gier Jak zarejestrować się w kasynie Dudespin to Twój wybór! Spróbuj szczęścia w Dudespin – Twoim kasynie online! Zarejestruj się i wygrywaj – bezpieczeństwo i niezawodność. Dude Spin to Twój przewodnik po świecie hazardu; wygrane i sukces są tylko tutaj! Dudespin Casino to Twój osobisty klub gier. Wykorzystaj w pełni dudespincasino-pl.com – graj mądrze.
One Bedroom Apartment For Rent In Dubai apartments for sale in palm jumeirah dubaiberkshire real estate dubaihotel apartments in dubai 3 stars
One Bedroom Apartment for Sale in Dubai Villas for sale in Nad Al Sheba 1spf realty real estate dubaiwhere should we live in dubai apartment
Distress Property for Sale in Dubai off plan properties in abu dhabiarabian escapes property dubaidubizzle all cities
Jumeirah Villas for Sale holiday rental properties in dubai2 bhk for sale in dubai marinacosta motor city
3 Bedroom Villa For Sale In Dubai villa for sale in meydan dubaicreate form f real estate dubaiprestige real estate dubai marina
Access your gaming profile and entertaining slot choices conveniently
with the 88PH App.
وی ایزوله موتانت، با ارائهی ۲۵ گرم پروتئین خالص در هر پیمانه، تجربهای بینظیر از یک مکمل باکیفیت را برای شما به ارمغان میآورد.
commercial real estate for sale in dubai where to buy investment property in dubaidenis dubai real estateSolena at The Orchard Place
5 Bedroom Villa for Sale in Dubai Meraasbuying a house off plandubai real estate corporation trn
Coach needs to call a timeout here. Worldie!
5 Bedroom Villa for Sale in Dubai steps competitor analysis for real estate in dubaiemaar projects in downtown dubaicando real estate broker dubai
Plots for Sale in Dubai marbella real estate dubaiatmosphere real estate dubaimonthly rent in bur dubai
Buy houses dubai can you buy properties in dubaihigh rise properties dubaiapartments in bluewaters dubai
land for sale in dubai real estate agenciy dubaipalm jumeirah apartments for saledubizzle room for rent
Cabinet IQ
8305 Տtate Hwy 71 #110, Austin,
TX 78735, United Stateѕ
254-275-5536
Green
Buy or Rent Property in Dubai. expo impact on dubai real estateflats for rent in dubai marina dubaiarthur mckenzie real estate dubai
Full Building for Sale in Dubai dubai properties noc chargeshotel apartments in al mankhool dubainuzul properties email address dubai
arabian ranches villas for sale emaar contracting companywohnung mieten dubaieqarat real estate dubai
Studio Apartment for Sale in Dubai studio flats for rent in al nahda dubaicheap flats for rent in al rigga dubaidubizzle property sale dubai
Benefits of Buying Property in Dubai for Investors green city karama menumovenpick hotel dubai downtowndubai media city apartments for rent
3 bedroom apartments for sale in dubai free property ads in dubaiinterdiction sale property dubaidubai properties mirdif
Счастья жизни не ждут под окном, купить кокаин
Донской район давно считается одним из наиболее привлекательных для жизни, поэтому ЖК Веспер на Шаболовке вызывает высокий интерес как среди покупателей жилья, так и среди инвесторов: жк vesper шаболовка 31
Dubai flats for sale 1 bedroom Apartments for sale in Zabeelhigh point real estate dubaidubai property sales office
Вообщем фейк крассавчик пошагово и все грамотно сделал, развел) купить кокаин
Villa for Sale in Dubai studio flat to rent near medubai international real estate diremajan dubai properties
Bintang4D – Aplikasi Chat Sosial untuk Curhat, Berbagi Cerita, dan Dukungan Sosial.
Temukan teman, curhat bebas, dan dapatkan dukungan emosional.
Everyone loves the thrill of the game and the chance to win big money! Now, people in UK have the opportunity to play at a casino britsino casinos and score huge payouts instantly. To find out all the details, stick around and read our review!
Сейчас по России что то не видно вас.Только пожелать ветра в парус,адекватных клиентов по меньше шкур купить кокаин
Buy Penthouse in Dubai 2 bedroom Villas for sale in Jumeirah Village Trianglevillas in dubai jumeirah for saleholiday villas in dubai
Vipluck vipluck live casino ist ein modernes Online-Casino mit großen Bonusangeboten und schnellen Auszahlungen. Spieler wählen Vipluck wegen der vielen Slots, sicheren Zahlungen und positiven Vipluck Casino Erfahrungen.
Double double for this player, what a performance. 🙌🙌🙌
Dubai Marina Apartments For Rent Monthly all real estate companies in dubailist of hotel apartments in deira dubaihonest real estate development dubai
Vipluck vipluck casino erfahrungen ist ein modernes Online-Casino mit großen Bonusangeboten und schnellen Auszahlungen. Spieler wählen Vipluck wegen der vielen Slots, sicheren Zahlungen und positiven Vipluck Casino Erfahrungen.
на icq – в четверг обещал трек, в пятницу обещал трек, пропал… купить кокаин
How to buy apartment in dubai without agent monthly rent in al nahda dubaiproperty transfer dubaiwasl office timings
все пришло.пока не пробовал.конспирация на высшем уровне.спасибо купить кокаин
Веспер на Шаболовке предлагает новый взгляд на премиальную недвижимость, где особое внимание уделяется не только квартирам, но и общей атмосфере жилого пространства: веспер на шабаловке
land for sale in dubai real estate broker dubai blockchain3br villa or apartment in dubai for rentkgr real estate dubai
Международный институт современного образования (МИСО) — это надёжная образовательная организация, работающая с 2016 года на основании лицензии Министерства образования Ставропольского края. На сайте https://misokmv.ru/ вы найдёте актуальные программы переподготовки, повышения квалификации и профессионального обучения в удобном дистанционном формате через современную платформу INDIGO. Все слушатели получают официальные документы с внесением данных в ФИС ФРДО, что гарантирует государственное признание квалификации.
посмотри в трипах магазина там всё написано купить кокаин
Studio Apartment for Sale in Dubai dubai residency buy propertyapartments in jumeirah rentfurnished apartments for rent in dubai aed 40000
ЖК Веспер на Шаболовке формирует новое представление о премиальном жилье благодаря вниманию к деталям и комплексному подходу к развитию территории: https://vesper-shabolovka.ru/
Стабильный вкус кофе — главное требование любой кофейни. Redberry Coffee обжаривает зерно небольшими партиями и поставляет его оптом, строго контролируя профиль обжарки от партии к партии. Это значит, что бариста каждый день работает с предсказуемым зерном, а гость получает одинаково хороший эспрессо. На https://redberrycoffee.ru/coffee-wholesale можно выбрать моносорта и купажи, запросить пробную партию и согласовать условия регулярных поставок для вашего заведения.
Сервис вообщем на ура. купить кокаин
Townhouse for Sale in Dubai apartments in deira dubaibuying property in dubai foreignersdubai real estate market chart trend
apartment for sale in international city dubai al nahda dubai studio flat for rent monthlycheap apartments in uae for sales residence dubai
а он мне очень нужен как никогда купить кокаин
That and-one play was massive! No way!
Vipluck vipluck paypal casino ist ein modernes Online-Casino mit großen Bonusangeboten und schnellen Auszahlungen. Spieler wählen Vipluck wegen der vielen Slots, sicheren Zahlungen und positiven Vipluck Casino Erfahrungen.
Full Building for Sale in Dubai platinum one arjan dubai rent monthly paymentdubai apartments for rent 1 bedroomdubai commercial real estate for sale
Good blog you have got here.. It’s difficult to find high quality
writing like yours these days. I really appreciate individuals like you!
Take care!!
“Выстовляет Эскимос список тестеров в Списке сверкает мой ник” “bob marli” купить кокаин
Looking for a great guide to Forex trading? Visit https://fxeasy.org/ and you’ll find simple, no-nonsense materials for those who want to understand the forex market—from basic concepts to real-world trading strategies. Try running test nodes for blockchain projects to get familiar with the crypto space, and then move on to copy trading with a reputable broker on this platform.
Хотите надёжно защитить свои данные и обойти любые блокировки? Три проверенных решения — BlancVPN, AmneziaVPN и TrueVPN — объединены на одном ресурсе https://taplink.cc/vpntop, где каждый найдёт подходящий вариант. BlancVPN отличается высокой скоростью и простотой настройки, AmneziaVPN предлагает уникальную защиту от глубокой инспекции трафика, а TrueVPN гарантирует стабильное соединение без логов. Все три сервиса работают на любых устройствах и обеспечивают полную анонимность в сети.
Studio for Sale in Dubai dubai property developer nakheel in talks over push into asiaEmirates Crown guidedubai chicken in private property
Falaaa. Ganhei e saquei na máquinas slots e já recuperei o investimento.
5 Bedroom Villa for Sale in Dubai al suwaidi real estate dubaiproperty growth in dubai for next 5 yearscompounds villa for rent in business bay
Работал с данным магазином Совсем давно, и что то все руки не доходили оставить отзыв о магаз:D купить кокаин
Просим прощения,все нормально,мы сами разобрались. купить кокаин
3 Bedroom Villa For Sale In Dubai Villas for sale in Wildflowerthe palladium real estate dubaithe valley emaar
1 Bedroom Apartment for Rent in Dubai Marina Apartment for Sale in Jumeirah Golf Estates, DubaiApartments for sale in Al Wasl2 bedroom furnished apartments in dubai for monthly basis
fantastic publish, very informative. I ponder why the other specialists of this sector do not realize this.
You must proceed your writing. I’m sure, you have a great readers’ base already!
ВЫ ЛУЧШИЕ! купить кокаин
Веспер на Шаболовке подойдет тем, кто ищет баланс между динамикой мегаполиса и комфортной жилой средой с развитой инфраструктурой вокруг, Новостройки Москвы
Выбирая недвижимость в историческом районе столицы, многие рассматривают ЖК Vesper Шаболовка благодаря сочетанию современной архитектуры, развитой инфраструктуры и близости к центру Москвы: https://vesper-shabolovka.ru/
Villa for Sale in Abu Dhabi smart home properties dubaial shafaq properties dubaireal estate consultant dubai
Языковая школа EnglishGroup обеспечивает результативное изучение английского для взрослых, подростков и детей. Профессиональные преподаватели помогут освоить язык с азов и сдать тесты TOEFL и IELTS. Записывайтесь на сайте https://englishgroup.by/ и получите бесплатное пробное занятие в идущей группе. Ощутимый прогресс и комфортный формат уроков обеспечены любому слушателю.
у меня тоже дроп подлетел с посылкой и брали его ФСБшники почему то , но слава богу до уголовного дела не дошло, и ТС обещал жирную скидку сделать при следуещем заказе как то так (документы о прекращении уголовного дела и экспертиза на руках) дело закрыли по двум причинам то что дроп не при делах а второе самое главное что экспертиза не выявила НС купить кокаин
Emaar Properties for Sale 2 bedroom apartments for rent in dubai near metro stationcheap holiday apartments to rent in dubaifree months on rent dubai
Spingranny spingranny česká ist eine Online-Casino-Plattform mit Spielen, Boni und Aktionen. Dieser Überblick behandelt Spingranny Bewertungen, Login, Registrierung, App-Zugang, Zahlungen und Verfügbarkeit in verschiedenen Ländern.
не мне в пятницу и субботу он отвечал.гворит документы есть что отправленно купить кокаин
Apartments For Sale In Downtown Dubai own a property in dubai in 25000 dhscrc property dubairafiq real estate dubai
World Cup 2026 Portugal qualify at good odds. Using 1xBet with m-pesa for fast deposits.
Villa in dubai for 2 million Terra Novacity walk dubai properties for saleal habtoor al qusais building
спасибо стараемся купить кокаин
Spingranny spingranny σύνδεση ist eine Online-Casino-Plattform mit Spielen, Boni und Aktionen. Dieser Überblick behandelt Spingranny Bewertungen, Login, Registrierung, App-Zugang, Zahlungen und Verfügbarkeit in verschiedenen Ländern.
Vipluck vipluck casino österreich ist ein modernes Online-Casino mit großen Bonusangeboten und schnellen Auszahlungen. Spieler wählen Vipluck wegen der vielen Slots, sicheren Zahlungen und positiven Vipluck Casino Erfahrungen.
Villa for Sale in Sharjah dream catcher real estate brokers dubaishort term rentals in dubai silicon oasismutual funds investment in uae
в курске у стаффсторе лутше не брать за кладом надо ехать с граблями и лопатой сугробы копать иначе никак купить кокаин
Everyone loves the thrill of the game and the chance to win big money! Now, people in UK have the opportunity to play at a casino britsino trustpilot and score huge payouts instantly. To find out all the details, stick around and read our review!
apartments for sale in downtown dubai sotheby’s real estate dubaicheapest place to rent in dubaihotel apartments in qusais dubai
С человеком приятно иметь дело. Склонен на компромиссы 😉 купить кокаин
villa for sale in dubai silicon oasis best area to invest in dubai real estatesphinx dubai real estateaqua properties dubai address
This piece was remarkably insightful, anticipating the reader’s questions and answering them proactively. The depth here is impressive without ever becoming unnecessarily technical or dense.
2 bedroom townhouse for sale in dubai brick home properties dubaiflats for rent in dubai motor citybest property investment
Качественные окна — основа уюта и энергоэффективности любого дома. Компания, представленная на сайте https://ideal-okna57.ru/, специализируется на производстве и установке пластиковых окон в Орле и области. Профессиональные замерщики, точный монтаж и современные профильные системы обеспечивают долговечность и надёжную теплоизоляцию. Клиенты получают не просто окна, а готовое решение под ключ с гарантией качества на весь срок эксплуатации.
Everyone loves the thrill of the game and the chance to win big money! Now, people in UK have the opportunity to play at a casino britsino bonus code and score huge payouts instantly. To find out all the details, stick around and read our review!
плиз подскажи выход с грамма и в чем растворяла ркс? (буду благодарен) купить кокаин
Меня один магазин вчера мурыжил с 5 вечера, никак не мог дать реквизиты, хотя чего уж проще? Выдал реквизиты, получил запрошенгую сумму, и пусть себе человек занимается своими делами. И адекватный же был сервис в прошлом году. Ну да ладно. купить кокаин
Houses for Sale in Dubai luxury living real estate dubaibuy property with cryptocurrency dubaikonami property dubai
Компания «МАСТЕРВУД-СТАНКИ» предлагает полный спектр оборудования для деревообработки и производства мебели от ведущих заводов HBW, Blue Elephant, Fravol, Maggi и V-hold. В каталоге — форматно-раскроечные, кромкооблицовочные, сверлильно-присадочные, четырёхсторонние и фрезерные станки с ЧПУ, а также сушильные камеры, покрасочные линии и инструмент. Опытные менеджеры подберут оборудование за 10 минут, а специалисты обеспечат доставку, пуско-наладку, обучение и сервис. Подробнее — на сайте https://mwstanki.ru/. Доступен лизинг, запчасти и демонстрационный зал в Химках. Надёжное решение для вашего производства.
Villa for Sale in Sharjah bank foreclosure properties dubaihot properties for sale in dubaielite city real estate dubai
Spingranny spingranny bonus code no deposit ist eine Online-Casino-Plattform mit Spielen, Boni und Aktionen. Dieser Überblick behandelt Spingranny Bewertungen, Login, Registrierung, App-Zugang, Zahlungen und Verfügbarkeit in verschiedenen Ländern.
Её переместили в арбитраж. Тогда ничем помочь не могу. купить кокаин
Distress Property for Sale in Dubai 1 bedroom flat to rentdubai properties group newszero down payment apartment in dubai
Анализ целевой аудитории и конкурентов — Торговые ряды(павильоны)
Однажды тормознули его два обкуренных в ноль пацаненка. Один из накуренных засовывает голову в окошко и говорит: купить кокаин
Spingranny spingranny no deposit bonus ist eine Online-Casino-Plattform mit Spielen, Boni und Aktionen. Dieser Überblick behandelt Spingranny Bewertungen, Login, Registrierung, App-Zugang, Zahlungen und Verfügbarkeit in verschiedenen Ländern.
luxury penthouses for sale in dubai al ghurair real estate dubai uaedubai properties ras al khor officefab properties in mankool dubai
Everyone loves the thrill of the game and the chance to win big money! Now, people in UK have the opportunity to play at a casino How to register on Britsino and score huge payouts instantly. To find out all the details, stick around and read our review!
I am curious to find out what blog system you happen to be utilizing?
I’m experiencing some small security problems with my latest
site and I would like to find something more risk-free.
Do you have any suggestions?
Everyone loves the thrill of the game and the chance to win big money! Now, people in UK have the opportunity to play at a casino britsino casinos and score huge payouts instantly. To find out all the details, stick around and read our review!
Full Building for Sale in Dubai buy dubai property cryptocurrencyshort stay apartment rental dubaiVillas for sale in Sobha Estates Villas
Трек получил! Данный магазин действительно выполняет свои обязанности перед покупателями.Просто при личном разговоре с продавцом можно действительно понять что работы у них действительно много и на это уходит время,просто стоит проявить терпение.Считаю как получу товар,его качество останется таким же наивысшим,как сама работа магазина купить кокаин
Hotel Apartments In Abu Dhabi For Monthly Rent major issues in the dubai property marketfirst choice real estate dubaidubizzle abu dhabi property for rent
Vipluck vipluck ist ein modernes Online-Casino mit großen Bonusangeboten und schnellen Auszahlungen. Spieler wählen Vipluck wegen der vielen Slots, sicheren Zahlungen und positiven Vipluck Casino Erfahrungen.
А вообще, читай раздел рецепты, там все очень подробно расписано, в нескольких темах причем купить кокаин
Property For Sale In Dubai Palm Jumeirah exclusive dubai real estate businessman jawad azizi detained by policewasl dubai real estate corporationmaydan village buy house dubai
Chào buổi tối, live scores section here is very useful for in-play betting. Nigeria match coming up soon.
Заглянул на сайт . Очень даже приятно удивлён увиденным . Сохранил в закладках (полезный сайт!) купить кокаин
2 bedroom apartment for sale in jbr dubai luxury property in dubai for saledubai real estate brokers commissionapartamentos en dubai venta
Торговые павильоны как элемент благоустройства городской среды — Торговые ряды(павильоны)
Great delivery. Great arguments. Keep up the great work.
Типография и копицентр «Самрай принт» предлагают полный спектр полиграфических услуг: печать визиток, листовок, брошюр, буклетов, книг, плакатов и чертежей. Ищете печать документов с флешки в москве? На samray.ru доступны широкоформатная печать, изготовление наклеек, календарей, бейджей, пластиковых карт, тиснение фольгой и шелкография. Брошюровка, ламинирование, сканирование, твёрдый переплёт дипломных работ и печать на футболках — под одной крышей.
СПб все ровно процветания магазину. Амф на 5+ купить кокаин
Apartments for Sale in Abu Dhabi Al Fahad Towerssecretary in real estate dubaipremium three bedroom apartments in dubai to buy
Павильон из сендвич-панелей московская область — Торговые ряды(павильоны)
2 Bedroom Townhouse for Sale in Dubai omran dubai properties officeproperty house real estate dubaifind a property
Я ж тебя хотел отпиарить. купить кокаин
My brother suggested I might like this blog.
He was entirely right. This post actually made my day.
You can not imagine just how much time I had spent for
this info! Thanks!
Apartment for Sale in Abu Dhabi dubai property purchase feesthe address dubai apartments for saleExclusive 2BR+Maid | Canal and Burj Khalifa View
ОТЗЫВ О РАБОТЕ МАГАЗИНА купить кокаин
2 bedroom apartment dubai for sale new developments in dubaiproperty agents in dubai marinadubai property for sale for foreigners
Cabinet IQ
8305 State Hwwy 71 #110, Austin,
TX 78735, United Տtates
254-275-5536
Bespoke
Football is the most exciting sport, especially when the World Cup is on. But you’ll be even more excited to watch the match if you decide to bet on it! But how do you learn to bet on sports, and most importantly, where? You can find the answers to all these questions at sports betting reviews
Ура! Скинул трек быстро) ждууууууу, отпишу. купить кокаин
Property for Sale in Downtown Dubai hotel apartments in dubai monthlydeloitte real estate dubaifalcon city dubai property show
“Я надеюсь что вы перепроверите товар ” купить кокаин
It is the best time to make some plans for the future and it’s time to
be happy. I have read this post and if I could I wish to suggest you
some interesting things or tips. Perhaps you could
write next articles referring to this article. I want
to read even more things about it!
buy a freehold property in dubai short term rental services dubaidubai marina propertyBuying property in Dubai through power of attorney — what you must know
Spingranny spingranny keine einzahlung ist eine Online-Casino-Plattform mit Spielen, Boni und Aktionen. Dieser Überblick behandelt Spingranny Bewertungen, Login, Registrierung, App-Zugang, Zahlungen und Verfügbarkeit in verschiedenen Ländern.
Hi there, this weekend is fastidious in favor of me, since this
point in time i am reading this impressive educational paragraph here at my home.
apartments for sale in downtown dubai want to buy house in dubaigarboob dubai propertiesdubizzle property rental in dubai
Отличный магазин Chemical-mix купить кокаин
Apartments For Sale In Downtown Dubai business ideas in dubai with low investment2 bedroom properties for rent in dubai1 bhk rent in sherlock house dubai
Клад был сделано на 5, инфу по кладу дали на 5. В общем очень доволен данным магазином, по качеству товара, отпишу позже! Заказывал здесь 1-ый раз, заливал бабки без гаранта, так что спокойно работайте без гаранта! Спасибо еще раз, продолжайте в том же духе, будем работать!!! купить кокаин
Irwin Casino irwin casino erfahrungen bietet eine moderne Plattform für Fans von Online-Casinospielen. Nutzer finden hier attraktive Bonusangebote, regelmäßige Aktionen und exklusive Vorteile für Neu- und Bestandskunden. Mit einem Promo Code Irwin Casino, einem Bonus Code Irwin Casino oder einem Irwin Casino Bonus Code können zusätzliche Boni und besondere Angebote freigeschaltet werden.
Павильон для выпечки под ключ Калуга — Торговые ряды(павильоны)
ксгорун рабочее зеркало
Павильон из сендвич-панелей московская область — Торговые ряды(павильоны)
Apartments In Uae For Sale across Top emerging real estate trends in Dubai for 2026property developers dubai listapartment for.rent 12 cheques business bay dubai
Irwin Casino irwin casino legal in deutschland bietet eine moderne Plattform für Fans von Online-Casinospielen. Nutzer finden hier attraktive Bonusangebote, regelmäßige Aktionen und exklusive Vorteile für Neu- und Bestandskunden. Mit einem Promo Code Irwin Casino, einem Bonus Code Irwin Casino oder einem Irwin Casino Bonus Code können zusätzliche Boni und besondere Angebote freigeschaltet werden.
2 Bedroom Townhouse for Sale in Dubai 1 bedroom apartment for rent in business bayproperty on rent in bur dubaidubai intercontinental real estate
и не планируете ни какой новой ветки на скайпе открыть!?там в скайпе мошенник значит от вас херачит направо и налево!и ссылку кидает на ваш магазин и говорит что от вас работает! купить кокаин
Just a quick note to express my appreciation. Take care
вчера сделал заказ. оплатил. жду трек купить кокаин
1 bedroom apartment for sale in downtown dubai genesis real estate dubai1 bhk for rent in bur dubai monthlysmart real estate dubai
Hi, I just hopped over to your web-site through StumbleUpon. Not somthing I might typically browse, but I liked your views none the less. Thanks for making something worthy of reading through.
Посетите сайт https://krasnodar.climateon.ru/ и вы найдете кондиционеры и сплит-системы, газовые котлы, тепловые завесы, водяные тепловентиляторы для квартиры, дома, офиса с доставкой в Краснодар и по всей России. Оказываем профессиональные услуги по установка кондиционеров в Краснодаре под ключ. Узнайте подробную информацию и цены на сайте.
Четкая структура меню позволяет быстро найти нужный металл
https://redmetsplav.ru/store/vanadiy-i-ego-splavy/vanadiy-vnm99-9—tu-1761-037-2587982-2002/polosa-vanadievaya-vnm99-9—tu-1761-037-2587982-2002/
Отличное соотношение цены и качества на весь цветной металлопрокат, будем заказывать еще.
https://xn--80aeedb0bfzeok.xn--p1ai/catalog/latunnoe-litoe-koltso/latunnoe-litoe-koltso-300kh800-mm-lmtssk/
Looking to buy or rent property in Dubai? jumeirah al waslnew launch dubai propertiesdubai international city studio apartment for rent
Ассортимент компании включает более 100 000 позиций, что позволяет закрыть практически любые потребности металлургического производства.
https://rms-ekb.ru/catalog/stalnoi-list/list-stalnoi-140kh380kh15000-mm-fe-360-en-10029/
Так что тут 50:50 если тебя примут. Все зависит от конкретного города и гнк в нем. купить кокаин
Great post, keep up the good work, I hope you don’t mind but I’ve added on my blog roll.
Your posts provide a clear, concise description of the issues.
Dubai Marina Apartments For Rent Monthly furnished villa for rent in dubai short termipf real estate brokers llc dubairesidential apartments in dubai
Молча !! Запрет вступает в силу 26го числа, если не ошибаюсь. Скидывай всё палево, жёсткий дист зарывай подальше и иди получай )) купить кокаин
Abnormal this put up is totaly unrelated to what I was searching google for, but it surely used to be listed at the first page. I suppose your doing one thing proper if Google likes you adequate to place you at the first page of a non similar search.
Ищете лучшие йога-туры, ретриты и авторские путешествия от проверенных и надежных организаторов? Посетите сайт https://yogajourney.ru/ где вы найдете большой выбор йога-туров, ретритов и семинаров. Не подошел ни один из множества туров? Мы разработаем его для вас под конкретный запрос. Подробнее на сайте. Yoga Journey – лучшие йога-туры по России и миру!
villa for sale in dubai silicon oasis la rosa dubai propertiesproperty show dubaifurnished room for rent in dubai for 3 months
“Вообщем не знаю кто подьебал Минер или Поставщик но товар “ЧИСТЫЕ ТАБЛЕТКИ ” купить кокаин
Irwin Casino irwin casino bonus bietet eine moderne Plattform für Fans von Online-Casinospielen. Nutzer finden hier attraktive Bonusangebote, regelmäßige Aktionen und exklusive Vorteile für Neu- und Bestandskunden. Mit einem Promo Code Irwin Casino, einem Bonus Code Irwin Casino oder einem Irwin Casino Bonus Code können zusätzliche Boni und besondere Angebote freigeschaltet werden.
Flats for Sale in Dubai old town dubai propertiesvillas for rent in discovery gardens dubairoom for rent in apartment in dubai deira
Корзина на сайте промышленного предприятия — удобный инструмент для формирования заявки
https://redmetsplav.ru/store/vanadiy-i-ego-splavy/vanadiy-fev60—iso-5451/list-vanadievyy-fev60—iso-5451/
Качество сварочных материалов на высоте, электроды варят отлично, состав металла стабильный.
https://xn--80aeedb0bfzeok.xn--p1ai/catalog/mednyi-perekhodnoi-troinik-press/mednyi-perekhodnoi-press-troinik-76-1kh28-mm-m3t-gost-r-52948-2008/
This article is really a pleasant one it assists new net viewers,
who are wishing in favor of blogging.
Дай думаю зайду поздороваюсь с мамонтами опасного бизнеса.:hello: купить кокаин
We recognize the value of your time, which is why we have
incorporated a Turbo Mode feature into Easy Videos Downloader.
وی ایزوله ناترکس، حاوی ۲۵ گرم پروتئین وی ایزوله ۱۰۰٪ در هر سروینگ است که با روش میکروفیلتراسیون پیشرفته تولید شده.
Emaar Properties for Sale big real estate developers in dubaial wasl village al qusaisdubai property lagoon sales center
В каталоге представлены конденсаторные ниобиевые порошки высокой чистоты, необходимые для современной электроники.
https://rms-ekb.ru/catalog/stalnoi-list/stalnoi-list-35khgsa-25x2000x1100-gost-19903-2006-gladkii-belyi-goriachekatanyi/
Apartments For Rent In Dubai Silicon Oasis real estate prices dubai further fallvilla in anbar dubai marina for salelegal counsel intellectual property seeking dubai
Магазин работает на 5+++++, я уже раз 5 беру у данного сейлера все ровно все катит, качество на высоте! купить кокаин
Сделать можно хоть в Новогоднюю ночь, но обработан он будет только после 9 января. купить кокаин
jvt villa for sale Al Barari guidehow to open a real estate business in dubaidubai hotel apartments rental
Отраслевой охват впечатляет: от медицины до космической промышленности
https://redmetsplav.ru/store/titan/rossiyskie-splavy-4/titan-vt2-sv—ost-1-90015-77-1/pokovka-titanovaya-vt2-sv—ost-1-90015-77-1/
2 Bedroom Townhouse for Sale in Dubai best sold properties in dubaiabu dhabi studio for rent monthlydubai real estate corporation payee name
Hey! This post could not be written any better! Reading
this post reminds me of my previous room mate!
He always kept talking about this. I will forward this
article to him. Fairly certain he will have a good read.
Many thanks for sharing!
хотел узнать по какой причине скайп магазина не в сети со вчерашнего дня? купить кокаин
Buy Property In Downtown Dubai majid al futtaim properties dubaiSama Townhousesdubai real estate companies in downtown
магаз ровный,всем советую!! купить кокаин
Dubai apartment for sale 1 bedroom real estate agents dubai salaryeres real estate dubaitiger properties dubai owner
https://uaksu.forum24.ru/?1-10-0-00004051-000-0-0-1779182141
Экспертная консультация при выборе сплавов помогает клиентам оптимизировать затраты и избежать технологических ошибок.
https://rms-ekb.ru/catalog/krug-iz-instrumentalnoi-stali/krug-4kh5v2mf-24-gost-7417-75/
https://telegram.me/s/look_com_ua/12
https://telegram.me/s/look_com_ua/23
У меня проблема с оплатой реквизитам 40817810… и 41548… Проверял несколько раз на нескольких терминалах… “Введён неверный номер” С сайта списал верно, несколько раз перепроверил. Вот так, хочу оплатить, а не могу, готов хоть блиц отправить или ещё как нибудь купить кокаин
Упоминание нефтегазовой отрасли как ключевого потребителя
https://redmetsplav.ru/store/titan/rossiyskie-splavy-4/titan-t4—gost-2171-90/pokovka-titanovaya-t4—gost-2171-90/
Off Plan Real Estate Dubai wasl building dubaidubai real estate news market trendspulse residence dubai south
Удобный сайт и понятная навигация по каталогу, легко найти нужную марку стали или сплава.
https://xn--80aeedb0bfzeok.xn--p1ai/catalog/mednyi-perekhodnoi-troinik-press/mednyi-perekhodnoi-press-troinik-35kh8-mm-cu-dhp-gost-r-52948-2008/
http://forum.grandvitara-club.ru/forum/showthread.php?32710-Доставка-цветов-в-Москве&p=74636#post74636
Выбирая квартиру в новом доме, многие ориентируются на перспективность района. Тимирязевский район обладает высоким потенциалом развития и считается одной из востребованных локаций столицы – квартиры в жк 26 парквью
Пару строк отписал паронойный напряг бы снял да дальше работал… купить кокаин
Hotel Apartments in Bur Dubai for Monthly Rent villa office for sale in dubaijust property rent dubaibeachfront properties in dubai
https://telegram.me/s/look_com_ua/22
https://telegram.me/s/look_com_ua/24
https://dom-nam.ru/index.php/component/kunena/stroitelnye-kompanii/169911-dostavka-tsvetov-v-moskve#212050
Studio for Sale in Dubai 2 bedroom apartment in dubai al nahdaApartments for sale in Elite Residencepakistani properties dubai psf
все огонь люди работают!!!пс за поддержку ) купить кокаин
Wer nach einem zuverlässigen Online-Casino sucht, findet bei Irwin Casino irwincasinox.de eine große Auswahl an Spielen und attraktiven Promotionen. Regelmäßige Bonusaktionen, exklusive Angebote und spezielle Belohnungen sorgen für zusätzlichen Spielspaß. Mit einem Irwin Casino Promo Code oder einem aktuellen Bonus Code lassen sich weitere Vorteile und interessante Prämien sichern.
Real estate business for sale in dubai real estate websitesoasis real estatehomes direct properties dubai
ЖК 26 ПаркВью станет хорошим выбором для семей, которые хотят жить рядом с образовательными учреждениями, парками и объектами повседневной инфраструктуры, 26 парквью жк мр групп
Оператор вполне одыкватный и понимающий:ok: Сколько раз он мне бонусы делал, за это конечно одельный +… купить кокаин
I don’t think the title of your article matches the content lol. Just kidding, mainly because I had some doubts after reading the article.
Информация о проверке качества продукции повышает лояльность клиентов
https://redmetsplav.ru/store/titan/rossiyskie-splavy-4/titan-et2—tu-1-9-77-85/provoloka-titanovaya-et2—tu-1-9-77-85/
Ответственная компания, которая ценит долгосрочное сотрудничество, всегда идут навстречу клиенту.
https://xn--80aeedb0bfzeok.xn--p1ai/catalog/latunnoe-litoe-koltso/latunnoe-litoe-koltso-500kh800-mm-lts40mts3a/
ООО «РМС» предлагает широкий спектр цветного проката, включая медь, латунь, бронзу и дюралюминий.
https://rms-ekb.ru/catalog/stalnoi-list/stalnoi-list-35khg2-25x1300x1100-gost-19903-2006-gladkii-belyi-goriachekatanyi/
3 bedroom townhouse for sale in dubai tax free investment dubai real estatebest return on investment property dubaihalal investment in uae
Football is the most exciting sport, especially when the World Cup is on. But you’ll be even more excited to watch the match if you decide to bet on it! But how do you learn to bet on sports, and most importantly, where? You can find the answers to all these questions at sports betting comparison
21 мая заказал -23 получил трек.все ок ,жду посыл купить кокаин
3 Bedroom Apartments For Rent In Dubai st clair real estate tecom dubairas al khor dubai propertieswhat to know about buying property in dubai
А с какого дживика еще больше делать можно? купить кокаин
material muito bem feito. cassino brasileiro é real. F12
5 Bedroom Villa for Sale in Dubai ahdaaf real estate dubaikeywords for dubai real estatesonder downtown towers
https://telegram.me/s/look_com_ua/21
https://telegram.me/s/look_com_ua/14
Studio Apartment for Sale in Dubai Apartments for sale in Dorra Baydubai investment properties llc dubaiberkshire real estate dubai
Успехов и процветания новому селлеру!!! Желаю денег пресс и в обществе вес)) купить кокаин
Наличие обратной связи позволяет быстро отправить запрос
https://redmetsplav.ru/store/titan/rossiyskie-splavy-4/titan-37b—gost-19807-91/poroshok-titanovyy-37b—gost-19807-91/
Wer nach einem zuverlässigen Online-Casino sucht, findet bei Irwin Casino irwin casino review eine große Auswahl an Spielen und attraktiven Promotionen. Regelmäßige Bonusaktionen, exklusive Angebote und spezielle Belohnungen sorgen für zusätzlichen Spielspaß. Mit einem Irwin Casino Promo Code oder einem aktuellen Bonus Code lassen sich weitere Vorteile und interessante Prämien sichern.
Быстрая доставка в регионы через «Деловые Линии», груз пришел в целости и отлично упакованным.
https://xn--80aeedb0bfzeok.xn--p1ai/catalog/mednyi-perekhodnoi-troinik-press/mednyi-perekhodnoi-press-troinik-42kh12-mm-m2t-gost-r-52948-2008/
Football is the most exciting sport, especially when the World Cup is on. But you’ll be even more excited to watch the match if you decide to bet on it! But how do you learn to bet on sports, and most importantly, where? You can find the answers to all these questions at live sports betting
Радуете ребята!!! купить кокаин
Irwin Casino irwin kasyno bietet eine moderne Plattform für Fans von Online-Casinospielen. Nutzer finden hier attraktive Bonusangebote, regelmäßige Aktionen und exklusive Vorteile für Neu- und Bestandskunden. Mit einem Promo Code Irwin Casino, einem Bonus Code Irwin Casino oder einem Irwin Casino Bonus Code können zusätzliche Boni und besondere Angebote freigeschaltet werden.
Apartments for sale in Arjan average cost of studio apartment in dubaidubai new projects real estatecheap villas in al furjan for rent
Благодаря репутации MR Group проект вызывает интерес не только у покупателей жилья, но и у инвесторов, рассматривающих перспективные объекты на рынке московской недвижимости – жк 26 парквью тимирязевская
Wer nach einem zuverlässigen Online-Casino sucht, findet bei Irwin Casino irwin casino aktionscode eine große Auswahl an Spielen und attraktiven Promotionen. Regelmäßige Bonusaktionen, exklusive Angebote und spezielle Belohnungen sorgen für zusätzlichen Spielspaß. Mit einem Irwin Casino Promo Code oder einem aktuellen Bonus Code lassen sich weitere Vorteile und interessante Prämien sichern.
География деятельности компании охватывает всю территорию России, обеспечивая металлом предприятия в удаленных регионах.
https://rms-ekb.ru/catalog/truba-konstruktsionnaia/truba-konstruktsionnaia-17g1s-325×7-gost-21729-76/
Full Building for Sale in Dubai freehold property in abu dhabistudio for rent in dubai investment parkintellectual property caeses dubai
I read this article fully about the comparison of hottest
and earlier technologies, it’s amazing article.
https://telegram.me/s/look_com_ua/15
Хороший сервис судя по отзывам!:) купить кокаин
Одним из преимуществ ЖК 26 ПаркВью является его расположение в районе с развитой социальной инфраструктурой, что особенно важно для семейного проживания: https://26park.ru/
Townhouses for Sale in Dubai damac properties dubai locationdubai real estate horizental hddubai hills estate maple 2
брат, у меня ощущение что я с тобой работал, но название магаза было немного другим, тоже в доверенной ветке был))) почерк тот же, и порядочность. я прав или ошибаюсь?)) купить кокаин
Четкое позиционирование как эксперта в области редких металлов
https://redmetsplav.ru/store/niobiy1/splavy-niobiya-1/niobiy-ta-nb3-1/poroshok-niobievyy-ta-nb3/
https://telegram.me/s/look_com_ua/30
Покупали изделия из драгметаллов для лаборатории, всё соответствует заявленным характеристикам.
https://xn--80aeedb0bfzeok.xn--p1ai/catalog/latunnoe-litoe-koltso/latunnoe-litoe-koltso-80kh100-mm-lk1/
Emaar Properties for Sale real estate companies in al quozproperty consultancy dubaistudio apartment for rent in jlt dubai
I feel this is one of the such a lot vital info for
me. And i’m glad studying your article. But
want to commentary on some basic issues,
The website style is perfect, the articles is in reality nice : D.
Excellent process, cheers
This resource was genuinely useful, supporting every claim with solid reasoning and real examples. The way this explains the subject is far better than anything else I found on it.
я вот тоже дождался и пришел ко мне груз ценный)) завтра поеду забирать, потом отпишу что и как купить кокаин
Studio for Sale in Dubai aqua properties dubai land departmentdubai office real estate report knight frank3 bedroom apartments for sale in dubai marina
У данного сллера только легал. Все проверено. купить кокаин
Football is the most exciting sport, especially when the World Cup is on. But you’ll be even more excited to watch the match if you decide to bet on it! But how do you learn to bet on sports, and most importantly, where? You can find the answers to all these questions at safe sports betting sites
Apartment for Sale in Abu Dhabi dt1 residential tower ellington properties dubaidubai properties medivivialis it wise to buy property in dubai
It’s a comprehensive, yet fast read.
Описание применения металлов в атомной энергетике подчеркивает качество
https://redmetsplav.ru/store/niobiy1/splavy-niobiya-1/niobiy-nb2-1/poroshok-niobievyy-nb2/
заметил, что там тс появляется на много чаще купить кокаин
Прозрачное оформление документов и быстрое выставление счетов, приятно работать с профессионалами.
https://xn--80aeedb0bfzeok.xn--p1ai/catalog/mednye-otvody-press/mednyi-otvod-press-45-gradusov-70-mm-m1r-gost-r-52948-2008/
Apartments for Sale in Dubai Emaar furnished studio for rent in al nahda dubai1 bedroom for rent dubaiwhere to invest
Football is the most exciting sport, especially when the World Cup is on. But you’ll be even more excited to watch the match if you decide to bet on it! But how do you learn to bet on sports, and most importantly, where? You can find the answers to all these questions at football betting news
Wer nach einem zuverlässigen Online-Casino sucht, findet bei Irwin Casino https://irwincasinox.de/ eine große Auswahl an Spielen und attraktiven Promotionen. Regelmäßige Bonusaktionen, exklusive Angebote und spezielle Belohnungen sorgen für zusätzlichen Spielspaß. Mit einem Irwin Casino Promo Code oder einem aktuellen Bonus Code lassen sich weitere Vorteile und interessante Prämien sichern.
buy penthouse in dubai emaar dubai chi esobha new project in dubaiapartment fopr sale in dubai
Привет всем бандиты? как дела у вас? купить кокаин
Wer nach einem zuverlässigen Online-Casino sucht, findet bei Irwin Casino irwin casino mobile eine große Auswahl an Spielen und attraktiven Promotionen. Regelmäßige Bonusaktionen, exklusive Angebote und spezielle Belohnungen sorgen für zusätzlichen Spielspaß. Mit einem Irwin Casino Promo Code oder einem aktuellen Bonus Code lassen sich weitere Vorteile und interessante Prämien sichern.
Ajman Villa for Sale zabeel institute sharjahis selling property with bitcoin illegal in dubaidubai international real estate al nahda
я от данного сэллера так ничего и не получил. заказывал 6 февраля, месяц тянул продаван резину, а в марте выслал повторно , но посылку арестовали еще в москве, итог:груза нет, денег нет. мотайте на ус, я с такими БАРЫГАМИ дел иметь не хочу… купить кокаин
1 Bhk For Sale In Dubai how to promote dubai real estate in russialanding in dubaiproperty for sale in al nahda dubai for indian
Фольга из редких металлов часто требуется для высокотехнологичных лабораторий
https://redmetsplav.ru/store/molibden-i-ego-splavy/molibden-nimo-25-3/polosa-molibdenovaya-nimo-25-1/
ребята ровно работают! купить кокаин
Долго искали надежного поставщика циркония, в Редметсплав предложили лучшие условия и чистоту металла.
https://xn--80aeedb0bfzeok.xn--p1ai/catalog/latunnoe-litoe-koltso/latunnoe-litoe-koltso-200kh700-mm-lk/
Компания осуществляет поставки базового металлургического сырья, включая олово, свинец и цинк в чушках.
https://rms-ekb.ru/catalog/plity/plita-5khv2sf-29x100x560-gost-19903-74/
Your means of describing everything in this post is actually good, all be able to easily know it, Thanks a lot.
1 Bedroom Apartment for Sale in Dubai Villas for sale in Eden House Dubai Hillsdubai marina property marketsara real estate brokerage dubai
Выбирая квартиру в новом доме, многие ориентируются на перспективность района. Тимирязевский район обладает высоким потенциалом развития и считается одной из востребованных локаций столицы https://26park.ru/
Мир вам! купить кокаин
One Bedroom Apartment for Sale in Dubai emaar istanbul apartments for saleAl Habtoor City Residentialdubai short term rental villa
Продован 1000 балоф те =) купить кокаин
Studio Apartment for Sale in Dubai apartment consulate ceneral of the russian federation in dubaidubai labour court location maproom for rent in dubai hor al anz
Irwin Casino casino irwin bonus code bietet eine moderne Plattform für Fans von Online-Casinospielen. Nutzer finden hier attraktive Bonusangebote, regelmäßige Aktionen und exklusive Vorteile für Neu- und Bestandskunden. Mit einem Promo Code Irwin Casino, einem Bonus Code Irwin Casino oder einem Irwin Casino Bonus Code können zusätzliche Boni und besondere Angebote freigeschaltet werden.
Удобное разделение продукции на сплавы и конкретные виды проката
https://redmetsplav.ru/store/molibden-i-ego-splavy/molibden-mo-cu30-1/izdeliya-iz-molibdena-mo-cu30/
Благодарим за оперативную поставку ниобиевых труб, выручили в очень сжатые сроки.
https://xn--80aeedb0bfzeok.xn--p1ai/catalog/mednye-otvody-press/mednyi-otvod-press-90-gradusov-15-mm-m3rt-gost-r-52948-2008/
Great resources and tips for families here.
whoah this weblog is wonderful i like reading your articles. Keep up the good paintings! You already know, many people are looking around for this information, you can help them greatly.
commercial real estate for sale in dubai dubai residential buildingsbest deals real estate dubaiApartments for sale in Dubai Creek Residences
Ещё и сообщения трут. купить кокаин
Informative article, totally what I was looking for.
https://senselessvenndiagrams.com/
Компания обеспечивает поставки оксовольфрамата гафния — редкого соединения для специфических нужд химической и атомной промышленности.
https://rms-ekb.ru/catalog/ugolok-stalnoi/ugolok-stalnoi-10khsnd-65x50x7-gost-19771-93/
villa for sale in meydan dubai metropolitan premium properties dubaiApartments for sale in Creek Riseapartments to let in dubai
особенно с вашей репутацией! купить кокаин
I love it when people get together and share views. Great site, continue the good work!
1 Bedroom Apartment for Sale in Dubai residential property to let in dubaiwhich areas expat buy the property in dubaimaestro real estate dubai
I was suggested this website by my cousin. I am not sure whether this post is written by him as no one else know such detailed about my difficulty. You are wonderful! Thanks!
Указан физический адрес в Екатеринбурге, что повышает доверие
https://redmetsplav.ru/store/molibden-i-ego-splavy/molibden-4604-1/polosa-molibdenovaya-4604/
Удачных закупок купить кокаин
Быстрая доставка в регионы через «Деловые Линии», груз пришел в целости и отлично упакованным.
https://xn--80aeedb0bfzeok.xn--p1ai/catalog/latunnaia-vtulka/latunnaia-vtulka-110-mm-lts40mts1-5/
2 BHK for Sale in Dubai holiday property rental dubaiApartment for Sale in Deira, Dubaidubai real estate brokerage license
Ждем трип репотов и описания про АМ купить кокаин
Distress Property for Sale in Dubai rental villas in jumeirah dubaicheap property for sale in dubaiwarehouse rent dubai monthly
Nice blog. Could someone with little experience do it, and add updates without messing it up? Good information on here, very informative.
Хотите, чтобы ваш сайт говорил с посетителями буквально? Сервис «Кузя Ассистент» предлагает уникальное решение: анимированный персонаж на страницах вашего ресурса ненавязчиво рекламирует товары, статьи и услуги, удерживая внимание аудитории. Загляните на https://kuzya-assistant.ru/ и выберите одного из 17 харизматичных героев — от уютного домовёнка до строгого робота-техника. Виджет легко встраивается на любой сайт, поддерживает AI-генерацию реплик и предоставляет детальную аналитику. Первые 7 дней — бесплатно, без привязки карты.
Arabian Ranches Villas for Sale mgk real estate broker dubaibuy apartment in burj khalifa dubaiproperty finder greens dubai
Магазин лутше не встречал!!!! купить кокаин
Экспертная консультация при выборе сплавов помогает клиентам оптимизировать затраты и избежать технологических ошибок.
https://rms-ekb.ru/catalog/list/list-11khf-2x1000x1500-gost-19903-74/
Ищете криптообменник вроцлав? Посетите сайт exchangeburo.com – мы гарантируем высокое качество обслуживания и максимально выгодные курсы обмена в Варшаве, в городе Вроцлав и других городах. Что вы получаете: молниеносный обмен, полную анонимность, безопасность и стабильность, а также выгодные условия обмена. Посетите сайт узнайте больше о нас и предлагаемых услугах. Мы стремимся предоставить вам самые выгодные условия и превосходное обслуживание.
apartment for sale downtown dubai 2bkh villa for rent in rashidiya dubaikings palace real estate dubai ??? ?????? ????????off plan villas dubai
Сайт поддерживает английскую версию, что важно для экспорта
https://redmetsplav.ru/store/magniy-i-ego-splavy/zarubezhnye-splavy-2/magniy-sismg4640-00—ss-144640/pokovka-magnievaya-sismg4640-00—ss-144640/
реагенты всегда чистые и по высшему??? сертифекаты вместе с реагентами присылают на прохождение экспертизы на легал? купить кокаин
Really when someone doesn’t understand after that its up to other viewers that they will help,
so here it occurs.
Ответственная компания, которая ценит долгосрочное сотрудничество, всегда идут навстречу клиенту.
https://xn--80aeedb0bfzeok.xn--p1ai/catalog/truba-mednaia-priamougolnaia/mednaia-priamougolnaia-truba-23x10x1-mm-mob-tu-48-21-366-74/
villa for sale in dubai silicon oasis flat for rent in dubai al quozcheapest freehold properties in dubai2 bedroom apartment in dubai land
I Am Going To have to come back again when my course load lets up – however I am taking your Rss feed so i can go through your site offline. Thanks.
один грамотей натупил тут , а про стафа правда купить кокаин
Like the way you’ve outlined things. Easy to follow. Not cluttered.
Emaar Properties for Sale arabian ranches 3 rubavilla in bur dubai for rentsmall scale business
ответь те на мыло я еще вчера вам написал! купить кокаин
Apartments for Sale in Dubai Investment Park Jebel Ali Villagestarting a manufacturing businessere homes real estate dubai
Поковки и штабики — важные заготовки для металлургических предприятий
https://redmetsplav.ru/store/magniy-i-ego-splavy/zarubezhnye-splavy-2/magniy-ms6—jis-h-4204/krug-magnievyy-ms6—jis-h-4204/
1xbet تحميل apk
Фирма «СтройДачу» занимается возведением жилых домов, бань и вспомогательных строений под ключ — в срок и с полной ответственностью. Профессиональные строители работают с различными материалами — деревом, блоками, каркасом — и предлагают проекты под каждый кошелёк. Посетите https://stroydachu.ru/ — здесь собраны готовые решения и расчёт стоимости онлайн. Каждый этап строительства — от основания до крыши — находится под контролем команды профессионалов.
Использование системы менеджмента качества гарантирует строгий контроль продукции на всех этапах отгрузки.
https://rms-ekb.ru/catalog/krug-iz-instrumentalnoi-stali/krug-3kh2mnf-48-gost-1133-71/
При разработке wellness-центра важно соединить бренд, планировку и будущую эксплуатацию. Если интерьер удобен для персонала и понятен клиенту, объект быстрее начинает работать на доверие, повторные обращения и выручку: https://vk.com/@-233185290-kak-otkryt-restoran-s-nulya-ot-idei-do-dizain-proekta
وان اكس بت apk
1xbet تحميل apk
5 Bedroom Villa for Sale in Dubai villas in dubai for rent 80000apartment for rent in al nahda sharjahdubai holding llc
Редметсплав — пример того, как должен работать современный поставщик металлургического сырья.
https://xn--80aeedb0bfzeok.xn--p1ai/catalog/latunnaia-vtulka/latunnaia-vtulka-630-mm-lts40mts3zh/
А то с после ситуации с РЦлаб все настораживают…… купить кокаин
وان اكس بت apk
Грамотный проект медицинского центра начинается с понимания формата, аудитории и ежедневных процессов. Такой подход помогает связать эстетику, функциональность и бюджет, чтобы интерьер был удобен для клиентов, команды и владельца бизнеса https://ru.pinterest.com/da_group/
хотел бы взять пару грамм на пробу, Амки, как это осуществить, уважаемый селлер подскажите пожалуйста купить кокаин
Hello, for all time i used to check webpage posts here in the
early hours in the dawn, for the reason that i enjoy to gain knowledge of more and more.
The other day, while I was at work, my sister stole my iphone and tested to see if it can survive a thirty foot drop, just so
she can be a youtube sensation. My apple ipad is now broken and she has 83 views.
I know this is totally off topic but I had to share it with someone!
One Bedroom Apartment for Sale in Dubai gemstar properties dubaioffice properties in dubai for rentawesome real estate ibn battuta dubai
وان اكس بت apk
Jumeirah Villas for Sale arabella phase 3 dubai propertieshotel monthly rates dubaimasterkey properties dubai
وان اكس بت apk
работаете качественно и по совести!так держать! купить кокаин
وان اكس بت apk
Наличие кобальтовых сплавов заинтересует авиастроение
https://redmetsplav.ru/store/magniy-i-ego-splavy/zarubezhnye-splavy-2/magniy-mg-c91-t5—en-2735/krug-magnievyy-mg-c91-t5—en-2735/
Business Bay apartments for sale flats for rent in dubai al ain roadcheap fully furnished studio for rent in dubaistudio flats in karama dubai for monthly rent
Первый раз брал у этого магазина,сразу же что то не то,если всё будет Ок,буду брать дальше,в принцыпе со всеми бывает( купить кокаин
1xbet تحميل apk
Townhouses For Rent In Dubai vat property dubaiprosperous real estate dubaiagency real estate dubai
ООО «РМС» обеспечивает поставки специализированных сварочных материалов для сложных условий эксплуатации.
https://rms-ekb.ru/catalog/stalnoi-list/stalnoi-list-12kh2nvfa-3-2x1700x1900-gost-19903-2006-gladkii-otsinkovannyi-goriachekatanyi/
وان اكس بت apk
Долго что то ты пробуешь:)интересно всё таки купить мефедрон
وان اكس بت apk
Информация о проверке качества продукции повышает лояльность клиентов
https://redmetsplav.ru/store/magniy-i-ego-splavy/zarubezhnye-splavy-2/magniy-mgal3zn1-alloy-25—iso-3116/prutok-magnievyy-mgal3zn1-alloy-25—iso-3116/
такчто чставлю 100/100баллов магазу и купить мефедрон Работы очень много, стараемся как можем, многие задают в Аську и Скайп одни и теже вопросы которые не касаются заказа(как в википедию ломяться)…
وان اكس بت apk
Хороший дизайн медицинского центра снижает риск ошибок на стройке, потому что заранее показывает, где будут оборудование, мебель, свет, коммуникации и ключевые зоны. Это помогает подрядчикам работать точнее, а владельцу контролировать результат – https://telegra.ph/Oshibki-v-dizajne-restorana-iz-za-kotoryh-biznes-teryaet-dengi-06-09
Технические специалисты компании помогли выбрать оптимальный сплав для работы в агрессивных средах.
https://xn--80aeedb0bfzeok.xn--p1ai/catalog/prutok-latunnyi-1/prutok-latunnyi-l63pt-7-mm-l-3000-mm-krug-1/
وان اكس بت apk
заказал, получил, покурил, охуел… купить мефедрон Все заказ пришел, не было времени отписаться, брали пробы, в аське вежливый,конкретный, все в сроки,просил отправить в день перевода денег, отправили, шла ровно 4 дня, как написанно на сайте, веса точные, не обманывают, все порадовало, консперация на высшем уровне, правда расчитывал на лучшее качество, мало держит, консентрация 1 к 6-8 самая лутая.. Огромное спасибо магазину, мир и процветание, выбераю чемикал микс) Всем мир друзья..
وان اكس بت apk
https://zaoavis.ru/
Я просто уже настолько завязан со сферой Lrc что подмечаю все мелочи. Даже когда в городе когда одни и та же машина мне попадается в разных местах я ее фоткаю и начинаю пробивать и узнавать че это за тачка и че зе номера )))). купить мефедрон А вот это очень интересно)))ДК есть он или его нет?В розницу пару г возможно надеюсь закзать?
وان اكس بت apk
Наличие прецизионных сплавов в ассортименте подтверждает работу компании с высокоточными и наукоемкими материалами.
https://rms-ekb.ru/catalog/ugolok-stalnoi/ugolok-iz-konstruktsionnoi-stali-30kh30kh4-mm-s16e-din-59370/
1xbet تحميل apk
продавец 8\10 долго отвечает, и порой не конкретно. купить мефедрон не понял вас.
Продажа проволоки из тугоплавких металлов востребована в электронике
https://redmetsplav.ru/store/magniy-i-ego-splavy/zarubezhnye-splavy-2/magniy-mcin2a—jis-h-2221/
وان اكس بت apk
Right now it appears like BlogEngine is the
best blogging platform out there right now.
(from what I’ve read) Is that what you’re using
on your blog?
وان اكس بت apk
все скоро будут всем довольны, а те кто ждал и не паниковал будут вдвойне довольны! купить мефедрон всем привет заказывал в етом магазе год назат постоянно но тут спустя год ко мне приходит сатрудница фскн говорит вы на мужны в качестве свидетеля типо в некоторых пасылках обнаружили наркотики и из моего города только я 1 заказывал дала павестку я непришол пришла сама и давай меня допрашивать я включаю дурака говорю я только кросовки и пуховик заказывал говорю а наркотиков там небыло , она все с моих слов записала и сказала больше меня непобиспокоят. я думал всё хана магазу
Boa tarde. Atualizando: jetx. 1xBet e a volatilidade é alta.
Цены на спецстали одни из самых конкурентных на рынке, при этом качество на уровне мировых стандартов.
https://xn--80aeedb0bfzeok.xn--p1ai/catalog/mednye-zaglushki-pod-paiku/mednaia-zaglushka-kolpachok-pod-paiku-88-9kh76kh1-8-mm-37-5kh40-5-mm-miagkaia-paika-m1-gost-r-52922-2008/
А как вы объясните такой факт, месяц назад я оплатил посылку и статус в обработке был более чем 11 дней да еще и ждал я посылку дней 10, я нечего не имею против вашей работы и вообще против вас в целом, вы отличный магазин, но согласитесь “ЛАЖИ” у вас все таки бывают, я говорю это к тому что бы в следующий раз такого не повторялось, без обид купить мефедрон Не понял…Его еще варить нужно??? На плитке?))
وان اكس بت apk
Vox Casino bonus bez depozytu vox casino to nowoczesna platforma dla miłośników gier kasynowych online. Gracze mogą korzystać z szerokiego wyboru automatów, gier stołowych oraz atrakcyjnych promocji przygotowanych zarówno dla nowych, jak i stałych użytkowników. Dodatkowe korzyści zapewniają kody promocyjne, darmowe spiny oraz bonusy bez depozytu dostępne w wybranych ofertach.
1xbet تحميل apk
https://zaoavis.ru/
Я уже начал сомневаться,что проблема в курьерке!Я им звонил,они в свою очередь звонили в головной офис-про мой трек они даже не слышали!!!А постановление вроде ещё не вступило в силу. купить мефедрон Заказал, оплатил, получил, Радуюсь… !:D Норм магаз приятно иметь дело..! !!
Наличие на складе редких металлов, таких как цирконий, выделяет компанию на фоне конкурентов, торгующих только массовым прокатом.
https://rms-ekb.ru/catalog/stalnoi-list/stalnoi-list-20khsnm-14x1250x1800-gost-19903-2006-gladkii-neotsinkovannyi-goriachekatanyi/
Superb post but I was wanting to know if you could
write a litte more on this subject? I’d be very thankful if
you could elaborate a little bit further. Bless
you!
tower rush game
1xbet تحميل apk
сам знаешь что я могу про тебя сказать, ты лучший в своем деле! все всегда в срок! товар на высшем уровне , качество огонь ! сколько раз не брал всегда все ровно и четко! ждем твоего возвращения очень очень ждем, уже сходим с ума без тебя братан)) возвращайся скорей купить мефедрон а че, под запрет попадает? вроде нет
Общее впечатление: надежный информационный ресурс для снабженцев.
https://redmetsplav.ru/store/magniy-i-ego-splavy/zarubezhnye-splavy-2/magniy-mag-5—bs-2970-1/izdeliya-iz-magniya-mag-5—bs-2970-1/
Vox Casino darmowe kody do vox casino to nowoczesna platforma dla miłośników gier kasynowych online. Gracze mogą korzystać z szerokiego wyboru automatów, gier stołowych oraz atrakcyjnych promocji przygotowanych zarówno dla nowych, jak i stałych użytkowników. Dodatkowe korzyści zapewniają kody promocyjne, darmowe spiny oraz bonusy bez depozytu dostępne w wybranych ofertach.
https://zaoavis.ru/
This is the right site for anyone who hopes to understand this
topic. You know a whole lot its almost tough to argue with you (not
that I personally will need to…HaHa). You definitely put a fresh spin on a
subject that’s been discussed for ages. Great stuff,
just great!
1xbet تحميل apk
Хороший магазин, все по совести купить мефедрон Все продукты кроме эйфора в наличии, заказывайте! Проб нет.
1xbet تحميل apk
Hello! I could have sworn I’ve been to this site before but after reading through some of the
post I realized it’s new to me. Nonetheless, I’m definitely
delighted I found it and I’ll be book-marking and checking back often!
Долго искали надежного поставщика циркония, в Редметсплав предложили лучшие условия и чистоту металла.
https://xn--80aeedb0bfzeok.xn--p1ai/catalog/latunnaia-polosa/latunnaia-polosa-2-5×200-mm-l80-gost-931-90/
tower rush cash game
вобще-то этот магазин трек присылает а не адрес… купить мефедрон “Что могу сказать Уважаемый Эскимос Я очень растроился в полученной Пробе И не хотелось выявлять Неготив в сторону твоего магазина”
وان اكس بت apk
Широкий выбор нержавеющей стали различных марок позволяет использовать продукцию в строительстве и пищевой промышленности.
https://rms-ekb.ru/catalog/truba-konstruktsionnaia/truba-konstruktsionnaia-12kh18n10t-22×0-3-gost-21729-76/
Братки все красиво стряпают, претензий к магазину нуль, всегда всё ровно. Единственное что сейчас напрягло, отсутствие на ветке вашего представителя в ЕКБ “онлайн”, представитель молчит ( а там по делу ему в лс отписано) и кажись воопще не заходит пару недель купить мефедрон посылка упакована оригинально =)) и скорость сборки удивила!
Лаконичное приветствие на главной странице сразу вводит в курс дела
https://redmetsplav.ru/store/magniy-i-ego-splavy/zarubezhnye-splavy-2/magniy-mag-111—bs-3370/prutok-magnievyy-mag-111—bs-3370/
1xbet تحميل apk
به دنبال VPN مناسب برای کاربران ایرانی هستید؟ به https://100vpn.org/ مراجعه کنید. ما بررسیها، مقایسهها و یک راهنمای جامع برای VPNها به زبان فارسی ارائه میدهیم. ما عاری از تبلیغات گمراهکننده، اطلاعات واقعی و تخصصی مورد نیاز شما برای تصمیمگیری درست و همچنین فهرستی از بهترین VPNها برای ایران را ارائه میدهیم.
Hello, I think your blog might be having browser compatibility issues. When I look at your website in Chrome, it looks fine but when opening in Internet Explorer, it has some overlapping. I just wanted to give you a quick heads up! Other than that, awesome blog!
Не согласен с Тобою!!! купить мефедрон у меня до сих пор нет реальной отправки,ток просроченная планируемая(((
1xbet تحميل apk
1xbet تحميل apk
My brother suggested I may like this website. He used to be entirely
right. This post truly made my day. You can not believe just how so much time I had spent for this information! Thank you!
We need to build frameworks and funding mechanisms.
Thank you pertaining to sharing the following great subject matter on your website. I ran into it on google. I am going to check to come back after you publish additional aricles.
گینر گالوانایز، به طور خاص برای ورزشکاران و افرادی طراحی شده که میخواهند بدن خود را تقویت کنند.
What time does the match start in my timezone? ⚽⚽⚽
tower rush cash game
You really make it seem really easy along with your presentation however I in finding this topic to be actually one thing which I think I might never understand.
It sort of feels too complex and very large for me.
I am looking forward for your next submit, I will try to get the grasp of it!
заказ дошел до нас))) купить мефедрон обращаюсь по возможности сюда беру оптом от 50 грамм
Спасибо команде за профессионализм и помощь в реализации нашего сложного промышленного проекта!
https://xn--80aeedb0bfzeok.xn--p1ai/catalog/mednoe-dvukhrastrubnoe-koleno-pod-paiku/mednoe-dvukhrastrubnoe-koleno-pod-paiku-180-gradusov-27-4kh23kh0-9-mm-18-4kh20-4-mm-miagkaia-paika-m3t-gost-32590-2013/
Vox Casino vox casino 38 to nowoczesna platforma dla miłośników gier kasynowych online. Gracze mogą korzystać z szerokiego wyboru automatów, gier stołowych oraz atrakcyjnych promocji przygotowanych zarówno dla nowych, jak i stałych użytkowników. Dodatkowe korzyści zapewniają kody promocyjne, darmowe spiny oraz bonusy bez depozytu dostępne w wybranych ofertach.
While this issue can vexed most people, my thought is that there has to be a middle or common ground that we all can find. I do value that you’ve added pertinent and sound commentary here though. Thank you!
tower rush game money
Запрета в прицепе это не касается. купить мефедрон да 203 й тут хороший,только я делал 1 к 15 мне понравилось)
وان اكس بت apk
Vox Casino kody promocyjne vox casino to nowoczesna platforma dla miłośników gier kasynowych online. Gracze mogą korzystać z szerokiego wyboru automatów, gier stołowych oraz atrakcyjnych promocji przygotowanych zarówno dla nowych, jak i stałych użytkowników. Dodatkowe korzyści zapewniają kody promocyjne, darmowe spiny oraz bonusy bez depozytu dostępne w wybranych ofertach.
https://zaoavis.ru/
property prices going up in dubaistudio flat for rent in oud metha dubaiproperty for sale in the springs dubai Off Plan Real Estate Dubai
Apartments for sale in Golf Heightsreal estate market news in dubai
https://zaoavis.ru/
Наличие прецизионных сплавов в ассортименте подтверждает работу компании с высокоточными и наукоемкими материалами.
https://rms-ekb.ru/catalog/ugolok-stalnoi/ugolok-iz-konstruktsionnoi-stali-30kh20kh3-mm-46cr2-en-10056-1/
p2p lending
товар появился? когда возобновите доставку по городам? купить мефедрон когда дело было? а то я сам жду заказ
Возможность заказа висмута — достаточно редкое предложение на рынке
https://redmetsplav.ru/store/magniy-i-ego-splavy/zarubezhnye-splavy-2/magniy-m16601—uns/polosa-magnievaya-m16601—uns/
rent apartment in wadi al safa 5 dubizzle dubai landemaar south emaarproperty finder dubai deira Distress Property for Sale in Dubai
dubai properties remraam rentproperty for sale in dubai studio city
p2p lending
Заливают паршивым вином. купить мефедрон Есть люди в вк, которые представляются под маркой вашего магазина и кидают людей, уже не одного так кинули, так что будьте внимательны и уточняйте у реальных представителей магазина, так оно или нет.
dubai property development companyapartments to buy in dubai marinathe green community dubai apartments for rent 3 bedroom townhouse for sale in dubai
dubai international real estate po boxapartment with garden
I wish I could craft such articles as this. Thank you very much.
p2p lending
Cabinet IQ
8305 Stаte Hwyy 71 #110, Austin,
TX 78735, United Ⴝtates
254-275-5536
Bookmarks
flat for rent in baniyas dubaireal estate crowdfundingchinese real estate market vs dubai real estate https://buypenthouseindubai.com
heat al barshareal estate brokerage dubai as a service
21 мая заказал -23 получил трек.все ок ,жду посыл купить мефедрон заказал rcs-4, чет не радует отзывы, как придет со дня на день посмотрим, что выйдет отпишусь, буду делать 1к 10-ти…
Поставки всегда вовремя, логистика отлажена до мелочей, что важно для бесперебойной работы цеха.
https://xn--80aeedb0bfzeok.xn--p1ai/catalog/latunnaia-polosa/latunnaia-polosa-1×400-mm-lmts58-2-gost-931-90/
1xbet تحميل apk
Brasil at 22Bet — mtn momo deposit confirmed. Good odds for WC2026 group stage.
WC2026 Africa: Gana betting markets are solid. 1xBet has fast cripto withdrawals.
Brasil at 1xBet — mtn momo deposit confirmed. Good odds for WC2026 group stage.
buy properties online dubaiflat for rent in bur dubai meena bazaarfurnished studio monthly rent dubai marina https://makerfairejerusalem.org
dubai rent 1 month notice vacatingreal estate agents in deira dubai
Ребята с 11го года магазин работает на отлично, сомнений не у кого не должно быть!!! купить мефедрон отдыхай до понедельника
1xbet تحميل apk
Прокат яхт в Адлере позволяет получить уникальные впечатления от отдыха на Черном море. Во время прогулки можно встретить дельфинов, полюбоваться закатом и увидеть побережье таким, каким его невозможно увидеть с суши https://yachtkater.ru/
Стабильный вкус кофе — главное требование любой кофейни. Redberry Coffee обжаривает зерно небольшими партиями и поставляет его оптом, строго контролируя профиль обжарки от партии к партии. Это значит, что бариста каждый день работает с предсказуемым зерном, а гость получает одинаково хороший эспрессо. На https://redberrycoffee.ru/coffee-wholesale можно выбрать моносорта и купажи, запросить пробную партию и согласовать условия регулярных поставок для вашего заведения.
real estate market in dubaisharing accommodation in dubai19 billion worth of real estate sold in dubai one bedroom apartment for sale in dubai
arlington properties dubai5 bedroom Villas for sale in Al Hamra Village
ООО «РМС» обеспечивает поставки специализированных сварочных материалов для сложных условий эксплуатации.
https://rms-ekb.ru/catalog/plity/plita-5khnvs-22x100x125-gost-19903-74/
ВСЁ супер,брал,беру, и буду брать!Всё на высоте! купить мефедрон брал все как всегда на 10 баллов забил
Возможность изготовления деталей по чертежам заказчика — это большой плюс
https://redmetsplav.ru/store/magniy-i-ego-splavy/zarubezhnye-splavy-2/magniy-m11920—uns/truba-magnievaya-m11920—uns/
1xbet تحميل apk
dubai land department regulation jointly owned property developersoriental pearls real estate development llc dubaiowner of new dubai properties llc https://selfstoragemanagement.org
risk in investing in dubai propertyguide to buying a sell real estate in dubai
وان اكس بت apk
Clean interface, no clutter, just scores. LET’S GOOO!
я начинаю выписывать недели за 2 до примерного окончания стратегических запасов))) и еще на черный день нычки есть)) простоев быть не должно) купить мефедрон “Думаю надо затестить через сигу, Заколачиваю пробую бля что то не то вкус не тот и т.д”
facts about the dubai real estateflat for rent in satwa dubaireal estate lawyer in dubai 1 bedroom apartment for sale in downtown dubai
property finder dubai1 bhk in al nahda
وان اكس بت apk
nrl real estate dubaiproperty in dubai 2 bedroom jvcvillas for rent in dubai dubizzle One Bedroom Apartment for Sale in Dubai
best property dealers in dubai reviwselect property dubai west avenue
Заказывали партию молибденовых листов для производства, качество металла идеальное, все сертификаты в наличии.
https://xn--80aeedb0bfzeok.xn--p1ai/catalog/mednyi-perekhodnoi-troinik-press/mednyi-perekhodnoi-press-troinik-53-6kh15-mm-m0b-gost-r-52948-2008/
Взяли у ТС 10тку MN-40, вполне довольны всё прошло хорошо качество на высоте, единственное произошла запара с кладом 2рой раз нам не могут заложить там где нам нужно, приходиться ездить очень долеко надеюсь для постоянного клиента так не будет впредь, работаю с ТС уже год всё ровно и всем доволен! купить мефедрон спасибо за отзыв!
Mushnyak, да ты гонишь походу, магазин работает как надо, каждую неделю у них заказываю все ровно, кидаловом тут не пахнет, ты наверное на отходосах)))) купить мефедрон все хорошие отзывы все пишут нам лично в асю или скайп, как что то не так к нам особо не ломятся, все бегут на форум…. если есть какая то проблема вы нам сразу пишите и будем разбираться, мы всегда идем на встречу клиентам…
1 br apartments near meal dhaheri real estate dubaidubai property rent news Apartments For Rent In Dubai Marina
cheapest freehold property in dubaidubai short term rental homes
Vox Casino vox casino sloty to nowoczesna platforma dla miłośników gier kasynowych online. Gracze mogą korzystać z szerokiego wyboru automatów, gier stołowych oraz atrakcyjnych promocji przygotowanych zarówno dla nowych, jak i stałych użytkowników. Dodatkowe korzyści zapewniają kody promocyjne, darmowe spiny oraz bonusy bez depozytu dostępne w wybranych ofertach.
Важным преимуществом является возможность изготовления деталей и изделий по индивидуальным чертежам заказчика.
https://rms-ekb.ru/catalog/ugolok-stalnoi/ugolok-iz-konstruktsionnoi-stali-40kh20kh4-mm-16crmo44-en-10056-1/
french speaker real estate internship dubaiAl Sufouh guidebecome a real estate agent in dubai https://landforsaleindubai.it.com
registered real estate companies in dubaistudio flat for monthly rent in al nahda dubai
Кровь и пламя возвращаются на экраны – https://dom-drakona-3.top/. Раскол королевства достиг точки невозврата – Рейнира и Эйгон ведут своих драконов в решающие схватки. Древние пророчества сбываются, родная кровь становится врагом, а трон требует новых жертв. Долгожданное продолжение саги!
Представлен полный цикл изделий: от фольги и проволоки до крупных поковок
https://redmetsplav.ru/store/magniy-i-ego-splavy/zarubezhnye-splavy-2/magniy-m11101—uns/krug-magnievyy-m11101—uns/
Да стопудова честный!!! В этом нет сомнений. А вот с волей Медведя и планом Путина ужиться сложно купить мефедрон Мы в Кургане не работаем, все наши представительства есть в соответствующем разделе.
property sale dubai marinaVillas for sale in The Oasis by Emaarbest holiday homes in dubai Palm Jumeirah Homes for Sale
spf realty real estate dubaicommunities near me
Магаз пропал из аськи и скайпа… Тобишь просто не появляется в онлайне. Такое уже бывало, но щас хз что… Качество товара было отменным. 203й высочайшего качества. купить мефедрон Тоже интересен вопрос по шифровке посылки при доставке курьером
1 bedroom apartments for rent in jumeirah beach residencedubai apartments to rent monthlylong term rental hotel apartments dubai Apartment for Sale in Abu Dhabi
dso customer portalsheikh colony qusais room for rent
Порадовало наличие вольфрамовых прутков редких диаметров, менеджер оперативно помог с подбором.
https://xn--80aeedb0bfzeok.xn--p1ai/catalog/latunnaia-polosa/latunnaia-polosa-1-5×100-mm-lmts58-2-gost-931-90/
Магазу Респект и Уважуха))) купить мефедрон а как ам то хоть вооще расшифровывается то по науке???
boom loader monthly rent in dubaithe terrace dubai property meydandubai properties group building media city https://stopvsd.net
damac properties metro to dubai boys secondaryal ghurair properties bur dubai
I think the admin of this web page is genuinely working hard for his website, since here every data is quality based stuff.
употреблял перорально, также пробовал нозально (не вариант сжигает все напрочь и комок в слизистой) купить мефедрон СПб все ровно процветания магазину. Амф на 5+
Lalabet Casino uitbetaling lalabet is een snel en modern online casino waar je direct kunt spelen zonder gedoe. Kies uit populaire slots en live games en profiteer van aantrekkelijke bonussen voor nieuwe spelers. Start nu, activeer je bonus en ontdek hoeveel je kunt winnen — speel meteen en mis geen kansen op winst!
steps for establishing real estate in dubaiVillas for sale in Maple 13 month apartment rental dubai 1 bedroom apartment for sale in dubai
rent for villa in dubaiDubai Media City
ООО «РМС» специализируется на поставках редких и тугоплавких металлов, таких как ниобий и вольфрам.
https://rms-ekb.ru/catalog/list/list-9kh5vf-1x1000x2000-gost-19903-74/
Кровь и пламя возвращаются на экраны – дом дракона 3 сезон последний трейлер. Раскол королевства достиг точки невозврата – Рейнира и Эйгон ведут своих драконов в решающие схватки. Древние пророчества сбываются, родная кровь становится врагом, а трон требует новых жертв. Долгожданное продолжение саги!
Информация о доставке по всей РФ делает компанию универсальным поставщиком
https://redmetsplav.ru/store/magniy-i-ego-splavy/zarubezhnye-splavy-2/magniy-iso-mgal6mn—iso-16220-1/list-magnievyy-iso-mgal6mn—iso-16220-1/
dubai luxury estatesdubai by foot1 bedroom hotel apartment for monthly rent in bur dubai https://lamarcheautrot.org
properties sold in dubai inmarmara real estate dubai
пацаны качество 250 на высоте советую 1к10-12 норм ваще прет 50-час ваще жестко , селеру респект ваще, спср тока черти купить мефедрон Конспирация на уровне
studio apartment for sale in dubai sports citycheap flats for rent in dubaivacation home rental companies buy penthouse in dubai
morka real estate business bay dubaithe grand dubai creek
Инфа с вашего сайта. Я уже брал 6-APB, и выглядел он несколько иначе. купить мефедрон Мне “типа фейк” назвал кодовое слово в жабере, которое я написал нашему розовоникому магазину в лс на форуме. Вопрос в том как он его узнал?
Lalabet Casino lalabet bijvullen is een snel en modern online casino waar je direct kunt spelen zonder gedoe. Kies uit populaire slots en live games en profiteer van aantrekkelijke bonussen voor nieuwe spelers. Start nu, activeer je bonus en ontdek hoeveel je kunt winnen — speel meteen en mis geen kansen op winst!
Кровь и пламя возвращаются на экраны – продолжение сериала дом дракона 3 сезон. Раскол королевства достиг точки невозврата – Рейнира и Эйгон ведут своих драконов в решающие схватки. Древние пророчества сбываются, родная кровь становится врагом, а трон требует новых жертв. Долгожданное продолжение саги!
p2p lending
What’s up to every one, as I am truly eager of
reading this website’s post to be updated daily. It consists of nice
material.
simsari property portal dubaisilver time properties dubai1 bhk sharjah https://theatreofwill.org
mbz zone 4new hotel projects in dubai
Ответственная компания, которая ценит долгосрочное сотрудничество, всегда идут навстречу клиенту.
https://xn--80aeedb0bfzeok.xn--p1ai/catalog/mednyi-perekhodnoi-troinik-press/mednyi-perekhodnoi-press-troinik-25kh17-mm-m1m-gost-r-52948-2008/
“Решил Попробовать Записаться” купить мефедрон Как и было обещано, адрес оператор прислал где-то в 23.
real estate audit checklist dubaistop real estatebuying property in dubai free zone for investor visa https://ragnarconde.com
business ideas in dubai with low investmentif tenant gets hurt your property in dubai
оп оп давай что за эфо дис купить мефедрон Оплатил заказ до нового года, связывался через почту, написали оплата прошла, отправка будет после праздников, … ответа до сих пор нет… Сделайте что нибудь, ответьте мне на почте емае, хз уже чо делать.
Good post. I learn something new and challenging on websites
I stumbleupon every day. It’s always helpful to read through
articles from other authors and use something from their websites.
Информация о времени работы (10:00–18:00) помогает планировать звонки
https://redmetsplav.ru/store/magniy-i-ego-splavy/zarubezhnye-splavy-2/magniy-iso-mb21320—bs-iso-16220/izdeliya-iz-magniya-iso-mb21320—bs-iso-16220/
expo golf villas 1 jbr dubai properties2bhk in bur dubaistudio for rent in dubai map view https://alicesgardentravelbuzz.com
studio apartments in dubai media cityserviced apartments dubai monthly
property apartment dubairesidential plots for sale in dubaihow to start a small business in uae Flat for Sale in Dubai
villas in dubai for rent 80000dubai properties lagoons office timings
Брал хоть и один раз, но все было отлично! Жду второго заказа) купить мефедрон А чего тут так тихо? Ребят, работаем?)
Хороший магазин,норм совместки купить мефедрон Ты выдал мне комбо
jebel ali gardens 4meedar real estate dubaihow to earn money in uae https://bestefm.net
slow real estate market dubaidubai housing estates
Заказывали партию молибденовых листов для производства, качество металла идеальное, все сертификаты в наличии.
https://xn--80aeedb0bfzeok.xn--p1ai/catalog/list-aliuminievyi-riflenyi/
CASENEXT — это инновационный портал по открытию кейсов CS2, CS:GO, Dota 2 и Rust, сделанный игроками и для игроков. Тут вы зарабатываете ценные предметы через открытие кейсов, создание контрактов и систему апгрейдов. Ищете кейсы кс 2? Заходите на сайт casenext.net/?lang=ru и начинайте зарабатывать прямо сейчас. Удобный интерфейс и настоящая прибыль делают весь процесс приятным и интересным для каждого участника.
Lalabet Casino lalabet app downloaden is een snel en modern online casino waar je direct kunt spelen zonder gedoe. Kies uit populaire slots en live games en profiteer van aantrekkelijke bonussen voor nieuwe spelers. Start nu, activeer je bonus en ontdek hoeveel je kunt winnen — speel meteen en mis geen kansen op winst!
real estate servicesnakheel real estate dubaimeraas dubai real estate 1 bedroom apartment for sale in dubai
dubai construction company vacancystar neighbourhood real estate dubai
ребятки так жержать!) уровень достойный купить мефедрон Уважаемый ТС,желаю вам успешных больших продаж!:$:
Кровь и пламя возвращаются на экраны – https://dom-drakona-3.top/. Раскол королевства достиг точки невозврата – Рейнира и Эйгон ведут своих драконов в решающие схватки. Древние пророчества сбываются, родная кровь становится врагом, а трон требует новых жертв. Долгожданное продолжение саги!
Lalabet Casino lalabet casino nl is een snel en modern online casino waar je direct kunt spelen zonder gedoe. Kies uit populaire slots en live games en profiteer van aantrekkelijke bonussen voor nieuwe spelers. Start nu, activeer je bonus en ontdek hoeveel je kunt winnen — speel meteen en mis geen kansen op winst!
Кровь и пламя возвращаются на экраны – https://dom-drakona-3.top/. Раскол королевства достиг точки невозврата – Рейнира и Эйгон ведут своих драконов в решающие схватки. Древние пророчества сбываются, родная кровь становится врагом, а трон требует новых жертв. Долгожданное продолжение саги!
awards building dubai real estaterent a apartement dubai for a monthbest real estates in dubai https://diasporoom.com
villa for private partydubai rental calculator
Широкий выбор тугоплавких металлов, таких как вольфрам и молибден
https://redmetsplav.ru/store/magniy-i-ego-splavy/zarubezhnye-splavy-2/magniy-gz6/pokovka-magnievaya-gz6/
Ориентация на долгосрочные отношения с клиентами позволяет компании формировать индивидуальные условия оплаты и графики поставок.
https://rms-ekb.ru/catalog/stalnoi-list/stalnoi-list-10g2s1-1-6x1250x1250-gost-19903-2006-gladkii-neotsinkovannyi-goriachekatanyi/
отписал бы по факту с картинками купить мефедрон маскировка 5+
Арендовать яхту в Адлере можно на несколько часов или на целый день. Такой отдых дарит свободу передвижения и возможность насладиться морскими пейзажами, https://yachtkater.ru/
Greetings from Los angeles! I’m bored at work so I decided to browse your site on my iphone during lunch break.
I really like the knowledge you provide here and can’t wait to take
a look when I get home. I’m surprised at how fast your blog loaded on my
mobile .. I’m not even using WIFI, just 3G .. Anyhow, excellent blog!
emaar projects in dubaireal estate agents in tecom dubaihotel service apartments in dubai marina Hotel Apartments In Abu Dhabi For Monthly Rent
palm jumeirah real estatecheap rentals near me
Заказал в понедельник – в среду мне уже позвонили. купить мефедрон Вообщем фейк крассавчик пошагово и все грамотно сделал, развел)
al wasl areamhm real estate dubaistudio flat in al barsha one bedroom apartment for sale in dubai
pg in bur dubaireal estate web design dubai
each time i used to read smaller content that also clear their motive, and that
is also happening with this post which I am reading here.
Снять яхту в Адлере стоит тем, кто мечтает увидеть побережье с моря и провести несколько часов в атмосфере комфорта и спокойствия https://yachtkater.ru/
Пацаны из ТЛТ не берите через этот магаз ФСКН кроет курьерку в нашем городе!!! купить мефедрон оплачивай лучше через киви.самый лучший способ во всех магазах.и перевод идёт в секунду.только обрати внимание на комисию чтоб небыло недоплаты.обычно 2% от суммы перевода
sultan real estate dubai locationvilla for holiday rent in palm jumeirah5 bedroom Villas for rent in Emirates Hills palm jumeirah apartments for sale
how do you invest in real estateuk property in dubai
Благодарим за оперативную поставку ниобиевых труб, выручили в очень сжатые сроки.
https://xn--80aeedb0bfzeok.xn--p1ai/catalog/mednye-otvody-press/mednyi-otvod-press-90-gradusov-15-mm-m1r-gost-r-52948-2008/
http://www.topsync.com/bbs/board.php?bo_table=free&wr_id=118%3F
al yousuf real estate llc dubaireal estate brokers uaedubai property deals Buy Property In Downtown Dubai
avenue square real estate dubaicheap studio apartments near me
заказал и оплатил ещё в понедельник, сегодня пятница но трэка до сих пор нет, раньше такого не было а в этот раз че то медлят купить мефедрон грац вам джентльмены!
https://pgs.uscws.com/about/8th-box/
Наличие кобальтовых сплавов заинтересует авиастроение
https://redmetsplav.ru/store/magniy-i-ego-splavy/zarubezhnye-splavy-2/magniy-gfi1—gost-22517-77/izdeliya-iz-magniya-gfi1—gost-22517-77/
ООО «РМС» специализируется на поставках редких и тугоплавких металлов, таких как ниобий и вольфрам.
https://rms-ekb.ru/catalog/ugolok-stalnoi/ugolok-iz-konstruktsionnoi-stali-150kh75kh9-mm-15nicr13-en-10056-1/
Land for Sale in Dubai al sufouh villas by meraasproperty sourcing agents in dubaidubai mall lost property
https://kevinwedding.net/why-a-web-version-of-phantom-changes-how-you-use-solana-and-how-to-do-it-right/
Уже не раз писали – настраивают сайт для автоматизации заказов, с потоком розничных покупателей не справляются с нынешный системой ) купить мефедрон Привет, нету в личке нечего.
https://nightqueenspa24x7.com/nail-care-in-winter-protecting-your-nails-from-the-cold/
https://nfp.uk.com/huong-dan-soi-cau-xoc-dia/
Houses for Sale in Palm Jumeirah Dubai apartments for rent near dubai media citysahara plaza buildingdanube home distribution centre
https://www.jetor.it/le-big-four/
http://hnvr.co.kr/bbs/board.php?bo_table=news&wr_id=66926
Прокат яхт Сириус является отличным решением для тех, кто ценит комфорт и высокий уровень сервиса. Современные суда оснащены всем необходимым для отдыха, а морские маршруты позволяют увидеть самые красивые места побережья https://yachtkater.ru/
часть покупателей устраивает, продавцы тоже не жалуется. В чем проблема? нет терпения – идите в другие шопы. купить мефедрон МХЕ-таки не работает, пускали по носу 250мг+ потом догонялись, 0 эффекта. Грустно, очень грустно.
Flat for Sale in Dubai gwp real estate dubaial manara real estate dubai transfer offciesbk real estate dubai office
https://stoerig-it.de/index.php?title=User:IvyLigon587721
Аренда яхт в Сириусе подходит для организации романтических прогулок. Морской закат, спокойные волны и комфортная атмосфера на борту создают идеальные условия для особенных моментов https://yachtkater.ru/
в скаипе не отвечают!!!! купить мефедрон сделал заказ,оплатил,на следующий день получил трек – всё чётко,так держать! успехов и процветания вашей компании!
Отличное соотношение цены и качества на весь цветной металлопрокат, будем заказывать еще.
https://xn--80aeedb0bfzeok.xn--p1ai/catalog/provoloka-aliuminievaia/provoloka-aliuminievaia-3mm-amg5/
https://clartevegetale.com/pigments-naturels-prirodni-pigmenty-france-ceska-republika-akvarel-aquarelle-mineraux-mineralni-pigmenty/
Villa for Sale in Sharjah primera real estate dubaistudio apartment for rent in deira dubaiprosperous real estate dubai
https://tanjawijnen.com/buttons/
Now adding a small note in my reading log that this site is one to watch, and a look at thisisfreshdoamin reinforced the watch status, the few sites I track deliberately rather than encounter accidentally are sites I expect ongoing returns from and this one has cleared the bar for that elevated tracking based on what I read.
Лаконичное приветствие на главной странице сразу вводит в курс дела
https://redmetsplav.ru/store/magniy-i-ego-splavy/zarubezhnye-splavy-2/magniy-ga10/izdeliya-iz-magniya-ga10/
https://barelytrue.com/new-la-therapy-involves-oat-milk-baths-and-emotional-breakdowns-on-purpose/
https://powermaedel.com office properties in dubai for rentlist of properties in dubai1 bhk for rent in bur dubai
Работал с данным магазином Совсем давно, и что то все руки не доходили оставить отзыв о магаз:D купить мефедрон По сути он эйфо, но ничего, кроме расширенных зрачков, учащенного сердцебиения и потливости, я не почувствовал… А колличество принятого было просто смешным: 550 мг. в первый день теста и 750 мг. во второй день… Тестирующих набралось в сумме около 8 и никто ничего не почувствовал.
https://shreerkenterprises.in/new-limited-apple-watches/
https://shoppingssj.com.br/ola-mundo/?unapproved=6947&moderation-hash=54211af15f5abaff6a6421b44f0c7709
“Решил Попробовать Записаться” купить мефедрон Спасибо за вашу работу,вы лучшие!
Hola, live scores section here is very useful for in-play betting. Argentina match coming up soon.
Lalabet Casino lalabet casino app is een snel en modern online casino waar je direct kunt spelen zonder gedoe. Kies uit populaire slots en live games en profiteer van aantrekkelijke bonussen voor nieuwe spelers. Start nu, activeer je bonus en ontdek hoeveel je kunt winnen — speel meteen en mis geen kansen op winst!
https://actituddigital.com/phasellus-vel-odio-commodo-pharetra-urna-sit-amet-gravida-nibh-2-3/
https://tulpardergi.com buying property in dubai lawsone bedroom flat near meshop for rent in dubai deira
При выборе недвижимости многие ориентируются на перспективность района, и ЖК Апсайд Мосфильмовская находится именно в такой локации с высоким потенциалом развития: мосфильмовская апсайд жк
https://pvplgroup.com/the-evolution-of-smart-home-electrical-systems-for-everyone/
https://kaleidoscopefestivals.com compounds near me2 bedroom apartments for rent in deira dubailearn real estate online free in dubai
http://www.buhanis.de/brautpaare/
Удачи и развития в дальнейшем! купить мефедрон заказ делал на человека который вообще не в теме и был чистый, поэтому меняйте для начала хотя бы курьерку и курьеров..
Looking for a high-quality, hassle-free transfer from airports across Europe? Visit https://transferme24.com/ where you’ll find the best transfer prices when you book online. We offer a fixed rate. Learn all about our fleet and personalized service on our website. Our drivers monitor your flights to ensure you’re met on time and safely transported to your destination.
Ответственная компания, которая ценит долгосрочное сотрудничество, всегда идут навстречу клиенту.
https://xn--80aeedb0bfzeok.xn--p1ai/catalog/melkhiorovaia-truba/melkhiorovaia-truba-35kh2kh10000-mm-mnzhmts30-1-1-gost-10092-2006/
https://p3mp.hamzanwadi.ac.id/?p=365
https://2bedroomtownhouseforsaleindubai.org best small business ideasfind property abu dhabichemical properties of soil from dubai municipality
Всем мир,заказывал кто нибудь через доставку курьерской службой?дошло все ровно? купить мефедрон Движения каждый день у нас, и все ровно .
کراتین کیجد، یک مکمل ورزشی بسیار باکیفیت و با خلوص بالا است که به طور ویژه برای افزایش قدرت، استقامت و حجم عضلانی ورزشکاران طراحی شده است.
http://shop.ororo.co.kr/bbs/board.php?bo_table=free&wr_id=5345703
https://thetradeauthority.com sustainable apartments in dubaione bedroom apartment kitchen in dubaiproperty for sale in england cluster y2 international city dubai
Использование современных технологий защиты данных пользователей
https://redmetsplav.ru/store/magniy-i-ego-splavy/zarubezhnye-splavy-2/magniy-en-mb10010—en-12421-1998/folga-magnievaya-en-mb10010—en-12421-1998/
https://competitiontrampolines.com/product/rebound-power-track/
I’ve been browsing on-line greater than 3 hours lately, yet I never discovered any attention-grabbing article like yours.
It is beautiful worth sufficient for me. In my opinion, if all webmasters and bloggers made excellent content material as you did, the web
can be a lot more helpful than ever before.
в розницу работаете? купить мефедрон Привет! В Наличии рега мощная 1к30 и скорость мука.
https://culturatijucatenis.com.br/eventos/frozen-2-2022-09-07/
Ищете лучшие йога-туры, ретриты и авторские путешествия от проверенных и надежных организаторов? Посетите сайт https://yogajourney.ru/ где вы найдете большой выбор йога-туров, ретритов и семинаров. Не подошел ни один из множества туров? Мы разработаем его для вас под конкретный запрос. Подробнее на сайте. Yoga Journey – лучшие йога-туры по России и миру!
palm jumeirah apartments for sale flats for rent in al rigga dubaii want to sale real estate broker license dubaidistance between al makoutm airport and serena dubai properties
https://keystagelearning.co.uk/mastering-the-gcse-mocks/
Современная недвижимость должна отвечать высоким требованиям комфорта, и ЖК Апсайд Мосфильмовская полностью соответствует этим ожиданиям благодаря качественной архитектуре и продуманным планировкам: новый жк на мосфильмовской
спасибо , стараемся для всех Вас купить мефедрон И еще, слышал типа ам2233, который отличного качества, желтого цвета. мне приходит белый, но када с ацетоном смешиваешь и ставишь нагреваться, стенки рюмки покрываются желтым цветом.
Villa for Sale in Ajman distance between al maktoum airport and parklane dubai south propertywest end real estate dubaiHarbour Views
https://bollywoodtonic.com/best-ott-platforms-in-india-to-watch-bollywood-movies/
Hey! I’m at work browsing your blog from my new iphone! Just wanted to say I love reading
your blog and look forward to all your posts! Keep up the
great work!
ข้อมูลชุดนี้ น่าสนใจดี ค่ะ
ดิฉัน ได้อ่านบทความที่เกี่ยวข้องกับ ข้อมูลเพิ่มเติม
สามารถอ่านได้ที่ Newton
ลองแวะไปดู
มีตัวอย่างประกอบชัดเจน
ขอบคุณที่แชร์ เนื้อหาดีๆ นี้
และหวังว่าจะได้เห็นโพสต์แนวนี้อีก
https://www.iwckotkapura.in/how-solar-energy-works-from-sunlight-to-electricity/
Argentina vs Brazil is the biggest rivalry in football. Textbook finish.
https://sportcarecatalogotrauma.com/the-art-of-negotiation-tips-for-successful-business-deals/
Ajman Villa for Sale how to invest in stocks in uaereal estate companies dubai uaeluxury property in dubai for sale
бро все что ты хочешь услышать, написано выше!! спакойствие и ожидание!)) купить мефедрон не паникуй бро, всё ровно будет, я уверен…
https://ange-group.jp/2023/07/22/eyebrow-onayami-enquete-ranking/
Тем, кто рассматривает покупку квартиры в западной части столицы, стоит обратить внимание на Апсайд Мосфильмовская с его современным подходом к организации пространства, апсайд девелопмент мосфильмовская
Офис в Екатеринбурге работает четко, забирали самовывозом — складская логистика на высоте.
https://xn--80aeedb0bfzeok.xn--p1ai/catalog/mednye-dvukhrastrubnye-mufty-pod-paiku/mednaiadvukhrastrubnaia-podvizhnaiamufta-pod-paiku66-7kh2-4mmm1egost-32590-2013/
http://www.annunciogratis.net/author/morawoolnou
https://apres91.org 2 bedroom apartments for rent in dubai festival cityreal estate office in dubai mallproperty linkers dubai
https://rollitosmariem.online/hello-world/
https://rota-agro.ru/news/na-poljah-rota-agro-zavershajutsja-sel/
почему ты наводишь панику? я зашел на сайт фскн, там не говориться ни о каких октябрьских поправках в список запрещенных препаратов? купить мефедрон Ребят я не терпила и не превык чтоб меня кидали и вы тоже я думаю и если нас кинули то я предлогаю мстить таким образам для начала надо писать на всвсех форумах где есть этом магаз о том что это кидала а не довереный магаз не лениться и писать каждый день об этом чтоб все браза знали правду и не постродали как мы
Важным преимуществом является возможность изготовления деталей и изделий по индивидуальным чертежам заказчика.
https://rms-ekb.ru/catalog/ugolok-stalnoi/ugolok-iz-konstruktsionnoi-stali-90kh90kh8-mm-c16-en-10277/
http://www.stichtingdijken.nl/?p=1
Buy Penthouse in Dubai serviced apartment for rent in difc dubaicheap apartments in dubai on daily basisgreen community rent
Glad I clicked through from where I did because this turned out to be worth the time spent, and after finkgulf I had a fuller picture, the kind of content that earns its visitors through delivering value rather than chasing them through aggressive advertising or constant pop ups appearing everywhere on the screen lately.
https://potzandpanzgourmetcafe.com/hello-world/
Glad to have another data point on a question I am still thinking through, and a look at gambitfort added two more, content that acknowledges its place in a wider conversation rather than pretending to settle the question alone is intellectually honest in a way that I wish was more common across the open web.
Felt the post had been written without using a single buzzword, and a look at foilgenie continued that clean vocabulary, content free of jargon and trendy phrases reads better and ages better and this site has clearly committed to a vocabulary that will not feel dated in three years which is impressive editorially.
My time on this site has now extended past what I had budgeted, and a stop at goldenknack keeps extending it further, content that overstays its budget in my schedule is content that has earned the extra time and this site has been earning extra time across multiple visits to the point where my schedule needs adjustment.
Refreshing to read something where the words actually mean something instead of filling space, and a stop at huskkindle kept that going, the writing here trusts the reader to follow along without endless repetition or constant reminders of what was already said earlier in the post which I appreciate.
Started reading expecting to disagree and ended mostly nodding along, and a look at stitchtwine continued the pattern, content that wins agreement through evidence and reasoning rather than rhetorical force is the kind that actually shifts minds and this site clearly knows how to do that across what I have read so far.
нет курьерки по мск нету, да все работает как обычно купить мефедрон только не под своим ником :confused: (мож поэтому и не отвечают)
Liked the balance between depth and brevity, never too shallow and never too long, and a stop at herbfife kept the same balance going across the rest of the site, this is one of the harder skills in writing and the team here clearly has it figured out very well indeed across every page.
http://www.domaero.co.kr/bbs/board.php?bo_table=notice&wr_id=42
Took a screenshot of one section to come back to later, and a stop at salutevandal prompted another saved tab, the urge to capture and revisit specific pieces of content is something I rarely feel but when I do it tells me the work is worth more than the average passing read for sure.
https://biggbuz.com springfield real estate dubaiproperty for sale in dubai landras al khor dubai properties
https://ketanmetalworks.com/redeveloping-floridas-remote-southern-coast-2/
Bookmark added with a small mental note that this is a site to keep, and a look at jumbokelp reinforced the keep status, the verb keep rather than visit captures something about how I think about this kind of site and it is a higher tier of relationship than I have with most places online today.
https://ventanasm10.com/hola-mundo/
Чего у вас со скайпом? Оффлайн уже несколько недель. купить мефедрон МАГАЗ КРУТОЙ!!!
Once I had read three posts the editorial pattern was clear, and a look at grovefalcon confirmed the pattern from a fourth angle, sites where the underlying approach reveals itself through accumulated reading rather than being announced are sites with real depth and this one has that quality clearly visible across multiple pieces consistently.
https://domaineequilibre.fr/bonjour-tout-le-monde/
1 bedroom apartment for sale in international city dubai homes for sale homes for salefamily room for rent in bur dubai monthly basisrent studio dubai by month
https://www.jordimorerabaker.com/2019/06/30/la-nueva-ley-del-pan-en-el-via-lliure-de-rac1/
Is there a way to enable dark mode?
Your mode of explaining the whole thing in this post is
truly nice, all be capable of without difficulty understand
it, Thanks a lot.
https://vanto.be/uncategorized/vimeo-video/
May I simply just say what a comfort to find someone that actually knows what they are discussing on the net.
You definitely understand how to bring an issue to light and make it important.
A lot more people must check this out and understand
this side of the story. I was surprised that you’re not more popular
because you surely possess the gift.
holiday apartment for rent in dubai malltwo bedroom apartments for rentapartments for sale in the address downtown dubai 1 Bedroom Apartment for Sale in Dubai houses for rent in al karama dubaiGolden Mile guidefurnished hotel apartments for rent in dubai monthly basis
I got this website from my friend who informed me on the topic
of this web page and now this time I am browsing this web site and reading very informative content at this
time.
I appreciate how this post stays well-considered and useful while still feeling easy to connect with and natural, because that combination usually makes discussions more pleasant and encourages people to interact in a positive way.
depot neosurf casino
https://charlotteswebdesignstudio.com/hello-world/
Оперативная логистика и поддержка на всех этапах сделки позволяют минимизировать сроки простоя производственных линий заказчиков.
https://rms-ekb.ru/catalog/krug-iz-instrumentalnoi-stali/krug-4kh3vmf-30-gost-7417-75/
http://www.astromonie.at/Texte/index.php/;focus=W4YPRD_com_cm4all_wdn_Flatpress_7166190&path=&frame=W4YPRD_com_cm4all_wdn_Flatpress_7166190?x=entry:entry230412-161606;comments:1
Grand slam quarterfinals, doesn’t get bigger than this. MATCH OF THE SEASON!
Купить Мефедрон, Бошки, Марихуану, Гашиш, Экстази магазину респект)) с корефанами накуримся вдоволь)))5мг реально из области фантастики…желаю попробыватьЧувствую что-то произойдёт , типа заказа:happy:
Granted my mood today might be elevating my reading experience but I still think this is genuinely good, and a stop at iconflank reinforced that even discounted assessment, controlling for the mood adjustment that affects content perception this site still reads as substantively above average across multiple pieces I have read carefully today.
business bay dubai real estateHow to invest in real estate in Dubaiproperty finder jlt https://couvreurtoiture95.com best budget hotel apartments in dubaihotel apartments in dubai al barsha 1c users user downloads dme_real-estate-predictioins_dubai-2019.pdf
Now realising this site has been quietly doing good work for longer than I knew, and a look at gambitgulf suggested an archive worth exploring, sites with deep archives of consistent quality represent a different kind of resource than sites with viral hits and this one looks like the durable kind based on what I see.
Thanks for treating the topic with the seriousness it deserves without becoming pompous about it, and a stop at firhex continued that balanced treatment, the gap between earnest and self serious is huge and writers who can stay on the right side of it earn my respect when I find them online today.
Quietly the writers approach to the topic differs from the dominant takes I have been encountering, and a stop at goldenknack extended that distinctive approach, content that maintains a different perspective without explicitly arguing against the dominant ones is content with confident editorial identity and this site has that confidence throughout pieces.
Approaching this site through a casual link click and being surprised by what I found, and a look at sherpaslick extended the surprise, the rare experience of stumbling into excellent independent content rather than predictable mediocrity is one of the actual remaining pleasures of casual web browsing and this site provided it cleanly.
https://avkofe.ru/news/my-otkrylis/
Купить Мефедрон, Бошки, Марихуану, Гашиш, Экстази Два часа, ребята в клубе,Магазу мир и процветания))”Так вот Основа это Продукта похожа на таблетки Гидроперит”
the view towerflats for rent in sheikh zayed road dubaihartland estates dubai apartments for sale in downtown dubai la maison dubai real estateatomic properties llc dubainew paint project in dubai
Refreshing change from the usual sites covering this topic, no clickbait and no padding, and a stop at forgefeat confirmed the difference, this place clearly has its own voice rather than copying the formulas everyone else uses to chase clicks online which is becoming increasingly rare these days across nearly every popular subject.
Сегодня многие покупатели выбирают жилье не только по расположению, но и по качеству проекта, поэтому ЖК Апсайд Мосфильмовская вызывает стабильный интерес на рынке недвижимости: upside мосфильмовская
https://seputarproperti.id/pj-walkot-palembang-ratu-dewa-rei-sumsel-berperan-dalam-pembangunan-perekonomian-kota-palembang/
Really appreciate the absence of stock photos that have nothing to do with the content, and a quick visit to swiftswallow maintained the same restraint, visual filler is a tell that the writing cannot stand on its own and the lack of it here suggests the team has confidence in their content quality alone.
Благодаря удачному расположению Апсайд Мосфильмовская позволяет быстро добираться до ключевых районов города и одновременно жить в комфортном окружении – мосфильмовская 74 78 upside
Will share this on a forum I am part of where it will be appreciated by others working in the same area, and a look at voicesash suggests there is more here worth passing along too, definitely a generous resource that deserves a wider audience than it probably has today across the open internet.
dubai stocks down real estate voewsgogreen real estate dubaidubai real estate groeth studio apartment dubai for sale one bhk in dubaidubai property market price developmental habtoor al qusais building
Felt energised after reading rather than drained, which is unusual for online content these days, and a look at juncokudos continued that good feeling, content that leaves you better than it found you is rare and worth bookmarking when you stumble across it for the first time today or any other day really.
Купить Мефедрон, Бошки, Марихуану, Гашиш, Экстази Наверно так же как и джив. попробуй минимальные пропорции сделать 0,1 к 1не понятно, жду трека говорил вторник, вторник они не успели, говорил среда, отмолчался, не ответил!да для ам и дживов ацик самая подходящяя тема. а основа из мачехи ништяк.только её надо выварить раза три по 15 мин. чтоб негорлодёрило и смол меньше,ведь в смоле много канабиола остаёца
My usual pattern is to skim and bounce but this site has reset that pattern temporarily, and a stop at vitalsummit maintained the slower reading mode, content that changes how I read is content with structural influence and this site has clearly nudged my reading behaviour toward something better at least for the duration of these visits.
3 bedroom flat to rent2 bedroom apartments for rent in dubai marinadubai downtown real estate Property for Sale in Downtown Dubai dubai property visa3 bedroom Villas for sale in Town Squaregrosvenor house apartments in dubai
Купить Мефедрон, Бошки, Марихуану, Гашиш, Экстази Ребята! Вы просто красавцы… На вышем уровне, срок доставке очень оперативная и спрятали хорошо. Советаю…МАГАЗ СУПЕР!,брал5 гр ск качество отменное все сделанно ровно,даже фото не понадобилось,кристалики отличные без мутного оттенка,плаватся отлично,присутствует запах уксусного ангедрида,ВЫРАЖАЮ ОГРОМНУЮ БЛАГОДАРНОСТЬ!ВСЕ СУПЕР ПРОДОЛЖАЙТЕ В ТОМ ЖЕ ДУХЕ!заказ в статусе обработки )))
Благодарим за оперативную поставку ниобиевых труб, выручили в очень сжатые сроки.
https://xn--80aeedb0bfzeok.xn--p1ai/catalog/mednye-krestoviny-pod-paiku/mednaia-krestovina-pod-paiku-34kh29kh1-mm-23kh25-mm-tverdaia-paika-m2-gost-32590-2013/
porno marocain
Важным преимуществом является возможность изготовления деталей и изделий по индивидуальным чертежам заказчика.
https://rms-ekb.ru/catalog/ugolok-stalnoi/ugolok-iz-konstruktsionnoi-stali-35kh35kh4-mm-c25e-din-59370/
Reading this in my last reading slot of the day was a good way to end, and a stop at idleflint provided a satisfying close to the reading session, content that ends a day well rather than agitating it before sleep is the kind I value increasingly and this site fits that role for me consistently now.
Started taking notes about halfway through because the points were stacking up, and a look at straitsalt added enough material that my notes file grew further, content that demands note taking from a passive reader is content with substance and the writers here are clearly producing that kind of work consistently across topics.
monthly short term apartments for rent in bur dubaiSofitel The PalmApartments for sale in Fairmont Residences Al Marjan Island Buy Property In Dubai one month apr room rent in dubai sharing accomadationlion properties to rent in dubaial safa tower al nahda sharjah
Felt the writer was speaking my language without trying to imitate it, and a look at gambithusk continued that natural fit, when a writers default voice happens to match what you find easy to read the experience feels frictionless and that is something I notice and remember about specific sites going forward.
Reading this in three sittings because the day was fragmented, and the piece survived the fragmentation, and a stop at gondoenvoy held up under similar reading conditions, content engineered for continuous attention is fragile in modern conditions and this site reads as durable across the realistic ways people consume content today.
Now saved this in a way that I will actually find again rather than the casual bookmark approach, and a stop at firhush earned the same careful saving, organising my reading bookmarks so that high quality sources rise to the top is something I should do more of and this site triggered that organisation today.
I like how the ideas here are presented clearly because it makes the discussion feel easygoing and more engaging overall.
在线购买大麻用于XXX成人色情视频
porno goobet
Купить Мефедрон, Бошки, Марихуану, Гашиш, Экстази Сорь за многобукав, не попустило еще ;)прям не втерпежзнакомый брал, збс говорит
shabbir ahmed dubai propertiesvilla for sale dubai silicon oasisdubai real estate growth rate Land for Sale in Dubai nrl real estate dubaiVillas for sale in Al Manara Villassobha llc dubai
Found the section structure particularly thoughtful, and a stop at sandaltimber suggested the same care across the broader site, structural choices guide the reader through the material in ways most people do not consciously notice but feel the absence of when those choices are made carelessly or not at all.
If you scroll past this site without looking carefully you will miss something, and a stop at fortfalcon extended that mild warning, the surface of the site does not advertise its quality loudly which means careful attention is required to recognise what is being offered here which is itself a kind of editorial signal.
Купить Мефедрон, Бошки, Марихуану, Гашиш, Экстази Хз, смотри, в тёплой кипяченке начали болтать, растворяется. Точно не регаМагазин работает!!! Бро очень понктуален!!! Магазину процветание и новых клиентов!!!РЕСПЕКТОС МАгаЗИНУ=)
Thanks for putting this online without locking it behind email signups or paywalls, and a quick visit to guavaflank kept that open feel going, content that trusts the reader to come back rather than gating access is the kind of approach I will reward with regular return visits over time happily.
gooobet drogues
online business in dubai ideasrent house in dubai for one monthfurnished apartment sharing in dubai https://2bedroomapartmentdubaiforsale.com dubai properties advertisingApartments for sale in Expo CityVillas for rent in Sienna Lakes
Apartment for Rent in Art Xiv, Dubaila rosa at villanova residential community dubai properties dubaionline investment in uae 1 bedroom apartment dubai for sale Apartments for sale in One Palmal thamayel residential complexstudio for rent in mirdif dubai
Reading this prompted me to subscribe to my first newsletter in months, and a stop at idleketo confirmed the subscribe was the right call, content that earns a newsletter signup is content that has cleared a higher trust bar than a casual visit and this site has clearly earned that level of commitment from me.
Купить Мефедрон, Бошки, Марихуану, Гашиш, Экстази спасибо Вам за отзыв!Получил RCS-4 развел в спирту 50, растворился только после нагрева…Я всегда делаю на растворителе для снятие лака с ногтей (без ацетона)и для огранизма менее вреден и запах нос не режет,кто нибуть может подсказать сколько МЛ растворителя на 10г АМ если делать 1к15?
gooobet drogues
Skipped the comments section but might come back to read it, and a stop at swiftswallow hinted at a quality reader community, sites where the comments are worth reading separately from the post are increasingly rare and signal a particular kind of audience that has grown around the editorial vision over time gradually.
Worth saying that the quiet confidence of the writing is what landed first, and a look at swampstaple continued that quiet quality, confident writing without the loud display of confidence is a rare combination and this site has clearly developed both the knowledge and the editorial restraint to land that combination consistently.
Сайт выглядит профессионально и лаконично, без лишней рекламы
https://redmetsplav.ru/store/magniy-i-ego-splavy/zarubezhnye-splavy-2/magniy-am60a—astm-b275/prutok-magnievyy-am60a—astm-b275/
Спецстали для машиностроения закупаем только здесь, надежность материала подтверждена испытаниями.
https://xn--80aeedb0bfzeok.xn--p1ai/catalog/latunnye-naruzhnye-stopornye-koltsa-po-gost/latunoe-naruzhnoe-stopornoe-pruzhinnoe-koltso-16kh1-2-mm-lk80-gost-13942-86/
Got something practical out of this that I can apply later this week, and a stop at keenfern added more details to think about, this is exactly the kind of content I bookmark for future reference rather than the throwaway listicles that dominate most search results these days for almost any common topic.
Worth flagging this post as worth a careful read rather than a casual skim, and a stop at gamerember earned the same careful approach, the few sites that warrant slower reading are sites I now treat differently from the daily content stream and this one has clearly moved into that elevated treatment category.
real estate investment in dubai landSouth Bay guidereal estate agencies al nahda dubai https://selfstoragemanagement.org tips to buy property in dubaiarabian ranches 3 townhousesarmada dubai land monthly rent
Купить Мефедрон, Бошки, Марихуану, Гашиш, Экстази “ДОБРА ТЕБЕ ЭСКИМОСИК”Спасибо. Похож на ам2**3:superman:По больше клиентов,с толстыми кошельками,да главное чтоб АДЕКВАТНЫЕ!:bro:
Worth your time, that is the simplest endorsement I can give, and a stop at gondoiris extends that endorsement across the rest of the site, this is one of those increasingly rare places that delivers on what it promises rather than over selling the content and under delivering on substance every time which I find frustrating elsewhere.
gooobet drogues
Now considering whether the post would translate well into a different form, and a look at firjuno suggested similar versatility, content that could move into other media without losing its substance is content that has been built around ideas rather than around format and this site reads as idea first throughout posts.
buy house in dubai palm islandit center building real estate office bur dubaimeeras head office https://fotoundvideografie.com studio for rent in dubai in dubaihotel apartments monthly in dubaione bedroom apartment in bur dubai
ISL starts next month, excited! ⚽⚽⚽
Now sitting back and recognising that this was a small but real win in my reading day, and a stop at sorbettower extended that quiet win, the cumulative effect of small reading wins versus the cumulative effect of small reading losses is real over time and this site is contributing to the wins side of that ledger.
Купить Мефедрон, Бошки, Марихуану, Гашиш, Экстази продавана сегодня в асе вообще ен видел, хз что там у них (Парни,короче я позвонил они сказали тепреь что посылку отправили на день раньше планируемой отправки,и чтоб я завтра позвонил в офис в своем городе,скорее всего она уже там,а я перед этим потерял телефон на который записан заказ,так что может они и звонили,а я и не знал!А по отслежке так и стоит планируемая отправка еще 3 дня назад.Каког хера они ее не зарегистрировали!Как думаете нормально????Бля пиздец волнуюсь!!!Спасибо за отзывы о новых реагентах. Можно также записаться на совместки, где цена от 400 р за грамм 🙂 Отправка быстрая
porno marocain
Felt the writer was being honest with the reader which is rare enough that I want to acknowledge it, and a look at vesselthrift continued that honest feel, content built on actual knowledge rather than aggregated summaries is something I value highly and rarely come across in regular searches on the open internet these days.
dubai investment real estatered rock real estate dubaiPorto View Business Bay apartments for sale 6 bedroom Villas for sale in Ras Al Khaimahreal estate companies in dubai startupvilla on rent in rashidiya dubai
Quality writing that respects the reader’s intelligence without overloading them, and a quick look at igloohaze reflected that approach, a balanced thoughtful site that earns trust by being consistent rather than by shouting about how trustworthy it is which is the usual approach online sadly across most content categories.
Купить Мефедрон, Бошки, Марихуану, Гашиш, Экстази Бро конечно я незнаю твою ситуацию, но с зданным магазом работал всегда всё на вышке было , и вот что думаю на 10 грамм смысла тебя кидать нет такому магазину!!!Где продавец то? Мысли самые печальные…тт1к10 незачет, 2к10, так, удовлетворительно.
Came in confused about the topic and left with a much firmer grasp on it, and after fossera I felt I could explain this to someone else without hesitation, that is the gold standard for any educational content and most sites simply fail to reach it ever which is unfortunate but true.
7 bedroom Villas for sale in Arabian Ranchescan i rent out a dubai property from outside uae3 bedroom properties for sale in dubai hills estate 1 bedroom apartment for sale in downtown dubai Apartments for rent in Imperial Avenueaffordable flats for rent in dubaidubai production city rent
porno marocain
https://zaoavis.ru/
Fala. Atualizando: calcular stake. Ninja mas não coloquem esperança.
Adding to the bookmarks now before I forget, that is how good this is, and a look at shamrockveil confirmed the rest of the site is worth saving too, this is one of those rare finds that justifies the time spent searching the web for once which is a relief in the current environment.
Looking through the archives suggests this site has been doing this for a while at this level, and a look at gapherb confirmed the long term consistency, sites that have maintained quality across years rather than just a recent stretch are sites with serious editorial discipline and this one has clearly been at it for a while.
Купить Мефедрон, Бошки, Марихуану, Гашиш, Экстази Редоктирование магазина!Коллектива!Прайс , цена осталась прежняя! скайп оператора:Chemicalrf.mix !!!!”Прыгаю в кеды, и лечу на адрес “бро много кидков, очень много покупай у проверенных магазинов (это которые на главной странице), а не у пользователей, и в чате не вздумай покупать только у ПРОВЕРЕННЫХ я серьезно!!! кинут
hph real estate dubaidubai new homebest freehold property in dubai https://glasinac.com business in uaeWhat 2025 data reveals about prices going up or slowing down?dubai residential property investment
Наличие редких позиций, например, изделий из гафния и ванадия
https://redmetsplav.ru/store/magniy-i-ego-splavy/zarubezhnye-splavy-2/magniy-9990—csa-hg-2/truba-magnievaya-9990—csa-hg-2/
Worth saying this site reads better than most paid newsletters I have tried, and a stop at gongflora confirmed that comparison, the bar for free content is often lower than for paid but this site clears the paid bar consistently and that says something about the editorial approach behind the work being published here regularly.
Редметсплав — надежный партнер, работаем по поставкам нержавеющего проката уже второй год, сбоев не было.
https://xn--80aeedb0bfzeok.xn--p1ai/catalog/dvutavr-aliuminievyi/aliuminievyi-dvutavr-akm-2x40x40-gost-13621-90/
porno marocain
After several visits I am now confident this site is one to follow seriously, and a stop at firkit reinforced that confidence, the gradual building of trust through repeated quality exposures is the only sustainable way to develop reader loyalty and this site is building that loyalty in me through patient consistent work consistently.
dubai real estate crowdfundingapartments for sale in dubai old towntop hotel apartments in dubai Ajman Villa for Sale afi mohamed hussein dubai propertieshow to start a small business in dubaidubai property apartments
Купить Мефедрон, Бошки, Марихуану, Гашиш, Экстази Отзыв по работе магазина: после оплаты мной товара имелась задержка и паника с моей стороны) после задержки продавец деньги вернул- проблему без внимания не оставил… далее получил от магазина приятный презент в размере не дошедшего товара- товар дошел за 2 дня, курьерка работает без перебоев. Магазину респект! Можно работатьон мне успел ответить – поверь, ничего такого о чём тебе стоило бы беспокоиться – не случилосьХороший магазинчик , рега хорошая , в общем стоит вашего внимания ))) всем удачи !
porno marocain
Came across this looking for something else entirely and ended up reading it through twice, and a look at thrashurge pulled me deeper into the site than I planned, the writing has a way of holding attention without resorting to manipulative cliffhangers or vague promises that never get delivered later down the page.
Just want to acknowledge that the writing here is doing something right, and a quick visit to keenfoil confirmed the same standards run across the broader site, recognising good work is something I try to do when I find it because the alternative is silence and silence rewards mediocrity.
Worth flagging that this approach to the topic is fresh without being contrarian, and a stop at irisetch extended the same fresh angle, finding original perspective on familiar subjects is rare and this site has clearly developed its own way of seeing rather than echoing the dominant takes from elsewhere consistently.
This actually answered the question I had been searching for, and after I checked guavahilt I had a few more pieces I had not realised I needed, that is the sign of a site that knows what its readers want before they even know how to ask it which is impressive.
1 bhk flat for rent in al quoz dubaibuy villa in jvc dubaicheap hotel apartments in tecom dubai https://2bedroomtownhouseforsaleindubai.org real estate managment software in dubaivillas in dubai south2bhk property in dubai
Really when someone doesn’t understand after that its up to other people that they will assist, so
here it occurs.
Купить Мефедрон, Бошки, Марихуану, Гашиш, Экстази слежка либо за магазином либо за курьеркойон чють чють с желтаи что за вещество
porno marocain
Tiger Sky Toweral wasl trading grouptop real estate projects in dubai https://ogniat.com rental apartments dubai monthlydubai property lookupnumber of property handed over so far in dubai
A piece that did not lecture even when it had clear positions, and a look at tailortarget maintained the same teaching without preaching tone, finding the line between informing and lecturing is hard and most sites land on the wrong side of it but this one has clearly figured out how to inform without becoming preachy.
Genuinely glad I clicked through to read this rather than skipping past, and a stop at fossgusto confirmed I should keep clicking through to more pages here, the kind of resource that justifies its place in my browser history rather than feeling like wasted time which is the highest compliment I offer any site online today.
Купить Мефедрон, Бошки, Марихуану, Гашиш, Экстази ТС прими во внимание!да не врядли просто ихнему курьеру поджопников надавать надо что бы копытами веселей шевелил да и всеmedved20-10 не еби людям голову!!!!!!!!!!! микс отличный, но на час-1,5! Не больше……
https://zaoavis.ru/
Reading this fit naturally into my afternoon walk because I was reading on my phone, and a stop at gapjumbo continued well in that walking format, content that survives mobile reading without becoming awkward is content with format flexibility and this site has clearly thought about how it reads across different devices today.
hack apk
scope broker dubai property finderApartments for sale in The Address Residence Sky View Towersdubai real estate market supply https://stopvsd.net ashraf diwan dubai propertiesemaar properties in dubai for saledamac villas for sale
Found this through a friend who recommended it and now I see why, and a look at gonggrip only strengthened that recommendation in my own mind, word of mouth still works for content that actually delivers and this site is clearly earning recommendations the old fashioned way through quality rather than marketing.
География деятельности компании охватывает всю территорию России, обеспечивая металлом предприятия в удаленных регионах.
https://rms-ekb.ru/catalog/stalnoi-list/stalnoi-list-03kh21n21m4gb-0-45x1700x1250-gost-19903-2006-gladkii-otsinkovannyi-goriachekatanyi/
Will share this on a forum I am part of where it will be appreciated by others working in the same area, and a look at flameeden suggests there is more here worth passing along too, definitely a generous resource that deserves a wider audience than it probably has today across the open internet.
family room for monthly rent in dubai investment parktax on real estate sale dubaidubai south logistics district https://theabsolutepeach.com dubai property crashph real estates dubaifurnished apartments for rent in discovery gardens dubai
Купить Мефедрон, Бошки, Марихуану, Гашиш, Экстази чувак сделай 2к15 самый раз для меня))Дружище, если ты не понял, нам магазин в пятницу и здесь и везде перестал отвечать. Продавец принимал деньги до пятницы 17:00, и то (почитай ветку) тянул с треками. А потом пропал. Форум этот тоже больше не имеет той волшебной силы, что была раньше. Вместо того, чтобы составлять мнение о магазе, дибилы просто отписывают во все ветки без разбора “магаз улет” и “все ровно”, чтобы нужное количество сообщений набрать и умоляют о новых тестерах.Также возможен выбор курьерки, если какая-то из них не возможна для доставки в ваш город
I was able to find good information from your articles.
Reading this in a quiet coffee shop matched the calm energy of the writing, and a stop at irisgusto extended that environmental match, content that has its own ambient quality which can match or clash with surroundings is content with a personality and this site has the kind of personality that suits calm reading.
porno marocain
Appreciated the way each section connected smoothly to the next without abrupt jumps, and a stop at sauntersonar kept that flow going nicely, transitions are something most blog writers ignore but the difference is huge for the reader who is trying to follow a sustained line of thought today across many different topics.
https://zaoavis.ru/
Genuinely useful read, the points are practical and easy to apply right away, and a quick look at sorbetsolo confirmed that this site is consistent in that approach, looking forward to digging through the rest of it when I get the chance to sit down properly later in the week or this weekend.
Купить Мефедрон, Бошки, Марихуану, Гашиш, Экстази реагенты всегда чистые и по высшему??? сертифекаты вместе с реагентами присылают на прохождение экспертизы на легал?Какое палево ты очём?Че за доверенный магазин мля!!! Кто нах его в доверенные записал!?! Админы убирайте его нах!!! Заказал товар, отправляли неделю, потом трек ждал завтраками кормили, счас трек не бьется 3 день, ася оффлайн, бросик отошел- на сообщения не отвечает!!! Люди не заказывайте тут ничего!!!
how to invest money in uaeaaj property dubaicoca cola win an apartment in dubai https://gedstudyguide.org property agent dubai marinaGolf Promenadefurnished studio for rent in dubai for 3 months
gooobet drogues
If I had to summarise the editorial sensibility of this site in a few words it would be careful and human, and a look at tidalslick extended that summary feeling, capturing the essence of a sites approach in brief is hard but this site has a clear enough identity that the summary comes naturally enough.
largest real estate brokers in dubaivilla for sale dubai the lakespayment plan dubai One Bedroom Apartment for Sale in Dubai rent a apartment in dubai palmbin hamoodah properties dubai officewhere to buy apartment in dubai
Купить Мефедрон, Бошки, Марихуану, Гашиш, Экстази мин заказ от 1гр.При “отменном” качестве 1к25 смело выходит. У вас отменное ?Да и вообще стот ли…? риск есть…?
porno marocain
Came in tired from a long day and the writing held my attention anyway, and a stop at gapkraft kept that going, content that can engage a fatigued reader is doing something right because most online reading happens in suboptimal conditions like that one and quality content adapts to it without complaint.
Reading carefully this time rather than scanning, and the depth shows up in places I missed first time around, and a look at kelpfancy rewarded the same careful approach, content that holds up to multiple reads is content I want more of in my regular rotation rather than disposable scroll fodder daily.
two bedroom apartment in dubairenting property in dubai guideal safa villas 2 bedroom apartment for sale in jbr dubai The Collection guideapollo real estate dubaiproperty finder sharjah
Now setting this aside as a model of how to write thoughtfully on the topic, and a stop at framegable extended that model status, content that becomes a reference for how a kind of writing should be done is content with influence beyond its own readership and this site is reaching that level for me clearly today.
Купить Мефедрон, Бошки, Марихуану, Гашиш, Экстази Член до колен и девок гарем))С возвращением друг!!!!адекватных клиентов,спокойных и прибыльных деньков)))На днях брал небольшой опт, был приятно удивлен подходом и предложением тс, товар еще не пробовали ,но забрал все ровно, по ходу отпишу в теме за качество товара, пока же могу сказать, что жалею , что раньше не работал с данным тс! Успехов, благодарю за сервис!!!
Solid little post, the kind that does not need to be flashy because the substance is doing the work, and a look at gongjade kept that quiet confidence going across the site, this is what writing looks like when the writer trusts the content to land on its own without theatrics or unnecessary attention seeking behaviour.
Четкая структура меню позволяет быстро найти нужный металл
https://redmetsplav.ru/store/magniy-i-ego-splavy/rossiyskie-splavy-1/magniy-ml15—gost-2856-79/prutok-magnievyy-ml15—gost-2856-79/
ООО «РМС» поставляет вольфрамовые порошки, соответствующие строгим техническим условиям (например, ТУ 48-4205-112-2017).
https://rms-ekb.ru/catalog/ugolok-stalnoi/ugolok-stalnoi-st3ps-75x60x7-gost-8509-93/
Most of my reading time goes to a small number of trusted sources and this one is now joining that group, and a stop at ironfleet reinforced the group membership, the few sites that earn a place in my regular rotation are sites I expect ongoing returns from and this one has earned that elevated position consistently.
Редметсплав — пример того, как должен работать современный поставщик металлургического сырья.
https://xn--80aeedb0bfzeok.xn--p1ai/catalog/dvutavr-aliuminievyi/aliuminievyi-dvutavr-ak4-1-6x105x240-gost-13621-90/
dubai investment and real estate companytransferring money from india to dubai to buy propertyDubai Hills 2 BHK for Sale in Dubai Apartments for sale in Creek Waters 2dubizzle classifieds abu dhabihotel dubai for rent per month
After several visits I am now confident this site is one to follow seriously, and a stop at flankgate reinforced that confidence, the gradual building of trust through repeated quality exposures is the only sustainable way to develop reader loyalty and this site is building that loyalty in me through patient consistent work consistently.
porno marocain
Купить Мефедрон, Бошки, Марихуану, Гашиш, Экстази принимай не меньше 300 мг МХЕ от данного селлера.Ясно, спс, отправил заказ на мыло, посмотрим.Мукообразная консистенция
Worth recommending broadly to anyone who reads on the topic, and a look at trenchvinca only confirms that, the rare combination of accessibility and depth in this site makes it suitable for both newcomers and people who already know the area which is hard to pull off in any blog format today and rarely managed.
Worth saying that this is one of the better things I have read on the topic in months, and a stop at gulfflux reinforced that ranking, the topic is well covered by many sources but few do it with this level of care and the few that do deserve to be flagged so other readers can find them.
arthur mckenzie properties group dubaivillas to rent in jumeirah golf estatesjoint property ownership dubai Property for Sale in Downtown Dubai studio room in dubaiwarranty on property cracks in walls dubailuxury apartment in dubai for rent
porno marocain
A satisfying piece in the way that good meals are satisfying rather than just filling, and a look at scrolltower extended that satisfaction, the metaphor between content and meals is one I find useful and this site reads as a satisfying meal rather than the empty calories that most content provides for casual readers.
Купить Мефедрон, Бошки, Марихуану, Гашиш, Экстази по Иванову работаемДабы не быть голословным: № заказа 1000707. 10г ам2233. Делал 1 к 7. Эффект болезненный. Все выброшено. Верни деньги ТС или пришли нормальный ам!Магазин в полном порядке!!
buy property in dubai and get visastudio apartment short term rental dubaione bedroom apartment for rent in dubai silicon oasis https://businessbayapartmentsforsale.com biggest developer in dubaidubai property pakistan investmentbio earth real estate dubai
porno goobet
Now planning to write about the topic myself eventually using this post as a reference, and a look at gaussfawn would also serve in that future piece, content that becomes raw material for my own writing rather than just informing my reading is content with multiplicative value and this site is generating that multiplicative effect.
Useful enough to recommend to several people I know who would appreciate it, and a stop at ironkrill added more material I will pass along too, the kind of writing that earns word of mouth is the kind that actually delivers on its promises which is what this site does without any drama or fanfare attached.
Купить Мефедрон, Бошки, Марихуану, Гашиш, Экстази Оплатил заказ до нового года, связывался через почту, написали оплата прошла, отправка будет после праздников, … ответа до сих пор нет… Сделайте что нибудь, ответьте мне на почте емае, хз уже чо делать.Друууууг, ну где же трееек……Магазин работает отлично!!! Работаю с ним давно!!! Бро ты лучший!!!)))
emaar towers in dubai marinadubai rent monthly paymentvilla rental dubai springs 2 Bedroom Townhouse for Sale in Dubai low rent apartments in dubairent villa in dubailanddowntown apartments for rent dubai
https://zaoavis.ru/
https://zaoavis.ru/
A piece that read as the work of someone who reads carefully themselves, and a look at gongketo continued that informed feel, writers who are also serious readers produce work with a different quality and this site reads as the product of someone steeped in good writing rather than just generating content for an audience.
Широкий выбор тугоплавких металлов, таких как вольфрам и молибден
https://redmetsplav.ru/store/magniy-i-ego-splavy/rossiyskie-splavy-1/magniy-ma12—gost-14957-76/polosa-magnievaya-ma12—gost-14957-76/
В каталоге представлены конденсаторные ниобиевые порошки высокой чистоты, необходимые для современной электроники.
https://rms-ekb.ru/catalog/stalnoi-list/stalnoi-list-07kh16n6-0-7x1100x1600-gost-19903-2006-gladkii-otsinkovannyi-goriachekatanyi/
Thanks for the clean writing, no broken sentences and no awkward translations like some other sites have, and a quick stop at frescoheron kept that polish going nicely, it really does make a difference when a reader can move through a page without tripping on every line or going back to reread.
Reading this prompted me to dig into a related topic later, and a stop at vectorswift provided some of the starting points for that follow up reading, content that triggers further exploration rather than satisfying curiosity completely is content with real generative energy and this site has plenty of that energy throughout it.
porno goobet
121 properties dubaiis it safe to buy a house in dubairealty one real estate development dubai 1 bedroom apartment dubai for sale downtown real estate dubaiaffordable service apartments in dubaireal estate agents dubai international city
Skipped a meeting reminder to finish the post, and a stop at flankhaven held me past another reminder, when content beats meetings the writer is doing something extraordinary because meetings have institutional support behind them and yet good writing can still occasionally win that competition for attention which I find heartening today.
Купить Мефедрон, Бошки, Марихуану, Гашиш, Экстази спасибо ответили…. доволенМагазин нормально работает?,а то некоторые говорят что не стоит обращаться в данный магазин для заказов!Фон или фок как твой ник правильно читаеться и пишиться ? отпишись нормальный магаз или нет !захвоти с собой пару парнеей, и еще пару бикс
Редметсплав — пример того, как должен работать современный поставщик металлургического сырья.
https://xn--80aeedb0bfzeok.xn--p1ai/catalog/latunnye-vnutrennie-stopornye-koltsa-po-gost/latunoe-vnutrennee-stopornoe-pruzhinnoe-koltso-145kh2-5-mm-l63-gost-13943-86/
Now I want to find more sites like this but I suspect they are rare, and a look at teapotshrine extended that thought, the few sites that meet this quality bar are precious specifically because they are rare and finding others like them is one of the ongoing projects of careful internet curation across the years.
hack apk
luxury apartment for rent dubaiwasl gate dubaidubai real estate maintenance https://lindyjankura.com rent house in dubai rage 20000studio apartment for rent in business bay with view2 bedroom hotel apartments in dubai
Started forming counter examples to test the claims and the post handled most of them implicitly, and a look at kelpgrip continued that anticipatory style, writers who think two steps ahead of the critical reader save themselves from a lot of follow up work and this writer has clearly internalised that habit consistently.
Strong recommendation from me, anyone curious about the topic should make time for this, and a look at surgesorrel only sharpens that recommendation further, the kind of resource that holds up against careful scrutiny rather than crumbling at the first critical question is rare and worth pointing other people toward when the topic comes up.
Купить Мефедрон, Бошки, Марихуану, Гашиш, Экстази Да я написал уже. Мб 2-dpmp в качестве компенсации подгонят, а вот что с фф не знаю, я ее проебал до того как я еще попробовал.А то декларировалась “быстрая реакция на заказ”, а на деле реакция отсутствует вообщебля у нас опен эйр будет 11 июня у шамана пороха нету!!!вот ищу где бы взять что нибудь на подобие скорости или кокса!а тут отзывы что соду продают!
real estate photographer freelance dubaiintellectual property dubai law firmsspace & place real estate dubai buy penthouse in dubai Villas for rent in Cayadubai property market crashhouse and lot for sale
porno marocain
Купить Мефедрон, Бошки, Марихуану, Гашиш, Экстази Снова магазин порадовал своей оперативностью) сдеал заказ, получил трек всё бьётся!Здравствуйте всем делали заказ у этого хорошего магазинане пожалеете)
The examples really helped me grasp the points faster than abstract descriptions would have, and a stop at gausskite added a few more practical illustrations that drove the message home, the kind of writing that knows its readers learn better through concrete situations rather than vague generalities is rare and worth recognising clearly.
real estate agents dubai directory2 bedroom Apartments for sale in Jumeirah Village Trianglestudio flat for rent in dubai al rigga Off Plan Real Estate Dubai ocean real estate dubai sheikh zayed roadapartments in jlt dubaihotel apartments in dubai for sell
Большой опыт работы, судя по копирайту с 2013 года
https://redmetsplav.ru/store/kobalt/wallex/kobalt-wallex-250-2/poroshok-kobaltovyy-wallex-250-2/
Использование системы менеджмента качества гарантирует строгий контроль продукции на всех этапах отгрузки.
https://rms-ekb.ru/catalog/stalnoi-list/stalnoi-list-35l-24x1550x2000-gost-19903-2006-gladkii-otsinkovannyi-goriachekatanyi/
hack apk
real estate free zone dubaiApartments for rent in La Vieproperty snagging inspection before handover dubai property for sale in arabian ranches dubai cheap studio apartment in dubaiThe Address Jumeirah Resort & Spamaple at dubai hills estate floor plan
Купить Мефедрон, Бошки, Марихуану, Гашиш, Экстази Подскажите когда примерно вналичии будет JTE-907про него что нить писали? точнее вы читали ?Все легально и проверено, есть NMR. Плохого ни чего не случиться. Скорей всего приняли потому что были паленые….
During my morning reading slot this fit perfectly into the routine, and a look at flankisle extended that perfect fit into the rest of the routine, content that matches the rhythm of how I actually read rather than demanding accommodation from my schedule is content well calibrated to its likely audience and this site has it.
My professional context would benefit from having this kind of resource available, and a look at gooseholm extended the professional applicability, the rare site that contributes meaningfully to professional work rather than just personal interest is content with multiplied value and this one is providing that professional utility consistently across multiple pieces.
Спасибо команде за профессионализм и помощь в реализации нашего сложного промышленного проекта!
https://xn--80aeedb0bfzeok.xn--p1ai/catalog/dvutavr-aliuminievyi/aliuminievyi-dvutavr-k48-2-2x58x100-gost-13621-90/
Left me wanting to read more rather than feeling burned out, that is a good sign, and a look at swiftswallow confirmed there is plenty more here to explore, the kind of writing that builds appetite rather than killing it which is a rare quality on the modern open internet today across most categories of content.
Picked up two new ideas that I expect will come up in conversations this week, and a look at gulfholm added another, content that arms me with talking points rather than just filling time is the kind that provides ongoing value beyond the moment of reading and this site is generating that kind of ongoing value.
Купить Мефедрон, Бошки, Марихуану, Гашиш, Экстази “Ладно думаю доберусь до дома там опробую нозально “единственная существенная проблема данного магазина – отсутствие автоматизированной системы оформления заказов… Вроде прикручивают к сайту, но что то долго уже…Магазин в полном порядке!!
Автомобильный блог помогает водителям лучше понимать устройство автомобиля и принимать правильные решения при обслуживании. Регулярно публикуются обзоры, советы и полезные материалы для владельцев разных марок машин – всё для водителей
Honestly this hits the sweet spot between detail and brevity, no rambling and no shortcuts, and a quick visit to frondketo kept that going across the related pages, the kind of place that respects your attention without trying to grab it through cheap tactics or attention seeking design choices that get tired fast.
gooobet drogues
Found the rhythm of the prose particularly enjoyable on this read through, and a look at shoresyrup kept that musical quality going across the related pages, sentence rhythm is something most blog writers ignore but it makes a real difference in how content lands with the careful reader who cares.
danube al barshaal warqa 1 apartments for rentproperty dubai real estate Luxury Apartments for Sale in Dubai property for rent in al barshaal wasl barsharental properties in karama dubai
Speaking carefully because I do not want to overstate things this site is genuinely above average across multiple measurements, and a stop at shamrockswan continued the above average performance, the calibration of judgement against potential overstatement is something I take seriously and this site clears the higher bar even after that calibration applies.
Архитектурная концепция комплекса ориентирована на современные стандарты качества и эстетики, благодаря чему проект гармонично вписывается в городской ландшафт: квартира в новостройке
wohnung dubai kaufenpenthouses for rent in jlt dubaibrand new apartments for rent in dubai https://sunvalleyballet.org al ain properties dubaibest magazine about real estate dubaiGolf Vista
porno marocain
Купить Мефедрон, Бошки, Марихуану, Гашиш, Экстази кто сказал что он закрылся? где это написано?я звонил седня.сказали либо номер не правлеьный..либо не отправили ещеНу просто реально непонятно. Народ заказывает, все довольны, я, мои знакомые тут берут стафф – всё на высшем уровне. И твой отзыв по поводу некачественного товара – первый… Да и чтоб сразу и ЖТЕ палёный, и ФА непрущая… Хз, разбирайтесь
Really clear writing, the kind that makes you want to share the link with someone who has been asking about the topic, and a quick browse through vitalsnippet only made me more sure of that, the information here stays useful long after the first read is done which says a lot.
Halfway through I knew I would finish the post, and a stop at gemglobe also held me through to the end, content that signals its quality early and then sustains it is content with real internal consistency and this site has clearly figured out how to maintain quality from opening sentence through to closing thought.
dubai hill property price will sky rocketemaar south villas for salearms and mcgregor real estate dubai Palm Jumeirah Villas for Sale ajd real estate dubai showroom1 bedroom apartment to buy in dubaidubai furnished apartments for rent long term
Came in expecting another generic take and got something with actual character instead, and a look at ironkudos carried that personality forward, finding a distinct voice on a saturated topic is impressive and worth pointing out when it happens because most sites end up sounding identical to their nearest competitors quickly.
Купить Мефедрон, Бошки, Марихуану, Гашиш, Экстази Извините удаляю сообщение!Отзыв коротенько. Закладка на месте. Обьяснение распологает. Фото имеется. Бот чёткий. бошки хороши. Вес норма! … ну вот и всё Коротко и ладно)Данный продукт не зашол в моё сознание:) его нужно бодяжить с более могучим порохом, будем пробовать АМ2233…
porno goobet
Описание применения металлов в атомной энергетике подчеркивает качество
https://redmetsplav.ru/store/kobalt/stellite/kobalt-stellite-4/folga-kobaltovaya-stellite-4/
Каждая партия товара сопровождается сертификатами качества, подтверждающими соответствие ГОСТ и ТУ.
https://rms-ekb.ru/catalog/ugolok-stalnoi/ugolok-iz-konstruktsionnoi-stali-180kh180kh18-mm-14nicrmo1-3-4-en-10056-1/
room for rent in al barsha monthlyhow long to sell property in dubaistudio for rent monthly dubai Looking to buy or rent property in Dubai? kaye & co real estate l.l.c dubaihotel apartments in dubai near burj khalifaApartments for sale in Jumeirah Village Circle
ЖК 26 ПаркВью станет хорошим выбором для семей, которые хотят жить рядом с образовательными учреждениями, парками и объектами повседневной инфраструктуры – жк 26 парквью мр групп
The conclusions felt earned rather than tacked on at the end like an afterthought, and a look at gorgefair kept that careful structure going, you can tell when a writer has thought about the shape of their post versus just letting it ramble out and hoping for the best at the end which most do.
Solid little post, the kind that does not need to be flashy because the substance is doing the work, and a look at flankivory kept that quiet confidence going across the site, this is what writing looks like when the writer trusts the content to land on its own without theatrics or unnecessary attention seeking behaviour.
Honestly enjoyed every minute spent here, that is not something I say lightly, and a look at thisdomainisdishk confirmed I will be back, the bar for spending time online is high for me these days but this site clears it without effort which is high praise indeed from this reader who is usually rather demanding.
Отличное соотношение цены и качества на весь цветной металлопрокат, будем заказывать еще.
https://xn--80aeedb0bfzeok.xn--p1ai/catalog/melkhiorovaia-truba/melkhiorovaia-truba-15kh2-5kh9000-mm-mnzhmts30-1-1-gost-10092-2006/
Купить Мефедрон, Бошки, Марихуану, Гашиш, Экстази Вы не могли сегодня оплатить заказ, потому что мы сегодня не работаем :)Ну что же, сегодня получил свою посылку, на этот раз все было в наилучшем виде, конспирация на все 10 баллов из 10!Вас не будет эйфоретик убивать или сносить голову как Ск или еще какая хрень, тут легкий эффект эйфории с диссоциативом, Так сказать на любителя, просьба не путать продукт, вы прежде чем заказывать должны были ознакомится с веществом, можно погуглить и узнать что это такое, не надо утверждать что эйфоретик не прущий можете зайти в соседние темы там пишут совсем другие отзывы, а вас почему то не торкает оно как так.
hack apk
Great post but I was wanting to know if you could write a litte more on this subject?
I’d be very grateful if you could elaborate a little bit more.
Thanks!
Most of my reading time goes to a small number of trusted sources and this one is now joining that group, and a stop at taffetaswan reinforced the group membership, the few sites that earn a place in my regular rotation are sites I expect ongoing returns from and this one has earned that elevated position consistently.
real estate companies in dubai vincitorearabian escapes real estate broker dubaijenan real estate dubai Hotel Apartments in Bur Dubai for Monthly Rent al khail gate propertiesdubai property salesSteps to buying property in Dubai
Picked a single sentence from this post to remember, and a look at summitshire gave me another to keep, content that produces memorable lines is doing more than just transferring information and the small selection of sentences I keep from each reading session is one of the actual returns I get from reading carefully.
Glad to have another data point on a question I am still thinking through, and a look at fumefig added two more, content that acknowledges its place in a wider conversation rather than pretending to settle the question alone is intellectually honest in a way that I wish was more common across the open web.
Купить Мефедрон, Бошки, Марихуану, Гашиш, Экстази Посмотри в ЛССделал заказ. Пропустил реквизиты для оплаты. Продавец свяжись со мной, оплачу. В понедельник сможете отправить товар?Оплатил 28 января это был вторник, продавец сказал отправки в течении 2х дней…
https://danielova.com/
city walk al wasl dubaistudio apartment for rent dubai marinadubai real estate report jll https://buypenthouseindubai.ae al warqa 1 bhk for rentchiller.free.studio.for.rent in al nahda dubaiexpat properties dubai license
gooobet drogues
https://danielova.com/
Thanks for taking the time to write this, it is clear that some thought went into how each point would land, and after I went through islegoal I had a better grip on the topic, real value without the usual marketing noise people have to put up with online when searching for answers.
Worth saying that this is one of the better things I have read on the topic in months, and a stop at genieframe reinforced that ranking, the topic is well covered by many sources but few do it with this level of care and the few that do deserve to be flagged so other readers can find them.
Купить Мефедрон, Бошки, Марихуану, Гашиш, Экстази Начинает формироваться мнение.на почту не кто не писалА со скольки у них скайп начинает работать?
Villas for sale in Sobha Hartland IIrenaissance real estate dubaiwhat is stock exchange market Property For Sale In Dubai Palm Jumeirah California Villageemkay properties dubai3 bedroom house for sale in dubai
hack apk
Купить Мефедрон, Бошки, Марихуану, Гашиш, Экстази а какие были проблемы по данном поводу?Эйфора сейчас нет в наличии, если только индивидуальный заказ от 1кг.Качественный магаз!
dubai properties ghoroobtop real estate properties in dubairooms for rent in villas dubai 3 bedroom apartments for sale in dubai real estate projectsh&s real estate dubai general managerFour Seasons Private Residences DIFC
Использование системы менеджмента качества гарантирует строгий контроль продукции на всех этапах отгрузки.
https://rms-ekb.ru/catalog/krug-iz-instrumentalnoi-stali/krug-55kh6v3smf-5-2-gost-7417-75/
Раздел «Контакты» содержит все необходимые реквизиты и карту
https://redmetsplav.ru/store/kobalt/stellite/kobalt-stellite-12/truba-kobaltovaya-stellite-12/
A piece that did exactly what it promised in the headline without overshooting or underdelivering, and a look at gorgeheron continued that calibration, alignment between promise and delivery is a basic editorial virtue that many sites fail at and this site has clearly mastered the matching of expectation and substance throughout pieces.
Picked something concrete from the post that I will use immediately, and a look at kelpherb added another concrete piece, content that produces immediately useful output rather than just abstract appreciation is content that earns its place in my regular rotation without needing any further evaluation from me at this point honestly.
Worth recognising that the post handled a familiar topic without reaching for any of the obvious hot takes, and a stop at flaskkelp continued that fresh treatment, sites that find new angles on subjects others have exhausted are sites worth following carefully and this one has clearly developed that exploratory instinct through patient practice.
hack apk
References:
Trump casino https://https://freehaitianmovies.com/@edithlynas687?page=about/@edithlynas687?page=about
Definitely returning here, that is decided, and a look at gulfkoala only made the case stronger, this is one of those rare websites that rewards regular visits rather than feeling stale after the first read which is something I cannot say about most of the places I bookmark today across all my topics.
Decided to write a short note to the author if there is contact info anywhere, and a stop at safaritriton extended that intention, the urge to thank the writer directly is a strong signal of content quality and this site has triggered that urge in me today which is a fairly rare event for my reading.
Закупали шлак ферросилиция для строительных нужд, материал качественный, без лишних примесей.
https://xn--80aeedb0bfzeok.xn--p1ai/catalog/dvutavr-aliuminievyi/aliuminievyi-dvutavr-vd17-4-5x34x37-gost-13621-90/
Now wondering how the writers calibrated the level of detail so well, and a stop at stencilveto continued the same calibration, the right level of detail is one of the harder editorial calls in any piece and this site has clearly developed an instinct for it through what I assume is years of careful practice publicly.
Купить Мефедрон, Бошки, Марихуану, Гашиш, Экстази сильнее и по времени 400.незнаю.сколько раз зака зывал , всегда приходило качество , был один момент когда был ркс 4. он был 15 минутный слабый. Но это сам реактив был такой. Он использовался как урб для добавок к другим. А так то что присылали всегда всё ровно. кач и кол..Ты покупал у этого магазина ? Если у этого то пиши ему в лс, и по каким контактам ты списывался , и сколько брал ? Не могли тебя тут кинуть
Проект от MR Group ориентирован на создание пространства, в котором удобно жить, отдыхать и проводить время с семьей в комфортной обстановке: жк 26 парквью на тимирязевской
gooobet drogues
Bookmark earned and folder updated to track this site separately, and a look at velourturban confirmed the folder upgrade was the right call, organising my reading list so that good sites do not get lost in a sea of casual bookmarks is something I do more carefully now and this site warranted its own spot.
A piece that earned its conclusions through the body rather than asserting them at the end, and a look at jadeflax maintained the same earned quality, conclusions that follow from what came before are more persuasive than declarations and this site has clearly internalised that principle in how it constructs arguments throughout pieces.
Compared to the usual results for this kind of search this site stands well above the average, and a quick visit to fumefinch kept the standard high, you can tell within seconds whether a site is going to waste your time or actually deliver and this one clearly delivers without any false starts.
Купить Мефедрон, Бошки, Марихуану, Гашиш, Экстази ПО ВРЕМЕНИ СКОЛЬКО?всё ровно бро делаетПривет, дорогие друзья! меня зовут Антон32131. Покупаю периодически у этого магазина различные товары. Перед каждой новой покупкой создаю новый профиль и в скайпе и на этом форуме и на сайте уважаемого магазина. Я сам не в курсе с какой целью я это делаю, может быть я болен, либо причина в моей гиперсексуальности. Но пишу я об этом к тому, чтобы вы дорогие друзья не заподозрили подвоха в том что отзыв пишет новичок!
ЖК 26 ParkView привлекает внимание благодаря сочетанию престижной локации, качественной архитектуры и современного уровня благоустройства территории https://26park.ru/
Worth every minute of the time spent reading, and a stop at gladfir extends that value across more pages, in a media environment where most content is engineered to waste attention this site stands out by treating reader time as something valuable rather than something to be exploited and stretched as far as possible.
gooobet drogues
Now adding a small note in my reading log that this site is one to watch, and a look at slacktally reinforced the watch status, the few sites I track deliberately rather than encounter accidentally are sites I expect ongoing returns from and this one has cleared the bar for that elevated tracking based on what I read.
Worth flagging that this approach to the topic is fresh without being contrarian, and a stop at vandaltavern extended the same fresh angle, finding original perspective on familiar subjects is rare and this site has clearly developed its own way of seeing rather than echoing the dominant takes from elsewhere consistently.
Купить Мефедрон, Бошки, Марихуану, Гашиш, Экстази Привет парни…Заказал тут 10-ку МНа..Ну, была задержка с отправкой,дней десять наверно…:fuck: Селлер сразу сказал про компенсацию:monetka:так что я особо не парился…Ну с посылки я конечно при.уел:confused:.18грам + конспирация:bravo:Товар достойный,…1к13 полчаса стабильно” на ура”:hello:Молодцы …порадовали таким подарком…:ok:Удачи в новом году..Успехов Вам всё ровно )трек получен, ребятам уважуха:rasta:
Now adding a small note in my reading log that this site is one to watch, and a look at slacktally reinforced the watch status, the few sites I track deliberately rather than encounter accidentally are sites I expect ongoing returns from and this one has cleared the bar for that elevated tracking based on what I read.
I learned more from this short post than from longer articles I read earlier today, and a stop at slacktally added even more useful detail without going off topic, this site clearly knows how to keep things focused without sacrificing depth which is a hard balance to strike for any writer.
Quietly enthusiastic about this site after the past few hours of reading, and a stop at gorgeivy extended that enthusiasm, the calibration of enthusiasm to evidence is something I try to maintain and this site has earned a calibrated quiet enthusiasm rather than the loud excitement that usually fades within a day or two of finding something.
One of the more thoughtful posts I have read recently on this topic, and a stop at herbharp added even more weight to that impression, this is genuinely good content that holds its own against far better known sites in the same space without trying to imitate any of them at all which I appreciate.
Coming back to this one, definitely, and a quick visit to flintgala only made me more sure of that, the kind of writing that makes you want to set aside time later rather than rushing through it now while distracted by everything else competing for attention on the screen today across so many tabs.
gooobet drogues
کراتین بی پی ای، ساخت کمپانی بی پی ای است که شعار خود را بر مبنای کیفیت و عملکرد بنا کرده و در این محصول روی یک ویژگی کلیدی دست گذاشته است، خلوص و میکرونیزاسیون.
https://danielova.com/
Описание складских позиций сокращает время ожидания ответа
https://redmetsplav.ru/store/kobalt/rossiyskie-splavy-3/kobalt-k1a—gost-123-08/polosa-kobaltovaya-k1a—gost-123-08/
Поставки жаропрочных сплавов ориентированы на потребности авиационной и энергетической отраслей.
https://rms-ekb.ru/catalog/ugolok-stalnoi/ugolok-stalnoi-st3ps5-140x140x12-gost-8509-93/
Купить Мефедрон, Бошки, Марихуану, Гашиш, Экстази всем желаю счастья!почему 0.3? акция?Да просто дедушка форума ))
Reading this gave me a small refresher on something I had partially forgotten, and a stop at velourturban extended the refresher, content that strengthens existing knowledge rather than just adding new is content with a particular kind of consolidating value and this site is providing that consolidating function across multiple visits.
Closed the tab and immediately reopened it ten minutes later because I wanted to reread a part, and a stop at sampleshadow drew the same return, content that pulls you back after closing it is doing something well beyond the average and worth marking as exceptional in my mental catalogue of reliable sites.
Now recognising that this site has earned a place in the small group of resources I treat as authoritative, and a stop at shrinetender confirmed that placement, the difference between resources I trust and resources I just consume is real and this site has clearly moved into the trusted category through consistent quality over time.
Now considering writing a longer note about the post somewhere, and a look at jetfrost added more material for that note, content that prompts me to write rather than just consume is content with generative energy and this site is producing that generative effect for me at a higher rate than most sources.
plataformas de crowdfunding en espana
gooobet drogues
Цены на спецстали одни из самых конкурентных на рынке, при этом качество на уровне мировых стандартов.
https://xn--80aeedb0bfzeok.xn--p1ai/catalog/melkhiorovaia-truba/melkhiorovaia-truba-36kh1kh3000-mm-mnzhmts30-1-1-gost-10092-2006/
If I were to recommend a starting point for the topic this site would be near the top of my list, and a stop at veilshore reinforced that recommendation status, the small list of starting point recommendations I keep for friends asking about topics is short and this site is now firmly on it.
Decided I would read the archives over the weekend, and a stop at ketohale confirmed that the archives would be worth the time, very few sites have archives I would actively read through but this one has earned that level of interest based on the consistent quality across what I have sampled so far.
Купить Мефедрон, Бошки, Марихуану, Гашиш, Экстази Всем привет! Хороший магазин. Удачи и развития в дальнейшем!Добрый день форумчане! Кто нибудь подскажет как по качеству реагент в этом магазине? Соответствует ли заявленная концентрация? Сколько по времени держит если 1 к 20 сделать? Всем спасибо!!!и не планируете ни какой новой ветки на скайпе открыть!?там в скайпе мошенник значит от вас херачит направо и налево!и ссылку кидает на ваш магазин и говорит что от вас работает!
Подбираете мебель для дома или ищете стильные предметы интерьера под конкретный проект? На сайте https://mebeli-sajt.ru/ собран каталог проверенных фабрик, коллекций и готовых интерьерных решений. Доступны кухни, спальни, гостиные, мягкая и детская мебель, столы и стулья. Специалисты помогут с подбором, расчетом и сопровождением заказа от выбора до доставки.
Closed the post with a small satisfied sigh, and a stop at gladhalo produced the same gentle exhale, content that ends well is content that respects the rhythm of reading and the writers here have clearly thought about how their pieces close rather than just trailing off when they run out of things to say.
Now adding this to a list of sites I want to see flourish, and a stop at fumegrove reinforced that wish, the few sites I actively root for are sites that produce the kind of work I want more of in the world and this one has joined that small list based on what I have read so far.
porno goobet
Купить Мефедрон, Бошки, Марихуану, Гашиш, Экстази В целом о работе магазина – как клиент,я доволен!!!:good:Киньте репки кому не сложно) не сочтите за попрошайкуС человеком приятно иметь дело. Склонен на компромиссы 😉
porno marocain
Closed it feeling I had taken something away rather than just consumed something, and a stop at goshfrost extended that taking away feeling, the difference between content I extract value from and content I just pass through is something I track informally and this site is consistently in the value extraction column for me.
Approaching this site through a casual link click and being surprised by what I found, and a look at flockergo extended the surprise, the rare experience of stumbling into excellent independent content rather than predictable mediocrity is one of the actual remaining pleasures of casual web browsing and this site provided it cleanly.
Really clear writing, the kind that makes you want to share the link with someone who has been asking about the topic, and a quick browse through solacesteam only made me more sure of that, the information here stays useful long after the first read is done which says a lot.
Купить Мефедрон, Бошки, Марихуану, Гашиш, Экстази качество правда не очень, именно по продолжительности эффекта- в разных концентрациях его можно варьировать как тебе хочется=))))Магазин замечательный!!У меня не бьётся вторые их трек. И бро в скайпе не видно. Мож приняли их посылки на почте? Тоже парюсь блин…. Но не хотел поднимать дискуссию, не имея причин. Выслали в пятницу СПСР.
Now setting up a small reminder to revisit the site on a slow day, and a stop at jetivory confirmed the reminder was a good idea, planning return visits is a small organisational act that signals trust in ongoing quality and this site has earned that planned return through consistent performance across the pieces I have read so far.
Наличие кобальтовых сплавов заинтересует авиастроение
https://redmetsplav.ru/store/kobalt/rossiyskie-splavy-3/kobalt-ep128-1/list-kobaltovyy-ep128-1/
Took something from this I did not expect to find, and a stop at tundrasyrup added another unexpected useful piece, content that exceeds expectations rather than just meeting them is the kind that builds enthusiasm and earns repeat visits without any explicit ask from the writer or platform behind the work being read.
Liked the way the post balanced confidence and humility, and a stop at gullgoal maintained the same balance, knowing when to assert and when to acknowledge uncertainty is a sign of mature thinking and the writers here have clearly developed that calibration through what I assume is years of careful work on their craft.
hack apk
Even on a quick first read the substance of the post comes through, and a look at herbharp reinforced that immediate quality, content that does not require a slow careful read to demonstrate value but rewards one anyway is content with real depth and this site has produced work of that demanding depth class.
The depth of coverage felt about right for the format, neither shallow nor overwhelming, and a look at velourturban kept that calibration going, getting the depth right for blog format is genuinely difficult because too shallow loses experts and too deep loses beginners but this site nailed it nicely which I really do appreciate.
Купить Мефедрон, Бошки, Марихуану, Гашиш, Экстази на бизе хорошей контора была….да!МАГАЗИН РАБОТАЕТ НОРМАЛЬНО!!! БЫЛИ МАЙСКИЕ ПРАЗДНИКИ И КУРЬЕРКИ НЕ РАБОТАЛИ ПОЭТОМУ ОНИ ТОЖЕ НЕ РАБОТАЛИ!!!пока никаких точных дат нет. цены будут когда придёт товар, так что ждёмс пока что.
Желаете овладеть популярной профессией и сразу работать с живыми клиентами? Школа-студия приглашает на курсы парикмахеров как начинающих, так и практикующих специалистов. Ищете курсы парикмахеров с нуля? К практике на клиентах вы приступаете уже после трёхдневной теории — обучают на сайте j-center.ru дипломированные специалисты. Программа охватывает мужские, женские и детские стрижки, свадебные укладки, плетение кос, химическую завивку и углублённую колористику с нуля.
If you asked me to point to a recent positive sign for the open web this site would be near the top, and a stop at senatetoucan reinforced that designation, the few sites that serve as evidence the web can still produce quality independent content are precious and this one has clearly become one for me.
Высокая квалификация персонала, знают специфику редких металлов и особенности их применения.
https://xn--80aeedb0bfzeok.xn--p1ai/catalog/prutok-aliuminievyi-1/prutok-aliuminievyi-amg3-22-mm-l-3000-mm-krug-1/
porno goobet
Bookmark earned, calendar reminder set, share queued, all from one good post, and a look at glazeflask did the same, when a single reading session triggers multiple downstream actions you know the content has actually moved me beyond the page and this site is moving me at that higher level reliably.
Reading this fit naturally into my afternoon walk because I was reading on my phone, and a stop at siennathrift continued well in that walking format, content that survives mobile reading without becoming awkward is content with format flexibility and this site has clearly thought about how it reads across different devices today.
Купить Мефедрон, Бошки, Марихуану, Гашиш, Экстази сегодня вот ночью прислал трек. Бьется, радуетНа тех кто продаёт в наглую…привет бразы, хочу нахватить вот реги, что за качество скажите? надеюсь не 15 минутка?
plataformas de crowdfunding en espana
Quality work here, the post reads cleanly and the points stay focused throughout, and a stop at sampleshadow kept the standard high, you can tell the writer cares about the final result rather than just hitting publish for the sake of having something new on the page to feed the search engines.
Now adjusting my mental model of how the topic fits into the broader landscape, and a look at fumehull extended that adjustment, content that affects my structural understanding rather than just my factual knowledge is content with deeper impact and this site is providing those structural updates at a meaningful rate consistently across topics.
plataformas de crowdfunding en espana
porno goobet
Купить Мефедрон, Бошки, Марихуану, Гашиш, Экстази сегодня оплатил заказ..буду ждать доставки..протестирую.сообщу о качестве продукта?Ребята подскажите JTE-907 1 к скольки делать и сколько по времени прет?так всё неоднознано,пока на сколько я заметил о приёмах всяких кричат люди у кого порой даже 50 постов нету(дак стоит ли таким верить…Но когда брал у данного продавца последний раз на моей посылке был повреждён штрих код,я человек параноидальный подумал мало ли чё там проверили и стало жутковато.А брал то ещё туси а под ней сами понимаите….сразу меня окружили и т.д. и т.п. ХD с тех пор незаказывал тут.Зато качество было хорошее)особенно соединение 2п жёсткое
Looking back on this reading session it stands as one of the better ones recently, and a look at ketojib extended that ranking, the informal ranking of reading sessions against each other is something I do mentally and this session ranks high largely because of this site and a couple of related pages here.
plataformas de crowdfunding en espana
The headings made navigating the post simple even when I needed to find a specific section quickly, and a look at grebeflame continued the same thoughtful structure, small details like clear headings show that someone is actually thinking about how the reader uses the page rather than just filling it for length alone.
A small thank you note from me to the team behind this work, the post earned it, and a stop at jibfig suggested more thanks would be in order over time, recognising the people who do good writing online is something I try to remember to do because the alternative is silence and silence rewards mediocrity unfortunately.
Looking at the surface design and the substance together this site has both right, and a look at flockfine reinforced that integrated quality, sites where presentation and content reinforce each other rather than fighting are sites with full editorial coherence and this one has clearly invested in both layers in a balanced way.
Одним из ключевых преимуществ комплекса является сочетание городского комфорта и близости к природным территориям. Благодаря этому жители ЖК 26 ПаркВью смогут наслаждаться комфортной городской жизнью и возможностью отдыхать рядом с зелеными зонами: https://26park.ru/
plataformas de crowdfunding en espana
Наш блог помогает водителям принимать более взвешенные решения при обслуживании автомобиля и выборе необходимых комплектующих: техническое обслуживание авто
A piece that did exactly what it promised in the headline without overshooting or underdelivering, and a look at tealthicket continued that calibration, alignment between promise and delivery is a basic editorial virtue that many sites fail at and this site has clearly mastered the matching of expectation and substance throughout pieces.
plataformas de crowdfunding en espana
Профессиональный подход к описанию каждого вида металла
https://redmetsplav.ru/store/kobalt/haynes/kobalt-haynes-150-1/polosa-kobaltovaya-haynes-150-1/
Наличие прецизионных сплавов в ассортименте подтверждает работу компании с высокоточными и наукоемкими материалами.
https://rms-ekb.ru/catalog/krug-iz-instrumentalnoi-stali/krug-kh-27-58-gost-7417-75/
Bookmarking this for later, the kind of resource I want to keep nearby, and a quick look at solidtiger confirmed the rest of the site is worth the same treatment, definitely going into my reference folder for the next time the topic comes up at work or in conversation with someone who asks.
porno marocain
Nice and clean, that is the best way to describe the writing here, no clutter and no wasted words, and a quick visit to tangovillage kept that going, I appreciate when a site treats its readers like people who can think for themselves without needing constant hand holding through every paragraph.
References:
Online casino uk https://bez2.ru/@aliodowd213834?page=about
Купить Мефедрон, Бошки, Марихуану, Гашиш, Экстази Магазин высшего уровня своей работы.принимай не меньше 300 мг МХЕ от данного селлера.В общем начну с начала.нашел ветку данного магазина и решил узнать че как.
References:
Hawks prairie casino https://yourclipz.com/@shanicejacoby6?page=about
Even from a single post the editorial care is clear, and a stop at halbrook extended that care across more pages, the kind of attention to quality that shows up in every paragraph is what separates serious sites from the rest and this one has clearly invested in that paragraph level attention across what I have read.
A piece that earned its conclusions through the body rather than asserting them at the end, and a look at creekharbormerchantgallery maintained the same earned quality, conclusions that follow from what came before are more persuasive than declarations and this site has clearly internalised that principle in how it constructs arguments throughout pieces.
Worth flagging this site to a few specific friends who would appreciate the editorial sensibility, and a look at solotopaz added more pages I will mention to them, recommending sites to specific people requires understanding both the site and the person and this site is making those personalised recommendations easy and natural for me.
Купить Мефедрон, Бошки, Марихуану, Гашиш, Экстази Оплатил подождал очередь неделю так как завал у магазина теперь жду посыль респект ребята работаете на высотезнакомый брал, збс говоритОбщая оценка магазина 10/10-идут на встречу покупателю, сервис общение и работа на высоте
porno marocain
Coming back to this one, definitely, and a quick visit to heronfoil only made me more sure of that, the kind of writing that makes you want to set aside time later rather than rushing through it now while distracted by everything else competing for attention on the screen today across so many tabs.
A piece that suggested careful editing without showing the marks of the editing, and a look at gleamjuly continued that invisible polish, the best editing disappears into the prose and this site reads as having been edited with skill that does not announce itself which is the highest compliment I can offer any blog content.
A piece that suggested careful editing without showing the marks of the editing, and a look at siennathrift continued that invisible polish, the best editing disappears into the prose and this site reads as having been edited with skill that does not announce itself which is the highest compliment I can offer any blog content.
Appreciate the practical examples, they made the abstract points easier to grasp, and a stop at suburbvesper added more of the same, this site clearly understands that real examples beat empty theory every single time which is the mark of a writer who knows their audience well and respects their time.
Cabinet IQ
8305 Ꮪtate Hwy 71 #110, Austin,
TX 78735, United Ѕtates
254-275-5536
homepage
Halfway through reading I knew this would be one to bookmark, and a look at jouleforge confirmed that early intuition, when bookmark intent forms before finishing a post you know the writing has cleared a quality bar that most content fails to clear and this site has cleared it on multiple visits already.
gooobet drogues
Купить Мефедрон, Бошки, Марихуану, Гашиш, Экстази Да,мне тоже первый класс как то ближе и недорого…так всё неоднознано,пока на сколько я заметил о приёмах всяких кричат люди у кого порой даже 50 постов нету(дак стоит ли таким верить…Но когда брал у данного продавца последний раз на моей посылке был повреждён штрих код,я человек параноидальный подумал мало ли чё там проверили и стало жутковато.А брал то ещё туси а под ней сами понимаите….сразу меня окружили и т.д. и т.п. ХD с тех пор незаказывал тут.Зато качество было хорошее)особенно соединение 2п жёсткоеНе смог не скопипастить
Reading this confirmed a hunch I had been carrying about the topic without having articulated it, and a stop at grebeheron extended the confirmation, content that gives shape to fuzzy intuitions is doing the rare work of making private thoughts public and this site is providing that articulating service consistently for me lately.
Thanks for the clean writing, no broken sentences and no awkward translations like some other sites have, and a quick stop at furlkale kept that polish going nicely, it really does make a difference when a reader can move through a page without tripping on every line or going back to reread.
A piece that did not lecture even when it had clear positions, and a look at flockgala maintained the same teaching without preaching tone, finding the line between informing and lecturing is hard and most sites land on the wrong side of it but this one has clearly figured out how to inform without becoming preachy.
Купить Мефедрон, Бошки, Марихуану, Гашиш, Экстази Могу предоставить переписку администрации форума. Уже определитесь, что вам нужно чтобы и мне не дергать отправщиков, склад и прочих сотрудников. То хочу, то не хочу, то вышлите 2 посылки, оплачу посфактум, то снова верните деньги.Отличный товар и работают ребята без перебоевНу просто выглядело твое сообщение как мессага на параное)))))
Found the use of subheadings really helpful for scanning back through the post later, and a stop at syruptarot kept that reader friendly approach going, navigation is something many blog writers ignore but small structural choices make a noticeable difference for someone returning to find a specific point again days or weeks later.
Cuts through the usual marketing fluff that dominates this topic online, and a stop at gullkindle kept the same clean approach going, this is the kind of writing that respects the reader’s time rather than wasting it on repetitive setups before finally getting to the point at hand which is what most sites do.
porno goobet
Found a small mental shift after reading this, the framing here is just a bit different from the standard takes online, and a look at steamstraw extended that fresh perspective across more material, the rare site whose voice actually changes how you think about something rather than just confirming existing beliefs.
Ориентация на долгосрочные отношения с клиентами позволяет компании формировать индивидуальные условия оплаты и графики поставок.
https://rms-ekb.ru/catalog/stalnoi-list/stalnoi-list-14g2-3-9x1500x1100-gost-19903-2006-gladkii-neotsinkovannyi-goriachekatanyi/
Логичное деление на вольфрамовый, молибденовый и титановый прокат
https://redmetsplav.ru/store/niobiy1/splavy-niobiya-1/niobiy-nbp-2b—gost-26252-84-1/
Блог об автомобилях предлагает широкий выбор статей на темы безопасности, технического обслуживания и современных автомобильных технологий. Информация будет полезна каждому автолюбителю https://ford-omg.ru/
Most of the time I feel the open web is in decline and then I find a site like this, and a stop at subletviper reinforced that mood lift, the cumulative effect of finding occasional excellent independent content versus the cumulative effect of finding mostly mediocre content is real for the long term reader maintaining web habits today.
Glad I gave this a chance instead of bouncing on the headline, and after ketojuly I was certain I had made the right call, snap judgements based on titles miss a lot of good content and this is a reminder to slow down and check things out before scrolling past in a hurry.
porno goobet
Now planning to recommend this site in a context where my recommendations are taken seriously, and a stop at crowncovemerchantgallery confirmed I should make that recommendation soon, the small but real act of recommending content into spaces where my taste matters is something I take seriously and this site is worth the recommendation.
Купить Мефедрон, Бошки, Марихуану, Гашиш, Экстази помнится на бизе у Вас с этим было все хорошо.С Уважением.ага в осадок выпадает в спирте это верно, но если после выпадания в осадок добавить 646 в спирт и все будет гуд. Кстати 250 также при перегреве выпадает в осадок
Probably going to mention this site in a write up I am working on later this month, and a stop at glenfir provided more material for that potential mention, content worth referencing in my own published work rather than just personal reading is content with the highest endorsement level and this site has earned that endorsement.
Coming back to this one, definitely, and a quick visit to siriussuperb only made me more sure of that, the kind of writing that makes you want to set aside time later rather than rushing through it now while distracted by everything else competing for attention on the screen today across so many tabs.
The historical data section is fantastic. Worldie!
Honestly enjoyed not being sold anything for the entire duration of the post, and a look at joustglade kept that pleasant absence going across more pages, content that exists for its own sake rather than as a funnel to a paid product is increasingly rare and worth supporting where I can find it.
Купить Мефедрон, Бошки, Марихуану, Гашиш, Экстази РЕБЯТА ЭТО ЛУЧШИЙ МАГАЗИН… Я БЛАГОДАРЕН МАГАЗИНУ ЧЕМИКАЛ МИКС… КАК НИ КАК МОЙ ПЕРВЫЙ МАГАЗИН В КОТОРОМ Я КУПИЛ БЕЗ КИДАЛОВА… ХОЧУ ВЫРАЗИТЬ СВОЮ ПРИЗНАТЕЛЬНОСТЬ КОМПАНИИ ЧЕМИКАЛ МИКС ЗА ОПЕРАТИВНУЮ И КАЧЕСТВЕННУЮ РАБОТУ.. БЛАГОДАРЮ ВАС..Магазин работает на 5+++++, я уже раз 5 беру у данного сейлера все ровно все катит, качество на высоте!всё ровн ждём =)
Доставка сборных грузов из Беларуси в Россию – https://semar.by/
Generally I bookmark sparingly to avoid building up a bookmark graveyard but this one earned a permanent slot, and a stop at snippetvamp extended that permanence designation, the few sites I keep permanent bookmarks for are sites I expect to use repeatedly and this one has clearly cleared that expectation bar today.
Редметсплав — надежный партнер, работаем по поставкам нержавеющего проката уже второй год, сбоев не было.
https://xn--80aeedb0bfzeok.xn--p1ai/catalog/list-aliuminievyi-gladkii/list-aliuminievyi-3kh1200kh3000-mm-amg2n/
porno marocain
After reading several posts back to back the consistent voice across them is impressive, and a stop at hanrim continued that voice consistency, sites that maintain a single coherent voice across many pieces by potentially many writers represent serious editorial discipline and this one has clearly developed the institutional consistency needed for that.
A thoughtful read in a week that has been mostly noisy, and a look at herongait carried that thoughtful quality across more pages, finding pockets of considered writing in a week of distractions is one of the small wins of careful curation and this site is providing those pockets at a sustainable rate.
Just want to flag that this was useful and not bury the appreciation in caveats, and a look at soontornado earned the same direct praise, recognising good work without hedging it with criticism is something I try to practice because over qualified compliments tend to read as backhanded and miss the point sometimes.
Reading this in pieces during a long afternoon and finding it consistently rewarding, and a stop at grebeknot fit naturally into the same fragmented reading pattern, sites whose posts can be read in segments without losing the thread are well suited to how I actually read these days and this one is built well.
Got something practical out of this that I can apply later this week, and a stop at floeiron added more details to think about, this is exactly the kind of content I bookmark for future reference rather than the throwaway listicles that dominate most search results these days for almost any common topic.
porno marocain
A piece that reads as if the writer trusted readers to fill in obvious gaps, and a look at verminturbo continued that respectful approach, content that does not over explain what the reader can infer is content that respects intelligence and this site has clearly chosen to write to capable readers rather than to the lowest common denominator.
Купить Мефедрон, Бошки, Марихуану, Гашиш, Экстази Какие у тебя претензии? ты провокатор и не более т.к. ты не дал даже номер заказа и не высказал притензию, к тому же за тебя мне уже написали в Личку, другие магазины..Черт приехал в офис говорю посмотрите посылку,мне сказали ее давно отправили!Она посмотрела ее нету,позвонила говорит она еще не отправлена и х.з. когда будет отправлена.всем привет.супер магаз))) позже отзыв отпишу. ))))
Honestly impressed by the consistency of voice across what I have read so far, and a quick visit to gablejuno continued that consistent feel, when a site reads like one careful person rather than a committee the experience is more rewarding for the reader who notices these subtle editorial details over time.
Once I had read three posts the editorial pattern was clear, and a look at serifveil confirmed the pattern from a fourth angle, sites where the underlying approach reveals itself through accumulated reading rather than being announced are sites with real depth and this one has that quality clearly visible across multiple pieces consistently.
Описание преимуществ компании подчеркивает надежность поставок
https://redmetsplav.ru/store/volfram/splavy-volframa-1/volfram-v-ppm-1/izdeliya-iz-volframa-v-ppm/
Мы публикуем статьи для начинающих и опытных водителей, освещая вопросы эксплуатации автомобилей, безопасности движения и правильного ухода за машиной: полезные советы для автомобилистов
gooobet drogues
Купить Мефедрон, Бошки, Марихуану, Гашиш, Экстази Да уже и так понятно что перепутали. Пробуй сразу и на кишку, и по носу мб определишь что же тебе прислали по ошибке.Если хотите подешевле – вам сюда. Если же располагаете финансами – штудируйте ветки доверенных магазинов, есть селлеры куда более ответственные и стоящие. Лично я не планирую дальше сотрудничать с этим магазином. Спасибо за внимание.трипы почитайте, кто уже брал
Автомобильная тематика охватывает множество направлений, начиная от ежедневной эксплуатации машины и заканчивая современными технологиями. В блоге регулярно появляются новые статьи по самым актуальным вопросам https://ford-omg.ru/
Reading this with my morning coffee turned into reading the related posts with my morning coffee, and a stop at jovigrove stretched the morning further, content that pulls breakfast into a reading session rather than just accompanying it is content that has earned a higher claim on my attention than the average article does.
Honestly this hits the sweet spot between detail and brevity, no rambling and no shortcuts, and a quick visit to crystalcovemerchantgallery kept that going across the related pages, the kind of place that respects your attention without trying to grab it through cheap tactics or attention seeking design choices that get tired fast.
I really like the calm tone here, it does not push anything on the reader, and after I went through globeflame I felt the same way, just steady useful content laid out without drama, which is exactly what someone trying to learn something quickly needs to find rather than aggressive marketing.
My professional context would benefit from having this kind of resource available, and a look at senatetrench extended the professional applicability, the rare site that contributes meaningfully to professional work rather than just personal interest is content with multiplied value and this one is providing that professional utility consistently across multiple pieces.
Came across this through a roundabout path and now it is on my regular rotation, and a stop at uptonshade sealed that decision, the open web still produces serendipitous discoveries when you let the citations and references guide you rather than relying purely on algorithmic feeds for new content recommendations always.
Vague feelings of recognition kept surfacing as I read because the writing names things I have been thinking, and a look at stencilslick produced more of those recognition moments, content that gives shape to private intuitions is content that makes me feel less alone in my own thinking and this site has that effect.
porno marocain
Reading this fit naturally into my afternoon walk because I was reading on my phone, and a stop at tealsilver continued well in that walking format, content that survives mobile reading without becoming awkward is content with format flexibility and this site has clearly thought about how it reads across different devices today.
Ответственная компания, которая ценит долгосрочное сотрудничество, всегда идут навстречу клиенту.
https://xn--80aeedb0bfzeok.xn--p1ai/catalog/melkhiorovaia-truba/melkhiorovaia-truba-25kh1kh5000-mm-mnzhmts10-1-1-gost-10092-2006/
Купить Мефедрон, Бошки, Марихуану, Гашиш, Экстази почему 0.3? акция?Рабочие дни отсчитываются со дня оплаты, а не заказа на сайте, разница порой месяц между тем когда человек создал заказ и когда оплатил его.”Достаточно связаться с нами и отправить на указанный e-mail информацию о заказе и получателе. Конфиденциальность гарантируется.”
Reading this on a long flight and finding it the best thing I read across hours of trying, and a stop at grecofinch kept the streak going, when content beats long flight reading you know it has substance because flight reading is a hard test of a piece given the alternatives available everywhere.
porno marocain
Купить Мефедрон, Бошки, Марихуану, Гашиш, Экстази ЛУЧШИЕ ИЗ ЛУЧШИХ НЕ РАЗ ЗАКАЗЫВАЛ И БУДУ ЗАКАЗЫВАТЬ!!!!Эффект чувствуется почти сразу, эйфория и стим в головеОтличный магаз!!!
Found something new in here that I had not seen explained this way before, and a quick stop at flumelake expanded the idea even further, the kind of writing that nudges your thinking forward a bit without forcing the issue is exactly what I look for online today and rarely actually find anywhere.
A piece that earned its conclusions through the body rather than asserting them at the end, and a look at haleforge maintained the same earned quality, conclusions that follow from what came before are more persuasive than declarations and this site has clearly internalised that principle in how it constructs arguments throughout pieces.
Picked up a couple of new ideas here that I can actually try out, and after my visit to tasselskein I have even more notes saved, this is the kind of resource that pays you back for the time you spend on it which is rare to come across in this corner of the web.
Reading this gave me a small jolt of recognition for an experience I thought was just mine, and a stop at herongrip produced more such jolts, content that universalises private experiences without flattening them is doing genuinely useful work and this site is providing that recognition function for me reliably across topics I read.
Указан физический адрес в Екатеринбурге, что повышает доверие
https://redmetsplav.ru/store/volfram/splavy-volframa-1/volfram-vd-10-1/truba-volframovaya-vd-10/
Ассортимент компании включает более 100 000 позиций, что позволяет закрыть практически любые потребности металлургического производства.
https://rms-ekb.ru/catalog/stalnoi-list/stalnoi-list-vt14-55x1200x1600-gost-19903-2006-gladkii-neotsinkovannyi-goriachekatanyi/
A handful of memorable phrases from this one I will probably use later, and a look at khakifrost added a couple more, content that contributes language to my own communication rather than just facts is content with a different kind of utility and this site is providing that linguistic utility consistently across what I read.
Granted my mood today might be elevating my reading experience but I still think this is genuinely good, and a stop at galagull reinforced that even discounted assessment, controlling for the mood adjustment that affects content perception this site still reads as substantively above average across multiple pieces I have read carefully today.
gooobet drogues
A genuinely unexpected highlight of my reading week, and a look at suntansage extended that pattern, the surprise of finding excellent content rather than the predictable mediocre is one of the few real pleasures of casual web browsing and this site delivered that surprise cleanly today which I really do appreciate.
Nice to see a post that does not try to overcomplicate the basics for the sake of looking smart, and once I looked at hazmug the same direct tone was there too, which honestly makes a difference when you are short on time and want answers without long pointless intros.
Really appreciate this kind of writing, no shouting and no clickbait headlines just steady useful content, and a quick look at julyelm kept that going, definitely a site I will be returning to whenever I need a sensible take on similar topics in the days ahead and also during slower work weeks.
Купить Мефедрон, Бошки, Марихуану, Гашиш, Экстази тока по “чуть чуть” а то вдруг там дезокси… или ещё что мгновенно вырубающее. мало ли. )Чем злиться, выдал бы дудки иль региотносительно норм цены
Felt the post handled a sensitive angle of the topic with appropriate care, and a look at glyphfig extended that careful handling across related material, sites that can navigate delicate territory without causing damage are rare and require a level of judgement that comes from experience rather than from following any clear playbook.
Now thinking about this site as a small example of what good independent writing looks like, and a stop at driftorchardmerchantgallery continued that exemplary status, the few sites that serve as good examples are sites worth holding up in conversations about quality and this one has earned that exemplary placement through patient consistent effort over time.
The number of old women in each movie and the number of women in general seem
to be evenly spread. Grandma on other mama, mama on another grandpa,
mama on young woman, grandma on young guy, and many others.
homepage https://livinginspain.info/author-profile/tajmakin787237/
Купить Мефедрон, Бошки, Марихуану, Гашиш, Экстази Сайт сделан на уровне в скором думаю сделаю заказ, только бы качество не подвелоРебята с 11го года магазин работает на отлично, сомнений не у кого не должно быть!!!если заказываю утром в пн, получаю максимум в четверг утром а то бывает и в среду утром, на счет выходных все вопросы к спср потому что они не работают в выходные нормально
The way this post presents its ideas makes the discussion feel both valuable and approachable for many readers online.
https://catechistaduepuntozero.it/
Once you start reading carefully here it is hard to go back to lower quality alternatives, and a stop at syruptunic reinforced that ratchet effect, the way good content raises standards is real over time and this site has clearly contributed to raising my expectations for what is possible in writing on the topic generally.
One of the more thoughtful posts I have read recently on this topic, and a stop at seriftackle added even more weight to that impression, this is genuinely good content that holds its own against far better known sites in the same space without trying to imitate any of them at all which I appreciate.
Now feeling the rare pleasure of trusting a source completely on first encounter, and a look at sectorsatin extended that initial trust into something more durable, the calibration of trust to evidence is something I do informally and this site has earned high trust through the cumulative weight of multiple consistently good posts already.
https://7themes.su/forum/13-22117-1
Спецстали для машиностроения закупаем только здесь, надежность материала подтверждена испытаниями.
https://xn--80aeedb0bfzeok.xn--p1ai/catalog/mednye-dvukhrastrubnye-mufty-pod-paiku/mednaiadvukhrastrubnaiamufta-pod-paiku64kh2-4mmm3rgost-32590-2013/
Купить Мефедрон, Бошки, Марихуану, Гашиш, Экстази магаз ровный спасибо 5+Сделал заказ. Пропустил реквизиты для оплаты. Продавец свяжись со мной, оплачу. В понедельник сможете отправить товар?новый запрет вступает через 7 дней. читай список бро,там это вещество есть)
However casually I came to this site I have ended up reading carefully, and a look at grecoglobe continued earning that careful reading, the conversion from casual visitor to careful reader is something content earns rather than demands and this site has accomplished that conversion for me over the course of just a few pieces.
ЖК Aurum Time сочетает современные стандарты строительства и удобные решения для жителей, создавая благоприятную атмосферу для жизни и отдыха, https://aurum-time-grad.ru/
Now planning to share the link with a small group of readers I trust, and a look at tarotshire suggested more material to share with the same group, recommending content into a curated circle requires confidence in the recommendation and this site is making me confident in those personal recommendations on multiple separate occasions now.
Thanks for keeping things clear and to the point, that is honestly hard to find online these days, and after reading through fluxhusk the message stayed consistent which makes me trust the information being shared more than I usually do on similar pages that cover this same kind of topic.
https://7themes.su/forum/13-22449-1
Really clear writing, the kind that makes you want to share the link with someone who has been asking about the topic, and a quick browse through udonvivid only made me more sure of that, the information here stays useful long after the first read is done which says a lot.
Now setting this aside as a model of how to write thoughtfully on the topic, and a stop at vincasinger extended that model status, content that becomes a reference for how a kind of writing should be done is content with influence beyond its own readership and this site is reaching that level for me clearly today.
Купить Мефедрон, Бошки, Марихуану, Гашиш, Экстази сказали отпрака на следующий день после платежа!обращаюсь по возможности сюда беру оптом от 50 граммВот по количеству норм, но кач…. Это то что осталось после меня и моих проб
Felt energised after reading rather than drained, which is unusual for online content these days, and a look at jumbohelm continued that good feeling, content that leaves you better than it found you is rare and worth bookmarking when you stumble across it for the first time today or any other day really.
В современных жилых проектах важно внимание к деталям, и ЖК Веспер на Шаболовке демонстрирует именно такой подход. Продуманные решения делают проживание более комфортным и удобным: жк веспер на шабаловке
https://7themes.su/forum/13-22090-1
Общее впечатление: надежный информационный ресурс для снабженцев.
https://redmetsplav.ru/store/vismut/zarubezhnye-splavy-3/vismut-tbc-19—pn-h-87203/pokovka-vismutovaya-tbc-19—pn-h-87203/
Наличие никелевых сплавов гарантирует высокую коррозийную стойкость оборудования, создаваемого заказчиками.
https://rms-ekb.ru/catalog/stalnoi-list/stalnoi-list-21kh2nvfa-15x1300x1300-gost-19903-2006-gladkii-neotsinkovannyi-goriachekatanyi/
وی بی پی ای، در واقع یک ترکیب فوقپیشرفته از پروتئینهای وی با سرعت جذب متفاوت است.
Took the time to read the comments on this post too and they were also worth reading, and a stop at gnarfrost suggested the community quality matches the content quality, when the conversation around a piece is as good as the piece itself you know you have found a real corner of the internet.
If I had to summarise the editorial sensibility of this site in a few words it would be careful and human, and a look at heronhilt extended that summary feeling, capturing the essence of a sites approach in brief is hard but this site has a clear enough identity that the summary comes naturally enough.
Now sitting back and recognising that this was a small but real win in my reading day, and a stop at galeember extended that quiet win, the cumulative effect of small reading wins versus the cumulative effect of small reading losses is real over time and this site is contributing to the wins side of that ledger.
Купить Мефедрон, Бошки, Марихуану, Гашиш, Экстази качество очень хорошее не подведёт даже не сомневайсяЯ пока временю.месяц назад
Decided to subscribe to the RSS feed if there is one, and a stop at dunemeadowcommercegallery confirmed that decision, content that I want delivered to me proactively rather than just remembered when I have time is content that has earned a higher level of commitment from me as a reader looking for reliable sources.
Купить Мефедрон, Бошки, Марихуану, Гашиш, Экстази Вы всё ещё работаете с Яндекс Деньгами?надо просто на мож-химовском ацике растворять любой jwh растворяетсяхотел уточнить а вы ващпе работаете? заказ сделал что то тишина
Skipped the social share buttons but might come back to actually use one later, and a stop at junipercovemerchantgallery extended that share urge, content that triggers genuine sharing impulses rather than performative ones is content that has actually moved me and not many posts in a typical week do that for me actually.
Liked that the post acknowledged complications rather than pretending they did not exist, and a stop at trancetidal continued that honest framing, sites that handle complexity with care rather than papering it over with simplifying claims are doing real intellectual work and this one is clearly in that category based on what I have read.
Pass this along to anyone you know dealing with similar questions, the answers here are clear, and a stop at hekarc adds even more useful material, this is the kind of resource that deserves to circulate widely rather than getting lost in the constant churn of new content online that buries good work daily.
Now wishing I had found this site sooner, and a look at khakikite extended that mild regret, the calculation of how many years of good content I missed by not finding the right sources earlier is one I try not to make too often but it does come up sometimes when I find sites this good.
I learned more from this short post than from longer articles I read earlier today, and a stop at slacktally added even more useful detail without going off topic, this site clearly knows how to keep things focused without sacrificing depth which is a hard balance to strike for any writer.
Reading this in pieces over a coffee break and finding it consistently rewarding, and a stop at shoreviper extended that into related material I will return to later, the kind of site that fits naturally into small reading windows without requiring a long uninterrupted block is genuinely useful for how I actually browse.
Спасибо команде за профессионализм и помощь в реализации нашего сложного промышленного проекта!
https://xn--80aeedb0bfzeok.xn--p1ai/catalog/medno-nikelevyi-otvod-90-gradusov/medno-nikelevyi-otvod-90-gradusov-mnzh5-1-25kh1-mm/
A thoughtful read in a week that has been mostly noisy, and a look at gridivory carried that thoughtful quality across more pages, finding pockets of considered writing in a week of distractions is one of the small wins of careful curation and this site is providing those pockets at a sustainable rate.
Really grateful for content like this, it does not waste my time and it does not insult my intelligence either, and a quick look at smeltstraw was the same, balanced respectful writing that makes a person feel welcome rather than rushed through pages of forced engagement just to keep clicking around.
Now noticing how rare it is to find a site that does not feel rushed, and a look at foamhull extended that calm pace, content produced without time pressure has a different quality than content shipped to meet a deadline and this site reads as written without urgency which produces a different and better experience for readers.
Купить Мефедрон, Бошки, Марихуану, Гашиш, Экстази хотели бы услышать отзывы о Ск мукемагазу процветания желаю и клиентов хорошихНу как видишь соответсвует …
Honest take is that this was better than I expected when I clicked through, and a look at havenfoam reinforced that, the bar for online content has dropped so much that finding something thoughtful and well constructed feels almost noteworthy now which says more about the average than about this site itself.
My usual response to new bookmarks is to forget them but this one I have already returned to twice, and a look at vetovarsity pulled me back a third time, the actual return rate to bookmarked sites is the real measure of value and this one is clearing that measure at a notable rate already.
Купить Мефедрон, Бошки, Марихуану, Гашиш, Экстази Я делал на муравьином спиртеСРОЧНЫЙ вопрос!!Расположите по мощности
Одним из главных преимуществ ЖК Веспер на Шаболовке является его расположение рядом с метро и крупными транспортными магистралями. Это позволяет существенно экономить время на ежедневных поездках по городу: новостройки от застройщика
Представлен полный цикл изделий: от фольги и проволоки до крупных поковок
https://redmetsplav.ru/store/vismut/zarubezhnye-splavy-3/vismut-l54935—uns/pokovka-vismutovaya-l54935—uns/
Поставка продукции возможна не только в промышленных, но и в малых лабораторных объемах для исследовательских целей.
https://rms-ekb.ru/catalog/ugolok-stalnoi/ugolok-iz-konstruktsionnoi-stali-100kh75kh10-mm-c15e-uni-6762/
The examples really helped me grasp the points faster than abstract descriptions would have, and a stop at twainsilica added a few more practical illustrations that drove the message home, the kind of writing that knows its readers learn better through concrete situations rather than vague generalities is rare and worth recognising clearly.
Felt the post had been written without using a single buzzword, and a look at gnarkit continued that clean vocabulary, content free of jargon and trendy phrases reads better and ages better and this site has clearly committed to a vocabulary that will not feel dated in three years which is impressive editorially.
Looking at this objectively the editorial quality is hard to deny even setting aside personal taste, and a stop at slippersixth maintained the same objective quality, the gap between what I personally enjoy and what is objectively well crafted exists and this site clears both bars simultaneously which is rarer than it sounds.
Decided to write a short note to the author if there is contact info anywhere, and a stop at echoharborcommercegallery extended that intention, the urge to thank the writer directly is a strong signal of content quality and this site has triggered that urge in me today which is a fairly rare event for my reading.
During the time spent here I noticed the absence of the usual distractions, and a stop at galehelm extended that distraction free experience, content that does not fight my attention with pop ups and modals and aggressive prompts is content that respects me and this site has clearly chosen the respectful approach throughout.
Купить Мефедрон, Бошки, Марихуану, Гашиш, Экстази У Данного Магазина я так понимаю Принцип не отвечать в Аське?!=)клады по мск все во времяа вот по этой теме отпиши по подробней,точнее о том как там дальше события развиваются?????????? очень волнует данная тема. как же так их просекла легавня???? откуда краснотой веет.???
ЖК Веспер на Шаболовке сочетает преимущества центральной локации и комфортного жилого комплекса, создавая благоприятные условия для постоянного проживания, квартиры в жк vesper шаболовская
fantastic post, very informative. I wonder why more of the ther experts in the field do not break it down like this. You should continue your writing. I am confident, you have a great readers’ base already!
A welcome reminder that thoughtful writing still happens online, and a look at heronjoust extended that reassurance, the modern web makes it easy to forget that careful writing exists and finding sites that practice it is a small antidote to the cynicism that builds up from too much exposure to algorithmic content.
Pretty impressive article. I just stumbled upon your site and wanted to say that I have really enjoyed reading your opinions. Any way I’ll be coming back and I hope you post again soon.
I wish I could craft such articles as this. Thank you very much.
Купить Мефедрон, Бошки, Марихуану, Гашиш, Экстази и уже сегодня за клевету, троллинг и проч. наш друг нас покинулреагенты всегда чистые и по высшему??? сертифекаты вместе с реагентами присылают на прохождение экспертизы на легал?действительно было в лом,спасибо)
Now recognising that this site has earned a place in the small group of resources I treat as authoritative, and a stop at grifffume confirmed that placement, the difference between resources I trust and resources I just consume is real and this site has clearly moved into the trusted category through consistent quality over time.
Закупали шлак ферросилиция для строительных нужд, материал качественный, без лишних примесей.
https://xn--80aeedb0bfzeok.xn--p1ai/catalog/mednye-dvukhrastrubnye-mufty-pod-paiku/mednaiadvukhrastrubnaia-podvizhnaiamufta-pod-paiku12kh1-1mmm0bgost-32590-2013/
Top notch writing, every paragraph carries weight and nothing feels like filler, and a stop at tinklesaddle reflected that same care, a rare thing on the open web these days where most pages exist for clicks rather than actual reader value or anything close to that which is honestly a real shame.
Now noticing that the post never raised its voice even when making a strong point, and a look at foilfrost continued that calm volume, content that can make important points without resorting to typographic emphasis or emotional appeal is content that trusts its substance to do the work and this site has that confidence consistently.
Considered as a whole this site has developed a coherent point of view that comes through in individual pieces, and a look at tomatotactic continued displaying that coherence, sites with a unified perspective rather than a grab bag of takes are sites with editorial maturity and this one has clearly developed that maturity through years of work.
Honestly this was the highlight of my reading queue today, and a look at superbtundra extended that across more pages I will return to, ranking what I read against what else I read each day is something I do informally and this site keeps moving up in those rankings the more I explore it.
A small thank you note from me to the team behind this work, the post earned it, and a stop at lavenderharborcommercegallery suggested more thanks would be in order over time, recognising the people who do good writing online is something I try to remember to do because the alternative is silence and silence rewards mediocrity unfortunately.
Decided to read this site for a while before forming a verdict, and the verdict after several pages is positive, and a stop at taigascenic continued that pattern, judging a site requires more than one post and giving sites a fair sample is something I try to do for promising candidates rather than rushing to dismiss.
Купить Мефедрон, Бошки, Марихуану, Гашиш, Экстази “Вообщем не знаю кто подьебал Минер или Поставщик но товар “ЧИСТЫЕ ТАБЛЕТКИ “Зашла на ваш сайт, а там “Your site hasn’t been activated yet!”… в общем ничего не выходит. Пробывала и через ТОР и через обычный браузер. Все одно. Что не так делаю?ты писал пришла посылка размыли в итоге прикола не поняли
A piece that was confident enough to leave some questions open rather than forcing closure, and a look at heyaro continued that intellectual honesty, content that admits the limits of its scope is more trustworthy than content that pretends to total understanding and this site has the right calibration on certainty consistently.
Found the rhythm of the prose particularly enjoyable on this read through, and a look at tundraturtle kept that musical quality going across the related pages, sentence rhythm is something most blog writers ignore but it makes a real difference in how content lands with the careful reader who cares.
Описание применения металлов в атомной энергетике подчеркивает качество
https://redmetsplav.ru/store/vismut/zarubezhnye-splavy-3/vismut-g-nicr13snbimo—iso-19960/truba-vismutovaya-g-nicr13snbimo—iso-19960/
География деятельности компании охватывает всю территорию России, обеспечивая металлом предприятия в удаленных регионах.
https://rms-ekb.ru/catalog/krug-iz-instrumentalnoi-stali/krug-r6m5-80-gost-7417-75/
Will be coming back to this for sure, too much good content to absorb in one sitting, and a stop at kitidle only added more pages I want to dig through, this site is going onto my regular rotation list because it consistently delivers something worth the visit lately rather than empty filler.
Купить Мефедрон, Бошки, Марихуану, Гашиш, Экстази напишите в аську, там порешают вашу проблему. С этой партией МХЕ определённо вышел косяк.Магазин чёткий… Нареканий нет…Да хватает придурков, только смысл писанины этой , что он думает что ему за это что то дадут ))) кроме бана явно ничего не выгорит )))! Тс красавчик брал 3 раза по кг сделки и всегда все чётко ! Жду пока появиться опт на ск!
Thanks for the simple approach, too many sites bury the actual point under layers of unnecessary words, but here every line earns its place, and a look at sodasalt showed the same care for the reader which is something I will remember the next time I need answers on a topic.
A small thank you note from me to the team behind this work, the post earned it, and a stop at waveharbormerchantgallery suggested more thanks would be in order over time, recognising the people who do good writing online is something I try to remember to do because the alternative is silence and silence rewards mediocrity unfortunately.
Speaking as someone who used to recommend blogs frequently and got out of the habit this site is rekindling that impulse, and a look at shorevolume extended the rekindling, the recovery of an old habit triggered by encountering work that justifies it is itself a small kind of pleasure and this site is providing that recovery experience.
References:
Aspers casino northampton https://my.playfre.com/jungp372515278/jungp372515278
Looking through the archives suggests this site has been doing this for a while at this level, and a look at elmharbormerchantgallery confirmed the long term consistency, sites that have maintained quality across years rather than just a recent stretch are sites with serious editorial discipline and this one has clearly been at it for a while.
Very fine blog.
Купить Мефедрон, Бошки, Марихуану, Гашиш, Экстази магазин отличныйБыстрая доставка , и высочайшее качество обслуживания! Думаю и сейчас ничего не изменилось.Продаван ровный ничего не скажеш
My usual pattern is to skim and bounce but this site has reset that pattern temporarily, and a stop at groovehale maintained the slower reading mode, content that changes how I read is content with structural influence and this site has clearly nudged my reading behaviour toward something better at least for the duration of these visits.
Купить Мефедрон, Бошки, Марихуану, Гашиш, Экстази И что толку за легалом охотиться.закладок нет, и представителей тоже, в Ярославль можем отправить курьером срок доставки 1 день.Желаю всего самого наилучшего вашему магазину,ваш бренд это качество!
Held my interest from the opening line through to the closing thought, and a stop at hickorygrid did the same, content that earns sustained attention in an environment full of distractions is doing something right and this site is clearly doing several things right rather than just one or two which I really appreciate.
Now feeling the post has earned a proper recommendation rather than a casual mention, and a stop at unionstaff reinforced the recommendation strength, the difference between mentioning and recommending is a small editorial distinction I observe in my own conversations and this site has earned the upgraded recommendation level from me confidently today.
Технические специалисты компании помогли выбрать оптимальный сплав для работы в агрессивных средах.
https://xn--80aeedb0bfzeok.xn--p1ai/catalog/magnievyi-krug/krug-magnievyi-35-mm-ma8-gost-18351-73/
Nice and clean, that is the best way to describe the writing here, no clutter and no wasted words, and a quick visit to hazegloss kept that going, I appreciate when a site treats its readers like people who can think for themselves without needing constant hand holding through every paragraph.
References:
Slots inferno https://qflirt.net/@preciouswicks3@preciouswicks3
At this time it appears like Drupal is the preferred blogging platform out there right now.
(from what I’ve read) Is that what you are using on your blog?
Solid little post, the kind that does not need to be flashy because the substance is doing the work, and a look at vectortimber kept that quiet confidence going across the site, this is what writing looks like when the writer trusts the content to land on its own without theatrics or unnecessary attention seeking behaviour.
Really appreciate that the writer did not overstate the importance of the topic to make the post feel weightier, and a quick visit to vinyltrophy maintained the same modest framing, content that is honest about its own scope rather than inflating itself is the kind I trust and return to repeatedly over time.
Looking for a transfer from Thessaloniki Airport? Visit https://thessaloniki-transfer.de/ for reliable, punctual, and convenient airport transfers to Chalkidiki, Sani Resort, and all of Greece. We offer fixed prices and no hidden costs, 24/7 customer support, and new, air-conditioned vehicles. Explore our other benefits on our website.
Just want to flag that this was useful and not bury the appreciation in caveats, and a look at shadetassel earned the same direct praise, recognising good work without hedging it with criticism is something I try to practice because over qualified compliments tend to read as backhanded and miss the point sometimes.
Проект Vesper Шаболовка сочетает современные стандарты строительства и удобное расположение рядом с ключевыми объектами городской инфраструктуры – vesper шаболовка 31
Описание применения металлов в атомной энергетике подчеркивает качество
https://redmetsplav.ru/store/vismut/zarubezhnye-splavy-3/vismut-cac903b—jis-h-5120-2016/izdeliya-iz-vismuta-cac903b—jis-h-5120-2016/
ООО «РМС» поставляет вольфрамовые порошки, соответствующие строгим техническим условиям (например, ТУ 48-4205-112-2017).
https://rms-ekb.ru/catalog/ugolok-stalnoi/ugolok-iz-konstruktsionnoi-stali-80kh80kh8-mm-40crnimo6-en-10056-1/
В современных жилых проектах важно внимание к деталям, и ЖК Веспер на Шаболовке демонстрирует именно такой подход. Продуманные решения делают проживание более комфортным и удобным – https://vesper-shabolovka.ru/
Quietly impressive in a way that does not announce itself, and a stop at moonharborcommercegallery extended that quiet impressiveness, the kind of quality that emerges through sustained attention rather than first impressions is the kind I trust more deeply and this site has been earning that deeper trust across multiple sessions over time consistently.
Now placing this in the small category of sites whose updates I would actually want to know about, and a stop at salemsolid confirmed that placement, the difference between sites I want to follow and sites I just consume from is real and this one has crossed into the active follow category from the casual consumption side.
Bookmarked the page and the homepage too because clearly there is more to explore here, and a quick stop at siskastencil only made that more obvious, this is the kind of place I want to dig through over a weekend rather than rushing through during a coffee break tomorrow morning before getting back to work.
Магазин чёткий… Нареканий нет…например тут ну или накрайняк тут а селлер совершенно не обязан консультировать по применению хим. реактивов. купить Мефедрон, Бошки, Гашиш, Марихуану, Альфа-ПВП ну как-то такchemical-mix.com держи в репу, заработал.. пазитивно всё.. тут всё хорошо.. обращайтесь помогут быстро..
Quality work here, the post reads cleanly and the points stay focused throughout, and a stop at crecall kept the standard high, you can tell the writer cares about the final result rather than just hitting publish for the sake of having something new on the page to feed the search engines.
A piece that exhibited the kind of patience that good writing requires, and a look at hoxfix continued that patient quality, hurried writing is easy to spot and this site reads as having been written without time pressure which produces a different feel than the rushed content that dominates much of the modern blog space.
Took a screenshot of one section to come back to later, and a stop at elmwoodcommercegallery prompted another saved tab, the urge to capture and revisit specific pieces of content is something I rarely feel but when I do it tells me the work is worth more than the average passing read for sure.
The tone stayed consistent across the whole post which is harder than it looks for longer pieces, and a look at woodcovemerchantgallery continued the same voice, this kind of editorial consistency is a sign of either a single careful writer or a tightly run team and either is impressive today across the broader media environment.
Лучше набери их в скайпе или аське так гораздо быстрей будетесли так то АМ не подойдет скорее всего купить Мефедрон, Бошки, Гашиш, Марихуану, Альфа-ПВП хотелось бы услышать какоето обьяснение?????Доброго времени суток Всем порядочным форумчанам-кто здесь заказывал,но трек так и не бьёться,или я один такой закинул 45к+доставка,и”жду у моря погоды”В скайпе вчера отвечали сегодня-игнор!
Worth saying that the quiet confidence of the writing is what landed first, and a look at studiosalute continued that quiet quality, confident writing without the loud display of confidence is a rare combination and this site has clearly developed both the knowledge and the editorial restraint to land that combination consistently.
Really appreciate that the writer did not overstate the importance of the topic to make the post feel weightier, and a quick visit to knollgull maintained the same modest framing, content that is honest about its own scope rather than inflating itself is the kind I trust and return to repeatedly over time.
Closed several other tabs to focus on this one as I read, and a stop at daisyharborcommercegallery held my undivided attention the same way, content that earns full focus in an attention environment full of competing pulls is content doing something genuinely well and the team behind it deserves recognition for that achievement consistently.
Liked everything about the experience, from the opening through to the closing notes, and a stop at timbertrailmerchantgallery extended that into more pages, finding a site where the editorial vision shows through every choice rather than feeling random is an increasingly rare experience and one I am glad to have today during this particular reading session.
Reading more of the archives is now on my plan for the weekend, and a stop at vinylvessel confirmed the archive worth the time, the rare archive worth a dedicated reading session rather than just casual sampling is the rare archive of serious work and this site has clearly produced enough of that work to warrant the deeper exploration.
Aurum Time создается как пространство для комфортной жизни, где продуманы как жилые помещения, так и общественные зоны комплекса – https://aurum-time-grad.ru/
Турция уверенно входит в число любимых туристами направлений благодаря ласковому морю, удобной инфраструктуре и разумным ценам. Ищете путеводитель по курортам турции? Лучшие курорты для пляжного отпуска, экскурсий и активного досуга собраны на сайте evrobuket-nn.ru/top-kurorty-turcii-gde-otdyhat/ Тут просто подобрать вариант под собственные пожелания и финансы, чтобы путешествие удалось на славу.
References:
Tunica casinos https://csmtube.exagopartners.com/@danielaccr7190?page=about/@danielaccr7190?page=about
Удачи. магазин))) Прайс соответствует реальности?можете хотя бы в лс скинуть веточку, а то поиска нет, так как новый акк и не допускаетс до поиска, раньше сидел на легал-рс.биз купить Мефедрон, Бошки, Гашиш, Марихуану, Альфа-ПВП Хорошо работает народ))все гууд
High quality writing, no marketing speak and no buzzwords that mean nothing, and a stop at glyjay kept that going, simple direct content that actually communicates something is harder to find than it should be and this is one of the rare places that gets it right consistently across many different posts.
Высокий уровень сервиса и контроля качества, для нашего научного проекта это было критически важно.
https://xn--80aeedb0bfzeok.xn--p1ai/catalog/mednye-dvukhrastrubnye-mufty-pod-paiku/mednaiadvukhrastrubnaiamufta-pod-paiku159kh5-5mmm2gost-32590-2013/
A piece that did not try to be timeless and ended up reading as durable anyway, and a look at solacevelour extended that durable feel, content that stays useful past its publication date without straining for permanence is content that ages well and this site has the kind of evergreen quality that I value highly today.
Quality you can feel from the first paragraph, the writer clearly knows the topic and how to share it, and a quick look at hiltgable confirmed the same depth runs throughout the rest of the site as well which is rare and worth pointing out when it happens online for any reader passing through.
Worth flagging this site to a few specific friends who would appreciate the editorial sensibility, and a look at waveharbormerchantgallery added more pages I will mention to them, recommending sites to specific people requires understanding both the site and the person and this site is making those personalised recommendations easy and natural for me.
Now adjusting my expectations upward for the topic based on this post, and a stop at sheentiny continued that bar raising effect, content that resets what I think is possible on a subject is doing real work in shaping my standards and this site is providing those bar raising experiences at a notable rate during sessions.
Took longer than expected to finish because I kept stopping to think, and a stop at shorevolume did the same to me, content that provokes thought rather than just delivering information is in a different category and the team here is clearly working at that higher level rather than just cranking out posts.
в скаипе не отвечают!!!!пока никаких точных дат нет. цены будут когда придёт товар, так что ждёмс пока что. купить Мефедрон, Бошки, Гашиш, Марихуану, Альфа-ПВП Ребята сайт хороший конечно, но вот у меня выдалась задержка с заказом, у кого были задержки отпишите сюда, просто раньше как только я делал заказа все высылалось либо к вечеру этого дня, либо на следующий, а теперь уже 4 дня жду отправки все не отправляют!Просто респектище курьеру. На моей памяти такие клады были всего раза три-четыре за три года обитания меня на этом форуме.
Bookmark earned and the bookmark feels like a permanent addition rather than a maybe, and a look at glyjay confirmed that permanent status, the difference between durable bookmarks and ephemeral ones is something I have learned to feel quickly and this site triggered the durable feeling almost immediately during my first read here.
A piece that was confident enough to leave some questions open rather than forcing closure, and a look at timbertrailmerchantgallery continued that intellectual honesty, content that admits the limits of its scope is more trustworthy than content that pretends to total understanding and this site has the right calibration on certainty consistently.
Came here from another site and ended up exploring much further than I planned, and a look at daisyharborcommercegallery only encouraged more exploration, the kind of place where one click leads to another not through manipulative design but through genuinely interesting content is rare and worth highlighting when found like this somewhere on the open internet.
Андрей Нехаев — один из самых авторитетных SEO-экспертов Рунета с более чем десятилетним опытом продвижения сайтов в Google и Яндекс. Специалист обеспечивает комплексный вывод бизнеса в ТОП поисковой выдачи, снижает стоимость лида до 40% за счёт точной настройки Яндекс.Директ и глубокого поведенческого анализа. На сайте https://andrey-nekhaev.ru/ можно ознакомиться с реальными кейсами, заказать SEO-консалтинг и изучить авторские книги-бестселлеры, включая «SEO для Яндекс» и «Быстротоп 2.0», ставшие практическими руководствами для тысяч маркетологов.
Возможность заказа висмута — достаточно редкое предложение на рынке
https://redmetsplav.ru/store/vismut/zarubezhnye-splavy-3/vismut-c89831—cda/krug-vismutovyy-c89831—cda/
Felt the post handled a sensitive angle of the topic with appropriate care, and a look at vinylvessel extended that careful handling across related material, sites that can navigate delicate territory without causing damage are rare and require a level of judgement that comes from experience rather than from following any clear playbook.
Поставка продукции возможна не только в промышленных, но и в малых лабораторных объемах для исследовательских целей.
https://rms-ekb.ru/catalog/list/list-u9-24x1000x1000-gost-19903-2006/
Благодаря продуманной концепции Aurum Time становится привлекательным вариантом как для собственного проживания, так и для долгосрочных инвестиций в недвижимость: https://aurum-time-grad.ru/
Just one of those reads that left me feeling slightly more capable rather than overwhelmed, and a look at skiffvantage kept that empowering feel going, the difference between content that builds the reader up and content that intimidates them is huge and this site clearly knows which side of that line to stand.
Cabinet IQ
8305 Ꮪtate Hwy 71 #110, Austin,
TX 78735, Unityed Ꮪtates
254-275-5536
webpage
Glad to have another reliable bookmark for this topic, and a look at trumpetsixth suggested several more pages I will be marking too, building a personal library of trustworthy resources is one of the actual rewards of careful browsing and this site is earning a place on my permanent shortlist for the topic.
Generally I am cautious about recommending sites on first encounter but this one warrants the exception, and a look at embermeadowmerchantgallery reinforced the exception making, the rare site that justifies breaking my normal cautious approach is the rare site worth flagging early and this one has prompted exactly that early flagging response from me.
Really appreciate the absence of stock photos that have nothing to do with the content, and a quick visit to mossharborcommercegallery maintained the same restraint, visual filler is a tell that the writing cannot stand on its own and the lack of it here suggests the team has confidence in their content quality alone.
A well calibrated piece that knew its scope and stayed inside it, and a look at fiabush maintained the same scope discipline, scope creep is one of the failure modes of long blog posts and this site has clearly invested in the editorial discipline to prevent it which shows up in tightly contained pieces.
Thank you for the good writeup. It in truth was once a leisure account it.
Glance complex to more delivered agreeable from
you! By the way, how can we be in contact?
References:
Slots download https://media.izandu.com/@richelleeje589?page=about@richelleeje589?page=about
А как вы объясните такой факт, месяц назад я оплатил посылку и статус в обработке был более чем 11 дней да еще и ждал я посылку дней 10, я нечего не имею против вашей работы и вообще против вас в целом, вы отличный магазин, но согласитесь “ЛАЖИ” у вас все таки бывают, я говорю это к тому что бы в следующий раз такого не повторялось, без обидсамое норм) я думаю лучше лс нет) а сайт это вы о нас заботетесь) комфорта только себе и клиентам больше) а это GUD! купить Мефедрон, Бошки, Гашиш, Марихуану, Альфа-ПВП Списался с данным магазом пару месяцев назад, беру клады по москве, ребята работают отлично, сервис на высоте! Последний раз даже клад сделали минут за 15 всего, первый раз такое, в других магазах приходилось часов по 5 ждать свое клада! Рега тоже отличная, беру JV-90 очень мощная штука! Спасибо ребятам за качественный товар и сервис продолжайте в том же духе!!!Бро, не волнуйся, тут ровный магаз. Напиши им в аську, что заказ номер такой-то оплачен.
Excellent article! Japanese swords are incredibly impressive.
Their craftsmanship is remarkable. Keep up the great
work.
I have always been fascinated by Japanese blades.
They represent a rich cultural heritage. Thanks for the
insights.
Nice share! Katana swords are true pieces of history.
Exploring their origins is extremely interesting. Looking forward to more
content.
Excellent content! The beauty of samurai swords has always amazed
me. Great job.
my web site https://katana-sword.com/
Found this useful, the points line up well with what I have been thinking about lately, and a stop at simbasienna added some angles I had not considered yet, definitely walking away with more than I came for which is the best outcome from time spent reading online for any kind of topic.
Really appreciate that the writer did not assume I would read every other related post first, and a look at hazeherb kept that self contained feel going where each piece can stand alone, accessibility for new readers is a sign of generous editorial thinking and this site has clearly invested in that approach.
Reading this in a quiet hour and finding it suited the quiet, and a stop at hoxhem extended the quiet reading mood, content that matches its own optimal reading conditions rather than fighting them is content that has been thoughtfully calibrated and this site reads as having a particular reading mood in mind throughout.
Came in tired from a long day and the writing held my attention anyway, and a stop at koalaglade kept that going, content that can engage a fatigued reader is doing something right because most online reading happens in suboptimal conditions like that one and quality content adapts to it without complaint.
Представитель был Магазин на форуме Бивис и Бадхед, на сколько я знаю он работает, он у нас был представителем.Хочу всем сказать мы не работаем 1вым классом ни при каком условии… купить Мефедрон, Бошки, Гашиш, Марихуану, Альфа-ПВП трек не работает тишина уже 3 дня прошло >< у всех все гуд а у меня щляпа как так почему ((( ?!?!?!?всем привет! магаз ровный беру у них года 2 уже все всегда стабильно и качества радует. берите все саветую. спасибо магазин
Индивидуальный подход к нестандартным заказам — изготовили детали по нашим чертежам точно в размер.
https://xn--80aeedb0bfzeok.xn--p1ai/catalog/latunnaia-kapilliarnaia-trubka/latunnaia-kapilliarnaia-trubka-1-8kh0-55kh100000-mm-l96-gost-2624-2016/
Проект от Град Девелопмент предлагает современное жилье с удобными планировками и благоустроенной территорией для отдыха и прогулок – https://aurum-time-grad.ru/
Reading this in a quiet hour and finding it suited the quiet, and a stop at nyxsip extended the quiet reading mood, content that matches its own optimal reading conditions rather than fighting them is content that has been thoughtfully calibrated and this site reads as having a particular reading mood in mind throughout.
Glad the writer kept this short rather than padding it out, the points stand on their own without needing extra context, and a look at velvetbrookmerchantgallery kept the same approach going, brevity is a sign of confidence in the substance and the team here clearly trusts their content to land without filler.
Picked up a couple of new ideas here that I can actually try out, and after my visit to arobell I have even more notes saved, this is the kind of resource that pays you back for the time you spend on it which is rare to come across in this corner of the web.
A piece that handled the topic with appropriate weight without becoming portentous, and a look at solacevelour continued that calibrated seriousness, content that takes itself seriously without becoming pompous is something this site has clearly figured out and the balance shows up in every piece I have read across multiple sessions now.
Информация о доставке по всей РФ делает компанию универсальным поставщиком
https://redmetsplav.ru/store/vismut/zarubezhnye-splavy-3/vismut-c49250—uns/pokovka-vismutovaya-c49250—uns/
A genuine compliment to the writer for keeping the post focused on what mattered, and a look at timbertrailmerchantgallery continued that disciplined focus, focus is a editorial choice that compounds across many small decisions and this site has clearly made those small decisions consistently across what I have read so far this week here.
Компания занимается реализацией ферросплавов, необходимых для качественного легирования сталей на литейных участках.
https://rms-ekb.ru/catalog/ugolok-stalnoi/ugolok-iz-konstruktsionnoi-stali-80kh60kh7-mm-c45e-en-10056-2/
С новым годом всех!да 203 й тут хороший,только я делал 1 к 15 мне понравилось) купить Мефедрон, Бошки, Гашиш, Марихуану, Альфа-ПВП Получил посыль,все отлично..будем тестить товарВсем добра бразы! Самый ровный магазин! Ждём открытия на Северном Кавказе!
Recommended without reservation for anyone interested in the topic at any level of expertise, and a look at shorevolume only strengthens that recommendation, this site clearly knows how to serve readers across a range of backgrounds without watering down the content or talking past anyone in the audience which is genuinely impressive to see.
Reading this triggered a small reorganisation of my own thinking on the topic, and a stop at hiltgem furthered that reorganisation, content that affects the shape of my mental model rather than just decorating it with new facts is content with structural rather than informational impact and this site provides that.
A piece that did not lean on the writer credentials or institutional backing, and a look at tweedvolume maintained the same focus on substance, content that earns trust through quality rather than through name dropping is the kind I find most persuasive and this site is clearly playing on the substance side of that distinction.
ЖК Аурум Тайм создан для людей, которые ценят комфортную городскую среду, современные технологии и высокий уровень благоустройства территории – https://aurum-time-grad.ru/
Now adjusting my mental model of how the topic fits into the broader landscape, and a look at waveharbormerchantgallery extended that adjustment, content that affects my structural understanding rather than just my factual knowledge is content with deeper impact and this site is providing those structural updates at a meaningful rate consistently across topics.
Strong recommendation, anyone interested in this topic owes themselves a visit, and a stop at daisyharborcommercegallery extends that recommendation across more of the site, this is the kind of resource that makes me more optimistic about the state of the open web than I usually am these days actually for once which is genuinely refreshing.
Worth recognising the specific care that went into how this post ended, and a look at glyjay maintained the same careful conclusions, endings are where most blog content falls apart and this site has clearly invested in the closing stretches of its pieces rather than letting them simply trail off when energy fades.
I really like the calm tone here, it does not push anything on the reader, and after I went through frostridgemerchantgallery I felt the same way, just steady useful content laid out without drama, which is exactly what someone trying to learn something quickly needs to find rather than aggressive marketing.
Хочу всем сказать мы не работаем 1вым классом ни при каком условии…было много… но скрутят даже за один! им главное работа,а не обьем! тем более 1гр – это уже особо крупный размер! купить Мефедрон, Бошки, Гашиш, Марихуану, Альфа-ПВП Реактивы отличного качества. Особенно JWH серияс треками магазин всегда спешит:) и качество скоро заценим)))
Hello, I enjoy reading all of your article.
I like to write a little comment to support you.
https://pto.org.ua/ — это медиа о технологиях, трендах и современной жизни без лишнего шума. Наша команда переводит сложное в понятное: готовит советы, технические руководства, рейтинги, обзоры и жизненные истории. Здесь легко разобраться, что действительно стоит внимания, а что просто очередной информационный шум. PTO — ваш помощник в том, чтобы быть на шаг впереди: лучше понимать происходящее и принимать более осознанные решения каждый день.
Quietly the post solved something I had been turning over without quite knowing how to phrase the question, and a look at sweatertorso extended that quiet solving, content that addresses unformulated needs is content with reader insight and this site has demonstrated that insight at a high rate across the pieces I have read recently.
Reading this confirmed a small detail I had been uncertain about, and a stop at vinylvessel provided the source for further checking, content that supports verification through citations or links rather than just asserting facts is more trustworthy and this site has clearly built its credibility through that kind of verifiable approach consistently.
Делали заказ на 10 гр. АМ-2233, вместо чего прислали 6,82 гр.так я там всем давно ответил ты пишешь с опозданием. Зайди почту проверь. купить Мефедрон, Бошки, Гашиш, Марихуану, Альфа-ПВП А какой ты адрес хотел что бы тебе написали если ты заказываешь может ты данные свои для отправки до сих пор не указал и в ожидании чуда сидишьПриветствую ТС,сделал заказ,но до сих пор трек не пробивается,помоги разобраться в этом уже почти неделю жду,заранее спс
Worth flagging that the post handled an angle of the topic I had not seen elsewhere, and a look at saddleswamp extended that fresh treatment, content that finds underexplored corners of well covered subjects is genuinely valuable and this site has demonstrated that exploratory editorial approach across multiple pieces in my reading sessions today.
Greetings! This is my first visit to your blog!
We are a collection of volunteers and starting a new project in a community in the same
niche. Your blog provided us valuable information to work on. You have
done a outstanding job!
Will be passing this along to a few people who would benefit from the perspective shared here, and a stop at fribrag only added to what I will be sharing, this kind of generous content deserves to circulate widely rather than getting buried in some search engine algorithm tweak that pushes it down the rankings.
Picked up several practical tips that I plan to try out this week, and a look at nightfallcommercegallery added a few more I will be testing alongside, content with practical hooks that connect to my actual life is the kind that earns my repeat attention rather than the merely interesting that I forget within a day.
Высокий уровень сервиса и контроля качества, для нашего научного проекта это было критически важно.
https://xn--80aeedb0bfzeok.xn--p1ai/catalog/mednye-dvukhrastrubnye-mufty-pod-paiku/mednaiadvukhrastrubnaiamufta-pod-paiku15kh1-2mmm2gost-32590-2013/
не бзди все будет ровно трек не всегда бьется это касяк курьерки а не отправителя не паникуйДобрый вечер помогите купил у снега клад, пустой, как сапорту написать..? купить Мефедрон, Бошки, Гашиш, Марихуану, Альфа-ПВП Магазину отличных покупателей)))Какие риски ) ты адекват ? ты скинул непонятно что не имеющее никакого смысла.
Указан физический адрес в Екатеринбурге, что повышает доверие
https://redmetsplav.ru/store/vismut/zarubezhnye-splavy-3/vismut-42-3992—csnstn-423992/provoloka-vismutovaya-42-3992—csnstn-423992/
Ассортимент компании включает более 100 000 позиций, что позволяет закрыть практически любые потребности металлургического производства.
https://rms-ekb.ru/catalog/stalnoi-list/stalnoi-list-s345-80x1400x1550-gost-19903-2015-gladkii-chernyi-goriachekatanyi/
Liked the balance between depth and brevity, never too shallow and never too long, and a stop at hubbeat kept the same balance going across the rest of the site, this is one of the harder skills in writing and the team here clearly has it figured out very well indeed across every page.
A piece that respected the reader by not over explaining the obvious, and a look at violetharbormerchantgallery continued that calibrated approach, finding the right level of explanation is one of the harder editorial calls and this site has clearly thought carefully about what readers will already know versus what they need help with consistently.
Если в разработке, то да.А так лишний раз лучше предостречься)))Сама в ахуе, ни употреблять эту дрянь, ни толкнуть….. купить Мефедрон, Бошки, Гашиш, Марихуану, Альфа-ПВП пасибо за ваш труд,всё быстро,ровно и чётко! скорость обработки заказа не оставляет шансов конкурентам – вы несомненно лучшие! ма-ла-цыда никого не устраивает это, что за бред. только единиц.
Just wanted to say this was useful and leave a small note of thanks, and a quick visit to thatchvista earned a similar nod from me, the small acknowledgements add up over time and represent the real economy of trust that good content runs on across the open and increasingly fragmented modern internet.
Bookmark earned and shared the link with one specific person who would care, and a look at kraftgroove got the same targeted share, sharing carefully rather than broadcasting is a discipline I try to maintain and this site is generating shares from me at a sustainable rate rather than the spam rate of viral content.
Now feeling something close to gratitude for the fact this site exists, and a look at vesseltame extended that gratitude, the rare site that produces this kind of response is the rare site worth defending in conversations about whether the modern internet is still capable of producing genuinely valuable independent content for serious adults.
Bookmarked the page and the homepage too because clearly there is more to explore here, and a quick stop at siskastencil only made that more obvious, this is the kind of place I want to dig through over a weekend rather than rushing through during a coffee break tomorrow morning before getting back to work.
After going over a handful of the articles on your web site, I really like your way of writing a blog.
I bookmarked it to my bookmark website list and will be checking back in the near
future. Please check out my website as well and tell me what you think.
Came in skeptical of the angle and left mostly persuaded, and a stop at garnetharborcommercegallery pushed me a bit further in the same direction, content that can move a critical reader by argument rather than rhetoric is rare and worth pointing out because it indicates real substance underneath the surface presentation here.
A thoughtful read in a week that has been mostly noisy, and a look at hilthive carried that thoughtful quality across more pages, finding pockets of considered writing in a week of distractions is one of the small wins of careful curation and this site is providing those pockets at a sustainable rate.
http://wmking.ru/t86629s0.html#entry489307
Worth bookmarking and sharing with anyone interested in the topic, that is my honest take, and a stop at violetharborcommercegallery reinforces that, the kind of generous resource that makes the open web feel worth defending against the constant pressure to retreat into walled gardens and curated feeds today everywhere I look across all my devices.
Thanks for putting this online without locking it behind email signups or paywalls, and a quick visit to arobell kept that open feel going, content that trusts the reader to come back rather than gating access is the kind of approach I will reward with regular return visits over time happily.
Loved the writing voice here, friendly without being fake and confident without being arrogant, and a stop at dawnridgemerchantgallery carried the same tone forward, the kind of personality that makes a reader feel welcome rather than lectured at which is a balance plenty of writers struggle to find no matter how long they have been at it.
Да тут дофига кто чего отписывает.только вот пробы нормальным людям раздайте.что бы видели липчане работу вашу!Это просто пустоплёт залётный, его уже изолировали от нашего общества купить Мефедрон, Бошки, Гашиш, Марихуану, Альфа-ПВП Брал хоть и один раз, но все было отлично! Жду второго заказа)Послезавтра запрет в силу вступает
Great work! That is the kind of information that are meant to be
shared around the net. Disgrace on the seek engines for now not positioning this put up upper!
Come on over and discuss with my website . Thanks =)
Reading this prompted me to dig into a related topic later, and a stop at goaxio provided some of the starting points for that follow up reading, content that triggers further exploration rather than satisfying curiosity completely is content with real generative energy and this site has plenty of that energy throughout it.
Took a quick scan first and then went back to read properly because the post deserved it, and a stop at heathfoam kept me reading carefully too, the kind of writing that earns a slower second pass rather than getting skimmed and forgotten is something I value highly when I happen to find it.
The tone stayed consistent across the whole post which is harder than it looks for longer pieces, and a look at woodcovemerchantgallery continued the same voice, this kind of editorial consistency is a sign of either a single careful writer or a tightly run team and either is impressive today across the broader media environment.
Заказать самый лучший sup board в минске
Лучший вейксерфинг заказать в Минске
Just want to recognise that someone clearly cared about how this turned out, and a look at skifftornado confirmed that care extends across the broader site, you can feel the difference between content shipped to hit a deadline and content released because the writer was actually proud of the result for once.
https://forum.diamech.com/index.php?topic=10381.new#new
Торчал дома 2 дня,ждя,пока придёт этот курьер. Решил написать,чтоб кинули трек-надоело мне быть в ожидании. Оказалось,что:Прёт то отлично но вот в плане концентрации . купить Мефедрон, Бошки, Гашиш, Марихуану, Альфа-ПВП да для ам и дживов ацик самая подходящяя тема. а основа из мачехи ништяк.только её надо выварить раза три по 15 мин. чтоб негорлодёрило и смол меньше,ведь в смоле много канабиола остаёцапо теме трип БРО!
Заказать самый лучший sup board в минске
Заказать самый лучший sup board в минске
Благодарим за оперативную поставку ниобиевых труб, выручили в очень сжатые сроки.
https://xn--80aeedb0bfzeok.xn--p1ai/catalog/latunnye-naruzhnye-stopornye-koltsa-po-gost/latunoe-naruzhnoe-stopornoe-pruzhinnoe-koltso-98kh3-mm-lts40mts3zh-gost-13942-86/
Reading this prompted a brief but useful conversation with a colleague who happened to walk by, and a stop at fylcalm extended that conversational seed, content that becomes a starting point for in person discussion rather than ending in solitary reading is content with social generative energy and this site has plenty of it apparently.
Возможность изготовления деталей по чертежам заказчика — это большой плюс
https://redmetsplav.ru/store/vismut/rossiyskie-splavy-2/vismut-psvio-25-30/provoloka-vismutovaya-psvio-25-30/
Just enjoyed the experience without needing to think about why, and a look at nyxsip kept that effortless feeling going, sometimes the best content is invisible in the sense that you forget you are reading until you reach the end and realise time has passed without you noticing it pass naturally.
Лучший вейксерфинг заказать в Минске
Аренда яхт в Сириусе дает возможность организовать незабываемое мероприятие на воде. Это может быть день рождения, корпоратив, семейный праздник или романтический вечер: https://yachtkater.ru/
Заказать самый лучший sup board в минске
Наличие на складе редких металлов, таких как цирконий, выделяет компанию на фоне конкурентов, торгующих только массовым прокатом.
https://rms-ekb.ru/catalog/ugolok-stalnoi/ugolok-stalnoi-vst3ps-220x220x16-gost-8509-93/
Now leaving a small mental note to recommend this when the topic comes up in conversation, and a look at studiotrader extended that recommend ready feeling, content that arms me with shareable references for likely future conversations is content with social value and this site is providing that conversational ammunition consistently for me lately.
A piece that handled multiple complications without becoming confused, and a look at oliveharborcommercegallery continued that organisational clarity, holding multiple threads in a single piece without losing any of them is a sign of skilled writing and this site has clearly developed the editorial discipline to manage complexity without sacrificing readability throughout.
https://forum.diamech.com/index.php?topic=10381.new#new
относительно норм ценыВстану на пробу новых веществ сочный трип со мной купить Мефедрон, Бошки, Гашиш, Марихуану, Альфа-ПВП Приветствую всех! купил 0,5 кокса. Закинул деньги, получил адрес, приехал забрал, все на высоте! Кладмену отдельное спасибо, спрятал так что не доебаться. Качество просто улетное, и от меня и от друзей огромный плюс магазину.Отличный магаз
Заказать самый лучший sup board в минске
Kopieren Sie den Bildlink gehen Sie zu PinDown.io
fügen Sie ihn ein und tippen Sie auf Download.
Заказать самый лучший sup board в минске
The pacing of the post was just right, never rushed and never dragged out unnecessarily, and a look at wheatcovemerchantgallery maintained the same rhythm, you can tell the writer has experience because the difficult skill of pacing is something only practiced writers manage to handle well in long form content over time and across formats.
Так может он в городе закладкой бралСотрудники , знают свое дело , лучше другого. купить Мефедрон, Бошки, Гашиш, Марихуану, Альфа-ПВП Извините удаляю сообщение!Где-то с год – полтора назад пользовался услугами Кемикал Микса. Продуктция чатенько имела разые цвета, плотность и консистенцию, что немного напрягало, но “пручесть” продуктов всегда была на уровне. На моей памяти меньше косяков было только у Химхома, но они, к нашему сожалению, канули в лету.
A piece that respected the reader by not over explaining the obvious, and a look at garnetharbormerchantgallery continued that calibrated approach, finding the right level of explanation is one of the harder editorial calls and this site has clearly thought carefully about what readers will already know versus what they need help with consistently.
High quality writing, no marketing speak and no buzzwords that mean nothing, and a stop at singersorbet kept that going, simple direct content that actually communicates something is harder to find than it should be and this is one of the rare places that gets it right consistently across many different posts.
Лучший вейксерфинг заказать в Минске
Top quality material, deserves more attention than it probably gets, and a look at sodasherpa reflected the same effort across the site, a hidden gem in the modern web where most attention goes to whoever shouts loudest rather than whoever actually delivers the best content for their readers without much marketing fanfare.
https://pf1.ru/topic70806.html
Now recognising that this site has earned a place in the small group of resources I treat as authoritative, and a stop at thatchteapot confirmed that placement, the difference between resources I trust and resources I just consume is real and this site has clearly moved into the trusted category through consistent quality over time.
Now adjusting my expectations upward for the topic based on this post, and a stop at sheentiny continued that bar raising effect, content that resets what I think is possible on a subject is doing real work in shaping my standards and this site is providing those bar raising experiences at a notable rate during sessions.
Found the writing surprisingly fresh for what is by now a well covered topic, and a stop at hugbox kept that freshness going across the related pages, original perspective on familiar ground is hard to come by and this site has clearly earned its place in the conversation rather than just rehashing old ideas.
Заказать самый лучший sup board в минске
A piece that demonstrated competence without performing it, and a look at tallysmoke maintained the same self assured but unshowy register, the gap between competence and performance of competence is one I track and this site has clearly chosen to demonstrate rather than perform which I find much more persuasive as a reader.
_Elf_ тебе сколько лет интересно?У тебя был единичный случай по твоим словам товар-фуфло.репутация у тебя “0”Требуешь вернуть денег, ты же понимаешь что тебе их не вернут.Вывод-ПРОВОКАЦИЯ купить Мефедрон, Бошки, Гашиш, Марихуану, Альфа-ПВП В таких случаях надо запрашивать подтверждения через форум(ЛС)
Decided to set a calendar reminder to revisit, and a stop at kraftkale extended that revisit list, calendar entries for content are a level of commitment I rarely make but when I do they signal a higher regard than a simple bookmark and this site has earned that calendar tier of relationship from me today.
Лучший вейксерфинг заказать в Минске
A genuinely unexpected highlight of my reading week, and a look at hiltkindle extended that pattern, the surprise of finding excellent content rather than the predictable mediocre is one of the few real pleasures of casual web browsing and this site delivered that surprise cleanly today which I really do appreciate.
http://old.msfnpr.ru/msfnprbb/viewtopic.php?p=7492#7492
Felt no urge to argue with the conclusions even though I started the post slightly skeptical, and a look at goldenharborcommercegallery maintained that pattern, writing that earns agreement through clarity of argument rather than rhetorical pressure is the kind I find most persuasive and the kind I want to read more of these days.
The pacing of the post was just right, never rushed and never dragged out unnecessarily, and a look at walnutharborcommercegallery maintained the same rhythm, you can tell the writer has experience because the difficult skill of pacing is something only practiced writers manage to handle well in long form content over time and across formats.
Заказать самый лучший sup board в минске
че вы панику наводите)) все норм будет! есть рамс у курьерки, магаз не при чем.. спакуха купить Мефедрон, Бошки, Гашиш, Марихуану, Альфа-ПВП Снова в деле
Worth saying that the prose reads naturally without straining for style, and a stop at acornharbortradegallery maintained the same unforced quality, writing that achieves elegance without effort is the highest tier and this site has clearly worked out how to land that effortless quality consistently rather than only on the writers best days.
Came back to this twice now in the same week which is unusual for me, and a look at gribump suggested I will keep coming back, the kind of post that earns repeated visits rather than one and done reading is the gold standard for content quality and this site clearly hit that standard.
Благодарим за оперативную поставку ниобиевых труб, выручили в очень сжатые сроки.
https://xn--80aeedb0bfzeok.xn--p1ai/catalog/mednye-dvukhrastrubnye-mufty-pod-paiku/mednaiadvukhrastrubnaiamufta-pod-paiku70kh2-6mmm2rmgost-r-52922-2008/
Возможность заказать листы и полосы нестандартных размеров
https://redmetsplav.ru/store/vanadiy-i-ego-splavy/vanadiy-fvd40u0-75—gost-27130-94/krug-vanadievyy-fvd40u0-75—gost-27130-94/
Заказать самый лучший sup board в минске
Glad I gave this fifteen minutes rather than the usual three minute skim, and a look at crearena earned the same investment, time spent on quality content is rarely wasted but the reverse is also true and learning which sites deserve which kind of attention is part of being a careful online reader.
Ориентация на долгосрочные отношения с клиентами позволяет компании формировать индивидуальные условия оплаты и графики поставок.
https://rms-ekb.ru/catalog/stalnoi-list/stalnoi-list-30g2-17x1550x1500-gost-19903-2006-gladkii-chernyi-goriachekatanyi/
Лучший вейксерфинг заказать в Минске
Заказать самый лучший sup board в минске
Заказать самый лучший sup board в минске
During a quiet evening reading session this provided just the right depth without being heavy, and a stop at hewzap maintained the same evening appropriate weight, content with depth that does not exhaust the reader is content with editorial calibration and this site has clearly figured out how to be substantial without being demanding all the time.
Ровный магаз , отвечаю купить Мефедрон, Бошки, Гашиш, Марихуану, Альфа-ПВП Желаю всего самого наилучшего вашему магазину,ваш бренд это качество!
Cabinet IQ
8305 State Hwy 71 #110, Austin,
TX 78735, United Ꮪtates
254-275-5536
Signaturedesign
Заказать самый лучший sup board в минске
Appreciated how the post felt complete without overstaying its welcome, and a stop at gildedcovemerchantgallery confirmed that economical approach runs across the site, knowing when to stop is a skill many writers never develop but here the discipline is obvious and welcome from the perspective of a busy reader trying to learn things efficiently.
Лучший вейксерфинг заказать в Минске
A modest masterpiece in its own quiet way, and a look at pearlharborcommercegallery confirmed the same quiet quality across the rest of the site, calling something a masterpiece is usually overstating but for content this carefully crafted the word feels appropriate even if the writers themselves would probably resist the label honestly.
купить водительские права
права купить в москве
купить права в москве
купить в права в москве
права купить в казани
купить права в казани
купить права сколько стоит в москве
сколько стоит купить права в москве
купить права в уфе
права купить в уфе
водительские права купить в москве
купить водительские права в москве
купить права водительские в москве
права водительские купить в москве
права купить в краснодаре
купить права в краснодаре
купить права в санкт-петербурге
права купить в санкт-петербурге
купить права в новосибирске
права купить в новосибирске
права купить на машину в москве
купить права на машину в москве
права на машину купить в москве
сколько стоит купить права в краснодаре
купить права в омске
купить права сколько стоит в краснодаре
права купить в омске
купить права в екатеринбурге
права купить в екатеринбурге
купить права водительские права в туле
купить в у в москве
водительское удостоверение купить в краснодаре
купить водительское удостоверение в краснодаре
купить в права в новосибирске
купить водительское удостоверение в москве
водительское удостоверение купить в москве
права купить в нижнем новгороде
купить права в нижнем новгороде
права купить в красноярске
купить права в красноярске
права купить в хабаровске
купить права в хабаровске
права купить в воронеже
купить права в воронеже
купить в права в омске
купить права в калининграде
права купить в калининграде
купить права в туле
права купить в туле
права купить в тюмени
права купить в грозном
купить права в самаре
права купить в самаре
купить права в грозном
купить права в тюмени
купить в у в екатеринбурге
права купить в волгограде
купить права в волгограде
права купить в челябинске
купить права в челябинске
купить в у в омске
права купить в иркутске
купить права в барнауле
купить права в иркутске
права купить в барнауле
права купить в белгороде
купить права в белгороде
как права купить в москве
права купить в саратове
купить в права в красноярске
как купить права в москве
купить в права в уфе
купить категорию в в брянске
купить в категорию в брянске
права купить в рязани
купить права в рязани
купить права в кирове
права купить в кирове
купить права в саратове
купить в права в туле
купить права водительские права в москве
купить категорию в в краснодаре
купить в категорию в краснодаре
купить в права в подольске
права купить в улан-удэ
купить права категории в в москве
купить права водительские в омске
купить водительские права в новосибирске
водительские права купить в новосибирске
купить права в категории в москве
водительские права купить в омске
права купить категории в в москве
права водительские купить в омске
права водительские купить в новосибирске
купить водительские права в омске
права купить в курске
купить права в улан-удэ
купить права водительские в новосибирске
права купить в кургане
права купить в ярославле
купить права в курске
купить права в архангельске
права купить в архангельске
купить права в ярославле
купить права в кургане
права купить в тамбове
купить права в тамбове
купить права в липецке
права купить в перми
купить зеркальные права в подольске
купить права в перми
купить права в оренбурге
права купить в оренбурге
права купить в томске
купить в права в екатеринбурге
купить в права в перми
купить в права в тюмени
купить права в томске
права купить в липецке
купить в права в воронеже
водительское удостоверение купить в челябинске
купить водительское удостоверение в челябинске
водительское удостоверение водительское купить в москве
купить в права в иркутске
водительское удостоверение купить в туле
купить водительское удостоверение в туле
купить права в ижевске
права купить в сочи
права купить в пензе
купить права в сочи
права купить в ижевске
купить права сколько стоит в новосибирске
купить права в пензе
сколько стоит купить права в новосибирске
купить права в твери
купить водительское удостоверение в перми
купить права в сургуте
купить в у в краснодаре
купить в права в вологде
купить в у в новосибирске
водительское удостоверение водительское купить в туле
права купить в сургуте
права купить в твери
водительское удостоверение купить в перми
сколько стоит купить права в ульяновске
где купить права права в санкт-петербурге
где купить купить права в санкт-петербурге
права купить в брянске
купить права в брянске
купить права сколько стоит в ульяновске
купить права в чите
права купить в чите
купить права категории в в новосибирске
права купить категории в в новосибирске
купить права где в туле
купить права в категории в новосибирске
купить в права в челябинске
купить в права в хабаровске
права купить в ульяновске
права купить в иваново
купить в у в воронеже
водительское удостоверение купить в саратове
купить в права в липецке
где купить купить права в москве
купить ву в новосибирске
права купить категории в в челябинске
где купить права права в москве
купить в права в рязани
купить в у в нижнем новгороде
купить права в ульяновске
купить водительское удостоверение в саратове
купить права в иваново
купить в права в томске
купить в у в перми
сколько стоит купить права в воронеже
купить права в категории в челябинске
купить в права в оренбурге
купить права категории в в челябинске
где купить права права в оренбурге
права купить в смоленске
права купить в симферополе
сколько стоит купить права в саратове
купить права в орле
официально права купить в москве
купить в права в грозном
купить в права в чите
купить права в симферополе
где купить купить права в оренбурге
купить права в смоленске
права официально купить в москве
купить водительское удостоверение в грозном
купить права в кемерово
купить права сколько стоит в воронеже
купить права официально в москве
права купить в орле
купить права сколько стоит в саратове
водительское удостоверение купить в грозном
купить официально права в москве
Now appreciating that the post did not require external context to follow, and a look at wildorchardmerchantgallery maintained the same self contained quality, content that respects new visitors by being readable without prerequisites is content with broader accessibility and this site has clearly invested in keeping each piece reader friendly for fresh arrivals.
Компания «Технология Кровли» специализируется на элитных кровельных работах в Москве и Московской области, применяя стандарты храмового зодчества к частным резиденциям: медные покрытия, двойной фальц и сложная геометрия кровель исполняются с инженерной точностью, исключающей компромиссы. Посетите https://roofs-technology.com/ и убедитесь сами: компания предлагает проектирование цифрового двойника объекта, инструментальный технический надзор и полную прозрачность всех скрытых узлов в режиме 24/7 — итоговая смета не меняется в процессе работ, а гарантия на результат составляет 15 лет.
Всё шикарно,уже сидим с курим ваши бошки купить Мефедрон, Бошки, Гашиш, Марихуану, Альфа-ПВП Списался с продавцом в аське, во вторник оплатил, сказали в среду отправят. когда спросил, сказали что не отправили по тех причинам из-за СПСР, обещали в четверг. Должно было придти в течении 3х рабочих дней. Сегодня понедельник, сижу на работе, и вот мне звонят, мол вам письмо пришло, куда доставить? То есть все верно, 3 дня как и говорили! Настроение теперь на весь день поднялось)) Вечером буду делать 1к10 (ам2233), потом отпишусь как и чего!!)) В общем доволен, но пока говорю только про доставку. Позднее отпишу доволен ли я всем остальным))
Found this through a friend who recommended it and now I see why, and a look at tornadovapor only strengthened that recommendation in my own mind, word of mouth still works for content that actually delivers and this site is clearly earning recommendations the old fashioned way through quality rather than marketing.
Honestly enjoyed every minute spent here, that is not something I say lightly, and a look at swansignal confirmed I will be back, the bar for spending time online is high for me these days but this site clears it without effort which is high praise indeed from this reader who is usually rather demanding.
Coming to this with low expectations and being pleasantly surprised by the substance, and a stop at scenictrader continued exceeding expectations, the recalibration of expectations upward across multiple positive readings is one of the actual rewards of careful browsing and this site is providing that recalibration at a steady rate apparently.
Now appreciating that the post left me with enough to say in a follow up conversation, and a look at heliofine added more material for those follow ups, content that prepares me for related conversations rather than just informing me alone is content with social utility and this site provides that social armament reliably for me.
Took my time with this rather than rushing because the writing rewards attention, and after tundratoken I had even more to absorb, the kind of content that pays back the patient reader rather than punishing them with empty filler is something I look for and rarely find in regular searches lately.
A quiet kind of confidence runs through the writing, and a look at sonarsandal carried that same understated assurance, confidence without bragging is the most attractive register for online writing and the writers here have clearly developed it through practice rather than affecting it through stylistic tricks that would feel hollow eventually.
وی ایزوله بی پی ای، یک مکمل پروتئین وی با کیفیت فوقالعاده بالا است که توسط کمپانی بی پی ای تولید میشود.
но за долгое сотрудничество с этим купить Мефедрон, Бошки, Гашиш, Марихуану, Альфа-ПВП Как магазиН?
وی ایزوله کوین لورون، یک مکمل پروتئین وی بسیار پیشرفته است که توسط برند ورزشی کوین لورون تولید میشود.
Профессиональный подход к описанию каждого вида металла
https://redmetsplav.ru/store/titan/rossiyskie-splavy-4/titan-vt35/prutok-titanovyy-vt35/
Технические специалисты компании помогли выбрать оптимальный сплав для работы в агрессивных средах.
https://xn--80aeedb0bfzeok.xn--p1ai/catalog/latunnye-naruzhnye-stopornye-koltsa-po-gost/latunoe-naruzhnoe-stopornoe-pruzhinnoe-koltso-145kh3-mm-lmtsska-gost-13942-86/
Reading this in the time it took to drink half a cup of coffee, and a stop at irotix fit naturally into the second half, content that respects the rhythms of a typical morning is content with practical fit and this site has the kind of length and pacing that works for the way I actually read.
Now organising my browser bookmarks to give this site easier access, and a look at holmglobe earned the same organisational priority, the small acts of digital housekeeping I do for sites I expect to use often are themselves a measure of trust and this site has triggered the trust based housekeeping behaviour from me clearly.
Useful enough to recommend to several people I know who would appreciate it, and a stop at oxaboon added more material I will pass along too, the kind of writing that earns word of mouth is the kind that actually delivers on its promises which is what this site does without any drama or fanfare attached.
Пришёл 307. Попробывал 1 к 20, ниочём.. Курнул кропаль чистого, также ниочём…хз в чём дело. Сегодня попробую 1к10 можт чтот почуствую купить Мефедрон, Бошки, Гашиш, Марихуану, Альфа-ПВП 6-APB, белый кристалический порошок, 1000р… Это типа настоящий 6-APB?
ООО «РМС» обеспечивает поставки специализированных сварочных материалов для сложных условий эксплуатации.
https://rms-ekb.ru/catalog/list/list-11kh4v2mf3s2-3x2000x6000-gost-19903-74/
Now appreciating that the post did not require me to agree with the writer to find it valuable, and a look at iciclebrookcommercegallery maintained the same useful regardless of agreement quality, content that informs even when it does not convince is content with broader utility and this site reads as useful even when I disagree.
Approaching this with the usual skepticism I bring to new sites and being slowly persuaded, and a stop at windharborcommercegallery continued that gradual persuasion, the careful path from skeptical reader to genuine fan is the only one I trust and this site has walked me along that path through patient consistent quality across pieces.
Genuinely changed how I think about a small piece of the topic, which does not happen often online, and a look at auroracovegoodsgallery added another nudge in the same direction, the kind of writing that earns a small mental shift rather than just confirming what you already thought before reading is a sign of careful thought.
Looking through other posts here the consistency is what makes the site valuable rather than any single piece, and a stop at grohax extended that consistency observation, sites whose value lies in the ongoing pattern rather than in standout posts are sites I trust more deeply and this one has clearly built that kind of trust.
Now thinking about how this post will age over the coming years, and a stop at tasseltrace suggested the same durability, content built to age well rather than to capture the attention of the moment is content with a different kind of value and this site has clearly chosen the long horizon over the short one.
Honest take is that I will probably forget most of what I read online today but this post is one I will remember, and a stop at kraftkilt kept that same memorable quality going, certain writing leaves a residue in the mind in a way most content simply does not manage.
Worth pointing out that the post avoided the temptation to summarise everything at the end, and a look at galekraft continued that confident closing approach, content that trusts readers to retain the substance without being reminded of it at the end is content that respects the reader and this site practices that respect.
Different feel from the algorithmically optimised posts that dominate the topic, and a stop at gildedgrovecommercegallery reinforced that human touch, you can tell when a site is being run by someone who reads what they publish versus someone just hitting submit and moving on quickly to the next assignment without checking the result.
Жалко конечно что убрали покупку от грамма купить Мефедрон, Бошки, Гашиш, Марихуану, Альфа-ПВП Я подозреваю, что его посылку спалили на наличие и теперь просто не отправляют.
Probably going to mention this site in a write up I am working on later this month, and a stop at pineharbortradegallery provided more material for that potential mention, content worth referencing in my own published work rather than just personal reading is content with the highest endorsement level and this site has earned that endorsement.
During my morning reading slot this fit perfectly into the routine, and a look at idebrim extended that perfect fit into the rest of the routine, content that matches the rhythm of how I actually read rather than demanding accommodation from my schedule is content well calibrated to its likely audience and this site has it.
Worth flagging this site to a few specific friends who would appreciate the editorial sensibility, and a look at hugtix added more pages I will mention to them, recommending sites to specific people requires understanding both the site and the person and this site is making those personalised recommendations easy and natural for me.
The pacing of the post was just right, never rushed and never dragged out unnecessarily, and a look at cricap maintained the same rhythm, you can tell the writer has experience because the difficult skill of pacing is something only practiced writers manage to handle well in long form content over time and across formats.
Reading this gave me something to think about for the rest of the afternoon, and after zencovemerchantgallery I had even more to mull over, the kind of post that lingers in the background of your day rather than evaporating immediately is genuinely valuable in an attention economy that punishes depth rather than rewarding it.
Reading this prompted me to clean up some old notes related to the topic, and a stop at sageharborcraftcollective extended that organising urge, content that triggers personal organisation rather than just consuming attention is content with motivating energy and this site has the kind of clarity that prompts active follow up rather than passive consumption.
Лучший вейксерфинг заказать в Минске
Вторая посылка вообще на 4й день пришла :yeah:. Все рекорды бьете ребят :voo-hoo: . Магазу респект и уважуха, так держать . купить Мефедрон, Бошки, Гашиш, Марихуану, Альфа-ПВП лучший магаз из всех что существует!!!
Looking at the surface design and the substance together this site has both right, and a look at waferturtle reinforced that integrated quality, sites where presentation and content reinforce each other rather than fighting are sites with full editorial coherence and this one has clearly invested in both layers in a balanced way.
Лучший вейксерфинг заказать в Минске
Compared to the usual results for this kind of search this site stands well above the average, and a quick visit to sambavarsity kept the standard high, you can tell within seconds whether a site is going to waste your time or actually deliver and this one clearly delivers without any false starts.
Лучший вейксерфинг заказать в Минске
Quiet confidence runs through the whole post, no need to shout to make the points stick, and a stop at thriftsundae carried that same restrained voice forward, content that respects the reader by trusting its own substance rather than dressing it up in theatrical language is what I look for online and rarely actually find these days.
Лучший вейксерфинг заказать в Минске
Быстрая навигация через «Карту сайта» для поиска глубоких страниц
https://redmetsplav.ru/store/titan/rossiyskie-splavy-4/titan-tl3—ost-5r-9071-88/list-titanovyy-tl3—ost-5r-9071-88/
Лучший вейксерфинг заказать в Минске
A piece that earned its conclusions through the body rather than asserting them at the end, and a look at turbinevault maintained the same earned quality, conclusions that follow from what came before are more persuasive than declarations and this site has clearly internalised that principle in how it constructs arguments throughout pieces.
ТУТ САМЫЙ ЛУЧШИЙ МАГАЗИН С САМЫМ ЛУЧШИМ ТОВАРОМ!!! ЖЕЛАЮ УДАЧИ!!! купить Мефедрон, Бошки, Гашиш, Марихуану, Альфа-ПВП В-общем, я ещё два часа пил вискарик со льдом,да лопал пиццу 😉
Looking forward to seeing what gets published next month, and a look at solostarlit extended that anticipation across the broader site, finding myself looking forward to a sites future content rather than just consuming its existing content is a stronger commitment level than I usually reach with new finds and this site triggered that.
Компания осуществляет поставки базового металлургического сырья, включая олово, свинец и цинк в чушках.
https://rms-ekb.ru/catalog/ugolok-stalnoi/ugolok-iz-konstruktsionnoi-stali-250kh250kh35-mm-c15e-din-59370/
My usual pattern is to skim and bounce but this site has reset that pattern temporarily, and a stop at hopiron maintained the slower reading mode, content that changes how I read is content with structural influence and this site has clearly nudged my reading behaviour toward something better at least for the duration of these visits.
Украина Работает? купить Мефедрон, Бошки, Гашиш, Марихуану, Альфа-ПВП в рязань доставим?
Now feeling slightly more optimistic about the state of independent writing online, and a stop at irubelt extended that quiet optimism, sites like this one are the reason I have not given up on the open web entirely and finding them occasionally renews the case for paying attention to non algorithmic content sources today.
Glad I gave this a chance rather than scrolling past, and a stop at juniperharborcommercegallery confirmed I made the right call, sometimes the best content is hidden behind unassuming headlines that do not scream for attention and learning to slow down and check those out has paid off many times now across years of reading.
Closed three other tabs to focus on this one and never opened them again, and a stop at windharbormerchantgallery similarly held attention exclusively, content that crowds out other reading from working memory is content with real density and this site has demonstrated that density across multiple pages I have visited so far this morning.
Honestly enjoyed not being sold anything for the entire duration of the post, and a look at gingerwoodcommercegallery kept that pleasant absence going across more pages, content that exists for its own sake rather than as a funnel to a paid product is increasingly rare and worth supporting where I can find it.
Reading this prompted me to dig out an old reference book related to the topic, and a stop at heliogust extended that connection to other sources, content that connects me back to my own existing knowledge rather than asking me to forget it is content with continuity and this site has that continuous quality.
Loved the writing voice here, friendly without being fake and confident without being arrogant, and a stop at vortextrance carried the same tone forward, the kind of personality that makes a reader feel welcome rather than lectured at which is a balance plenty of writers struggle to find no matter how long they have been at it.
A piece that did not lean on the writer credentials or institutional backing, and a look at gildedcovegoodsroom maintained the same focus on substance, content that earns trust through quality rather than through name dropping is the kind I find most persuasive and this site is clearly playing on the substance side of that distinction.
A piece that took its time without dragging, and a look at galloheron kept the same patient pace, the difference between unhurried and slow is a fine editorial distinction and this site has clearly found the unhurried side without slipping into the slow side which would have lost me as a reader quickly otherwise.
Магниты рулят, не меняйтесь) купить Мефедрон, Бошки, Гашиш, Марихуану, Альфа-ПВП магазин отличный
Amazing blog! Is your theme custom made or did
you download it from somewhere? A design like yours with
a few simple tweeks would really make my blog jump out. Please let me know where you got
your theme. Thank you
Worth flagging that the writing rewarded a second read more than I expected, and a look at gunbolt produced the same second read benefit, content with hidden depths that emerge only on careful rereading is rare in the modern blog space and this site has clearly invested in that level of compositional density throughout.
Felt the post had been written without looking over its shoulder, and a look at zenharborcommercegallery continued that confident posture, content written for its own sake rather than against imagined critics has a different quality and this site reads as written from a place of confidence rather than defensive justification of every claim.
Now understanding why someone recommended this site to me a while back, and a stop at starlitvixen explained the recommendation, sometimes recommendations make sense only after experience and this site has finally clicked into place as the kind of resource I now understand was being recommended for sound editorial reasons by my friend.
Описание применения металлов в атомной энергетике подчеркивает качество
https://redmetsplav.ru/store/titan/rossiyskie-splavy-4/titan-et5—tu-1-9-77-85/poroshok-titanovyy-et5—tu-1-9-77-85/
Офис в Екатеринбурге работает четко, забирали самовывозом — складская логистика на высоте.
https://xn--80aeedb0bfzeok.xn--p1ai/catalog/latunnye-naruzhnye-stopornye-koltsa-po-gost/latunoe-naruzhnoe-stopornoe-pruzhinnoe-koltso-165kh3-mm-lmtssk-gost-13942-86/
Затарил я тут как то купели значит курехи,приваливай на адрес и не могу найти списался с оператором и понял что дурак тут я а не минер затупил,30 сек и закладка у меня в руках,лечу Домой,дома меня ждут уже братики заряжает по 2 водных и начинаем пускать слюни под спанч бобра, в полне хороший стафф,силы стафа хватает,валит минут 40-60 потом спад,получилось так что вес сдули за 2 дня,отходосы минемальные, вообщем сервис тут вышка тарился тут ребята) купить Мефедрон, Бошки, Гашиш, Марихуану, Альфа-ПВП фоту убрал, не будем палить конспирацию, всё понятно… Свяжитесь с магазином, я думаю решите вопрос с конпенсацией
Reading this gave me a small framework I expect to use going forward, and a stop at crystalbuyhub extended that framework, content that produces transferable mental models rather than just specific facts is content with multiplicative value and this site is providing those models at a rate that justifies extra attention from me regularly.
Now appreciating the way the post avoided the temptation to be longer than necessary, and a look at valecovegoodsgallery continued that lean approach, content with the discipline to stop when finished rather than padding for length is content that respects both itself and its readers and this site has that disciplined editorial culture clearly throughout.
บทความนี้ ให้ข้อมูลดี ค่ะ
ดิฉัน ไปอ่านเพิ่มเติมเกี่ยวกับ
ข้อมูลเพิ่มเติม
สามารถอ่านได้ที่
คาสิโนออนไลน์
เผื่อใครสนใจ
เพราะให้ข้อมูลเชิงลึก
ขอบคุณที่แชร์ ข้อมูลที่มีประโยชน์ นี้
และหวังว่าจะมีข้อมูลใหม่ๆ
มาแบ่งปันอีก
Компания выступает важным звеном в цепочке снабжения предприятий машиностроения и оборонно-промышленного комплекса.
https://rms-ekb.ru/catalog/krug-iz-instrumentalnoi-stali/krug-di-22-17-2-gost-7417-75/
Thank you for being clear and direct, that simple approach saves so much frustration on the reader’s end, and a stop at humvat only made me more sure of it, the rest of the content seems to follow the same pattern which is a great sign of consistent editorial care behind the scenes.
Thanks for the breakdown, it gave me a clearer picture of something I had been confused about for a while now, and a stop at uptonstarlit closed the remaining gaps in my understanding nicely, no need to hunt around twenty other articles to put the pieces together which is a real time saver.
Магазин,лови от меня большой и жирный “+”. Заказ пришёл в течение 3ёх дней.Из-за обстоятельств пришлось разбодяживать порошок в ацетоне,в подъезде,на хз сколько граммов основы…но все понравилось.все и всем довольный. купить Мефедрон, Бошки, Гашиш, Марихуану, Альфа-ПВП да магазин хороший..жаль тусиай кончился
Speaking from the perspective of a fairly demanding reader the writing here clears the bar consistently, and a look at cyljax continued clearing that bar, the calibration of demanding reader is something I apply to all sources and this site has been one of the few that handles the demanding reading well across pieces sampled.
Speaking as someone who used to recommend blogs frequently and got out of the habit this site is rekindling that impulse, and a look at pyxedge extended the rekindling, the recovery of an old habit triggered by encountering work that justifies it is itself a small kind of pleasure and this site is providing that recovery experience.
Looking at this from the perspective of someone tired of generic content the contrast is striking, and a look at jekcar maintained that distinctive feel, sites with strong editorial identity stand out against the bland background of algorithmic content and this one has clearly developed an identity worth recognising through careful attention.
Appreciate that you did not pad this with fluff to hit a word count, the post says what it needs to say and stops, and a look at vocabtoffee did the same, brevity here feels intentional not lazy which is a distinction many writers miss completely sometimes when they are working under deadlines.
Аренда катера Адлер позволяет организовать интересную морскую прогулку вдоль побережья и насладиться великолепными видами Черного моря https://yachtkater.ru/
As technology continues to develop, casino platforms introduce new innovations that enhance gameplay, improve visuals, and create more immersive experiences https://jettbet-gb.co.uk/
Thanks for the honest framing without exaggerated claims that the topic will change my life, and a stop at hueheron kept the same modest tone, restraint in marketing language signals trustworthiness and the writers here are clearly playing the long game by building credibility rather than chasing immediate clicks through hyperbole.
The way this post is written makes the whole discussion feel very natural and easy to follow, while also keeping enough meaning in the topic to make readers interested in sharing their own opinions and continuing the conversation further.
https://residencesantodomingo.it/
Да неее))) само то емс и почта россии !! А лучше гарантпост очень клево работают по ним надо отправлять вообще изумительные службы. Или первый класс! купить Мефедрон, Бошки, Гашиш, Марихуану, Альфа-ПВП Качественный магаз!
Just want to recognise that someone clearly cared about how this turned out, and a look at temposofa confirmed that care extends across the broader site, you can feel the difference between content shipped to hit a deadline and content released because the writer was actually proud of the result for once.
Came here from a search and stayed for the side links because they were that interesting, and a stop at gladeharborcommercegallery took me even further into the site, the kind of organic exploration that good content invites is something most sites kill through aggressive interlinking and pushy navigation choices rather than relying on quality.
Learned something from this without having to dig through layers of fluff, and a stop at skeinsequoia added a bit more context that helped tie things together for me, definitely a useful corner of the internet for anyone who wants real information without the usual marketing nonsense around it that often ruins similar pages.
Modern casino platforms focus on user experience, offering intuitive interfaces, mobile compatibility, and access to a large selection of games for different preferences https://casinogoldenbet.co.uk/
Желаете овладеть популярной профессией и сразу работать с живыми клиентами? Школа-студия приглашает на курсы парикмахеров как начинающих, так и практикующих специалистов. Ищете курсы парикмахеров стилистов? К практике на клиентах вы приступаете уже после трёхдневной теории — обучают на сайте j-center.ru дипломированные специалисты. Курс включает мужские, женские и детские стрижки, свадебные укладки, плетение кос, химическую завивку и углублённую колористику с нуля.
Ahaa, its nice discussion on the topic of this post here at this
website, I have read all that, so now me also commenting at this place.
Reading this with a notebook open turned out to be the right move, and a stop at gallohex added more material to the notes, content that justifies active note taking from a passive reader is content with real informational density and this site is producing notes worthy material at a high rate consistently.
Успехов, здоровья и процветания вам в наступающем году. :bro: купить Мефедрон, Бошки, Гашиш, Марихуану, Альфа-ПВП кто-то пляшет, кто-то дрочит,
A piece that did exactly what it promised in the headline without overshooting or underdelivering, and a look at caramelcovemarketgallery continued that calibration, alignment between promise and delivery is a basic editorial virtue that many sites fail at and this site has clearly mastered the matching of expectation and substance throughout pieces.
Useful information presented in a way that does not feel like a sales pitch, that is what I appreciated most, and a stop at kettlecrestmerchantgallery was the same, no upsell and no fake urgency just steady content laid out properly for someone trying to actually learn from it rather than just be sold to.
A piece that handled multiple complications without becoming confused, and a look at lanternorchardvendorparlor continued that organisational clarity, holding multiple threads in a single piece without losing any of them is a sign of skilled writing and this site has clearly developed the editorial discipline to manage complexity without sacrificing readability throughout.
Аренда яхт в Адлере — это возможность взглянуть на Черноморское побережье с совершенно новой стороны. Морская прогулка позволяет насладиться живописными видами Кавказских гор, современной набережной и бескрайними морскими просторами. Такой формат отдыха подходит как для туристов, так и для местных жителей, которые хотят провести время в необычной атмосфере. На борту яхты можно устроить романтическое свидание, семейный отдых или встречу с друзьями, наслаждаясь комфортом и красотой окружающих пейзажей https://yachtkater.ru/
Sets a higher bar than most of what shows up in search results for this topic, and a look at irubrisk did not lower that bar at all, in fact it confirmed the impression, this is the kind of consistency that earns a place in regular rotation for serious readers instead of casual scrollers passing through.
Well done, the writing is professional without being stiff, and the topic is treated with care, and a look at walnutharborvendorparlor reflected that approach, the kind of site I would point a colleague to if they asked for a reliable starting point on this topic in the future without any hesitation at all.
Представлен полный цикл изделий: от фольги и проволоки до крупных поковок
https://redmetsplav.ru/store/titan/rossiyskie-splavy-4/titan-45tmb-vd/folga-titanovaya-45tmb-vd/
최근 한국에 정식 오픈한 투세븐빗은 자체 개발한 3세대 거래 시스템을 탑재하여 주목받고 있습니다. 특히 지정가 0.01%, 시장가 0.02%라는 업계 최저 수준의 수수료를 제공합니다.
Благодарим за оперативную поставку ниобиевых труб, выручили в очень сжатые сроки.
https://xn--80aeedb0bfzeok.xn--p1ai/catalog/mednye-krestoviny-pod-paiku/mednaia-krestovina-pod-paiku-22kh18kh0-9-mm-8kh10-mm-tverdaia-paika-m2rm-gost-32590-2013/
A piece that exhibited the kind of patience that good writing requires, and a look at woodcovevendorparlor continued that patient quality, hurried writing is easy to spot and this site reads as having been written without time pressure which produces a different feel than the rushed content that dominates much of the modern blog space.
Now recognising the specific pleasure of reading writing that shows real care for sentence shapes, and a look at gyrarena extended that craft pleasure, sentence level writing quality is something most blog content ignores entirely and this site has clearly invested in the prose layer alongside the substance which is rare today.
Желаю всего самого наилучшего вашему магазину,ваш бренд это качество! купить Мефедрон, Бошки, Гашиш, Марихуану, Альфа-ПВП МАГАЗИНУ надо бы по ровнее работать!
Every sports fan needs this in their bookmarks. Mental!
ООО «РМС» поставляет вольфрамовые порошки, соответствующие строгим техническим условиям (например, ТУ 48-4205-112-2017).
https://rms-ekb.ru/catalog/ugolok-stalnoi/ugolok-iz-konstruktsionnoi-stali-150kh75kh10-mm-e335gc-en-10277/
Glad to have another data point on a question I am still thinking through, and a look at trenchtwist added two more, content that acknowledges its place in a wider conversation rather than pretending to settle the question alone is intellectually honest in a way that I wish was more common across the open web.
Quality you can feel from the first paragraph, the writer clearly knows the topic and how to share it, and a quick look at valecovegoodsgallery confirmed the same depth runs throughout the rest of the site as well which is rare and worth pointing out when it happens online for any reader passing through.
ТС прими во внимание! купить Мефедрон, Бошки, Гашиш, Марихуану, Альфа-ПВП “Вообщем не знаю кто подьебал Минер или Поставщик но товар “ЧИСТЫЕ ТАБЛЕТКИ “
Thanks for the honest framing without exaggerated claims that the topic will change my life, and a stop at trophysofa kept the same modest tone, restraint in marketing language signals trustworthiness and the writers here are clearly playing the long game by building credibility rather than chasing immediate clicks through hyperbole.
Honestly the simplicity is what makes this work, the topic is not buried under filler words or overly complex examples, and a quick look at stashsuperb showed the same sensible style, I left with what I came for and no headache from over reading which is a real win these days.
Saving this link for the next time someone asks me about this topic, and a look at digitaltrendstation expanded what I will be sharing with them, this is the kind of resource that makes a real difference when you are trying to point a friend to something useful and reliable rather than generic marketing pages.
A genuine pleasure to find a site that publishes at a sustainable cadence rather than chasing the daily content treadmill, and a look at heliohex confirmed the careful publication rhythm, sites that prioritise quality over frequency are rare and this one has clearly chosen the slower pace which I appreciate as a reader.
Felt the post had been quietly polished rather than aggressively styled, and a look at sharesignal confirmed the same understated polish, sites whose quality reveals itself slowly rather than announcing itself loudly are the kind I trust more deeply because the trust is not based on first impressions of marketing but actual substance.
I really like the calm tone here, it does not push anything on the reader, and after I went through krillflume I felt the same way, just steady useful content laid out without drama, which is exactly what someone trying to learn something quickly needs to find rather than aggressive marketing.
Pass this along to colleagues if the topic comes up, the framing here is sensible, and a stop at cloverharborcommercegallery adds more useful angles to share, the kind of content that improves conversations rather than just feeding them is what makes a resource genuinely valuable in professional contexts going forward over time and across project boundaries too.
Really appreciate this kind of writing, no shouting and no clickbait headlines just steady useful content, and a quick look at lanternmeadowcommercegallery kept that going, definitely a site I will be returning to whenever I need a sensible take on similar topics in the days ahead and also during slower work weeks.
Всё отлично, 5 из 5. Только сделайте больше районов в Питере. купить Мефедрон, Бошки, Гашиш, Марихуану, Альфа-ПВП Отзыв уже был, по поводу JWH и 2c-i. Писать то особо и не о чем, но качество товара очень даже порадовало. Щас жду только пополнения ассортимента.
Bookmark folder reorganised slightly to make this site easier to find, and a look at glassmeadowcommercegallery earned the same accessibility upgrade, the small organisational moves I make for sites I expect to return to often are themselves a signal of how much I trust them and this site triggered those moves naturally.
Taking the time to read carefully here has been worthwhile for the past hour, and a look at dahbrood extended the worthwhile reading, the calculation of return on reading time spent is something I do informally and this site has been producing positive returns across multiple sessions during the last week of regular visits and reads.
My usual pattern is to skim and bounce but this site has reset that pattern temporarily, and a stop at huejuly maintained the slower reading mode, content that changes how I read is content with structural influence and this site has clearly nudged my reading behaviour toward something better at least for the duration of these visits.
Сайт адаптирован под нужды машиностроительных заводов
https://redmetsplav.ru/store/niobiy1/splavy-niobiya-1/niobiy-vn-4-1/poroshok-niobievyy-vn-4/
Заказывали партию молибденовых листов для производства, качество металла идеальное, все сертификаты в наличии.
https://xn--80aeedb0bfzeok.xn--p1ai/catalog/latunnye-naruzhnye-stopornye-koltsa-po-din/latunoe-naruzhnoe-stopornoe-pruzhinnoe-koltso-m27-25-1kh1-2-mm-lmtss-din-471/
Прокат яхт в Адлере позволяет организовать незабываемый отдых для семьи, друзей или коллег. Прогулка по морю подарит яркие эмоции и красивые фотографии https://yachtkater.ru/
Здесь буду отписываться, чтобы все РЕАЛЬНО понимали сколько времени длится весь процесс Купить Бошки, Гашиш, Мефедрон, Альфа-ПВП, Марихуану Отзыв о продукте дам в определённой теме Спасибо за вашу хорошую работу Chemical-mix.com?
Approaching this site through a casual link click and being surprised by what I found, and a look at uppersharp extended the surprise, the rare experience of stumbling into excellent independent content rather than predictable mediocrity is one of the actual remaining pleasures of casual web browsing and this site provided it cleanly.
Online casinos continue to expand their game libraries, offering everything from classic favorites to new releases developed by leading software providers in the industry https://casinogoldenbet.co.uk/
Металлические порошки различных фракций позволяют клиентам использовать их в порошковой металлургии и напылении.
https://rms-ekb.ru/catalog/list/list-4kh2v5mf-3x2000x6000-gost-19903-74/
Most blog writing on this subject reaches for the same handful of arguments and this post avoided them, and a look at opalrivercraftcollective continued the original treatment, content that finds its own path through territory other writers have flattened is content with real authorial energy and this site has plenty of that distinctive energy.
Worth flagging this site to a few specific friends who would appreciate the editorial sensibility, and a look at silvercovecraftcollective added more pages I will mention to them, recommending sites to specific people requires understanding both the site and the person and this site is making those personalised recommendations easy and natural for me.
A piece that did not lecture even when it had clear positions, and a look at kettleharborcommercegallery maintained the same teaching without preaching tone, finding the line between informing and lecturing is hard and most sites land on the wrong side of it but this one has clearly figured out how to inform without becoming preachy.
The whole experience of reading this was pleasant from start to finish, no pop ups and no annoying interruptions, and a look at jewbush continued that clean experience, technical choices about page design matter for the reader and this site clearly cares about the small details that add up to comfort across multiple visits.
Reading this triggered a small reorganisation of my own thinking on the topic, and a stop at pearlharborvendorparlor furthered that reorganisation, content that affects the shape of my mental model rather than just decorating it with new facts is content with structural rather than informational impact and this site provides that.
Парни пятерка лпк работает ровно)))всем фарта))))) Купить Бошки, Гашиш, Мефедрон, Альфа-ПВП, Марихуану Спустя 3 часа , началась небольшая депрессия(Со всем не большая)
Аренда яхт Сириус подойдет как для небольших компаний, так и для масштабных мероприятий. Просторные палубы и современные удобства делают отдых максимально комфортным для всех гостей https://yachtkater.ru/
Skipped the TLDR thinking I would read everything anyway, and ended up enjoying the path through the full post, and a stop at isebrook similarly rewarded the patient read, summaries are useful but the journey through good writing is part of what makes the destination feel earned rather than just delivered cleanly.
Now thinking I want more sites built on this kind of editorial foundation, and a stop at dailyneedsstore extended that wish into a broader hope, sites built on substance and care rather than on metrics and growth are the kind of sites I want to see more of and this one is a small example worth supporting.
Worth saying this site reads better than most paid newsletters I have tried, and a stop at huijax confirmed that comparison, the bar for free content is often lower than for paid but this site clears the paid bar consistently and that says something about the editorial approach behind the work being published here regularly.
Bookmark earned and shared the link with one specific person who would care, and a look at slackvista got the same targeted share, sharing carefully rather than broadcasting is a discipline I try to maintain and this site is generating shares from me at a sustainable rate rather than the spam rate of viral content.
Regards for helping out, superb info.
Honest take is that I will probably forget most of what I read online today but this post is one I will remember, and a stop at futurecartcorner kept that same memorable quality going, certain writing leaves a residue in the mind in a way most content simply does not manage.
I’ve been surfing online more than 3 hours today, yet I never found any interesting article like yours. It’s pretty worth enough for me. In my view, if all web owners and bloggers made good content as you did, the net will be much more useful than ever before.
Nevertheless, it’s all carried out with tongues rooted solidly in cheeks, and everybody has got nothing but absolutely love for their friendly neighborhood scapegoat. In reality, he is not merely a pushover. He is simply that extraordinary breed of person solid enough to take all that good natured ribbing for what it really is.
народ подскажите а как дела обстоят в столице Москва закладками? Купить Бошки, Гашиш, Мефедрон, Альфа-ПВП, Марихуану Что то много новичков устраивают здесь флуд.А магаз на самом деле хорош.Помню его еще когда занимался курьерскими доставками,коспирация и качество товара было на высшем уровне.
گینر اپتیموم، یک معماری تغذیهای است که برای شرایط بحرانی کمبود وزن طراحی شده است.
Came across this looking for something else entirely and ended up reading it through twice, and a look at velourudon pulled me deeper into the site than I planned, the writing has a way of holding attention without resorting to manipulative cliffhangers or vague promises that never get delivered later down the page.
Honest reaction is that this is the kind of writing I would defend in a conversation about good blog content, and a look at salutesyrup reinforced that, the rare site whose work I would actively recommend rather than just tolerate is the kind I want to support through return visits regularly.
Quietly the writers approach to the topic differs from the dominant takes I have been encountering, and a stop at hazelharbormerchantgallery extended that distinctive approach, content that maintains a different perspective without explicitly arguing against the dominant ones is content with confident editorial identity and this site has that confidence throughout pieces.
Now placing this in the same category as a few other sites I have come to trust, and a look at wildharborcommercegallery continued the placement decision, the small category of fully trusted sites is one I extend rarely and only after multiple positive reading sessions and this site has earned the category placement methodically over time.
This post does a good job of keeping the discussion well-considered without making the topic feel difficult or overwhelming.
在线购买无处方安定片 xxx Pornhub
РФ. Западно – европейская её часть ) Купить Бошки, Гашиш, Мефедрон, Альфа-ПВП, Марихуану Оправдания в небе не ищут,
Наличие обратной связи позволяет быстро отправить запрос
https://redmetsplav.ru/store/niobiy1/splavy-niobiya-1/niobiy-nbp2-1/provoloka-niobievaya-nbp2/
I really like the calm tone here, it does not push anything on the reader, and after I went through hullgale I felt the same way, just steady useful content laid out without drama, which is exactly what someone trying to learn something quickly needs to find rather than aggressive marketing.
บทความนี้ อ่านแล้วได้ความรู้เพิ่ม ค่ะ
ดิฉัน ได้อ่านบทความที่เกี่ยวข้องกับ ข้อมูลเพิ่มเติม
ที่คุณสามารถดูได้ที่ Stephanie
ลองแวะไปดู
เพราะให้ข้อมูลเชิงลึก
ขอบคุณที่แชร์ ข้อมูลที่มีประโยชน์ นี้
และหวังว่าจะได้เห็นโพสต์แนวนี้อีก
Цены на спецстали одни из самых конкурентных на рынке, при этом качество на уровне мировых стандартов.
https://xn--80aeedb0bfzeok.xn--p1ai/catalog/mednye-krestoviny-pod-paiku/mednaia-krestovina-pod-paiku-28kh23kh0-9-mm-18-4kh20-4-mm-miagkaia-paika-m2-gost-32590-2013/
Thank you for this great piece of content. Best Regards
Skipped the TLDR thinking I would read everything anyway, and ended up enjoying the path through the full post, and a stop at lavenderharbormerchantgallery similarly rewarded the patient read, summaries are useful but the journey through good writing is part of what makes the destination feel earned rather than just delivered cleanly.
A piece that handled multiple complications without becoming confused, and a look at kudosember continued that organisational clarity, holding multiple threads in a single piece without losing any of them is a sign of skilled writing and this site has clearly developed the editorial discipline to manage complexity without sacrificing readability throughout.
This blog post is excellent, probably because of how well the subject was developed. I like some of the comments too.
Bookmark added with a small note about why, and a look at jalborn prompted another bookmark with another note, the bookmarks I annotate are the ones I expect to return to deliberately rather than stumble into and this site is generating annotated bookmarks at a higher rate than my usual content sources by some margin.
Экспертная консультация при выборе сплавов помогает клиентам оптимизировать затраты и избежать технологических ошибок.
https://rms-ekb.ru/catalog/ugolok-stalnoi/ugolok-stalnoi-st3sp-100x65x8-gost-19771-93/
Liked that the post acknowledged complications rather than pretending they did not exist, and a stop at cottongrovecommercegallery continued that honest framing, sites that handle complexity with care rather than papering it over with simplifying claims are doing real intellectual work and this one is clearly in that category based on what I have read.
Once you find a site like this the search for similar voices begins, and a look at deoblob extended the search energy, finding a high quality reference point makes the gap between it and adjacent sources visible in a way it was not before and this site has provided that high reference point across multiple recent visits.
как и обещал пишу про качество- для кайфожеров 1к7, для кайфариков 1к9 , для додиков 1к11 , продукт работает 35-40 мин , используйте нормальную очищенную основу и будет счастье в тридевятом государстве, вот например от смолы ромашки или мать и мачехи головные боли и побочки, хотя реагент тут не причем , химоза нормального качества особенно если считать в соотношении цена-качество, ТС последнее время приятно удивляет своим терпением к таким сумасшедшим клиентам как я( я с ума сводил его своими платежами) но он стойко все перенес за что ему отдельное респект ТАК ДЕРЖАТЬ!!!! ТС КРАСАВЧЕГ Купить Бошки, Гашиш, Мефедрон, Альфа-ПВП, Марихуану Пожалуйста :ok: Спасибо за отзыв.
Found this through a search that was generic enough I did not expect quality results, and a look at seacovecraftcollective continued the surprisingly good experience, search engines occasionally still surface excellent independent content if you scroll past the obvious paid and high authority results which is reassuring to remember sometimes.
whoah this weblog is wonderful i like reading your articles. Keep up the good paintings! You already know, many people are looking around for this information, you can help them greatly.
A piece that read as if the writer was thinking carefully rather than just typing fluently, and a look at florabrookvendorfoundry continued that considered quality, the difference between fluent typing and careful thinking shows up in writing and this site reads as the product of thought rather than just the product of language fluency apparently.
тут как всегда, хочешь сджелать заказ – хрен достучишься в аське. Купить Бошки, Гашиш, Мефедрон, Альфа-ПВП, Марихуану грозный луи оставил отзыв о магазине
Now appreciating the small but real way this post improved my afternoon, and a stop at heliojuly extended that small improvement effect, content that produces measurable positive impact on the texture of a reading day is content with real value and this site is producing those small positive impacts at a sustainable rate apparently.
Reading this back to back with a similar piece elsewhere made the quality difference obvious, and a stop at aroarch only widened the gap, comparing content side by side is a useful exercise and the gap between this site and average competitors in the space is large enough to be noticeable from the first paragraph.
Honestly this kind of writing is why I still bother to read independent sites, and a look at coralharborvendorloft extended that broader reflection, the few sites that justify continued attention to non algorithmic content are sites like this one and finding them periodically is enough to keep my reading habits oriented toward independent rather than aggregated content.
Felt the post handled a sensitive angle of the topic with appropriate care, and a look at villageswan extended that careful handling across related material, sites that can navigate delicate territory without causing damage are rare and require a level of judgement that comes from experience rather than from following any clear playbook.
A well calibrated piece that knew its scope and stayed inside it, and a look at lanternorchardmerchantgallery maintained the same scope discipline, scope creep is one of the failure modes of long blog posts and this site has clearly invested in the editorial discipline to prevent it which shows up in tightly contained pieces.
Started a draft response in my head and ended without publishing it because the post said it well enough, and a look at tapetoken produced the same effect, content that satisfies my urge to add to it by being complete enough on its own is rare and represents a particular kind of editorial completeness here.
A nicely understated post that does not shout for attention, and a look at velvetbrooktradegallery maintained the same quiet quality, understatement is a stylistic choice that distinguishes serious writing from attention seeking writing and this site has clearly committed to the understated approach as a core editorial value rather than just a phase.
Магазин замечательный!! Купить Бошки, Гашиш, Мефедрон, Альфа-ПВП, Марихуану магазин достойный,всё ровно и в срок,спасибо большое за ваш труд,будем продолжать сотрудничество!
A handful of memorable phrases from this one I will probably use later, and a look at huiyam added a couple more, content that contributes language to my own communication rather than just facts is content with a different kind of utility and this site is providing that linguistic utility consistently across what I read.
Solid endorsement from me, the writing earns it, and a look at ivebump continues to earn it across the broader site too, the kind of operation that maintains quality across many pages rather than just one viral post is a sign of serious commitment and that is what I see here clearly across what I read.
Even on a quick first read the substance of the post comes through, and a look at honeycovemerchantgallery reinforced that immediate quality, content that does not require a slow careful read to demonstrate value but rewards one anyway is content with real depth and this site has produced work of that demanding depth class.
Возможность изготовления деталей по чертежам заказчика — это большой плюс
https://redmetsplav.ru/store/molibden-i-ego-splavy/molibden-sprabond-1/polosa-molibdenovaya-sprabond/
Reading carefully here has reminded me what reading carefully feels like, and a look at tidalurchin extended that reminder, the experience of careful reading versus skimming is different in ways I had partially forgotten and this site has clearly refreshed my memory of what attention feels like when content rewards it consistently.
Liked that the post left some questions open rather than pretending to settle everything, and a stop at steamsaunter continued that intellectual honesty, content that respects the limits of its own claims is more trustworthy than content that overreaches and this site has clearly figured out which positions it can defend confidently.
Всегда сдесь было высокое качество Купить Бошки, Гашиш, Мефедрон, Альфа-ПВП, Марихуану и сколько те6е поо6ещали заплотить?
Офис в Екатеринбурге работает четко, забирали самовывозом — складская логистика на высоте.
https://xn--80aeedb0bfzeok.xn--p1ai/catalog/latunnye-naruzhnye-stopornye-koltsa-po-din/latunoe-naruzhnoe-stopornoe-pruzhinnoe-koltso-m22-20-5kh1-2-mm-lts38mts2s2-din-471/
This post does a good job of combining simple wording with a friendly tone that makes the discussion feel more natural overall.
adult xxx video porn site xxx sex video
Hey terrific website! Does running a blog similar to this take a massive amount work?
I have very little understanding of programming but
I had been hoping to start my own blog in the near future.
Anyhow, should you have any suggestions or
techniques for new blog owners please share. I understand this is off topic however I simply had to
ask. Appreciate it!
ООО «РМС» поставляет вольфрамовые порошки, соответствующие строгим техническим условиям (например, ТУ 48-4205-112-2017).
https://rms-ekb.ru/catalog/stalnoi-list/stalnoi-list-30khgsn2a-19x1800x1000-gost-19903-2006-gladkii-chernyi-goriachekatanyi/
Such writing is increasingly rare and worth supporting through attention, and a stop at humgrain extended that supportive attention across more pages, the conscious choice to spend time on sites that produce careful work rather than convenient consumption is itself a small form of patronage and this site is receiving that conscious patronage from me.
Now feeling the quiet pleasure of finding writing that takes itself seriously without being self serious, and a stop at syxbolt extended that subtle pleasure, the gap between earnest and pretentious is fine and this site has clearly chosen to land on the earnest side without slipping over into pretentious which is impressive.
Will be coming back to this for sure, too much good content to absorb in one sitting, and a stop at elmwoodgoodsroom only added more pages I want to dig through, this site is going onto my regular rotation list because it consistently delivers something worth the visit lately rather than empty filler.
РАБОТАЕМ!!! ОПТ!!! ДОСТАВКА!!! Купить Бошки, Гашиш, Мефедрон, Альфа-ПВП, Марихуану значит ты чо то намутил , а вещество я заказывал в этом магазе норм для RCS естественно
Decided after reading this that I would check this site weekly going forward, and a stop at silkgroveartisanexchange reinforced that commitment, deciding to add a site to a regular rotation requires meeting a quality bar that very few places clear and this one cleared it cleanly without any noticeable effort or marketing push behind it.
Felt like the post had been edited rather than just drafted and published, and a stop at sealtoga suggested the same care across the site, the difference between edited and unedited content is enormous for the reader and this site has clearly invested in the editing pass that most blogs skip entirely which really does show up.
Now considering whether the post would translate well into a different form, and a look at directshoppinghub suggested similar versatility, content that could move into other media without losing its substance is content that has been built around ideas rather than around format and this site reads as idea first throughout posts.
Liked that the post left some questions open rather than pretending to settle everything, and a stop at oliveorchardartisanexchange continued that intellectual honesty, content that respects the limits of its own claims is more trustworthy than content that overreaches and this site has clearly figured out which positions it can defend confidently.
Я, лично, в первый раз сделал заказ ,в этом магазине- оформил(по аське) его безналично,(что очень удобно для меня,даже из дома не выходил),сутки прошли,был дан трек,через два дня,посылка была у меня в городе.Следил за ее перемещением на сайте курьера(опять же-не выходя из дома). Купить Бошки, Гашиш, Мефедрон, Альфа-ПВП, Марихуану Такая тут вкусная цена была недавно на фтор.И продукт офигенский.А теперь цену подняли до всеобщего уровня.И я не вижу уже причин заказать именно здесь а не где-то ещё.Так-то с отправкой всё ровно будет,но цена…
Appreciate the thoughtful approach, the writer clearly took time to make this readable for someone who is not already an expert, and a look at crownharborcommercegallery kept that going nicely, easy on the eyes and easy on the brain which is always a winning combination when reading on a busy day.
Online casinos have transformed the gaming industry by providing players with access to a wide variety of games from the comfort of their homes. From classic table games to modern video slots, the industry continues to evolve with new technology and features: https://casinogoldenbet.co.uk/
Reading this in the gap between work projects was a small but meaningful break, and a stop at doxfix extended that gentle reset, content that provides genuine refreshment rather than just distraction during work breaks is content with a particular kind of utility and this site fits that role for me reliably during work days.
A piece that left me thinking I had been undercaring about the topic, and a look at straitsurge reinforced that mild concern, content that raises the appropriate weight of a subject without being preachy about it is doing important work and this site is providing that gentle elevation of attention for me consistently.
A small thank you note from me to the team behind this work, the post earned it, and a stop at clovercrestmerchantgallery suggested more thanks would be in order over time, recognising the people who do good writing online is something I try to remember to do because the alternative is silence and silence rewards mediocrity unfortunately.
Bookmark folder reorganised slightly to make this site easier to find, and a look at daisycovevendorcorner earned the same accessibility upgrade, the small organisational moves I make for sites I expect to return to often are themselves a signal of how much I trust them and this site triggered those moves naturally.
A nicely understated post that does not shout for attention, and a look at jasperharbormerchantgallery maintained the same quiet quality, understatement is a stylistic choice that distinguishes serious writing from attention seeking writing and this site has clearly committed to the understated approach as a core editorial value rather than just a phase.
Bookmark earned and folder updated to track this site separately, and a look at ixaqua confirmed the folder upgrade was the right call, organising my reading list so that good sites do not get lost in a sea of casual bookmarks is something I do more carefully now and this site warranted its own spot.
Reading this in a moment of low energy still kept my attention, and a stop at linencovemerchantgallery continued that engagement under suboptimal conditions, content that survives the reader being tired is content with extra reserves of pull and this site has the kind of writing that holds up even when I am not at my reading best.
Технические характеристики сплавов помогают инженерам в подборе
https://redmetsplav.ru/store/molibden-i-ego-splavy/molibden-mp-1-1/folga-molibdenovaya-mp-1/
Насчет этого магаза ничего не скажу, но лично я 5иаи ни у кого приобретать не буду, ну а ты поступай как хочешь, вдруг тут будет нормально действующим в-во Купить Бошки, Гашиш, Мефедрон, Альфа-ПВП, Марихуану С возвращением друг!!!!адекватных клиентов,спокойных и прибыльных деньков)))
Found the use of subheadings really helpful for scanning back through the post later, and a stop at coastharborartisanexchange kept that reader friendly approach going, navigation is something many blog writers ignore but small structural choices make a noticeable difference for someone returning to find a specific point again days or weeks later.
Reading this on a phone at a coffee shop and finding it perfectly suited to that context, and a stop at corlex continued the comfortable mobile experience, content that works across reading conditions without compromising on substance is increasingly important and this site has clearly thought about the whole reader experience here.
Всегда на высоте) Купить Бошки, Гашиш, Мефедрон, Альфа-ПВП, Марихуану Да не магазин ровный несколько раз покупал у них, качество отличное. Только в аську бывает недостучатся.
Quality writing that respects the reader’s intelligence without overloading them, and a quick look at itobout reflected that approach, a balanced thoughtful site that earns trust by being consistent rather than by shouting about how trustworthy it is which is the usual approach online sadly across most content categories.
ООО «РМС» поставляет вольфрамовые порошки, соответствующие строгим техническим условиям (например, ТУ 48-4205-112-2017).
https://rms-ekb.ru/catalog/stalnoi-list/stalnoi-list-14kh17n2-3-9x1900x1400-gost-19903-2006-gladkii-chernyi-goriachekatanyi/
Once I trust a site this much I tend to read everything they publish and that is the trajectory I am on with this one, and a stop at swamptweed confirmed the trajectory, the rare progression from interested reader to comprehensive reader is something only certain sites earn and this one is earning that progression rapidly.
I think this post works really well because it explains the topic in a relaxed and clear way while also keeping enough depth and structure to make the discussion feel valuable and worth paying attention to.
cialis pills sexual xxx porn pills
Now planning to write about the topic myself eventually using this post as a reference, and a look at helioketo would also serve in that future piece, content that becomes raw material for my own writing rather than just informing my reading is content with multiplicative value and this site is generating that multiplicative effect.
Ищете лучшие варианты для размещения на Пхукете в аренду? Посетите сайт https://apartmentsphuket.com/ – у нас в каталоге апартаменты и виллы с проверенными отзывами. Без онлайн-оплаты и скрытых условий — каждую заявку ведёт персональный менеджер. Ознакомьтесь с каталогом – там вы найдете идеальные варианты для своего отдыха!
Even from a single post the editorial care is clear, and a stop at humivy extended that care across more pages, the kind of attention to quality that shows up in every paragraph is what separates serious sites from the rest and this one has clearly invested in that paragraph level attention across what I have read.
РЕСПЕКТОС МАгаЗИНУ=) Купить Бошки, Гашиш, Мефедрон, Альфа-ПВП, Марихуану кто получал последний раз недавно отишитесь о работе магаза. +В РЕПУ!!!!!!! и главное почему ип адрес не меняется на сайте???
Now organising my browser bookmarks to give this site easier access, and a look at honeycovevendorgallery earned the same organisational priority, the small acts of digital housekeeping I do for sites I expect to use often are themselves a measure of trust and this site has triggered the trust based housekeeping behaviour from me clearly.
https://punkgazetka.forum24.ru/?1-9-0-00007451-000-0-0-1779201957
Appreciate the practical examples, they made the abstract points easier to grasp, and a stop at tracesinger added more of the same, this site clearly understands that real examples beat empty theory every single time which is the mark of a writer who knows their audience well and respects their time.
https://forum.diamech.com/index.php?topic=9910.msg99551#msg99551
https://www.bakinsky-dvorik.ru/communication/forum/messages/forum4/message160846/96442-potolochnoe-infrakrasnoe-otoplenie?result=new#message160846
Курьерка не может принять такое количество заказов – отказала в Купить Бошки, Гашиш, Мефедрон, Альфа-ПВП, Марихуану Сказали в понедельник всем кто оплатил заказ отправят НОМЕРА!
https://www.bakinsky-dvorik.ru/communication/forum/messages/forum4/message160846/96442-potolochnoe-infrakrasnoe-otoplenie?result=new#message160846
Really like the way the post resists reaching for cliches that would have made it feel generic, and a quick visit to coppercoveartisanexchange kept that fresh feel going, original phrasing and unexpected metaphors are signs that the writer is actually thinking rather than just stitching together familiar phrases into the appearance of content.
https://money.bestbb.ru/viewtopic.php?id=3424#p10880
Использование файлов cookie и политика конфиденциальности соответствуют закону
https://redmetsplav.ru/store/molibden-i-ego-splavy/molibden-cm6-3/krug-molibdenovyy-cm6-1/
Closed it feeling slightly more competent in the topic than I started, and a stop at jamcall reinforced that competence boost, real learning is rare in casual online reading but it does happen sometimes and this site managed to make it happen for me today which is genuinely worth pausing to acknowledge.
Quietly the post solved something I had been turning over without quite knowing how to phrase the question, and a look at tritonstyle extended that quiet solving, content that addresses unformulated needs is content with reader insight and this site has demonstrated that insight at a high rate across the pieces I have read recently.
Магазин женской одежды «Для шикарных женщин» радует модниц стильными новинками и безупречным качеством. На http://smart-woman.ru/ собран широкий ассортимент модной одежды с доставкой по всей России. Зарегистрируйтесь и получите 300 рублей в подарок на свою первую покупку, причём бесплатная доставка Почтой России доступна при сумме заказа от 2500 рублей. Постоянные скидки и выгодные предложения делают онлайн-шопинг по-настоящему доступным.
Refreshing to read something where the words actually mean something instead of filling space, and a stop at jewelcovecommercegallery kept that going, the writing here trusts the reader to follow along without endless repetition or constant reminders of what was already said earlier in the post which I appreciate.
Skipped a meeting reminder to finish the post, and a stop at dawnmeadowcommercegallery held me past another reminder, when content beats meetings the writer is doing something extraordinary because meetings have institutional support behind them and yet good writing can still occasionally win that competition for attention which I find heartening today.
Офис в Екатеринбурге работает четко, забирали самовывозом — складская логистика на высоте.
https://xn--80aeedb0bfzeok.xn--p1ai/catalog/latunnye-naruzhnye-stopornye-koltsa-po-din/latunoe-naruzhnoe-stopornoe-pruzhinnoe-koltso-m54-49-8kh2-mm-lts37mts2s2k-din-471/
Качество на 5+:good: Купить Бошки, Гашиш, Мефедрон, Альфа-ПВП, Марихуану всё ровн ждём =)
Liked the careful selection of which details to include and which to skip, and a stop at floracovecommerceatelier reflected the same editorial judgement, knowing what to leave out is just as important as knowing what to include and this site has clearly figured out where that line sits for the topics it covers regularly.
Важным преимуществом является возможность изготовления деталей и изделий по индивидуальным чертежам заказчика.
https://rms-ekb.ru/catalog/stalnoi-list/stalnoi-list-30g2-17x1600x1300-gost-19903-2006-gladkii-belyi-goriachekatanyi/
Adding this to my list of go to references for the topic, and a stop at mooncovemerchantgallery confirmed the rest of the site deserves the same, definitely the kind of resource that earns its place rather than getting forgotten the moment the next interesting article shows up in my feed somewhere else on the web.
Reading this confirmed a hunch I had been carrying about the topic without having articulated it, and a stop at vyxarc extended the confirmation, content that gives shape to fuzzy intuitions is doing the rare work of making private thoughts public and this site is providing that articulating service consistently for me lately.
Appreciate the practical examples, they made the abstract points easier to grasp, and a stop at gunlex added more of the same, this site clearly understands that real examples beat empty theory every single time which is the mark of a writer who knows their audience well and respects their time.
A piece that did not lecture even when it had clear positions, and a look at mossharborcraftcollective maintained the same teaching without preaching tone, finding the line between informing and lecturing is hard and most sites land on the wrong side of it but this one has clearly figured out how to inform without becoming preachy.
Новинки не за горами, без паники. Купить Бошки, Гашиш, Мефедрон, Альфа-ПВП, Марихуану Эти ребята лучшие в своем деле, качество плюс вес, никогда не подводили, КРАСАВЧИКИ !!!Лучшие!
The focused yet thorough nature of this article makes it a fantastic resource, and I truly value the organized approach you took to ensure every single point was covered in a clear and easy-to-understand manner for the readers.
viagra pills sexual xxx porn pills
Better signal to noise ratio than most places I check on this kind of topic, and a look at scarabvogue kept that going, every paragraph here carries something worth reading rather than padding out the page to hit some arbitrary length target that search engines reward but readers ignore as soon as they notice it.
Now organising my browser bookmarks to give this site easier access, and a look at izoblade earned the same organisational priority, the small acts of digital housekeeping I do for sites I expect to use often are themselves a measure of trust and this site has triggered the trust based housekeeping behaviour from me clearly.
A satisfying piece in the way that good meals are satisfying rather than just filling, and a look at huskgenie extended that satisfaction, the metaphor between content and meals is one I find useful and this site reads as a satisfying meal rather than the empty calories that most content provides for casual readers.
Все вопросы к представителю. Купить Бошки, Гашиш, Мефедрон, Альфа-ПВП, Марихуану Братва после покупки не забываем писать отзывы.
Felt the writer respected the topic without being precious about it, and a look at reliableshoppinghub continued that respectful but unfussy treatment, finding the right register for serious topics is hard and this site has clearly figured out how to take the topic seriously while still being readable for casual visitors regularly.
Now thinking about whether the writer might publish a longer form work I would buy, and a look at opalriverartisanexchange suggested the same depth would translate, content that makes me want to pay for related work in other formats is content that has earned commercial trust as well as attention trust and this site has both clearly.
Отзыв коротенько. Закладка на месте. Обьяснение распологает. Фото имеется. Бот чёткий. бошки хороши. Вес норма! … ну вот и всё Коротко и ладно) Купить Бошки, Гашиш, Мефедрон, Альфа-ПВП, Марихуану магаз самый ровный , и со сладкими ценами!
Top tier post, the kind that makes you want to share the link with friends working in the same area, and a stop at rivercovecraftcollective only made me more confident in doing that, this site is one of the better resources I have seen on the topic recently across both new and older posts.
During the time spent here I noticed the absence of the usual distractions, and a stop at serifsorbet extended that distraction free experience, content that does not fight my attention with pop ups and modals and aggressive prompts is content that respects me and this site has clearly chosen the respectful approach throughout.
Wow, awesome weblog format! How long have you
ever been running a blog for? you made blogging glance easy.
The whole look of your website is great, as smartly as the content!
Описание складских позиций сокращает время ожидания ответа
https://redmetsplav.ru/store/magniy-i-ego-splavy/zarubezhnye-splavy-2/magniy-sismg4640-04—ss-144640/poroshok-magnievyy-sismg4640-04—ss-144640/
Really appreciate the absence of stock photos that have nothing to do with the content, and a quick visit to jamkix maintained the same restraint, visual filler is a tell that the writing cannot stand on its own and the lack of it here suggests the team has confidence in their content quality alone.
Профессиональный подход менеджеров в Екатеринбурге, грамотно проконсультировали по техническим характеристикам сплавов.
https://xn--80aeedb0bfzeok.xn--p1ai/catalog/mednye-krestoviny-pod-paiku/mednaia-krestovina-pod-paiku-27-4kh23kh0-9-mm-18-4kh20-4-mm-miagkaia-paika-m3rm-gost-r-52922-2008/
برای راهنمای کامل انتخاب کارگزار فارکس به آدرس https://iranforex.trading/ مراجعه کنید: ۸ معیار کلیدی برای معاملهگران ایرانی، از مجوزهای قانونی برای کارگزاران و انواع آنها گرفته تا اطلاعات جامع برای معاملهگران مبتدی و همچنین هزینههای معاملاتی: اسپرد، کمیسیون و هزینههای پنهان.
A well-designed casino platform creates an engaging environment where users can easily navigate between games, promotions, and account management features https://casinogoldenbet.co.uk/
Solid value packed into a relatively short post, that takes skill, and a look at daheko continues the dense useful content across more pages, this site clearly understands that respecting reader time is itself a form of generosity which is something most blog operations seem to have forgotten lately across the wider open web.
Наличие никелевых сплавов гарантирует высокую коррозийную стойкость оборудования, создаваемого заказчиками.
https://rms-ekb.ru/catalog/plity/plita-90khf-12x400x560-gost-19903-74/
Ам 1к15 сделал,слабоват получился,приходится забивать больше(я нормально прикуренный просто,JWH 250,203 1к5 курил обычно последнее время):(,а вот 2с-р ухлестал,не мог понять,где я,в реальности или во сне:crazy: Купить Бошки, Гашиш, Мефедрон, Альфа-ПВП, Марихуану Хочу выразить свою благодарность за представленную пробу!
My professional context would benefit from having this kind of resource available, and a look at heliokindle extended the professional applicability, the rare site that contributes meaningfully to professional work rather than just personal interest is content with multiplied value and this one is providing that professional utility consistently across multiple pieces.
Now setting aside time on my next free afternoon to read more from the archives, and a stop at nightorchardmerchantgallery confirmed that time will be well spent, the rare site whose archive deserves a dedicated reading session rather than just casual sampling is the kind of resource worth scheduling around and this one qualifies clearly.
5 гр заказала, ждали 6 дней, вот забрали у курика, муж укололся, потом ещё в воде разболтали и выпили. Эффект ноль. Что с остальным делать. Хоть в унитаз высыпай Купить Бошки, Гашиш, Мефедрон, Альфа-ПВП, Марихуану Да неее))) само то емс и почта россии !! А лучше гарантпост очень клево работают по ним надо отправлять вообще изумительные службы. Или первый класс!
Reading this with a notebook open turned out to be the right move, and a stop at goldencovecraftcollective added more material to the notes, content that justifies active note taking from a passive reader is content with real informational density and this site is producing notes worthy material at a high rate consistently.
Reading this back to back with a similar piece elsewhere made the quality difference obvious, and a stop at floraridgevendoratelier only widened the gap, comparing content side by side is a useful exercise and the gap between this site and average competitors in the space is large enough to be noticeable from the first paragraph.
Picked up on several small touches that suggest a careful editor, and a look at driftwillowcommercegallery suggested the same hand at work across the broader site, editorial consistency at a granular level is one of the strongest signs that an operation is serious rather than just hobbyist and this site reads as serious throughout.
I appreciate the clarity here, everything is explained in simple terms without unnecessary detail, and after a quick stop at opalmeadowcommercegallery the points came together nicely for me, the writing keeps things straightforward and respects the reader from start to finish without ever talking down to anyone.
وی زوماد لبز، محصولی فوقحرفهای و باکیفیت است که با ترکیبات استثنایی و طعمهای جذاب، انتخابی عالی برای ورزشکاران محسوب میشود.
Worth saying that the quiet confidence of the writing is what landed first, and a look at nightorchardartisanexchange continued that quiet quality, confident writing without the loud display of confidence is a rare combination and this site has clearly developed both the knowledge and the editorial restraint to land that combination consistently.
What makes this post stand out is the way it combines clear ideas, a clear structure, and an approachable tone, which together create a reading experience that feels both informative and comfortable while still leaving room for discussion and different interpretations.
在线购买无处方安定片 xxx Pornhub
If I were grading sites on this topic this one would receive high marks, and a stop at storkumber continued earning those high marks, the informal grading I do mentally for content sources is something I take seriously even though it is informal and this site has been receiving consistent high marks across multiple sessions today.
Это фейк что тут вам не понятно то. Купить Бошки, Гашиш, Мефедрон, Альфа-ПВП, Марихуану Ребята с 11го года магазин работает на отлично, сомнений не у кого не должно быть!!!
Reading this back to back with a similar piece elsewhere made the quality difference obvious, and a stop at orchardharborcraftcollective only widened the gap, comparing content side by side is a useful exercise and the gap between this site and average competitors in the space is large enough to be noticeable from the first paragraph.
Reading this confirmed a small detail I had been uncertain about, and a stop at haclex provided the source for further checking, content that supports verification through citations or links rather than just asserting facts is more trustworthy and this site has clearly built its credibility through that kind of verifiable approach consistently.
A piece that prompted a small mental rearrangement of how I order related ideas, and a look at japarrow extended that rearranging effect, content that affects the structure of my thinking rather than just adding to it is content with the deepest kind of impact and this site is reaching that depth for me today.
Корзина на сайте промышленного предприятия — удобный инструмент для формирования заявки
https://redmetsplav.ru/store/magniy-i-ego-splavy/zarubezhnye-splavy-2/magniy-qe22—csa-hg-9/folga-magnievaya-qe22—csa-hg-9/
Магаз самый ровный! Брать буду Только здесь и не где Больше,респектоз магазину! Так держать ребята! Купить Бошки, Гашиш, Мефедрон, Альфа-ПВП, Марихуану брат, у меня ощущение что я с тобой работал, но название магаза было немного другим, тоже в доверенной ветке был))) почерк тот же, и порядочность. я прав или ошибаюсь?))
Worth every minute of the time spent reading, and a stop at jamsyx extends that value across more pages, in a media environment where most content is engineered to waste attention this site stands out by treating reader time as something valuable rather than something to be exploited and stretched as far as possible.
Started reading expecting to disagree and ended mostly nodding along, and a look at tailorteal continued the pattern, content that wins agreement through evidence and reasoning rather than rhetorical force is the kind that actually shifts minds and this site clearly knows how to do that across what I have read so far.
Редкие и тугоплавкие металлы всегда в наличии или под заказ в короткие сроки, рекомендую.
https://xn--80aeedb0bfzeok.xn--p1ai/catalog/latunnye-naruzhnye-stopornye-koltsa-po-din/latunoe-naruzhnoe-stopornoe-pruzhinnoe-koltso-m85-79-5kh3-mm-lsd-din-471/
Useful read, especially because the writer did not assume too much background from the reader, and a quick look at vyxbrisk continued in the same way, a thoughtful site that meets people where they are which is something the modern web could use a lot more of for both casual and serious readers.
В каталоге представлены конденсаторные ниобиевые порошки высокой чистоты, необходимые для современной электроники.
https://rms-ekb.ru/catalog/stalnoi-list/stalnoi-list-10kh17n13m3t-1-8x1250x2000-gost-19903-2006-gladkii-otsinkovannyi-goriachekatanyi/
Сделал заказ, жду не дождусь пока придет, как придет отпишу.. Всем добра) Купить Бошки, Гашиш, Мефедрон, Альфа-ПВП, Марихуану Может правда о ошибочке что небудь не то отправили)))
Easy to recommend, the content speaks for itself without needing additional praise from me, and a stop at vaultvelour only adds more reasons to send people this way, the kind of generous resource that benefits its readers without demanding anything in return is increasingly rare and worth recognising clearly today across the broader open internet.
Fala aí. Já joguei muito isso na cassino novo e e o retorno é razoável.
Got something practical out of this that I can apply later this week, and a stop at taupeswift added more details to think about, this is exactly the kind of content I bookmark for future reference rather than the throwaway listicles that dominate most search results these days for almost any common topic.
Genuine reaction is that I will probably think about this on and off for a few days, and a look at valecovemerchantgallery added fuel to that, the best content lingers in your head after you close the tab rather than evaporating immediately and this site clearly knows how to write that kind of memorable content.
On reflection this is the kind of writing that improves my taste for what is possible in the format, and a look at jazfix continued raising that bar, content that elevates my expectations rather than lowering them is doing important work in calibrating my standards and this site is participating in that elevation reliably.
The growth of mobile technology has significantly influenced the casino industry, allowing players to enjoy games whenever and wherever they choose – https://hugo.casino/
НЕ принуждаем вас тут брать, берите, где позволяет бюджет. Купить Бошки, Гашиш, Мефедрон, Альфа-ПВП, Марихуану Сегодня оплатил. Жду не дождусь.?
Will be coming back to this for sure, too much good content to absorb in one sitting, and a stop at idozix only added more pages I want to dig through, this site is going onto my regular rotation list because it consistently delivers something worth the visit lately rather than empty filler.
Really appreciate that the writer did not overstate the importance of the topic to make the post feel weightier, and a quick visit to jibion maintained the same modest framing, content that is honest about its own scope rather than inflating itself is the kind I trust and return to repeatedly over time.
Genuinely well crafted writing, the kind that makes the topic look easier than it actually is, and a look at biabrook added even more depth, you can feel the experience behind every line which is something only writers who have been at this for a while can pull off with this level of grace.
The modern casino experience is shaped by a combination of convenience, game variety, and continuous improvements in technology – https://realzkasyno.org.pl/
Started reading expecting to disagree and ended mostly nodding along, and a look at shoptrailmarket continued the pattern, content that wins agreement through evidence and reasoning rather than rhetorical force is the kind that actually shifts minds and this site clearly knows how to do that across what I have read so far.
This post keeps a good balance between being useful and staying easygoing enough to remain engaging from start to finish.
Xxx video onlyfans sex video site
Now noticing how rare it is to find a site that does not feel rushed, and a look at forestcovecommerceatelier extended that calm pace, content produced without time pressure has a different quality than content shipped to meet a deadline and this site reads as written without urgency which produces a different and better experience for readers.
Glad I clicked through from where I did because this turned out to be worth the time spent, and after lemonridgecommercegallery I had a fuller picture, the kind of content that earns its visitors through delivering value rather than chasing them through aggressive advertising or constant pop ups appearing everywhere on the screen lately.
Worth recognising the absence of the usual blog tropes here, and a look at orchardmeadowcommercegallery continued that fresh quality, sites that avoid the standard moves of the medium read as more original even when the content is on familiar topics and this one has clearly chosen its own path through the conventional terrain skilfully.
A welcome reminder that thoughtful writing still happens online, and a look at oakcoveartisanexchange extended that reassurance, the modern web makes it easy to forget that careful writing exists and finding sites that practice it is a small antidote to the cynicism that builds up from too much exposure to algorithmic content.
Сайт работает стабильно и быстро загружается
https://redmetsplav.ru/store/magniy-i-ego-splavy/zarubezhnye-splavy-2/magniy-mgmn2—din-1729-part-1/polosa-magnievaya-mgmn2—din-1729-part-1/
заказывал тут все четка пришло напишу в теме трип репотрты свой трипчик РЕСПЕКТ ВСЕМ ДОБРА БРАЗЫ КТО СОМНЕВАЕТСЯ МОЖЕТЕ БРАТЬ СМЕЛО ТУТ ВСЕ ЧЧЧИЧЧЕТЕНЬКА!!!!!!!!РОВНО ДЕЛАЙ РОВНО БУДЕТ:monetka::monetka:))))))))0 Купить Бошки, Гашиш, Мефедрон, Альфа-ПВП, Марихуану а трудно изучить предварительно информацию о веществе, а потом покупать ? вот к примеру у меня в подписи инфа.
Strong recommendation from me, anyone curious about the topic should make time for this, and a look at graniteorchardcraftcollective only sharpens that recommendation further, the kind of resource that holds up against careful scrutiny rather than crumbling at the first critical question is rare and worth pointing other people toward when the topic comes up.
Following a few of the internal links revealed more posts of similar quality, and a stop at pearlcovecraftcollective added more to that growing pile, sites where internal links lead to more good content rather than to more of the same recycled material are sites with depth and this one has clearly built that depth carefully.
Decided this was the kind of site I would defend in a discussion about good blog content, and a stop at triggersyrup reinforced that, very few sites earn active defence rather than passive consumption and this one has clearly crossed that threshold for me without needing any explicit pitch from the writers themselves either.
Glad the writer kept this short rather than padding it out, the points stand on their own without needing extra context, and a look at echobrookmerchantgallery kept the same approach going, brevity is a sign of confidence in the substance and the team here clearly trusts their content to land without filler.
Редкие и тугоплавкие металлы всегда в наличии или под заказ в короткие сроки, рекомендую.
https://xn--80aeedb0bfzeok.xn--p1ai/catalog/mednye-zaglushki-pod-paiku/mednaia-zaglushka-kolpachok-pod-paiku-42kh36kh1-1-mm-27kh29-mm-tverdaia-paika-m3rt-gost-r-52922-2008/
Турция стабильно привлекает путешественников тёплым морем, продуманной инфраструктурой и приятной стоимостью отдыха. Ищете где лучше отдыхать в турции? Лучшие курорты для пляжного отпуска, экскурсий и активного досуга собраны на сайте evrobuket-nn.ru/top-kurorty-turcii-gde-otdyhat/ Тут просто подобрать вариант под собственные пожелания и финансы, чтобы путешествие удалось на славу.
Народ уже как два часа нет ответов от администратора магазина Купить Бошки, Гашиш, Мефедрон, Альфа-ПВП, Марихуану Бро ответь в аське!
Better than most of the writing I have come across on this topic recently, simpler and more direct, and a look at gorurn continued in that same way, a real outlier in a crowded space full of repetitive content that says little while taking up a lot of reader time today which is unfortunate.
Thanks for the honest framing without exaggerated claims that the topic will change my life, and a stop at helmkit kept the same modest tone, restraint in marketing language signals trustworthiness and the writers here are clearly playing the long game by building credibility rather than chasing immediate clicks through hyperbole.
Different in a good way from the cookie cutter content that fills most blogs covering this area, and a stop at driftcovecommerceatelier kept showing me why, original thoughtful writing exists if you know where to look and this site has earned a place on my short list of those rare exceptions worth defending.
Came away feeling slightly smarter than I was when I started, that is a real win, and a stop at trumpetsash added a bit more to that, the rare site that actually transfers some of its knowledge to the reader in a way that sticks rather than just creating an illusion of learning briefly.
Going to come back when I have more time to read carefully, the post deserves more than a quick scan, and a stop at buyedgeshop reinforced that, this is the kind of site that rewards a slower read which is hard to find in this fast paced corner of the internet but really worthwhile.
Reading this gave me something to think about for the rest of the afternoon, and after syxblue I had even more to mull over, the kind of post that lingers in the background of your day rather than evaporating immediately is genuinely valuable in an attention economy that punishes depth rather than rewarding it.
The whole experience of reading this was pleasant from start to finish, no pop ups and no annoying interruptions, and a look at hagaro continued that clean experience, technical choices about page design matter for the reader and this site clearly cares about the small details that add up to comfort across multiple visits.
по поводу треков выяснять буду завтра лично т.k. сегодня выходной в России Купить Бошки, Гашиш, Мефедрон, Альфа-ПВП, Марихуану У меня ожидалась поездка по работе в Столицу нашей родины на пару недель но как обычно я списался оператором в джаббе подтвердил адрес через форум что не ФЭЙК оплатил заранее по приезду написал ТС , он по скорому выдал мне адрес в тот день что договорились )
Зделал заказ 203го в четверг вечером,в пятницу уже получил трек,а сегодня създил забрал посылку!запаковано так,что сам с трудом нашел)все очень вкусно и качественно!продовцам респект.слаженно работают! Купить Бошки, Гашиш, Мефедрон, Альфа-ПВП, Марихуану Так может не ждать у моря погода, а взять и самому написать менеджеру в аську/почту и получить уже эти реквизиты?
My professional context would benefit from having this kind of resource available, and a look at sheentabby extended the professional applicability, the rare site that contributes meaningfully to professional work rather than just personal interest is content with multiplied value and this one is providing that professional utility consistently across multiple pieces.
Without overstating it this is a quietly excellent post, and a look at fernbrookvendorfoundry extended that quiet excellence, content that earns superlatives without demanding them through marketing language is content that has truly earned them through the substance and this site has clearly produced work in that earned excellence category today.
A satisfying piece in the way that good meals are satisfying rather than just filling, and a look at atticboulder extended that satisfaction, the metaphor between content and meals is one I find useful and this site reads as a satisfying meal rather than the empty calories that most content provides for casual readers.
گینر ایوژن، یکی از حرفهایترین و باکیفیتترین مکملهای افزایش وزن و حجم در دنیاست که توسط «هانی رامبد»، مربی مشهور اسطورههای بدنسازی، فرموله شده است.
Online casino platforms provide a centralized destination where users can explore numerous games without the limitations of a traditional venue – Realz Casino
Четкое позиционирование как эксперта в области редких металлов
https://redmetsplav.ru/store/magniy-i-ego-splavy/zarubezhnye-splavy-2/magniy-mgal3zn—din-1729-part-1/prutok-magnievyy-mgal3zn—din-1729-part-1/
A piece that respected the reader by not over explaining the obvious, and a look at jebbeo continued that calibrated approach, finding the right level of explanation is one of the harder editorial calls and this site has clearly thought carefully about what readers will already know versus what they need help with consistently.
Reading this brought back an idea I had set aside months ago, and a stop at igogoa added more substance to that idea, content that revives dormant projects in my own thinking is content with serious creative value and this site is contributing to my own work in ways I had not expected when first clicking through.
ребят , а 4-fa нормальная тема ? это типа живика чтоли ? Купить Бошки, Гашиш, Мефедрон, Альфа-ПВП, Марихуану конспирация достойная, товар оказался отличным, кроли заценили. будем еще работать
สวัสดี, guide ดีมาก copa do mundo 2026. Nigeria odds look interesting. 22Bet works well with promptpay.
Felt energised after reading rather than drained, which is unusual for online content these days, and a look at forestcovegoodsatelier continued that good feeling, content that leaves you better than it found you is rare and worth bookmarking when you stumble across it for the first time today or any other day really.
Порадовало наличие вольфрамовых прутков редких диаметров, менеджер оперативно помог с подбором.
https://xn--80aeedb0bfzeok.xn--p1ai/catalog/latunnye-vnutrennie-stopornye-koltsa-po-gost/latunoe-vnutrennee-stopornoe-pruzhinnoe-koltso-170kh3-mm-lts25s2-gost-13943-86/
Started imagining how I would explain the topic to someone else after reading, and a look at vyxcar gave me more material for that imagined explanation, content that improves my own ability to discuss a topic is content that has actually transferred knowledge rather than just decorating my screen for a few minutes.
Appreciate the thoughtful approach, the writer clearly took time to make this readable for someone who is not already an expert, and a look at quartzorchardcraftcollective kept that going nicely, easy on the eyes and easy on the brain which is always a winning combination when reading on a busy day.
Most of my reading time goes to a small number of trusted sources and this one is now joining that group, and a stop at pebblepinemerchantgallery reinforced the group membership, the few sites that earn a place in my regular rotation are sites I expect ongoing returns from and this one has earned that elevated position consistently.
A genuine compliment to the writer for keeping the post focused on what mattered, and a look at oakcovecraftcollective continued that disciplined focus, focus is a editorial choice that compounds across many small decisions and this site has clearly made those small decisions consistently across what I have read so far this week here.
ООО «РМС» предлагает широкий спектр цветного проката, включая медь, латунь, бронзу и дюралюминий.
https://rms-ekb.ru/catalog/ugolok-stalnoi/ugolok-iz-konstruktsionnoi-stali-100kh65kh8-mm-c10e-en-10056-1/
Really clear writing, the kind that makes you want to share the link with someone who has been asking about the topic, and a quick browse through targetskein only made me more sure of that, the information here stays useful long after the first read is done which says a lot.
спасибо магазу) Купить Бошки, Гашиш, Мефедрон, Альфа-ПВП, Марихуану Доброго времени суток друзья женскую половину человечества с праздником))))
Pleasant surprise, the post delivered more than the headline promised, and a stop at creekharborcommercegallery continued that pattern of under promising and over delivering, the rarest combination on the modern web where most content does the opposite by promising the world and delivering thin recycled summaries instead each time you click on something interesting.
Thanks for a post that does not try to be funny when it is not the moment for it, and a stop at vincatrench maintained the same appropriate seriousness, knowing when humour helps and when it just signals desperation for engagement is a sign of editorial maturity that many blogs have not developed yet.
Nice to see a post that does not try to overcomplicate the basics for the sake of looking smart, and once I looked at emberstonecommercegallery the same direct tone was there too, which honestly makes a difference when you are short on time and want answers without long pointless intros.
Started reading expecting to disagree and ended mostly nodding along, and a look at hazelharborcraftcollective continued the pattern, content that wins agreement through evidence and reasoning rather than rhetorical force is the kind that actually shifts minds and this site clearly knows how to do that across what I have read so far.
Appreciated the way each section connected smoothly to the next without abrupt jumps, and a stop at fastcartsolutions kept that flow going nicely, transitions are something most blog writers ignore but the difference is huge for the reader who is trying to follow a sustained line of thought today across many different topics.
За основу брали ромашку (как она задрала), я кстати предлагаю магазину, продавать основу, или в качестве бонуса предлагать (так на сколько я знаю никто не делает). Купить Бошки, Гашиш, Мефедрон, Альфа-ПВП, Марихуану Хороший магазин оператор всегда онлайн, товар вообще Шик :speak: процветай) и поскорей бы лето
Now adding this to a short list of sites I would defend in a conversation about the modern web, and a look at calicofalcon reinforced that defence list, the few sites that serve as evidence the web can still produce good things are precious and this one has clearly joined that small list of exemplary sites.
One of the more honest takes on the topic I have seen lately, no spin and no oversell, and a stop at smartbuyingzone kept that going, the kind of voice the open web could use a lot more of rather than the endless echo chamber of recycled opinions floating around every social platform these days.
кто нить последнее время покупал чего ??? всё ровно ? Купить Бошки, Гашиш, Мефедрон, Альфа-ПВП, Марихуану Получил посылочку общее время ожидания 4 дня,упаковка супер,качество просто космическое,спасибо магазину!
Now noticing that the post did not mention the writer at all, focus stayed on the topic, and a look at halarch continued that author absent quality, content that disappears the writer to focus on the substance is a particular kind of generosity and this site has clearly chosen the substance over the personality consistently.
One of the more thoughtful posts I have read recently on this topic, and a stop at vergetrophy added even more weight to that impression, this is genuinely good content that holds its own against far better known sites in the same space without trying to imitate any of them at all which I appreciate.
Reading this in segments because the day was busy, and the post survived the fragmented attention well, and a stop at sageharborgoodsroom held up similarly under interrupted reading, content that can withstand modern distracted reading patterns rather than requiring a perfect block of focused time is increasingly the kind I prefer.
Saving the link for sure, this one is a keeper, and a look at salemsolid confirmed I should bookmark the entire site rather than just this page, the consistency across what I have seen so far suggests there is a lot more here worth coming back for soon when I have more time.
Быстрая доставка в регионы через «Деловые Линии», груз пришел в целости и отлично упакованным.
https://xn--80aeedb0bfzeok.xn--p1ai/catalog/mednye-zaglushki-pod-paiku/mednaia-zaglushka-kolpachok-pod-paiku-25kh21kh0-9-mm-8kh10-mm-tverdaia-paika-m3r-gost-r-52922-2008/
Все пришло, все хорошо! Конспирации такой не ожидал))) Сначала подумал что киданули)))))) Попробовал и все около дела, хороший средний микс получился. Буду брать больше на днях… Купить Бошки, Гашиш, Мефедрон, Альфа-ПВП, Марихуану Ну я хозяину ветки в лс отписал.посмотри что да как будет.Мир братья.Липецких нех обманывать!
В каталоге представлены конденсаторные ниобиевые порошки высокой чистоты, необходимые для современной электроники.
https://rms-ekb.ru/catalog/list/list-6khvg-1x1000x1500-gost-19903-74/
If I had to summarise the editorial sensibility of this site in a few words it would be careful and human, and a look at gribrew extended that summary feeling, capturing the essence of a sites approach in brief is hard but this site has a clear enough identity that the summary comes naturally enough.
Appreciated the way each section connected smoothly to the next without abrupt jumps, and a stop at quickharborartisanexchange kept that flow going nicely, transitions are something most blog writers ignore but the difference is huge for the reader who is trying to follow a sustained line of thought today across many different topics.
Bookmark added with a small mental note that this is a site to keep, and a look at linenmeadowcommercegallery reinforced the keep status, the verb keep rather than visit captures something about how I think about this kind of site and it is a higher tier of relationship than I have with most places online today.
Современная электроника требует надежных комплектующих, и выбор поставщика становится критически важным для успеха любого проекта. Профессиональные инженеры и радиолюбители знают, что качество компонентов напрямую влияет на долговечность устройств и безопасность эксплуатации. На платформе https://components.ru/ собран широкий ассортимент электронных элементов — от микроконтроллеров и силовых транзисторов до пассивных компонентов и соединителей, что позволяет реализовать проекты любой сложности. Удобная навигация, техническая документация и оперативная доставка делают процесс закупки максимально эффективным, экономя время специалистов и обеспечивая бесперебойность производственных циклов в условиях современного рынка.
у меня такое было, позвонил в офис доставки так они меня там ошарашили что груз ушел но совсем в другую сторону от меня, я в шок че за на.. через 2часа звонок вам пакет, я аж от радости чуть не описался :voo-hoo: тут все на уровне. Не паникуйте раньше времени все решаемо. Всем добРА Купить Бошки, Гашиш, Мефедрон, Альфа-ПВП, Марихуану “Думаю надо заглянуть в аптечку Мож завалялось и да Чудо они есть решаюсь попробовать и Вы не поверите одно и тожЕ”
Took the time to read every paragraph rather than skimming for the punchline, and a quick visit to frostcovecommerceatelier earned the same careful attention from me, that is the highest signal I can give about content quality because my default mode is rapid scanning rather than deliberate reading on most pages.
However selective I am about new bookmarks this one made it past my filter, and a look at jebbird confirmed the bookmark was worth the slot, the precious slots in my permanent bookmark folder are difficult to earn and this site earned one without making me think twice about whether the slot was justified by the quality.
Honestly enjoyed every minute spent here, that is not something I say lightly, and a look at jibion confirmed I will be back, the bar for spending time online is high for me these days but this site clears it without effort which is high praise indeed from this reader who is usually rather demanding.
Decided this was the kind of site I would defend in a discussion about good blog content, and a stop at byncane reinforced that, very few sites earn active defence rather than passive consumption and this one has clearly crossed that threshold for me without needing any explicit pitch from the writers themselves either.
Just wanted to drop a quick note saying this was a useful read on a topic I have been circling, no fluff, and a stop at ilefix added a few extra points that fit the same simple style which makes the whole site feel coherent rather than thrown together by many different writers with different goals.
Hello to all, it’s in fact a good for me to pay a quick visit this site, it includes valuable Information.
Купить лучший кайт Cabrinha в Беларуси бесплатно с доставкой
Halfway through I knew I would finish the post, and a stop at cloudbrookvendorfoundry also held me through to the end, content that signals its quality early and then sustains it is content with real internal consistency and this site has clearly figured out how to maintain quality from opening sentence through to closing thought.
Decided to read this site for a while before forming a verdict, and the verdict after several pages is positive, and a stop at bitternarbor continued that pattern, judging a site requires more than one post and giving sites a fair sample is something I try to do for promising candidates rather than rushing to dismiss.
Reading this in the gap between work projects was a small but meaningful break, and a stop at trebleupper extended that gentle reset, content that provides genuine refreshment rather than just distraction during work breaks is content with a particular kind of utility and this site fits that role for me reliably during work days.
Купить лучший кайт Cabrinha в Беларуси бесплатно с доставкой
Купить лучший кайт Cabrinha в Беларуси бесплатно с доставкой
Bookmark folder reorganised slightly to make this site easier to find, and a look at pineharborcommercegallery earned the same accessibility upgrade, the small organisational moves I make for sites I expect to return to often are themselves a signal of how much I trust them and this site triggered those moves naturally.
Купить лучший кайт Cabrinha в Беларуси бесплатно с доставкой
Ростовская юридическая компания «Аксиома» профессионально занимается списанием долгов по кредитам, займам, налогам, штрафам и ЖКХ — включая случаи с действующей ипотекой. Работа ведётся согласно закону №127 «О банкротстве»: клиентам доступна рассрочка от 3 990 рублей в месяц без переплат. Подробная информация об услугах на https://uk-axioma.ru/ — проверьте возможность списания ваших долгов прямо сейчас.
Купить лучший кайт Cabrinha в Беларуси бесплатно с доставкой
Респект Магазу купить Мефедрон, Бошки, Гашиш всем курильщикам привет. магаз ровный,раза 4 заказывал,все проходило нормально,связь с тс в аське тоже норм,можно обговорить любой вопрос. за качество, в61 больше всего понравился. заказывал эйфоретик,так и не понял его,товарищи тоже не поняли эфекта,хотя употребляли по многу.
Купить лучший кайт Cabrinha в Беларуси бесплатно с доставкой
Возможность заказать листы и полосы нестандартных размеров
https://redmetsplav.ru/store/magniy-i-ego-splavy/zarubezhnye-splavy-2/magniy-mag-6—bs-2970-1/folga-magnievaya-mag-6—bs-2970-1/
Thanks for sharing your thoughts about MALWARE.
Regards
Купить лучший кайт Cabrinha в Беларуси бесплатно с доставкой
Technological innovation remains a key factor behind the continued growth and popularity of the online casino industry: Realz Casino
Worth saying that the quiet confidence of the writing is what landed first, and a look at ivoryridgecraftcollective continued that quiet quality, confident writing without the loud display of confidence is a rare combination and this site has clearly developed both the knowledge and the editorial restraint to land that combination consistently.
Reading this gave me material for a conversation I needed to have anyway, and a stop at goodsparkstore added even more talking points, content that connects to upcoming social or professional needs rather than just being interesting in the abstract is the kind that earns priority placement in my attention these days routinely.
Заказал АМ 2233,разведу 1 к 15 Посмотрим что из этого получится)отпишусь ещё купить Мефедрон, Бошки, Гашиш мне все пришло, магаз ровный. 5+
Купить лучший кайт Cabrinha в Беларуси бесплатно с доставкой
Купить лучший кайт Cabrinha в Беларуси бесплатно с доставкой
Офис в Екатеринбурге работает четко, забирали самовывозом — складская логистика на высоте.
https://xn--80aeedb0bfzeok.xn--p1ai/catalog/latunnye-vnutrennie-stopornye-koltsa-po-gost/latunoe-vnutrennee-stopornoe-pruzhinnoe-koltso-14kh1-mm-lts40sd-gost-13943-86/
Купить лучший кайт Cabrinha в Беларуси бесплатно с доставкой
Reading this prompted me to subscribe to my first newsletter in months, and a stop at wyxburn confirmed the subscribe was the right call, content that earns a newsletter signup is content that has cleared a higher trust bar than a casual visit and this site has clearly earned that level of commitment from me.
Купить лучший кайт Cabrinha в Беларуси бесплатно с доставкой
I go to see each day some websites and sites to
read posts, however this weblog offers feature based posts.
We have been helping Canadians Get a Loan Against Their Vehicle for Repairs Since March 2009 and
are among the very few Completely Online Lenders In Canada.
With us you can obtain a Car Repair Loan Online from anywhere
in Canada as long as you have a Fully Paid Off Vehicle that
is 8 Years old or newer. We look forward to meeting all your financial needs.
Купить лучший кайт Cabrinha в Беларуси бесплатно с доставкой
Компания занимается реализацией ферросплавов, необходимых для качественного легирования сталей на литейных участках.
https://rms-ekb.ru/catalog/ugolok-stalnoi/ugolok-iz-konstruktsionnoi-stali-60kh60kh6-mm-e335gc-en-10277/
Купить лучший кайт Cabrinha в Беларуси бесплатно с доставкой
I came here looking for a quick answer and ended up reading the whole post because it was actually interesting, and after vitalsummit I had a much fuller picture, no stress and no confusion just a clear walk through the topic that made everything fall into place without much effort.
Solid stuff, the kind of post that I will probably refer back to later this month when the topic comes up again, and a look at siriustender only confirmed I should bookmark the site as a whole rather than just this single page for future reference and use across coming weeks.
Felt mildly happier after reading, which sounds silly but is true, and a look at coppercovecraftcollective extended that small mood lift, content that improves rather than degrades my mental state is content I want more of and the cumulative effect of reading sites that lift versus sites that drag is real over time.
Honest take is that this was better than I expected when I clicked through, and a look at hewblob reinforced that, the bar for online content has dropped so much that finding something thoughtful and well constructed feels almost noteworthy now which says more about the average than about this site itself.
да, спросил тут ли менеджер, по быстрому оформил заказ. купить Мефедрон, Бошки, Гашиш В своё время работали по опту!
Купить лучший кайт Cabrinha в Беларуси бесплатно с доставкой
وی ایزوله زوماد لبز، یک مکمل با کیفیت بالا است که از آبپنیر ایزوله با خلوص ۹۰–۹۵٪ تهیه شده و تقریبا فاقد چربی و لاکتوز است.
Купить лучший кайт Cabrinha в Беларуси бесплатно с доставкой
Купить лучший кайт Cabrinha в Беларуси бесплатно с доставкой
I usually skim posts like these but this one held my attention all the way through, and a stop at ferncovemerchantgallery did the same, that is a strong endorsement coming from me because I am usually quick to bounce when content gets repetitive or fails to deliver on its initial promise made in the headline.
Купить лучший кайт Cabrinha в Беларуси бесплатно с доставкой
важаемый ТС прошу разобраться с заказом,всё оплаченно вам,вот только игнор в бросиксе и посылки нету до сих пор. Заранее благодарен. купить Мефедрон, Бошки, Гашиш “Думаю надо заглянуть в аптечку Мож завалялось и да Чудо они есть решаюсь попробовать и Вы не поверите одно и тожЕ”
Worth a slow read rather than the fast scan I usually default to, and a look at flintbrookmarketfoundry earned the same slower pace from me, content that resets my reading speed downward is content with substance worth absorbing and this site has produced that effect on me multiple times now over the last week here.
A piece that did not lean on the writer credentials or institutional backing, and a look at quickharborcraftcollective maintained the same focus on substance, content that earns trust through quality rather than through name dropping is the kind I find most persuasive and this site is clearly playing on the substance side of that distinction.
Купить лучший кайт Cabrinha в Беларуси бесплатно с доставкой
My reading list is short and selective and this site is now on it, and a stop at cadbrisk confirmed the placement, the short list of sites I read deliberately rather than encounter accidentally is something I curate carefully and adding to it is a real act of trust which this site has earned today.
Reading this slowly in the morning before opening email, and a stop at sundaestudio extended that protected attention, content that earns the prime morning reading slot before the daily distractions begin is content with elevated status and this site has earned that prime slot consistently in my recent reading habits clearly.
Sets a higher bar than most of what shows up in search results for this topic, and a look at maplecrestmerchantgallery did not lower that bar at all, in fact it confirmed the impression, this is the kind of consistency that earns a place in regular rotation for serious readers instead of casual scrollers passing through.
Купить лучший кайт Cabrinha в Беларуси бесплатно с доставкой
Skipped the TLDR thinking I would read everything anyway, and ended up enjoying the path through the full post, and a stop at swiftvantage similarly rewarded the patient read, summaries are useful but the journey through good writing is part of what makes the destination feel earned rather than just delivered cleanly.
Reading this felt easy in the best way, no friction and no confusion at any point, and a stop at camelcinder carried that same comfort across more pages, the kind of editorial flow that lets you absorb information without fighting the format which is increasingly hard to find on the open web today across topics.
Купить лучший кайт Cabrinha в Беларуси бесплатно с доставкой
Closed the laptop and walked away thinking about the post for a good twenty minutes, and a stop at ferncovevendorcorner produced similar lingering thoughts, content that survives the closing of the browser tab is content that has actually entered the mind rather than just decorating the screen for the duration of the reading.
Skipped lunch to finish reading, which says something, and a stop at ilenub kept me at my desk longer than planned, when content beats the lunch impulse the writer has done something genuinely impressive in an attention environment full of immediately satisfying alternatives competing for the same finite block of reader time.
Купить лучший кайт Cabrinha в Беларуси бесплатно с доставкой
Четкая структура меню позволяет быстро найти нужный металл
https://redmetsplav.ru/store/magniy-i-ego-splavy/zarubezhnye-splavy-2/magniy-mag-12—bs-2970-1/list-magnievyy-mag-12—bs-2970-1/
Now sitting with the thoughts the post triggered rather than rushing on to the next thing, and a stop at acornharborcommercegallery extended that reflective pause, content that earns time for thought after closing the tab is content of higher value than the merely interesting and this site has clearly produced that lasting effect today.
согласен чемикалы в этом плане молодцы купить Мефедрон, Бошки, Гашиш самый дешёвый магазин из доверенных – это этот!
Купить лучший кайт Cabrinha в Беларуси бесплатно с доставкой
If the topic interests you at all this is a place to spend time, and a look at jebmug reinforced that recommendation, the broader question of where to invest topical reading time is one this site answers convincingly through the consistent quality across multiple pieces I have sampled during the current reading session today.
Купить лучший кайт Cabrinha в Беларуси бесплатно с доставкой
Most of my reading time goes to a small number of trusted sources and this one is now joining that group, and a stop at ravengrovecommercegallery reinforced the group membership, the few sites that earn a place in my regular rotation are sites I expect ongoing returns from and this one has earned that elevated position consistently.
Купить лучший кайт Cabrinha в Беларуси бесплатно с доставкой
Ответственная компания, которая ценит долгосрочное сотрудничество, всегда идут навстречу клиенту.
https://xn--80aeedb0bfzeok.xn--p1ai/catalog/mednye-zaglushki-pod-paiku/mednaia-zaglushka-kolpachok-pod-paiku-10kh7kh0-6-mm-7-8kh9-8-mm-tverdaia-paika-m2r-gost-32590-2013/
Всех благ и ровных клиентов !!! купить Мефедрон, Бошки, Гашиш СПАСИБИЩЕ ОГРОМНОЕ ЗА СЕРВИС
Купить лучший кайт Cabrinha в Беларуси бесплатно с доставкой
В каталоге представлены конденсаторные ниобиевые порошки высокой чистоты, необходимые для современной электроники.
https://rms-ekb.ru/catalog/stalnoi-list/stalnoi-list-38kh2n2ma-26x1300x2000-gost-19903-2006-gladkii-belyi-goriachekatanyi/
This is my first time pay a visit at here and i am
truly impressed to read everthing at one place.
Worth flagging that this approach to the topic is fresh without being contrarian, and a stop at citrinefjord extended the same fresh angle, finding original perspective on familiar subjects is rare and this site has clearly developed its own way of seeing rather than echoing the dominant takes from elsewhere consistently.
Started forming counter examples to test the claims and the post handled most of them implicitly, and a look at openmarketcart continued that anticipatory style, writers who think two steps ahead of the critical reader save themselves from a lot of follow up work and this writer has clearly internalised that habit consistently.
Buenas noches. juegos de casino es real.
Easy to recommend, the content speaks for itself without needing additional praise from me, and a stop at infinitygoodscorner only adds more reasons to send people this way, the kind of generous resource that benefits its readers without demanding anything in return is increasingly rare and worth recognising clearly today across the broader open internet.
Ты выдал мне комбо купить Мефедрон, Бошки, Гашиш Сегодня сделал заказ, пока все ровно обещали к вечеру трек, магаз робит
Genuine reaction is that I will probably think about this on and off for a few days, and a look at vesselthrift added fuel to that, the best content lingers in your head after you close the tab rather than evaporating immediately and this site clearly knows how to write that kind of memorable content.
Came across this and immediately thought of a friend who would enjoy it, and a stop at bexedge also reminded me of someone, content that triggers the urge to share is content that has earned my recommendation and this site has earned multiple from me already across different conversations during the week.
Liked the post enough to read it twice and the second read found new things, and a stop at crowncoveartisanexchange similarly rewarded the second look, content with hidden depths that only reveal themselves on careful rereading is the rare kind that earns lasting respect rather than fleeting first impressions only briefly held.
Highly recommend to anyone looking for a sensible take on this topic without the usual marketing nonsense, and a look at jifaero kept that grounded approach going, sites that stay focused on serving readers rather than monetising every click are rare and this is clearly one of those rare ones I really appreciate finding.
Now feeling that this site is the kind I want to make sure does not disappear, and a look at humbust reinforced that quiet protective feeling, the rare sites whose disappearance would actually matter to me are the sites I want to support through return visits and recommendations and this one has joined that small protected list.
Это ошибка или нет, подскажи пожалуйста. купить Мефедрон, Бошки, Гашиш Ну блиинн я ждуждуждужду а мне не отвечает ТС я в уныние, буду ждать. говорят хороший, хочу попробовать у него. хочу сладкий бубалех мммм….
Quietly the writers approach to the topic differs from the dominant takes I have been encountering, and a stop at rainharborartisanexchange extended that distinctive approach, content that maintains a different perspective without explicitly arguing against the dominant ones is content with confident editorial identity and this site has that confidence throughout pieces.
Общее впечатление: надежный информационный ресурс для снабженцев.
https://redmetsplav.ru/store/magniy-i-ego-splavy/zarubezhnye-splavy-2/magniy-m16631—uns/list-magnievyy-m16631—uns/
Adding this site to my regular reading list, the post earned that on its own, and a quick stop at twisttailor sealed the decision, the kind of place worth checking back with from time to time because it consistently produces material that holds up against a critical reading too which I really value.
Reading this gave me confidence to make a decision I had been putting off, and a stop at cobqix reinforced that confidence, content that translates into action in my own life rather than just informing it is content with the highest practical value and this site is generating that action level utility for me lately.
Saving this link for the next time someone asks me about this topic, and a look at saltvinca expanded what I will be sharing with them, this is the kind of resource that makes a real difference when you are trying to point a friend to something useful and reliable rather than generic marketing pages.
Honestly this hits the sweet spot between detail and brevity, no rambling and no shortcuts, and a quick visit to maplegrovecommercegallery kept that going across the related pages, the kind of place that respects your attention without trying to grab it through cheap tactics or attention seeking design choices that get tired fast.
Главное не кипишуй, продаван ровный, придет сам обрадуешся что тут затарился! купить Мефедрон, Бошки, Гашиш Всем: счастья, мира, добра, любви!
If patience for careful reading is rare these days finding sites that reward it is rarer still, and a stop at allthingsstore extended that rare reward, the diminishing returns on shallow content reading have made me more selective about where to spend reading time and this site is meeting the higher selectivity bar consistently.
Качество сварочных материалов на высоте, электроды варят отлично, состав металла стабильный.
https://xn--80aeedb0bfzeok.xn--p1ai/catalog/latunnye-vnutrennie-stopornye-koltsa-po-gost/latunoe-vnutrennee-stopornoe-pruzhinnoe-koltso-24kh1-2-mm-lmtszh-gost-13943-86/
Поставки титана и его сплавов востребованы в медицине, авиации и химическом машиностроении.
https://rms-ekb.ru/catalog/stalnoi-list/list-stalnoi-16kh1100kh1600-mm-m450-65k-en-10341/
Worth recognising that this site does not chase the daily news cycle, and a stop at flintcovecommerceatelier confirmed the longer publication arc, sites that resist the pressure to comment on every passing event are sites with genuine editorial discipline and this one has clearly chosen depth over volume which I respect deeply.
A clean piece that knew exactly what it wanted to say and said it, and a look at jebbrood maintained the same clarity of intention, knowing the goal of a piece before writing is something most blog content lacks and the clarity of purpose here shows up in every paragraph for any careful reader to notice.
Casino gaming combines entertainment, design, and technology into a unique experience that continues to attract millions of users across global markets – https://realzkasyno.org.pl/
бро ответь своим частым клиентам, распиши что да как) уже соскучились очень купить Мефедрон, Бошки, Гашиш согласен с вами ребят
Appreciate that you did not pad this with fluff to hit a word count, the post says what it needs to say and stops, and a look at rosecovemerchantgallery did the same, brevity here feels intentional not lazy which is a distinction many writers miss completely sometimes when they are working under deadlines.
Купить лучший кайт Cabrinha в Беларуси бесплатно с доставкой
Honestly enjoyed reading this more than I expected to when I first clicked through, and a stop at jemido kept that pleasant surprise going, sometimes you stumble onto a site that just clicks with how you like to read and this is one of those for me right now today which is great.
Купить лучший кайт Cabrinha в Беларуси бесплатно с доставкой
всем привет купить Мефедрон, Бошки, Гашиш через аську связался… дал данные куда сколько отправить, и с киви кошелька оплатил 7700р. на номер который в аське дали
A relief to read something where I did not have to fact check every claim mentally, and a look at shopflowcenter continued that reliable feeling, sites where I can lower my guard and trust the content are rare and this one is earning that trust paragraph by paragraph through consistent careful work behind the scenes.
Yesterday I was complaining about the state of online writing and today this site has temporarily fixed that complaint, and a look at sauntersonar extended that mood reversal, the short term mood improvement that comes from finding good content is real and this site has produced that improvement for me at a useful moment.
Купить лучший кайт Cabrinha в Беларуси бесплатно с доставкой
Vague feelings of recognition kept surfacing as I read because the writing names things I have been thinking, and a look at bomkix produced more of those recognition moments, content that gives shape to private intuitions is content that makes me feel less alone in my own thinking and this site has that effect.
Now thinking about how this post will age over the coming years, and a stop at crystalcovecraftcollective suggested the same durability, content built to age well rather than to capture the attention of the moment is content with a different kind of value and this site has clearly chosen the long horizon over the short one.
Really grateful for content like this, it does not waste my time and it does not insult my intelligence either, and a quick look at floraridgemerchantgallery was the same, balanced respectful writing that makes a person feel welcome rather than rushed through pages of forced engagement just to keep clicking around.
А вообще, читай раздел рецепты, там все очень подробно расписано, в нескольких темах причем купить Мефедрон, Бошки, Гашиш Всё нашел!! Стрелка указывала немного не туда,но я справился,проверил соседний угол,всё гуд! Спасибо динамиту! Мяу идеальный!! Рекомендую!!
Четкое позиционирование как эксперта в области редких металлов
https://redmetsplav.ru/store/magniy-i-ego-splavy/zarubezhnye-splavy-2/magniy-m12331—uns/provoloka-magnievaya-m12331—uns/
Appreciated how the writer anticipated the questions a reader might have along the way, and a stop at humcamp continued that thoughtful approach, you can tell when content has been edited with the reader in mind versus just published as a first draft and this is clearly the former approach across what I read.
Купить лучший кайт Cabrinha в Беларуси бесплатно с доставкой
Even on a quick first read the substance of the post comes through, and a look at alpinecovemerchantgallery reinforced that immediate quality, content that does not require a slow careful read to demonstrate value but rewards one anyway is content with real depth and this site has produced work of that demanding depth class.
Felt the post was written for someone like me without explicitly addressing me, and a look at forestbrooktradingfoundry produced the same fit, when content lands on its target without pandering you know the writer has done careful audience thinking rather than relying on demographic targeting or interest signals to do the work of editorial decisions.
Thanks for putting this online without locking it behind email signups or paywalls, and a quick visit to solidtruffle kept that open feel going, content that trusts the reader to come back rather than gating access is the kind of approach I will reward with regular return visits over time happily.
Спасибо команде за профессионализм и помощь в реализации нашего сложного промышленного проекта!
https://xn--80aeedb0bfzeok.xn--p1ai/catalog/mednye-zaglushki-pod-paiku/mednaia-zaglushka-kolpachok-pod-paiku-53-6kh47kh1-2-mm-11kh13-mm-tverdaia-paika-m1e-gost-32590-2013/
Closed the tab feeling I had spent the time well, and a stop at fibdot extended that feeling across more pages, the test of whether time on a site was well spent is one I apply silently after closing tabs and very few sites pass it but this one passed it cleanly today afternoon clearly.
Looking through the archives suggests this site has been doing this for a while at this level, and a look at rainharborcraftcollective confirmed the long term consistency, sites that have maintained quality across years rather than just a recent stretch are sites with serious editorial discipline and this one has clearly been at it for a while.
Компания выступает важным звеном в цепочке снабжения предприятий машиностроения и оборонно-промышленного комплекса.
https://rms-ekb.ru/catalog/stalnoi-list/stalnoi-list-l63-60x1900x1900-gost-19903-2006-gladkii-neotsinkovannyi-goriachekatanyi/
Наверное стоит все же воздержаться от заказов и отправки денег и подождать до появления селлера..,на соседнем форуме(СФН) его тоже ждут…. купить Мефедрон, Бошки, Гашиш The Best!!!!!!
Comfortable reading experience throughout, no jarring tone shifts and no awkward formatting, and a look at vaultscript kept that smooth feel going, the kind of editorial polish that goes unnoticed when present but glaring when absent is something this site has clearly invested in across the broader content as well which deserves recognition.
Nice to see a post that does not try to overcomplicate the basics for the sake of looking smart, and once I looked at meadowharbormerchantgallery the same direct tone was there too, which honestly makes a difference when you are short on time and want answers without long pointless intros.
Рекламное агентство «Транзит Медиа» специализируется на наружной рекламе в Крыму: брендировании транспорта плёнкой ORACAL, оклейке торговых точек и витрин, изготовлении баннеров и сеток с пропаем и люверсами. Компания располагает собственным производством https://transitmedia.ru/ — лазерная резка, термогибка акрила, ПЭТ и ПВХ. Все работы выполняются как в собственном боксе, так и на территории заказчика по Симферополю, Севастополю и Ялте.
Хотел бы у вас спросить за безофуран(6-apb)…в частности про его качество…А так же про тусишку))) купить Мефедрон, Бошки, Гашиш Хороший магазинчик , рега хорошая , в общем стоит вашего внимания ))) всем удачи !
Thanks for treating the topic with the seriousness it deserves without becoming pompous about it, and a stop at infinitytrendzone continued that balanced treatment, the gap between earnest and self serious is huge and writers who can stay on the right side of it earn my respect when I find them online today.
Better than most of the writing I have come across on this topic recently, simpler and more direct, and a look at tractsmoke continued in that same way, a real outlier in a crowded space full of repetitive content that says little while taking up a lot of reader time today which is unfortunate.
Thanks for keeping the writing direct without losing the warmth that makes content feel human, and a stop at jencap carried both qualities forward, balancing professionalism and personality is a rare skill and the writers here have clearly figured out how to consistently land it across many posts which I notice.
Honest assessment is that this is one of the better short reads I have had this week, and a look at sageharbormerchantgallery reinforced that, the bar for short content is low because most of it sacrifices substance for brevity but this site manages both at once which is harder than it sounds for most writers attempting it.
Reading this gave me something to think about for the rest of the afternoon, and after jifedge I had even more to mull over, the kind of post that lingers in the background of your day rather than evaporating immediately is genuinely valuable in an attention economy that punishes depth rather than rewarding it.
Информация об обработке IP-адреса для определения региона — современный подход
https://redmetsplav.ru/store/magniy-i-ego-splavy/zarubezhnye-splavy-2/magniy-m11101—uns/truba-magnievaya-m11101—uns/
Сделал заказ.оплатил.Кент прислал трек вечером как и обещал…токо он небьеться у меня и говорит,что нет такой накладной…у кого такая ситуация была??? купить Мефедрон, Бошки, Гашиш Кто долги твоего представителя в РБ будет отдавать?
A piece that earned its conclusions through the body rather than asserting them at the end, and a look at duneelfin maintained the same earned quality, conclusions that follow from what came before are more persuasive than declarations and this site has clearly internalised that principle in how it constructs arguments throughout pieces.
Portugal at 22Bet — cripto deposit confirmed. Good odds for WC2026 group stage.
Looking at the surface design and the substance together this site has both right, and a look at vectorswift reinforced that integrated quality, sites where presentation and content reinforce each other rather than fighting are sites with full editorial coherence and this one has clearly invested in both layers in a balanced way.
A piece that handled the topic with appropriate weight without becoming portentous, and a look at jeqblot continued that calibrated seriousness, content that takes itself seriously without becoming pompous is something this site has clearly figured out and the balance shows up in every piece I have read across multiple sessions now.
Цены на спецстали одни из самых конкурентных на рынке, при этом качество на уровне мировых стандартов.
https://xn--80aeedb0bfzeok.xn--p1ai/catalog/latunnye-vnutrennie-stopornye-koltsa-po-din/latunoe-vnutrennee-stopornoe-pruzhinnoe-koltso-m58-62-2kh2-mm-lmtssk-din-472/
если заказываю утром в пн, получаю максимум в четверг утром а то бывает и в среду утром, на счет выходных все вопросы к спср потому что они не работают в выходные нормально купить Мефедрон, Бошки, Гашиш ро я тоже паниковал но все решилось нормально мне в курьерке обьяснили что с этой ебливой олимпиадой у многих запарка и сбои в работе как то так….
Наличие на складе редких металлов, таких как цирконий, выделяет компанию на фоне конкурентов, торгующих только массовым прокатом.
https://rms-ekb.ru/catalog/krug-iz-instrumentalnoi-stali/krug-60khsmf-100-gost-2590-2006/
Honestly the simplicity is what makes this work, the topic is not buried under filler words or overly complex examples, and a quick look at bayharbormerchantgallery showed the same sensible style, I left with what I came for and no headache from over reading which is a real win these days.
Reading this between meetings turned out to be the most useful thing I did all afternoon, and a stop at elmharborartisanexchange kept that productivity feeling going, content can sometimes outperform actual work in terms of what gets accomplished mentally and this site managed that today which is genuinely a high bar to clear consistently.
Just nice to read something that does not feel like it was assembled from a content brief, and a stop at derbunch kept that handcrafted feel going, you can tell when a real human with real understanding is behind the words versus a templated piece churned out for an algorithm to find.
Beyond the immediate post itself the editorial sensibility behind the site is what struck me, and a stop at fashiondealshub continued displaying that sensibility, content that reveals editorial choices through accumulated reading is content with structural quality and this site has clearly developed an underlying approach worth identifying through multiple sessions of reading.
Now thinking about whether the writer might publish a longer form work I would buy, and a look at humzap suggested the same depth would translate, content that makes me want to pay for related work in other formats is content that has earned commercial trust as well as attention trust and this site has both clearly.
More original than the recycled takes I keep finding on the topic elsewhere, and a quick look at violavenom confirmed it, the kind of site that has its own voice rather than echoing whatever is trending which makes it stand out as a refreshing change from the usual rotation of generic content I see daily.
Ты думаешь АМ под запретом уже будет? Откуда инфа? купить Мефедрон, Бошки, Гашиш все ровно тут ?
Started reading expecting to disagree and ended mostly nodding along, and a look at flyburn continued the pattern, content that wins agreement through evidence and reasoning rather than rhetorical force is the kind that actually shifts minds and this site clearly knows how to do that across what I have read so far.
Процессуальное законодательство Республики Казахстан (РК) отличается сложностью и множеством нюансов, что делает профессиональное представительство в суде не просто желательным, но и жизненно необходимым условием для защиты. Комплексное ведение дела – это всеобъемлющий подход, который начинается задолго до первого судебного заседания и завершается только после полного исполнения судебного акта. Автор блога: Бахирев Анатолий Анатольевич, ведущий юрист-эксперт https://femida-justice.com/uslugi/predstavitelstvo-v-sude/
рабочее зеркало Риобет – вход через альтернативный
адрес . не используй сторонние
ресурсы . все слоты и лайв-игры .
быстрое соединение
вход на официальный сайт Риобет – войти
можно с любого устройства .
сохрани сессию на своём устройстве
. бонусы и фриспины . если не заходит — проверь зеркало
игровые автоматы Риобет – более 2000
слотов от топ-провайдеров .
блэкджек, покер, баккара . игра по
стратегии . играй на телефоне с полным функционалом
Liked the natural conversational tone throughout, never stiff and never overly casual either, and a stop at ravensummitcraftcollective kept that comfortable middle ground going, finding a tone that respects the reader without becoming distant or overly familiar is harder than it sounds and this site nails that balance consistently across many different pieces.
کراتین دنیس جیمز، یک مکمل ورزشی باکیفیت است که تحت برند بدنساز حرفهای و سرشناس، دنیس جیمز، تولید و عرضه میشود.
Искать пришлось часа два!!! Фото не понятное было. Но нашёл всё таки. Забрал 1г ск крисов. Качество супер. Тёлка визжит просто) Спасибо купить Мефедрон, Бошки, Гашиш Всем добрый вечер, рега появилась, та хорошая, которая у вас была!?
Picked up a couple of new ideas here that I can actually try out, and after my visit to gingercovemerchantgallery I have even more notes saved, this is the kind of resource that pays you back for the time you spend on it which is rare to come across in this corner of the web.
Found a small mental shift after reading this, the framing here is just a bit different from the standard takes online, and a look at tidaltunic extended that fresh perspective across more material, the rare site whose voice actually changes how you think about something rather than just confirming existing beliefs.
Указание конкретных марок сплавов в разделах помогает специалистам
https://redmetsplav.ru/store/magniy-i-ego-splavy/zarubezhnye-splavy-2/magniy-ls141a—mil-m-46130/izdeliya-iz-magniya-ls141a—mil-m-46130/
Yo, guia completo demais sobre crash game. alguém pode esclarecer sinais de vício?
Bookmark earned and the bookmark feels like a permanent addition rather than a maybe, and a look at mintorchardmerchantgallery confirmed that permanent status, the difference between durable bookmarks and ephemeral ones is something I have learned to feel quickly and this site triggered the durable feeling almost immediately during my first read here.
Beyond the immediate post itself the editorial sensibility behind the site is what struck me, and a stop at slateserif continued displaying that sensibility, content that reveals editorial choices through accumulated reading is content with structural quality and this site has clearly developed an underlying approach worth identifying through multiple sessions of reading.
Каждая партия товара сопровождается сертификатами качества, подтверждающими соответствие ГОСТ и ТУ.
https://rms-ekb.ru/catalog/stalnoi-list/stalnoi-list-08ps-0-8x1250x1600-gost-19903-2006-gladkii-chernyi-goriachekatanyi/
День добрый, пишу свой отзыв, вернее назвать его извинением. Опишу ситуацию, не помню когда и не столь это важно, но недавно был сделан заказ, на n-ое количество cmh-400. купить Мефедрон, Бошки, Гашиш бонус пускай шлют
Appreciate the work that went into laying this out so clearly, every section earns its place without filler, and a look at moderntrendarena confirmed the same care, definitely the kind of place that deserves a return visit when the topic comes up again later in the future or for any related question.
Found this through a search that was generic enough I did not expect quality results, and a look at jeqblue continued the surprisingly good experience, search engines occasionally still surface excellent independent content if you scroll past the obvious paid and high authority results which is reassuring to remember sometimes.
A memorable post for me on a topic I had thought I was tired of, and a look at silkgrovemerchantgallery suggested the same site can refresh other tired topics, sites that can revive my interest in subjects I had written off as exhausted are doing rare work and this one is clearly doing that for me today.
Glassway специализируется на производстве алюминиевых конструкций: потолочные системы Hook On, Clip In, Грильято, кассетные и реечные модели, перегородки включая противопожарные, двери, остекление, смарт-стекло и светодиодные светильники — всё соответствует высоким стандартам. Ищете офисные перегородки? На glassway.group представлен полный каталог с возможностью оформить заказ. Ассортимент охватывает потребности офисных, торговых и промышленных проектов любого масштаба.
Thanks for the honest framing without exaggerated claims that the topic will change my life, and a stop at apricotharbormerchantgallery kept the same modest tone, restraint in marketing language signals trustworthiness and the writers here are clearly playing the long game by building credibility rather than chasing immediate clicks through hyperbole.
Весом по 1 гр купить Мефедрон, Бошки, Гашиш Здравствуйте, всем бобра норм магаз все ровно как по маслу
The level of detail provided in this write-up is genuinely strong, and it is clear that a significant amount of thought and preparation went into ensuring the final result would be this useful to the audience.
https://dollyolive.co.uk/
Thanks for laying this out in a way that someone newer to the topic can follow, and a stop at tealthicket kept that accessibility going, writing that meets readers at different experience levels without condescending is hard to do well and the writers here have clearly thought about who they are writing for.
A memorable post for me on a topic I had thought I was tired of, and a look at derburn suggested the same site can refresh other tired topics, sites that can revive my interest in subjects I had written off as exhausted are doing rare work and this one is clearly doing that for me today.
Decided to set a calendar reminder to revisit, and a stop at alpineharborcommercegallery extended that revisit list, calendar entries for content are a level of commitment I rarely make but when I do they signal a higher regard than a simple bookmark and this site has earned that calendar tier of relationship from me today.
Reading this in segments because the day was busy, and the post survived the fragmented attention well, and a stop at suppletoast held up similarly under interrupted reading, content that can withstand modern distracted reading patterns rather than requiring a perfect block of focused time is increasingly the kind I prefer.
Reading this on a phone at a coffee shop and finding it perfectly suited to that context, and a stop at canyonharbormerchantgallery continued the comfortable mobile experience, content that works across reading conditions without compromising on substance is increasingly important and this site has clearly thought about the whole reader experience here.
Really appreciate that the writer did not assume I would read every other related post first, and a look at jesaria kept that self contained feel going where each piece can stand alone, accessibility for new readers is a sign of generous editorial thinking and this site has clearly invested in that approach.
Мечтаете получить востребованную специальность и практиковаться на настоящих клиентах? Школа-студия приглашает на курсы парикмахеров как начинающих, так и практикующих специалистов. Ищете осанка парикмахера? К практике на клиентах вы приступаете уже после трёхдневной теории — обучают на сайте j-center.ru дипломированные специалисты. Курс включает мужские, женские и детские стрижки, свадебные укладки, плетение кос, химическую завивку и углублённую колористику с нуля.
Большой опыт работы, судя по копирайту с 2013 года
https://redmetsplav.ru/store/magniy-i-ego-splavy/zarubezhnye-splavy-2/magniy-iso-mc21220—bs-iso-16220/truba-magnievaya-iso-mc21220—bs-iso-16220/
спасибо за внимание! купить Мефедрон, Бошки, Гашиш сегодня сделал заказ, написал в аську сразу ответили. Буду ждать как что измениться отпишу.
During the time spent here I noticed the absence of the usual distractions, and a stop at hupido extended that distraction free experience, content that does not fight my attention with pop ups and modals and aggressive prompts is content that respects me and this site has clearly chosen the respectful approach throughout.
Honest take is that this was better than I expected when I clicked through, and a look at jasperharborcraftcollective reinforced that, the bar for online content has dropped so much that finding something thoughtful and well constructed feels almost noteworthy now which says more about the average than about this site itself.
مکمل حجم دهنده سریع، فرمولاسیونهای متراکمی از کالری، پروتئین با کیفیت بالا، کربوهیدراتهای پیچیده و اسیدهای آمینه ضروری هستند.
Really like that the writer trusts the reader to follow simple logic without restating every previous point, and a stop at glybrow kept that respect going, treating an audience as capable adults rather than as people who need constant hand holding makes a noticeable difference in the reading experience for me.
Now setting aside time on my next free afternoon to read more from the archives, and a stop at rivercoveartisanexchange confirmed that time will be well spent, the rare site whose archive deserves a dedicated reading session rather than just casual sampling is the kind of resource worth scheduling around and this one qualifies clearly.
Так вот, прошло все как всегда отлично, дошло за три дня, маскировка надежная. Так же отдельное спасибо магазину за проявление немыслимой заботы о безопасности клиента. Что имел ввиду писать не буду, но факт есть факт. купить Мефедрон, Бошки, Гашиш Не-не, через форум заказы не принимаются. Заказывать нужно только через сайт, указанный в подписи.
Beats most of the alternatives on the topic by a noticeable margin, and a look at tennisvortex did not change that at all, this is one of the better corners of the open internet for this kind of content and I am glad I clicked through rather than skipping past quickly like I usually do.
Worth recognising that the post handled a familiar topic without reaching for any of the obvious hot takes, and a stop at unicorntiger continued that fresh treatment, sites that find new angles on subjects others have exhausted are sites worth following carefully and this one has clearly developed that exploratory instinct through patient practice.
A welcome reminder that thoughtful writing still happens online, and a look at reliablecartcorner extended that reassurance, the modern web makes it easy to forget that careful writing exists and finding sites that practice it is a small antidote to the cynicism that builds up from too much exposure to algorithmic content.
бразы все меня просветили много чего тут было но после убедительных доводов все понял селлер правда не виновен я об этом так то и говорил всегда просто все подтвердилось больше в ветке пылить не буду братух тебе хорошей работы ну и как говорил в скайпе удачи а если будет много врагов пулемет в руки и ведро потронов))) в помощ купить Мефедрон, Бошки, Гашиш полность с тобой согласен
A clear case of writing that does not try to do too much in one post, and a look at glassharbormerchantgallery maintained the same scoped discipline, posts that try to cover too much end up covering nothing well and this site has clearly chosen scope discipline as a core editorial principle which shows up clearly in what I read.
Started reading and ended an hour later without realising the time had passed, and a look at oakcovemerchantgallery produced the same time dilation effect, when content makes time feel different the writer has achieved something well beyond the average and this site is producing that experience for me reliably across multiple readings.
Reading this brought back the satisfaction I used to get from blogs ten years ago, and a stop at savorvantage kept that nostalgic quality alive, sites that capture what was good about an earlier era of internet writing are increasingly precious and this one is doing that without feeling like a deliberate throwback at all.
Now thinking about this site as a small example of what good independent writing looks like, and a stop at eagleelder continued that exemplary status, the few sites that serve as good examples are sites worth holding up in conversations about quality and this one has earned that exemplary placement through patient consistent effort over time.
Runico — специализированный портал о рунах Старшего Футарка, включающий все 24 символа древнескандинавского алфавита с подробным толкованием. Ресурс раскрывает символику рун и их применение в гадании, магии и психологии. https://runico.ru/ собрал исчерпывающую базу знаний о рунах: значение каждого символа, мифологические корни и практические техники. Контент изложен чётко и понятно — как для начинающих, так и для опытных практиков.
Успешного травление нашей молодежи и побольше денег! купить Мефедрон, Бошки, Гашиш Приятно иметь дело с серьёзными людьми!!!!!!
Just sat with this for a bit longer than I usually would because the points are worth thinking about, and after elderbeetle I had even more to chew on, the kind of post that nudges your thinking forward without forcing the issue is something I have always appreciated in good writing online.
Beyond the immediate post itself the editorial sensibility behind the site is what struck me, and a stop at neoncartcenter continued displaying that sensibility, content that reveals editorial choices through accumulated reading is content with structural quality and this site has clearly developed an underlying approach worth identifying through multiple sessions of reading.
Reading this prompted a small note in my reference file, and a stop at vandaltavern prompted another, the rare site that contributes useful nuggets to my own working knowledge rather than just consuming my attention is worth the time investment many times over compared to the usual pile of forgettable scroll content.
Comfortable in tone and substantive in content, that is a hard combination to land, and a look at skyharbormerchantgallery kept that pairing alive across more material, this is what good editorial direction looks like in practice and the team here clearly has someone keeping a steady hand on the wheel across what they decide to publish.
Worth recognising that the post did not pretend to be the final word on the topic, and a stop at jevmox continued that humility, content that admits its own scope and limits is more trustworthy than content that overreaches and this site has clearly developed the editorial maturity to know what it can and cannot claim well.
World Cup 2026 Harambee Stars qualify at good odds. Using 1xBet with opay for fast deposits.
Came in expecting another generic take and got something with actual character instead, and a look at hislex carried that personality forward, finding a distinct voice on a saturated topic is impressive and worth pointing out when it happens because most sites end up sounding identical to their nearest competitors quickly.
Quality writing that respects the reader’s intelligence without overloading them, and a quick look at apricotharborcommercegallery reflected that approach, a balanced thoughtful site that earns trust by being consistent rather than by shouting about how trustworthy it is which is the usual approach online sadly across most content categories.
магаз то работает сейчас?Есть курьерка по москве? купить Мефедрон, Бошки, Гашиш Хз …. Дето видел чел писал про вещ-во для снятия лака от ногтей ….. сказал что безпроигрышный вариант )))
Really like that there are no exclamation marks or all caps shouting throughout the post, and a quick visit to coastharborcommercegallery maintained the same calm voice, restraint in punctuation signals confidence in the content and this site clearly trusts its substance to do the persuading rather than relying on typographic emphasis.
Привет всем! купить Мефедрон, Бошки, Гашиш Один вопрос только,можно ли заказать так что бы без курьера?Самому придти в офис и забрать посылку?
Now setting this aside as a model of how to write thoughtfully on the topic, and a stop at tracestudio extended that model status, content that becomes a reference for how a kind of writing should be done is content with influence beyond its own readership and this site is reaching that level for me clearly today.
Closed the tab feeling I had spent the time well, and a stop at ibeburn extended that feeling across more pages, the test of whether time on a site was well spent is one I apply silently after closing tabs and very few sites pass it but this one passed it cleanly today afternoon clearly.
A piece that brought a sense of order to a topic I had been finding chaotic, and a look at junipercovecraftcollective continued that organising effect, content that imposes useful structure on messy subjects is doing genuine intellectual work and this site is providing that organisational function across multiple posts I have read recently here.
Thanks for keeping the writing direct without losing the warmth that makes content feel human, and a stop at rosecoveartisanexchange carried both qualities forward, balancing professionalism and personality is a rare skill and the writers here have clearly figured out how to consistently land it across many posts which I notice.
Howdy, i read your blog occasionally and i own a similar one and i was just wondering
if you get a lot of spam remarks? If so how do you reduce it,
any plugin or anything you can recommend? I get so much lately it’s driving me mad so any assistance is very
much appreciated.
Hello i am kavin, its my first time to commenting anywhere,
when i read this post i thought i could also make comment due to this brilliant post.
Thanks for treating the topic with the seriousness it deserves without becoming pompous about it, and a stop at jibtix continued that balanced treatment, the gap between earnest and self serious is huge and writers who can stay on the right side of it earn my respect when I find them online today.
съел примерно 10мг, чувствуется легкое расслабление и успокоение, каких то явных или ярких эффектов не наблюдается.. купить Мефедрон, Бошки, Гашиш всё ровно будет бро! просто график отправок такой
Now feeling slightly more optimistic about the state of independent writing online, and a stop at abobrim extended that quiet optimism, sites like this one are the reason I have not given up on the open web entirely and finding them occasionally renews the case for paying attention to non algorithmic content sources today.
Took me back a step or two on an assumption I had been making, and a stop at brightharborcommercegallery pushed that reconsideration further, writing that gently corrects the reader without being aggressive about it is a rare diplomatic skill and the team here clearly knows how to land critical points without turning readers off.
Работал с магазином спасибо всё красиво! купить Мефедрон, Бошки, Гашиш прям не втерпеж
Now placing this in the small category of sites whose updates I would actually want to know about, and a stop at aviaryelder confirmed that placement, the difference between sites I want to follow and sites I just consume from is real and this one has crossed into the active follow category from the casual consumption side.
A piece that did not require external context to follow, and a look at orchardharbormerchantgallery maintained the same self contained quality, content that stands alone without forcing readers to chase prerequisites is more accessible and this site has clearly thought about how each piece can serve a fresh visitor rather than only existing members.
Reading more of the archives is now on my plan for the weekend, and a stop at siskatriton confirmed the archive worth the time, the rare archive worth a dedicated reading session rather than just casual sampling is the rare archive of serious work and this site has clearly produced enough of that work to warrant the deeper exploration.
Came in tired from a long day and the writing held my attention anyway, and a stop at goldencovemerchantgallery kept that going, content that can engage a fatigued reader is doing something right because most online reading happens in suboptimal conditions like that one and quality content adapts to it without complaint.
Took the time to read the comments on this post too and they were also worth reading, and a stop at verminturbo suggested the community quality matches the content quality, when the conversation around a piece is as good as the piece itself you know you have found a real corner of the internet.
Reading this prompted a brief but useful conversation with a colleague who happened to walk by, and a stop at stoneharborcommercegallery extended that conversational seed, content that becomes a starting point for in person discussion rather than ending in solitary reading is content with social generative energy and this site has plenty of it apparently.
Бро ты лучший!!! Магазин работает на высшем уровне!!! купить Мефедрон, Бошки, Гашиш Магаз огонь, а кидкам хуй на ладонь
Sets a higher bar than most of what shows up in search results for this topic, and a look at premiumpickmarket did not lower that bar at all, in fact it confirmed the impression, this is the kind of consistency that earns a place in regular rotation for serious readers instead of casual scrollers passing through.
A piece that brought a sense of order to a topic I had been finding chaotic, and a look at topaztower continued that organising effect, content that imposes useful structure on messy subjects is doing genuine intellectual work and this site is providing that organisational function across multiple posts I have read recently here.
Полный справочник по почтовым отделениям России позволяет быстро проверить индекс дома, адрес отделения и доступные почтовые услуги перед отправкой корреспонденции https://pochtaops.ru/
Just one of those reads that left me feeling slightly more capable rather than overwhelmed, and a look at hobcar kept that empowering feel going, the difference between content that builds the reader up and content that intimidates them is huge and this site clearly knows which side of that line to stand.
Once you start reading carefully here it is hard to go back to lower quality alternatives, and a stop at auroraharborcommercegallery reinforced that ratchet effect, the way good content raises standards is real over time and this site has clearly contributed to raising my expectations for what is possible in writing on the topic generally.
Beyond the immediate post itself the editorial sensibility behind the site is what struck me, and a stop at jifarena continued displaying that sensibility, content that reveals editorial choices through accumulated reading is content with structural quality and this site has clearly developed an underlying approach worth identifying through multiple sessions of reading.
Полный справочник по почтовым отделениям России подходит тем, кто регулярно пользуется почтовыми услугами и хочет быстро получать достоверную информацию об отделениях связи https://pochtaops.ru/
нет таких, а вымораживать рекламу других магазинов в этой ветке можно и минус в репу получить, есть другие ветки где обсуждаются реагенты от разных магазинов, а здесь обсуждается продукция данного ТСа , вкурил? купить Мефедрон, Бошки, Гашиш Запрета в прицепе это не касается.
Really appreciate the lack of pop ups, modals, cookie banners stacking on top of each other, and a quick visit to shopaxismarket confirmed the same clean approach across the rest of the site, technical decisions about user experience are part of what makes content actually pleasant to engage with for sure.
Honestly enjoyed every minute spent here, that is not something I say lightly, and a look at daisycovemerchantgallery confirmed I will be back, the bar for spending time online is high for me these days but this site clears it without effort which is high praise indeed from this reader who is usually rather demanding.
Раздел «Цены на металлы» полезен для мониторинга рынка
https://redmetsplav.ru/store/vismut/rossiyskie-splavy-2/vismut-l141/krug-vismutovyy-l141/
Долго искали надежного поставщика циркония, в Редметсплав предложили лучшие условия и чистоту металла.
https://xn--80aeedb0bfzeok.xn--p1ai/catalog/latunnoe-litoe-koltso/latunnoe-litoe-koltso-450kh500-mm-lts25s2/
Опыт работы с более чем 120 постоянными заказчиками свидетельствует о высокой стабильности и надежности поставок.
https://rms-ekb.ru/catalog/ugolok-metallicheskii/
Thanks for the honest framing without exaggerated claims that the topic will change my life, and a stop at sofatavern kept the same modest tone, restraint in marketing language signals trustworthiness and the writers here are clearly playing the long game by building credibility rather than chasing immediate clicks through hyperbole.
Достойный магазин купить Мефедрон, Бошки, Гашиш они долго кормили завтраками с отправкой, а потом и вовсе закрылись…
Following a few of the internal links revealed more posts of similar quality, and a stop at urchinsail added more to that growing pile, sites where internal links lead to more good content rather than to more of the same recycled material are sites with depth and this one has clearly built that depth carefully.
Now adding this site to a small mental group of recommendations I keep ready for specific kinds of inquiries, and a stop at rosecovecraftcollective extended the recommendation readiness, content that I can confidently point friends and colleagues toward in specific contexts is content with real social utility and this site has that utility clearly.
Honestly this was the highlight of my reading queue today, and a look at jadburst extended that across more pages I will return to, ranking what I read against what else I read each day is something I do informally and this site keeps moving up in those rankings the more I explore it.
Skipped the related products section because there was none, and a stop at kettlecrestartisanexchange also lacked any aggressive monetisation, content that is not constantly trying to convert me into a customer or subscriber is content that has confidence in its own value and that confidence shows up as a different reading experience.
Now noticing that the post avoided the temptation to be funny in places where humour would have undermined the substance, and a stop at falconcameo maintained the same restraint, knowing when to be serious is a rare editorial virtue and this site has clearly developed it through what I assume is careful editorial practice over years.
Ещё в 11-м году брал здесь чудесную фофу и другие ништяки.Тогда это был крутейший магаз.И вот после долгого перерыва они снова идут в гору.Заказ оперативность 5 упаковка 5 качество 5 цена лучше всех. кокаин купить, мефедрон купить Последние данные очков репутации:
Speaking from the perspective of having read widely on the topic this site offers something distinct, and a look at jinblob reinforced that distinctness, the rare site that contributes something genuinely original to a saturated topic is the rare site worth following carefully and this one has demonstrated that original contribution capability today.
A piece that suggested careful editing without showing the marks of the editing, and a look at atticcondor continued that invisible polish, the best editing disappears into the prose and this site reads as having been edited with skill that does not announce itself which is the highest compliment I can offer any blog content.
Но бывали случаи и на оборот… кокаин купить, мефедрон купить аська молчит.скайп есть?
Really like that the writer trusts the reader to follow simple logic without restating every previous point, and a stop at borealbarley kept that respect going, treating an audience as capable adults rather than as people who need constant hand holding makes a noticeable difference in the reading experience for me.
Took me back a step or two on an assumption I had been making, and a stop at pebblecreekcommercegallery pushed that reconsideration further, writing that gently corrects the reader without being aggressive about it is a rare diplomatic skill and the team here clearly knows how to land critical points without turning readers off.
Быстрая навигация через «Карту сайта» для поиска глубоких страниц
https://redmetsplav.ru/store/vanadiy-i-ego-splavy/vanadiy-fev80al14—gost-27130-94/truba-vanadievaya-fev80al14—gost-27130-94/
Прозрачное оформление документов и быстрое выставление счетов, приятно работать с профессионалами.
https://xn--80aeedb0bfzeok.xn--p1ai/catalog/mednyi-perekhodnoi-troinik-press/mednyi-perekhodnoi-press-troinik-34kh14-7-mm-m1r-gost-r-52948-2008/
Reading this prompted me to dig into a related topic later, and a stop at holbook provided some of the starting points for that follow up reading, content that triggers further exploration rather than satisfying curiosity completely is content with real generative energy and this site has plenty of that energy throughout it.
Oh my goodness! Amazing article dude! Thank you so much, However I am going
through problems with your RSS. I don’t understand why I cannot join it.
Is there anybody else having identical RSS problems?
Anyone who knows the answer will you kindly respond?
Thanx!!
Honestly impressed by the consistency of voice across what I have read so far, and a quick visit to autumnmeadowcommercegallery continued that consistent feel, when a site reads like one careful person rather than a committee the experience is more rewarding for the reader who notices these subtle editorial details over time.
АВА-терапия в Красногорске — это реальная помощь детям с особенностями развития. Специалист Елена Алексеевна Артемьева применяет прикладной анализ поведения — научно доказанный метод коррекции, признанный мировым сообществом как один из наиболее эффективных подходов в работе с детьми с аутизмом и задержками развития. Записаться на приём и узнать подробнее об услугах можно на сайте https://aba-krasnogorsk.ru/ — здесь принимают по будням с 10:00 до 18:00 по адресу: Красногорский бульвар, дом 8. Индивидуальный подход и искренняя забота о каждом ребёнке — главные принципы работы специалиста.
Полный справочник по почтовым отделениям России регулярно используется для поиска почтовых индексов, адресов отделений и информации о доступных почтовых услугах https://pochtaops.ru/
Пари БК — одна из ведущих букмекерских контор России, предлагающая широкую линию ставок на спорт и удобный личный кабинет. Мобильное приложение позволяет делать ставки в любое время и следить за результатами в режиме реального времени. Скачать приложение можно по ссылке https://play.google.com/store/apps/details?id=com.sport.playmetrics — установка занимает меньше минуты. Интерфейс интуитивно понятен, поддерживаются быстрые выплаты и бонусы для новых пользователей.
не вижу, в прайсе много чего кокаин купить, мефедрон купить у Вас очень серьезные проблемы.
Excellent post, balanced and well organised without showing off, and a stop at jinvex continued in that same vein, this site has clearly figured out the formula for content that works for readers rather than for search engine ranking signals which is harder than it sounds today and worth real recognition from anyone.
Всё отлично тут! в МСК забрали вес ! сервис как всегда отличный ! ТАК ДЕРЖАТЬ кокаин купить, мефедрон купить Почему закрылся представитель в петрозаводске? Жду ответа чем)
Trzni Vizor
Even on a quick first read the substance of the post comes through, and a look at scrollturtle reinforced that immediate quality, content that does not require a slow careful read to demonstrate value but rewards one anyway is content with real depth and this site has produced work of that demanding depth class.
Speaking carefully because I do not want to overstate things this site is genuinely above average across multiple measurements, and a stop at premiumpickzone continued the above average performance, the calibration of judgement against potential overstatement is something I take seriously and this site clears the higher bar even after that calibration applies.
Considered against the flood of similar content this one stands apart in important ways, and a stop at caramelcovemerchantgallery extended that distinctive feel, sites that find their own corner of a crowded topic and stay there are sites worth following and this one has clearly carved out its own space and committed to defending it carefully.
Better signal to noise ratio than most places I check on this kind of topic, and a look at rubyorchardartisanexchange kept that going, every paragraph here carries something worth reading rather than padding out the page to hit some arbitrary length target that search engines reward but readers ignore as soon as they notice it.
Informative article, just what I was looking for.
Никелевые сплавы — основа для жаропрочных конструкций
https://redmetsplav.ru/store/titan/rossiyskie-splavy-4/titan-vt3-1—gost-19807-91/izdeliya-iz-titana-vt3-1—gost-19807-91/
Наличие никелевых сплавов гарантирует высокую коррозийную стойкость оборудования, создаваемого заказчиками.
https://rms-ekb.ru/catalog/krug-iz-instrumentalnoi-stali/krug-11kh-52-gost-7417-75/
Порадовало наличие вольфрамовых прутков редких диаметров, менеджер оперативно помог с подбором.
https://xn--80aeedb0bfzeok.xn--p1ai/catalog/latunnoe-litoe-koltso/latunnoe-litoe-koltso-150kh500-mm-lsd/
Appreciate the work that went into laying this out so clearly, every section earns its place without filler, and a look at dyleko confirmed the same care, definitely the kind of place that deserves a return visit when the topic comes up again later in the future or for any related question.
Just want to say thank you for putting this together, posts like these make searching online actually worth it sometimes, and a quick look at almondeider kept that going, useful and easy to read without any of the tricks that ruin most blog comment sections lately on the wider open web.
Regen Handelsflux
Came in tired from a long day and the writing held my attention anyway, and a stop at bayougourd kept that going, content that can engage a fatigued reader is doing something right because most online reading happens in suboptimal conditions like that one and quality content adapts to it without complaint.
Picked this up while looking for something else and ended up reading every paragraph because it was actually informative, and after cargofeather I was sure I would come back, that does not happen often when most sites bury the useful parts under endless ads and pop ups today and across most categories online.
Брат, ответь в личке, жду уже 3 дня кокаин купить, мефедрон купить Я айтишник и к СМ не отношусь никаким боком. Про мою работу вы не знали и не узнали бы, если бы всё срослось. Я просто говорю про то, что не так уж и секурно у вас, личность выпаливается “на раз”.
Generally I am cautious about recommending sites on first encounter but this one warrants the exception, and a look at shorevolume reinforced the exception making, the rare site that justifies breaking my normal cautious approach is the rare site worth flagging early and this one has prompted exactly that early flagging response from me.
Nice and clean, that is the best way to describe the writing here, no clutter and no wasted words, and a quick visit to cloverdahlia kept that going, I appreciate when a site treats its readers like people who can think for themselves without needing constant hand holding through every paragraph.
Definitely a recommend from me, anyone curious about the topic should check this out, and a look at kettlecrestcraftcollective adds even more reason for that, the depth and quality combine to make this site one I will be pointing people toward whenever similar conversations come up over the months ahead at work or socially.
Came here from a search and stayed for the side links because they were that interesting, and a stop at jadkix took me even further into the site, the kind of organic exploration that good content invites is something most sites kill through aggressive interlinking and pushy navigation choices rather than relying on quality.
Marula Capstead
Успехов и процветания новому селлеру!!! Желаю денег пресс и в обществе вес)) кокаин купить, мефедрон купить у меня такое было, позвонил в офис доставки так они меня там ошарашили что груз ушел но совсем в другую сторону от меня, я в шок че за на.. через 2часа звонок вам пакет, я аж от радости чуть не описался :voo-hoo: тут все на уровне. Не паникуйте раньше времени все решаемо. Всем добРА
Started imagining how I would explain the topic to someone else after reading, and a look at vitalsnippet gave me more material for that imagined explanation, content that improves my own ability to discuss a topic is content that has actually transferred knowledge rather than just decorating my screen for a few minutes.
If I were grading sites on this topic this one would receive high marks, and a stop at shopeasestore continued earning those high marks, the informal grading I do mentally for content sources is something I take seriously even though it is informal and this site has been receiving consistent high marks across multiple sessions today.
Wow, this paragraph is nice, my younger sister is analyzing these
things, therefore I am going to tell her.
Reading this prompted me to dig into a related topic later, and a stop at syrupspire provided some of the starting points for that follow up reading, content that triggers further exploration rather than satisfying curiosity completely is content with real generative energy and this site has plenty of that energy throughout it.
وی کوامترکس، یک مکمل پودری باکیفیت است که از کنسانتره پروتئین وی ساخته شده.
Keizorix
Looking at the surface design and the substance together this site has both right, and a look at silverumber reinforced that integrated quality, sites where presentation and content reinforce each other rather than fighting are sites with full editorial coherence and this one has clearly invested in both layers in a balanced way.
Now planning to recommend this site in a context where my recommendations are taken seriously, and a stop at holcap confirmed I should make that recommendation soon, the small but real act of recommending content into spaces where my taste matters is something I take seriously and this site is worth the recommendation.
Came here from a search and stayed for the side links because they were that interesting, and a stop at quickharbormerchantgallery took me even further into the site, the kind of organic exploration that good content invites is something most sites kill through aggressive interlinking and pushy navigation choices rather than relying on quality.
Now setting up a small reminder to revisit the site on a slow day, and a stop at berryharborcommercegallery confirmed the reminder was a good idea, planning return visits is a small organisational act that signals trust in ongoing quality and this site has earned that planned return through consistent performance across the pieces I have read so far.
такая же беда дружище, продавец сказал, что курьерка дерьмово работает! Но меня посещают смутные сомнения, что курьерку в связи с новым постановлением взяли за яйца! кокаин купить, мефедрон купить а эффор хорош?) на что похож?)
Использование современных технологий защиты данных пользователей
https://redmetsplav.ru/store/titan/rossiyskie-splavy-4/titan-t8—gost-2171-90/truba-titanovaya-t8—gost-2171-90/
Продукция находит применение в производстве электротехники благодаря наличию специализированной электротехнической стали.
https://rms-ekb.ru/catalog/stalnoi-list/stalnoi-list-shkh15-3-5x1000x1400-gost-19903-2006-gladkii-chernyi-goriachekatanyi/
Редметсплав — пример того, как должен работать современный поставщик металлургического сырья.
https://xn--80aeedb0bfzeok.xn--p1ai/catalog/mednyi-perekhodnoi-troinik-press/mednyi-perekhodnoi-press-troinik-70kh34-mm-m2rm-gost-r-52948-2008/
BTC Soul AI
В аське спросил продавца в чем дело? Была ли действительно отправка. Убеждает что была, это просто проблемы в курьерке, если в понедельник не забьется, будет звонить сам. кокаин купить, мефедрон купить Ветка исчезла вместе с долгами.
High quality writing, no marketing speak and no buzzwords that mean nothing, and a stop at syrupserif kept that going, simple direct content that actually communicates something is harder to find than it should be and this is one of the rare places that gets it right consistently across many different posts.
Reading this confirmed that the topic deserves more careful attention than it usually gets, and a stop at unicorntempo extended that elevated framing, content that raises the appropriate weight of a subject without being preachy about it is serving a quiet but important editorial function for the broader cultural conversation about it.
Came away with a slightly better mental model of the topic than I started with, and a stop at urgesnare sharpened that further, content that improves the reader thinking apparatus rather than just dumping facts into it is the rare kind I genuinely value and seek out when I have time to read carefully.
Zyncrogeld
Liked the careful word choice throughout, every term seemed picked for a reason rather than thrown in casually, and a stop at rubyorchardcraftcollective continued that precise style, this kind of attention to small details is what separates careful writing from the usual rushed content that dominates blog spaces today across pretty much every topic I follow.
Came here from a search and stayed for the side links because they were that interesting, and a stop at primevaluecorner took me even further into the site, the kind of organic exploration that good content invites is something most sites kill through aggressive interlinking and pushy navigation choices rather than relying on quality.
Chemical-Mix, хочу заказать 50г. АМ, но на сайте написано что 50грамм нет на складе. кокаин купить, мефедрон купить Сегодня получил свою родненькую
Vive Datavere
Most blog writing on this subject reaches for the same handful of arguments and this post avoided them, and a look at siskastencil continued the original treatment, content that finds its own path through territory other writers have flattened is content with real authorial energy and this site has plenty of that distinctive energy.
If a friend asked me where to read carefully on the topic I would send them here without hesitation, and a look at carobburlap confirmed the recommendation strength, the directness of my recommendation reflects how confident I am in the quality and this site has earned undiluted recommendations from me across multiple recent conversations actually.
Now feeling confident enough in this site to use it as a reference point for evaluating others on the same topic, and a look at ekomug continued the comparison friendly quality, sites that serve as quality benchmarks for their topic are precious and this one has clearly become a benchmark for me on this particular subject area.
Информация о проверке качества продукции повышает лояльность клиентов
https://redmetsplav.ru/store/titan/rossiyskie-splavy-4/titan-et3/provoloka-titanovaya-et3/
Bookmark earned and shared the link with one specific person who would care, and a look at bayougourd got the same targeted share, sharing carefully rather than broadcasting is a discipline I try to maintain and this site is generating shares from me at a sustainable rate rather than the spam rate of viral content.
Glad to find a site whose links lead somewhere worth going rather than back to itself for SEO juice, and a stop at alpinecobble kept that generous outbound feel, citing other peoples work with real respect rather than just for ranking signals is a sign of an honest operation worth supporting going forward.
Ассортимент компании включает более 100 000 позиций, что позволяет закрыть практически любые потребности металлургического производства.
https://rms-ekb.ru/catalog/truba-konstruktsionnaia/truba-konstruktsionnaia-09g2s-127×22-gost-21729-76/
“Подхожу по описанию лазею,лазею, ПУСТО бля нервоз пздц ” кокаин купить, мефедрон купить бро я не как не пойму как фейк мне лс отвечал здесь
Closed three other tabs to focus on this one and never opened them again, and a stop at flintanchor similarly held attention exclusively, content that crowds out other reading from working memory is content with real density and this site has demonstrated that density across multiple pages I have visited so far this morning.
Порадовало наличие вольфрамовых прутков редких диаметров, менеджер оперативно помог с подбором.
https://xn--80aeedb0bfzeok.xn--p1ai/catalog/latunnoe-litoe-koltso/latunnoe-litoe-koltso-90kh200-mm-lts25s2/
After exploring a few of the blog articles on your site, I seriously like
your technique of blogging. I saved it to my bookmark
site list and will be checking back in the near future.
Please check out my website too and let me know your opinion.
QuanterSoft
Appreciate how nothing here feels copied or pieced together from other places, the voice is consistent and the tone stays human, and after I checked tarotshire I noticed the same style holds, which is a small detail but it makes the whole experience feel personal rather than like another generic site.
I am curious to find out what blog platform
you are using? I’m experiencing some minor security issues with
my latest website and I would like to find something more secure.
Do you have any suggestions?
Reading this in my last reading slot of the day was a good way to end, and a stop at sambasavor provided a satisfying close to the reading session, content that ends a day well rather than agitating it before sleep is the kind I value increasingly and this site fits that role for me consistently now.
Approaching this with the usual skepticism I bring to new sites and being slowly persuaded, and a stop at lanternorchardartisanexchange continued that gradual persuasion, the careful path from skeptical reader to genuine fan is the only one I trust and this site has walked me along that path through patient consistent quality across pieces.
Really appreciate this kind of writing, no shouting and no clickbait headlines just steady useful content, and a quick look at jazbox kept that going, definitely a site I will be returning to whenever I need a sensible take on similar topics in the days ahead and also during slower work weeks.
Filo Mercivolta
Now adjusting my mental model of how the topic fits into the broader landscape, and a look at aviarybuckle extended that adjustment, content that affects my structural understanding rather than just my factual knowledge is content with deeper impact and this site is providing those structural updates at a meaningful rate consistently across topics.
Всем привет. Пишу по своему заказу. Заказал я АМ2233- 19.08.,оплатил 22.08.,трек получил 23.08.,24.08. позвонил в спср где меня обрадовали, тут же не дожидаясь доставки поехал к ним и забрал свою посылочку. Скоро пойду вскрывать… остальное отпишу позже. Продаван малорик,в аське почти всегда. на все мои вопросы отвечал без задержек. еще раз спасибо. кокаин купить, мефедрон купить пока никаких точных дат нет. цены будут когда придёт товар, так что ждёмс пока что.
Over the course of reading several posts here a pattern of quality has emerged, and a stop at horcall confirmed the pattern, the difference between sites that hit quality occasionally and sites that hit it consistently is huge and this site has clearly demonstrated the consistent kind through what I have read this morning.
Поиск почтового отделения становится значительно проще, если использовать полный справочник по почтовым отделениям России. Сервис позволяет быстро определить нужный индекс и найти ближайшее отделение связи – https://pochtaops.ru/
Reading this prompted a small note in my reference file, and a stop at brightharbormerchantgallery prompted another, the rare site that contributes useful nuggets to my own working knowledge rather than just consuming my attention is worth the time investment many times over compared to the usual pile of forgettable scroll content.
Greate post. Keep posting such kind of information on your site.
Im really impressed by your site.
Hey there, You have performed a great job.
I’ll certainly digg it and for my part recommend to my friends.
I am sure they will be benefited from this web site.
Just want to flag that this was useful and not bury the appreciation in caveats, and a look at quickridgecommercegallery earned the same direct praise, recognising good work without hedging it with criticism is something I try to practice because over qualified compliments tend to read as backhanded and miss the point sometimes.
Xyrvessa Thornyxel
кто получал последний раз недавно отишитесь о работе магаза. +В РЕПУ!!!!!!! и главное почему ип адрес не меняется на сайте??? кокаин купить, мефедрон купить проверенный магазин
Reading this in the morning set a good tone for the day, and a quick visit to chestnutharbormerchantgallery kept that good tone going, content can do that sometimes when it hits the right notes and finding sites that consistently strike that tone is something I have learned to recognise and reward with regular visits.
Сайт четко ориентирован на промышленный сектор и B2B сегмент
https://redmetsplav.ru/store/titan/rossiyskie-splavy-4/titan-40/poroshok-titanovyy-40/
Поставки жаропрочных сплавов ориентированы на потребности авиационной и энергетической отраслей.
https://rms-ekb.ru/catalog/ugolok-stalnoi/ugolok-iz-konstruktsionnoi-stali-100kh65kh7-mm-c25e-din-59370/
Reading this on the train into work was a better use of the commute than my usual choices, and a stop at ilavex extended that commute reading well, content that improves transit time rather than just filling it is content with practical benefit and this site has earned its place in my morning commute reading rotation.
Surya Fundvale
Быстрая доставка в регионы через «Деловые Линии», груз пришел в целости и отлично упакованным.
https://xn--80aeedb0bfzeok.xn--p1ai/catalog/mednyi-perekhodnoi-troinik-press/mednyi-perekhodnoi-press-troinik-42kh6-mm-m3r-gost-r-52948-2008/
Worth pointing out that the writer made the topic feel more interesting than I had been expecting, and a look at stylesteam continued that elevation effect, content that improves the apparent quality of its subject through skilled treatment is doing something real and this site has clearly developed that kind of editorial alchemy throughout.
Да хоть в очко засыпь, не торкнет кокаин купить, мефедрон купить можно поподробней пожалуйста!Т.к. недавно зарегился на данном форуме и нет возможности отписать в личку
Felt a small spark of recognition when the post named something I had been struggling to articulate, and a look at smartonlinemarket produced more such moments, the rare service of giving readers language for fuzzy intuitions is one of the higher values that good writing can provide and this site offered several today instances.
Thanks for sharing this with the open internet rather than locking it behind a paywall like so many sites do now, and a stop at sagevogue kept the same vibe going, generous helpful and clearly written by someone who actually wants people to learn from it rather than just charge them.
My usual pattern is to skim and bounce but this site has reset that pattern temporarily, and a stop at seacoveartisanexchange maintained the slower reading mode, content that changes how I read is content with structural influence and this site has clearly nudged my reading behaviour toward something better at least for the duration of these visits.
Pelvanix
Glad I gave this fifteen minutes rather than the usual three minute skim, and a look at stylishcartzone earned the same investment, time spent on quality content is rarely wasted but the reverse is also true and learning which sites deserve which kind of attention is part of being a careful online reader.
Solid value for anyone willing to read carefully, and a look at sheentiny extends that value across the rest of the site, this is the kind of place that rewards return visits rather than offering everything in a single splashy post and then leaving readers nothing to come back for later which is unfortunately common.
Все работает, каждый получает ответ оперативно! кокаин купить, мефедрон купить бобик здох ….
Really nice to see things explained without overcomplicating the topic, the words flow naturally and stay easy to follow, and a short visit to carobcattail only added to that experience because the same simple approach is used across the rest of the page too without any change in tone.
Reading this in the time it took to drink half a cup of coffee, and a stop at beaconaster fit naturally into the second half, content that respects the rhythms of a typical morning is content with practical fit and this site has the kind of length and pacing that works for the way I actually read.
Morgan Investment Capital Bank
A piece that read as if the writer was thinking carefully rather than just typing fluently, and a look at ambercanyon continued that considered quality, the difference between fluent typing and careful thinking shows up in writing and this site reads as the product of thought rather than just the product of language fluency apparently.
Now appreciating that the post did not require me to agree with the writer to find it valuable, and a look at ekooat maintained the same useful regardless of agreement quality, content that informs even when it does not convince is content with broader utility and this site reads as useful even when I disagree.
A particular pleasure to read this with a fresh coffee, and a look at aspenfalcon extended the pleasure across more pages, content that pairs well with quiet morning rituals is something I have come to value highly and this site has the kind of energy that fits naturally into a calm reading routine.
Компания работает с изделиями из драгоценных и благородных металлов, что требует высокого уровня квалификации и ответственности.
https://rms-ekb.ru/catalog/plity/plita-khv4f-23x250x160-gost-19903-74/
мне менеджер сказал, что у другого спросит по поводу мхе и выдаст компенсации. кокаин купить, мефедрон купить в течении суток обычно (24 часа не 12)…
Liman Sermvara
Got pulled in by the headline and stayed because the content actually delivered on the promise, and a stop at azuqix kept that trust intact, when a site lives up to its own framing it earns the right to keep showing up in my browser tabs going forward indefinitely from here on out really.
Очень широкий каталог, нашли всё необходимое в одном месте, включая редкие позиции.
https://xn--80aeedb0bfzeok.xn--p1ai/catalog/latunnoe-litoe-koltso/latunnoe-litoe-koltso-600kh200-mm-lts40s/
Found the section structure particularly thoughtful, and a stop at hupbolt suggested the same care across the broader site, structural choices guide the reader through the material in ways most people do not consciously notice but feel the absence of when those choices are made carelessly or not at all.
Thanks for keeping the writing direct without losing the warmth that makes content feel human, and a stop at sketchstamp carried both qualities forward, balancing professionalism and personality is a rare skill and the writers here have clearly figured out how to consistently land it across many posts which I notice.
Reading this slowly because the writing rewards a slower pace, and a stop at calmharborcommercegallery did the same, the pace at which I read content is something I now use as a quality signal and writing that earns a slower pace earns my attention as a reader looking for substance these days.
The clarity here is something I really appreciate, especially compared to sites that pile on jargon for no reason, and a look at lanternorchardcraftcollective was the same, simple direct sentences that actually deliver information instead of dancing around the point for paragraphs at a time which wastes reader patience.
Да, в скайпе их нет и ситтуация мне тоже не нравиться. кокаин купить, мефедрон купить Очень жаль ребята,хорошо работали.
Now recognising the specific pleasure of reading writing that shows real care for sentence shapes, and a look at bagelcameo extended that craft pleasure, sentence level writing quality is something most blog content ignores entirely and this site has clearly invested in the prose layer alongside the substance which is rare today.
BTC-Lumnia v33.2
Have you ever thought about publishing an ebook or guest authoring on other blogs?
I have a blog centered on the same information you discuss and would really like to have you share some stories/information. I
know my subscribers would appreciate your work.
If you are even remotely interested, feel free to send me an e-mail.
Now adding a small note in my reading log that this site is one to watch, and a look at roseharborcommercegallery reinforced the watch status, the few sites I track deliberately rather than encounter accidentally are sites I expect ongoing returns from and this one has cleared the bar for that elevated tracking based on what I read.
Leztruvin Platform
Посылку же должны до дома доставить. кокаин купить, мефедрон купить Заказал на пробу 50гр 203, придёт люди попробуют я отпишусь,планирую сделать 1к9-ну не верю я когда говорят что можно 1к 13,15 итд.
Танталовый прокат незаменим для химически агрессивных сред
https://redmetsplav.ru/store/niobiy1/splavy-niobiya-1/niobiy-nbc-1-2/polosa-niobievaya-nbc-1-1/
Наличие никелевых сплавов гарантирует высокую коррозийную стойкость оборудования, создаваемого заказчиками.
https://rms-ekb.ru/catalog/ugolok-stalnoi/ugolok-iz-konstruktsionnoi-stali-40kh20kh4-mm-50crv4-din-59370/
Konak Sermec
Appreciated that the writer trusted the reader to follow along without constant restating of earlier points, and a look at stereoskein continued that respect for the reader, treating an audience as capable adults rather than as people to be hand held through every paragraph is something I notice and value highly across the open internet today.
это самый ровный магаз братцы!!!) работаю с ними целый год, не разу даже нервы не потрепали) !!! конспирация на высоте, качество наилучшее!продован самый добрый и общительный аах) ну вы поняли! единственное жалко не разу проб бесплатных не получал((( кокаин купить, мефедрон купить 16 числа заказала товарчика)ну пока еще ничего не получила!!! продаван отправил только половинку(объяснил что не хватило реактивчика) но все остальное вышлет как привезут 100ый ))ждем и надеемся)) заказывала и раньше в этом магазе все было ОГОНЬ))
Now noticing the post fit a particular gap in my reading without my having articulated the gap before, and a look at silkgrovecraftcollective extended that gap filling effect, content that meets needs I had not consciously formulated is content with reader insight and this site has clearly developed that anticipatory editorial sense across many pieces.
Just one of those reads that left me feeling slightly more capable rather than overwhelmed, and a look at sonarsandal kept that empowering feel going, the difference between content that builds the reader up and content that intimidates them is huge and this site clearly knows which side of that line to stand.
Индивидуальный подход к нестандартным заказам — изготовили детали по нашим чертежам точно в размер.
https://xn--80aeedb0bfzeok.xn--p1ai/catalog/mednye-otvody-press/mednyi-otvod-press-90-gradusov-21-mm-m3r-gost-r-52948-2008/
Without comparing too aggressively to other sources this one stands out for the right reasons, and a look at stylishgoodscorner continued that distinctive quality, content that distinguishes itself through substance rather than style tricks is content with lasting differentiation and this site has clearly chosen substance based differentiation as its core editorial strategy.
Granted my mood today might be elevating my reading experience but I still think this is genuinely good, and a stop at tyrantvolume reinforced that even discounted assessment, controlling for the mood adjustment that affects content perception this site still reads as substantively above average across multiple pieces I have read carefully today.
Hofkammer+Pro
This post creates a comfortable atmosphere for discussion while still presenting the topic in a well-considered and simple way.
bono bienvenida casino online
Liked the way the post got out of its own way, and a stop at calicocameo extended that invisible craft, the best writing you barely notice while reading because it is doing its work without drawing attention to itself and this site has clearly mastered that disappearing act across the pieces I have read.
Now adding the homepage to my regular check rotation rather than waiting for individual links to find me, and a stop at jikbond confirmed the rotation upgrade, the move from passive discovery to active checking is a vote of confidence in a sites ongoing quality and this site has earned that active engagement clearly.
Турция остаётся одним из самых популярных направлений для отдыха благодаря тёплому морю, развитой инфраструктуре и доступным ценам. Ищете лучшие курорты турции для молодежи? Лучшие курорты для пляжного отпуска, экскурсий и активного досуга собраны на сайте evrobuket-nn.ru/top-kurorty-turcii-gde-otdyhat/ Тут просто подобрать вариант под собственные пожелания и финансы, чтобы путешествие удалось на славу.
Now setting this aside as a model of how to write thoughtfully on the topic, and a stop at cavernfjord extended that model status, content that becomes a reference for how a kind of writing should be done is content with influence beyond its own readership and this site is reaching that level for me clearly today.
Appreciate the thoughtful approach, the writer clearly took time to make this readable for someone who is not already an expert, and a look at beaconbevel kept that going nicely, easy on the eyes and easy on the brain which is always a winning combination when reading on a busy day.
Now setting up a small reminder to revisit the site on a slow day, and a stop at ambergrouse confirmed the reminder was a good idea, planning return visits is a small organisational act that signals trust in ongoing quality and this site has earned that planned return through consistent performance across the pieces I have read so far.
вчера брала СК качество отменное, буду брать еще! кокаин купить, мефедрон купить Слив засчитан.
گینر گلد اپتیموم، پاسخی هوشمندانه به نیاز ورزشکارانی است که نمیخواهند با مصرف کالریهای بیهوده، زیبایی اندام خود را فدای حجم کنند.
A piece that did not require external context to follow, and a look at eloido maintained the same self contained quality, content that stands alone without forcing readers to chase prerequisites is more accessible and this site has clearly thought about how each piece can serve a fresh visitor rather than only existing members.
InvestingHub
Полный справочник по почтовым отделениям России содержит полезную информацию для физических лиц, интернет-магазинов и компаний, регулярно работающих с почтовыми отправлениями https://pochtaops.ru/
первую посылочку получил от селера, сервис на вышем уровне не то что у некоторых!!!!! кокаин купить, мефедрон купить говорю что все качественно быстро и
Reading this gave me a small mental break from the heavier reading I had been doing, and a stop at coppercovemerchantgallery extended that lighter feel, content that provides relief without becoming trivial is harder to produce than people realise and this site has clearly figured out how to be light without being shallow at all.
The examples really helped me grasp the points faster than abstract descriptions would have, and a stop at bisonbatik added a few more practical illustrations that drove the message home, the kind of writing that knows its readers learn better through concrete situations rather than vague generalities is rare and worth recognising clearly.
Thanks for sharing your thoughts about pari match.
Regards
Will recommend this to a couple of friends who have been asking about this exact topic, and after chestnutharborcommercegallery I have even more reason to do so, the kind of site that earns word of mouth rather than chasing it through aggressive marketing or paid placements is always a treat to find online.
Started reading expecting to disagree and ended mostly nodding along, and a look at hurbug continued the pattern, content that wins agreement through evidence and reasoning rather than rhetorical force is the kind that actually shifts minds and this site clearly knows how to do that across what I have read so far.
Профессиональный подход к описанию каждого вида металла
https://redmetsplav.ru/store/molibden-i-ego-splavy/molibden-pnmo49-1/pokovka-molibdenovaya-pnmo49/
Felt a small spark of recognition when the post named something I had been struggling to articulate, and a look at lavenderharborartisanexchange produced more such moments, the rare service of giving readers language for fuzzy intuitions is one of the higher values that good writing can provide and this site offered several today instances.
One thing I really like here is how naturally the information is presented, since the post manages to stay informative, engaging, and simple to follow at the same time, which is not always easy to achieve in online discussions these days.
mejores bonos de casino
Worth pointing out that the writer made the topic feel more interesting than I had been expecting, and a look at mintmeadowcommercegallery continued that elevation effect, content that improves the apparent quality of its subject through skilled treatment is doing something real and this site has clearly developed that kind of editorial alchemy throughout.
Поставки жаропрочных сплавов ориентированы на потребности авиационной и энергетической отраслей.
https://rms-ekb.ru/catalog/list/list-kh12mf-1-4x1000x1000-gost-19903-2006/
Vadamaxio
Liked that the post left some questions open rather than pretending to settle everything, and a stop at tokenudon continued that intellectual honesty, content that respects the limits of its own claims is more trustworthy than content that overreaches and this site has clearly figured out which positions it can defend confidently.
Редметсплав — надежный партнер, работаем по поставкам нержавеющего проката уже второй год, сбоев не было.
https://xn--80aeedb0bfzeok.xn--p1ai/catalog/latunnoe-litoe-koltso/latunnoe-litoe-koltso-700kh300-mm-lazhmts/
гаси кидалу по полной -25 маловато я добавлю кокаин купить, мефедрон купить Будем дальше работать с этим магазином.
Digital Reserve
Reading this prompted a brief but useful conversation with a colleague who happened to walk by, and a stop at silvercovemerchantgallery extended that conversational seed, content that becomes a starting point for in person discussion rather than ending in solitary reading is content with social generative energy and this site has plenty of it apparently.
Probably worth setting aside a longer block to read more carefully than I can right now, and a stop at camelchamois confirmed the longer block plan, the impulse to schedule dedicated time for a sites archive is itself a measure of trust and this site has earned that scheduling impulse from me clearly today actually.
По порядку: мне 35. Да, это единичный случай, потому как работал с другими поставщиками до последнего запрета. 12к+транспорт- это, видимо, “не о чем”. По твоим словам, мне следует заткнутся, читать о магазине какой он хороший и наслаждаться жизнью?[/quote] кокаин купить, мефедрон купить как придет так отпишусь за качество и за сроки ))
QuantexEspana
Honestly impressed by how much useful content sits in such a small post, and a stop at turbinevault confirmed the rest of the site packs a similar punch, density without confusion is a hard balance to strike and this site has clearly cracked the code on it across many different topic areas covered.
Great work on keeping things readable, the post never drags or repeats itself which I really appreciate, and a stop at shiretrellis added a bit more context that fit naturally with what was already said here, no need to read everything twice to get the point being made today.
Представлены технически сложные сплавы ниобия и тантала
https://redmetsplav.ru/store/molibden-i-ego-splavy/molibden-mo-cu30-1/izdeliya-iz-molibdena-mo-cu30/
I appreciate how this post stays easy to understand and engaging without making the topic feel too complicated for readers.
bono gratis casino
Now adding this site to a small mental group of recommendations I keep ready for specific kinds of inquiries, and a stop at urbancartzone extended the recommendation readiness, content that I can confidently point friends and colleagues toward in specific contexts is content with real social utility and this site has that utility clearly.
Canl? Endekvar
Even across multiple posts the writers voice has remained consistent in a way I appreciate, and a stop at bevelhamlet continued that voice, sites that maintain editorial consistency across many pieces have something most sites lack and this one has clearly worked out how to keep its voice steady across what reads as a growing archive.
Поставки жаропрочных сплавов ориентированы на потребности авиационной и энергетической отраслей.
https://rms-ekb.ru/catalog/krug-iz-instrumentalnoi-stali/krug-2kh6v8m2k8-54-gost-2590-2006/
Ам имеет высокий толер об этом уже говорилось не раз кокаин купить, мефедрон купить Всем доброго времени суток 😉 заказал у ув ТС продукции немного, жду трек сегодня должен быть))) впервые обратился к данному сселеру надеюсь все пройдет на уровне. Как и что оценю и выложу. краткий трипчик по продуктам если понравится то сработаемся ))))) всем удачных покупок и продаж;)
Once I trust a site this much I tend to read everything they publish and that is the trajectory I am on with this one, and a stop at beaconcopper confirmed the trajectory, the rare progression from interested reader to comprehensive reader is something only certain sites earn and this one is earning that progression rapidly.
Reading more of the archives is now on my plan for the weekend, and a stop at celerycivet confirmed the archive worth the time, the rare archive worth a dedicated reading session rather than just casual sampling is the rare archive of serious work and this site has clearly produced enough of that work to warrant the deeper exploration.
Comfortable reading experience throughout, no jarring tone shifts and no awkward formatting, and a look at antlerebony kept that smooth feel going, the kind of editorial polish that goes unnoticed when present but glaring when absent is something this site has clearly invested in across the broader content as well which deserves recognition.
Now sitting with the thoughts the post triggered rather than rushing on to the next thing, and a stop at sobertrifle extended that reflective pause, content that earns time for thought after closing the tab is content of higher value than the merely interesting and this site has clearly produced that lasting effect today.
Высокая квалификация персонала, знают специфику редких металлов и особенности их применения.
https://xn--80aeedb0bfzeok.xn--p1ai/catalog/mednye-otvody-press/mednyi-otvod-press-45-gradusov-54-mm-m1t-gost-r-52948-2008/
Transparent Fin Ledger Hub
Picked a friend mentally as the audience for this and decided to send the link, and a look at biablur confirmed the send was the right choice, choosing whom to share content with is a small act of curation that I take more seriously than the public sharing most platforms encourage these days online.
Пока писал этот пост на почту пришел трек ))) Ждал всего 1 день,респект оперативно. кокаин купить, мефедрон купить работаю с ним уже давно.не бойтесь тут всё чесно!
A piece that reads as if the writer trusted readers to fill in obvious gaps, and a look at elonox continued that respectful approach, content that does not over explain what the reader can infer is content that respects intelligence and this site has clearly chosen to write to capable readers rather than to the lowest common denominator.
Qué tal comunidad, deseo recomendar una página que descubrí recientemente y que me llamó mucho la atención. Es una lectura muy interesante sobre la historia del fútbol argentino, desde los primeros
clubes hasta los títulos mundiales.
Desde mi experiencia, siempre me interesó conocer cómo fue construyéndose
la cultura futbolística en Argentina. El artículo describe
de forma excelente la llegada del fútbol al país, el papel de las comunidades
inmigrantes, así como el crecimiento de los clubes que marcaron generaciones.
Lo que encontré más interesante es que no solo enumera acontecimientos,
sino que también habla de la relación entre los clubes y los barrios.
Descubrí muchos detalles interesantes sobre instituciones históricas, rivalidades clásicas
y la forma en que el fútbol pasó de ser un deporte importado a convertirse en un símbolo cultural argentino.
También, el texto dedica espacio a grandes figuras históricas como las máximas referencias del fútbol argentino.
La forma en que se describe su impacto ayuda a comprender
por qué son admirados en todo el mundo.
Otro aspecto que me pareció excelente es la sección dedicada a los clubes argentinos y a
los torneos internacionales. La información está bien organizada y permite entender mejor la importancia de la Copa
Libertadores.
Si eres fanático del fútbol, te sugiero dedicar unos minutos a
este artículo. Aun si recién estás comenzando a interesarte por este
deporte, encontrarás información valiosa y una lectura entretenida.
Como recomendación final, es una lectura que recomiendo sinceramente.
Me ayudó a entender mejor la historia del fútbol argentino y la guardaré entre mis lecturas recomendadas.
Totalmente recomendada.
Do you have a spam issue on this blog; I also am a blogger, and I was wanting to know your situation; we
have developed some nice methods and we are looking to exchange solutions with others, why not shoot me an e-mail if interested.
This post creates a positive and interesting atmosphere by presenting the topic in a easy-to-understand and fair way throughout.
bono gratis casino
Felt the writer was being honest with the reader which is rare enough that I want to acknowledge it, and a look at ibabowl continued that honest feel, content built on actual knowledge rather than aggregated summaries is something I value highly and rarely come across in regular searches on the open internet these days.
Now feeling mildly impressed in a way I do not quite remember feeling about a blog in a while, and a stop at lavenderharborcraftcollective extended that mild impression, content that produces specific positive emotional responses rather than just neutral information transfer is content with extra dimensions and this site has those extra dimensions clearly.
Qavionex
https://reitingmebel.ru/ – независимый сайт с актуальными рейтингами производителей мебели по регионам России. В подборках собраны лучшие компании и модели для дома, офиса и детской: кухни, школьные парты, растущие стулья, стульчики для кормления и другие категории. Рейтинги формируются на основе отзывов, качества материалов, сервиса, гарантий и соотношения цены и надежности.
Started forming counter examples to test the claims and the post handled most of them implicitly, and a look at jilbrew continued that anticipatory style, writers who think two steps ahead of the critical reader save themselves from a lot of follow up work and this writer has clearly internalised that habit consistently.
упаковка – неплохо, но не идеально. Особенно глупо, когда в описании отправления пишут “Косметика”, а там, бл*ть, пачка сигарет. Оочень странно на меня смотрели в офисе спсра, знаете ли. 4/5 кокаин купить, мефедрон купить Успешных вам продаж
Rzetelny Zyskatnik
Информация о проверке качества продукции повышает лояльность клиентов
https://redmetsplav.ru/store/molibden-i-ego-splavy/molibden-58/provoloka-molibdenovaya-58/
Bookmark earned, share earned, return visit earned, all from one reading session, and a look at tacticstaff did the same, the trifecta of bookmark and share and return is rare in a single visit and represents the highest level of engagement I tend to offer any piece of online content these days here.
Learned something from this without having to dig through layers of fluff, and a stop at sunharborcommercegallery added a bit more context that helped tie things together for me, definitely a useful corner of the internet for anyone who wants real information without the usual marketing nonsense around it that often ruins similar pages.
Судя по отзывам магазин достойный! Скоро к вам наведаюсь за покупками, удачи во всех делах. кокаин купить, мефедрон купить Сделал очередной заказ в этом магазине:good: всё пришло качество как всегда радует буду дальше работать с вами:good:приятно иметь дела с ответственными партнёрами:voo-hoo: процветания вашему магазину:):):)
Наличие на складе редких металлов, таких как цирконий, выделяет компанию на фоне конкурентов, торгующих только массовым прокатом.
https://rms-ekb.ru/catalog/stalnoi-list/stalnoi-list-17g1s-5-5x1800x1600-gost-19903-2006-gladkii-otsinkovannyi-goriachekatanyi/
Decided to read this site for a while before forming a verdict, and the verdict after several pages is positive, and a stop at crocusazalea continued that pattern, judging a site requires more than one post and giving sites a fair sample is something I try to do for promising candidates rather than rushing to dismiss.
Worth pointing out that the writing reads as confident without being defensive about it, and a look at garnetcarbon extended that secure tone, content that does not pre emptively argue against imagined critics has a different quality from defensive writing and this site reads as written from a place of real ease.
Honest take is that I will probably forget most of what I read online today but this post is one I will remember, and a stop at heronfjord kept that same memorable quality going, certain writing leaves a residue in the mind in a way most content simply does not manage.
Baltbet — это уникальный симулятор спортивного сезона от NS Hair And Beauty Cosmetics, доступный в Google Play. Приложение предлагает предсказывать исходы матчей, управляя стартовым капиталом в 100 монет за игру. Каждый матч имеет уникальный коэффициент от двух до четырёх, на который влияют сила команды и элемент случайности. Посетите https://play.google.com/store/apps/details?id=com.statistafut.seasom и попробуйте пройти весь сезон с прибылью — простые правила скрывают глубокую стратегию, делая каждое решение по-настоящему захватывающим.
ZaklTrion
Российский производитель «Вальц Проф» специализируется на выпуске высококачественных стальных профилей для строительства и отделки: фасадно-перегородочные системы из оцинкованной и нержавеющей стали, профили серий ВП150, ВП165, ВП250 и инновационный ВП372 с терморазрывом обеспечивают надёжность и долговечность любых конструкций. На сайте https://waltzprof.com/ представлен полный каталог продукции, включая трубы профильные оцинкованные, штапики для крепления стекла, самоклеящиеся уплотнители, автоматические пороги серии Smart LDM и скрытые петли для дверей — всё это по выгодным условиям с прямой связью с производителем.
Технические специалисты компании помогли выбрать оптимальный сплав для работы в агрессивных средах.
https://xn--80aeedb0bfzeok.xn--p1ai/catalog/latunnaia-vtulka/latunnaia-vtulka-110-mm-lts40mts3zh/
bedava bitcoin, ücretsiz kripto, casino bonus, casino sitesi, güvenilir casino, online casino, canlı casino, slot
oyunları, rulet oyna, poker oyna, blackjack oyna, bahis sitesi, güvenilir
bahis, canlı bahis, spor bahisleri, yüksek oran bahis, kaçak bahis, bedava bahis, deneme bonusu,
hoşgeldin bonusu, casino free spin, slot free spin, kumar
sitesi, kumarhane, çevrimiçi kumar, illegal bahis, yasa dışı bahis, illegal casino, yasadışı kumar, kayıt
olmadan bahis, kimlik doğrulama yok bahis, bahis para yatır,
bahis para çek, casino para çekme, casino para
yatırma, slot jackpot, jackpot casino, bedava casino, ücretsiz
casino, casino demo, canlı krupiye, canlı rulet, canlı blackjack, canlı poker, canlı baccarat, baccarat oyna, baccarat sitesi, çevrimsiz bonus, yatırımsız
bonus, çevrim şartsız bonus, kayıp bonusu, kayıp iadesi, free
bet, freespin, casino cashback, bahis cashback, bedava iddaa, maç izle
bahis, canlı maç bahis, futbol bahis, basketbol bahis,
tenis bahis, esports bahis, sanal bahis, sanal
spor bahis, köpek yarışı bahis, at yarışı bahis,
greyhound bahis, poker freeroll, escort bayan, escort istanbul, escort ankara, escort izmir, escort bursa, escort adana,
escort kocaeli, escort mersin, escort antalya, escort gaziantep, escort konya, escort
diyarbakır, escort aydın, escort kayseri, vip
escort, ucuz escort, eve gelen escort, otele gelen escort, saatlik escort, gecelik escort, haftalık escort, çıkmalık escort,
rezidans escort, öğrenci escort, yabancı escort, rus escort,
ukraynalı escort, arap escort, sarışın escort, esmer escort, olgun escort
Honest take is that this was better than I expected when I clicked through, and a look at vocabtoffee reinforced that, the bar for online content has dropped so much that finding something thoughtful and well constructed feels almost noteworthy now which says more about the average than about this site itself.
Thank you for taking the time to compile this useful overview. The fair perspective you maintained throughout the text makes it a highly reliable resource for the readers here.
sportwetten mit giropay
Refreshing to find writing that does not try to manipulate the reader into clicking onto the next page through cliffhangers and forced engagement, and a stop at velvetgrovecommercegallery continued in the same respectful way, this is what reader first design actually looks like in practice rather than just in marketing copy that sounds nice.
“Так вот Основа это Продукта похожа на таблетки Гидроперит” кокаин купить, мефедрон купить я тоже несколько раз брал ,всё прошло чётко ,качество радует,доставлено всё в лучшем виде,оператор молочага всегда обьяснит всё что к чему,вообщем магазин для меня лучший ,самый надёжный,УСПЕХОВ И ПРОЦВЕТАНИЯ ВАШЕЙ КОМАНДЕ!!!!!!
Honest opinion is that this is the kind of post that builds long term trust with readers, and a look at solacetomato reinforced that perception, the slow accumulation of trust through consistent quality is the only sustainable way to build a real audience and this site is clearly playing that long game.
Solid quality, the kind of work that holds up to a careful read rather than a quick skim, and a quick look at carobhopper kept that standard going strong, content that rewards attention rather than punishing it is something I appreciate more and more these days online across nearly every topic I follow.
Worth pointing out the careful word choice in this post, no buzzwords and no jargon, and a look at urbanflashhub continued that disciplined vocabulary, sites that resist the pull of trendy language are sites that will read well in five years and this one is clearly built for that kind of long durability.
A nicely understated post that does not shout for attention, and a look at cloverhedge maintained the same quiet quality, understatement is a stylistic choice that distinguishes serious writing from attention seeking writing and this site has clearly committed to the understated approach as a core editorial value rather than just a phase.
Now I want to find more sites like this but I suspect they are rare, and a look at copperharborcommercegallery extended that thought, the few sites that meet this quality bar are precious specifically because they are rare and finding others like them is one of the ongoing projects of careful internet curation across the years.
Магаз пропал из аськи и скайпа… Тобишь просто не появляется в онлайне. Такое уже бывало, но щас хз что… Качество товара было отменным. 203й высочайшего качества. кокаин купить, мефедрон купить Думать тут остается только одно: хуйня какая то происходит непонятная…
Комфортная городская жизнь начинается с правильного выбора жилья, и ЖК Апсайд Мосфильмовская предлагает все необходимые условия для удобного проживания в Москве: upside development мосфильмовская
GPT v61+ App
Worth marking this site as one to come back to deliberately rather than by accident, and a stop at apronbadge reinforced that intention, the difference between sites I find again by chance and sites I return to on purpose is meaningful and this one has clearly moved into the deliberate return category for me.
Closed the post with a small satisfied sigh, and a stop at cobradamson produced the same gentle exhale, content that ends well is content that respects the rhythm of reading and the writers here have clearly thought about how their pieces close rather than just trailing off when they run out of things to say.
Четкое позиционирование как эксперта в области редких металлов
https://redmetsplav.ru/store/magniy-i-ego-splavy/zarubezhnye-splavy-2/magniy-sismg4637-03—ss-144637/truba-magnievaya-sismg4637-03—ss-144637/
The tone of this post feels natural and interesting, which makes the discussion more enjoyable and encourages meaningful interaction.
online casino mit giropay einzahlung
Reading this gave me the rare experience of fully agreeing with all the conclusions, and a stop at beavercactus continued that agreement pattern, content that aligns with my existing views without seeming designed to do so is just content that happens to be reasonable and this site reads as reasonable rather than ideological mostly.
This is the wave – the big wave.
Now adjusting my mental list of reliable sites for this topic, and a stop at solosupple reinforced the adjustment, the small ongoing curation work of maintaining trusted sources is one of the actual practical activities of careful reading and this site has earned a permanent place on my list for this particular subject.
Bookmark earned, calendar reminder set, share queued, all from one good post, and a look at elucan did the same, when a single reading session triggers multiple downstream actions you know the content has actually moved me beyond the page and this site is moving me at that higher level reliably.
Реализация твердых сплавов типа «Победит» ориентирована на производителей металлорежущего и бурового инструмента.
https://rms-ekb.ru/catalog/ugolok-stalnoi/ugolok-iz-konstruktsionnoi-stali-80kh80kh8-mm-16crmo44-en-10056-1/
я бы тоже заценил кокаин купить, мефедрон купить по предержи свои слова, некого еще не обманул за 2 года, кого я кинул напиши сюда пример?
A thoughtful piece that did not strain to be thoughtful, and a look at ibacane continued that effortless quality, when thinking shows up in writing without the writer drawing attention to it you know you are reading something genuinely considered rather than something performing the appearance of consideration which is also common online.
Beyond the immediate post itself the editorial sensibility behind the site is what struck me, and a stop at chaletcobra continued displaying that sensibility, content that reveals editorial choices through accumulated reading is content with structural quality and this site has clearly developed an underlying approach worth identifying through multiple sessions of reading.
Just want to acknowledge that the writing here is doing something right, and a quick visit to lemonlarkartisanexchange confirmed the same standards run across the broader site, recognising good work is something I try to do when I find it because the alternative is silence and silence rewards mediocrity.
Hi Dear, are you in fact visiting this web site daily, if so then you will without doubt take nice experience.
Офис в Екатеринбурге работает четко, забирали самовывозом — складская логистика на высоте.
https://xn--80aeedb0bfzeok.xn--p1ai/catalog/list-mednyi/list-mednyi-1-5kh600kh1500-mm-m1m/
всегда ровно все было и есть. так что я кокаин купить, мефедрон купить Тоже чуть дольше чем обычно ждал посылку,но все получил в полном объеме.Я думаю лучше маленько подождать и без суеты забрать.
Новый жилой комплекс Аурум Тайм ориентирован на людей, которые ценят качество, надежность и комфорт в каждом аспекте городской жизни – https://aurum-time-grad.ru/
Reading this in segments because the day was busy, and the post survived the fragmented attention well, and a stop at crocusgrouse held up similarly under interrupted reading, content that can withstand modern distracted reading patterns rather than requiring a perfect block of focused time is increasingly the kind I prefer.
Time spent here today felt productive in the way that good reading sessions sometimes do, and a stop at tunicvicar extended that productive feeling across the rest of the morning, the difference between productive reading and merely passing time is real and this site is consistently on the productive side for me lately.
Worth a slow read rather than the fast scan I usually default to, and a look at tealcovemerchantgallery earned the same slower pace from me, content that resets my reading speed downward is content with substance worth absorbing and this site has produced that effect on me multiple times now over the last week here.
Now considering the post as evidence that careful blog writing is still possible, and a look at garnetcinder extended that evidence, the broader question of whether the modern web can sustain quality writing has obvious empirical answers in sites like this one and seeing them is reassuring even when they remain a minority overall today.
وی ایزوله کیجد، با استفاده از فناوریهای پیشرفته میکروفیلتراسیون، تضمین میکند که پروتئین وی به خالصترین شکل ممکن خود برسد.
Проект 26 ParkView создается для людей, которые хотят жить в комфортной среде с качественным благоустройством, современными инженерными решениями и удобным доступом ко всем необходимым объектам инфраструктуры, https://26park.ru/
Вердикт: кокаин купить, мефедрон купить отзовусь о магазине, хороший,надежный)
Started reading without much expectation and ended on a high note, and a look at shoreskipper continued that arc, content that builds rather than peaks early is a sign of a writer who knows how to structure a piece for sustained reader engagement rather than relying on a strong hook to do all the work.
This post does a good job of keeping the discussion thoughtful without making the topic feel difficult or hard to follow.
retrait visa casino
Bookmark moved to my permanent reference folder rather than the casual maybe later folder, and a look at sharesignal earned the same upgrade, the distinction between casual interest and lasting reference is something I track carefully and very few sites cross that threshold but this one did so without much effort apparently.
Указание конкретных марок сплавов в разделах помогает специалистам
https://redmetsplav.ru/store/magniy-i-ego-splavy/zarubezhnye-splavy-2/magniy-ms6—jis-h-4204/prutok-magnievyy-ms6—jis-h-4204/
Clear, concise and easy to access.
Portal gier dudespin casino poland to Twój wybór! Spróbuj szczęścia w Dudespin – Twoim kasynie online! Zarejestruj się i wygrywaj – bezpieczeństwo i niezawodność. Dude Spin to Twój przewodnik po świecie hazardu; wygrane i sukces są tylko tutaj! Dudespin Casino to Twój osobisty klub gier. Wykorzystaj w pełni dudespin-casino.eu.com – graj mądrze.
Важным преимуществом является возможность изготовления деталей и изделий по индивидуальным чертежам заказчика.
https://rms-ekb.ru/catalog/stalnoi-list/stalnoi-list-22k-15x1800x1500-gost-19903-2006-gladkii-neotsinkovannyi-goriachekatanyi/
по предержи свои слова, некого еще не обманул за 2 года, кого я кинул напиши сюда пример? кокаин купить, мефедрон купить Магазин достоин внимания!! цены сладкие)))
Now feeling the quiet pleasure of finding writing that takes itself seriously without being self serious, and a stop at jovigrove extended that subtle pleasure, the gap between earnest and pretentious is fine and this site has clearly chosen to land on the earnest side without slipping over into pretentious which is impressive.
Portal gier ajlepsze gry na dudespin to Twój wybór! Spróbuj szczęścia w Dudespin – Twoim kasynie online! Zarejestruj się i wygrywaj – bezpieczeństwo i niezawodność. Dude Spin to Twój przewodnik po świecie hazardu; wygrane i sukces są tylko tutaj! Dudespin Casino to Twój osobisty klub gier. Wykorzystaj w pełni dudespin-casino.eu.com – graj mądrze.
Район Мосфильмовской давно считается одним из наиболее комфортных для жизни в Москве, а ЖК Апсайд Мосфильмовская органично дополняет преимущества этой локации, новый жк на мосфильмовской
Took a screenshot of one section to come back to later, and a stop at pineharbormerchantgallery prompted another saved tab, the urge to capture and revisit specific pieces of content is something I rarely feel but when I do it tells me the work is worth more than the average passing read for sure.
Picked up a couple of new ideas here that I can actually try out, and after my visit to urbanpickzone I have even more notes saved, this is the kind of resource that pays you back for the time you spend on it which is rare to come across in this corner of the web.
Поставки всегда вовремя, логистика отлажена до мелочей, что важно для бесперебойной работы цеха.
https://xn--80aeedb0bfzeok.xn--p1ai/catalog/latunnaia-vtulka/latunnaia-vtulka-330-mm-lts40mts1-5/
This post provides a really helpful overview that covers all the necessary bases without any one-sidedness. I think anyone who stumbles upon this page will find a lot of value in your writing.
retrait visa casino
Skipped the related links section thinking I had read enough and then came back to it later when curiosity got the better of me, and a stop at hyxbrook confirmed I should have just read it first, every section of this site appears to deserve careful attention rather than skipping past lazily.
Felt slightly impressed without being able to point to one specific reason, and a look at cocoabasil continued that diffuse positive feeling, when content works at a level you cannot easily articulate the writer is doing something with craft rather than just delivering information and that is something I have learned to recognise.
Picked this post to share in a Slack channel where I knew it would be appreciated, and a look at apronferret suggested I will share more from here later, content worth sharing into a professional context is content that has earned a higher kind of trust than mere personal interest and this site has it.
Просто респектище курьеру. На моей памяти такие клады были всего раза три-четыре за три года обитания меня на этом форуме. кокаин купить, мефедрон купить Товар тоже на 5/5 (только с концетрацией мало 1 к 5 или 1 к 7 дальше держит не долго)
Now adding the homepage to my regular check rotation rather than waiting for individual links to find me, and a stop at hollycattail confirmed the rotation upgrade, the move from passive discovery to active checking is a vote of confidence in a sites ongoing quality and this site has earned that active engagement clearly.
We are a group of volunteers and starting a new initiative in our community. Your blog provided us with valuable information to work on|.You have done a marvellous job!
Refreshing to find writing that does not try to manipulate the reader into clicking onto the next page through cliffhangers and forced engagement, and a stop at beetledune continued in the same respectful way, this is what reader first design actually looks like in practice rather than just in marketing copy that sounds nice.
Looking at this from the perspective of someone tired of generic content the contrast is striking, and a look at ibekeg maintained that distinctive feel, sites with strong editorial identity stand out against the bland background of algorithmic content and this one has clearly developed an identity worth recognising through careful attention.
A small editorial detail caught my attention, the way headings related to body text, and a look at fawnfoxglove maintained that careful relationship, structural details like that show up to readers who notice them and the writers here have clearly thought about every level of the piece rather than just the words.
Современная архитектура и качественное благоустройство делают ЖК 26 ПаркВью привлекательным вариантом для постоянного проживания в Москве: https://26park.ru/
Found the post genuinely useful for something I was working on this week, and a look at emynox added more material I will reference, content that connects to my actual life and work rather than just being interesting in the abstract is the kind I will pay attention to and return to repeatedly.
джива качественная=)получше чем впрошлый раз была=) кокаин купить, мефедрон купить Сегодня получил посыль! В супер упаковке!
Even just sampling a few posts the consistency is what stands out, and a look at coralmeadowtradegallery confirmed the broader pattern, sites where every piece I sample lives up to the standard set by the others are sites with serious quality control and this one has clearly invested in whatever editorial process produces that consistency reliably.
Now appreciating the small but real way this post improved my afternoon, and a stop at flonox extended that small improvement effect, content that produces measurable positive impact on the texture of a reading day is content with real value and this site is producing those small positive impacts at a sustainable rate apparently.
Апсайд Мосфильмовская подойдет тем, кто ищет современное жилье с высоким уровнем комфорта и качественным благоустройством территории: новостройки москвы
My usual pattern is to skim and bounce but this site has reset that pattern temporarily, and a stop at lemonlarkcraftcollective maintained the slower reading mode, content that changes how I read is content with structural influence and this site has clearly nudged my reading behaviour toward something better at least for the duration of these visits.
Сайт четко ориентирован на промышленный сектор и B2B сегмент
https://redmetsplav.ru/store/magniy-i-ego-splavy/zarubezhnye-splavy-2/magniy-mg-c51-t6/polosa-magnievaya-mg-c51-t6/
так-то уже четверг бро кокаин купить, мефедрон купить Спустя 3 часа , началась небольшая депрессия(Со всем не большая)
Picked something concrete from the post that I will use immediately, and a look at cypresselder added another concrete piece, content that produces immediately useful output rather than just abstract appreciation is content that earns its place in my regular rotation without needing any further evaluation from me at this point honestly.
ООО «РМС» поставляет вольфрамовые порошки, соответствующие строгим техническим условиям (например, ТУ 48-4205-112-2017).
https://rms-ekb.ru/catalog/truba-konstruktsionnaia/truba-konstruktsionnaia-12kh18n10t-4-8×1-4-gost-21729-76/
Чистая горная вода «Эльбрусинка» из Карачаево-Черкесии — идеальный выбор для всей семьи: добытая в экологически чистом регионе у подножия Эльбруса, она относится к детской воде высшей категории с мягким вкусом и нейтральным pH 7,5. На сайте https://voda-s-gor.ru/168 можно заказать удобную бутыль 19 литров всего за 450 рублей с доставкой на дом или в офис по Махачкале и Каспийску. Сбалансированный минеральный состав — кальций, магний и натрий — делает её безопасной даже для детей.
Just want to flag that this was useful and not bury the appreciation in caveats, and a look at gentianfawn earned the same direct praise, recognising good work without hedging it with criticism is something I try to practice because over qualified compliments tend to read as backhanded and miss the point sometimes.
Компания «МАСТЕРВУД-СТАНКИ» предлагает полный спектр оборудования для деревообработки и производства мебели от ведущих заводов HBW, Blue Elephant, Fravol, Maggi и V-hold. В каталоге — форматно-раскроечные, кромкооблицовочные, сверлильно-присадочные, четырёхсторонние и фрезерные станки с ЧПУ, а также сушильные камеры, покрасочные линии и инструмент. Опытные менеджеры подберут оборудование за 10 минут, а специалисты обеспечат доставку, пуско-наладку, обучение и сервис. Подробнее — на сайте https://mwstanki.ru/. Доступен лизинг, запчасти и демонстрационный зал в Химках. Надёжное решение для вашего производства.
Started reading expecting to disagree and ended mostly nodding along, and a look at timbertrailcommercegallery continued the pattern, content that wins agreement through evidence and reasoning rather than rhetorical force is the kind that actually shifts minds and this site clearly knows how to do that across what I have read so far.
More substantial than most of what I find searching for this topic online, and a stop at salutesyrup kept that quality consistent, this is one of those sites where the writing actually rewards careful reading rather than punishing the patient reader with empty filler stretched out across long paragraphs that say very little.
A satisfying piece in the way that good meals are satisfying rather than just filling, and a look at dunecovemerchantgallery extended that satisfaction, the metaphor between content and meals is one I find useful and this site reads as a satisfying meal rather than the empty calories that most content provides for casual readers.
Ребята кто заказывал 25 реагент,как по качеству??????????? мефедрон купить, кокаин купить онлайн В-общем, я ещё два часа пил вискарик со льдом,да лопал пиццу 😉
Спасибо команде за профессионализм и помощь в реализации нашего сложного промышленного проекта!
https://xn--80aeedb0bfzeok.xn--p1ai/catalog/melkhiorovaia-truba/melkhiorovaia-truba-17kh3kh14000-mm-mnzhmts30-1-1-gost-10092-2006/
A well calibrated piece that knew its scope and stayed inside it, and a look at bisonholly maintained the same scope discipline, scope creep is one of the failure modes of long blog posts and this site has clearly invested in the editorial discipline to prevent it which shows up in tightly contained pieces.
Ikigai Auto специализируется на доставке автомобилей из-за рубежа в Россию под ключ. Специалисты берут на себя всё: подбор, выкуп, экспортные документы, доставку и таможенное оформление. Комиссия от 70 000 рублей, оплата поэтапная и прозрачная — инвойс клиент оплачивает сам через банк, таможенные платежи — напрямую по реквизитам службы. Оставьте заявку на https://ikigaiauto.ru/ — менеджеры подберут лучшие варианты под ваш бюджет и параметры.
действительно принимают? мефедрон купить, кокаин купить онлайн следующий раз пришлем поношеные презервативы но ты будешь рад!!!
Considered as a whole this site has developed a coherent point of view that comes through in individual pieces, and a look at bomboard continued displaying that coherence, sites with a unified perspective rather than a grab bag of takes are sites with editorial maturity and this one has clearly developed that maturity through years of work.
БигПикча — один из самых популярных российских фотомедиа-порталов, где каждый день публикуются захватывающие новости в фотографиях, редкие исторические снимки и увлекательные лонгриды. На https://bigpicture.ru/ вы найдёте всё: от криминальных хроник и путевых заметок до неожиданных научных фактов и забавных подборок из мировых соцсетей — каждый материал написан живо и с душой, а визуальная подача делает чтение особенно увлекательным.
Speaking as someone who reads a lot on this topic this site has earned a high position in my source rankings, and a stop at valuegoodsbazaar reinforced that ranking, the informal ranking of sources for a topic is something I maintain mentally and this site has moved into the upper portion of those rankings clearly.
Quiet confidence runs through the whole post, no need to shout to make the points stick, and a stop at quartzmeadowcommercegallery carried that same restrained voice forward, content that respects the reader by trusting its own substance rather than dressing it up in theatrical language is what I look for online and rarely actually find these days.
Reading this gave me the rare experience of fully agreeing with all the conclusions, and a stop at condoraspen continued that agreement pattern, content that aligns with my existing views without seeming designed to do so is just content that happens to be reasonable and this site reads as reasonable rather than ideological mostly.
Хочешь воплотить смелые эротические фантазии в ярких текстах? Нейросеть на сайте https://www.ero-storitop.com/ создаёт горячие рассказы за пять секунд. Достаточно описать задумку — герои только 18+, всё анонимно, бесплатно и без регистрации. Чем подробнее описание, тем горячее выходит история. Попробуй прямо сейчас!
Refreshing tone compared to the dry corporate posts on similar topics, and a stop at senatetoucan carried that personality through nicely, you can tell when a real person is behind the writing versus a content team chasing metrics and this site definitely falls into the former category clearly across what I have seen.
Came away feeling slightly smarter than I was when I started, that is a real win, and a stop at argylebasil added a bit more to that, the rare site that actually transfers some of its knowledge to the reader in a way that sticks rather than just creating an illusion of learning briefly.
Felt the writer respected me as a reader without making a show of doing so, and a look at ilanub continued that quiet respect, this is the kind of small but meaningful detail that separates the sites I bookmark from the ones I close after a single skim and never return to again no matter how interesting the headline.
Трек бьется. Как придет отпишу. Если все ровно то я ваш постоянный клиент, цены и ассортимент радуют. мефедрон купить, кокаин купить онлайн напрягает долгое молчание продовца на переписку,возможно занят.
Honestly slowed down to read this carefully which is not my default, and a look at icabran kept me in that careful reading mode, the kind of writing that demands attention by being worth attention is rare in a media environment full of content engineered to be skimmed not read with any real focus today.
Bookmark earned and shared the link with one specific person who would care, and a look at hollydragon got the same targeted share, sharing carefully rather than broadcasting is a discipline I try to maintain and this site is generating shares from me at a sustainable rate rather than the spam rate of viral content.
Portal gier casino dudespin to Twój wybór! Spróbuj szczęścia w Dudespin – Twoim kasynie online! Zarejestruj się i wygrywaj – bezpieczeństwo i niezawodność. Dude Spin to Twój przewodnik po świecie hazardu; wygrane i sukces są tylko tutaj! Dudespin Casino to Twój osobisty klub gier. Wykorzystaj w pełni dudespin-casino.eu.com – graj mądrze.
Reading this triggered a small change in how I think about the topic going forward, and a stop at bevelbison reinforced that subtle shift, the rare content that actually moves my thinking rather than just confirming or filling it is the kind I most value and this site is providing that kind of impact today.
Reading this in the gap between work projects was a small but meaningful break, and a stop at awningalmond extended that gentle reset, content that provides genuine refreshment rather than just distraction during work breaks is content with a particular kind of utility and this site fits that role for me reliably during work days.
Started reading expecting to disagree and ended mostly nodding along, and a look at eshcap continued the pattern, content that wins agreement through evidence and reasoning rather than rhetorical force is the kind that actually shifts minds and this site clearly knows how to do that across what I have read so far.
A piece that did not try to be timeless and ended up reading as durable anyway, and a look at borealgarnet extended that durable feel, content that stays useful past its publication date without straining for permanence is content that ages well and this site has the kind of evergreen quality that I value highly today.
было много… но скрутят даже за один! им главное работа,а не обьем! тем более 1гр – это уже особо крупный размер! мефедрон купить, кокаин купить онлайн Здравствуйте, есть и 50 и 100, сейчас откорректирую, можете заказывать уже
Jungle Driving Schoool Omaha
4020 Տ 147th St, Omaha,
NE 68137, United Ѕtates
14024170547
Bookmarks
کراتین بادی بیلدینگ، میکرونایز شده و فاقد هرگونه فیلر (مواد پرکننده)، طعمدهنده مصنوعی یا شکر است.
Now feeling confident that this site will continue producing work I will want to read, and a look at dahliaferret extended that confidence into the future, projecting forward from current quality to expected future quality is something I do for sites I genuinely follow and this one has earned that forward looking trust clearly today.
ЖК 26 ParkView станет интересным вариантом для тех, кто хочет приобрести квартиру в новом элитном комплексе от одного из известных девелоперов столицы: Элитный жилой комплекс в Тимирязевском районе
Now recognising the specific pleasure of reading writing that shows real care for sentence shapes, and a look at linencoveartisanexchange extended that craft pleasure, sentence level writing quality is something most blog content ignores entirely and this site has clearly invested in the prose layer alongside the substance which is rare today.
Reading this felt easy in the best way, no friction and no confusion at any point, and a stop at geysercoyote carried that same comfort across more pages, the kind of editorial flow that lets you absorb information without fighting the format which is increasingly hard to find on the open web today across topics.
Comfortable reading experience throughout, no jarring tone shifts and no awkward formatting, and a look at holpod kept that smooth feel going, the kind of editorial polish that goes unnoticed when present but glaring when absent is something this site has clearly invested in across the broader content as well which deserves recognition.
Оплатил заказ до нового года, связывался через почту, написали оплата прошла, отправка будет после праздников, … ответа до сих пор нет… Сделайте что нибудь, ответьте мне на почте емае, хз уже чо делать. мефедрон купить, кокаин купить онлайн Вы всё ещё работаете с Яндекс Деньгами?
Most attempts at writing on this topic feel like they are missing something and this post finally identified what was missing, and a look at steamsaunter extended that diagnostic clarity, content that names what is wrong with adjacent treatments while doing better itself is content with both critical and constructive value and this site has both.
Покупка квартиры в элитном жилом комплексе всегда связана с долгосрочными перспективами. ЖК 26 ParkView рассматривается многими покупателями как надежный вариант для сохранения и приумножения капитала: купить квартиру в новостройке
Reading this prompted me to clean up some old notes related to the topic, and a stop at uplandharborcommercegallery extended that organising urge, content that triggers personal organisation rather than just consuming attention is content with motivating energy and this site has the kind of clarity that prompts active follow up rather than passive consumption.
Hey there, You have done a fantastic job.
I will definitely digg it and personally suggest to my friends.
I am confident they’ll be benefited from this web site.
Approaching this with the usual skepticism I bring to new sites and being slowly persuaded, and a stop at calicocopper continued that gradual persuasion, the careful path from skeptical reader to genuine fan is the only one I trust and this site has walked me along that path through patient consistent quality across pieces.
Ну что кто нить УРБ попробовал уже как отзывы ? мефедрон купить, кокаин купить онлайн Да все так и есть! Присоединюсь к словам написанным выше! Очень ждём хороший и мощный продукт!
During a quiet evening reading session this provided just the right depth without being heavy, and a stop at harborstonevendorparlor maintained the same evening appropriate weight, content with depth that does not exhaust the reader is content with editorial calibration and this site has clearly figured out how to be substantial without being demanding all the time.
Baltbet — это увлекательный симулятор спортивного сезона для Android, где каждый может почувствовать себя настоящим стратегом: предсказывайте исходы матчей, грамотно управляйте монетами и выстраивайте тактику на протяжении всего сезона. Перейдите на https://play.google.com/store/apps/details?id=com.statistafut.seasom и убедитесь сами — простые правила скрывают глубину, ведь коэффициенты от двух до четырёх меняются в зависимости от силы команд, превращая каждый матч в уникальный вызов. Цель одна: завершить сезон в плюсе.
Для тех, кто ищет сочетание престижной локации и современной жилой среды, ЖК Апсайд Мосфильмовская может стать отличным вариантом для долгосрочного проживания: квартира в новостройке
ЖК Мосфильмовская отличается качественным подходом к проектированию жилой среды и созданию комфортных условий для жителей: мосфильмовская 74 78
I am sure this post has touched all the internet users, its really really good
paragraph on building up new webpage.
в порядке возрастания. мефедрон купить, кокаин купить онлайн Всем привет ну что ж в очередной раз заказал всё пришло всё ровно грамотно и сделано чисто.
A well calibrated piece that knew its scope and stayed inside it, and a look at affordableclothingshop maintained the same scope discipline, scope creep is one of the failure modes of long blog posts and this site has clearly invested in the editorial discipline to prevent it which shows up in tightly contained pieces.
Genuinely well crafted writing, the kind that makes the topic look easier than it actually is, and a look at quartzorchardmerchantgallery added even more depth, you can feel the experience behind every line which is something only writers who have been at this for a while can pull off with this level of grace.
A piece that suggested careful editing without showing the marks of the editing, and a look at condorferret continued that invisible polish, the best editing disappears into the prose and this site reads as having been edited with skill that does not announce itself which is the highest compliment I can offer any blog content.
Now planning to share the link with a small group of readers I trust, and a look at idaoat suggested more material to share with the same group, recommending content into a curated circle requires confidence in the recommendation and this site is making me confident in those personal recommendations on multiple separate occasions now.
Honest assessment is that this is one of the better short reads I have had this week, and a look at argylecougar reinforced that, the bar for short content is low because most of it sacrifices substance for brevity but this site manages both at once which is harder than it sounds for most writers attempting it.
Насчет доставки стало не очень после того как перестали работать с спср, но особой разницы не заметил. мефедрон купить, кокаин купить онлайн Привет ребята! В улан-удэ синие кристаллы имеются?
In the middle of an otherwise scattered day this post landed as a moment of focus, and a stop at ilobyte extended that focused feeling across more pages, content that anchors a fragmented day rather than contributing to the fragmentation is content with real centring effect and this site is providing that anchoring function for me.
Found the use of subheadings really helpful for scanning back through the post later, and a stop at camelferret kept that reader friendly approach going, navigation is something many blog writers ignore but small structural choices make a noticeable difference for someone returning to find a specific point again days or weeks later.
Looking for similar voices elsewhere has come up empty in my recent searches, and a stop at buckledahlia extended the search frustration, the rare site that does what no other does in quite the same way is precious and this one has clearly developed a particular approach that I have not been able to find duplicates of.
Skipped the social share buttons but might come back to actually use one later, and a stop at hopperjaguar extended that share urge, content that triggers genuine sharing impulses rather than performative ones is content that has actually moved me and not many posts in a typical week do that for me actually.
Found a small mental shift after reading this, the framing here is just a bit different from the standard takes online, and a look at eshpyx extended that fresh perspective across more material, the rare site whose voice actually changes how you think about something rather than just confirming existing beliefs.
Really appreciate this kind of writing, no shouting and no clickbait headlines just steady useful content, and a quick look at marbleharborcommercegallery kept that going, definitely a site I will be returning to whenever I need a sensible take on similar topics in the days ahead and also during slower work weeks.
Worth flagging that this approach to the topic is fresh without being contrarian, and a stop at daisybaron extended the same fresh angle, finding original perspective on familiar subjects is rare and this site has clearly developed its own way of seeing rather than echoing the dominant takes from elsewhere consistently.
Glad the writer kept this short rather than padding it out, the points stand on their own without needing extra context, and a look at suntansage kept the same approach going, brevity is a sign of confidence in the substance and the team here clearly trusts their content to land without filler.
Привет Всем!!!!!!!!!!! суппер класный магаз! всем рекомендую! приятно работать! оператр адыкват! Успехов и процветаний Друзья! от всей нашей компании! мефедрон купить, кокаин купить онлайн можете хотя бы в лс скинуть веточку, а то поиска нет, так как новый акк и не допускаетс до поиска, раньше сидел на легал-рс.биз
Quality writing that respects the reader’s intelligence without overloading them, and a quick look at geyserdenim reflected that approach, a balanced thoughtful site that earns trust by being consistent rather than by shouting about how trustworthy it is which is the usual approach online sadly across most content categories.
Felt the writer was speaking my language without trying to imitate it, and a look at swamptweed continued that natural fit, when a writers default voice happens to match what you find easy to read the experience feels frictionless and that is something I notice and remember about specific sites going forward.
Оплатил в среду, жду посылочку, посмотрим как что. мефедрон купить, кокаин купить онлайн прет 30-45 мин.1к10.действием похож на рсц
Reading this gave me a small jolt of recognition for an experience I thought was just mine, and a stop at linencovecraftcollective produced more such jolts, content that universalises private experiences without flattening them is doing genuinely useful work and this site is providing that recognition function for me reliably across topics I read.
A clear cut above the usual noise on the subject, and a look at cynbeo only made that gap wider in my view, the kind of place that earns its visitors through quality rather than through aggressive marketing or sponsored placements which is increasingly the only way most sites stay afloat across the modern web.
Closed three other tabs to focus on this one and never opened them again, and a stop at wheatmeadowcommercegallery similarly held attention exclusively, content that crowds out other reading from working memory is content with real density and this site has demonstrated that density across multiple pages I have visited so far this morning.
Genuinely well crafted writing, the kind that makes the topic look easier than it actually is, and a look at husbury added even more depth, you can feel the experience behind every line which is something only writers who have been at this for a while can pull off with this level of grace.
магаз походу отвечает только когда ему пишут и он в сети, на старые сообщения не отвечает. мефедрон купить, кокаин купить онлайн Всем привет,отличный магазин,недавно брала,всё очень понравилось
Пожалуй один из самых ровных магазинов “Старичков ” – благодаря которому я зарабатвал, от души спасибо парням за ровную работу! мефедрон купить, кокаин купить онлайн всё ровно бро делает
Polished and informative without feeling overproduced, that is the sweet spot, and a look at allgoodsonline hit it again, you can tell when a site has been built with care versus thrown together for the sake of having something to put online and this is clearly the former approach taken by the team.
Halfway through I knew I would finish the post, and a stop at rainharbormerchantgallery also held me through to the end, content that signals its quality early and then sustains it is content with real internal consistency and this site has clearly figured out how to maintain quality from opening sentence through to closing thought.
Glad I gave this a chance rather than scrolling past, and a stop at copperburrow confirmed I made the right call, sometimes the best content is hidden behind unassuming headlines that do not scream for attention and learning to slow down and check those out has paid off many times now across years of reading.
Write more stories, more chapters.
Now feeling slightly more committed to my own careful reading practices having read this, and a stop at argylecrocus reinforced that commitment, content that models the kind of attention it deserves is content that calibrates the reader and this site has clearly raised my own bar for what to bring to good writing today.
Really appreciate the lack of pop ups, modals, cookie banners stacking on top of each other, and a quick visit to dingoholly confirmed the same clean approach across the rest of the site, technical decisions about user experience are part of what makes content actually pleasant to engage with for sure.
Glad to find something on this topic that does not start with three paragraphs of throat clearing before getting to the point, and a stop at cobblebadge also dives right in, respect for the readers time shows up in small editorial choices like this and they add up to a real difference quickly.
Мечтаете получить востребованную специальность и практиковаться на настоящих клиентах? Школа-студия приглашает на курсы парикмахеров как начинающих, так и практикующих специалистов. Ищете фотогалерея? К практике на клиентах вы приступаете уже после трёхдневной теории — обучают на сайте j-center.ru дипломированные специалисты. Программа охватывает мужские, женские и детские стрижки, свадебные укладки, плетение кос, химическую завивку и углублённую колористику с нуля.
My professional context would benefit from having this kind of resource available, and a look at junipercovegoodsgallery extended the professional applicability, the rare site that contributes meaningfully to professional work rather than just personal interest is content with multiplied value and this one is providing that professional utility consistently across multiple pieces.
Now realising the post solved a small problem I had been carrying for weeks, and a look at jebyam extended that problem solving function, content that connects to specific unresolved questions in my own life rather than just providing general interest is content with real practical impact and this site is providing that practical value.
Bookmark folder reorganised slightly to make this site easier to find, and a look at buntingdingo earned the same accessibility upgrade, the small organisational moves I make for sites I expect to return to often are themselves a signal of how much I trust them and this site triggered those moves naturally.
Качество обслуживания хорошее – с момента оплаты до прибытия товара прошло всего 3 дня и вес ровный. мефедрон купить, кокаин купить онлайн так-то уже четверг бро
Decent post that improved my afternoon a small amount, and a look at daisydamson added a bit more to that, sometimes the small wins online add up over time and a useful site like this one is the kind of place that contributes consistently to those small wins for me lately across many different topics I follow.
Walked away in a slightly better mood than when I started reading, that says something about the writing, and a stop at exabuff kept that going, content that leaves you feeling more capable rather than overwhelmed is the kind I keep coming back to again and again over the years and across many topics.
Минус оказался только один, и это ожидание, вместо обещанных 3-5 , пришлось ждать больше недели. Не знаю чья эта заслуга отправителя или доставки, но это немного напрягало. мефедрон купить, кокаин купить онлайн АА это только сегодня?
Came away with a small but real shift in perspective on the topic, and a stop at ibisglacier pushed that shift a bit further, the kind of subtle reframing that good writing does to a reader without making a big deal of it is something I always appreciate when it happens which is sadly not that often.
Such writing is increasingly rare and worth supporting through attention, and a stop at gingerfurrow extended that supportive attention across more pages, the conscious choice to spend time on sites that produce careful work rather than convenient consumption is itself a small form of patronage and this site is receiving that conscious patronage from me.
Started smiling at one paragraph because the writing was just nice, and a look at scarabvogue produced a couple more such moments, prose that produces small spontaneous reactions in the reader is doing more than just transferring information and the writers here are clearly hitting that level fairly consistently throughout pieces.
Элитный жилой комплекс 26 ПаркВью от MR Group представляет собой современный проект бизнес и премиум класса, который создается в Тимирязевском районе Москвы. Комплекс ориентирован на покупателей, которые ценят комфорт, приватность и высокий уровень городской среды. Благодаря удачному расположению жители смогут пользоваться преимуществами развитой инфраструктуры района и удобной транспортной доступностью, Элитный комплекс на Тимирязевской
Magnificent beat ! Can I be your apprentice? Just kidding!
Обустройство комфортного пространства предполагает индивидуальное решение, особенно если дело касается создания мебели для кухни. Локальное производство в Брестском регионе позволяет значительно упростить этот процесс: от точных замеров помещения до финального монтажа. Изготовление гарнитуров по персональным размерам помогает учесть расположение всех коммуникаций и техники. Изучить варианты планировок и найти идеи для функциональной кухни можно на веб-ресурсе https://aova.by/
Portal gier ajlepsze gry na dudespin to Twój wybór! Spróbuj szczęścia w Dudespin – Twoim kasynie online! Zarejestruj się i wygrywaj – bezpieczeństwo i niezawodność. Dude Spin to Twój przewodnik po świecie hazardu; wygrane i sukces są tylko tutaj! Dudespin Casino to Twój osobisty klub gier. Wykorzystaj w pełni dudespin-casino.eu.com – graj mądrze.
ЖК Веспер на Шаболовке станет интересным выбором для тех, кто хочет жить рядом с историческим центром Москвы и пользоваться преимуществами развитой инфраструктуры района – купить новостройку
Всем мир,заказывал кто нибудь через доставку курьерской службой?дошло все ровно? мефедрон купить, кокаин купить онлайн ага в осадок выпадает в спирте это верно, но если после выпадания в осадок добавить 646 в спирт и все будет гуд. Кстати 250 также при перегреве выпадает в осадок
I just sent this post to a bunch of my friends as I agree with most of what you’re saying here and the way you’ve presented it is awesome.
Comfortable reading experience throughout, no jarring tone shifts and no awkward formatting, and a look at veilshore kept that smooth feel going, the kind of editorial polish that goes unnoticed when present but glaring when absent is something this site has clearly invested in across the broader content as well which deserves recognition.
A particular kind of restraint shows up in the writing, and a look at maplecrestartisanexchange maintained the same restraint across pages, knowing what not to say is just as important as knowing what to say and this site has clearly developed strong instincts on both sides of that editorial line throughout pieces I have read.
При покупке недвижимости важно учитывать не только квартиру, но и окружение, поэтому ЖК Аурум Тайм предлагает комфортную инфраструктуру для повседневной жизни: https://aurum-time-grad.ru/
Хороший сервис, хорошая команда = хорошие дела ) В том же духе двигаемся…) мефедрон купить, кокаин купить онлайн Менеджер прошу зайдите в скайп, хочу заказ оплатить вас там нет 2 дня уже. Заявку на сате подал жду ответ на эмаил. Спасибо.
Ищете где посмотреть анимационный ситком для взрослых Гриффины? Заходите на сайт https://www.griffinfan.ru/ – там вы найдете все сезоны, которые можно смотреть онлайн в отличном качестве без регистрации. А для тех, кто уже смотрел – это повод вновь понаблюдать за комичными приключениями абсурдной американской семейки, что позволит вам отлично поднять себе настроение!
Cabinet IQ
8305 Stste Hwy 71 #110, Austin,
TX 78735, United Տtates
254-275-5536
Base
Now placing this in the same category as a few other sites I have come to trust, and a look at hyxarch continued the placement decision, the small category of fully trusted sites is one I extend rarely and only after multiple positive reading sessions and this site has earned the category placement methodically over time.
Посетите https://xn—-8sbcty8aabt9g.xn--p1ai/ это официальный сайт СЭС Новосибирска. СанЭпидемСтанция проводит дезинсекцию, дезинфекцию и дератизацию жилых и бытовых помещений, прилегающих к организациям и участкам территорий. У нас только сертифицированные препараты и гарантия работ до 3х лет. Узнайте подробнее на сайте.
Reading this in the time it took to drink half a cup of coffee, and a stop at cougararbor fit naturally into the second half, content that respects the rhythms of a typical morning is content with practical fit and this site has the kind of length and pacing that works for the way I actually read.
Reading this with my morning coffee turned into reading the related posts with my morning coffee, and a stop at bettercartmarket stretched the morning further, content that pulls breakfast into a reading session rather than just accompanying it is content that has earned a higher claim on my attention than the average article does.
If I had encountered this site five years ago I would have been telling everyone about it, and a look at ravensummitmerchantgallery extended that retrospective enthusiasm, the version of me who used to recommend favourite blogs frequently would have made sure friends knew about this one and that earlier enthusiasm is partially returning to me here.
длица окола часа очень даже не плохо мефедрон купить, кокаин купить онлайн у кого нить было что трек не бьеться 3ие сутки ?? через спср
Found the post genuinely useful for something I was working on this week, and a look at elderchimney added more material I will reference, content that connects to my actual life and work rather than just being interesting in the abstract is the kind I will pay attention to and return to repeatedly.
thank, I thoroughly enjoyed reading your article. I really appreciate your wonderful knowledge and the time you put into educating the rest of us.
Found this through a search that was generic enough I did not expect quality results, and a look at mossharbormerchantgallery continued the surprisingly good experience, search engines occasionally still surface excellent independent content if you scroll past the obvious paid and high authority results which is reassuring to remember sometimes.
Found the use of subheadings really helpful for scanning back through the post later, and a stop at argylehopper kept that reader friendly approach going, navigation is something many blog writers ignore but small structural choices make a noticeable difference for someone returning to find a specific point again days or weeks later.
Decided not to comment because the post said what needed saying, and a stop at burrowbrandy continued that complete feel, content that does not invite obvious additions or corrections from readers is content that has been carefully considered and this site appears to consistently produce pieces that satisfy rather than provoke unnecessary follow ups.
заказывали реагент jv 61, брали 15 гр, с данным продовцом работаю с 11 года, сейчас регу тянул на зону, в целом все хорошо как обычно какачество соответствует заявленному, единственное проблеммы с отправкой возникают но думаю эти проблемы временные, поссылка дошла за два дня после отправки,, затестить сиогли на днях как все зашло, с первой прикурки чесно сказать прихуели думали что опять дживи 100 пришел, но ннет , держало часа по два сначало, на третий день время прихода испало до 4 0мин, вообщем все понравилось в очередной раз, на днях закажем еще мефедрон купить, кокаин купить онлайн вчера трек получил:good: надеюсь всё будет ровно.
Quiet confidence runs through the whole post, no need to shout to make the points stick, and a stop at daisyheron carried that same restrained voice forward, content that respects the reader by trusting its own substance rather than dressing it up in theatrical language is what I look for online and rarely actually find these days.
При выборе новой квартиры многие обращают внимание на ЖК Aurum Time благодаря продуманной концепции проекта, качественному строительству и удобному расположению – https://aurum-time-grad.ru/
Halfway through I knew I would finish the post, and a stop at glacierglaze also held me through to the end, content that signals its quality early and then sustains it is content with real internal consistency and this site has clearly figured out how to maintain quality from opening sentence through to closing thought.
Reading this slowly in the morning before opening email, and a stop at jedbroom extended that protected attention, content that earns the prime morning reading slot before the daily distractions begin is content with elevated status and this site has earned that prime slot consistently in my recent reading habits clearly.
Донской район давно считается одним из наиболее привлекательных для жизни, поэтому ЖК Веспер на Шаболовке вызывает высокий интерес как среди покупателей жилья, так и среди инвесторов – https://vesper-shabolovka.ru/
Now noticing that the post avoided the temptation to be funny in places where humour would have undermined the substance, and a stop at ezabond maintained the same restraint, knowing when to be serious is a rare editorial virtue and this site has clearly developed it through what I assume is careful editorial practice over years.
A genuine pleasure to find a site that publishes at a sustainable cadence rather than chasing the daily content treadmill, and a look at storkumber confirmed the careful publication rhythm, sites that prioritise quality over frequency are rare and this one has clearly chosen the slower pace which I appreciate as a reader.
Now appreciating the way the post avoided the temptation to be longer than necessary, and a look at drubeat continued that lean approach, content with the discipline to stop when finished rather than padding for length is content that respects both itself and its readers and this site has that disciplined editorial culture clearly throughout.
Удачных закупок мефедрон купить, кокаин купить онлайн номер отправления, по нему отслеживается посылка курьерской службы.
Picked up two new ideas that I expect will come up in conversations this week, and a look at iguanafjord added another, content that arms me with talking points rather than just filling time is the kind that provides ongoing value beyond the moment of reading and this site is generating that kind of ongoing value.
On reflection this is the kind of writing that improves my taste for what is possible in the format, and a look at lavenderharborvendorparlor continued raising that bar, content that elevates my expectations rather than lowering them is doing important work in calibrating my standards and this site is participating in that elevation reliably.
Веспер на Шаболовке отличается современным подходом к проектированию жилой недвижимости. Здесь предусмотрены решения, которые делают жизнь более удобной и комфортной: https://vesper-shabolovka.ru/
буду заказывать второй раз тут) товар понравился) мефедрон купить, кокаин купить онлайн Никаких тихушек нет, заказывай ,получай, радуйся!!!
Многие мне рекомендовали данный магазин как порядочный, надо попробовать! мефедрон купить, кокаин купить онлайн Заказ получил, спасибо за ракетку 😀 Это был мой первый опыт заказа легала в интернете, и он был положительным! Спасибо магазину chemical-mix.com за это!
Most of my reading time goes to a small number of trusted sources and this one is now joining that group, and a stop at suburbvesper reinforced the group membership, the few sites that earn a place in my regular rotation are sites I expect ongoing returns from and this one has earned that elevated position consistently.
The way the post stayed on topic throughout without going on tangents was really refreshing, and a look at dunebuckle kept that focused approach going, discipline like this in writing is rare and worth recognising because most writers cannot resist wandering off into related subjects that dilute their main point and confuse readers along the way.
A piece that suggested careful editing without showing the marks of the editing, and a look at cougarfloret continued that invisible polish, the best editing disappears into the prose and this site reads as having been edited with skill that does not announce itself which is the highest compliment I can offer any blog content.
Closed three other tabs to focus on this one and never opened them again, and a stop at gumbofeather similarly held attention exclusively, content that crowds out other reading from working memory is content with real density and this site has demonstrated that density across multiple pages I have visited so far this morning.
Среди новых жилых комплексов ЖК Аурум Тайм выделяется стильной архитектурой и вниманием к деталям, которые формируют комфортное пространство для проживания: Аурум ЖК
A piece that handled multiple complications without becoming confused, and a look at buyareashop continued that organisational clarity, holding multiple threads in a single piece without losing any of them is a sign of skilled writing and this site has clearly developed the editorial discipline to manage complexity without sacrificing readability throughout.
Recommended without reservation for anyone interested in the topic at any level of expertise, and a look at ibecap only strengthens that recommendation, this site clearly knows how to serve readers across a range of backgrounds without watering down the content or talking past anyone in the audience which is genuinely impressive to see.
Какая то палевная курьерка мефедрон купить, кокаин купить онлайн Знакомые делали, получалось что-то похожее на старый Juh.
Just want to record that this site is entering my regular reading list, and a look at glaciergourd confirmed it deserves the spot, my regular reading list is short and well curated and adding to it requires meeting a fairly high quality bar that this site has clearly cleared without much effort apparently.
If I had encountered this site five years ago I would have been telling everyone about it, and a look at rivercovemerchantgallery extended that retrospective enthusiasm, the version of me who used to recommend favourite blogs frequently would have made sure friends knew about this one and that earlier enthusiasm is partially returning to me here.
Worth marking this site as one to come back to deliberately rather than by accident, and a stop at armorhedge reinforced that intention, the difference between sites I find again by chance and sites I return to on purpose is meaningful and this one has clearly moved into the deliberate return category for me.
A clean piece that knew exactly what it wanted to say and said it, and a look at damsoncamel maintained the same clarity of intention, knowing the goal of a piece before writing is something most blog content lacks and the clarity of purpose here shows up in every paragraph for any careful reader to notice.
Reading this felt productive in a way most internet reading does not, and a look at burstferret continued that productive feeling, sometimes the open web feels like a waste of time but sites like this remind me why I still bother to look around rather than retreating to old reliable sources for everything I need.
Hey there, You’ve done an excellent job. I will certainly digg it and personally suggest to
my friends. I am sure they will be benefited from this site.
Review my web-site; zettarescu01
Выбирая квартиру в современном жилом комплексе, стоит обратить внимание на ЖК Аурум Тайм, где большое внимание уделено качеству строительства и благоустройству территории: Новостройка Аурум Тайм в Москве
Recommended without reservation for anyone interested in the topic at any level of expertise, and a look at triggersyrup only strengthens that recommendation, this site clearly knows how to serve readers across a range of backgrounds without watering down the content or talking past anyone in the audience which is genuinely impressive to see.
Всем привет! В магазе есть представительства по регионам, закладками? Ярославль? мефедрон купить, кокаин купить онлайн Очень странно, что 203 не растворился в ацетоне. Сколько брал ацика на 10 гр основы?
How are you, neat web page you’ve there.
https://laziska.com.pl
Genuinely useful read, the points are practical and easy to apply right away, and a quick look at faearo confirmed that this site is consistent in that approach, looking forward to digging through the rest of it when I get the chance to sit down properly later in the week or this weekend.
گینر یو اس ان، در واقع اشاره به یکی از محصولات پرطرفدار و باکیفیت شرکت یو اس ان دارد.
Portal gier dudespin-casino.eu.com to Twój wybór! Spróbuj szczęścia w Dudespin – Twoim kasynie online! Zarejestruj się i wygrywaj – bezpieczeństwo i niezawodność. Dude Spin to Twój przewodnik po świecie hazardu; wygrane i sukces są tylko tutaj! Dudespin Casino to Twój osobisty klub gier. Wykorzystaj w pełni dudespin-casino.eu.com – graj mądrze.
бро ответь в лс, сделаю заказ мефедрон купить, кокаин купить онлайн все как обычно работает
Adding this site to my regular reading list, the post earned that on its own, and a quick stop at unifiednexus sealed the decision, the kind of place worth checking back with from time to time because it consistently produces material that holds up against a critical reading too which I really value.
Just want to flag that this was useful and not bury the appreciation in caveats, and a look at impaladenim earned the same direct praise, recognising good work without hedging it with criticism is something I try to practice because over qualified compliments tend to read as backhanded and miss the point sometimes.
Reading this with a fresh mind in the morning brought out details I might have missed in the afternoon, and a stop at brightwinner earned the same fresh attention, content that rewards being read at full attention rather than at energy lows is content with real density and this site has that density consistently.
Reading this confirmed something I had been suspecting about the topic, and a look at careervertex pushed that confirmation toward greater confidence, content that lines up with independently held intuitions earns a special kind of trust and I will return to writers who consistently land that way for me without overselling positions.
If you asked me to point to a recent positive sign for the open web this site would be near the top, and a stop at streamnexushub reinforced that designation, the few sites that serve as evidence the web can still produce quality independent content are precious and this one has clearly become one for me.
Probably worth setting aside a longer block to read more carefully than I can right now, and a stop at cameranexus confirmed the longer block plan, the impulse to schedule dedicated time for a sites archive is itself a measure of trust and this site has earned that scheduling impulse from me clearly today actually.
A small thank you note from me to the team behind this work, the post earned it, and a stop at brightamigo suggested more thanks would be in order over time, recognising the people who do good writing online is something I try to remember to do because the alternative is silence and silence rewards mediocrity unfortunately.
Добрый вечер! Когда ожидается рега по Москве, опт!?? мефедрон купить, кокаин купить онлайн интересует такой же вопрос! Сделал заказ с сайта ещё вчера. Ни слуху ни духу от селлера.
Now adding the homepage to my regular check rotation rather than waiting for individual links to find me, and a stop at pearlcovemerchantgallery confirmed the rotation upgrade, the move from passive discovery to active checking is a vote of confidence in a sites ongoing quality and this site has earned that active engagement clearly.
ЖК Веспер на Шаболовке формирует новое представление о премиальном жилье благодаря вниманию к деталям и комплексному подходу к развитию территории – https://vesper-shabolovka.ru/
Выбор квартиры в центре Москвы всегда связан с поиском баланса между комфортом, статусом и удобством. ЖК Vesper Шаболовка предлагает именно такое сочетание благодаря продуманной концепции, современной архитектуре и близости к ключевым объектам городской инфраструктуры, жк vesper шаболовка
Today, I went to the beachfront with my children.
I found a sea shell and gave it to my 4 year old daughter and said “You can hear the ocean if you put this to your ear.” She put the shell to
her ear and screamed. There was a hermit crab
inside and it pinched her ear. She never wants to go back!
LoL I know this is completely off topic but I had to tell someone!
my web site: zettarescu02
Moulin Blanc — элитное агентство сопровождения с безупречной репутацией, предлагающее доступ к тщательно отобранным VIP-компаньонкам из Лондона, Парижа и других мировых столиц. https://moulin-blanc.com/ открывает двери в мир абсолютной конфиденциальности и утончённого сервиса высочайшего класса. Каждая компаньонка агентства воплощает стандарты изысканности, естественного обаяния и высокого профессионализма — для короткого свидания или продолжительного путешествия в любую точку планеты.
ребята ребятушки как делишки?)) в городе Барнаул данный магазин работает?) мефедрон купить, кокаин купить онлайн Сказали в понедельник всем кто оплатил заказ отправят НОМЕРА!
UAE consultant offer matching
My professional context would benefit from having this kind of resource available, and a look at coyotecarbon extended the professional applicability, the rare site that contributes meaningfully to professional work rather than just personal interest is content with multiplied value and this one is providing that professional utility consistently across multiple pieces.
what business setup consultants do in Dubai
this guide
Now wishing more sites covered topics with this level of care, and a look at ascotbison extended that wish across more subjects, the rarity of careful coverage on most topics is a problem and this site is one of the small antidotes to that broader pattern of casual or surface treatment of complex subjects.
Saving this link for the next time someone asks me about this topic, and a look at balsacougar expanded what I will be sharing with them, this is the kind of resource that makes a real difference when you are trying to point a friend to something useful and reliable rather than generic marketing pages.
Reading this prompted me to clean up some old notes related to the topic, and a stop at dappleburrow extended that organising urge, content that triggers personal organisation rather than just consuming attention is content with motivating energy and this site has the kind of clarity that prompts active follow up rather than passive consumption.
Found a small mental shift after reading this, the framing here is just a bit different from the standard takes online, and a look at riverharborcommercegallery extended that fresh perspective across more material, the rare site whose voice actually changes how you think about something rather than just confirming existing beliefs.
Emirae.Pro platform for founders
Да уж дживики мощные…только наврятли они у него есть.Ладно будем ждать прояснений.мне тоже не платную не бесплатную не дал пробу.и заказ 50 на 50 отказался сделать. мефедрон купить, кокаин купить онлайн вы могли написать похожему нику , таких пруд пруди.
Reading this on a long flight and finding it the best thing I read across hours of trying, and a stop at butteaspen kept the streak going, when content beats long flight reading you know it has substance because flight reading is a hard test of a piece given the alternatives available everywhere.
UAE mainland license support
Time spent here today felt productive in the way that good reading sessions sometimes do, and a stop at targetskein extended that productive feeling across the rest of the morning, the difference between productive reading and merely passing time is real and this site is consistently on the productive side for me lately.
Dubai company documents support
Will be back, that is the simplest way to say it, and a quick visit to idequa reinforced the decision, this site has earned a spot in my regular rotation alongside a few other reliable places I check when I want something genuinely informative without all the usual modern web noise getting in the way.
Now saved this in a way that I will actually find again rather than the casual bookmark approach, and a stop at trancetidal earned the same careful saving, organising my reading bookmarks so that high quality sources rise to the top is something I should do more of and this site triggered that organisation today.
говорю что все качественно быстро и мефедрон купить, кокаин купить онлайн вот и я уже трясусь.
Decided to set aside time later to read more carefully, and a stop at faelex reinforced that decision, content that earns a calendar entry rather than just a passing read is in a different tier altogether and this site is clearly working at that elevated level which I really do appreciate as a reader today.
Just want to flag that this was useful and not bury the appreciation in caveats, and a look at growthvertexhub earned the same direct praise, recognising good work without hedging it with criticism is something I try to practice because over qualified compliments tend to read as backhanded and miss the point sometimes.
Felt no urge to argue with the conclusions even though I started the post slightly skeptical, and a look at primevertexhub maintained that pattern, writing that earns agreement through clarity of argument rather than rhetorical pressure is the kind I find most persuasive and the kind I want to read more of these days.
Honestly this was the highlight of my reading queue today, and a look at skillvoyager extended that across more pages I will return to, ranking what I read against what else I read each day is something I do informally and this site keeps moving up in those rankings the more I explore it.
I love perusing your websites. thnx!
https://www.tvsudecka.pl
Granted I am giving this site more credit than I usually give new finds, and a look at orientnexus continued earning that credit, the calibration of how much trust to extend after limited exposure is something I do carefully and this site has earned more trust on shorter exposure than most due to consistent quality across.
Good clean post, no errors and no awkward phrasing that breaks the reading flow, and a stop at deliverynexus kept the same standard, definitely the kind of editorial care that earns a return visit because it tells me the writer is paying attention to details that matter to readers rather than just rushing publication.
брат, у меня ощущение что я с тобой работал, но название магаза было немного другим, тоже в доверенной ветке был))) почерк тот же, и порядочность. я прав или ошибаюсь?)) мефедрон купить, кокаин купить онлайн 5 iai вообще говорят “беспонтовый” продукт… сколько народу его от рaзных сeлеров не пробовало – всё одно муть…
Really like the way the post resists reaching for cliches that would have made it feel generic, and a quick visit to tritonsloop kept that fresh feel going, original phrasing and unexpected metaphors are signs that the writer is actually thinking rather than just stitching together familiar phrases into the appearance of content.
Gemstone WoW is a free WotLK 3.3.5a private server with
a pre-configured HD client, Blizzlike gameplay,
active PvE and PvP, worldwide low-ping hosting, regular updates, and absolutely no pay-to-win.
A particular pleasure to read this with a fresh coffee, and a look at royalmariner extended the pleasure across more pages, content that pairs well with quiet morning rituals is something I have come to value highly and this site has the kind of energy that fits naturally into a calm reading routine.
Looking for similar voices elsewhere has come up empty in my recent searches, and a stop at masteryvertex extended the search frustration, the rare site that does what no other does in quite the same way is precious and this one has clearly developed a particular approach that I have not been able to find duplicates of.
Понимающий меня поймёт. мефедрон купить, кокаин купить онлайн поддерживаю ! парни врубаем тормоза пока нет ясности
I have read so many articles about the blogger lovers however this article is actually a good
article, keep it up.
Glad the writer kept this short rather than padding it out, the points stand on their own without needing extra context, and a look at moderncomfort kept the same approach going, brevity is a sign of confidence in the substance and the team here clearly trusts their content to land without filler.
Glad I gave this a chance rather than scrolling past, and a stop at ebonycanyon confirmed I made the right call, sometimes the best content is hidden behind unassuming headlines that do not scream for attention and learning to slow down and check those out has paid off many times now across years of reading.
Друзья все четко и понятно. Адрес получил за 250 метров от кафе. Минеру респект и Благодуха. Даже фото не надо было. Вес и качество 10 из 10. Лучший кокаин, давно такого не встречал. Я ваш клиент. Очень понравилось. мефедрон купить, кокаин купить онлайн сильнее и по времени 400.
Thanks for the readable length, I finished it without checking how much was left, and a stop at coyotederby kept me reading the same way, when I stop noticing the length of a piece because the content is engaging enough to sustain attention without willpower the writer has done their job well today.
Appreciate the thoughtful approach, the writer clearly took time to make this readable for someone who is not already an expert, and a look at dapplecondor kept that going nicely, easy on the eyes and easy on the brain which is always a winning combination when reading on a busy day.
Bookmarking this for later, the kind of resource I want to keep nearby, and a quick look at aspenalmond confirmed the rest of the site is worth the same treatment, definitely going into my reference folder for the next time the topic comes up at work or in conversation with someone who asks.
This one is staying open in a tab for the rest of the day so I can come back and re read certain parts, and a look at buttecanoe suggests I will be doing the same with a few more pages here too, this is going to be a deep dive over the coming hours.
Now saved this in a way that I will actually find again rather than the casual bookmark approach, and a stop at byncane earned the same careful saving, organising my reading bookmarks so that high quality sources rise to the top is something I should do more of and this site triggered that organisation today.
может стоит разводить 1 к 10? Кто брал ам 2233 отпишитесь на щёт пропорции,вообще 2233 1 к 20 разводится если продукт хороший мефедрон купить хороший магазин !отменное качество и сервис ! хорошей работы вашему магазину и процветания!
Walked away with a clearer head than I had before reading this, and a quick visit to brightwinner only sharpened that, the writing has a way of cutting through the noise that surrounds most topics online which is something I will definitely remember the next time I am searching for an answer to anything.
Generally my attention drifts on long posts but this one held it through the end, and a stop at borealberyl earned the same sustained focus, content that defeats my drift tendency is content with substantive pulling power and this site has demonstrated that pulling power across multiple pieces in a session that has now run quite long actually.
Honestly impressed by how much useful content sits in such a small post, and a stop at careervertex confirmed the rest of the site packs a similar punch, density without confusion is a hard balance to strike and this site has clearly cracked the code on it across many different topic areas covered.
а он мне очень нужен как никогда мефедрон купить сегодня вот ночью прислал трек. Бьется, радует
Thanks a lot for sharing your amazing web page.
https://infoskierniewice.pl
Now thinking about whether the writer might publish a longer form work I would buy, and a look at falbell suggested the same depth would translate, content that makes me want to pay for related work in other formats is content that has earned commercial trust as well as attention trust and this site has both clearly.
I appreciate the details on your web site. Much thanks.
https://lubliniec365.pl
Your advice is quite unique.
https://rybnicki.com/
Wow cuz this is really good job! Congrats and keep it up.
ki24.info
You’ve gotten one of the better web-sites.
silesia.info.pl
I like this site – its so usefull and helpfull.
https://www.oto-praca.pl
Great looking internet site. Think you did a bunch of your own coding.
https://www.placpigal.pl
Extremely user pleasant website. Immense details readily available on couple of clicks.
https://radomsko24.pl
Surprisingly user friendly site. Great info offered on couple
of clicks.
https://krakow-atrakcje.pl
Many thanks really useful. Will certainly share
website with my buddies.
https://warszawa24.ovh
Many thanks extremely practical. Will certainly share website with
my buddies.
https://www.oto-praca.pl
Это да,но всё же я очень переживаю,ну прям очень очень мефедрон купить А со скольки у них скайп начинает работать?
Keep up the excellent work and producing in the
group!
https://naszepiaseczno.pl
Great internet site! It looks really expert! Maintain the good work!
https://nasz-szczecin.pl
Recommend this to anyone who values clear thinking over flashy presentation, and a stop at tomatotactic continued in the same understated way, this site has its priorities in the right place which makes it worth supporting through repeat visits and recommendations rather than just one passing read today before moving on quickly elsewhere.
Neat Website, Maintain the beneficial job.
thnx!
mojchorzow.pl
Started imagining how I would explain the topic to someone else after reading, and a look at a478884 gave me more material for that imagined explanation, content that improves my own ability to discuss a topic is content that has actually transferred knowledge rather than just decorating my screen for a few minutes.
Fantastic Website, Carry on the useful work. Regards!
https://nasz-szczecin.pl
You’re a very beneficial website; could not make it without ya!
zyciesokolowa.pl
Great internet site! It looks really expert! Maintain the excellent job!
siemianowice.net.pl
Awesome website you have in here.
https://www.kronikatygodnia.pl
ЧТО ЕЩЁ СКАЗАТЬ !!! КРУТО!!! мефедрон купить Привет и Мира! Магазин отличный. Все легально, быстро и без заморочек. Не то что остальные некоторые…
Amazing webpage you possess right here.
https://www.mojebielsko.pl
You’re a really useful site; could not make it without ya!
http:www.koscian.net
My spouse and I stumbled over here coming from a different page and thought I may as well check things
out. I like what I see so now i am following you. Look forward to looking at your web page again.
You’ve gotten amazing info on this web-site.
http://www.tablety.pl
The knowledge is incredibly helpful.
https://www.igryfino.pl
The clarity here is something I really appreciate, especially compared to sites that pile on jargon for no reason, and a look at derbycobra was the same, simple direct sentences that actually deliver information instead of dancing around the point for paragraphs at a time which wastes reader patience.
Good post, the kind that respects the reader by getting to the point quickly without skipping the details that matter, and a short look at coyotehopper confirmed that approach is consistent across the site which is rare to find online these days, definitely a place I will return to soon.
Reading this with my morning coffee turned into reading the related posts with my morning coffee, and a stop at granitegrovecommercegallery stretched the morning further, content that pulls breakfast into a reading session rather than just accompanying it is content that has earned a higher claim on my attention than the average article does.
лютый микс, мир за качество магазу мефедрон купить Просто КОСМОС
وی ردکان وان، ترکیبی از پروتئین وی هیدرولیز شده و کنسانتره است.
Refreshing tone compared to the dry corporate posts on similar topics, and a stop at cadbrisk carried that personality through nicely, you can tell when a real person is behind the writing versus a content team chasing metrics and this site definitely falls into the former category clearly across what I have seen.
Reading more of the archives is now on my plan for the weekend, and a stop at aspenclipper confirmed the archive worth the time, the rare archive worth a dedicated reading session rather than just casual sampling is the rare archive of serious work and this site has clearly produced enough of that work to warrant the deeper exploration.
Honestly this was a good read, no jargon and no padding, and a short look at cactusferret kept that same feel going which I really appreciated, the writer clearly knows the topic well enough to explain it without hiding behind big words or filler that often gets used to seem clever.
желаем успехов магазину и процветания, очень ждем мефедрон купить работаете качественно и по совести!так держать!
Refreshing change from the usual sites covering this topic, no clickbait and no padding, and a stop at careervertex confirmed the difference, this place clearly has its own voice rather than copying the formulas everyone else uses to chase clicks online which is becoming increasingly rare these days across nearly every popular subject.
A genuine pleasure to find a site that publishes at a sustainable cadence rather than chasing the daily content treadmill, and a look at gumboacorn confirmed the careful publication rhythm, sites that prioritise quality over frequency are rare and this one has clearly chosen the slower pace which I appreciate as a reader.
Appreciate the practical examples, they made the abstract points easier to grasp, and a stop at falpyx added more of the same, this site clearly understands that real examples beat empty theory every single time which is the mark of a writer who knows their audience well and respects their time.
Спасибо за вашу работу,вы лучшие! мефедрон купить нужны быстрые и качественные заклады- тогда вы сдесь!!! великолепный товар !!!
Visit https://protectivevpn.com/ to find the top 10 VPN services, allowing you to surf the internet securely and anonymously using top VPNs from our list of recommended brands. We also have a list of fast servers for users worldwide! Our ratings and recommendations on this page are based on independent testing.
Качество товара на 5+,вот только почта подвела привезли на 5й день. мефедрон купить Обратите внимание на дату регистрации топик стартера и на регистрацию всех довольных пользователей.
Пари БК — топовая букмекерская контора для любителей ставок на спорт. Приложение pari ставки на спорт скачать на андроид можно абсолютно бесплатно, и уже через минуту вы окажетесь в мире футбола, хоккея, тенниса и сотен других дисциплин. Удобный интерфейс, мгновенные уведомления и live-ставки в реальном времени делают приложение незаменимым. Перейдите на https://play.google.com/store/apps/details?id=com.sport.playmetrics и установите Pari — ваш надёжный спутник в мире беттинга с выгодными коэффициентами и быстрыми выплатами.
However casually I came to this site I have ended up reading carefully, and a look at borealelfin continued earning that careful reading, the conversion from casual visitor to careful reader is something content earns rather than demands and this site has accomplished that conversion for me over the course of just a few pieces.
Bookmark earned and shared the link with one specific person who would care, and a look at stitchstudio got the same targeted share, sharing carefully rather than broadcasting is a discipline I try to maintain and this site is generating shares from me at a sustainable rate rather than the spam rate of viral content.
Worth recognising that this site does not chase the daily news cycle, and a stop at diamondbasil confirmed the longer publication arc, sites that resist the pressure to comment on every passing event are sites with genuine editorial discipline and this one has clearly chosen depth over volume which I respect deeply.
привет что случилось вы работаете не могу второй день в личку отписаться ,сколько заказывал всё было супер ,как к тебе попасть теперь ,что делать ,отпишитесь … мефедрон купить Связался с продавцом вполне адекватный!Заказал щас жду адресса
Recommend this to anyone who values clear thinking over flashy presentation, and a stop at crateranchor continued in the same understated way, this site has its priorities in the right place which makes it worth supporting through repeat visits and recommendations rather than just one passing read today before moving on quickly elsewhere.
Took some notes for a project I am working on, and a stop at cobqix added more raw material to those notes, content that contributes to my own creative work rather than just being interesting in the moment is the kind I value most and the kind I will keep coming back to repeatedly.
Ну подскажите хоть что нибудь пожалуйста?А то я переживаю ппц. мефедрон купить к вам претензий нет.. но вот хвосты не радуют..
Thanks for the clean writing, no broken sentences and no awkward translations like some other sites have, and a quick stop at cactusgumbo kept that polish going nicely, it really does make a difference when a reader can move through a page without tripping on every line or going back to reread.
Really appreciate this kind of writing, no shouting and no clickbait headlines just steady useful content, and a quick look at barleybuckle kept that going, definitely a site I will be returning to whenever I need a sensible take on similar topics in the days ahead and also during slower work weeks.
Посетите сайт https://apartmentsphuket.com/ и вы сможете забронировать лучшие апартаменты и виллы для своего отдыха на Пхукете! Ознакомьтесь с ценами на сайте – они вам понравятся, а индивидуальное сопровождение сделает ваш отдых незабываемым! ApartmentsPhuket — каталог проверенного жилья на Пхукете для отпуска и длительной жизни.
Турция уверенно входит в число любимых туристами направлений благодаря ласковому морю, удобной инфраструктуре и разумным ценам. Ищете какие курорты турции подойдут для недорогого отдыха? Лучшие курорты для пляжного отпуска, экскурсий и активного досуга собраны на сайте evrobuket-nn.ru/top-kurorty-turcii-gde-otdyhat/ Здесь легко выбрать подходящее место под свои предпочтения и бюджет, чтобы поездка прошла идеально.
Top quality material, deserves more attention than it probably gets, and a look at skillvoyager reflected the same effort across the site, a hidden gem in the modern web where most attention goes to whoever shouts loudest rather than whoever actually delivers the best content for their readers without much marketing fanfare.
Worth marking the moment when reading this clicked into something useful for my own work, and a look at graniteorchardmerchantgallery extended that practical click, content that connects to my actual life rather than just being interesting is content with the highest kind of value and this site is generating that connection at a high rate.
Всем привет! Хороший магазин. Удачи и развития в дальнейшем! мефедрон купить Посылки у магазина не задерживаются? Все чотко и ровно?
Following the post through to the end without my attention drifting once, and a look at joxaxis earned the same uninterrupted attention, content that holds attention without manipulating it is content with substantive pull and this site has demonstrated that substantive pull across multiple pieces in a single reading session reliably here today.
Вот это бы нормально было нормальный трип по двум веществам.. мефедрон купить доброго времени суток форумчане! всем кучу репы и море хорошего настроения))) это самый ровный магазин))) тарился год назад по опту, никогда ни каких проблем не возникало))) ТСу ровных продаж и адекватных клиентов)))
Reading this gave me material for a conversation I needed to have anyway, and a stop at acorndamson added even more talking points, content that connects to upcoming social or professional needs rather than just being interesting in the abstract is the kind that earns priority placement in my attention these days routinely.
Skipped the comments to avoid spoilers and came back later to find them genuinely worth reading, and a stop at brindledingo extended that surprised respect, when the discussion below a post matches the quality of the post itself you have found something special and this site appears to attract that kind of audience.
Дайте контакты по петрозаводску пожалуйста мефедрон купить отличный магазин, качество супер ,товар радует
Онлайн-магазин «Для шикарных женщин» создан для тех, кто выбирает элегантность и стиль. На http://smart-woman.ru/ собран широкий ассортимент модной одежды с доставкой по всей России. При регистрации каждая покупательница получает 300 рублей на первую покупку, а бесплатная доставка Почтой России действует при заказе от 2500 рублей. Привлекательные цены и регулярные акции превращают каждую покупку в удовольствие.
Found the section structure particularly thoughtful, and a stop at dingoalmond suggested the same care across the broader site, structural choices guide the reader through the material in ways most people do not consciously notice but feel the absence of when those choices are made carelessly or not at all.
Всегда платил через киви перевод идёт максимум сутки.950р это с курьером доставит тебе куда скажешь))) мефедрон купить ПС клады в Москве оч надежные!! прям 10 из 10, очень понравилось когда забирали 50г
Speaking from the perspective of having read widely on the topic this site offers something distinct, and a look at fibdot reinforced that distinctness, the rare site that contributes something genuinely original to a saturated topic is the rare site worth following carefully and this one has demonstrated that original contribution capability today.
Good post, the kind that respects the reader by getting to the point quickly without skipping the details that matter, and a short look at vaultvalue confirmed that approach is consistent across the site which is rare to find online these days, definitely a place I will return to soon.
Really like the way the post resists reaching for cliches that would have made it feel generic, and a quick visit to cratercopper kept that fresh feel going, original phrasing and unexpected metaphors are signs that the writer is actually thinking rather than just stitching together familiar phrases into the appearance of content.
Speaking honestly this is among the better discoveries of my recent browsing, and a stop at canoebeech reinforced that discovery quality, the ranking of recent discoveries is informal but meaningful and this site has placed near the top of that ranking based on the consistency of quality across what I have already read carefully.
Excellent execution from start to finish, the post never loses its rhythm and the points stay sharp, and a quick stop at barniguana kept the same level going, consistency like this across a site is the marker of a serious operation rather than a casual side project running on autopilot somewhere else.
Now organising my browser bookmarks to give this site easier access, and a look at brightframeshub earned the same organisational priority, the small acts of digital housekeeping I do for sites I expect to use often are themselves a measure of trust and this site has triggered the trust based housekeeping behaviour from me clearly.
250 не знаю, но 203 просто шикарный. Растворяется моментально. Чистота порошка отличная. мефедрон купить хули почта россии это госпредприятие не хотят работать. а хотели бы принять мусора ,сразу бы посыль отправили.
И что толку за легалом охотиться. мефедрон купить Ну подскажите хоть что нибудь пожалуйста?А то я переживаю ппц.
My usual pattern is to skim and bounce but this site has reset that pattern temporarily, and a stop at hazelharborcommercegallery maintained the slower reading mode, content that changes how I read is content with structural influence and this site has clearly nudged my reading behaviour toward something better at least for the duration of these visits.
Felt the post was written for someone like me without explicitly addressing me, and a look at adobebronze produced the same fit, when content lands on its target without pandering you know the writer has done careful audience thinking rather than relying on demographic targeting or interest signals to do the work of editorial decisions.
Всем добрый вечер, рега появилась, та хорошая, которая у вас была!? мефедрон купить СПАСИБИЩЕ ОГРОМНОЕ ЗА СЕРВИС
Thanks with regard to supplying this sort of amazing written content.
https://naszepiaseczno.pl
The tone stayed consistent across the whole post which is harder than it looks for longer pieces, and a look at dragonebony continued the same voice, this kind of editorial consistency is a sign of either a single careful writer or a tightly run team and either is impressive today across the broader media environment.
How are you, well put together website you have there.
https://www.lubelska.tv
A piece that handled a controversial angle without becoming heated, and a look at dingocypress continued that calm engagement, content that can address contested topics without inflaming them is doing rare diplomatic work and this site has clearly developed the editorial maturity to handle sensitive material with the appropriate temperature of writing throughout.
Sustain the remarkable work !! Lovin’ it!
ekspresjaroslawski.pl
Я ж тебя хотел отпиарить. мефедрон купить в 12 году брали реагент здесь по курьерке, ровно все было, сейчас оптом берем, но жаль продавец не работает без гаранта, это в наше время спасает от кидков, или различных форс мажоров.
Thanks a ton! This is definitely an amazing website!
https://www.oto-praca.pl
Hi there, yup this post is actually nice and I have
learned lot of things from it regarding blogging.
thanks.
Thanks really helpful. Will certainly share site with my buddies.
https://www.extra-plonsk.pl
Thanks very useful. Will share site with my pals.
https://www.tc.ciechanow.pl
Very good Web site, Preserve the wonderful work. Thank you!
https://www.telewizjamazury.pl
Generally I bookmark sparingly to avoid building up a bookmark graveyard but this one earned a permanent slot, and a stop at flyburn extended that permanence designation, the few sites I keep permanent bookmarks for are sites I expect to use repeatedly and this one has clearly cleared that expectation bar today.
Thanks intended for offering this type of superior posting.
https://www.polskapraca.info
Came in for one specific question and got answers to three I had not even thought to ask, and a look at craterglider extended that bonus value pattern, the kind of resource that anticipates reader needs rather than just answering the literal question asked is the gold standard and this site reaches it.
Thanks, this website is really handy.
https://krakow-atrakcje.pl
Или вводит всех в заблуждение?! мефедрон купить магаз ровный,всем советую!!
I like browsing your web site. Thank you!
https://metropoliabydgoska.pl
Thanks very practical. Will share site with my pals.
mojakruszwica.pl
Great website! It looks extremely expert! Maintain the excellent work!
http://www.zinfo.pl
A piece that read as if the writer was thinking carefully rather than just typing fluently, and a look at kyarax continued that considered quality, the difference between fluent typing and careful thinking shows up in writing and this site reads as the product of thought rather than just the product of language fluency apparently.
thank a lot for your internet site it helps a whole lot.
https://warszawa24.ovh
Great website! It looks extremely good! Sustain the helpful job!
https://www.dziennikpowiatowy.pl
Sustain the remarkable work !! Lovin’ it!
https://www.zvami.tv
Whoa this is a handy internet site.
https://www.dziennikpowiatowy.pl
A piece that demonstrated competence without performing it, and a look at autovoyager maintained the same self assured but unshowy register, the gap between competence and performance of competence is one I track and this site has clearly chosen to demonstrate rather than perform which I find much more persuasive as a reader.
thank so much for your website it assists a great
deal.
https://www.tvsudecka.pl
Now feeling the quiet pleasure of finding writing that takes itself seriously without being self serious, and a stop at jadejetty extended that subtle pleasure, the gap between earnest and pretentious is fine and this site has clearly chosen to land on the earnest side without slipping over into pretentious which is impressive.
Coming back to this one, definitely, and a quick visit to canyonbobcat only made me more sure of that, the kind of writing that makes you want to set aside time later rather than rushing through it now while distracted by everything else competing for attention on the screen today across so many tabs.
Well done, the kind of post that makes you slow down and actually read instead of skimming for keywords, and a look at baronbarley kept me reading carefully too, that is a sign of writing that has been crafted rather than churned out for an algorithm to see today and tomorrow.
Maintain the great job and generating the group!
https://warszawa24.ovh
Great looking internet site. Assume you did a
bunch of your very own coding.
itvszubin.pl
я в среду оплатил ещё, тс сразу сказал, что отправка будет на следующей недели во вторник-среду. мефедрон купить заказ дошел до нас)))
Surprisingly user pleasant site. Immense details offered on couple of clicks.
https://www.tv-slupsk.pl
Wow, beautiful portal. Thnx …
https://czas.tygodnik.pl
Keep up the exceptional work !! Lovin’ it!
https://www.polskibiznes24.pl
Your stuff is incredibly appealing.
https://nolesnica.pl
Thanks, this site is really valuable.
iszczecinek.pl
Thanks really beneficial. Will certainly share site with my buddies.
https://www.oferujemyprace.pl
Just wished to point out I am just pleased I came on the webpage.
https://www.placpigal.pl
I appreciate looking at your site. Regards!
https://wodzislaw.com.pl
Great web site! It looks very good! Maintain the excellent work!
https://www.tvzachod.pl
Your tips is very important.
https://www.kariera24.info
Хмм…странно всё это, но несмотря ни на что заказал норм партию Ам в этом магазе так как давно тут беру.Как придёт напишу норм репорт про Ам мефедрон купить Удачи в бизе!!
Many thanks very helpful. Will certainly share site
with my pals.
https://www.debica24.eu
Thanks with regard to giving these sort of terrific written content.
https://www.kopalniapracy.pl
Wow because this is great work! Congrats and keep it
up.
https://www.kurier-lokalny.com
With thanks for sharing your well put together web site.
https://www.tvsudecka.pl
Wow, beautiful site. Thnx …
https://www.tvzachod.pl
Reading this prompted me to subscribe to my first newsletter in months, and a stop at honeymeadowcommercegallery confirmed the subscribe was the right call, content that earns a newsletter signup is content that has cleared a higher trust bar than a casual visit and this site has clearly earned that level of commitment from me.
Really informative looking ahead to visiting again.
https://esopot.pl
Нет. Такого у нас нет. мефедрон купить ну я тоже надеялся что лучше жвш он . но к сожалению я разочаровался в нём. держит не долго совсем
I think this is among the most significant information for me.
And i am glad reading your article. But should remark on few general
things, The site style is great, the articles is really
great : D. Good job, cheers
Reading this slowly and letting each paragraph land before moving on, and a stop at agatebrindle earned the same patient approach, content that rewards slow reading rather than speed is content with real density and the writers here are clearly producing work that benefits from the careful eye rather than the rushed scan.
Found the section structure particularly thoughtful, and a stop at elmwoodgumbo suggested the same care across the broader site, structural choices guide the reader through the material in ways most people do not consciously notice but feel the absence of when those choices are made carelessly or not at all.
I just sent this post to a bunch of my friends as I agree with most of what you’re saying here and the way you’ve presented it is awesome.
Wow, beautiful website. Thnx …
https://www.gazetamiedzyszkolna.pl
Unbelievably individual friendly site. Tremendous info readily available on few gos
to.
https://www.pilska.tv
Клад взял в касание, просто идеально. И никаких ебеней. Прям центр города. К стафу есть вопросы, почему-то вместо 5 было 4 колеса. Что расстроило. Не делайте так больше. мефедрон купить народ а присылают вместе с заключением экспертизы?
Superb content you’ve gotten in here.
https://www.ta-praca.pl
Now appreciating that the post did not try to imitate any other style I might recognise, and a stop at glybrow continued that distinct voice, content with its own register rather than borrowed from elsewhere is content with real authorial presence and this site has clearly developed that presence through what feels like patient editorial work.
So helpful, look forwards to coming back again.
https://www.telewizjamazury.pl
You’ve got one of the better internet websites.
https://www.lubelska.tv
I enjoy looking through your website. Thank you so much!
https://www.swiebodzin.tv
Great internet site! It looks extremely expert! Keep up the excellent job!
https://www.kopalniapracy.pl
Thanks, this site is really valuable.
https://metropoliabydgoska.pl
Terrific Web-site, Continue the great work. thnx.
https://www.zvami.tv
Удачи и процветания! мефедрон купить Вообщем так, с момента отправки из курьерской службы до рук курьера в нашем городе прошло 3 дня, забрал я значительно позже, но это не суть.
Now understanding why someone recommended this site to me a while back, and a stop at cricketcameo explained the recommendation, sometimes recommendations make sense only after experience and this site has finally clicked into place as the kind of resource I now understand was being recommended for sound editorial reasons by my friend.
Just want to point out I’m ecstatic that i came upon your website page!
mojbytom.pl
This will be helpful for my family.
What’s up, good internet site you possess going here.
http://www.instalki.pl
Reading this on a phone at a coffee shop and finding it perfectly suited to that context, and a stop at tinyharbor continued the comfortable mobile experience, content that works across reading conditions without compromising on substance is increasingly important and this site has clearly thought about the whole reader experience here.
Passion the website– very individual friendly
and whole lots to see!
https://www.debica24.eu
Really this is a valuable website.
https://www.lubelska.tv
Reading this on a long flight and finding it the best thing I read across hours of trying, and a stop at canyonclover kept the streak going, when content beats long flight reading you know it has substance because flight reading is a hard test of a piece given the alternatives available everywhere.
Reading this gave me material for a conversation I needed to have anyway, and a stop at baroncanyon added even more talking points, content that connects to upcoming social or professional needs rather than just being interesting in the abstract is the kind that earns priority placement in my attention these days routinely.
Wow, attractive website. Thnx …
https://krakow-atrakcje.pl
Wow cuz this is extremely good job! Congrats and keep it up.
nowagazeta.pl
Amazing….this is a handy web-site.
https://www.lokalnatelewizja.pl
You’ve gotten wonderful information listed here.
https://www.telewizjamazury.pl
да это будет полная:ass:.Ну я надеюсь все будет хорошо.тогда так вышло иза того что это остатки товара из серии мн – 001.Уверен такой жопы больше не будет мефедрон купить анологичная ситуация! продаван ты на примете, раз твоих клиентов начали принимать…
A piece that handled multiple complications without becoming confused, and a look at streamingstash continued that organisational clarity, holding multiple threads in a single piece without losing any of them is a sign of skilled writing and this site has clearly developed the editorial discipline to manage complexity without sacrificing readability throughout.
Sustain the amazing job !! Lovin’ it!
https://www.ta-praca.pl
Thanks a lot! This is an incredible site.
https://www.dziennikpowiatowy.pl
Maintain the good job and generating the crowd!
https://www.pilska.tv
Took a chance on the headline and was rewarded, and a stop at nyxsip kept the rewards coming as I clicked through, the kind of place where every link leads somewhere worth the click is a small luxury on the modern web where so many sites are mostly empty calories disguised as content.
Liked the careful word choice throughout, every term seemed picked for a reason rather than thrown in casually, and a stop at rubymeadowcommercegallery continued that precise style, this kind of attention to small details is what separates careful writing from the usual rushed content that dominates blog spaces today across pretty much every topic I follow.
Достойны уважения! мефедрон купить Ребят вообще на высоте!!!)Удачи вам всех благ!!! ВСЕХ С ПРАЗДНИКОМ!!!Всего самого самого наилучшего!)
Hi, do have a e-newsletter? In the event you don’t definately should get on that piece…this web site is pure gold!
В Ульяновске (Новый Город) салон «Планета Красоты» предлагает широкий выбор услуг: стрижки, покраска, маникюр, педикюр, прически и укладки. Наши мастера в Заволжье имеют большой опыт. Мы делаем женские и мужские стрижки, окрашивание, маникюр с дизайном, педикюр с уходом, а также свадебные прически. Салон причёсок «Планета Красоты» ждет вас. Приходите, и мы сделаем вас красивыми: BeautyPlanet73.RU
Took my time with this rather than rushing because the writing rewards attention, and after ermineattic I had even more to absorb, the kind of content that pays back the patient reader rather than punishing them with empty filler is something I look for and rarely find in regular searches lately.
Thanks for the honest framing without exaggerated claims that the topic will change my life, and a stop at elfincamel kept the same modest tone, restraint in marketing language signals trustworthiness and the writers here are clearly playing the long game by building credibility rather than chasing immediate clicks through hyperbole.
И потом не удивляйтесь, что магазин медленно работает или не отвечает. Попробуйте по 100 раз в день рассказывать что и как разводить, и при этом успевать оформлять заказы. мефедрон купить Магаз качественный ни разу не подводил!!!
Now feeling confident that this site will continue producing work I will want to read, and a look at icicleislemerchantgallery extended that confidence into the future, projecting forward from current quality to expected future quality is something I do for sites I genuinely follow and this one has earned that forward looking trust clearly today.
Over the course of reading several posts here a pattern of quality has emerged, and a stop at lyxbark confirmed the pattern, the difference between sites that hit quality occasionally and sites that hit it consistently is huge and this site has clearly demonstrated the consistent kind through what I have read this morning.
можно записаться на пробник ам как он придет…а то ниче про него непонятно мефедрон купить Да хватает придурков, только смысл писанины этой , что он думает что ему за это что то дадут ))) кроме бана явно ничего не выгорит )))! Тс красавчик брал 3 раза по кг сделки и всегда все чётко ! Жду пока появиться опт на ск!
Точные номера регистратур поликлиник, никаких скрытых подписок, все полностью бесплатно.
http://dustlikestars.de/index.php?title=Vracha_Na_Dom
When are you going to take this to a full book?
https://forum.diamech.com/index.php?topic=10812.msg109218#msg109218
https://pic.borda.ru/?1-7-0-00000203-000-0-0-1779794304
Just want to recognise that someone clearly cared about how this turned out, and a look at cricketgourd confirmed that care extends across the broader site, you can feel the difference between content shipped to hit a deadline and content released because the writer was actually proud of the result for once.
Coming to this with low expectations and being pleasantly surprised by the substance, and a stop at answerharbor continued exceeding expectations, the recalibration of expectations upward across multiple positive readings is one of the actual rewards of careful browsing and this site is providing that recalibration at a steady rate apparently.
Всех благ данному магазину!!! мефедрон купить скорость доставки 5+ (во вторник заказали в пятницу получили)
https://forum.diamech.com/index.php?topic=10812.msg109218#msg109218
کراتین اکتیولب، بر پایه کراتین مونوهیدرات خالص بنا شده است، اما با درجه خلوص دارویی و فرآوری میکرونایز شده.
Bookmark moved to my permanent reference folder rather than the casual maybe later folder, and a look at batikcitrine earned the same upgrade, the distinction between casual interest and lasting reference is something I track carefully and very few sites cross that threshold but this one did so without much effort apparently.
Really insightful….looking onward to returning.
https://www.oferujemyprace.pl
Came back to this an hour later to reread a specific section, and a quick visit to carbonantler also drew a second look, content that pulls you back rather than letting you move on permanently is the kind I want to fill my browser bookmarks with in 2026 and beyond as the open internet evolves.
Wonderful web-site you’ve right here.
https://radomsko24.pl
Все хорошо, ждем товар, когда будет сразу дадим знать. мефедрон купить фофу кушают, 2 дмпм нюхается, судя по всему
You’re an extremely useful website; couldn’t make it without ya!
https://www.oferujemyprace.pl
I treasure the content on your web site. Regards!
https://www.tvsudecka.pl
You’re an extremely practical web site; could not make it without
ya!
https://www.tvobiektyw.pl
Maintain the remarkable work !! Lovin’ it!
https://www.korsosanockie.pl
I appreciate reading through your website. Thanks a ton!
https://www.oto-praca.pl
I love the info on your website. Thanks for your time!
https://www.tvobiektyw.pl
A piece that read as if the writer was thinking carefully rather than just typing fluently, and a look at snowcovemerchantgallery continued that considered quality, the difference between fluent typing and careful thinking shows up in writing and this site reads as the product of thought rather than just the product of language fluency apparently.
Superb Webpage, Continue the good work. Thanks for your time!
https://sosnowiecki.pl/
Wow, stunning website. Thnx …
https://swiecie24.pl/pl/
Wow because this is excellent job! Congrats and keep it up.
https://www.telewizjamazury.pl
Glad I clicked through from where I did because this turned out to be worth the time spent, and after uxupgrade I had a fuller picture, the kind of content that earns its visitors through delivering value rather than chasing them through aggressive advertising or constant pop ups appearing everywhere on the screen lately.
Simply wanted to tell you I’m grateful I stumbled onto your
internet page.
https://radio5.com.pl/
I like reading through your site. Cheers!
https://www.polskibiznes.info
пиши разберемся мефедрон купить Приходите еще, всегда рады
You’re a really valuable internet site; could not make it without ya!
https://www.polskibiznes24.pl
Simply wanted to point out I am just thankful that i came upon your webpage.
https://mojmikolow.pl
Simply wanted to state I am just thrilled that i stumbled on your site!
https://www.pewnybiznes.info
Bookmark earned and the bookmark feels like a permanent addition rather than a maybe, and a look at erminecobble confirmed that permanent status, the difference between durable bookmarks and ephemeral ones is something I have learned to feel quickly and this site triggered the durable feeling almost immediately during my first read here.
Love the site– extremely individual pleasant and great deals to see!
https://www.tvobiektyw.pl
Love the website– extremely individual pleasant and
whole lots to see!
https://www.praca-biznes.pl
I love reading through your web site. Kudos!
https://www.mojebielsko.pl
Wow, gorgeous portal. Thnx …
https://czas.tygodnik.pl
ребятки так жержать!) уровень достойный мефедрон купить Отличный магаз.
Greetings, tidy website you have going here.
gwe24.pl
You’re an extremely valuable website; couldn’t make it without ya!
https://www.nowytydzien.pl
http://www.birulevo.su/component/option,com_smf/Itemid,34/topic,30682.0/
I delight in the details on your website. Appreciate it.
https://www.praca-biznes.pl
Wow, gorgeous site. Thnx …
https://www.lubelska.tv
https://uaksu.forum24.ru/?1-10-0-00004067-000-0-0-1779794086
I love the knowledge on your web sites. Thanks for your time.
https://mojegliwice.pl/
Extremely individual friendly website. Enormous information readily available on few clicks
on.
mojekatowice.pl
Great internet site! It looks very expert! Keep up the excellent work!
https://www.swiebodzin.tv
https://planetasp.ru/forum/viewtopic.php?pid=30405#p30405
Great webpage you have going here.
https://www.kociewiak.pl
Quietly impressive in a way that does not announce itself, and a stop at ivoryridgemerchantgallery extended that quiet impressiveness, the kind of quality that emerges through sustained attention rather than first impressions is the kind I trust more deeply and this site has been earning that deeper trust across multiple sessions over time consistently.
janet jackson leaked nude
Оплатил 3 февраля, 6 получил трек-трек не бьётся, посылкинет. Раньше заказывал за 2 дня всё приходило, на данный момент по почте не отвечают, в аське сказали скоро придет, в общем, ребята, попридержите коней. мефедрон купить сорь за флуд)))
Amazing….such a useful web site.
https://www.gazetamiedzyszkolna.pl
Great internet website! It looks very good!
Maintain the great work!
https://www.polskibiznes.info
Great website! It looks really expert! Maintain the good work!
orzesze.com.pl
I love this website – its so usefull and helpfull.
https://www.mojebielsko.pl
Most posts I read end up forgotten within a day but this one is sticking, and a look at driveharbor extended that lingering effect, content that survives the immediate moment of reading rather than evaporating is content with genuine retention quality and this site has been producing memorable pieces at a rate notable across my reading.
Thanks meant for providing these kinds of well put together written content.
https://www.kopalniapracy.pl
Top tier post, the kind that makes you want to share the link with friends working in the same area, and a stop at oxaboon only made me more confident in doing that, this site is one of the better resources I have seen on the topic recently across both new and older posts.
What’s up, great websites you’ve here.
https://www.kronikatygodnia.pl
You’ve got impressive info on this web-site.
https://www.ta-praca.pl
ага в осадок выпадает в спирте это верно, но если после выпадания в осадок добавить 646 в спирт и все будет гуд. Кстати 250 также при перегреве выпадает в осадок мефедрон купить По петрозаводску работаете?или будете?
Amazing Web site, Stick to the excellent work. Appreciate it.
https://infoskierniewice.pl
Cool web-site you’ve got right here.
https://www.polskibiznes.info
A welcome reminder that thoughtful writing still happens online, and a look at carboncobble extended that reassurance, the modern web makes it easy to forget that careful writing exists and finding sites that practice it is a small antidote to the cynicism that builds up from too much exposure to algorithmic content.
Thanks, this website is extremely beneficial.
https://www.kariera24.info
Appreciate it! This a very good web site!
https://www.mojebielsko.pl
Keep up the incredible work !! Lovin’ it!
https://www.ta-praca.pl
You have probably the greatest internet sites.
https://czas.tygodnik.pl
Stands apart from similar pages by actually being useful, that is high praise these days, and a look at solarorchardmerchantgallery kept that standard going, you can tell when a site is built around the reader versus around metrics and this one clearly belongs to the first category for sure based on what I read.
I appreciate reading your web site. Thank you!
https://izyrardow.pl
I treasure the details on your internet site. Cheers.
https://metropoliabydgoska.pl
You’re a really useful website; could not make it without ya!
https://www.kariera24.info
I delight in the content on your website. Thanks.
swiony.pl
You’re an extremely practical internet site; couldn’t make it without
ya!
https://www.mojebielsko.pl
Took the time to read every paragraph rather than skimming for the punchline, and a quick visit to soontornado earned the same careful attention from me, that is the highest signal I can give about content quality because my default mode is rapid scanning rather than deliberate reading on most pages.
Во время поиска хорошего места в Варшаве с блюдами на углях случайно наткнулись на отменный гриль-бар с шашлыком, хачапури и пиццей. Гости в отзывах единодушно отмечают отличный вкус блюд и высокий уровень обслуживания, а парковка рядом с заведением тоже не вызывает затруднений. Меню и адрес точки можно посмотреть на сайте https://grillpappa.pl/ , у них там всё подробно расписано Если любите качественное мясо на огне и хорошую атмосферу, однозначно стоит заглянуть или заказать доставку на вечер.
понравилось очень!!!!!! кокаин купить онлайн про него что нить писали? точнее вы читали ?
If you would like to obtain a great deal from this paragraph then you have to apply such techniques to your won web site.
Your advice is incredibly unique.
https://www.oferujemyprace.pl
Bookmarked the page and the homepage too because clearly there is more to explore here, and a quick stop at erminecondor only made that more obvious, this is the kind of place I want to dig through over a weekend rather than rushing through during a coffee break tomorrow morning before getting back to work.
Lovely Web-site, Continue the fantastic job. Appreciate it.
https://naszepiaseczno.pl
Thanks, this website is really beneficial.
https://extrawalcz.pl
Oh my goodness! Amazing article dude! Many thanks,
However I am encountering difficulties with your RSS.
I don’t understand why I can’t subscribe to it. Is there anybody getting identical RSS problems?
Anyone who knows the solution will you kindly respond?
Thanks!!
Felt the writer did the homework before publishing, the references hold up, and a look at satinspindle continued that documented care, content with traceable claims rather than vague assertions is the kind I trust and the lack of bald assertion in this post is one of its quietly impressive qualities for me.
Ну подскажите хоть что нибудь пожалуйста?А то я переживаю ппц. кокаин купить онлайн как так его разве нету? с самого утра тут сижу
A piece that read smoothly because the writer understood how readers actually move through prose, and a look at fawnimpala maintained the same reader awareness, writers who think about the reading experience as much as the writing experience produce better work and this site has clearly made that shift in editorial approach.
Now considering writing a longer note about the post somewhere, and a look at focusconstructor added more material for that note, content that prompts me to write rather than just consume is content with generative energy and this site is producing that generative effect for me at a higher rate than most sources.
Магазин не работает по выходными и праздникам кокаин купить онлайн Лучшего амфа я в жизни не пробовал. Правда цена кусается, но оно того стоит!
ЗАО «Техносвязь» — российское предприятие-изготовитель печатных плат, уже второе десятилетие совершенствующее производство для выпуска продукции высочайшего качества. Подробнее на сайте https://www.techno-svyaz.ru/ — здесь применяют современные технологии и материалы от мировых лидеров. Компания одинаково чётко выполняет серийные и единичные заказы, гарантируя короткие сроки и внимательный подход к каждому клиенту.
и Антошке пару точек, кокаин купить онлайн тоже хочу заказать бро!!!
Liked the natural conversational tone throughout, never stiff and never overly casual either, and a stop at jaspermeadowcommercegallery kept that comfortable middle ground going, finding a tone that respects the reader without becoming distant or overly familiar is harder than it sounds and this site nails that balance consistently across many different pieces.
Связался с продавцом вполне адекватный!Заказал щас жду адресса кокаин купить онлайн Просто КОСМОС
Now sitting with the thoughts the post triggered rather than rushing on to the next thing, and a stop at valeharborcommercegallery extended that reflective pause, content that earns time for thought after closing the tab is content of higher value than the merely interesting and this site has clearly produced that lasting effect today.
203 живик – отпадного качества. Растворился на раз. 1к 15 получился норм микс) кокаин купить онлайн Послезавтра запрет в силу вступает
High quality writing, no marketing speak and no buzzwords that mean nothing, and a stop at modernvertex kept that going, simple direct content that actually communicates something is harder to find than it should be and this is one of the rare places that gets it right consistently across many different posts.
Ищете качественную покраску волос в Ульяновске? Салон «Планета Красоты» в Новом Городе предлагает услуги колористов. Окрашивание по техникам: балаяж, шатуш, омбре, мелирование и тонирование. Мы используем краски премиум-класса, которые не повреждают структуру волос. В Заволжье наши мастера славятся точным попаданием в тон. Также предлагаем покраску корней и полное окрашивание. Приходите, чтобы получить насыщенный цвет и здоровый блеск волос. В салоне работают визажисты, которые помогут завершить образ – https://beautyplanet73.ru/
вобще-то этот магазин трек присылает а не адрес… кокаин купить онлайн Как связаться?
Decided not to skim despite my usual habit and was rewarded for the discipline, and a stop at visavoyage earned the same patient approach, training myself to recognise sites that warrant slower reading is part of being a careful online reader and this site is the kind that helps me practice that skill regularly.
وی ایوژن، یک مکمل پروتئینی پیشرفته و چندمرحلهای است که از ترکیب سه منبع پروتئینی با سرعت جذب متفاوت شامل پروتئین وی ایزوله، پروتئین وی کنسانتره و کازئین میسلار تشکیل شده است.
Вы реально думаете что тут сидят роботы, которые должны отвечать всем без перерывов и выходных? Праздники же были, все отдыхать хотят. кокаин купить онлайн Желаю вам удачи в дальнейшей работе)
ЛУЧШИЕ ИЗ ЛУЧШИХ НЕ РАЗ ЗАКАЗЫВАЛ И БУДУ ЗАКАЗЫВАТЬ!!!! кокаин купить онлайн заказала в этом магазе сувениров:), посыль пришел на 3ий день, продукты качеством вкусны
Ищете, где сделать прическу и укладку в Ульяновске? «Планета Красоты» в Новом Городе — ваш выбор. Мы предлагаем укладку с эффектом салонного блеска, используем профессиональные фены и брашинги. В Заволжье наши стилисты создают укладки на любую длину: от коротких мальчишеских до длинных локонов. Также делаем укладку с элементами плетения. Прическа и укладка от наших мастеров подчеркнут вашу красоту. Приходите на процедуру и наслаждайтесь результатом. «Планета Красоты» заботится о вашем стиле: https://beautyplanet73.ru/
คอนเทนต์นี้ น่าสนใจดี ครับ
ผม ได้อ่านบทความที่เกี่ยวข้องกับ
เนื้อหาในแนวเดียวกัน
ที่คุณสามารถดูได้ที่
Mazie
สำหรับใครกำลังหาเนื้อหาแบบนี้
มีการยกตัวอย่างที่เข้าใจง่าย
ขอบคุณที่แชร์ เนื้อหาดีๆ
นี้
และหวังว่าจะมีข้อมูลใหม่ๆ มาแบ่งปันอีก
Ahaa, its pleasant dialogue on the topic of this article
at this place at this website, I have read all that,
so at this time me also commenting at this place.
Извините удаляю сообщение! кокаин купить онлайн Спасибо, будем работать тогда тоже )
Thank you for the auspicious writeup.
Reading this felt productive in a way most internet reading does not, and a look at walnutcovemerchantgallery continued that productive feeling, sometimes the open web feels like a waste of time but sites like this remind me why I still bother to look around rather than retreating to old reliable sources for everything I need.
Если вы ищете надёжный магазин для всего, что нужно ребёнку, «Резиденция детства» — именно то место, где удобный выбор сочетается с качеством: на https://childresidence.ru/ собраны игрушки, детская одежда, мебель и электроника для всей семьи. Магазин предлагает широкий ассортимент проверенных товаров, помогая родителям создавать уют и радость для своих детей без лишних хлопот. Менеджеры всегда готовы помочь с выбором.
Going to come back when I have more time to read carefully, the post deserves more than a quick scan, and a stop at flintbunting reinforced that, this is the kind of site that rewards a slower read which is hard to find in this fast paced corner of the internet but really worthwhile.
Заказал вчера 30гр 4-FA . Трек пока не получил. Надеюсь что все будет олрайт. В планах долговременное сотрудничество! кокаин купить онлайн Заказываю в третий раз, дали скидку 8%, приятно.
А чего брали то? кокаин купить онлайн ну что,сказать все на высшем уровне!!
Wonderful website. A lot of helpful information here. I’m sending it to several pals ans additionally sharing in delicious.
And of course, thank you to your effort!
A piece that built up gradually rather than front loading its main points, and a look at ukurban maintained the same gradual structure, content that trusts the reader to reach conclusions through accumulating reasoning is more persuasive than content that announces conclusions and then defends them and this site uses the persuasive approach.
Felt the post had been quietly polished rather than aggressively styled, and a look at sailorvertex confirmed the same understated polish, sites whose quality reveals itself slowly rather than announcing itself loudly are the kind I trust more deeply because the trust is not based on first impressions of marketing but actual substance.
Жалко тест профукал ) кокаин купить онлайн Приветствую. Хотели бы предложить вам сотрудничество по опту, по очень низким ценам 180т за 1 кг скорость и реагент, мы с форума легалрц больше 3 лет в ветках доверенных магазинов если заинтересует напишите сюда. , делаем кладом , вот ссылка на нашу ветку //legalrc.com/forums/mix/ контакты можете сверить из подписи
Залетные это какие то, представь, на целых 10 грамм кинули, смешно да и только . кокаин купить онлайн не понятно, жду трека говорил вторник, вторник они не успели, говорил среда, отмолчался, не ответил!
Салон причёсок «Планета Красоты» в Ульяновске (Заволжье) — идеальное место для укладки любой сложности. Ищете, где сделать прическу на выпускной или свадьбу? Мы предлагаем укладки с использованием бигуди, плойки и диффузора. В Новом Городе наши стилисты создают объемные и гладкие прически. Также делаем укладки для мужчин: укладка волос гелем или воском. Приходите за красивой прической и укладкой. Мы учтем все ваши пожелания и тип волос. «Планета Красоты» сделает ваш образ неповторимым – https://beautyplanet73.ru/
Ищете, где сделать маникюр и педикюр в Ульяновске (Новый Город) с покрытием гель-лаком? В «Планете Красоты». Мы предлагаем маникюр с покрытием, которое держится до месяца. Педикюр с аппаратной обработкой и нанесением увлажняющего крема. В Заволжье наши мастера делают дизайн «кошачий глаз», «зеркало». Маникюр и педикюр в «Планете Красоты» — это красота и надежность. Запишитесь на процедуру прямо сейчас BeautyPlanet73.RU
САБЖ САМ ПО СЕБЕ НЕ ПРЁТ !! МУТИТЬ НА НЁМ МИКСЫ СМЫСЛА НЕТ !!! ЭТО АНТИДЕПРЕССАНТ !! кокаин купить онлайн о господи 😀 я не селлер – я просто зашёл на сайт и посмотрел что есть в ассортименте – из скоростей нормальных разве что..кхм, оно…
Натуральные соки и квас «СУЛАК» от https://voda-s-gor.ru/soki-kvas/ — это настоящая альтернатива магазинным напиткам с искусственными добавками: абрикос, персик, слива, гранат, яблоко и миксы выжаты из отборного горного сырья без консервантов и красителей. Компактный формат 0,25 л удобен в дороге и для детского питания, а упаковки от 15 штук делают покупку выгодной для семьи или офиса. Попробуйте вкус настоящих фруктов — без компромиссов.
You need to really control the comments listed here
I love your blog. It looks every informative.
Learned something from this without having to dig through layers of fluff, and a stop at waveharborcommercegallery added a bit more context that helped tie things together for me, definitely a useful corner of the internet for anyone who wants real information without the usual marketing nonsense around it that often ruins similar pages.
You need to really control the comments listed here
Great write-up, I am a big believer in placing comments on sites to inform the blog writers know that they’ve added something advantageous to the world wide web!
I just added your web site to my blogroll, I hope you would look at doing the same.
Good day! This is my first comment here so I just wanted to give a quick shout out and say I really enjoy reading through your articles. Can you recommend any other blogs/websites/forums that cover the same subjects? Thanks a lot!
нету. в ближайшее время не будет. кокаин купить онлайн брали 10 гр реги ))))
A neighbor of mine encouraged me to take a look at your blog site couple weeks ago, given that we both love similar stuff and I will need to say I am quite impressed.
I wish I could craft such articles as this. Thank you very much.
Excellent read, I just passed this onto a colleague who was doing a little research on that. And he actually bought me lunch because I found it for him smile So let me rephrase that.|
I for all time emailed this webpage post page to all
my friends, since if like to read it afterward my contacts will too.
Ровный магазин . Всем советую ! кокаин купить онлайн что сильнее 100 или 400 ? и по времени сколько действуют ?
Делать надо 1к10, можно и послабже, например 1к13, но не более, а то 30 минут эт мало, хотя смотря для кого)) кокаин купить онлайн Благодарен за заказ во вторник оплатил – в пятницу / утром / товар получил
Great site. Lots of useful info here. I am sending it to several pals ans additionally sharing in delicious.
And obviously, thanks to your sweat!
тоже хочу заказать бро!!! кокаин купить онлайн Я так понимаю,магаз – надёжный! Цены на сегодняшний день соответствуют заявленным в прайсе?
https://balashiha.myqip.ru/?1-12-0-00001527-000-0-0-1780151006
We stumbled over here from a different website and thought I might check things out.
I like what I see so i am just following you. Look forward to looking at your web page
for a second time.
лютый микс, мир за качество магазу кокаин купить онлайн Трек получил! Данный магазин действительно выполняет свои обязанности перед покупателями.Просто при личном разговоре с продавцом можно действительно понять что работы у них действительно много и на это уходит время,просто стоит проявить терпение.Считаю как получу товар,его качество останется таким же наивысшим,как сама работа магазина
https://newyork.site666.com/index.php?topic=123979.new#new
https://moskva.kamrbb.ru/?x=read&razdel=0&tema=297&start=0#new
Now appreciating the way the post avoided the temptation to be longer than necessary, and a look at riderzenith continued that lean approach, content with the discipline to stop when finished rather than padding for length is content that respects both itself and its readers and this site has that disciplined editorial culture clearly throughout.
https://pic.borda.ru/?1-7-0-00000208-000-0-0-1780150648
Reading this in a relaxed evening setting was a small pleasure, and a stop at bisonfudge extended the pleasant evening reading, content that fits the tone of relaxed time without becoming forgettable is what I look for in evening reading and this site has the right tone for that particular slot in my daily reading routine.
https://spb24.kamrbb.ru/?x=read&razdel=1&tema=263&start=0#new
http://forum.grandvitara-club.ru/forum/showthread.php?32740-Eazy-Energy&p=74684#post74684
https://spb24.kamrbb.ru/?x=read&razdel=1&tema=263&start=0#new
https://moskva.kamrbb.ru/?x=read&razdel=0&tema=296&start=0#new
Всем привет вчера забегал в этот магазин ни чего не нашел ! кокаин купить онлайн я имел ввиду что вещевства а не способ в/в я не конченый
https://omsi2mod.ru/forum/9-14328-1
http://banki.tomsk.ru/forum/viewtopic.php?p=16693#16693
сегодня получил посулку с двумя пакетиками жёлтоватого и белого цвета, магазин работает:good: качество проверю и в соседней темке отпишу кокаин купить онлайн Кекс знакомый бpал тут- качество-самолет! Меня угостил – я тоже остался доволен!
https://pf1.ru/topic70903.html
کراتین ترکیبی ماسل تک، یک کراتین ترکیبی پیشرفته و چندمؤلفهای است که برای به حداکثر رساندن جذب کراتین و افزایش حجم عضلانی طراحی شده است.
http://center-2.ru/forum/?mingleforumaction=viewtopic&t=28031#postid-50485
http://banki.tomsk.ru/forum/viewtopic.php?p=16693#16693
http://wmking.ru/t86723.html
швеллер для лестницы
http://wmking.ru/t86723.html
Написал заказ на мыло… никто не ответил. Списался через скайп сказали чтоб переоформил заказ.. Переоформил, опять никакого ответа… кокаин купить онлайн “В Лс загораеться сообщениее,Захожу там координаты клада”
Comfortable reading experience throughout, no jarring tone shifts and no awkward formatting, and a look at intentionalprogression kept that smooth feel going, the kind of editorial polish that goes unnoticed when present but glaring when absent is something this site has clearly invested in across the broader content as well which deserves recognition.
http://old.msfnpr.ru/msfnprbb/viewtopic.php?p=7537#7537
http://center-2.ru/forum/?mingleforumaction=viewtopic&t=28031#postid-50485
Reading this gave me a small refresher on something I had partially forgotten, and a stop at pyxedge extended the refresher, content that strengthens existing knowledge rather than just adding new is content with a particular kind of consolidating value and this site is providing that consolidating function across multiple visits.
http://wmking.ru/t86723.html
доброй ночи ровной ветке! кокаин купить онлайн Всем Привет! :hello:Немного хороших строк о магазине;)
http://center-2.ru/forum/?mingleforumaction=viewtopic&t=28031#postid-50485
وی ویکتور مارتینز، یک مکمل ورزشی پیشرفته و باکیفیت است که تحت نظارت مستقیم “ویکتور مارتینز”، قهرمان سرشناس دنیای بدنسازی، برای حمایت از رشد و ریکاوری عضلات طراحی شده است.
спасибо магазу) кокаин купить онлайн Заказал в понедельник – в среду мне уже позвонили.
Qué tal comunidad, deseo recomendar una página que descubrí recientemente y que
realmente disfruté. Se trata de un artículo muy completo
sobre la historia del fútbol argentino, desde sus orígenes hasta la actualidad.
Desde mi experiencia, siempre me interesó conocer cómo nació y evolucionó la cultura
futbolística en Argentina. Esta página explica muy bien la llegada del fútbol al país, el papel de las comunidades inmigrantes, así como el crecimiento
de los clubes que formaron la identidad deportiva nacional.
Lo que más me gustó es que no presenta datos de manera fría, sino que también explica el
contexto social. Aprendí bastante sobre instituciones históricas, rivalidades clásicas y la forma
en que el fútbol pasó de ser un deporte importado a convertirse en parte de la identidad del
país.
Además, el texto dedica espacio a íconos del fútbol mundial como Maradona, Messi y otras estrellas argentinas.
La forma en que se describe su impacto ayuda a comprender por qué
ocupan un lugar tan importante en la historia del deporte.
Un punto muy interesante es la sección dedicada a los
clubes argentinos y a los torneos internacionales.
El contenido resulta fácil de seguir y permite entender mejor el prestigio de los equipos argentinos.
Si disfrutas leyendo sobre grandes tradiciones futbolísticas, sin duda recomiendo leer este contenido.
Aunque no seas un experto en el tema, encontrarás datos interesantes, contexto histórico y curiosidades.
Para concluir, pienso que este contenido vale la pena.
Disfruté mucho recorriendo cada sección del artículo y
la compartiré con otros aficionados al fútbol.
Una excelente lectura para cualquier amante del
fútbol.
мин заказ от 1гр. кокаин купить онлайн на сайте нету не кого в jaber тишина и онлайн его нет онлайн оператор
Все получил в наилучшем виде, спасибо магазину за все, буду брать здесь всегда кокаин купить онлайн Магаз однозначно ровный. В прошлый раз брал ам, быстро четко оперативно работает этот селлер. Делал на аце, 1 к 10, плюс еще немного урб (пробник) До этого пыхал ам 1 к 10 без урб, было с чем сравнивать. С урб, однозначно лучше.
Found the section structure particularly thoughtful, and a stop at happyvoyager suggested the same care across the broader site, structural choices guide the reader through the material in ways most people do not consciously notice but feel the absence of when those choices are made carelessly or not at all.
И еще, слышал типа ам2233, который отличного качества, желтого цвета. мне приходит белый, но када с ацетоном смешиваешь и ставишь нагреваться, стенки рюмки покрываются желтым цветом. кокаин купить онлайн конспирация достойная, товар оказался отличным, кроли заценили. будем еще работать
Град Девелопмент реализует ЖК Аурум Тайм с учетом современных требований к качеству жилья и городской инфраструктуре – аурум тайм застройщик
такая же беда, тс говорит все ровно уже в пути, но самое интересное то что, все говорят что курьерки там как то каряво работают, но я звоню операторам они отвечают такой накладной нет, отсюда вопрос как она может в пути если у них во внутренней базе нет моей накладной, курьер взял сразу от нашего тс. и уехал ко мне ))))) кокаин купить онлайн Спасибо огромное вам многим за понимание.
Отзывы вроде неплохие кокаин купить онлайн 6-APB, белый кристалический порошок, 1000р… Это типа настоящий 6-APB?
The post made the topic feel approachable without making it feel trivial, that is a fine balance, and a stop at calicobanyan maintained the same balance, finding the middle ground between welcoming and serious is genuinely difficult and the writers here have clearly figured out how to consistently hit it well across many different posts.
сказали отпрака на следующий день после платежа! кокаин купить онлайн все как обычно работает
Now feeling the rare pleasure of trusting a source completely on first encounter, and a look at agaveamber extended that initial trust into something more durable, the calibration of trust to evidence is something I do informally and this site has earned high trust through the cumulative weight of multiple consistently good posts already.
Refreshing change from the usual sites covering this topic, no clickbait and no padding, and a stop at dailyneedsstore confirmed the difference, this place clearly has its own voice rather than copying the formulas everyone else uses to chase clicks online which is becoming increasingly rare these days across nearly every popular subject.
сделал заказ,оплатил,на следующий день получил трек – всё чётко,так держать! успехов и процветания вашей компании! кокаин купить онлайн У меня пришел чисто белый зернистый как крупа порошок.Кал.
спасибо вам уважаемый магазин за то что вы есть! ведь пока что лучшего на легале я не видел не чего! кокаин купить онлайн Решили мы тут значит с кентом несколько дней назад покурить . Вспомнили про сайт chem24.biz.ski и решили взять 2гр твердого, оплотили короче,описание адреса было простым и спрятано было грамотно!!!
Для тех, кто ищет премиальную недвижимость в Москве, Vesper Шаболовка предлагает современный формат городской жизни с акцентом на комфорт, безопасность и качество архитектурных решений, vesper шаболовка 31
Ждем трип репотов и описания про АМ кокаин купить онлайн И духовной отсутствие пищи
Picked a friend mentally as the audience for this and decided to send the link, and a look at bargainvertex confirmed the send was the right choice, choosing whom to share content with is a small act of curation that I take more seriously than the public sharing most platforms encourage these days online.
Спасибо всем сотрудникам Chemical-mix.com кокаин купить онлайн продукт – прет дико и жестко, но по сути ничего интересного, цена в 2 тыр себя полностью оправдывает. Эдакий бычий кайф. Если вам нравится трястись и стучать зубами – вы попали по адресу. Во всех остальных случаях – нахер-нахер. Слабенькая 3/5
тоже хочу заказать бро!!! кокаин купить онлайн и качество всегда на уровне))
The pacing of the post was just right, never rushed and never dragged out unnecessarily, and a look at agavebarley maintained the same rhythm, you can tell the writer has experience because the difficult skill of pacing is something only practiced writers manage to handle well in long form content over time and across formats.
Успехов, здоровья и процветания вам в наступающем году. :bro: кокаин купить онлайн слов нет.Вы ребята давно шум должны поднять что такая херня а то молчите по две недели!!!!я бы так хрен зарядил.А я почитал типа все ровно пишут и отдал кровные 22т.р
А чего тут так тихо? Ребят, работаем?) кокаин купить онлайн Трек получил, всё ровно!
While this issue can vexed most people, my thought is that there has to be a middle or common ground that we all can find. I do value that you’ve added pertinent and sound commentary here though. Thank you!
Flying to Thessaloniki from the UK? Visit https://halkidiki-transfer.uk/ for competitively priced private transfers from Thessaloniki Airport (SKG) to every corner of Halkidiki—Kassandra, Sithonia, and Mount Athos—with a fixed price, an English-speaking driver, and no fees until you arrive. We offer free child seats and online booking. Learn more on our website.
Hi just wanted to give you a quick heads up and let you know a few of the
pictures aren’t loading properly. I’m not sure why
but I think its a linking issue. I’ve tried it in two different browsers and both show the same results.
отличный магаз,пришло всё быстро и в лучшем виде:dansing:спасибо,удачи и процветания кокаин купить онлайн в кемерово откроетесь??
کراتین بلید اسپرت، از تکنولوژی میکرونیزاسیون استفاده کرده تا ذرات کراتین را به اندازههای بسیار ریز (میکرونی) خرد کند.
Really appreciate the confidence to make a clear point rather than hedging everything, and a quick visit to chimneycargo maintained the same direct stance, writing that takes positions rather than equivocating is more useful even when the positions are debatable because at least the reader has something to react to clearly.
Доберус до пк выложу скрины, магазин угрожает говорит что заплатит за подставу в общем очень взбесился когда я сказал что свои сомнения выложу в паблик, прямо как с катушек слетел, хотя я сначала сказал либо кидок аля лига 12, либо взлом.сразу мат срач угрозы ипр что никогда не сделал бы приличный шоп кокаин купить онлайн 21 мая заказал -23 получил трек.все ок ,жду посыл
Привет форуму! всем кто сомневался брать или нет здесь советую брать не ошибетесь,заказывал сам первый раз тоже побаивался, но решился,, заказал реги jv 60 10 гр в пятницу, оплатил в тот же день, сегодня все на руках конспирация на уровне, тс вполне адекватный человек отвечает быстро, все прошло быстро, оперативно, чему я очень рад, надеюсь на дальнейшее с ним сотрудничество, за качество пока сказать не могу, тк еще микс не делал. Процветания и удачи вашему магазину, приятно было с вами работать! кокаин купить онлайн не бзди все будет ровно трек не всегда бьется это касяк курьерки а не отправителя не паникуй
Amazing lots of very good information! https://www.twitch.tv/matarroledo/about
Even across multiple posts the writers voice has remained consistent in a way I appreciate, and a stop at talentnexus continued that voice, sites that maintain editorial consistency across many pieces have something most sites lack and this one has clearly worked out how to keep its voice steady across what reads as a growing archive.
203 тут говно.. 10к вникуда улетели.. клиенты от меня сбежали… присылали какую-то желтую хуй*ю, не растворяется вовсе, выпадает в осдок.. прет максимум 20-30 минут (в лучшем случае) кокаин купить онлайн Друзья ВВ 200мг. Дикая головная боль. И всё.
Проект от MR Group ориентирован на создание пространства, в котором удобно жить, отдыхать и проводить время с семьей в комфортной обстановке: купить квартиру в новостройке
спасибо за инфу , но только узнал про новый список запвеществ , чувствую вся лавочка прикроется на некоторое время … кокаин купить онлайн спасибо за инфу , но только узнал про новый список запвеществ , чувствую вся лавочка прикроется на некоторое время …
Saving the link for sure, this one is a keeper, and a look at eskimoarbor confirmed I should bookmark the entire site rather than just this page, the consistency across what I have seen so far suggests there is a lot more here worth coming back for soon when I have more time.
сам знаешь что я могу про тебя сказать, ты лучший в своем деле! все всегда в срок! товар на высшем уровне , качество огонь ! сколько раз не брал всегда все ровно и четко! ждем твоего возвращения очень очень ждем, уже сходим с ума без тебя братан)) возвращайся скорей кокаин купить онлайн и Антошке пару точек,
Указание конкретных марок сплавов в разделах помогает специалистам
https://redmetsplav.ru/store/vismut/rossiyskie-splavy-2/vismut-l141/krug-vismutovyy-l141/
Качество сварочных материалов на высоте, электроды варят отлично, состав металла стабильный.
https://xn--80aeedb0bfzeok.xn--p1ai/catalog/latunnoe-litoe-koltso/latunnoe-litoe-koltso-400kh800-mm-lmtssk/
Каждая партия товара сопровождается сертификатами качества, подтверждающими соответствие ГОСТ и ТУ.
https://rms-ekb.ru/catalog/bolty-zheleznodorozhnye/
Продавец общительный, выслал с заказом пару пробников бесплатно! заказы высылют оперативно кокаин купить онлайн интересует больше реагент для миксов.
Пари БК — одна из ведущих букмекерских контор России, предлагающая широкую линию ставок на спорт и удобный личный кабинет. Мобильное приложение позволяет делать ставки в любое время и следить за результатами в режиме реального времени. Скачать приложение можно по ссылке https://play.google.com/store/apps/details?id=com.sport.playmetrics — установка занимает меньше минуты. Интерфейс интуитивно понятен, поддерживаются быстрые выплаты и бонусы для новых пользователей.
307 не появился??? кокаин купить онлайн Дело не в постах. В любом случае нужно быть осторожным. И строить систему сложнее…
Возможность заказа висмута — достаточно редкое предложение на рынке
https://redmetsplav.ru/store/vanadiy-i-ego-splavy/vanadiy-fev80al14—iso-5451/provoloka-vanadievaya-fev80al14—iso-5451/
Поставки всегда вовремя, логистика отлажена до мелочей, что важно для бесперебойной работы цеха.
https://xn--80aeedb0bfzeok.xn--p1ai/catalog/mednyi-perekhodnoi-troinik-press/mednyi-perekhodnoi-press-troinik-76-1kh28-mm-m3t-gost-r-52948-2008/
В каталоге представлены конденсаторные ниобиевые порошки высокой чистоты, необходимые для современной электроники.
https://rms-ekb.ru/catalog/stalnoi-list/list-stalnoi-15kh220kh2300-mm-a263-astm-a480/
В пробе было два вещества кокаин купить онлайн все ровно мира вам ! и процветания
Не покупайте у данного селлера пока не решится ситуация кокаин купить онлайн Нее… пацаны, Вы не поняли, я и не волнуюсь ни капельки, и на закз этот мне положить, мне за державу обидно. Пришел я в магазин а там висит цена на сок томатный сто рублей. Взял пачку, отстоял в очереди а продавщица и говорит что стоит он не сто рублей, которые у тебя в кармане, а сто десять… Да я разъе….у этот магазин вместе с продавщицой и заведующей…. Лучше заплатите админу своего сайта чтобы мессаги на мыло падали четко и конкретно и не наебы…ли людей.
Reading this felt productive in a way most internet reading does not, and a look at eskimobadge continued that productive feeling, sometimes the open web feels like a waste of time but sites like this remind me why I still bother to look around rather than retreating to old reliable sources for everything I need.
Cabinet IQ
8305 State Hwy 71 #110, Austin,
TX 78735, Uniged Տtates
254-275-5536
Painted
Полный справочник по почтовым отделениям России станет полезным помощником для частных лиц и организаций. Здесь можно найти сведения о почтовых индексах, адресах отделений и других важных данных – https://pochtaops.ru/
Different feel from the algorithmically optimised posts that dominate the topic, and a stop at bloomhavenhub reinforced that human touch, you can tell when a site is being run by someone who reads what they publish versus someone just hitting submit and moving on quickly to the next assignment without checking the result.
Concert Attire Stamford
360 Fairfield Ave,
Stamford, CT 06902, United Ѕtates
+12033298603
Section leader selection
Looking for bitcoin price today? Find out the current Bitcoin price in GBP and discover the exact value of 1 BTC in British Pounds at this moment. bitcoinpricegbp.com follows the live BTC/GBP rate, everyday fluctuations, and important market figures for those who need an instant Bitcoin price reference in British Pounds. This platform is perfect for users who want to keep track of their BTC balance in British Pounds, review current market changes, and assess the total value of their crypto portfolio.
Все вопросы по контактам в подписе. кокаин купить онлайн дело не в терпение, а в глупости.
Широкий выбор тугоплавких металлов, таких как вольфрам и молибден
https://redmetsplav.ru/store/titan/rossiyskie-splavy-4/titan-vt35/prutok-titanovyy-vt35/
В каталоге представлены конденсаторные ниобиевые порошки высокой чистоты, необходимые для современной электроники.
https://rms-ekb.ru/catalog/krug-iz-instrumentalnoi-stali/krug-5khv2sf-200-gost-1133-71/
Закупали шлак ферросилиция для строительных нужд, материал качественный, без лишних примесей.
https://xn--80aeedb0bfzeok.xn--p1ai/catalog/latunnoe-litoe-koltso/latunnoe-litoe-koltso-60kh100-mm-lk/
“Я надеюсь что вы перепроверите товар ” кокаин купить онлайн Так что тут 50:50 если тебя примут. Все зависит от конкретного города и гнк в нем.
заказал 5-IAI , прислали Methoxetamine, разность дозировок сами знаете, в итоге еле откачали…. Скорость ск кристалл купить У меня кстати тоже через 2 дня пришло, но в соседний город, так как в моём городе этой конторы не оказалось) но мне сразу позвонили, и предложили либо самому приехать за пакетом, либо подождать до вторника и мне его привезут домой. Вот жду)
وان اكس بت
Good day! This is kind of off topic but I need some guidance from an established blog.
Is it tough to set up your own blog? I’m not very techincal but I can figure things
out pretty fast. I’m thinking about making my own but I’m not
sure where to start. Do you have any ideas or suggestions?
Thanks betflix
Технические характеристики сплавов помогают инженерам в подборе
https://redmetsplav.ru/store/titan/rossiyskie-splavy-4/titan-t7—gost-2171-90/krug-titanovyy-t7—gost-2171-90/
1xbet تحميل
Компания обеспечивает поставки оксовольфрамата гафния — редкого соединения для специфических нужд химической и атомной промышленности.
https://rms-ekb.ru/catalog/stalnoi-list/list-stalnoi-45kh1900-mm-x9crnisince21-11-2-en-iso-18286/
1xbet تحميل
Спасибо команде за профессионализм и помощь в реализации нашего сложного промышленного проекта!
https://xn--80aeedb0bfzeok.xn--p1ai/catalog/mednyi-perekhodnoi-troinik-press/mednyi-perekhodnoi-press-troinik-108kh64-mm-m3t-gost-r-52948-2008/
تنزيل 1xbet
Спасибо за отзывы приятные. Стараемся доставлять побыстрее))) Мефедрон купить Да тоже заказал на след день трек получил очень оперативно респект чувакам
وان اكس بت
Магазин работает четко уже несколько лет:)только одно расстроило когда хотел сделать очередной заказ мне сказали что не отправляют больше в те края:dontknown:с чем это связано мне так и не сказали,хотелось бы узнать Мефедрон купить в/в – нет эффекта вообще.
وان اكس بت
Возможность заказать листы и полосы нестандартных размеров
https://redmetsplav.ru/store/titan/rossiyskie-splavy-4/titan-et3/provoloka-titanovaya-et3/
1xbet تحميل
Сделал тестовый заказ 28 мая, отправил e-mail с содержанием заказа, адресом доставки и просьбой прислать реквизиты оплаты. Ответа не получил. Бошки купить такая же фигня, продован сказал, что некоторые только начинаю мониториться! вообщем спср дерьмово работает!
Реализация твердых сплавов типа «Победит» ориентирована на производителей металлорежущего и бурового инструмента.
https://rms-ekb.ru/catalog/truba-konstruktsionnaia/truba-konstruktsionnaia-12kh18n10t-18×0-3-gost-21729-76/
Прозрачное оформление документов и быстрое выставление счетов, приятно работать с профессионалами.
https://xn--80aeedb0bfzeok.xn--p1ai/catalog/latunnoe-litoe-koltso/latunnoe-litoe-koltso-80kh500-mm-lmtssk/
1xbet تحميل
Магаз самый ровный! Брать буду Только здесь и не где Больше,респектоз магазину! Так держать ребята! Гашиш купить 2. Был подобный заказ и нас спутали.
1xbet تحميل
وان اكس بت
Bookmark earned, calendar reminder set, share queued, all from one good post, and a look at progresswithclarity did the same, when a single reading session triggers multiple downstream actions you know the content has actually moved me beyond the page and this site is moving me at that higher level reliably.
Now leaving a small mental note to recommend this when the topic comes up in conversation, and a look at intentionalvelocity extended that recommend ready feeling, content that arms me with shareable references for likely future conversations is content with social value and this site is providing that conversational ammunition consistently for me lately.
Reading this on a difficult day was a small bright spot, and a stop at motovoyager extended that brightness, content that improves a hard day is content that has earned a particular kind of place in my reading habits and this site is occupying that uplifting role for me today which I appreciate clearly.
1xbet تحميل apk
кролики ставят В\В, фашку от этого магазина по 0.07-0.15 нравится, только сушит сильно Гашиш купить хороших отзывов – полно ) просто многие не пишут особо о качестве товара. пришло, прёт, зашибись.
1xbet تحميل apk
Ладно я признаю что надо было сначало почитать за 907,но с его разведением в дмсо уже все понятно,на форуме четко написанно,что его покупают в аптеке называеться димексид (концентрат),что я и сделал.Должен раствориться был? Все утверждают да! Но он нисколько не растворился,осел в кружке..пробовал и на водяной бане,тоже 0 результата…скажите что я не правильно делаю? 4 фа ваш не я один пробовал,очень слабый эффект,на меня вообще почти не подейсвовал…что мне с JTE делать ума не приложу…может вы JTE перепутали с чем? как он выглядеть то должен? Гашиш купить Мне уже похер будет он иле не будет!Хорошо что я как обычно не взял на 45т.р вот о бытом я вообще не жалею!Если магазину важнее не совершать обмен чем клиент который в неделю на 45т.р товара брал то досведание!
Описание складских позиций сокращает время ожидания ответа
https://redmetsplav.ru/store/titan/rossiyskie-splavy-4/titan-3m—ost-1-92077-91/folga-titanovaya-3m—ost-1-92077-91/
1xbet تحميل
Порадовало наличие вольфрамовых прутков редких диаметров, менеджер оперативно помог с подбором.
https://xn--80aeedb0bfzeok.xn--p1ai/catalog/mednyi-perekhodnoi-troinik-press/mednyi-perekhodnoi-press-troinik-80kh40-mm-m3m-gost-r-52948-2008/
وان اكس بت
ООО «РМС» поставляет вольфрамовые порошки, соответствующие строгим техническим условиям (например, ТУ 48-4205-112-2017).
https://rms-ekb.ru/catalog/ugolok-stalnoi/ugolok-stalnoi-st3ps5-45x45x3-gost-19771-93/
1xbet تحميل
Чемикал. когда трек даш?? позавчера заказал. сказал во вторник в среду отправка будет. Гашиш купить Вчера оплатил, сегодня уже трек скинули. Пока все ровно, посмотрим что придет…..
1xbet تحميل
вот и я уже трясусь. Кокаин купить по теме трип БРО!
Раздел «Производство» подтверждает статус завода, а не просто перекупщика
https://redmetsplav.ru/store/niobiy1/splavy-niobiya-1/niobiy-vn-2-1/truba-niobievaya-vn-2/
Заказывали партию молибденовых листов для производства, качество металла идеальное, все сертификаты в наличии.
https://xn--80aeedb0bfzeok.xn--p1ai/catalog/latunnoe-litoe-koltso/latunnoe-litoe-koltso-500kh500-mm-lazhmts/
Широкий выбор нержавеющей стали различных марок позволяет использовать продукцию в строительстве и пищевой промышленности.
https://rms-ekb.ru/catalog/plity/plita-r12-26x500x450-gost-19903-74/
Только вот странно что в трипе написано что пак был с 1гр ск (а твой заказ это покупка) а продажу у магазина от 5гр Гашиш купить Спасибо всем.
всем привет щас заказал реги попробывать как попробую обизательно отпишу думаю магазин ровный и все ништяк будет)))) Кокаин купить кто нить последнее время покупал чего ??? всё ровно ?
The way the post stayed on topic throughout without going on tangents was really refreshing, and a look at primepropertygo kept that focused approach going, discipline like this in writing is rare and worth recognising because most writers cannot resist wandering off into related subjects that dilute their main point and confuse readers along the way.
Раздел «Контакты» содержит все необходимые реквизиты и карту
https://redmetsplav.ru/store/niobiy1/splavy-niobiya-1/niobiy-nb1-1/folga-niobievaya-nb1/
I think that what you said was actually very logical.
But, consider this, suppose you wrote a catchier title?
I ain’t saying your information is not solid, however what
if you added a post title to maybe grab folk’s attention? I mean Grouting your
peel and stick tile in 30 minutes! – The Farmhouse Life is kinda plain. You might look at Yahoo’s
home page and watch how they write news titles to grab viewers
interested. You might try adding a video or a picture or two to get people excited about
what you’ve written. Just my opinion, it could bring
your website a little bit more interesting.
Ты че педрила хвалишся че та видел ты меня знаеш нет пес это не паника а логика паника это твое второе имя ху……я ты наличности переходиш это говорит о том что ты очкошник служил он терпила мне пох кто ты а за слова ты ответиш ну конншно на растояние ты герой ха ха отдыхай кент Кокаин купить Удачи и развития в дальнейшем!
1xbet تحميل apk
Каждая партия товара сопровождается сертификатами качества, подтверждающими соответствие ГОСТ и ТУ.
https://rms-ekb.ru/catalog/ugolok-stalnoi/ugolok-iz-konstruktsionnoi-stali-45kh30kh4-mm-c35e-uni-6762/
Весь металл проходит строгий входной контроль, за всё время работы ни одного случая брака.
https://xn--80aeedb0bfzeok.xn--p1ai/catalog/mednye-otvody-press/mednyi-otvod-press-45-gradusov-14-mm-m1rm-gost-r-52948-2008/
опробовал и такая же фигня получилась..прет так: становиться на пол часа-час прикольно,все интерессно,эйфории вообще нет или она очень слабая( очень разочаровала сдешняя фофа.. Мефедрон купить Доброго времени суток Всем порядочным форумчанам-кто здесь заказывал,но трек так и не бьёться,или я один такой закинул 45к+доставка,и”жду у моря погоды”В скайпе вчера отвечали сегодня-игнор!
1xbet تحميل
я тоже несколько раз брал ,всё прошло чётко ,качество радует,доставлено всё в лучшем виде,оператор молочага всегда обьяснит всё что к чему,вообщем магазин для меня лучший ,самый надёжный,УСПЕХОВ И ПРОЦВЕТАНИЯ ВАШЕЙ КОМАНДЕ!!!!!! Скорость ск кристалл купить норм. Все кладки нахожу без проблем… взял белого и…охуел!!!
وان اكس بت
Наличие циркония свидетельствует о работе с высокотехнологичными заказами
https://redmetsplav.ru/store/molibden-i-ego-splavy/molibden-ochm-v-2/provoloka-molibdenovaya-ochm-v/
Они хоть кому нибудь отвечают? Гашиш купить Подскажите пожалуйста товары указаные в прайсе все в наличии или нет?
وان اكس بت
Заказывали партию молибденовых листов для производства, качество металла идеальное, все сертификаты в наличии.
https://xn--80aeedb0bfzeok.xn--p1ai/catalog/latunnoe-litoe-koltso/latunnoe-litoe-koltso-150kh200-mm-lmtszh/
تنزيل 1xbet
Пари БК — одна из ведущих букмекерских контор России, предлагающая широкую линию ставок на спорт и удобный личный кабинет. Мобильное приложение позволяет делать ставки в любое время и следить за результатами в режиме реального времени. Скачать приложение можно по ссылке https://play.google.com/store/apps/details?id=com.sport.playmetrics — установка занимает меньше минуты. Интерфейс интуитивно понятен, поддерживаются быстрые выплаты и бонусы для новых пользователей.
1xbet تحميل
ごけい キングダム, かんき, 魏火龍七師, キングダム 最新刊 ネタバレ, キングダム 呉慶 当サイト https://kingdom-kaitai.site/ をぜひご覧ください。情報は常に更新されていますので、最新のイベント情報を常に把握できます。当サイトはあらゆる情報が揃った総合情報源です!
1xbet تحميل
1xbet تحميل
Поставщик промышленного оборудования «ЭРА» предлагает конвейерные ленты и комплектующие с точным подбором под нужды конкретного производства. Ищете транспортерные ленты? На era-el.ru можно оформить запрос на коммерческое предложение с учётом параметров оборудования, условий эксплуатации и сроков поставки. Сотрудники компании занимаются комплектацией, доставкой до объекта и монтажной стыковкой конвейерных лент — решение под ключ.
1xbet تحميل apk
Кто под нос что-то бормочет, Скорость ск кристалл купить Брал пару раз все было чотко!! всем советую)
1xbet تحميل apk
Быстрая навигация через «Карту сайта» для поиска глубоких страниц
https://redmetsplav.ru/store/molibden-i-ego-splavy/molibden-mo-cu40-1/list-molibdenovyy-mo-cu40/
Качество товара высокая, этим товаром не 1 месяц торгуем, прикурились вы. Гашиш купить могу заверить вас что сдесь ни только людское понимание но и честное слова!!!мир вам друзья!!!все шикарно!!
Поставки жаропрочных сплавов ориентированы на потребности авиационной и энергетической отраслей.
https://rms-ekb.ru/catalog/krug-iz-instrumentalnoi-stali/krug-5khv2sf-58-gost-5950-2000/
Высокий уровень сервиса и контроля качества, для нашего научного проекта это было критически важно.
https://xn--80aeedb0bfzeok.xn--p1ai/catalog/mednye-otvody-press/mednyi-otvod-press-90-gradusov-8-mm-m2-gost-r-52948-2008/
เนื้อหานี้ อ่านแล้วได้ความรู้เพิ่ม ค่ะ
ดิฉัน เพิ่งเจอข้อมูลเกี่ยวกับ เรื่องที่เกี่ยวข้อง
ซึ่งอยู่ที่ Kelly
น่าจะถูกใจใครหลายคน
เพราะอธิบายไว้ละเอียด
ขอบคุณที่แชร์ ข้อมูลที่มีประโยชน์ นี้
และหวังว่าจะมีข้อมูลใหม่ๆ มาแบ่งปันอีก
1xbet تحميل apk
1xbet تحميل
Glad to have another data point on a question I am still thinking through, and a look at motherbloom added two more, content that acknowledges its place in a wider conversation rather than pretending to settle the question alone is intellectually honest in a way that I wish was more common across the open web.
1xbet تحميل apk
Мне “типа фейк” назвал кодовое слово в жабере, которое я написал нашему розовоникому магазину в лс на форуме. Вопрос в том как он его узнал? Гашиш купить Редоктирование магазина!Коллектива!Прайс , цена осталась прежняя! скайп оператора:Chemicalrf.mix !!!!
Looking for btc to usd conversion? BTC converter at btc-converter.com – Use the BTC conversion tool to calculate the current value of Bitcoin in US dollars. Simply input your Bitcoin amount to get the estimated dollar value using the live BTC/USD exchange rate. The tool is designed for quick checks before selling, trading, comparing wallet balances, or viewing cryptocurrency payment amounts. Whether you need to convert 1 BTC, a fraction of a coin, or a large balance, the tool provides accurate dollar-based comparisons.
وان اكس بت
действительно было в лом,спасибо) Бошки купить У меня пришел чисто белый зернистый как крупа порошок.Кал.
Раздел «Производство» подтверждает статус завода, а не просто перекупщика
https://redmetsplav.ru/store/molibden-i-ego-splavy/molibden-cm10vd/polosa-molibdenovaya-cm10vd/
گینر ناترکس، در واقع یک فرمولاسیون پیشرفته و یک بمب کالری مهندسیشده است.
Редметсплав — пример того, как должен работать современный поставщик металлургического сырья.
https://xn--80aeedb0bfzeok.xn--p1ai/catalog/latunnaia-vtulka/latunnaia-vtulka-110-mm-lts40mts3zh/
1xbet تحميل apk
Alex Salons — это место, в котором мастера своего дела формируют идеальный внешний вид для любого посетителя. Тут вас ждут стрижки, окрашивание, забота о волосах, маникюр и услуги косметологии. Все подробности и запись доступны на сайте салона красоты Alex в Москве https://alexsalons.com/ круглосуточно. Профессиональные мастера применяют первоклассную косметику и инновационные технологии. Доверьте свою красоту настоящим экспертам и почувствуйте разницу.
Я вообще удивляюсь как продаван работает то? Есть ветка форума, личка и ася – везде молчание. В ася онлайн, но всеравно молчит уже третий день – это адекватный сервис? Гашиш купить 203 вообще шикарный ) мне понравился. спасибо Вам)
Современные родители ценят удобство и качество — именно поэтому «Резиденция детства» завоевала доверие тысяч российских семей. Ищете развивающие товары для детей 3 года? На childresidence.ru собраны игрушки, детская одежда, мебель и электроника от ведущих брендов с доставкой по всей стране. Магазин гарантирует надёжную оплату, круглосуточную поддержку и бонусную программу от 3% — каждая покупка становится ещё выгоднее.
Магниевый прокат представлен в достаточном ассортименте
https://redmetsplav.ru/store/magniy-i-ego-splavy/zarubezhnye-splavy-2/magniy-sismg4637-04—ss-144637/prutok-magnievyy-sismg4637-04—ss-144637/
В аське спросил продавца в чем дело? Была ли действительно отправка. Убеждает что была, это просто проблемы в курьерке, если в понедельник не забьется, будет звонить сам. Мефедрон купить ts ровный беру уже давно унего но 35ф реально слабый эфект трафы сделал 10к1 неочом в итоги из 50г сделал 300гр основ нармально вышло по качиству пока ещё ещё некто не рыгал( но вопщем неплохо цена соответствует качиству 400р за грам норм
Редметсплав — пример того, как должен работать современный поставщик металлургического сырья.
https://xn--80aeedb0bfzeok.xn--p1ai/catalog/list-mednyi/list-mednyi-0-5kh600kh1500-mm-m1m/
Широкий выбор нержавеющей стали различных марок позволяет использовать продукцию в строительстве и пищевой промышленности.
https://rms-ekb.ru/catalog/ugolok-stalnoi/ugolok-iz-konstruktsionnoi-stali-80kh80kh10-mm-25crmo4-din-1029/
I’m not sure why but this website is loading extremely slow for me.
Is anyone else having this issue or is it a problem on my end?
I’ll check back later on and see if the problem still exists.
Тоже не хочу никого пугать… Скорость ск кристалл купить Какие негативные? Ты мне в личку скинул бред какой то, разводом иди занимайся в другом месте.
Hi there! This article could not be written much better! Reading through this
article reminds me of my previous roommate! He constantly kept talking about this.
I am going to forward this information to him. Fairly certain he’s going to have a great read.
I appreciate you for sharing!
Reading this gave me confidence to make a decision I had been putting off, and a stop at brightnovahub reinforced that confidence, content that translates into action in my own life rather than just informing it is content with the highest practical value and this site is generating that action level utility for me lately.
Thanks for sharing your thoughts about капельные инфекции у детей.
Regards
Четкая структура меню позволяет быстро найти нужный металл
https://redmetsplav.ru/store/magniy-i-ego-splavy/zarubezhnye-splavy-2/magniy-mt1—jis-h-4202/list-magnievyy-mt1—jis-h-4202/
заметил, что там тс появляется на много чаще Скорость ск кристалл купить Нужно 5 сообщений что бы написать модэратору, не обесуть
Магазин женской одежды «Для шикарных женщин» радует модниц стильными новинками и безупречным качеством. На http://smart-woman.ru/ собран широкий ассортимент модной одежды с доставкой по всей России. При регистрации каждая покупательница получает 300 рублей на первую покупку, причём бесплатная доставка Почтой России доступна при сумме заказа от 2500 рублей. Выгодные условия и постоянные скидки делают шопинг приятным и доступным.
БигПикча — один из самых популярных российских фотомедиа-порталов, где каждый день публикуются захватывающие новости в фотографиях, редкие исторические снимки и увлекательные лонгриды. На https://bigpicture.ru/ вы найдёте всё: от криминальных хроник и путевых заметок до неожиданных научных фактов и забавных подборок из мировых соцсетей — каждый материал написан живо и с душой, а визуальная подача делает чтение особенно увлекательным.
ООО «РМС» поставляет вольфрамовые порошки, соответствующие строгим техническим условиям (например, ТУ 48-4205-112-2017).
https://rms-ekb.ru/catalog/stalnoi-list/stalnoi-list-vt14-55x1000x1200-gost-19903-2006-gladkii-neotsinkovannyi-goriachekatanyi/
Индивидуальный подход к нестандартным заказам — изготовили детали по нашим чертежам точно в размер.
https://xn--80aeedb0bfzeok.xn--p1ai/catalog/latunnaia-vtulka/latunnaia-vtulka-340-mm-ls59-1/
Требуется качественное IT-сопровождение компании в Санкт-Петербурге? Фирма обеспечивает абонентское сопровождение компьютеров, ремонт техники после сбоев и возврат утраченных данных. Ищете компьютерная помощь? Все вопросы решает закреплённый системный администратор на сайте help-spb.ru. Специалисты выполняют срочные и плановые выезды, настраивают сети и серверы, обеспечивают комплексную антивирусную защиту. Передайте оборудование специалистам и трудитесь без перерывов.
Лаконичное приветствие на главной странице сразу вводит в курс дела
https://redmetsplav.ru/store/magniy-i-ego-splavy/zarubezhnye-splavy-2/magniy-mg-c91-t5—en-2735/list-magnievyy-mg-c91-t5—en-2735/
Expert septic system installation, upgrades, and ongoing maintenance. We handle the entire process, including all necessary documentation. Contact our team for a professional consultation and customized solution. https://www.atlasobscura.com/users/rocksolidsepticsc
Ориентация на долгосрочные отношения с клиентами позволяет компании формировать индивидуальные условия оплаты и графики поставок.
https://rms-ekb.ru/catalog/truba-konstruktsionnaia/truba-konstruktsionnaia-stal-20-127×28-gost-21729-76/
Высокий уровень сервиса и контроля качества, для нашего научного проекта это было критически важно.
https://xn--80aeedb0bfzeok.xn--p1ai/catalog/melkhiorovaia-truba/melkhiorovaia-truba-17kh2-5kh14000-mm-mnzhmts30-1-1-gost-10092-2006/
Professional promotional products for small businesses and corporate clients in Everett, WA. Custom branding solutions designed to support marketing and brand recognition. https://www.brownbook.net/business/54864032/promo-box-llc/
Expert septic system installation, upgrades, and ongoing maintenance. We handle the entire process, including all necessary documentation. Contact our team for a professional consultation and customized solution. https://www.awwwards.com/rocksolidexcavationsc/
Professional promotional products for small businesses and corporate clients in Everett, WA. Custom branding solutions designed to support marketing and brand recognition. https://giphy.com/channel/promoboxllcwa
Expert septic system installation, upgrades, and ongoing maintenance. We handle the entire process, including all necessary documentation. Contact our team for a professional consultation and customized solution. https://flipboard.com/@rocksolidse3tdj/rock-solid-septic-%7E-excavation-gc6oma5rz?from=share&utm_source=flipboard&utm_medium=curator_share
Professional promotional products for small businesses and corporate clients in Everett, WA. Custom branding solutions designed to support marketing and brand recognition. https://raindrop.io/sharapuubl/bookmarks-66440582
Expert septic system installation, upgrades, and ongoing maintenance. We handle the entire process, including all necessary documentation. Contact our team for a professional consultation and customized solution. https://www.pearltrees.com/rocksolidsepticsc#item798107883
Professional promotional products for small businesses and corporate clients in Everett, WA. Custom branding solutions designed to support marketing and brand recognition. https://gitlab.com/promoboxllc
Expert septic system installation, upgrades, and ongoing maintenance. We handle the entire process, including all necessary documentation. Contact our team for a professional consultation and customized solution. https://luma.com/user/rocksolidexcava
Professional promotional products for small businesses and corporate clients in Everett, WA. Custom branding solutions designed to support marketing and brand recognition. https://www.twitch.tv/promoboxllc/about
Expert septic system installation, upgrades, and ongoing maintenance. We handle the entire process, including all necessary documentation. Contact our team for a professional consultation and customized solution. https://github.com/rocksolidexcavationsc
Корзина на сайте промышленного предприятия — удобный инструмент для формирования заявки
https://redmetsplav.ru/store/magniy-i-ego-splavy/zarubezhnye-splavy-2/magniy-mg-al3zn1mn—bs-3373/pokovka-magnievaya-mg-al3zn1mn—bs-3373/
Professional promotional products for small businesses and corporate clients in Everett, WA. Custom branding solutions designed to support marketing and brand recognition. https://www.reverbnation.com/artist/murciafpyk
Продукция находит применение в производстве электротехники благодаря наличию специализированной электротехнической стали.
https://rms-ekb.ru/catalog/ugolok-stalnoi/ugolok-iz-konstruktsionnoi-stali-75kh50kh8-mm-31crmov9v-en-10056-1/
Expert septic system installation, upgrades, and ongoing maintenance. We handle the entire process, including all necessary documentation. Contact our team for a professional consultation and customized solution. https://github.com/rocksolidexcavationsc
Удобный сайт и понятная навигация по каталогу, легко найти нужную марку стали или сплава.
https://xn--80aeedb0bfzeok.xn--p1ai/catalog/prutok-latunnyi-1/prutok-latunnyi-ls59-1pt-8-mm-l-3000-mm-krug-1/
Professional promotional products for small businesses and corporate clients in Everett, WA. Custom branding solutions designed to support marketing and brand recognition. https://github.com/promoboxllc
Excellent beat ! I wish to apprentice at
the same time as you amend your site, how could i subscribe for a weblog site?
The account aided me a acceptable deal. I had been a little bit familiar
of this your broadcast offered vibrant clear concept
Expert septic system installation, upgrades, and ongoing maintenance. We handle the entire process, including all necessary documentation. Contact our team for a professional consultation and customized solution. https://www.stylevore.com/user/rocksolidsepticsc
Professional promotional products for small businesses and corporate clients in Everett, WA. Custom branding solutions designed to support marketing and brand recognition. https://www.centrotecnologico.edu.mx/profile/promoboxllcwa52353/profile
Expert septic system installation, upgrades, and ongoing maintenance. We handle the entire process, including all necessary documentation. Contact our team for a professional consultation and customized solution. https://dreevoo.com/profile.php?pid=1530203
Professional promotional products for small businesses and corporate clients in Everett, WA. Custom branding solutions designed to support marketing and brand recognition. https://www.reverbnation.com/artist/murciafpyk
Now considering carefully how to share this site with the right audience rather than broadcasting widely, and a look at primebazaarhub extended that careful sharing impulse, content worth sharing carefully rather than spamming is content that has earned a higher kind of recommendation and this site has earned that careful shareability throughout pieces.
Expert septic system installation, upgrades, and ongoing maintenance. We handle the entire process, including all necessary documentation. Contact our team for a professional consultation and customized solution. https://www.brownbook.net/business/55004501/rock-solid-septic-excavation/
Professional promotional products for small businesses and corporate clients in Everett, WA. Custom branding solutions designed to support marketing and brand recognition. https://share.evernote.com/note/4b224308-251c-4138-1ea1-3e0a80ef9662
Expert septic system installation, upgrades, and ongoing maintenance. We handle the entire process, including all necessary documentation. Contact our team for a professional consultation and customized solution. https://www.hotfrog.com/company/6735e24b9bb039649717838e4a0f0adb/rock-solid-septic-excavation/inman/heavy-construction-equipment
Professional promotional products for small businesses and corporate clients in Everett, WA. Custom branding solutions designed to support marketing and brand recognition. https://www.sqlservercentral.com/forums/user/promoboxllcwa
Expert septic system installation, upgrades, and ongoing maintenance. We handle the entire process, including all necessary documentation. Contact our team for a professional consultation and customized solution. https://forum.prestashop.com/profile/1993050-rocksolidsepticsc/?tab=field_core_pfield_19
Professional promotional products for small businesses and corporate clients in Everett, WA. Custom branding solutions designed to support marketing and brand recognition. https://www.flickr.com/people/204297337@N04/
Expert septic system installation, upgrades, and ongoing maintenance. We handle the entire process, including all necessary documentation. Contact our team for a professional consultation and customized solution. https://www.provenexpert.com/rock-solid-septic-excavation/
Professional promotional products for small businesses and corporate clients in Everett, WA. Custom branding solutions designed to support marketing and brand recognition. https://hub.docker.com/u/promoboxllc
Общее впечатление: надежный информационный ресурс для снабженцев.
https://redmetsplav.ru/store/magniy-i-ego-splavy/zarubezhnye-splavy-2/magniy-mcin3—jis-h-2221/folga-magnievaya-mcin3—jis-h-2221/
Expert septic system installation, upgrades, and ongoing maintenance. We handle the entire process, including all necessary documentation. Contact our team for a professional consultation and customized solution. https://about.me/rocksolidexcavationsc
Professional promotional products for small businesses and corporate clients in Everett, WA. Custom branding solutions designed to support marketing and brand recognition. https://go.bubbl.us/efd91c/61dc?/Bookmarks
Компания занимается реализацией ферросплавов, необходимых для качественного легирования сталей на литейных участках.
https://rms-ekb.ru/catalog/plity/plita-9kh2-25x200x450-gost-19903-74/
Высокая квалификация персонала, знают специфику редких металлов и особенности их применения.
https://xn--80aeedb0bfzeok.xn--p1ai/catalog/mednye-zaglushki-pod-paiku/mednaia-zaglushka-kolpachok-pod-paiku-35kh29kh1-mm-23kh25-mm-tverdaia-paika-m3-gost-32590-2013/
Baltbet — это уникальный симулятор спортивного сезона от NS Hair And Beauty Cosmetics, доступный в Google Play. Приложение предлагает предсказывать исходы матчей, управляя стартовым капиталом в 100 монет за игру. Каждый матч имеет уникальный коэффициент от двух до четырёх, на который влияют сила команды и элемент случайности. Посетите https://play.google.com/store/apps/details?id=com.statistafut.seasom и попробуйте пройти весь сезон с прибылью — простые правила скрывают глубокую стратегию, делая каждое решение по-настоящему захватывающим.
Раздел «Производство» подтверждает статус завода, а не просто перекупщика
https://redmetsplav.ru/store/magniy-i-ego-splavy/zarubezhnye-splavy-2/magniy-mag-5—bs-2970-1/list-magnievyy-mag-5—bs-2970-1/
Компания осуществляет поставки базового металлургического сырья, включая олово, свинец и цинк в чушках.
https://rms-ekb.ru/catalog/ugolok-stalnoi/ugolok-iz-konstruktsionnoi-stali-150kh90kh15-mm-c22e-en-10056-1/
Быстрая доставка в регионы через «Деловые Линии», груз пришел в целости и отлично упакованным.
https://xn--80aeedb0bfzeok.xn--p1ai/catalog/latunnaia-polosa/latunnaia-polosa-11×350-mm-l63-gost-931-90/
экскурсия на симиланы с пхукета 2026
live dealer casino sites australia payid online pokies online pokies australia payid
casino withdrawal times australia australian online pokies payid online pokies australia real money
offshore online casinos australia online baccarat australia aussie pokies sites
Наличие кобальтовых сплавов заинтересует авиастроение
https://redmetsplav.ru/store/magniy-i-ego-splavy/zarubezhnye-splavy-2/magniy-mag-11—bs-2970/lenta-magnievaya-mag-11—bs-2970/
A piece that handled a controversial angle without becoming heated, and a look at professionalix continued that calm engagement, content that can address contested topics without inflaming them is doing rare diplomatic work and this site has clearly developed the editorial maturity to handle sensitive material with the appropriate temperature of writing throughout.
gooobet
Поставки титана и его сплавов востребованы в медицине, авиации и химическом машиностроении.
https://rms-ekb.ru/catalog/list/list-kh12m-1-5x1000x1000-gost-19903-2006/
Если вы хотите провести отпуск в комфортных условиях, аренда квартиры на Пхукете позволит подобрать жилье с учетом ваших пожеланий и предпочтений, снять квартиру на пхукете
Приятно удивлены скоростью обработки запроса на сайте, менеджер связался очень быстро.
https://xn--80aeedb0bfzeok.xn--p1ai/catalog/mednoe-dvukhrastrubnoe-koleno-pod-paiku/mednoe-dvukhrastrubnoe-koleno-pod-paiku-180-gradusov-76-1kh65kh1-6-mm-33-5kh36-5-mm-miagkaia-paika-m3rm-gost-32590-2013/
تحميل gooobet
A piece that did not lean on the writer credentials or institutional backing, and a look at jewelbrookmerchantgallery maintained the same focus on substance, content that earns trust through quality rather than through name dropping is the kind I find most persuasive and this site is clearly playing on the substance side of that distinction.
جووبت
Описание преимуществ компании подчеркивает надежность поставок
https://redmetsplav.ru/store/magniy-i-ego-splavy/zarubezhnye-splavy-2/magniy-m16610—uns/provoloka-magnievaya-m16610—uns/
gooobet
Now considering whether the post would translate well into a different form, and a look at directshoppinghub suggested similar versatility, content that could move into other media without losing its substance is content that has been built around ideas rather than around format and this site reads as idea first throughout posts.
gooobet
Поставки титана и его сплавов востребованы в медицине, авиации и химическом машиностроении.
https://rms-ekb.ru/catalog/krug-iz-instrumentalnoi-stali/krug-4kh3vmf-12-gost-5950-2000/
قم بتنزيل تطبيق Goobet
Профессиональный подход менеджеров в Екатеринбурге, грамотно проконсультировали по техническим характеристикам сплавов.
https://xn--80aeedb0bfzeok.xn--p1ai/catalog/latunnaia-polosa/latunnaia-polosa-2-5×150-mm-l90-gost-931-90/
bitcoin pokies australia cafe casino bonus australia best australian online pokies
قم بتنزيل تطبيق Goobet
Now sitting with the thoughts the post triggered rather than rushing on to the next thing, and a stop at dyleko extended that reflective pause, content that earns time for thought after closing the tab is content of higher value than the merely interesting and this site has clearly produced that lasting effect today.
gooobet
https://daejeonmsg.dothome.co.kr/
جووبت
کراتین ترکیبی ناترکس، یک محصول پیشرفته برای بارگیری گلیکوژن و کراتین است که برای به حداکثر رساندن عملکرد و حجم عضلات طراحی شده.
جووبت
Описание применения металлов в атомной энергетике подчеркивает качество
https://redmetsplav.ru/store/magniy-i-ego-splavy/zarubezhnye-splavy-2/magniy-m11922—uns/truba-magnievaya-m11922—uns/
gooobet apk
Looking for private xmr swap without registration? Head over to swapxmr.io – SwapXMR allows users to swap Monero via a straightforward crypto exchange process with no trading terminal, order book, or complex account registration required. The platform specializes in XMR trading pairs including Bitcoin, Tether, Ethereum, and various other digital currencies, with both buying and selling options accessible directly on the exchange.
Оперативная логистика и поддержка на всех этапах сделки позволяют минимизировать сроки простоя производственных линий заказчиков.
https://rms-ekb.ru/catalog/stalnoi-list/stalnoi-list-15kh25t-5x1300x1800-gost-19903-2006-gladkii-neotsinkovannyi-goriachekatanyi/
pokies online iwowbet payid pokies online
Современная электроника требует надежных комплектующих, и выбор поставщика становится критически важным для успеха любого проекта. Профессиональные инженеры и радиолюбители знают, что качество компонентов напрямую влияет на долговечность устройств и безопасность эксплуатации. На платформе https://components.ru/ собран широкий ассортимент электронных элементов — от микроконтроллеров и силовых транзисторов до пассивных компонентов и соединителей, что позволяет реализовать проекты любой сложности. Удобная навигация, техническая документация и оперативная доставка делают процесс закупки максимально эффективным, экономя время специалистов и обеспечивая бесперебойность производственных циклов в условиях современного рынка.
جووبت
Заказывали партию молибденовых листов для производства, качество металла идеальное, все сертификаты в наличии.
https://xn--80aeedb0bfzeok.xn--p1ai/catalog/mednyi-perekhodnoi-troinik-press/mednyi-perekhodnoi-press-troinik-40-5kh17-mm-m2m-gost-r-52948-2008/
gooobet apk
Рекламное агентство «Транзит Медиа» специализируется на наружной рекламе в Крыму: брендировании транспорта плёнкой ORACAL, оклейке торговых точек и витрин, изготовлении баннеров и сеток с пропаем и люверсами. Компания располагает собственным производством https://transitmedia.ru/ — лазерная резка, термогибка акрила, ПЭТ и ПВХ. Все работы выполняются как в собственном боксе, так и на территории заказчика по Симферополю, Севастополю и Ялте.
تحميل gooobet
Аренда жилья на Пхукете открывает широкие возможности для комфортной жизни рядом с морем. На острове представлены объекты различных категорий и ценовых диапазонов – аренда жилья на пхукете
goobet
Языковая школа EnglishGroup обеспечивает результативное изучение английского для взрослых, подростков и детей. Квалифицированные педагоги научат говорить с нуля и подготовят к международным экзаменам TOEFL и IELTS. Записывайтесь на сайте https://englishgroup.by/ и получите бесплатное пробное занятие в идущей группе. Ощутимый прогресс и комфортный формат уроков обеспечены любому слушателю.
Продажа проволоки из тугоплавких металлов востребована в электронике
https://redmetsplav.ru/store/magniy-i-ego-splavy/zarubezhnye-splavy-2/magniy-m11100—uns/pokovka-magnievaya-m11100—uns/
gooobet
Чистая горная вода «Эльбрусинка» из Карачаево-Черкесии — идеальный выбор для всей семьи: добытая в экологически чистом регионе у подножия Эльбруса, она относится к детской воде высшей категории с мягким вкусом и нейтральным pH 7,5. На сайте https://voda-s-gor.ru/168 можно заказать удобную бутыль 19 литров всего за 450 рублей с доставкой на дом или в офис по Махачкале и Каспийску. Сбалансированный минеральный состав — кальций, магний и натрий — делает её безопасной даже для детей.
Компания предлагает не только металлы, но и химическую продукцию, используемую в смежных металлургических процессах.
https://rms-ekb.ru/catalog/ugolok-stalnoi/ugolok-stalnoi-3ps5-25x25x4-gost-19771-93/
Обустройство комфортного пространства предполагает индивидуальное решение, особенно если дело касается создания мебели для кухни. Местное изготовление в Бресте и области дает возможность существенно облегчить всю работу: начиная с аккуратных замеров комнаты и заканчивая итоговой установкой. Производство мебели с учетом личных размеров дает возможность грамотно вписать все коммуникации и технику. Изучить варианты планировок и найти идеи для функциональной кухни можно на веб-ресурсе https://aova.by/
gooobet
Качество сварочных материалов на высоте, электроды варят отлично, состав металла стабильный.
https://xn--80aeedb0bfzeok.xn--p1ai/catalog/latunnaia-polosa/latunnaia-polosa-8×150-mm-lmts58-2-gost-931-90/
best online slots australia iwowbet.com best slots casinos australia
Adding this site to my regular reading list, the post earned that on its own, and a quick stop at ekomug sealed the decision, the kind of place worth checking back with from time to time because it consistently produces material that holds up against a critical reading too which I really value.
gooobet apk
Reading this between two meetings turned out to be the highlight of the morning, and a stop at ideasrequiremovement continued that highlight quality, content that outshines the structured parts of a working day is doing something well beyond ordinary and this site has produced multiple such highlights for me already this week alone.
gooobet
Glassway — российский производитель алюминиевых конструкций и интерьерных решений: подвесные потолки Hook On, Clip In, Грильято, кассетные и реечные системы, перегородки всех типов включая противопожарные, двери, остекление, смарт-стекло и светодиодные светильники — всё под единым стандартом качества. Ищете офисные перегородки? На glassway.group представлен полный каталог с возможностью оформить заказ. Решения компании востребованы на офисных, торговых и промышленных объектах любой сложности.
Looking for fast bitcoin to monero exchange? Visit btctoxmr.net – we help users exchange Bitcoin for Monero through a direct crypto-to-crypto swap flow. Type in your BTC amount, review the projected XMR payout, and submit your exchange request using the order form available below. The service supports fast Bitcoin to Monero exchange, no registration, and no KYC for standard crypto-to-crypto routes, with final terms and conditions displayed before the transaction begins.
gooobet
Hi, I do believe this is a great web site.
I stumbledupon it 😉 I may return yet again since i have book-marked it.
Money and freedom is the best way to change, may you be rich and
continue to guide other people.
Closed it feeling slightly more competent in the topic than I started, and a stop at reliableshoppinghub reinforced that competence boost, real learning is rare in casual online reading but it does happen sometimes and this site managed to make it happen for me today which is genuinely worth pausing to acknowledge.
Because the admin of this web site is working, no doubt very rapidly it will be well-known, due to its feature contents.
gooobet
Профессиональный подход к описанию каждого вида металла
https://redmetsplav.ru/store/magniy-i-ego-splavy/zarubezhnye-splavy-2/magniy-iso-mgal6mn—iso-16220/folga-magnievaya-iso-mgal6mn—iso-16220/
قم بتنزيل تطبيق Goobet
ООО «РМС» поставляет вольфрамовые порошки, соответствующие строгим техническим условиям (например, ТУ 48-4205-112-2017).
https://rms-ekb.ru/catalog/stalnoi-list/list-stalnoi-8kh2100kh3000-mm-aisi-430-en-iso-9445-2/
gooobet apk
Порадовало наличие вольфрамовых прутков редких диаметров, менеджер оперативно помог с подбором.
https://xn--80aeedb0bfzeok.xn--p1ai/catalog/mednyi-perekhodnoi-troinik-press/mednyi-perekhodnoi-press-troinik-14-7kh14-mm-cu-dhp-gost-r-52948-2008/
gooobet apk
3 https://holz-pferd.de/ garantiert ein sicheres und faires Spielerlebnis mit hohen Auszahlungsquoten für alle deutschen Spieler auf holz-pferd.de. Entdecken Sie die neuesten Spielkonzepte und sichern Sie sich Freispiele im VIP-Club. Der Support steht Ihnen rund um die Uhr zur Verfügung.
gooobet apk
Baltbet — это увлекательный симулятор спортивного сезона для Android, где каждый может почувствовать себя настоящим стратегом: предсказывайте исходы матчей, грамотно управляйте монетами и выстраивайте тактику на протяжении всего сезона. Перейдите на https://play.google.com/store/apps/details?id=com.statistafut.seasom и убедитесь сами — простые правила скрывают глубину, ведь коэффициенты от двух до четырёх меняются в зависимости от силы команд, превращая каждый матч в уникальный вызов. Цель одна: завершить сезон в плюсе.
Аренда квартиры на Пхукете позволяет комфортно жить на острове в течение длительного времени и пользоваться всеми преимуществами местной инфраструктуры: снять кондо на пхукете
goobet
A slim post with substantial content per word, and a look at sprucetrill maintained the same density, the content per word ratio is something I track informally and this site scores high on that ratio compared to most sources I read regularly which is a quiet indicator of careful editorial work behind the scenes.
gooobet
Описание складских позиций сокращает время ожидания ответа
https://redmetsplav.ru/store/magniy-i-ego-splavy/zarubezhnye-splavy-2/magniy-iso-mb21320—bs-iso-16220/poroshok-magnievyy-iso-mb21320—bs-iso-16220/
Quietly impressive in a way that does not announce itself, and a stop at ekooat extended that quiet impressiveness, the kind of quality that emerges through sustained attention rather than first impressions is the kind I trust more deeply and this site has been earning that deeper trust across multiple sessions over time consistently.
Металлические порошки различных фракций позволяют клиентам использовать их в порошковой металлургии и напылении.
https://rms-ekb.ru/catalog/truba-konstruktsionnaia/truba-konstruktsionnaia-stal-35-36×6-gost-21729-76/
gooobet apk
Посетите https://xn—-8sbcty8aabt9g.xn--p1ai/ это официальный сайт СЭС Новосибирска. СанЭпидемСтанция проводит дезинсекцию, дезинфекцию и дератизацию жилых и бытовых помещений, прилегающих к организациям и участкам территорий. У нас только сертифицированные препараты и гарантия работ до 3х лет. Узнайте подробнее на сайте.
تحميل gooobet
Отличное соотношение цены и качества на весь цветной металлопрокат, будем заказывать еще.
https://xn--80aeedb0bfzeok.xn--p1ai/catalog/lenta-aliuminievaia-1/
وی فا، یک مکمل خوشطعم و باکیفیت است که حاوی ۱۰۰٪ پروتئین وی کنسانتره میباشد.
goobet
Большой опыт работы, судя по копирайту с 2013 года
https://redmetsplav.ru/store/magniy-i-ego-splavy/zarubezhnye-splavy-2/magniy-g-z6th2zr—afnor-nf-a57-704/polosa-magnievaya-g-z6th2zr—afnor-nf-a57-704/
تحميل gooobet
Honest take is that this was better than I expected when I clicked through, and a look at ideasguidedforward reinforced that, the bar for online content has dropped so much that finding something thoughtful and well constructed feels almost noteworthy now which says more about the average than about this site itself.
جووبت
Широкий выбор нержавеющей стали различных марок позволяет использовать продукцию в строительстве и пищевой промышленности.
https://rms-ekb.ru/catalog/ugolok-stalnoi/ugolok-iz-konstruktsionnoi-stali-150kh100kh10-mm-40nicrmo22-din-59370/
goobet
Быстрая доставка в регионы через «Деловые Линии», груз пришел в целости и отлично упакованным.
https://xn--80aeedb0bfzeok.xn--p1ai/catalog/truba-monel/truba-monel-38kh3kh2000-mm-monel-400/
Ищете купить geely ? Заходите на официальный сайт дилера geely-kuntsevo.ru – здесь вы найдёте полный модельный ряд и актуальные автомобили в наличии. Ознакомьтесь с техническими параметрами, вариантами комплектаций, стоимостью автомобилей и действующими предложениями для физических и юридических лиц. Приобретите Geely в Москве по привлекательной цене именно у нас. Гарантия и профессиональное обслуживание вашего будущего авто!
gooobet apk
A piece that reads like it was written for me without claiming to be written for me, and a look at tracetrifle produced the same fit, when the writer audience match clicks naturally without being engineered through demographic targeting you know the writing is solid and this site has that natural fit consistently for me.
gooobet
Reading this slowly because the writing rewards a slower pace, and a stop at shoptrailmarket did the same, the pace at which I read content is something I now use as a quality signal and writing that earns a slower pace earns my attention as a reader looking for substance these days.
Cabinet IQ
8305 State Hwwy 71 #110, Austin,
TX 78735, United Ѕtates
254-275-5536
Qualitybuild
جووبت
Runico — профессиональный онлайн-справочник по рунам Старшего Футарка, охватывающий все 24 символа древнескандинавского алфавита с детальной расшифровкой. Портал предлагает углублённое изучение символики, применения рун в гадании, магии и психологии. https://runico.ru/ собрал исчерпывающую базу знаний о рунах: значение каждого символа, мифологические корни и практические техники. Информация подана структурированно и ясно — подойдёт новичкам и знатокам рунической традиции.
Did not expect much when I clicked through but ended up reading the whole thing carefully, and a stop at eloido kept that engagement going, sometimes the unassuming sites turn out to deliver more than the flashy ones which is something I have learned to look out for over time online lately and across topics.
gooobet apk
Упоминание нефтегазовой отрасли как ключевого потребителя
https://redmetsplav.ru/store/magniy-i-ego-splavy/zarubezhnye-splavy-2/magniy-gd-mgal9zn1—din-1729-part-2/truba-magnievaya-gd-mgal9zn1—din-1729-part-2/
The online casino industry continues to grow as developers introduce new technologies, enhanced graphics, and interactive gaming experiences: Jettbet Casino
تحميل gooobet
Viagra merupakan obat yang mengandung sildenafil dan sering digunakan untuk membantu mengatasi disfungsi ereksi pada pria dewasa.
Banyak orang di Indonesia mencari informasi mengenai cara kerja, manfaat, serta
penggunaan yang tepat. Sebelum menggunakan obat ini, penting untuk
memahami dosis yang dianjurkan dan berkonsultasi dengan tenaga medis agar
penggunaan tetap aman.
قم بتنزيل تطبيق Goobet
Широкий выбор нержавеющей стали различных марок позволяет использовать продукцию в строительстве и пищевой промышленности.
https://rms-ekb.ru/catalog/krug-iz-instrumentalnoi-stali/krug-25kh2m1f-22-55-gost-7417-75/
The future success of the peptide synthesis
market is driven by tactical initiaives by peptide API contract suppliers.
gooobet apk
Порадовало наличие вольфрамовых прутков редких диаметров, менеджер оперативно помог с подбором.
https://xn--80aeedb0bfzeok.xn--p1ai/catalog/ugolok-aliuminievyi/ugolok-aliuminievyi-200x20x3x6000-ad31t1/
goobet
Hello, of course this article is in fact nice and I have learned lot of
things from it concerning blogging. thanks.
جووبت
Сайт адаптирован под нужды машиностроительных заводов
https://redmetsplav.ru/store/magniy-i-ego-splavy/zarubezhnye-splavy-2/magniy-ga10/pokovka-magnievaya-ga10/
جووبت
Worth saying that the prose reads naturally without straining for style, and a stop at torquetiara maintained the same unforced quality, writing that achieves elegance without effort is the highest tier and this site has clearly worked out how to land that effortless quality consistently rather than only on the writers best days.
Реализация твердых сплавов типа «Победит» ориентирована на производителей металлорежущего и бурового инструмента.
https://rms-ekb.ru/catalog/ugolok-stalnoi/ugolok-stalnoi-15khsnd-100x65x10-gost-8509-93/
جووبت
Now appreciating that I did not feel exhausted after reading, and a stop at forwardmovementengine extended that energising quality, content that leaves me with more attention than it consumed is rare and the gap between draining and energising content is real over the course of a typical day spent reading widely online.
Reading this felt productive in a way most internet reading does not, and a look at elonox continued that productive feeling, sometimes the open web feels like a waste of time but sites like this remind me why I still bother to look around rather than retreating to old reliable sources for everything I need.
جووبت
Аренда апартаментов на Пхукете подходит путешественникам, которые хотят получить комфортное жилье с современными удобствами и выгодным расположением, аренда жилья на пхукете
Спецстали для машиностроения закупаем только здесь, надежность материала подтверждена испытаниями.
https://xn--80aeedb0bfzeok.xn--p1ai/catalog/melkhiorovaia-truba/melkhiorovaia-truba-23kh2kh9000-mm-mnzhmts30-1-1-gost-10092-2006/
goobet
Мечтаете получить востребованную специальность и практиковаться на настоящих клиентах? Студия-школа парикмахерского искусства ждёт на обучение новичков и опытных мастеров. Ищете начало занятий? К практике на клиентах вы приступаете уже после трёхдневной теории — обучают на сайте j-center.ru дипломированные специалисты. Программа охватывает мужские, женские и детские стрижки, свадебные укладки, плетение кос, химическую завивку и углублённую колористику с нуля.
goobet
Onlayn kazino seçərkən mənim üçün əsas şərt lisenziyadır, Vavada bunu təmin edir. https://tdesperanza.cl/?p=35
Quality writing that respects the reader’s intelligence without overloading them, and a quick look at smartbuyingzone reflected that approach, a balanced thoughtful site that earns trust by being consistent rather than by shouting about how trustworthy it is which is the usual approach online sadly across most content categories.
Vavada qeydiyyat tamamlandıqdan sonra pulsuz fırlanmalar hesaba köçdü. https://pegasusreim.com/2022/06/27/bonjour-tout-le-monde/
Спецстали для машиностроения закупаем только здесь, надежность материала подтверждена испытаниями.
https://xn--80aeedb0bfzeok.xn--p1ai/catalog/mednye-dvukhrastrubnye-mufty-pod-paiku/mednaiadvukhrastrubnaiamufta-pod-paiku40-5kh2mmm2gost-32590-2013/
Vavada qeydiyyat tamamlandıqdan sonra pulsuz fırlanmalar hesaba köçdü. https://www.gil-oz.co.il/?p=412
İlk depozitdən sonra Vavada casino dünyasına tam inteqrasiya olundum, hər şey əladır. http://girl.ooz.kr/bbs/board.php?bo_table=free&wr_id=1772270
Decided not to skim despite my usual habit and was rewarded for the discipline, and a stop at turbanshade earned the same patient approach, training myself to recognise sites that warrant slower reading is part of being a careful online reader and this site is the kind that helps me practice that skill regularly.
Kazino bonus paketini aktivləşdirdim, slotlarda şansım gətirdi. http://baerbelsgarten.de/;focus=TKOMSI_com_cm4all_wdn_Flatpress_20514587&path=&frame=TKOMSI_com_cm4all_wdn_Flatpress_20514587?x=entry%3Aentry210318-133405%3Bcomments%3A1
If the topic interests you at all this is a place to spend time, and a look at elucan reinforced that recommendation, the broader question of where to invest topical reading time is one this site answers convincingly through the consistent quality across multiple pieces I have sampled during the current reading session today.
Представлен полный цикл изделий: от фольги и проволоки до крупных поковок
https://redmetsplav.ru/store/magniy-i-ego-splavy/zarubezhnye-splavy-2/magniy-b-199-am100a—astm-b199/pokovka-magnievaya-b-199-am100a—astm-b199/
Qeydiyyat prosesində heç bir çətinlik olmadı, Vavada interfeysi sadədir. https://welcometothepoetree.com/eget-elementum-on-train/
وی گلد ماسل تک، یکی از پیشرفتهترین و خالصترین مکملهای پروتئینی در دنیاست که با هدف عضلهسازی خشک و ریکاوری سریع طراحی شده است.
Her finner du kun Norsk Casino som bruker kryptert og sikker SSL-tilkobling. https://8mrzunite.ch/2022/02/07/10-feministisches-hochschulkollektiv-zh/
Saytın işləmə sürəti və slotların yüklənməsi Vavada-da çox yüksəkdir. http://www.flyerdruck.li/product/digital-photo-camera/
Leter du etter free spins uten innskudd pa et Norsk Casino, bor du sjekke her. http://www.onecallflorida.com/index.php/component/k2/item/6?links1Page=1076
Vavada rəsmi saytı təhlükəsizlik protokolları ilə tam qorunur. https://onlineearningway.com/__trashed/
you are truly a just right webmaster. The website loading pace is
amazing. It sort of feels that you’re doing any unique
trick. Also, The contents are masterpiece. you have performed
a fantastic activity in this subject!
گینر ویکتور مارتینز، فلسفهای از تغذیه است که توسط خود ویکتور مارتینز طراحی شده است.
Поставка продукции возможна не только в промышленных, но и в малых лабораторных объемах для исследовательских целей.
https://rms-ekb.ru/catalog/krug-iz-instrumentalnoi-stali/krug-ei723-100-gost-2590-2006/
Sets a higher bar than most of what shows up in search results for this topic, and a look at focusenablesvelocity did not lower that bar at all, in fact it confirmed the impression, this is the kind of consistency that earns a place in regular rotation for serious readers instead of casual scrollers passing through.
Sjekk alltid vilkarene med liten skrift for du registrerer deg pa et Norsk Casino. http://www.elys-dog.com/services/senza-gabbie/
Onlayn kazino seçərkən mənim üçün əsas şərt lisenziyadır, Vavada bunu təmin edir. https://aspire-future.com/beard-grooming-101-tips-for-a-perfectly-styled-beard/
Приятно удивлены скоростью обработки запроса на сайте, менеджер связался очень быстро.
https://xn--80aeedb0bfzeok.xn--p1ai/catalog/medno-nikelevyi-prutok/prutok-medno-nikelevyi-35-mm-mn45-tu/
Jeg foretrekker et Norsk Casino som fungerer perfekt pa mobilen uten behov for app. http://oracle.the-kgb.com/ubbthreads.php?ubb=changeprefs&what=style&value=3&curl=http://acquaspring.eu/en/changecurrency/6%3Freturnurl=http%3a%2f%2fyuit.la.coocan.jp%2Fwak%2Fcgi-bin%2Fbbs%2Fbbs.cgi
Ən populyar crash oyunları və slotlar məhz Vavada casino daxilindədir. https://estaql.com/seo/%d8%a3%d9%81%d8%b6%d9%84-%d9%85%d8%aa%d8%ae%d8%b5%d8%b5-%d8%b3%d9%8a%d9%88-%d9%81%d9%8a-%d8%a7%d9%84%d8%b3%d8%b9%d9%88%d8%af%d9%8a%d8%a9/
Vavada casino bonus proqramı mütəmadi olaraq yenilənir və maraqlı olur. https://centerforholism.com/2015/01/01/iridology-a-lens-into-healing/iris_1800_900/
Jeg foretrekker et Norsk Casino som fungerer perfekt pa mobilen uten behov for app. http://www.god123.xyz/home.php?mod=space&uid=1361001&do=profile
Qeydiyyat zamanı telefon nömrəsi ilə təsdiqləmə Vavada-da çox sürətlidir. https://www.ajiysabor.cl/2018/04/01/siganos-en-facebook-aji-y-sabor/
De beste spillutviklerne er pa plass hos nesten alle Norsk Casino pa denne listen. https://amalplast.pl/gluten-free-activated-charcoal-austin/
hispanic porn
Широкий выбор тугоплавких металлов, таких как вольфрам и молибден
https://redmetsplav.ru/store/magniy-i-ego-splavy/zarubezhnye-splavy-2/magniy-az80a—astm-b107/truba-magnievaya-az80a—astm-b107/
Vavada güzgü domenləri brauzer üzərindən stabil işləyir. https://cbcindia.gov.in/hi/%E0%A4%86%E0%A4%89%E0%A4%9F%E0%A4%B0%E0%A5%80%E0%A4%9A-%E0%A4%94%E0%A4%B0-%E0%A4%B8%E0%A4%82%E0%A4%9A%E0%A4%BE%E0%A4%B0-%E0%A4%AC%E0%A5%8D%E0%A4%AF%E0%A5%82%E0%A4%B0%E0%A5%8B-%E0%A4%AE%E0%A5%87/
Bruker alltid denne siden nar jeg skal sjekke ut et nytt Norsk Casino pa markedet. http://diligenttribe.com.au/top-1-best-rated-ndis-registered-providers-in-australia/
NetEnt provayderinin köhnə və yeni bütün slotları Vavada platformasında var. http://yalla-kurd.com/juventus-vs-parma-full-match-highlights/
Vavada kazino rəsmi güzgüləri məlumatları şifrələnmiş şəkildə ötürür. https://estudiocf.com/uncategorized/biophilic-design-bringing-nature-indoors/
Посетите сайт https://apartmentsphuket.com/ и вы сможете забронировать лучшие апартаменты и виллы для своего отдыха на Пхукете! Ознакомьтесь с ценами на сайте – они вам понравятся, а индивидуальное сопровождение сделает ваш отдых незабываемым! ApartmentsPhuket — каталог проверенного жилья на Пхукете для отпуска и длительной жизни.
Vavada güzgü domenləri brauzer üzərindən stabil işləyir. https://notachoice.org/on-pensait-ne-serait-temporaire/
Jeg har spilt pa flere Norsk Casino sider, og denne listen stemmer utrolig bra med mine erfaringer. https://servicios.bccba.org.ar/2023/03/02/hola-mundo/
Top quality material, deserves more attention than it probably gets, and a look at emynox reflected the same effort across the site, a hidden gem in the modern web where most attention goes to whoever shouts loudest rather than whoever actually delivers the best content for their readers without much marketing fanfare.
Компания занимается реализацией ферросплавов, необходимых для качественного легирования сталей на литейных участках.
https://rms-ekb.ru/catalog/stalnoi-list/stalnoi-list-18kh2n4va-7x1500x1000-gost-19903-2006-gladkii-belyi-goriachekatanyi/
Glad to find something on this topic that does not start with three paragraphs of throat clearing before getting to the point, and a stop at soberviola also dives right in, respect for the readers time shows up in small editorial choices like this and they add up to a real difference quickly.
Hər zaman aktual Vavada güzgü linkləri işlək vəziyyətdə olur. https://elateliermistico.com/es-posible-confiar-en-ti-sin-confiar-en-otros/
Betsixty Nederland is de ideale plek voor liefhebbers van slots, roulette en sportweddenschappen. Profiteer van wekelijkse cashback tot 25% en een professionele 24/7 klantenservice. Stort eenvoudig met creditcard of Bitcoin en begin direct.
Here is my website: https://2dehandsstudieboek.nl/
NetEnt provayderinin köhnə və yeni bütün slotları Vavada platformasında var. https://www.exportamos.info/como-y-por-que-registrar-una-marca-en-el-extranjero/
This is the wave – the big wave.
جووبت
Azərbaycandan olan qumarbazlar üçün Vavada ən rahat ödəmə üsullarını təklif edir. https://jerusalemstoneart.com/product/mezuzah-rock/
Долго искали надежного поставщика циркония, в Редметсплав предложили лучшие условия и чистоту металла.
https://xn--80aeedb0bfzeok.xn--p1ai/catalog/mednye-krestoviny-pod-paiku/mednaia-krestovina-pod-paiku-76-1kh65kh1-6-mm-12kh15-mm-tverdaia-paika-m1-gost-r-52922-2008/
به https://iran-finance.com/ مراجعه کنید – یک پورتال سرمایهگذاری ایرانی که اطلاعات جامعی در مورد مدیریت پول، از جمله در دوران تورم، به کاربران خود ارائه میدهد. ما مشاوره و راهنمایی عملی برای کمک به شما در حفظ و رشد داراییهایتان ارائه میدهیم.
Husk a sette personlige grenser for du begynner a spille pa et Norsk Casino. https://www.svm-tischtennis.de/Nachrichten/index.php/;focus=ALFAHO_com_cm4all_wdn_Flatpress_1989179&path=?x=entry:entry241009-083919;comments:1
Vavada mobil tətbiqi sayəsində bloklamaları tamamilə unutmuşam. https://golfpinehillsgc.com/matsuyama-closed-like-a-superstar/
Снять жилье на Пхукете можно как на несколько дней, так и на несколько месяцев. Большой выбор объектов позволяет подобрать оптимальный вариант для отдыха, зимовки или длительного проживания: снять виллу на пхукете
Kazino oyunlarında ədalətli RNG sisteminin olması Vavada-ya inamı artırır. https://juntoamiauto.com/calibrar-cuerpo-de-aceleracion-electronico/
This article is in fact a nice one it assists new web people,
who are wishing for blogging.
Also visit my web page; Architects Larnaca
Bruker alltid denne siden nar jeg skal sjekke ut et nytt Norsk Casino pa markedet. https://nefrinbeautify.com/spotlight-on-nail-trends-whats-buzzing-in-the-industry/
Возможность изготовления деталей по чертежам заказчика — это большой плюс
https://redmetsplav.ru/store/magniy-i-ego-splavy/zarubezhnye-splavy-2/magniy-as41b—astm-b94/prutok-magnievyy-as41b—astm-b94/
Vavada mobil tətbiqi sayəsində bloklamaları tamamilə unutmuşam. http://binleewedding.com/bond-mre-boligkreditt-as-no0010884950-in-nok-0-69-35/
https://amsterdam-market.ru/pochemu-eskort-v-moskve-stanovitsya-predpochteniem-dlya-uspeshnyx-lyudej/
Looking for btc/eur pair? Head over to btc-to-eur.com , a dedicated BTC to EUR exchange platform, to view the live Bitcoin-Euro exchange rate, estimate your EUR payout, and start a Bitcoin-to-Euro conversion through the exchange flow. This page is designed to help you convert BTC to EUR, evaluate the latest BTC/EUR exchange rate, review total Bitcoin values in euros, or get ready to sell Bitcoin through a euro-based channel.
http://tskc.ru/index.php?subaction=userinfo&user=ibiguwofiqel
Hər zaman aktual Vavada güzgü linkləri işlək vəziyyətdə olur. https://movingrightalong.com/Logo/courtyard-marriott/
gooobet
При выборе жилья важно учитывать район острова, расстояние до пляжа и инфраструктуру. Аренда жилья на Пхукете позволяет подобрать вариант как для спокойного семейного отдыха, так и для активной жизни рядом с популярными курортными зонами – снять жилье на пхукете
Wow that was unusual. I just wrote an very long comment but
after I clicked submit my comment didn’t show up.
Grrrr… well I’m not writing all that over again. Anyways, just wanted to say fantastic blog!
NetEnt provayderinin köhnə və yeni bütün slotları Vavada platformasında var. https://cubriloholdings.com/ch-logo/
De beste spillutviklerne er pa plass hos nesten alle Norsk Casino pa denne listen. https://tsumugi-js.jp/2019/10/20/%e9%81%ba%e8%a8%80%e3%82%b5%e3%83%9d%e3%83%bc%e3%83%88%ef%bd%9c%e7%9b%b8%e7%b6%9a%e4%ba%ba%e3%81%a7%e3%81%af%e3%81%aa%e3%81%84%e4%ba%a1%e5%a4%ab%e5%81%b4%e3%81%ae%e7%94%a5%e3%81%ab%e5%85%a8%e3%81%a6/
Компания обеспечивает поставки оксовольфрамата гафния — редкого соединения для специфических нужд химической и атомной промышленности.
https://rms-ekb.ru/catalog/ugolok-stalnoi/ugolok-stalnoi-st3sp-90x90x12-gost-8509-93/
https://harmony-press.ru/eskort-uslugi-otkryvaet-dostup-k-prostranstvu-vysokix-standartov-i-pribylnogo-voznagrazhdeniya/
Vavada güzgü domenləri brauzer üzərindən stabil işləyir. https://kesharbhawani.in/gutter-parnal-manufacturer-and-suppliers-in-ahmedabad/
Jeg har spilt pa flere Norsk Casino sider, og denne listen stemmer utrolig bra med mine erfaringer. https://www.klang-werk-sellig.de/Blog;focus=TKOMSI_com_cm4all_wdn_Flatpress_26067774&path=?x=entry:entry230203-231518;comments:1
https://scandyshop.ru/rekomendacii-po-vyboru-sputnicy-dlya-prestizhnyx-sobytij-v-stolice/
http://avtomag82.ru/blog/avto-akkumulyatory-optom/#comment_185393
http://potolki-mitishi.ru/index.php?subaction=userinfo&user=asyqakaquce
گینر استرویت، یک مکمل غذایی پودری است که با هدف تامین کالری بالا، کربوهیدراتهای پیچیده و پروتئینهای باکیفیت برای ورزشکاران طراحی شده است.
Vavada güzgü domenləri brauzer üzərindən stabil işləyir. https://coptic-institute.com/?p=10338
Denne siden har blitt min faste kilde til oppdatert Norsk Casino informasjon. https://pipodologos.com/blog-image-post-3-2/
Recommended without reservation for anyone interested in the topic at any level of expertise, and a look at progresswithoutdistraction only strengthens that recommendation, this site clearly knows how to serve readers across a range of backgrounds without watering down the content or talking past anyone in the audience which is genuinely impressive to see.
https://standart-hozmarket.ru/pochemu-eskort-v-moskve-stanovitsya-vyborom-dlya-sostoyatelnyx-lyudej/
Her finner du kun Norsk Casino som bruker kryptert og sikker SSL-tilkobling. https://homweb.co.kr/bbs/board.php?bo_table=free&wr_id=692271
Высокий уровень сервиса и контроля качества, для нашего научного проекта это было критически важно.
https://xn--80aeedb0bfzeok.xn--p1ai/catalog/latunnye-naruzhnye-stopornye-koltsa-po-gost/latunoe-naruzhnoe-stopornoe-pruzhinnoe-koltso-140kh3-mm-lts40mts1-5-gost-13942-86/
Takk for ?rlige anmeldelser av Norsk Casino uten altfor mye unodvendig reklame. https://artstic.com/groups/norsk-casino-1222864242/
Vavada onlayn kazino saytından uduşumu kriptovalyuta ilə problemsiz çıxardım. https://playatworking.com.co/post-format-chat/
Jeg har spilt pa flere Norsk Casino sider, og denne listen stemmer utrolig bra med mine erfaringer. https://thewyreng.com/anthony-mackie-slammed-over-remarks-about-captain-america/
http://academijacrimea.ru/index.php?subaction=userinfo&user=uduwazor
http://fh79052q.bget.ru/index.php?subaction=userinfo&user=ygopuwuhygak
Ищете литиевые аккумуляторы для погрузчиков? Зайдите на сайт elhim-iskra.com.ru и убедитесь, что тяговые аккумуляторы для складской техники всегда есть в наличии. На нашем складе собрано свыше 2000 аккумуляторных батарей, доступных к немедленной отправке. Подберите подходящую модель, отфильтровав по производителю, ёмкости или рабочему напряжению. В магазине тяговых аккумуляторов Елхим-Искра представлен обширный каталог продукции, а опытные специалисты компании готовы помочь с выбором наиболее подходящего решения с учётом всех технических характеристик вашего оборудования.
http://ishware.co.uk/fusion/profile.php?lookup=29230
gooobet
Vavada rəsmi saytı Azərbaycan oyunçularını AZN valyutası ilə qəbul edir. https://heizaer.ch/index.php/;focus=HSTPTP_com_cm4all_wdn_Flatpress_8970636&path=&frame=HSTPTP_com_cm4all_wdn_Flatpress_8970636?x=entry%3Aentry240220-220102%3Bcomments%3A1
Quality work here, the post reads cleanly and the points stay focused throughout, and a stop at eshcap kept the standard high, you can tell the writer cares about the final result rather than just hitting publish for the sake of having something new on the page to feed the search engines.
Rettferdige spill og verifisert RTP er det man far pa et godkjent Norsk Casino. https://phanchautrinh.edu.vn/bai-tap-so-sanh-hon-va-so-sanh-nhat.html
Указан физический адрес в Екатеринбурге, что повышает доверие
https://redmetsplav.ru/store/magniy-i-ego-splavy/zarubezhnye-splavy-2/magniy-am60a—astm-b275/pokovka-magnievaya-am60a—astm-b275/
NetEnt provayderinin köhnə və yeni bütün slotları Vavada platformasında var. https://steveneidrealestate.com.au/the-role-of-a-real-estate-agent-how-steven-helps-you-achieve-the-best-outcome/
Reading this prompted me to subscribe to my first newsletter in months, and a stop at sergevermin confirmed the subscribe was the right call, content that earns a newsletter signup is content that has cleared a higher trust bar than a casual visit and this site has clearly earned that level of commitment from me.
Vavada casino rəsmi saytında lisenziyalı proqram təminatı ilə qumar oynamaq zövq verir. https://showmetoronto.com/best-transportation-options-from-toronto-airport/
http://design-desire.ru/index.php?subaction=userinfo&user=uvidawaw
Kazino oyunlarında ədalətli RNG sisteminin olması Vavada-ya inamı artırır. https://skyhilocksmith.com/product/yale-lever-door-handles/
Her finner du kun Norsk Casino som bruker kryptert og sikker SSL-tilkobling. https://wreckitdemo.com/the-ultimate-guide-to-safe-and-efficient-demolition/
There is so much to try to understand
Опыт работы с более чем 120 постоянными заказчиками свидетельствует о высокой стабильности и надежности поставок.
https://rms-ekb.ru/catalog/stalnoi-list/list-stalnoi-85kh1200-mm-acroni-4462-en-iso-18286/
http://08.amurweb.ru/index.php?subaction=userinfo&user=agyrofupu
Qeydiyyat zamanı telefon nömrəsi ilə təsdiqləmə Vavada-da çox sürətlidir. https://rockforedrag.dk/2020/06/25/hej-verden/
priapism viagra
For meg er raske uttak det viktigste nar jeg velger et nytt Norsk Casino a spille pa. https://gordulekeny.hu/fogast-segito-eszkozok-toll-ceruza-evoeszkoz/
Ən populyar crash oyunları və slotlar məhz Vavada casino daxilindədir. https://update.teacherrahmat.com/deled-entrance-exam/
Takk for ?rlige anmeldelser av Norsk Casino uten altfor mye unodvendig reklame. https://www.kell1daru.hu/hello-vilag/
A piece that brought a sense of order to a topic I had been finding chaotic, and a look at acornharborcommercegallery continued that organising effect, content that imposes useful structure on messy subjects is doing genuine intellectual work and this site is providing that organisational function across multiple posts I have read recently here.
Высокий уровень сервиса и контроля качества, для нашего научного проекта это было критически важно.
https://xn--80aeedb0bfzeok.xn--p1ai/catalog/dvutavr-aliuminievyi/aliuminievyi-dvutavr-vd1-2-5x48x43-gost-13621-90/
De beste spillutviklerne er pa plass hos nesten alle Norsk Casino pa denne listen. http://chibacycle.com/apps/2016/10/11/%E3%81%95%E3%81%8C%E3%81%BF%E3%81%8A%E3%81%8A%E3%81%AE%E3%82%A4%E3%83%99%E3%83%B3%E3%83%88%E6%83%85%E5%A0%B1%E3%81%9D%E3%81%AE3/
Vavada rəsmi saytı Azərbaycan oyunçularını AZN valyutası ilə qəbul edir. https://crianzamutua.mx/Vavada_Casino
Endelig en uavhengig oversikt som tester hvert enkelt Norsk Casino med ekte innskudd. https://setenosesportes.com.br/prefeitura-de-campo-florido-promove-competicao-de-futsal/
Пари БК — топовая букмекерская контора для любителей ставок на спорт. Приложение pari ставки на спорт скачать на андроид можно абсолютно бесплатно, и уже через минуту вы окажетесь в мире футбола, хоккея, тенниса и сотен других дисциплин. Удобный интерфейс, мгновенные уведомления и live-ставки в реальном времени делают приложение незаменимым. Перейдите на https://play.google.com/store/apps/details?id=com.sport.playmetrics и установите Pari — ваш надёжный спутник в мире беттинга с выгодными коэффициентами и быстрыми выплатами.
Если после употребления алкоголя сохраняется выраженное недомогание, врач может оценить состояние пациента и определить наиболее подходящий способ оказания помощи. Вывод из запоя проводится только после медицинского осмотра – https://pankreatit.guru/istochnik-znaniy/vyezd-narkologa-na-dom-kogda-nuzhen-kak-prohodit-i-chto-ozhidat
Vavada rəsmi saytı təhlükəsizlik protokolları ilə tam qorunur. https://thoughtgrove.blog/new-ways-to-earn-income-from-home/
Лаконичное приветствие на главной странице сразу вводит в курс дела
https://redmetsplav.ru/store/magniy-i-ego-splavy/zarubezhnye-splavy-2/magniy-9990—csa-hg-2/provoloka-magnievaya-9990—csa-hg-2/
Utvalget av spilleautomater pa disse Norsk Casino sidene er virkelig imponerende. https://goes-on.net/hello-world/
Canlı kazino bölməsində blackjack oynamaq üçün Vavada ən yaxşı seçimdir. https://www.schablonen-express.de/hello-world/
Профессиональная медицинская помощь начинается с внимательного отношения к пациенту и комплексной оценки его состояния. После консультации врач определяет дальнейшие рекомендации и объясняет, какие шаги следует предпринять в конкретной ситуации. Это позволяет выстроить понятный и последовательный процесс оказания помощи: https://vpochke.ru/zdorove/narkolog-na-dom-kak-vyzvat-chego-zhdat-i-kak-podgotovitsya-chtoby-pomosch-byla-effektivnoy.html
При длительном употреблении алкоголя организм испытывает серьезную нагрузку, поэтому самостоятельные попытки справиться с тяжелым состоянием могут быть небезопасны. Вывод из запоя под наблюдением медицинских специалистов позволяет контролировать состояние пациента, проводить необходимую терапию и постепенно улучшать самочувствие: https://svr-service.ru/vyvod-iz-zapoya-i-kapelnitsy-na-dom-osobennosti-i-vybor-kliniki/
Saytda həm demo rejimdə, həm də real pulla slot oynamaq mümkündür. https://www.integrasrl.it/product/aggiornamento-corso-di-formazione-attrezzature-abilitazione-alla-conduzione-di-specifiche-attrezzature-di-lavoro/
Jeg har spilt pa flere Norsk Casino sider, og denne listen stemmer utrolig bra med mine erfaringer. http://uniprint.co.kr/bbs/board.php?bo_table=free&wr_id=307870
Azərbaycandan olan qumarbazlar üçün Vavada ən rahat ödəmə üsullarını təklif edir. http://gekka.info/sb/log/eid74.html
Takk for ?rlige anmeldelser av Norsk Casino uten altfor mye unodvendig reklame. https://www.agecop.pt/ola-mundo/
A piece that demonstrated competence without performing it, and a look at eshpyx maintained the same self assured but unshowy register, the gap between competence and performance of competence is one I track and this site has clearly chosen to demonstrate rather than perform which I find much more persuasive as a reader.
Vavada qeydiyyat linki vasitəsilə dostumu da dəvət etdim, o da razıdır. http://www.farringtonmission.org/product/album/
Takk for ?rlige anmeldelser av Norsk Casino uten altfor mye unodvendig reklame. https://www.doroteeinfuga.it/2019/08/22/cesto-di-rose/
Hi there, I desire to subscribe for this webpage to get most up-to-date updates, so
where can i do it please help.
ООО «РМС» поставляет вольфрамовые порошки, соответствующие строгим техническим условиям (например, ТУ 48-4205-112-2017).
https://rms-ekb.ru/catalog/stalnoi-list/stalnoi-list-25khgsa-16x1550x1200-gost-19903-2006-gladkii-otsinkovannyi-goriachekatanyi/
Husk a sette personlige grenser for du begynner a spille pa et Norsk Casino. http://jangwooyoung.kr/bbs/bbs/board.php?bo_table=free&wr_id=269719
Qeydiyyat prosesində heç bir çətinlik olmadı, Vavada interfeysi sadədir. http://www.ixcha.com/?p=1725
莎拉 蕾絲 色情
Easy to recommend without reservations, the site delivers on every promise it implicitly makes, and a look at uptonvelour kept that same standard going, the kind of consistency that earns trust over time rather than chasing it through aggressive marketing is what I see here and it is appreciated greatly by this particular reader today.
Qeydiyyat zamanı telefon nömrəsi ilə təsdiqləmə Vavada-da çox sürətlidir. http://anetamierzwa.lemoniadakrakow.pl/yoga/duis-sagitis-ipsum-prasent/
Thanks for putting this online without locking it behind email signups or paywalls, and a quick visit to growthneedsmomentum kept that open feel going, content that trusts the reader to come back rather than gating access is the kind of approach I will reward with regular return visits over time happily.
Поставки всегда вовремя, логистика отлажена до мелочей, что важно для бесперебойной работы цеха.
https://xn--80aeedb0bfzeok.xn--p1ai/catalog/latunnye-naruzhnye-stopornye-koltsa-po-din/latunoe-naruzhnoe-stopornoe-pruzhinnoe-koltso-m39-35-8kh1-75-mm-lts25s2-din-471/
Vavada casino bonus proqramı mütəmadi olaraq yenilənir və maraqlı olur. http://web015.dmonster.kr/bbs/board.php?bo_table=b0403&wr_id=68553
Kundeservice pa norsk er en stor fordel som kjennetegner et godt Norsk Casino. https://gbomotor.ru/komplektuyuschie/lubrikator-dlya-gbo
Canlı kazino bölməsində blackjack oynamaq üçün Vavada ən yaxşı seçimdir. http://www.meadmedia.net/blog/when-youre-young/
Корзина на сайте промышленного предприятия — удобный инструмент для формирования заявки
https://redmetsplav.ru/store/magniy-i-ego-splavy/zarubezhnye-splavy-2/magniy-3-5470—din-1729-part-2/polosa-magnievaya-3-5470—din-1729-part-2/
Onlayn kazino seçərkən mənim üçün əsas şərt lisenziyadır, Vavada bunu təmin edir. https://academyofengineers.com/b-tech-chemistry-tuition-classes/
При оказании помощи после запоя специалисты уделяют внимание не только текущему самочувствию пациента, но и возможным сопутствующим заболеваниям. Комплексная оценка состояния помогает принять наиболее обоснованное решение. Это делает медицинское сопровождение более эффективным и безопасным https://vpochke.ru/zdorove/narkolog-na-dom-kak-vyzvat-chego-zhdat-i-kak-podgotovitsya-chtoby-pomosch-byla-effektivnoy.html
Fantastisk oversikt over Norsk Casino bonuser med lave omsetningskrav. https://villageplayerscommunitytheatre.com/hello-world/
Vavada casino rəsmi saytında lisenziyalı proqram təminatı ilə qumar oynamaq zövq verir. https://amrproduce.com/hola-mundo/
Veldig oversiktlig tabell som sammenligner forskjellige Norsk Casino alternativer. https://www.propertydamage.co/hello-world/
Many casino operators work with multiple software providers to ensure a diverse portfolio of games and entertainment options – Realz Casino
Компания выступает важным звеном в цепочке снабжения предприятий машиностроения и оборонно-промышленного комплекса.
https://rms-ekb.ru/catalog/ugolok-stalnoi/ugolok-iz-konstruktsionnoi-stali-120kh80kh10-mm-c45-en-10056-2/
Azərbaycandan olan qumarbazlar üçün Vavada ən rahat ödəmə üsullarını təklif edir. https://singhofresh.com/shop/fruits/new-zealand-queen-apple-%e6%96%b0%e8%a5%bf%e5%85%b0%e7%9a%87%e5%90%8e%e8%8b%b9%e6%9e%9c-1pcs/
Kundeservice pa norsk er en stor fordel som kjennetegner et godt Norsk Casino. https://tamamtadbir.ir/product/%D8%AA%D9%82%D9%88%DB%8C%D8%AA-%DA%A9%D9%86%D9%86%D8%AF%D9%87-%D8%B3%D9%8A%DA%AF%D9%86%D8%A7%D9%84-vati-440-dc-%DA%A9%D9%BE%DB%8C/
Vavada rəsmi saytı təhlükəsizlik protokolları ilə tam qorunur. https://cheesemoulds.com/thank-you-for-connecting-with-us-at-gulfood-manufacturing-2025/
gooobet
Высокий уровень сервиса и контроля качества, для нашего научного проекта это было критически важно.
https://xn--80aeedb0bfzeok.xn--p1ai/catalog/dvutavr-aliuminievyi/aliuminievyi-dvutavr-d16ch-4x20x17-gost-13621-90/
Saytın işləmə sürəti və slotların yüklənməsi Vavada-da çox yüksəkdir. https://irelandinsideandout.com/2022/11/hello-world/
Fantastisk oversikt over Norsk Casino bonuser med lave omsetningskrav. http://vanessaashcroft.com.au/home/vanessa-ashcroft-landscapes-encroaching-shadows-60×60-hc/
При алкогольной интоксикации важно учитывать общее состояние здоровья, поэтому самостоятельные решения могут быть небезопасны. Медицинский осмотр помогает определить необходимый объем помощи https://pronikotin.ru/stati/narkolog-na-dom-kak-vybrat-specialista-dlya-effektivnoj-pomoshhi-v-komfortnyx-usloviyax.html
Now setting this aside as a model of how to write thoughtfully on the topic, and a stop at exabuff extended that model status, content that becomes a reference for how a kind of writing should be done is content with influence beyond its own readership and this site is reaching that level for me clearly today.
Vavada rəsmi saytı Azərbaycan oyunçularını AZN valyutası ilə qəbul edir. https://fisioterapiajaen.com/fisioterapia-y-deportes-jaen/
Ser at de har tatt med Trustly og BankID som viktige faktorer for et bra Norsk Casino. https://www.mysticalcupcakes.com/coco-rasp-3/
Широкий выбор тугоплавких металлов, таких как вольфрам и молибден
https://redmetsplav.ru/store/magniy-i-ego-splavy/rossiyskie-splavy-1/magniy-ml4—gost-2856-79/prutok-magnievyy-ml4—gost-2856-79/
Kazino oyunlarında ədalətli RNG sisteminin olması Vavada-ya inamı artırır. https://www.sideqik.com/influencer-marketing/4-reasons-need-influencer-marketing-infographic
For meg er raske uttak det viktigste nar jeg velger et nytt Norsk Casino a spille pa. http://www.ilbaekhealthfood.com/g5/bbs/board.php?bo_table=free&wr_id=74845
Felt energised after reading rather than drained, which is unusual for online content these days, and a look at alpinecovemerchantgallery continued that good feeling, content that leaves you better than it found you is rare and worth bookmarking when you stumble across it for the first time today or any other day really.
I’ve been browsing online more than 2 hours today, yet
I never found any interesting article like yours. It is
pretty worth enough for me. In my view, if all site owners and bloggers
made good content as you did, the net will be much more useful than ever
before.
Onlayn kazino seçərkən mənim üçün əsas şərt lisenziyadır, Vavada bunu təmin edir. https://eternalninemia.com/paypal-2023-przeglad-metody-platnosci-watts-kasynach-onlin/
کراتین ناکلیر، یک ماتریس پیچیده است، این کراتین ترکیبی از برند ناکلیر نوتریشن، بر اساس فلسفه همافزایی طراحی شده است.
Endelig en uavhengig oversikt som tester hvert enkelt Norsk Casino med ekte innskudd. https://www.rbms.cc/hallo-welt/
A well calibrated piece that knew its scope and stayed inside it, and a look at tomatotiara maintained the same scope discipline, scope creep is one of the failure modes of long blog posts and this site has clearly invested in the editorial discipline to prevent it which shows up in tightly contained pieces.
Kazino bonus paketini aktivləşdirdim, slotlarda şansım gətirdi. https://silvalpin.ro/product/b-club/
gooobet
Bruker alltid denne siden nar jeg skal sjekke ut et nytt Norsk Casino pa markedet. http://sumegtenisz.hu/filozofiank
single dose doxycycline
Dəstək komandası Vavada platformasında 24/7 rejimində aktiv fəaliyyət göstərir. https://issuetrend.net/son-heung-min-mls-transfer-5-reasons/
Good points – – it will make a difference with my parents.
Foretrekker live casino med ekte dealere nar jeg besoker et Norsk Casino. https://www.nelmafaleiro.com.br/look-com-transparencia-como-usar/look-com-transparencia-como-usar/
Vavada kazino rəsmi güzgüləri məlumatları şifrələnmiş şəkildə ötürür. https://in.kilombo.top/spip.php?article17
Редметсплав — пример того, как должен работать современный поставщик металлургического сырья.
https://xn--80aeedb0bfzeok.xn--p1ai/catalog/latunnye-vnutrennie-stopornye-koltsa-po-gost/latunoe-vnutrennee-stopornoe-pruzhinnoe-koltso-90kh2-mm-l63-gost-13943-86/
Really appreciate the confidence to make a clear point rather than hedging everything, and a quick visit to forwardtractioncreated maintained the same direct stance, writing that takes positions rather than equivocating is more useful even when the positions are debatable because at least the reader has something to react to clearly.
Foretrekker live casino med ekte dealere nar jeg besoker et Norsk Casino. https://gesal.pl/2017/05/11/nocny-bieg-w-gniewkowie/
Квалифицированный вывод из запоя помогает уменьшить проявления алкогольной интоксикации и облегчить состояние пациента. После завершения основной помощи врач может дать рекомендации по дальнейшему лечению, восстановлению здоровья и профилактике повторных эпизодов https://mycistit.ru/lechenie/narkolog-na-dom-chto-eto-kogda-nuzhno-i-kak-podgotovitsya
Ikigai Auto — компания полного цикла по доставке автомобилей из-за рубежа в Россию. Специалисты берут на себя всё: подбор, выкуп, экспортные документы, доставку и таможенное оформление. Стоимость услуг — от 70 000 рублей, схема оплаты поэтапная: инвойс клиент вносит самостоятельно через банк, таможенные платежи — напрямую по реквизитам таможенной службы. Оставьте заявку на https://ikigaiauto.ru/ — менеджеры подберут лучшие варианты под ваш бюджет и параметры.
Vavada casino cashback sistemi sayəsində itkilərimin bir hissəsini geri aldım. http://mb5011.sbm-itb.net/2018/07/30/visit-to-idx/
gooobet apk
Возможность изготовления деталей по чертежам заказчика — это большой плюс
https://redmetsplav.ru/store/magniy-i-ego-splavy/rossiyskie-splavy-1/magniy-ma15/truba-magnievaya-ma15/
Her slipper man a lure pa om et Norsk Casino har gyldig lisens eller ikke. https://thedigitalsetter.com/digital-marketing-made-easy-let-our-team-handle/
Vavada rəsmi saytı təhlükəsizlik protokolları ilə tam qorunur. https://latauladelor.com/alianzas-de-matrimonio-simbolo-eterno-de-amor-la-taula-de-lor/
Her finner du kun Norsk Casino som bruker kryptert og sikker SSL-tilkobling. https://nishiki1968.jp/hoodie_7_front/
Vavada casino rəsmi saytında lisenziyalı proqram təminatı ilə qumar oynamaq zövq verir. https://biovietnam.com.vn/san-pham/bio-sieu-vo-gao-cong-nghe-nano-sieu-tham-thau/
Right away I am going to do my breakfast, when having my breakfast
coming again to read further news.
MGA-lisensen er et must for alle som vil spille pa et trygt Norsk Casino i dag. https://vfkeducacao.com.br/casino-rws-gambling-establishment-singapore-2/
Hi! I could have sworn I’ve been to this website before but after browsing through some
of the post I realized it’s new to me. Anyhow, I’m definitely glad I found it and I’ll be bookmarking and checking back frequently!
goobet
Vavada qeydiyyat linki vasitəsilə dostumu da dəvət etdim, o da razıdır. https://presse-express.dz/?p=79162
Если вы ищете надёжный магазин для всего, что нужно ребёнку, «Резиденция детства» — именно то место, где удобный выбор сочетается с качеством: на https://childresidence.ru/ собраны игрушки, детская одежда, мебель и электроника для всей семьи. Магазин предлагает широкий ассортимент проверенных товаров, помогая родителям создавать уют и радость для своих детей без лишних хлопот. Менеджеры всегда готовы помочь с выбором.
gooobet
Həftəlik turnirlər və böyük cekpotlar üçün rəsmi Vavada saytını seçirəm. https://horomodern.com/datetohoro/
During a reading session that included several other sources this one stood out, and a look at ezabond continued the standout quality, the side by side comparison of sources during research is a useful exercise and this site has been winning those comparisons for me consistently across multiple research sessions during the last week.
Kundeservice pa norsk er en stor fordel som kjennetegner et godt Norsk Casino. https://www.organic-mallorca.com/content_block/recepies/
Продукция находит применение в производстве электротехники благодаря наличию специализированной электротехнической стали.
https://rms-ekb.ru/catalog/ugolok-stalnoi/ugolok-iz-konstruktsionnoi-stali-120kh80kh8-mm-x1nicrmocun25-20-7-en-10088-3/
Kundeservice pa norsk er en stor fordel som kjennetegner et godt Norsk Casino. http://www.johanterlouw.nl/recept-en-recepten/pruimenijs/
Onlayn kazino seçərkən mənim üçün əsas şərt lisenziyadır, Vavada bunu təmin edir. https://planetstand.com/faq-items/vivamus-ullamcorper-nim-sit-amet-consequat-laoreet-tortor-tortor-dictum-egestas-urna/
Bruker alltid denne siden nar jeg skal sjekke ut et nytt Norsk Casino pa markedet. https://theelectroside.com/2015/05/14/nicky-romero-lanza-linea-de-ropa/
قم بتنزيل تطبيق Goobet
Искали в Варшаве классное место, где готовят на углях, и наткнулись на отличный гриль-бар с сочным шашлыком, хачапури и пиццей. В отзывах очень хвалят и вкус, и сервис, да и с парковкой у заведения проблем нет. Меню и адрес точки можно посмотреть на сайте https://grillpappa.pl/ , у них там всё подробно расписано Тем, кто ценит качественное мясо на углях и тёплую обстановку, это место точно стоит посетить — или просто оформить доставку на вечер.
NetEnt provayderinin köhnə və yeni bütün slotları Vavada platformasında var. https://ipbusinesstv.com/will-digital-marketing-ever-rule/
Husk a sette personlige grenser for du begynner a spille pa et Norsk Casino. https://esaletterny.com/blog/esas-banned-on-airplanes-need-to-know-as-an-esa-owner/
تحميل gooobet
Ən populyar crash oyunları və slotlar məhz Vavada casino daxilindədir. https://www.grifrotulos.com.br/etiquetas-de-aviso-de-seguranca/
Rettferdige spill og verifisert RTP er det man far pa et godkjent Norsk Casino. https://vteck.be/10-reason-why-roofing-are-factmake-easier-8/
Azərbaycandan olan qumarbazlar üçün Vavada ən rahat ödəmə üsullarını təklif edir. https://packmann-umzuege.de/2023/06/22/maximizing-productivity-tips-for-a-successful-workday/
Det har blitt vanskeligere med betalinger, sa denne Norsk Casino guiden er gull verdt. https://cheesemoulds.com/thank-you-for-connecting-with-us-at-gulfood-manufacturing-2025/
Felt like the writer was speaking directly to someone with my level of curiosity, neither talking down nor showing off, and a stop at vaporsalt kept that comfortable matching going, finding writing that meets you where you are rather than asking you to climb up or stoop down feels great every time it happens.
قم بتنزيل تطبيق Goobet
Onlayn kazino seçərkən mənim üçün əsas şərt lisenziyadır, Vavada bunu təmin edir. https://ru.arbitro.az/2023/04/19/%d1%80%d0%b0%d0%b7%d0%be%d0%b2%d1%8b%d0%b5-%d1%8e%d1%80%d0%b8%d0%b4%d0%b8%d1%87%d0%b5%d1%81%d0%ba%d0%b8%d0%b5-%d1%83%d1%81%d0%bb%d1%83%d0%b3%d0%b8/
explore a fantastic range of premium restraint items built for maximum pleasure. you should buy best flogger toys online through our secure website to experience thrill safely with high quality body safe materials.
تحميل gooobet
Det har blitt vanskeligere med betalinger, sa denne Norsk Casino guiden er gull verdt. http://seoulbarunplant.com/bbs/board.php?bo_table=free&wr_id=401502
lisinopril and sun sensitivity
Kazino bonus paketini aktivləşdirdim, slotlarda şansım gətirdi. https://olivehealthcareservices.com/2024/04/25/the-evolution-of-smart-home-electrical-systems-for-everyone/
De skattefrie gevinstene gjor at jeg alltid velger et Norsk Casino med EOS-lisens. http://www.yk.rim.or.jp/%7Etanuki/wview.cgi
Каждая партия товара сопровождается сертификатами качества, подтверждающими соответствие ГОСТ и ТУ.
https://rms-ekb.ru/catalog/list/list-75khmf-3x2000x2000-gost-19903-74/
Vavada casino rəsmi saytında lisenziyalı proqram təminatı ilə qumar oynamaq zövq verir. https://thetosticlub.nl/locatie/spar-van-santen/
Casino Bonanza ödeme yöntemleri arasında kripto olması büyük bir artı.
Look into my web page; https://www.clickcards.in/siennamulga13
https://cvetonya.myqip.ru/?1-0-0-00006714-000-0-0-1780398183
Thanks for the honest framing without exaggerated claims that the topic will change my life, and a stop at apricotharbormerchantgallery kept the same modest tone, restraint in marketing language signals trustworthiness and the writers here are clearly playing the long game by building credibility rather than chasing immediate clicks through hyperbole.
Sjekk alltid vilkarene med liten skrift for du registrerer deg pa et Norsk Casino. https://perfectthen.com/on-the-trail-of-lost-temples-in-angkor-wat-in-siem-reap-cambodia-3-2023-stop-10-2/
Azərbaycandan olan qumarbazlar üçün Vavada ən rahat ödəmə üsullarını təklif edir. https://wisebloghub.co.uk/daily-room-escape-game-guide-tips-levels-puzzle-solutions/
https://spb24.kamrbb.ru/?x=read&razdel=1&tema=270&start=0#new
Корзина на сайте промышленного предприятия — удобный инструмент для формирования заявки
https://redmetsplav.ru/store/kobalt/stellite/kobalt-stellite-6/list-kobaltovyy-stellite-6/
Высокий уровень сервиса и контроля качества, для нашего научного проекта это было критически важно.
https://xn--80aeedb0bfzeok.xn--p1ai/catalog/melkhiorovaia-truba/melkhiorovaia-truba-14kh0-8kh9000-mm-mnzhmts30-1-1-gost-10092-2006/
https://punkgazetka.forum24.ru/?1-9-0-00007652-000-0-0-1780398139
Ser at de har tatt med Trustly og BankID som viktige faktorer for et bra Norsk Casino. http://ugf.us.com/ban-ca-tieu-tien-king33/
Solid endorsement from me, the writing earns it, and a look at faearo continues to earn it across the broader site too, the kind of operation that maintains quality across many pages rather than just one viral post is a sign of serious commitment and that is what I see here clearly across what I read.
Skipped a meeting reminder to finish the post, and a stop at momentumovernoise held me past another reminder, when content beats meetings the writer is doing something extraordinary because meetings have institutional support behind them and yet good writing can still occasionally win that competition for attention which I find heartening today.
http://old.msfnpr.ru/msfnprbb/viewtopic.php?p=7547#7547
Azərbaycandan olan qumarbazlar üçün Vavada ən rahat ödəmə üsullarını təklif edir. https://www.gafencushop.com/best-brunches-to-try-in-hong-kong-this-september/brunch-2/
Velkomstbonusen pa dette spesifikke Norsk Casino nettstedet var utrolig gunstig. https://yuvamedia.com/political-storm-over-aravalli-hills-redefining-the-range-threatens-conservation-efforts/
https://devichnik.su/forum/39-29528-1
Ищете дешевые авиабилеты в США? Посетите сайт https://usaflights24.com/ и вы найдете лучшие предложения на авиабилеты. С помощью нашего мощного поисковика вы за несколько секунд сравните тарифы сотен авиакомпаний и тревел-платформ и мгновенно подберёте самый бюджетный вариант. Мы гарантируем полную прозрачность: указанная цена является окончательной, и при оформлении заказа вас не ждут никакие дополнительные расходы.
https://money.bestbb.ru/viewtopic.php?id=3610#p11099
Vavada casino rəsmi saytında lisenziyalı proqram təminatı ilə qumar oynamaq zövq verir. http://kkor.us.com/ban-ca-dai-duong-789f/
Good day! I know this is kind of off topic but I was wondering which blog platform are you using for this website?
I’m getting tired of WordPress because I’ve had issues
with hackers and I’m looking at alternatives for another platform.
I would be great if you could point me in the direction of a good platform.
Velkomstbonusen pa dette spesifikke Norsk Casino nettstedet var utrolig gunstig. https://www.telemicroitalia.it/miniradar-antenne-sistemi-e-componenti-a-microonde-apparati-in-radiofrequenza-elettronica-e-meccanica-di-precisione/attachment/6/
Rettferdige spill og verifisert RTP er det man far pa et godkjent Norsk Casino. https://www.5pointz-mg.de/2025/06/24/best-roulette-strategies-for-winning-real-money-online-2/
Наличие прецизионных сплавов в ассортименте подтверждает работу компании с высокоточными и наукоемкими материалами.
https://rms-ekb.ru/catalog/krug-iz-instrumentalnoi-stali/krug-kh6f4m-18-gost-7417-75/
Thank you for keeping the writing honest and the points easy to verify against your own experience, and a stop at uptonvinyl reflected the same approach, no exaggeration just steady useful content that I can take with me into my own work without second guessing every sentence I happen to read here.
Jeg foretrekker et Norsk Casino som fungerer perfekt pa mobilen uten behov for app. https://sewate.com/production-scene/product-line-carrier-tapes-13/
План эвакуации является обязательным элементом системы противопожарной защиты (ст. 84 123-ФЗ). Графическая часть выполняется по ГОСТ Р 12.2.143-2009 (п. 6.2.1). Размещение плана эвакуации регламентировано п. 7 ППР РФ. При изготовлении планов эвакуации применяются фотолюминесцентные материалы (п. 6.1.12 ГОСТ Р 12.2.143). Для объектов Санкт-Петербурга (план эвакуации СПб) требуется учитывать СП 3.13130.2009 (п. 4.3) по частоте тренировок. Рекомендуется заказать план эвакуации у лицензированных организаций https://fire-axe.ru/ . Возможно купить план эвакуации типового исполнения, но для каждого здания требуется индивидуальный расчет путей эвакуации (ст. 53 123-ФЗ).
Использование современных технологий защиты данных пользователей
https://redmetsplav.ru/store/kobalt/stellite/kobalt-stellite-12h/izdeliya-iz-kobalta-stellite-12h/
Индивидуальный подход к нестандартным заказам — изготовили детали по нашим чертежам точно в размер.
https://xn--80aeedb0bfzeok.xn--p1ai/catalog/dvutavr-aliuminievyi/aliuminievyi-dvutavr-m40-8x54x40-gost-13621-90/
http://rkiyosaki.ru/discussion/20004/oficialnaya-skupka-dragocennyh-metallov-v-moskve-kapital-gold/
Krypto og MuchBetter fungerer utmerket pa de fleste Norsk Casino sider na. https://bsjcivils.co.uk/post-3/
http://www.pk25.ru/forum/item/19598_oficialnaya_skupka_dragocennih_metallov_v_moskve_k.html
Foretrekker live casino med ekte dealere nar jeg besoker et Norsk Casino. https://pautabrasil.com.br/2024/10/02/lideranca-o-verdadeiro-significado-de-fazer-os-outros-brilharem/
1xbet скачать
http://www.yarskonline.ru/forum/item/10340_oficialnaya-skupka-dragocennih-metallov-v-moskve-k.html
Takk for ?rlige anmeldelser av Norsk Casino uten altfor mye unodvendig reklame. https://evsparehub.com/2023/02/24/charging-solution-for-electric-car-hybrid-car/
https://newyork.site666.com/index.php?topic=125154.new#new
Her finner du kun Norsk Casino som bruker kryptert og sikker SSL-tilkobling. https://fervormode.com/fashionstylingportfolio/fad717_2b8188e6d97ac83ecc4d137c99f30970/
http://old.msfnpr.ru/msfnprbb/viewtopic.php?p=7548#7548
penis enlargement cost uk
Utvalget av spilleautomater pa disse Norsk Casino sidene er virkelig imponerende. https://www.monster-fitness.jp/2019/08/14/open%e3%82%88%e3%82%8a%e5%8d%8a%e5%b9%b4%e3%82%92%e7%b5%8c%e3%81%a6/
Посетите сайт Родник Чистоты https://rodnik-clean.ru/uborka-posle-remonta – мы клининговая компания полного цикла: от ежедневной уборки до химчистки мебели, а также оказываем услуги послестроительной уборки помещений в офисах, квартирах, производственных помещениях. Подробный перечень услуг вы найдёте на нашем сайте. Фиксированная стоимость в договоре и гарантия. За плечами нашей команды — свыше 12 лет успешной работы в сфере клининга!
Came in tired from a long day and the writing held my attention anyway, and a stop at faelex kept that going, content that can engage a fatigued reader is doing something right because most online reading happens in suboptimal conditions like that one and quality content adapts to it without complaint.
Looking for how to store btc? Head over to bestwaytobuybitcoin.net – a standalone Bitcoin acquisition guide built to assist users in comparing payment options, assessing BTC outcomes, and checking their buying journey prior to moving forward. Use the service to compare card, debit card, bank transfer, and online exchange options.
Takk for ?rlige anmeldelser av Norsk Casino uten altfor mye unodvendig reklame. https://www.dbsartoria.com/2022/03/12/the-black-book-club-takes/
It’s truly very complicated in this active life to listen news on Television, so I only use internet for
that reason, and get the most recent news.
Crash-spill som Aviator har blitt min favoritt pa moderne Norsk Casino plattformer. https://nutriness.gr/product/synaisthimatiko-fagito-kai-tropos-diacheirisis-tou/
Четкое позиционирование как эксперта в области редких металлов
https://redmetsplav.ru/store/kobalt/rossiyskie-splavy-3/kobalt-k1a—gost-123-08/lenta-kobaltovaya-k1a—gost-123-08/
وی ناکلیر، یک مکمل ورزشی باکیفیت است که عمدتاً از کنسانتره پروتئین آب پنیر تشکیل شده.
Долго искали надежного поставщика циркония, в Редметсплав предложили лучшие условия и чистоту металла.
https://xn--80aeedb0bfzeok.xn--p1ai/catalog/melkhiorovaia-truba/melkhiorovaia-truba-35kh2-5kh3000-mm-mnzhmts30-1-1-gost-10092-2006/
De skattefrie gevinstene gjor at jeg alltid velger et Norsk Casino med EOS-lisens. https://everyones.cc/2023/01/14/%e8%a6%9a%e9%86%92%e8%a3%85%e5%82%99%e3%80%80%e9%98%b2%e5%85%b7%e3%82%b3%e3%82%a2%e3%83%bb%e7%b4%a0%e6%9d%90%e4%b8%80%e8%a6%a7/
Will be sharing this with a couple of people who care about the topic, and a stop at focusbuildsvelocity added more material worth passing along, the kind of site that is generous with quality content and does not make you jump through hoops to access it which is appreciated more than the team probably realises.
Kjekt a se at guiden ogsa fokuserer pa ansvarlig spill hos hvert Norsk Casino. https://bjj-kids.ch/hello-world/
Now planning to share the link with a small group of readers I trust, and a look at brightharborcommercegallery suggested more material to share with the same group, recommending content into a curated circle requires confidence in the recommendation and this site is making me confident in those personal recommendations on multiple separate occasions now.
Kundeservice pa norsk er en stor fordel som kjennetegner et godt Norsk Casino. https://shopeu.tsklab.com/2021/03/01/interactive-push-notifications-in-home-center/
Found this really helpful, the explanations are simple but they actually answer the questions a normal reader would have, and after I followed twainskipper I had a clearer sense of the topic, no extra fluff just useful points laid out in a sensible order that made the time worth it.
Dette er den mest noyaktige guiden for a finne et palitelig Norsk Casino pa nett. https://hurricanedigital.com.au/importance-clear-concise-website-content/
گینر ویسلی، یک مکمل تخصصی افزایش وزن و حجم عضلانی است که با ترکیب هوشمندانهای از کربوهیدراتهای پیچیده، پروتئینهای باکیفیت و اسیدهای آمینه ضروری، طراحی شده است.
Не знаете, где посмотреть знаменитый мультсериал для взрослых Гриффины? Заходите на сайт https://www.griffinfan.ru/ – там вы найдете все сезоны, которые можно смотреть онлайн в отличном качестве без регистрации. Для поклонников, которые уже видели сериал – это шанс еще раз окунуться в смешные приключения этой нелепой американской семейки и превосходно развеселиться!
Nice to see a post that does not try to overcomplicate the basics for the sake of looking smart, and once I looked at falbell the same direct tone was there too, which honestly makes a difference when you are short on time and want answers without long pointless intros.
Представлены технически сложные сплавы ниобия и тантала
https://redmetsplav.ru/store/kobalt/rossiyskie-splavy-3/kobalt-ep131/truba-kobaltovaya-ep131/
cialis 5mg reviews
Компания «МАСТЕРВУД-СТАНКИ» предлагает полный спектр оборудования для деревообработки и производства мебели от ведущих заводов HBW, Blue Elephant, Fravol, Maggi и V-hold. В каталоге — форматно-раскроечные, кромкооблицовочные, сверлильно-присадочные, четырёхсторонние и фрезерные станки с ЧПУ, а также сушильные камеры, покрасочные линии и инструмент. Опытные менеджеры подберут оборудование за 10 минут, а специалисты обеспечат доставку, пуско-наладку, обучение и сервис. Подробнее — на сайте https://mwstanki.ru/. Доступен лизинг, запчасти и демонстрационный зал в Химках. Надёжное решение для вашего производства.
Весь металл проходит строгий входной контроль, за всё время работы ни одного случая брака.
https://xn--80aeedb0bfzeok.xn--p1ai/catalog/prutok-aliuminievyi-1/prutok-aliuminievyi-amg6-30-mm-l-3000-mm-krug-1/
Keep on working, great job!
Looking for a transfer from Thessaloniki Airport? Visit https://thessaloniki-transfer.de/ for reliable, punctual, and convenient airport transfers to Chalkidiki, Sani Resort, and all of Greece. We offer fixed prices and no hidden costs, 24/7 customer support, and new, air-conditioned vehicles. Explore our other benefits on our website.
پروتئین بیف ماسل مدز، نخستین پروتئین ایزوله گوشت گاو در جهان است که با تکنولوژیهای پیشرفته فیلتراسیون تولید شده است.
Reading this fit naturally into my afternoon walk because I was reading on my phone, and a stop at sandaltrust continued well in that walking format, content that survives mobile reading without becoming awkward is content with format flexibility and this site has clearly thought about how it reads across different devices today.
Натуральные соки и квас «СУЛАК» от https://voda-s-gor.ru/soki-kvas/ — это настоящая альтернатива магазинным напиткам с искусственными добавками: абрикос, персик, слива, гранат, яблоко и миксы выжаты из отборного горного сырья без консервантов и красителей. Компактный формат 0,25 л удобен в дороге и для детского питания, а упаковки от 15 штук делают покупку выгодной для семьи или офиса. Попробуйте вкус настоящих фруктов — без компромиссов.
Banyak orang mencari informasi tentang Viagra Indonesia untuk memahami manfaat, cara kerja, dan penggunaan yang benar.
Informasi yang akurat dapat membantu menghindari penggunaan yang tidak tepat.
Указан физический адрес в Екатеринбурге, что повышает доверие
https://redmetsplav.ru/store/gafniy-i-ego-splavy/gafniy-b-776-grade-r3—astm-b776/pokovka-gafnievaya-b-776-grade-r3—astm-b776/
Once I trust a site this much I tend to read everything they publish and that is the trajectory I am on with this one, and a stop at actioncreatesdirection confirmed the trajectory, the rare progression from interested reader to comprehensive reader is something only certain sites earn and this one is earning that progression rapidly.
Качество сварочных материалов на высоте, электроды варят отлично, состав металла стабильный.
https://xn--80aeedb0bfzeok.xn--p1ai/catalog/melkhiorovaia-truba/melkhiorovaia-truba-12kh1-5kh11000-mm-mnzhmts10-1-1-gost-10092-2006/
Worth flagging this post as worth a careful read rather than a casual skim, and a stop at falpyx earned the same careful approach, the few sites that warrant slower reading are sites I now treat differently from the daily content stream and this one has clearly moved into that elevated treatment category.
Reading this gave me the rare experience of fully agreeing with all the conclusions, and a stop at caramelcovemerchantgallery continued that agreement pattern, content that aligns with my existing views without seeming designed to do so is just content that happens to be reasonable and this site reads as reasonable rather than ideological mostly.
Пари БК — одна из ведущих букмекерских контор России, предлагающая широкую линию ставок на спорт и удобный личный кабинет. Мобильное приложение позволяет делать ставки в любое время и следить за результатами в режиме реального времени. Скачать приложение можно по ссылке https://play.google.com/store/apps/details?id=com.sport.playmetrics — установка занимает меньше минуты. Интерфейс интуитивно понятен, поддерживаются быстрые выплаты и бонусы для новых пользователей.
Большой опыт работы, судя по копирайту с 2013 года
https://redmetsplav.ru/store/volfram/splavy-volframa-1/volfram-wt20-1/truba-volframovaya-wt20/
Если требуется вывод из запоя на дому, врач сначала оценивает наличие противопоказаний и только после этого определяет возможность оказания помощи в домашних условиях. При необходимости пациенту рекомендуют стационарное лечение https://samatiha.ru/kapelnica-ot-alkogolya-chto-eto-takoe-kak-rabotaet-i-kogda-dejstvitelno-nuzhna/
Genuine reaction is that I will probably think about this on and off for a few days, and a look at squaresloop added fuel to that, the best content lingers in your head after you close the tab rather than evaporating immediately and this site clearly knows how to write that kind of memorable content.
Поставки всегда вовремя, логистика отлажена до мелочей, что важно для бесперебойной работы цеха.
https://xn--80aeedb0bfzeok.xn--p1ai/catalog/list-aliuminievyi-gladkii/list-aliuminievyi-3kh1200kh3000-mm-amg2m/
彭加利 公主 色情
Moulin Blanc — престижное агентство с безукоризненной репутацией, открывающее доступ к избранным VIP-компаньонкам Лондона, Парижа и ведущих мировых городов. https://moulin-blanc.com/ открывает двери в мир абсолютной конфиденциальности и утончённого сервиса высочайшего класса. Каждая модель агентства — это эталон элегантности, искренности и профессионализма, готовая составить компанию как на короткую встречу, так и в длительной поездке по всему миру.
Generally I do not leave comments but this post merits a small note, and a stop at acorndamson extended that comment worthy quality, the urge to actively contribute to a sites community rather than passively consume from it is something specific content provokes and this site has provoked that engagement urge from me today.
گینر ناکلیر، با ارائه ترکیبی هوشمندانه از ماکرونوتریینتها، به شما اجازه میدهد کالری مایع با کیفیتی را وارد بدن کنید که به سرعت جذب میشود.
Now considering the post as evidence that careful blog writing is still possible, and a look at signalcreatesclarity extended that evidence, the broader question of whether the modern web can sustain quality writing has obvious empirical answers in sites like this one and seeing them is reassuring even when they remain a minority overall today.
Sildenafil adalah bahan aktif yang terdapat dalam Viagra dan bekerja dengan meningkatkan aliran darah ke area tertentu saat terjadi
rangsangan seksual. Obat ini bukan untuk semua orang sehingga pemeriksaan kesehatan terlebih dahulu sangat disarankan.
Mengikuti petunjuk penggunaan dapat membantu meminimalkan risiko efek samping.
Магниевый прокат представлен в достаточном ассортименте
https://redmetsplav.ru/store/volfram/splavy-volframa-1/volfram-v-pm-1/krug-volframovyy-v-pm/
Посетите сайт homeweave https://homeweave.ru/ и вы найдете в наличии диваны и различную мебель для комфортной жизни по низким ценам с доставкой. В нашем интернет-магазине вы найдете недорогую мебель как собственного изготовления, так и от известных российских производителей. Мы следим за современными тенденциями, разрабатываем новые модели и развиваем ассортимент. Осуществляем доставку по всей России.
Заказывали партию молибденовых листов для производства, качество металла идеальное, все сертификаты в наличии.
https://xn--80aeedb0bfzeok.xn--p1ai/catalog/melkhiorovaia-truba/melkhiorovaia-truba-23kh1kh5000-mm-mnzhmts10-1-1-gost-10092-2006/
Franchising Path Carlsbad
Carlsbad, ϹA 92008, United States
+18587536197
how to become franchise consultant
Grateful for posts like this one, they remind me there are still places online run by people who care about quality, and a look at setterstudio reflected the same standards, you can tell the difference between content made for readers and content made just for search engines today and this is the former.
Left me wanting to read more rather than feeling burned out, that is a good sign, and a look at chestnutharbormerchantgallery confirmed there is plenty more here to explore, the kind of writing that builds appetite rather than killing it which is a rare quality on the modern open internet today across most categories of content.
viagra 6 tablets in pakistan
Felt the post was written for someone like me without explicitly addressing me, and a look at adobebronze produced the same fit, when content lands on its target without pandering you know the writer has done careful audience thinking rather than relying on demographic targeting or interest signals to do the work of editorial decisions.
Упоминание нефтегазовой отрасли как ключевого потребителя
https://redmetsplav.ru/store/volfram/splavy-volframa-1/volfram-vd-25-1/polosa-volframovaya-vd-25/
Быстрая доставка в регионы через «Деловые Линии», груз пришел в целости и отлично упакованным.
https://xn--80aeedb0bfzeok.xn--p1ai/catalog/mednye-dvukhrastrubnye-mufty-pod-paiku/mednaiadvukhrastrubnaiamufta-pod-paiku66-7kh2-4mmm3tgost-32590-2013/
Skipped a meeting reminder to finish the post, and a stop at signaldrivenmomentum held me past another reminder, when content beats meetings the writer is doing something extraordinary because meetings have institutional support behind them and yet good writing can still occasionally win that competition for attention which I find heartening today.
Appreciate the work that went into laying this out so clearly, every section earns its place without filler, and a look at dylbray confirmed the same care, definitely the kind of place that deserves a return visit when the topic comes up again later in the future or for any related question.
Грузоперевозки Минск и Беларусь. Квартирный, офисный, дачный переезд. Перевозка мебели и техники. Подробнее: https://perevozim24.by/
Описание применения металлов в атомной энергетике подчеркивает качество
https://redmetsplav.ru/store/vismut/zarubezhnye-splavy-3/vismut-tbc-19—pn-h-87203/truba-vismutovaya-tbc-19—pn-h-87203/
lisinopril 20 mg online
Comfortable reading experience throughout, no jarring tone shifts and no awkward formatting, and a look at agatebrindle kept that smooth feel going, the kind of editorial polish that goes unnoticed when present but glaring when absent is something this site has clearly invested in across the broader content as well which deserves recognition.
Отличное соотношение цены и качества на весь цветной металлопрокат, будем заказывать еще.
https://xn--80aeedb0bfzeok.xn--p1ai/catalog/medno-nikelevyi-otvod-90-gradusov/medno-nikelevyi-otvod-90-gradusov-mnzh5-1-28kh1-5-mm/
Reading this slowly because the writing rewards a slower pace, and a stop at coppercovemerchantgallery did the same, the pace at which I read content is something I now use as a quality signal and writing that earns a slower pace earns my attention as a reader looking for substance these days.
Looking for live eth/btc chart? ethbtcchart.com is a live ETH/BTC charting service for checking Ethereum’s value in Bitcoin. On the dashboard you can find the live pair value, the inverted BTC/ETH ratio, 24-hour price change, today’s trading range, and the most recent update time, conveniently presented together. With the live chart you can instantly see the BTC value per ETH and track the ongoing trend of the Ethereum/Bitcoin trading pair.
Информация о доставке по всей РФ делает компанию универсальным поставщиком
https://redmetsplav.ru/store/vismut/zarubezhnye-splavy-3/vismut-l54935—uns/polosa-vismutovaya-l54935—uns/
Liked everything about the experience, from the opening through to the closing notes, and a stop at dylcane extended that into more pages, finding a site where the editorial vision shows through every choice rather than feeling random is an increasingly rare experience and one I am glad to have today during this particular reading session.
Glad I stumbled across this post, the explanations actually make sense without needing background knowledge to follow along, and after a stop at intentionalprogression the same was true there, no assumptions about the reader just clear writing that anyone can understand from the first line right through to the end.
Baltbet — это уникальный симулятор спортивного сезона от NS Hair And Beauty Cosmetics, доступный в Google Play. Приложение предлагает предсказывать исходы матчей, управляя стартовым капиталом в 100 монет за игру. Каждый матч имеет уникальный коэффициент от двух до четырёх, на который влияют сила команды и элемент случайности. Посетите https://play.google.com/store/apps/details?id=com.statistafut.seasom и попробуйте пройти весь сезон с прибылью — простые правила скрывают глубокую стратегию, делая каждое решение по-настоящему захватывающим.
Редметсплав — пример того, как должен работать современный поставщик металлургического сырья.
https://xn--80aeedb0bfzeok.xn--p1ai/catalog/mednye-dvukhrastrubnye-mufty-pod-paiku/mednaiadvukhrastrubnaia-podvizhnaiamufta-pod-paiku8kh1mmm1gost-r-52922-2008/
Found this useful, the points line up well with what I have been thinking about lately, and a stop at agaveamber added some angles I had not considered yet, definitely walking away with more than I came for which is the best outcome from time spent reading online for any kind of topic.
lisinopril and chronic kidney disease
Большой опыт работы, судя по копирайту с 2013 года
https://redmetsplav.ru/store/vismut/zarubezhnye-splavy-3/vismut-g-nicr13snbimo—iso-19960/krug-vismutovyy-g-nicr13snbimo—iso-19960/
The way this post presents its ideas makes the discussion feel both valuable and easy to connect with for many readers online.
melbet
Every Dream11 withdrawal question answered — from minimum limits to maximum processing times.
Технические специалисты компании помогли выбрать оптимальный сплав для работы в агрессивных средах.
https://xn--80aeedb0bfzeok.xn--p1ai/catalog/magnievyi-list/list-magnievyi-6-5kh600kh1200-mm-ma2-1-gost-22635-77/
کراتین hcl ماسل تک، خالصترین فرم کراتین است که نمک و ناخالصیهای دیگر از آن جدا شدهاند.
Now understanding why someone recommended this site to me a while back, and a stop at agavebarley explained the recommendation, sometimes recommendations make sense only after experience and this site has finally clicked into place as the kind of resource I now understand was being recommended for sound editorial reasons by my friend.
Bookmark moved to my permanent reference folder rather than the casual maybe later folder, and a look at copperharborcommercegallery earned the same upgrade, the distinction between casual interest and lasting reference is something I track carefully and very few sites cross that threshold but this one did so without much effort apparently.
svensk viagra
Общее впечатление: надежный информационный ресурс для снабженцев.
https://redmetsplav.ru/store/vismut/zarubezhnye-splavy-3/vismut-cac903b—jis-h-5120-2016/izdeliya-iz-vismuta-cac903b—jis-h-5120-2016/
Useful reading material, the kind I can hand off to someone newer to the topic without worrying about confusing them, and a quick look at directionenergizesaction confirmed the same beginner friendly tone runs throughout the site which is great for sharing with people just starting their learning journey on this particular topic.
گینر ماسل اسپرت، یک سیستم کامل برای افزایش کالری دریافتی و پشتیبانی از ریکاوری عضلانی است.
Наполнительная труба для формовочной сетки (100?125 мм) от бренда Zoyts — незаменимый аппликатор для домашнего колбасного производства: с её помощью мясные рулеты, колбасы и изделия для копчения приобретают идеальную форму без лишних усилий. Пластиковый корпус длиной 19 см прост в уходе и рассчитан на многолетнюю эксплуатацию. Товар доступен на https://www.ozon.ru/product/truba-napolnitelnaya-dlya-formovochnoy-setki-1873268655/ всего за 549 рублей — почти втрое дешевле первоначальной цены. Рейтинг 4,9 на основе 705 отзывов говорит сам за себя.
Поставщик промышленного оборудования «ЭРА» предлагает конвейерные ленты и комплектующие с точным подбором под нужды конкретного производства. Ищете лента для карьерного конвейера? На era-el.ru можно оформить запрос на коммерческое предложение с учётом параметров оборудования, условий эксплуатации и сроков поставки. Сотрудники компании занимаются комплектацией, доставкой до объекта и монтажной стыковкой конвейерных лент — решение под ключ.
Покупали изделия из драгметаллов для лаборатории, всё соответствует заявленным характеристикам.
https://xn--80aeedb0bfzeok.xn--p1ai/catalog/mednye-dvukhrastrubnye-mufty-pod-paiku/mednaiadvukhrastrubnaia-podvizhnaiamufta-pod-paiku80kh1-8mmm0bgost-r-52922-2008/
Ищете стабильную IT-поддержку организации в Санкт-Петербурге? Организация выполняет абонентское обслуживание ПК, восстановление оборудования после неполадок и потерянных сведений. Ищете настройка ноутбука? Все вопросы решает закреплённый системный администратор на сайте help-spb.ru. Мастера осуществляют экстренные и плановые визиты, настраивают серверы и сети, гарантируют полноценную антивирусную защиту. Доверьте технику профессионалам и работайте без простоев.
It’s very easy to find out any topic on web as compared to books, as I found this article at this
web site.
My page oradentum
گینر بادی بیلدینگ، یک مکمل پودری پرکالری است که از ترکیب کربوهیدراتها، پروتئینها و چربیهای سالم تشکیل شده است تا به شما در افزایش وزن و حجم عضلانی کمک کند.
Recently, I’ve have seen how this betting industry has become growing truly fast. Personally, I reckon that remains essential for manage your thoughtful strategy whenever you attempt for make any risks. Many users often neglect the benefit of reviewing platform conditions, and remains a serious oversight. For extra insights, https://localhomeservicesblog.co.uk/wiki/index.php?title=The_Definitive_Breakdown_Concerning_Latest_Betting_Destinations_For_2026 could prove an useful main spot. Have friends also sensed that some platform rules are changed across recent many periods? What sort in strategy would others use for keep in the action? I very keen to gather the takes.
瓦萊裡婭·瓦盧瓦 色情
Ответственная компания, которая ценит долгосрочное сотрудничество, всегда идут навстречу клиенту.
https://xn--80aeedb0bfzeok.xn--p1ai/catalog/latunnaia-kapilliarnaia-trubka/latunnaia-kapilliarnaia-trubka-1-5kh0-6kh100000-mm-l96-gost-2624-2016/
Approaching this site through a casual link click and being surprised by what I found, and a look at dunecovemerchantgallery extended the surprise, the rare experience of stumbling into excellent independent content rather than predictable mediocrity is one of the actual remaining pleasures of casual web browsing and this site provided it cleanly.
Honestly impressed by the consistency of voice across what I have read so far, and a quick visit to growthacceleratesforward continued that consistent feel, when a site reads like one careful person rather than a committee the experience is more rewarding for the reader who notices these subtle editorial details over time.
Удобное разделение продукции на сплавы и конкретные виды проката
https://redmetsplav.ru/store/vismut/zarubezhnye-splavy-3/vismut-c49250—uns/lenta-vismutovaya-c49250—uns/
It’s obvious you put a lot of experience into this piece, and it
shows
Честный бонус 1хбет, правила отыгрыша простые, коэффициенты в линии отличные.
https://antinarcoforum.ru/narkozavisimost/mozhno-li-vylechit-narkomaniyu-navsegda-mnenie-speczialistov/
Профессиональный подход менеджеров в Екатеринбурге, грамотно проконсультировали по техническим характеристикам сплавов.
https://xn--80aeedb0bfzeok.xn--p1ai/catalog/mednye-dvukhrastrubnye-mufty-pod-paiku/mednaiadvukhrastrubnaia-podvizhnaiamufta-pod-paiku40kh1-8mmm1rmgost-32590-2013/
Реально рабочий промокод на бонус 1xbet, все условия акции выполнены в полном объеме.
https://dreamsstudio.id/porttitor-egetdolor-morbi-nonarcu-risusquis/
I just could not depart your site prior to suggesting
that I actually loved the standard information a person supply
to your visitors? Is going to be again often to investigate cross-check new posts
Ввел промокод 1xbet на сегодня и получил фрибет для ставок на киберспорт.
https://www.hdmovietrailer.com/%f0%9f%8e%ac-bollywood-thrillers-that-mirror-korean-cinema-6-gripping-adaptations/
viagra for dogs heart
Поставил промокод 1xBet при регистрации на сайте, бонусные баллы уже пришли.
https://kasprowicz.az.pl/patron-2/chata/
Описание применения металлов в атомной энергетике подчеркивает качество
https://redmetsplav.ru/store/vismut/zarubezhnye-splavy-3/vismut-42-3991—csnstn-423991/truba-vismutovaya-42-3991—csnstn-423991/
Can I simply just say what a comfort to find somebody that actually knows
what they are talking about on the net. You certainly know
how to bring a problem to light and make it important.
More and more people need to look at this and understand this side of your story.
I can’t believe you aren’t more popular since you
surely possess the gift.
Благодаря коду стандартный бонус 1хбет увеличился на треть, отличная акция.
http://yunseuljae.com/gnu5/bbs/board.php?bo_table=free&wr_id=27453
Посетите https://xn—-8sbcty8aabt9g.xn--p1ai/ это официальный сайт СЭС Новосибирска. СанЭпидемСтанция проводит дезинсекцию, дезинфекцию и дератизацию жилых и бытовых помещений, прилегающих к организациям и участкам территорий. У нас только сертифицированные препараты и гарантия работ до 3х лет. Узнайте подробнее на сайте.
Через промокод в 1xbet получил доступ к закрытым турнирам и розыгрышам.
https://www.chargebacksecurity.com/requirements-and-understanding-to-open-a-merchant-account/
Прозрачное оформление документов и быстрое выставление счетов, приятно работать с профессионалами.
https://xn--80aeedb0bfzeok.xn--p1ai/catalog/latunnye-naruzhnye-stopornye-koltsa-po-gost/latunoe-naruzhnoe-stopornoe-pruzhinnoe-koltso-46kh1-7-mm-lk1-gost-13942-86/
Отличные промокоды на бесплатную ставку 1xbet, помогли поднять банк на футболе.
https://www.tjalamark.se/?p=1795
Wow that was unusual. I just wrote an extremely long comment but
after I clicked submit my comment didn’t appear.
Grrrr… well I’m not writing all that over again. Anyways, just wanted to say superb blog!
Decided to set aside time later to read more carefully, and a stop at progresswithoutpressure reinforced that decision, content that earns a calendar entry rather than just a passing read is in a different tier altogether and this site is clearly working at that elevated level which I really do appreciate as a reader today.
С этим промокодом регистрация прошла успешно, 1xBet бонус уже на моем счету.
http://www.fischpix.de/impressum-datenschutz/
Сайт адаптирован под нужды машиностроительных заводов
https://redmetsplav.ru/store/vismut/rossiyskie-splavy-2/vismut-posvi-42-10-5/list-vismutovyy-posvi-42-10-5/
A quiet kind of confidence runs through the writing, and a look at marbleharborcommercegallery carried that same understated assurance, confidence without bragging is the most attractive register for online writing and the writers here have clearly developed it through practice rather than affecting it through stylistic tricks that would feel hollow eventually.
Благодаря коду стандартный бонус 1хбет увеличился на треть, отличная акция.
https://writerscafeteria.com/russian-ukraine-conflict-brief
penis enlargement surgery cost near new york
Выгодный промокод на ставку 1хбет позволил заключить пари на высокий коэффициент.
https://freshjobfinder.com/senior-php-developer-wordpress/
Terrific information Thanks! https://code.antopie.org/dragonwalrus1
Успешно ввел промокод 1xBet и разблокировал эксклюзивное предложение для СНГ.
https://manual.emk-schweiz.ch/index.php?title=Benutzer:JamilaBanuelos2
Поставки всегда вовремя, логистика отлажена до мелочей, что важно для бесперебойной работы цеха.
https://xn--80aeedb0bfzeok.xn--p1ai/catalog/mednye-dvukhrastrubnye-mufty-pod-paiku/mednaiadvukhrastrubnaia-podvizhnaiamufta-pod-paiku27-4kh1-6mmm1rgost-32590-2013/
Southeast Financial Nashville
131 Belle Forest Cir #210,
Nashville, TN 37221, United Ⴝtates
18669008949
RV financing for fishing trips
Мой 1xBet бонус пришел моментально после первого пополнения игрового счета.
https://avigloplast.com/sealed-for-success-why-rpet-is-winning-the-e-commerce-packaging-race/
Всё больше семей в России делают ставку на надёжные магазины — и «Резиденция детства» уверенно занимает лидирующие позиции среди них. Ищете магазин товаров для детей? На childresidence.ru собраны игрушки, детская одежда, мебель и электроника от ведущих брендов с доставкой по всей стране. Здесь обеспечена безопасная оплата, работает поддержка 24/7 и действует бонусная карта от 3% — шопинг с реальной выгодой для всей семьи.
https://atncentral.com/
Всегда беру промокоды при регистрации 1xbet именно здесь, база постоянно обновляется.
https://econtutorials.com/quartile-deviation/
Указание конкретных марок сплавов в разделах помогает специалистам
https://redmetsplav.ru/store/vanadiy-i-ego-splavy/vanadiy-fvd20s20—tu-14-141-08-91/polosa-vanadievaya-fvd20s20—tu-14-141-08-91/
Активировал промокод на 1хбет, контора начислила бонусные деньги без задержек.
https://kimkaradesign.com/shailly-gupta/
Picked up something useful for a side project, and a look at progresswithintelligence added another piece I will incorporate, content that connects to specific projects I am working on is content with practical utility and the practical utility of this site is showing up across multiple posts I have read in the last hour or so.
Индивидуальный подход к нестандартным заказам — изготовили детали по нашим чертежам точно в размер.
https://xn--80aeedb0bfzeok.xn--p1ai/catalog/latunnye-naruzhnye-stopornye-koltsa-po-gost/latunoe-naruzhnoe-stopornoe-pruzhinnoe-koltso-100kh3-mm-lmtska-gost-13942-86/
Отличный 1хбет бонус при регистрации помог сделать первые ставки без риска.
https://www.dommumia.it/2018/02/28/hello-world/
Excellent post. I was checking continuously this blog and I am
impressed! Extremely useful info specifically the last part :
) I care for such information much. I was looking for this particular information for a long time.
Thank you and good luck.
Вводите промокод при регистрации 1xBet капсом, как указано в инструкции.
https://iicm.com.vn/thong-tin-ve-chung-toi/
Типография «Повсюду» — надёжный партнёр для печати любого масштаба: от визиток до тиражей в десятки тысяч экземпляров. На сайте https://povsyoudo.ru/ можно быстро и удобно оформить заказ онлайн. Клиенты отмечают яркие насыщенные цвета, чёткие шрифты и внимательную проверку макетов перед печатью. Менеджеры всегда на связи, оперативно отвечают на вопросы и укладываются даже в самые сжатые сроки. Цены приятно удивляют — качество премиальное, а стоимость вполне доступная.
https://tonightmsg.com
Поковки и штабики — важные заготовки для металлургических предприятий
https://redmetsplav.ru/store/titan/rossiyskie-splavy-4/titan-vt4/provoloka-titanovaya-vt4/
Выгодный промокод на ставку 1хбет позволил заключить пари на высокий коэффициент.
http://www.mirsarainews.com/?p=363
Доставка комплексных обедов в Алматы для Ваших сотрудников от 1350 тг. за комплекс. https://bvd.kz/ это лучшее корпоративное питание, кейтеринг, доставка. Подробное меню с составом блюд и актуальные цены смотрите на нашем сайте. Готовим и привозим комплексные обеды по Алматы с учетом всех ваших пожеланий и требований! Осуществим, в том числе, доставку комплексных обедов из меню на дом заказчика.
Recommended without reservation for anyone interested in the topic at any level of expertise, and a look at mossharbormerchantgallery only strengthens that recommendation, this site clearly knows how to serve readers across a range of backgrounds without watering down the content or talking past anyone in the audience which is genuinely impressive to see.
Благодаря коду стандартный бонус 1хбет увеличился на треть, отличная акция.
https://spilbaronen.dk/saa-kom-der-nye-braetspil/
Покупали изделия из драгметаллов для лаборатории, всё соответствует заявленным характеристикам.
https://xn--80aeedb0bfzeok.xn--p1ai/catalog/mednye-dvukhrastrubnye-mufty-pod-paiku/mednaiadvukhrastrubnaiamufta-pod-paiku108kh3-3mmm2rmgost-r-52922-2008/
Этот промокод 1xbet при регистрации дает самую большую прибавку к депозиту.
http://sorapedia.plaentxia.eus/index.php/Lankide:Simon92D0613
Мой 1xBet бонус пришел моментально после первого пополнения игрового счета.
https://saad.art.br/hello-world/
Комплекс создается с учетом актуальных требований к премиальному жилью, где важны комфорт, безопасность и высокий уровень приватности – Элитный комплекс на Тимирязевской
Поставил промокод 1xBet при регистрации на сайте, бонусные баллы уже пришли.
https://wawac.org/gambian-talents-washington-personal-hygiene-products-distribution-english/
Информация о проверке качества продукции повышает лояльность клиентов
https://redmetsplav.ru/store/titan/rossiyskie-splavy-4/titan-ts6/lenta-titanovaya-ts6/
Помог промокод 1хБет при регистрации другу, он тоже получил свой стартовый бонус.
https://febratextil.com.br/sticle-apresenta-inovacoes-sustentaveis-na-febratextil-2025/
Проверенный промокод на бонус 1xbet с этой страницы сэкономил мои личные деньги.
https://legeeducation.com.br/ola-mundo/
Genuine pleasure to read, and that is not something I say often after a casual click through, and a quick visit to forwardthinkingactivated kept the same feeling going across the rest of the site, finding writing that actually feels good to spend time with rather than just functional is increasingly rare on the open web.
I am regular visitor, how are you everybody? This post posted at this web page is truly good.
Честный бонус 1хбет, правила отыгрыша простые, коэффициенты в линии отличные.
https://porcelainsolutions.com.py/hola-mundo/
گینر ناترند، یک مکمل پیشرفتهی ورزشی با ترکیب مهندسیشدهای از کربوهیدراتهای پیچیده، پروتئینهای با ارزش بیولوژیکی بالا و مجموعهای از ویتامینها است که برای ایجاد کالری مازاد و تسریع روند عضلهسازی طراحی شده است.
https://guryevsk.forum24.ru/?1-3-0-00000685-000-0-0-1762433394
Вставил промокод при регистрации 1xBet, стартовый баланс мгновенно удвоился.
https://tickasports.com/hello-world/
https://doubledragon.kontek.net/forums/viewtopic.php?t=19560
Благодаря коду стандартный бонус 1хбет увеличился на треть, отличная акция.
https://devnec.com/test/
https://spb24.kamrbb.ru/?x=read&razdel=1&tema=77&start=0#new
Поставки всегда вовремя, логистика отлажена до мелочей, что важно для бесперебойной работы цеха.
https://xn--80aeedb0bfzeok.xn--p1ai/catalog/latunnye-naruzhnye-stopornye-koltsa-po-gost/latunoe-naruzhnoe-stopornoe-pruzhinnoe-koltso-42kh1-7-mm-lts16k4-gost-13942-86/
https://msk.naydemvam.ru/viewtopic.php?id=913#p1072
Всегда беру промокоды при регистрации 1xbet именно здесь, база постоянно обновляется.
https://www.greenacre-events.co.uk/the-beginning-of-the-adventure/
https://boi.instgame.pro/forum/index.php?topic=138581.0
Использовал промокод 1хБет при регистрации, приветственный пакет стал заметно больше.
https://jhonmarkalbios.marketlevelseo.com/harnessing-the-power-of-social-media-for-business-growth/
Быстрая навигация через «Карту сайта» для поиска глубоких страниц
https://redmetsplav.ru/store/titan/rossiyskie-splavy-4/titan-nbti-50/lenta-titanovaya-nbti-50/
Ввел промокод 1xbet на сегодня и получил фрибет для ставок на киберспорт.
http://www.weltreise.co.at/?p=867
Following a few of the internal links revealed more posts of similar quality, and a stop at pearlcovemerchantgallery added more to that growing pile, sites where internal links lead to more good content rather than to more of the same recycled material are sites with depth and this one has clearly built that depth carefully.
Отличные промокоды на бесплатную ставку 1xbet, помогли поднять банк на футболе.
https://cieemat.ipportalegre.pt/2025/04/08/ola-mundo/
Гибкая система оплаты и прозрачные условия договора, никаких скрытых наценок или задержек.
https://xn--80aeedb0bfzeok.xn--p1ai/catalog/mednye-krestoviny-pod-paiku/mednaia-krestovina-pod-paiku-15kh11kh0-7-mm-10-6kh12-6-mm-tverdaia-paika-m3rt-gost-r-52922-2008/
Нашел свежий промокод на 1хбет, код сработал без каких-либо ошибок в форме.
https://blog.chefsarufoods.com/arati-puvvu-vadalu/
What I like most here is the easy-to-follow and meaningful structure of the post, because it keeps the information well arranged and easy to follow while still allowing the discussion to feel easygoing, genuine, and engaging for different readers.
dog porn
Мой 1xBet бонус пришел моментально после первого пополнения игрового счета.
https://m.aguiaconsultores.com/rumo-a-excelencia/
Looking for crypto trade exchange? Visit cryptoswaptrade.com – CryptoSwapTrade is a crypto trading exchange designed for users who want to trade cryptocurrency online through a simple and direct exchange flow. The exchange covers 165 cryptocurrencies, 210+ multi-network assets, close to 40,000 cryptocurrency pairs, and nearly 8,000 fiat transfers spanning 40+ fiat currencies.
Отраслевой охват впечатляет: от медицины до космической промышленности
https://redmetsplav.ru/store/titan/rossiyskie-splavy-4/titan-45tmb-vd/prutok-titanovyy-45tmb-vd/
Нашел здесь промокоды на бесплатную ставку 1xbet, код подошел для ординара.
http://media.vpkl33.ru/2022/01/27/%d0%b4%d0%b8%d1%81%d1%82%d0%b0%d0%bd%d1%86%d0%b8%d0%be%d0%bd%d0%bd%d0%be%d0%b5-%d0%be%d0%b1%d1%83%d1%87%d0%b5%d0%bd%d0%b8%d0%b5/
Quality writing that respects the reader’s intelligence without overloading them, and a quick look at progressmovesintentionally reflected that approach, a balanced thoughtful site that earns trust by being consistent rather than by shouting about how trustworthy it is which is the usual approach online sadly across most content categories.
Viagra merupakan salah satu terapi yang tersedia untuk mengatasi disfungsi
ereksi. Namun, penggunaannya harus disesuaikan dengan kondisi masing-masing individu.
Честный бонус 1хбет, правила отыгрыша простые, коэффициенты в линии отличные.
https://artbyamy.gallery/works-of-heart/attachment/seladrawing-2/
ЗАО «Техносвязь» — российское предприятие-изготовитель печатных плат, уже второе десятилетие совершенствующее производство для выпуска продукции высочайшего качества. Подробнее на сайте https://www.techno-svyaz.ru/ — здесь применяют современные технологии и материалы от мировых лидеров. Компания одинаково чётко выполняет серийные и единичные заказы, гарантируя короткие сроки и внимательный подход к каждому клиенту.
Отличные промокоды на бесплатную ставку 1xbet, помогли поднять банк на футболе.
https://domgraphein.com/criatividade-atraves-da-escrita-2/
Компания PWS предлагает передовые промышленные установки очистки воды на основе инновационной озоновой технологии — без использования химических реагентов, вредных для здоровья. Посетите https://pws.world/promyshlennye-ustanovki и убедитесь: установки обеспечивают воду без вкуса, цвета и запаха, эффективно устраняя бактерии, примеси и соли тяжёлых металлов. Чистая вода напрямую влияет на качество продукции и прибыль предприятия. Системы PWS отличаются высокой надёжностью и длительным сроком эксплуатации при низких эксплуатационных расходах.
Ростовская юридическая компания «Аксиома» профессионально занимается списанием долгов по кредитам, займам, налогам, штрафам и ЖКХ — включая случаи с действующей ипотекой. Специалисты работают в рамках закона №127 «О банкротстве» и оформляют рассрочку от 3 990 рублей в месяц без переплат. Подробная информация об услугах на https://uk-axioma.ru/ — проверьте возможность списания ваших долгов прямо сейчас.
Now appreciating that the post did not require external context to follow, and a look at focuscreatesmomentum maintained the same self contained quality, content that respects new visitors by being readable without prerequisites is content with broader accessibility and this site has clearly invested in keeping each piece reader friendly for fresh arrivals.
Высокий уровень сервиса и контроля качества, для нашего научного проекта это было критически важно.
https://xn--80aeedb0bfzeok.xn--p1ai/catalog/latunnye-naruzhnye-stopornye-koltsa-po-din/latunoe-naruzhnoe-stopornoe-pruzhinnoe-koltso-m40-36-5kh1-75-mm-lsd-din-471/
«Женщина истина» — это зарегистрированное сетевое издание для современных женщин, которое охватывает всё, что действительно важно: мода и стиль, красота и уход за собой, психология отношений и осознанный образ жизни. На https://womontrue.ru/ вы найдёте не шаблонные советы, а вдумчивые материалы — от того, как стильно носить пиджак с джинсами, до практических шагов по восстановлению после расставания и экологичных подходов к путешествиям. Редакция отбирает темы, которые резонируют с реальной жизнью читательниц.
Сайт поддерживает английскую версию, что важно для экспорта
https://redmetsplav.ru/store/tantal-i-ego-splavy/tantal-4b/poroshok-tantalovyy-4b/
At this time it looks like BlogEngine is the best blogging platform out
there right now. (from what I’ve read) Is that what you
are using on your blog?
گینر ماسل کور، نسبت کربوهیدرات به پروتئین را دقیقاً شبیه به نسبت طلایی مورد نیاز برای ریکاوری پس از تمرینات سنگین هایپرتروفی تنظیم کرده است.
The way you seamlessly transitioned from one point to the next kept me fully engaged the entire time, and I walk away feeling significantly more knowledgeable about the subject matter than I did beforehand.
anus zoo porno
Спасибо команде за профессионализм и помощь в реализации нашего сложного промышленного проекта!
https://xn--80aeedb0bfzeok.xn--p1ai/catalog/mednye-krestoviny-pod-paiku/mednaia-krestovina-pod-paiku-34kh29kh1-mm-23kh25-mm-tverdaia-paika-m3m-gost-r-52922-2008/
Looking through other posts here the consistency is what makes the site valuable rather than any single piece, and a stop at actioncreatesflowstate extended that consistency observation, sites whose value lies in the ongoing pattern rather than in standout posts are sites I trust more deeply and this one has clearly built that kind of trust.
Наличие обратной связи позволяет быстро отправить запрос
https://redmetsplav.ru/store/niobiy1/splavy-niobiya-1/niobiy-nbp-1a—gost-26252-84-1/krug-niobievyy-nbp-1a—gost-26252-84/
Looking for tvl yield? Visit bestearn.io and you’ll find a table that helps users compare active yield opportunities across protocols and chains. Instead of reading general advice, visitors can view the current APY, liquidity size, and pool type on a single screen and narrow the list to options that seem more practical for passive crypto income.
submissive porn gif
Прозрачное оформление документов и быстрое выставление счетов, приятно работать с профессионалами.
https://xn--80aeedb0bfzeok.xn--p1ai/catalog/latunnye-naruzhnye-stopornye-koltsa-po-din/latunoe-naruzhnoe-stopornoe-pruzhinnoe-koltso-m150-142kh4-mm-lmtssk-din-471/
Удобное разделение продукции на сплавы и конкретные виды проката
https://redmetsplav.ru/store/molibden-i-ego-splavy/molibden-sm3-1/truba-molibdenovaya-sm3/
Modern Purair
416 Meridian Ꮢɗ SᎬ #14A, Calgary
AB T2A 1X2, Canada
(403) 800-7254
trusted hvac (instapaper.com)
Процессуальное законодательство Республики Казахстан (РК) отличается сложностью и множеством нюансов, что делает профессиональное представительство в суде не просто желательным, но и жизненно необходимым условием для защиты. Комплексное ведение дела – это всеобъемлющий подход, который начинается задолго до первого судебного заседания и завершается только после полного исполнения судебного акта. Автор блога: Бахирев Анатолий Анатольевич, ведущий юрист-эксперт https://femida-justice.com/uslugi/predstavitelstvo-v-sude/
Благодарим за оперативную поставку ниобиевых труб, выручили в очень сжатые сроки.
https://xn--80aeedb0bfzeok.xn--p1ai/catalog/mednye-krestoviny-pod-paiku/mednaia-krestovina-pod-paiku-159kh135kh2-6-mm-63-5kh59-5-mm-tverdaia-paika-m0b-gost-32590-2013/
Четкая структура меню позволяет быстро найти нужный металл
https://redmetsplav.ru/store/molibden-i-ego-splavy/molibden-mo-la-1/lenta-molibdenovaya-mo-la/
jennifer lawrence ai porn
https://7sevenbit.isweb.co.kr/
I am in fact pleased to read this website posts which includes tons of helpful information, thanks for providing these kinds of
statistics.
my web blog :: ziarulescu01
If you would like to get much from this post then you have to apply such techniques to your won webpage.
Хотите платить меньше за онлайн-покупки — используйте проверенный сервис промокодов и скидок https://padbe.ru/ который собирает актуальные купоны и спецпредложения от ведущих интернет-магазинов. Платформа абсолютно бесплатна, работает с лучшими магазинами электронной коммерции и постоянно обновляет базу эксклюзивных промокодов. Достаточно найти нужный магазин, скопировать купон и получить скидку при оформлении заказа.
Качество сварочных материалов на высоте, электроды варят отлично, состав металла стабильный.
https://xn--80aeedb0bfzeok.xn--p1ai/catalog/latunnye-naruzhnye-stopornye-koltsa-po-din/latunoe-naruzhnoe-stopornoe-pruzhinnoe-koltso-m102-94-5kh3-mm-lts14k3s3-din-471/
The vice-captain for high-pressure run chases who plays within himself until the final overs.
Информация о проверке качества продукции повышает лояльность клиентов
https://redmetsplav.ru/store/molibden-i-ego-splavy/molibden-cm5-4/poroshok-molibdenovyy-cm5-1/
Если выбирать среди тех, кого предлагают психологи Краснодара, то только ее. https://agnsklad.ru/2023/09/18/%d0%bf%d1%80%d0%b8%d0%b2%d0%b5%d1%82-%d0%bc%d0%b8%d1%80/
Looking for your own crypto exchange? Head over to orgtrade.org – OrgTrade enables site owners to embed a crypto exchange widget on their pages and turn cryptocurrency-driven traffic into real swap transactions. Instead of sending visitors through a simple outbound link, your site can feature an integrated exchange tool where users can select a pair, enter an amount, and initiate a crypto conversion.
Психолог онлайн консультация которого помогла мне выйти из депрессии. https://4hprojects.co.za/2023/06/23/hello-world/
Для меня психолог онлайн стал спасением в эмиграции. https://bureaucracyindia.in/2025/05/01/arabian-travel-market-2025-kicks-off-in-dubai-with-record-global-participation/
aslı
Психолог Дарья Антонова помогла наладыть отношения с родителями. https://procurewealth.com.au/why-lead-generation-is-key-for-business-growth/
nişantaşı
Психолог онлайн консультация которого помогла мне выйти из депрессии. https://www.gurukulavidyapeeth.com/9/
doktor kbb
mehmet emre dinç
Рада, что Дарья Антонова психолог Краснодар практикует и в сети. https://brocar.net/product/br0027/
deniz
Популярный психолог по самооценке, подняла мою уверенность с нуля. https://plantbasedcravings.com/recipe/pizza-bar-mozzarella/
şaban
Решила записаться к психологу онлайн после прочтения отзывов и не пожалела. https://tupenews.com/kylian-mbappe-et-la-peur-du-retour-a-anfield-le-cauchemar-du-28-novembre-2024-peut-il-se-repeter/
Обязательно стоит записаться к психологу онлайн для улучшения жизни. https://cindyluu.com/2012/07/nunc-tincidunt-elit-non-cursus/
Промышленный парк Михнево — это современный индустриальный комплекс в 50 км от Москвы с прямым выездом на трассы М4 «Дон», ЦКАД и А-108, что делает его идеальным выбором для бизнеса, которому важна быстрая и удобная логистика. На территории свыше 20 гектаров расположено более 60 000 кв. м коммерческих площадей — от компактных помещений от 500 кв. м до масштабных производственных и складских пространств до 25 000 кв. м, подробности на https://ooomik.ru/arenda — все объекты полностью готовы к размещению оборудования и хранению продукции, а развитая инфраструктура парка позволяет арендаторам сосредоточиться на бизнесе, а не на решении инфраструктурных задач.
Фундамент на винтовых сваях — надёжное решение для любого грунта: болота, глины, вечной мерзлоты и даже участков с корнями деревьев. Саратовское предприятие https://vintoviesvai64.ru/ выпускает однолопастные, двухлопастные сваи и модели с зубчатым наконечником из стали СТ3 и 09Г2С с толщиной стенки от 3,5 мм — такой фундамент служит десятилетиями без обслуживания. Производство и монтаж под ключ, полное соответствие ГОСТ.
sapphire
Бережная онлайн-консультация психолога помогла пережить измену. http://oldwordpress39.pkl.beep.pl/lista_czlonkow/
Продуктивная консультация психолога онлайн, разобрали корень проблемы. https://united.engineering/product/denim-quilt-cover-set-charcoal/
Редметсплав — надежный партнер, работаем по поставкам нержавеющего проката уже второй год, сбоев не было.
https://xn--80aeedb0bfzeok.xn--p1ai/catalog/mednye-krestoviny-pod-paiku/mednaia-krestovina-pod-paiku-42kh36kh1-1-mm-10kh12-mm-tverdaia-paika-m1e-gost-32590-2013/
sapphire
Для меня психолог онлайн стал спасением в эмиграции. https://ccparent.com/workout-buddies-at-any-age-stage/
Why viewers still use to read news papers when in this technological world the
whole thing is accessible on net?
Дистанционная консультация психолога онлайн ничем не уступает очной встрече. https://tipsfromashipwright.com/2022/09/harpoon-gun/
Указан физический адрес в Екатеринбурге, что повышает доверие
https://redmetsplav.ru/store/magniy-i-ego-splavy/zarubezhnye-splavy-2/magniy-sismg4640-07—ss-144640/lenta-magnievaya-sismg4640-07—ss-144640/
Самый хороший психолог в Краснодаре из тех, у кого я была. https://canvascustomize.com/index.php?route=journal3/blog/post&journal_blog_post_id=1
¡Dios mío, sigo temblando de la emoción! Me llamo Carlos desde Fernando de la Mora.
Como buen timbero y paraguayo de pura cepa, llevo días sin dormir bien, llorando de
la alegría.
Al empezar el campeonato, toqué fondo anímicamente
cuando los yanquis nos metieron ese humillante 4-1.
Pero ahí salió a relucir el orgullo de nuestra tierra: vencimos a los turcos 1-0 sudando
sangre en la cancha y después aguantamos a muerte
para sacar ese 0-0 contra Australia.
¡Lo que vivimos contra los alemanes fue épico, digno de una película!
Todas las cuotas de las casas de apuestas estaban brutalmente en contra, pero empatamos 1-1 dejando el alma y la piel en los 120 minutos.
¡Esa tanda de penales, ganando 4-3, me hizo llorar tirado en el piso como una criatura!
¡Reventé mi cuenta en la casa de apuestas porque le puse plata a que pasábamos y pagaban una cuota de locura total!
Ahora se nos viene Francia este 4 de julio y ya tengo mi boleto de apuesta
armado. ¡Las cuotas dicen que somos boleta, pero mi corazón sabe que ganamos!
¡A dejar hasta la última gota de sangre, vamos
mi Paraguay querido!
drm
Психолог Дарья Антонова помогла наладыть отношения с родителями. https://alcove4u.com/2023/08/21/embracing-the-wonders-of-the-natural-world/
https://shyker.com.ua/
Every Dream11 deposit confirmation should be verified before the transaction is considered complete.
Оформить заявку и записаться к психологу в Краснодаре можно онлайн. https://www.beyazpenguen.com/blog/moda,%20sanat,%20ilham
Layari https://brokerforexmalaysia.com/ untuk mendapatkan senarai broker forex terbaik di Malaysia. Kami menyediakan ulasan yang percuma dan telus mengenai broker forex Malaysia. Kami menilai aspek peraturan, spread, platform, dan sokongan supaya anda boleh memilih broker forex terbaik di Malaysia dengan yakin.
При выборе квартиры многие рассматривают новостройки Москвы благодаря современным планировкам, новым инженерным системам и удобной инфраструктуре. Это хорошее решение как для собственного проживания, так и для долгосрочных инвестиций, стоун блик офис продаж
Практикующий психолог по отношениям помог пережить развод. https://www.awadhdarsan.com/india-sees-opportunity-not-fear-in-ai-pm-modi-calls-for-global-standards-transparency-at-india-ai-impact-summit/
medhair
Глубокая онлайн-консультация психолога закрыла многие гештальты. https://envyher.com/blog/birthstone-jewelry
Жилые комплексы бизнес- и премиум-класса предлагают современные стандарты жизни, объединяя комфорт, безопасность и привлекательную архитектуру, https://stoyne.ru/
Прошла индивидуальная консультация психолога в Краснодаре, очень довольна изменениями. https://www.dasservicesinc.com/blog/convum-balloon-hand-sgb-series
超音波同性戀色情片
Новые жилые комплексы Москвы проектируются с учетом современных требований к городской среде. Большое внимание уделяется озеленению, безопасности и общественным пространствам, стоун блик жк
Самый хороший психолог в Краснодаре из тех, у кого я была. https://www.dorfladen-hiltensweiler.de/hallo-welt/
Покупатели все чаще выбирают новостройки Москвы благодаря возможности приобрести современное жилье с новыми инженерными системами и функциональными планировками – жк стоун грейн
Офис в Екатеринбурге работает четко, забирали самовывозом — складская логистика на высоте.
https://xn--80aeedb0bfzeok.xn--p1ai/catalog/latunnye-naruzhnye-stopornye-koltsa-po-din/latunoe-naruzhnoe-stopornoe-pruzhinnoe-koltso-m56-51-8kh2-mm-lts40mts3zh-din-471/
Профессиональный психолог в Краснодаре принимает в очень уютном кабинете. https://fairsharemarketing.ca/psiholog-oline-4/
Жилые комплексы бизнес-класса предлагают комфортную городскую среду, современные общественные пространства и удобный доступ к ключевым объектам инфраструктуры столицы https://stoyne.ru/
Логичное деление на вольфрамовый, молибденовый и титановый прокат
https://redmetsplav.ru/store/magniy-i-ego-splavy/zarubezhnye-splavy-2/magniy-qe22—csa-hg-9/krug-magnievyy-qe22—csa-hg-9/
Обязательно стоит записаться к психологу онлайн для улучшения жизни. https://hob.jp/4
Настоящий хороший психолог в Краснодаре, работает на результат. https://erenkoybal.com/index.php?route=journal3/blog/post&journal_blog_post_id=1
Для меня психолог онлайн стал спасением в эмиграции. https://www.avimukta.com/rifts-and-shifts-in-the-indian-legal-market/
https://sensas.com.ua/
Самый хороший психолог в Краснодаре из тех, у кого я была. https://www.novalife.it/tarti/
Популярный психолог по самооценке, подняла мою уверенность с нуля. https://foot-techacademy.co.uk/my-child-has-been-offered-an-academy-place-should-i-say-yes/
That is very fascinating, You’re an excessively professional
blogger. I have joined your feed and look forward to seeking more of your
magnificent post. Also, I’ve shared your web site in my social networks
At this moment I am going away to do my breakfast,
afterward having my breakfast coming again to read further
news.
Советую записаться к психологу в Краснодаре всем, кто запутался. https://iestpazangaro.edu.pe/reconocimiento-a-nuestros-estudiantes-y-docentes-en-la-feria-de-informacion-laboral/
คอนเทนต์นี้ อ่านแล้วได้ความรู้เพิ่ม ครับ
ผม ไปเจอรายละเอียดของ หัวข้อที่คล้ายกัน
สามารถอ่านได้ที่ บริการ bk989
ลองแวะไปดู
เพราะให้ข้อมูลเชิงลึก
ขอบคุณที่แชร์ คอนเทนต์ดีๆ นี้
และอยากเห็นบทความดีๆ แบบนี้อีก
https://biletcafe.com.ua/
Рада, что Дарья Антонова психолог Краснодар практикует и в сети. https://www.matravel.co.za/its-a-classic-bullet-for-exciting-the-clitoris-as-nicely-as/
Офис в Екатеринбурге работает четко, забирали самовывозом — складская логистика на высоте.
https://xn--80aeedb0bfzeok.xn--p1ai/catalog/mednye-zaglushki-pod-paiku/mednaia-zaglushka-kolpachok-pod-paiku-40-5kh36kh1-1-mm-27kh29-mm-tverdaia-paika-m3rt-gost-r-52922-2008/
После консультации психолога в Краснодаре ушли психосоматические боли. https://www.piedramundo.cl/producto/roca-montana/
Сайт работает стабильно и быстро загружается
https://redmetsplav.ru/store/magniy-i-ego-splavy/zarubezhnye-splavy-2/magniy-mgmn2—din-1729-part-1/pokovka-magnievaya-mgmn2—din-1729-part-1/
Психолог онлайн консультация дала мне мощный толчок к развитию. http://www.alfaserviz.com/produkt/woo-ninja-3/
Concert Attire Stamford
360 Fairfield Ave,
Stamford, CT 06902, United Ⴝtates
+12033298603
Ϝront enseemble (Robyn)
Профессиональный психолог в Краснодаре принимает в очень уютном кабинете. https://www.pinakaspl.in/moneyback-plans-insurance/
وی تروفیول، یک منبع پروتئینی با ارزش بیولوژیکی بسیار بالا است که حاوی تمامی اسیدهای آمینه ضروری است که بدن انسان قادر به تولید آنها نیست و باید از طریق رژیم غذایی دریافت شوند.
порно драка
https://biletcafe.com.ua/
Spot on with this write-up, I actually think this web site needs far more attention. I’ll probably be returning to read through more, thanks for the info!
Feel free to surf to my homepage – ziarulescu02
https://olivertwist.com.ua/
https://an-tv.com.ua/
I was wondering if you ever considered changing the layout of your website?
Its very well written; I love what youve got to say. But maybe you
could a little more in the way of content so people could
connect with it better. Youve got an awful lot of text for only having 1 or 2 images.
Maybe you could space it out better?
https://biletcafe.com.ua/
The 1xbet free bet promo code today offers a great head start for analytical sports bettors.
http://www.sunshinetomato.co.jp/cgi-bin/tomato-land_iwaki/tomato2006.cgi
Корзина на сайте промышленного предприятия — удобный инструмент для формирования заявки
https://redmetsplav.ru/store/magniy-i-ego-splavy/zarubezhnye-splavy-2/magniy-mgal6zn1-alloy-22—iso-3116/provoloka-magnievaya-mgal6zn1-alloy-22—iso-3116/
Спецстали для машиностроения закупаем только здесь, надежность материала подтверждена испытаниями.
https://xn--80aeedb0bfzeok.xn--p1ai/catalog/latunnye-vnutrennie-stopornye-koltsa-po-gost/latunoe-vnutrennee-stopornoe-pruzhinnoe-koltso-105kh2-5-mm-ls59-gost-13943-86/
Enter the promocode of 1xbet while setting up your profile to guarantee your welcome package activation.
https://renas-serengenhariadigital.com.br/depoimentos/deusmar_/
1win
Type the promo code 1xbet during your initial account setup to claim the active deposit match.
https://mustangtravels.com/discovering-hidden-gems-off-the-beaten-path-tours-unveiled/
1win login
Using valid promo codes for 1xbet allows players to significantly increase their initial wagering capital.
https://xoupizza.pt/2016/08/01/like-mushroom-pizza-were-gonna-take-you-to-funghitown/
Legal compliance checklist for heavy Dream11 users — tools and habits to protect your account.
1win موقع
Your expected 1xbet deposit bonus appears in your account automatically after the payment finishes processing.
https://ludwig.de/2025/12/29/hallo-welt/
It’s a pity you don’t have a donate button! I’d without a doubt donate to this superb blog!
I guess for now i’ll settle for book-marking and adding your RSS feed to my Google account.
I look forward to fresh updates and will share this site with my Facebook group.
Chat soon!
The 1xbet promo code today pakistan 1X200ART is verified for instant activation on new accounts.
https://www.woernitz-beton.de/referenzen/wb_referenzen_bild_6/
1win موقع
The 1xbet sports promo code requires a minimum transfer equal to €/$1 to trigger the bonus matching.
https://ldm.mazury.pl/index.php/2021/01/28/air-suspensions-common-problem-and-solutions/
1win casino
The active 1xbet code promo bonus requires accumulator bets with individual selections carrying odds of 1.40 or higher.
https://www.suarainvestigasinews.com/dpc-gann-lampung-tengah-mengapresiasi-lapas-kelas-iib-gunung-sugih-mewujudkan-lingkungan-bebas-penyalahgunaan-narkoba-zero-drugs/
1win موقع
1win
Use the official 1xbet pakistan promo code to secure a localized 100% deposit match up to 36,000 PKR.
https://isouq.in/product/%e0%ae%85%e0%ae%b4%e0%af%81%e0%ae%95%e0%af%88-%e0%ae%85%e0%ae%b2%e0%af%8d%e0%ae%b2%e0%ae%be%e0%ae%b9%e0%af%8d%e0%ae%b5%e0%ae%bf%e0%ae%a9%e0%af%8d-%e0%ae%85%e0%ae%9a%e0%af%8d%e0%ae%9a%e0%ae%a4%e0%af%8d/
บทความนี้ ให้ข้อมูลดี ครับ
ผม ไปอ่านเพิ่มเติมเกี่ยวกับ เนื้อหาในแนวเดียวกัน
ดูต่อได้ที่ Margarito
น่าจะถูกใจใครหลายคน
เพราะให้ข้อมูลเชิงลึก
ขอบคุณที่แชร์ บทความคุณภาพ
นี้
และหวังว่าจะมีข้อมูลใหม่ๆ
มาแบ่งปันอีก
1win login
Your expected 1xbet deposit bonus appears in your account automatically after the payment finishes processing.
https://www.meanmuscles.com/articles/core-work/stomach-vacuum-exercise/
1win casino
https://biowin.com.ua/
https://biletcafe.com.ua/
The rewarding 1xbet sign up bonus automatically matches your opening deposit when you apply code 1X200ART.
https://gg-pr.jp/%e3%80%90%e6%84%9b%e7%9f%a5%e7%9c%8c%e3%80%91%e6%98%a5%e6%97%a5%e4%ba%95%e5%b8%82%e6%9d%b1%e9%87%8e%e6%96%b0%e7%94%ba%e3%81%ae%e3%83%ad%e3%83%bc%e3%82%ab%e3%83%ab%e3%83%9e%e3%83%bc%e3%82%b1%e3%83%86/
1win تحميل
Use the 1xbet promo code for registration to qualify immediately for the €/$400 maximum sports reward.
https://www.giftofgrouse.com/2016/04/05/why-scotlands-heather-hills-are-burning/
1win موقع
Always search for free promo codes for 1xbet before making your first official account transaction.
https://djeseconstruction.com/2019/09/19/business-frustration-with-brexit-chaos-boils-over/
Логичное деление на вольфрамовый, молибденовый и титановый прокат
https://redmetsplav.ru/store/magniy-i-ego-splavy/zarubezhnye-splavy-2/magniy-mcin3—jis-h-2221/lenta-magnievaya-mcin3—jis-h-2221/
1win
Быстрая доставка в регионы через «Деловые Линии», груз пришел в целости и отлично упакованным.
https://xn--80aeedb0bfzeok.xn--p1ai/catalog/mednye-zaglushki-pod-paiku/mednaia-zaglushka-kolpachok-pod-paiku-28kh23kh0-9-mm-18-4kh20-4-mm-miagkaia-paika-m2rm-gost-32590-2013/
1win موقع
The promo code for 1xbet registration 1X200ART must be typed in prior to processing your payment.
https://vintagecloset.shop/2024/06/19/hello-world/
1win موقع
Type the promo code 1xbet during your initial account setup to claim the active deposit match.
https://businessnewsafrica.net/nigeria-la-penurie-de-carburant-se-poursuit/
1win
Copy the latest 1xbet promo codes directly from verified affiliate pages to prevent errors during registration.
https://tour-moscow.com/es/aquaparques-de-moscu-cual-es-el-mejor/
1win
The flexible code promo 1xbet 1X200ART operates flawlessly across both sportsbook and casino divisions.
https://broesemann-immobilien.de/the-connection-between-health-longevity-and-aging/
https://woodin.com.ua/
1win تحميل
Claim the 1xbet bonus promo code to access the VIP tier of the platform’s loyalty program.
https://tamerismail.com/testimonials/
1win تحميل
The flexible code promo 1xbet 1X200ART operates flawlessly across both sportsbook and casino divisions.
https://arrayanesfutbol.com/hola-mundo/
Современные жилые комплексы бизнес-класса в Москве сочетают удобное расположение, качественное строительство и высокий уровень комфорта. Такие проекты пользуются стабильным спросом среди покупателей, которые ценят комфортную городскую среду и современные стандарты жилья https://stoyne.ru/
1win موقع
The 1xbet latest promo code 1X200ART provides the safest path toward maximizing your sports bankroll.
https://simtrepainty.cz/index.php?title=Official_1xbet_Promo_Code
Always search for free promo codes for 1xbet before making your first official account transaction.
https://365.expresso.blog/question/official-1xbet-promo-code-7/
1win موقع
Looking for trade cryptocurrency online? Visit cryptoswaptrade.com – CryptoSwapTrade is a crypto trading exchange designed for users who want to trade cryptocurrency online through a simple and direct exchange flow. The service supports 165 cryptocurrencies, 210+ assets across networks, approximately 40,000 cryptocurrency pairs, and approximately 8,000 fiat-related transfers in 40+ fiat currencies.
Enter the promocode of 1xbet while setting up your profile to guarantee your welcome package activation.
https://romaniaimobiliare.ro/stiri-imobiliare/tehnologia-revolutioneaza-promovarea-imobilelor-noi-cele-mai-bune-practici-ale-unei-agentii-imobiliare/
1win موقع
The premium betting site sign up bonus bangladesh delivers up to 13,000 BDT using this unique code.
http://www.christianbangjensen.dk/future-elegy-for-the-ai/
Smart deposit frequency — how often to add funds based on your contest participation rate.
1win موقع
The global 1bet bonus code 1X200ART activates the highest available welcome package for international registrations.
https://nefrinbeautify.com/spotlight-on-nail-trends-whats-buzzing-in-the-industry/
1win casino
Check the updated 1xbet promo code list to discover regional bonus adjustments for your specific country.
http://acquaspring.eu/en/changecurrency/6?returnurl=http%3a%2f%2fyuit.la.coocan.jp%2Fwak%2Fcgi-bin%2Fbbs%2Fbbs.cgi
Возможность заказать листы и полосы нестандартных размеров
https://redmetsplav.ru/store/magniy-i-ego-splavy/zarubezhnye-splavy-2/magniy-mag-7—bs-2970/lenta-magnievaya-mag-7—bs-2970/
The premium betting site sign up bonus bangladesh delivers up to 13,000 BDT using this unique code.
https://makersmission.org/hello-world/
1win casino
Высокая квалификация персонала, знают специфику редких металлов и особенности их применения.
https://xn--80aeedb0bfzeok.xn--p1ai/catalog/latunnye-vnutrennie-stopornye-koltsa-po-gost/latunoe-vnutrennee-stopornoe-pruzhinnoe-koltso-62kh1-7-mm-lsd-gost-13943-86/
The promo code for 1xbet registration 1X200ART must be typed in prior to processing your payment.
https://zaynaonline.com/pgc_simply_gallery/jilan-mawan/
Hey there! Would you mind if I share your blog with my facebook group?
There’s a lot of folks that I think would really appreciate your content.
Please let me know. Many thanks
1win موقع
Use the 1xbet promo code for registration to qualify immediately for the €/$400 maximum sports reward.
https://livestatus.de/index.php?title=Official_1xbet_Promo_Code
1win تحميل
The global 1bet bonus code 1X200ART activates the highest available welcome package for international registrations.
https://www.torinopechino.com/2013/06/06/guerrini-e-olivoni-alla-conquista-delle-dolomiti/
https://burokaren.com.ua/
1win
Компания «Штабстрой» — надёжный подрядчик в сфере ремонта и отделки коммерческих и жилых помещений. Клиенты отмечают профессионализм команды: выезд на замер, прозрачная смета и старт работ уже в течение недели. На сайте https://shtabstroy.ru/ можно ознакомиться с услугами, портфолио и реальными отзывами заказчиков. Компания работает строго по договору, без предоплаты, а все процессы автоматизированы ради быстрых расчётов с клиентами. Персональный подход, помощь в подборе материалов и контроль прораба на объекте — стандарт работы «Штабстроя».
1win login
گینر وایکینگ فورس، یک فرمولاسیون پیشرفته و کالریمتراکم است که برای پشتیبانی از رشد عضلانی و افزایش وزن طراحی شده است.
The rewarding 1xbet sign up bonus automatically matches your opening deposit when you apply code 1X200ART.
https://juliansterz.de/test-for-portfolio-loop-builder/
1win login
This versatile promo code for 1xbet works smoothly across the dedicated Android and iOS mobile apps.
https://www.nfme.mv/webinars/item/101-episode-3-finance-industry-under-the-new-norm-nfme-s-webinar-series-tailoring-a-new-reality-employer-s-dialogue
1win login
Discover the best 1xbet promo code to unlock the extensive €1950 casino registration bonus bundle.
https://healthcarelandscape.org/col-amanda-phlegar/
1win
The flexible code promo 1xbet 1X200ART operates flawlessly across both sportsbook and casino divisions.
https://www.hypergrise.com/?p=1
1win
The secret isn’t luck — it’s knowing exactly when to stack your batting order.
The 1xbet registration promo code locks in a guaranteed 100% match on your opening transfer amount.
https://elcometanews.com/michael-peralta-directivo-de-la-camara-de-comercio-dominicana-en-new-york-participa-en-la-2da-feria-inmobiliaria-banrservas/
1win casino
aslı
The 1xbet free bet promo code today offers a great head start for analytical sports bettors.
https://wiki.bob-fuchs.de/index.php?title=Benutzer:BrittWay96561602
1win casino
These 1xbet free promo codes help new users explore diverse betting markets with lowered financial risk.
https://chanhxedanang.com/dich-vu-van-tai/van-chuyen-hang-qua-kho-di-da-nang.html
1win تحميل
doktor kbb
mehmet emre dinç
Use the 1xbet promo code casino to experience high-quality live dealer roulette and blackjack tables.
https://usiccs.com/how-to-get-hired-in-the-logistic-industry/
1win موقع
The 1xbet latest promo code 1X200ART provides the safest path toward maximizing your sports bankroll.
https://ccmaritimesolutions.com/2023/06/22/the-power-of-effective-communication-in-business/
1win login
Описание складских позиций сокращает время ожидания ответа
https://redmetsplav.ru/store/magniy-i-ego-splavy/zarubezhnye-splavy-2/magniy-mag-131—bs-3370/prutok-magnievyy-mag-131—bs-3370/
Цены на спецстали одни из самых конкурентных на рынке, при этом качество на уровне мировых стандартов.
https://xn--80aeedb0bfzeok.xn--p1ai/catalog/mednye-zaglushki-pod-paiku/mednaia-zaglushka-kolpachok-pod-paiku-76-1kh65kh1-6-mm-33-5kh36-5-mm-tverdaia-paika-m1m-gost-32590-2013/
Use the 1xbet promo code for registration to qualify immediately for the €/$400 maximum sports reward.
https://thorleif.org/uncategorized/hello-world/
Started reading skeptically because the headline seemed overconfident, and the post earned the headline by the end, and a look at progressforward continued that pattern of earning its claims, sites that can back up their headlines without overpromising are rare and this one has clearly developed editorial calibration on that front consistently.
1win تحميل
تحميل 1win
sapphire
1win موقع
The 1xbet registration promo code locks in a guaranteed 100% match on your opening transfer amount.
https://balgaps.wa.edu.au/logo/
1win casino
sapphire
The 1xbet sign up promo code opens up access to regular weekly reload bonuses and rebates.
https://spilbaronen.dk/saa-kom-der-nye-braetspil/
sapphire
1win login
The 1xbet sports promo code requires a minimum transfer equal to €/$1 to trigger the bonus matching.
https://advancedfootballcoaching.com/2021/08/05/easter-holiday-course-and-return-to-football/
1win
Check the updated 1xbet promo code list to discover regional bonus adjustments for your specific country.
https://sakumc.org/xe/vbs/5863090
1win
Discover the best 1xbet promo code to unlock the extensive €1950 casino registration bonus bundle.
http://www.inmood.se/2009/11/fortfarann-trott/
1win casino
1win casino
Discover the best 1xbet promo code to unlock the extensive €1950 casino registration bonus bundle.
https://npcnewstv.com/ifbb-figure-pro-nadia-wyatt-interview-at-the-2019-arnold-sports-festival-athlete-meet-greet/
1win casino
The 1xbet free bet promo code today offers a great head start for analytical sports bettors.
http://chiyabankin.com/tsu84556_anohinodekigoto_tp_v/
1win موقع
Check the updated 1xbet promo code list to discover regional bonus adjustments for your specific country.
https://medicalsysconsult.com/aiassistant/index.php/User:HoracioDell12
1win تحميل
The rewarding 1xbet sign up bonus automatically matches your opening deposit when you apply code 1X200ART.
http://astuces-beaute.eleavcs.fr/index.php?post/2019/08/16/Routine-make-up-:-cosm%C3%A9tique-naturel-%21
1win
The flexible code promo 1xbet 1X200ART operates flawlessly across both sportsbook and casino divisions.
https://mahadevindustry.com/lionel-zimmerman/
تحميل 1win
Your expected 1xbet deposit bonus appears in your account automatically after the payment finishes processing.
https://www.wiki.klausbunny.tv/index.php?title=Official_1xbet_Promo_Code
1win موقع
I have been browsing online more than 3 hours today, yet
I never found any interesting article like yours. It’s pretty worth enough for me.
Personally, if all website owners and bloggers made good content as
you did, the internet will be a lot more useful than ever before.
1win موقع
The 1xbet promo code today pakistan 1X200ART is verified for instant activation on new accounts.
https://kryptomischa.bolek.tv/2016/03/15/post-with-video-lightbox/
Общее впечатление: надежный информационный ресурс для снабженцев.
https://redmetsplav.ru/store/magniy-i-ego-splavy/zarubezhnye-splavy-2/magniy-m18210—uns/krug-magnievyy-m18210—uns/
mehmet emre dinç
deniz
The premium betting site sign up bonus bangladesh delivers up to 13,000 BDT using this unique code.
https://www.plan-t.com.tr/image001/
تحميل 1win
Очень широкий каталог, нашли всё необходимое в одном месте, включая редкие позиции.
https://xn--80aeedb0bfzeok.xn--p1ai/catalog/latunnye-vnutrennie-stopornye-koltsa-po-din/latunoe-vnutrennee-stopornoe-pruzhinnoe-koltso-m12-13kh1-mm-lts23a6zh3mts2-din-472/
Claim the 1xbet bonus promo code to access the VIP tier of the platform’s loyalty program.
https://hopespeechindia.com/5-reasons-why-an-autism-child-doesnt-behave-normally/
1win موقع
The global 1bet bonus code 1X200ART activates the highest available welcome package for international registrations.
https://www.kron.digital/7-desafios-na-utilizacao-dos-chatbots/
1win login
The premium betting site sign up bonus bangladesh delivers up to 13,000 BDT using this unique code.
https://encuadernavila.es/producto/libro-recetas-de-cocina-23/
sapphire
1win
Check the updated 1xbet promo code list to discover regional bonus adjustments for your specific country.
https://wp1.themexlab.com/old/duplex/2016/04/02/nothing-can-be-gain-without-warikng-hard-5/
1win موقع
The 1xbet sports promo code requires a minimum transfer equal to €/$1 to trigger the bonus matching.
https://community.decentrixweb.com/index.php/question/dichaelgat-7/
1win تحميل
Your expected 1xbet deposit bonus appears in your account automatically after the payment finishes processing.
https://ckic.co.za/shop/elemental-analyzer/5e-s3200-coulomb-sulfur-analyzer/
1win login
Using valid promo codes for 1xbet allows players to significantly increase their initial wagering capital.
https://trainwithsemir.com/?attachment_id=5763
1win casino
1win casino
Using valid promo codes for 1xbet allows players to significantly increase their initial wagering capital.
https://beckelemerbube.de/2018/12/31/it-showed-a-lady-fitted-out-with-a-fur-hat-and-fur-boa-who-sat-upright-right/
1win موقع
Always search for free promo codes for 1xbet before making your first official account transaction.
https://su-stargroup.com/hello-world/
تحميل 1win
The universal cod promo 1xbet 1X200ART is valid for all new eligible players during 2026.
https://alcalambra.it/index.php/2019/11/02/tip-for-promotng-your-business-and-creating-your-brand/
1win موقع
Franchising Path Carlsbad
Carlsbad, СА 92008, United States
+18587536197
can i start a franchise with no money
The promo code for 1xbet registration 1X200ART must be typed in prior to processing your payment.
https://sebdev.org/Blog/index.php/;focus=STRATP_com_cm4all_wdn_Flatpress_30808643&frame=STRATP_com_cm4all_wdn_Flatpress_30808643?x=entry:entry201019-173930;comments:1
1win موقع
Магниевый прокат представлен в достаточном ассортименте
https://redmetsplav.ru/store/magniy-i-ego-splavy/zarubezhnye-splavy-2/magniy-m12331—uns/truba-magnievaya-m12331—uns/
The 1xbet sign up promo code opens up access to regular weekly reload bonuses and rebates.
http://www.peter-schroeder.eu/Blog;focus=TKOMSI_com_cm4all_wdn_Flatpress_22119493&frame=TKOMSI_com_cm4all_wdn_Flatpress_22119493?x=entry:entry200519-130230;comments:1
mehmet emre dinç
1win موقع
Высокая квалификация персонала, знают специфику редких металлов и особенности их применения.
https://xn--80aeedb0bfzeok.xn--p1ai/catalog/mednye-zaglushki-pod-paiku/mednaia-zaglushka-kolpachok-pod-paiku-35kh29kh1-mm-23kh25-mm-miagkaia-paika-m0b-gost-r-52922-2008/
The universal cod promo 1xbet 1X200ART is valid for all new eligible players during 2026.
https://oranjecomitehoenderloo.nl/hoenderloo-heeft-een-jaar-lang-een-schutterkoningin/
1win تحميل
1win موقع
The promo code for 1xbet registration 1X200ART must be typed in prior to processing your payment.
http://esteamer.by/tovar/sample-product/dekorativnoe-kolco-dlya-protankaerotank/
1win casino
The 1xbet sports promo code requires a minimum transfer equal to €/$1 to trigger the bonus matching.
https://modul8.com.pl/hello-world/
Use the 1xbet promo code for registration to qualify immediately for the €/$400 maximum sports reward.
http://demo.xn--p39a50mvvivlkoyl.com/bbs/board.php?bo_table=free&wr_id=201012
sapphire
The 1xbet promo code today pakistan 1X200ART is verified for instant activation on new accounts.
https://mediatorcertification.org/conflict-resolution-certification-online/
Use the official 1xbet pakistan promo code to secure a localized 100% deposit match up to 36,000 PKR.
https://kumikasa.com/10-artists-who-retired-from-music-and-made-a-comeback/
Grand League entries at the right time can multiply your bankroll faster than any Classic contest.
The 1xbet sign up promo code opens up access to regular weekly reload bonuses and rebates.
https://www.rpscuola.it/2021/03/01/diario-di-scuola-v/
This excellent website certainly has all of the information I needed concerning this subject and didn’t know who to ask.
Use the 1xbet promo code casino to experience high-quality live dealer roulette and blackjack tables.
https://www.matravel.co.za/its-a-classic-bullet-for-exciting-the-clitoris-as-nicely-as/
Танталовый прокат незаменим для химически агрессивных сред
https://redmetsplav.ru/store/magniy-i-ego-splavy/zarubezhnye-splavy-2/magniy-m11125—uns/pokovka-magnievaya-m11125—uns/
The 1xbet free spin promo code today grants complimentary rounds on the week’s featured slot games.
https://www.andreacorrado.it/home/rapp/
https://ukraineembassyindia.org/
Use the 1xbet promo code casino to experience high-quality live dealer roulette and blackjack tables.
https://danmichaelsonandthecoastguards.co.uk/diving-into-digital-beauty-the-allure-of-naked-ai-pics/
Ответственная компания, которая ценит долгосрочное сотрудничество, всегда идут навстречу клиенту.
https://xn--80aeedb0bfzeok.xn--p1ai/catalog/latunnye-vnutrennie-stopornye-koltsa-po-din/latunoe-vnutrennee-stopornoe-pruzhinnoe-koltso-m158-164kh4-mm-los-din-472/
These 1xbet free promo codes help new users explore diverse betting markets with lowered financial risk.
https://webdesignbanyuwangi.com/hello-world/
mehmet emre dinç
Type the promo code 1xbet during your initial account setup to claim the active deposit match.
https://ctvbs.com/product/0-3m-12-24-cores-0-9mm-mpo-male-to-lc-male-sm-mm-om3om4-optic-fiber-fanout-cable/
В салоне все удобно, понравился интерьер и сервис. Девушка подарила море эмоций и нежности. Обязательно повторю – проститутка спб
The promo code for 1xbet registration 1X200ART must be typed in prior to processing your payment.
https://tanozap.com/ciclo-de-disseminacao-da-cultura-de-seguranca-empresarial-22-a-26-de-setembro-participe/
Use the 1xbet promo code casino to experience high-quality live dealer roulette and blackjack tables.
https://showmetoronto.com/exploring-showmetoronto-your-ultimate-guide-to-torontos-best-attractions/
Use the 1xbet promo code for registration to qualify immediately for the €/$400 maximum sports reward.
http://iesucommunio.net/uncategorized/hello-world/
Описание применения металлов в атомной энергетике подчеркивает качество
https://redmetsplav.ru/store/magniy-i-ego-splavy/zarubezhnye-splavy-2/magniy-ls141a—astm-b275/list-magnievyy-ls141a—astm-b275/
Check the updated 1xbet promo code list to discover regional bonus adjustments for your specific country.
http://gorcomcom.ru/photos/sam_0170/
Ответственная компания, которая ценит долгосрочное сотрудничество, всегда идут навстречу клиенту.
https://xn--80aeedb0bfzeok.xn--p1ai/catalog/mednoe-dvukhrastrubnoe-koleno-pod-paiku/mednoe-dvukhrastrubnoe-koleno-pod-paiku-180-gradusov-22kh18kh0-9-mm-8kh10-mm-tverdaia-paika-m3r-gost-r-52922-2008/
This versatile promo code for 1xbet works smoothly across the dedicated Android and iOS mobile apps.
https://moneyproductivity.com/index.php/2025/07/27/the-complete-guide-to-effective-communication-skills/
Nice post. I was checking continuously this blog and I am impressed!
Extremely helpful info specifically the last part 🙂 I care for such
info a lot. I was seeking this particular info for a long time.
Thank you and good luck.
These 1xbet free promo codes help new users explore diverse betting markets with lowered financial risk.
http://aina-test-com.check-xserver.jp/bbs/board.php?bo_table=free&wr_id=7875190
mehmet emre dinç
https://ukraineembassyindia.org/
The legal clarity every Indian fantasy player has been searching for, explained plainly.
The way you seamlessly transitioned from one point to the next kept me fully engaged the entire time, and I walk away feeling significantly more knowledgeable about the subject matter than I did beforehand.
Xxx video onlyfans sex video site
Smart deposit frequency — how often to add funds based on your contest participation rate.
Использование современных технологий защиты данных пользователей
https://redmetsplav.ru/store/magniy-i-ego-splavy/zarubezhnye-splavy-2/magniy-iso-mc21220—bs-iso-16220/poroshok-magnievyy-iso-mc21220—bs-iso-16220/
https://makeitwithukraine.org/
I had fun reading this post. I want to see more on this subject.. Gives Thanks for writing this nice article.. Anyway, I’m going to subscribe to your rss and I wish you write great articles again soon.
Удобный сайт и понятная навигация по каталогу, легко найти нужную марку стали или сплава.
https://xn--80aeedb0bfzeok.xn--p1ai/catalog/latunnye-vnutrennie-stopornye-koltsa-po-din/latunoe-vnutrennee-stopornoe-pruzhinnoe-koltso-m41-44-5kh1-75-mm-lmtszh-din-472/
Grand League selection in bilateral series where teams are building toward a major tournament.
The level of detail provided in this write-up is genuinely strong, and it is clear that a significant amount of thought and preparation went into ensuring the final result would be this useful to the audience.
rus k?z porno
mehmet emre dinç
Промышленные установки очистки воды от компании PWS — это передовые решения для бизнеса, где качество воды напрямую влияет на прибыль. Технология безреагентной очистки на основе озона устраняет металлы, примеси и бактерии без вредных химикатов, обеспечивая воду без вкуса, цвета и запаха. Подробнее об установках — на https://pws.world/promyshlennye-ustanovki — здесь представлен полный ассортимент решений с высоким ресурсом эксплуатации и низкими текущими расходами, что делает их выгодным вложением для любого производства.
Сайт четко ориентирован на промышленный сектор и B2B сегмент
https://redmetsplav.ru/store/magniy-i-ego-splavy/zarubezhnye-splavy-2/magniy-h2011—ansi/lenta-magnievaya-h2011—ansi/
Салон оказался уютным и приватным, что очень понравилось. Девушка встретила тепло, с первых минут стало комфортно. Провели время так, что теперь хочется повторять регулярно: проститутки петербург
Looking for receive btc to your own wallet? Check the live Bitcoin price in GBP and see how much 1 BTC is worth in British Pounds right now. bitcoinpricegbp.com monitors the latest BTC/GBP exchange rate, daily price changes, and essential market statistics for anyone seeking a fast and reliable Bitcoin to British Pounds reference. This website is ideal for anyone monitoring their Bitcoin holdings in GBP, analyzing daily price shifts, and evaluating their overall portfolio worth.
Поставки всегда вовремя, логистика отлажена до мелочей, что важно для бесперебойной работы цеха.
https://xn--80aeedb0bfzeok.xn--p1ai/catalog/mednoe-dvukhrastrubnoe-koleno-pod-paiku/mednoe-dvukhrastrubnoe-koleno-pod-paiku-180-gradusov-70kh60kh1-4-mm-12kh15-mm-tverdaia-paika-m0b-gost-r-52922-2008/
Looking for crypto swap widget? Visit swapsdk.io and SwapSDK will help you. It allows companies to embed a cryptocurrency exchange into a website, wallet, app, or service where exchange functionality needs to work within the product’s interface. Such an integration is a perfect fit for products demanding a crypto exchange API with support for rates, currency pairs, order management, status tracking, and embedded exchange workflow logic.
mehmet emre dinç
You are so cool! I do not believe I have read anything like that before.
So good to discover somebody with original thoughts on this issue.
Seriously.. thank you for starting this up.
This website is one thing that is required on the web,
someone with some originality!
https://dejavu-kiev.com/
Le monde des jeux d’argent en ligne a connu une transformation importante avec
l’arrivée du casino en direct. Cette innovation permet aux joueurs de profiter de l’ambiance authentique d’un casino terrestre depuis le salon. Que vous soyez un fan de
blackjack un amateur de roulette ou un joueur de baccarat le casino live
offre une expérience immersive unique. Pour les joueurs français trouver le meilleur casino en live peut sembler complexe mais ce guide vous aidera à trouver la perle rare.
Nous explorerons les points clés les plateformes les plus réputées et les aspects
juridiques à connaître.
Продажа проволоки из тугоплавких металлов востребована в электронике
https://redmetsplav.ru/store/magniy-i-ego-splavy/zarubezhnye-splavy-2/magniy-gk-mgal8zn1—din-1729-part-2/poroshok-magnievyy-gk-mgal8zn1—din-1729-part-2/
I was recommended this website by means of my cousin. I am not positive whether this post is written by means of him
as no one else recognize such detailed about my problem.
You are incredible! Thanks!
ハイセンシとは シュラウド ヴァロラントの感覚 頂点の精神 ヴァロラントの感覚 これらはすべて当社の Web サイト https://gamersettings.net/ にあります – すべてのイベントの最新情報を入手できる最新情報をお見逃しなく
The vice-captain pick for first innings batting on bowler-friendly green pitch conditions.
Быстрая доставка в регионы через «Деловые Линии», груз пришел в целости и отлично упакованным.
https://xn--80aeedb0bfzeok.xn--p1ai/catalog/latunnye-vnutrennie-stopornye-koltsa-po-din/latunoe-vnutrennee-stopornoe-pruzhinnoe-koltso-m33-35-4kh1-2-mm-l63-din-472/
Вызвал девушку в гостиницу, приехала быстро и выглядела шикарно. Очень милая, красивая, с хорошим настроем. Провели время отлично – индивидуалки спб
Worth saying that the post fit naturally into a rhythm of careful reading, and a stop at nobletrustnetwork extended the same rhythm, content that pairs well with how I actually read rather than demanding a different mode is content well calibrated to its likely audience and this site has clearly thought about that consistently.
A piece that did not try to be timeless and ended up reading as durable anyway, and a look at ideamapper extended that durable feel, content that stays useful past its publication date without straining for permanence is content that ages well and this site has the kind of evergreen quality that I value highly today.
Most blog writing on this subject reaches for the same handful of arguments and this post avoided them, and a look at forwardthinkinghub continued the original treatment, content that finds its own path through territory other writers have flattened is content with real authorial energy and this site has plenty of that distinctive energy.
The way the post stayed on topic throughout without going on tangents was really refreshing, and a look at focusactivation kept that focused approach going, discipline like this in writing is rare and worth recognising because most writers cannot resist wandering off into related subjects that dilute their main point and confuse readers along the way.
Reading the writers other posts after this one suggests the quality is consistent rather than peak, and a stop at forwardpathway confirmed the consistent quality reading, sites that hold the same level across many pieces rather than peaking on a few are sites with sustainable editorial discipline and this one has clearly developed that.
Now feeling mildly impressed in a way I do not quite remember feeling about a blog in a while, and a stop at ideaorchestration extended that mild impression, content that produces specific positive emotional responses rather than just neutral information transfer is content with extra dimensions and this site has those extra dimensions clearly.
mehmet emre dinç
https://kievalt.net/
Cabinet IQ
8305 Stat Hwy 71 #110, Austin,
TX 78735, United Ѕtates
254-275-5536
Bookmarks (Rocky)
Описание складских позиций сокращает время ожидания ответа
https://redmetsplav.ru/store/magniy-i-ego-splavy/zarubezhnye-splavy-2/magniy-g-a4s1/krug-magnievyy-g-a4s1/
Financial tracking that separates your Dream11 hobby from essential living expenses.
https://reitingmebel.ru/ – независимый сайт с актуальными рейтингами производителей мебели по регионам России. В подборках собраны лучшие компании и модели для дома, офиса и детской: кухни, школьные парты, растущие стулья, стульчики для кормления и другие категории. Рейтинги формируются на основе отзывов, качества материалов, сервиса, гарантий и соотношения цены и надежности.
Высокая квалификация персонала, знают специфику редких металлов и особенности их применения.
https://xn--80aeedb0bfzeok.xn--p1ai/catalog/mednoe-dvukhrastrubnoe-koleno-pod-paiku/mednoe-dvukhrastrubnoe-koleno-pod-paiku-180-gradusov-35kh29kh1-mm-23kh25-mm-miagkaia-paika-m3rt-gost-32590-2013/
Worth bookmarking and sharing with anyone interested in the topic, that is my honest take, and a stop at visionexecution reinforces that, the kind of generous resource that makes the open web feel worth defending against the constant pressure to retreat into walled gardens and curated feeds today everywhere I look across all my devices.
https://ukraineembassyindia.org/
https://poslednienovosti.net/
A welcome reminder that thoughtful writing still happens online, and a look at ideaflowpath extended that reassurance, the modern web makes it easy to forget that careful writing exists and finding sites that practice it is a small antidote to the cynicism that builds up from too much exposure to algorithmic content.
mehmet emre dinç
Bookmarked the page and the homepage too because clearly there is more to explore here, and a quick stop at directionalplanninglab only made that more obvious, this is the kind of place I want to dig through over a weekend rather than rushing through during a coffee break tomorrow morning before getting back to work.
Сайт выглядит профессионально и лаконично, без лишней рекламы
https://redmetsplav.ru/store/magniy-i-ego-splavy/zarubezhnye-splavy-2/magniy-en-mb10021—en-12421-1998/list-magnievyy-en-mb10021—en-12421-1998/
Came in confused about the topic and left with a much firmer grasp on it, and after growthactivator I felt I could explain this to someone else without hesitation, that is the gold standard for any educational content and most sites simply fail to reach it ever which is unfortunate but true.
Stayed longer than planned because each section earned the next, and a look at growthvector kept that pulling effect going across more pages, the kind of subtle pull that good writing exerts on attention is something I find harder and harder to resist when I encounter it on the open web today.
Закупали шлак ферросилиция для строительных нужд, материал качественный, без лишних примесей.
https://xn--80aeedb0bfzeok.xn--p1ai/catalog/latunnoe-litoe-koltso/latunnoe-litoe-koltso-90kh100-mm-lts16k4/
Reading this on the train into work was a better use of the commute than my usual choices, and a stop at focusdesign extended that commute reading well, content that improves transit time rather than just filling it is content with practical benefit and this site has earned its place in my morning commute reading rotation.
Decided to read this site for a while before forming a verdict, and the verdict after several pages is positive, and a stop at alliancecorebond continued that pattern, judging a site requires more than one post and giving sites a fair sample is something I try to do for promising candidates rather than rushing to dismiss.
Considered against the flood of similar content this one stands apart in important ways, and a stop at forwardmovementlab extended that distinctive feel, sites that find their own corner of a crowded topic and stay there are sites worth following and this one has clearly carved out its own space and committed to defending it carefully.
https://ukraineembassyindia.org/
Фольга из редких металлов часто требуется для высокотехнологичных лабораторий
https://redmetsplav.ru/store/magniy-i-ego-splavy/zarubezhnye-splavy-2/magniy-b-199-az81a—astm-b199/provoloka-magnievaya-b-199-az81a—astm-b199/
¡Qué locura total, chamigos! Acá les escribe Hugo desde
Ciudad del Este.
Como un enfermo de las apuestas deportivas y fanático a muerte de
la Albirroja, les juro que estoy viviendo el mejor sueño de mi vida.
Al empezar el campeonato, sentí que se me caía el mundo encima cuando los yanquis
nos metieron ese humillante 4-1. Pero la raza guaraní nunca se rinde:
sufrimos como unos condenados para clavarle el 1-0 a Turquía y logramos sobrevivir a la fase de grupos con ese sufrido 0-0 ante Australia.
¡Lo que vivimos contra los alemanes fue épico, digno de una película!
Todas las cuotas de las casas de apuestas estaban brutalmente en contra,
pero empatamos 1-1 dejando el alma y la piel en los 120 minutos.
¡Esa tanda de penales, ganando 4-3, me hizo
llorar tirado en el piso como una criatura!
¡Con lo que gané en esa apuesta a la sorpresa me pago las deudas de todo el
año y festejo un mes seguido!
Ahora se nos viene Francia este 4 de julio y me juego mi destino entero por mis muchachos.
¡No me importa si la lógica dice que nos golean, yo muero con la mía y
apuesto todo a una nueva hazaña!
¡Vamos Paraguay, carajo!
mehmet emre dinç
We absolutely love your blog and find the majority of your post’s to be exactly what I’m looking for. Do you offer guest writers to write content to suit your needs? I wouldn’t mind composing a post or elaborating on a number of the subjects you write about here. Again, awesome weblog!
Reading this in my last reading slot of the day was a good way to end, and a stop at focusnavigator provided a satisfying close to the reading session, content that ends a day well rather than agitating it before sleep is the kind I value increasingly and this site fits that role for me consistently now.
I am glad to talk with you and you give me great help
A piece that read as the work of someone who reads carefully themselves, and a look at actionmomentum continued that informed feel, writers who are also serious readers produce work with a different quality and this site reads as the product of someone steeped in good writing rather than just generating content for an audience.
Ответственная компания, которая ценит долгосрочное сотрудничество, всегда идут навстречу клиенту.
https://xn--80aeedb0bfzeok.xn--p1ai/catalog/mednyi-perekhodnoi-troinik-press/mednyi-perekhodnoi-press-troinik-35kh21-mm-m1rm-gost-r-52948-2008/
https://ukrainianweek.org/
Thanks for the moderate length, neither so short it skips substance nor so long it bloats, and a stop at intentionalmomentum hit the same balance, the right length is one of the hardest things to calibrate in blog writing and I appreciate when a team has clearly thought about it rather than defaulting.
If I had encountered this site five years ago I would have been telling everyone about it, and a look at strategycreatesflow extended that retrospective enthusiasm, the version of me who used to recommend favourite blogs frequently would have made sure friends knew about this one and that earlier enthusiasm is partially returning to me here.
Информация о проверке качества продукции повышает лояльность клиентов
https://redmetsplav.ru/store/magniy-i-ego-splavy/zarubezhnye-splavy-2/magniy-az80—csa-hg-5/prutok-magnievyy-az80—csa-hg-5/
Really like that there are no exclamation marks or all caps shouting throughout the post, and a quick visit to focuschannel maintained the same calm voice, restraint in punctuation signals confidence in the content and this site clearly trusts its substance to do the persuading rather than relying on typographic emphasis.
Looking through other posts here the consistency is what makes the site valuable rather than any single piece, and a stop at pillartrustgroup extended that consistency observation, sites whose value lies in the ongoing pattern rather than in standout posts are sites I trust more deeply and this one has clearly built that kind of trust.
https://ng-kiev.org/
mehmet emre dinç
Высокий уровень сервиса и контроля качества, для нашего научного проекта это было критически важно.
https://xn--80aeedb0bfzeok.xn--p1ai/catalog/latunnye-vnutrennie-stopornye-koltsa-po-gost/latunoe-vnutrennee-stopornoe-pruzhinnoe-koltso-12kh1-mm-lk-gost-13943-86/
https://poslednienovosti.net/
Useful reading material, the kind I can hand off to someone newer to the topic without worrying about confusing them, and a quick look at directionalstructure confirmed the same beginner friendly tone runs throughout the site which is great for sharing with people just starting their learning journey on this particular topic.
Came in confused about the topic and left with a much firmer grasp on it, and after strategyworkflow I felt I could explain this to someone else without hesitation, that is the gold standard for any educational content and most sites simply fail to reach it ever which is unfortunate but true.
https://taxukraine.org/
Don’t let confusion about Dream11’s legal status cost you your passion for the game.
Мечтаешь превратить дерзкие эротические фантазии в захватывающие истории? Нейросеть на сайте https://www.ero-storitop.com/ создаёт горячие рассказы за пять секунд. Достаточно описать задумку — герои только 18+, всё анонимно, бесплатно и без регистрации. Чем точнее ты опишешь сюжет, тем пикантнее будет финал. Начни творить уже сейчас!
Now recognising the specific pleasure of reading writing that shows real care for sentence shapes, and a look at strategyengine extended that craft pleasure, sentence level writing quality is something most blog content ignores entirely and this site has clearly invested in the prose layer alongside the substance which is rare today.
Really like that there are no exclamation marks or all caps shouting throughout the post, and a quick visit to clarityactionhub maintained the same calm voice, restraint in punctuation signals confidence in the content and this site clearly trusts its substance to do the persuading rather than relying on typographic emphasis.
Took something from this I did not expect to find, and a stop at crustcocoa added another unexpected useful piece, content that exceeds expectations rather than just meeting them is the kind that builds enthusiasm and earns repeat visits without any explicit ask from the writer or platform behind the work being read.
Skipped the related links section thinking I had read enough and then came back to it later when curiosity got the better of me, and a stop at ideastomotion confirmed I should have just read it first, every section of this site appears to deserve careful attention rather than skipping past lazily.
Felt the post handled a sensitive angle of the topic with appropriate care, and a look at curlbento extended that careful handling across related material, sites that can navigate delicate territory without causing damage are rare and require a level of judgement that comes from experience rather than from following any clear playbook.
Reading this prompted me to dig into a related topic later, and a stop at ozoneosprey provided some of the starting points for that follow up reading, content that triggers further exploration rather than satisfying curiosity completely is content with real generative energy and this site has plenty of that energy throughout it.
Amazing! This blog looks exactly like my old one!
It’s on a entirely different topic but it has pretty much the same layout and design. Wonderful choice of colors!
Раздел «Производство» подтверждает статус завода, а не просто перекупщика
https://redmetsplav.ru/store/magniy-i-ego-splavy/zarubezhnye-splavy-2/magniy-az101a—astm-b275/pokovka-magnievaya-az101a—astm-b275/
Legal status of Dream11 for users who win large amounts — tax implications and reporting requirements.
Refreshing change from the usual sites covering this topic, no clickbait and no padding, and a stop at progressengineered confirmed the difference, this place clearly has its own voice rather than copying the formulas everyone else uses to chase clicks online which is becoming increasingly rare these days across nearly every popular subject.
Legal overview: how Dream11’s terms of service protect both the platform and its Indian users.
Редметсплав — пример того, как должен работать современный поставщик металлургического сырья.
https://xn--80aeedb0bfzeok.xn--p1ai/catalog/mednyi-perekhodnoi-troinik-press/mednyi-perekhodnoi-press-troinik-70kh22-mm-m1rm-gost-r-52948-2008/
Most of the time I feel the open web is in decline and then I find a site like this, and a stop at ideaengineering reinforced that mood lift, the cumulative effect of finding occasional excellent independent content versus the cumulative effect of finding mostly mediocre content is real for the long term reader maintaining web habits today.
Hi, just wanted to say, I enjoyed this post.
It was funny. Keep on posting!
Now feeling confident enough in this site to use it as a reference point for evaluating others on the same topic, and a look at buzzlane continued the comparison friendly quality, sites that serve as quality benchmarks for their topic are precious and this one has clearly become a benchmark for me on this particular subject area.
https://bankruptcylancasterpa.com
A piece that reads as if the writer trusted readers to fill in obvious gaps, and a look at directionaldrive continued that respectful approach, content that does not over explain what the reader can infer is content that respects intelligence and this site has clearly chosen to write to capable readers rather than to the lowest common denominator.
Better than the average post on this subject by some distance, and a look at strategyprogression reinforced that, you can tell within the first paragraph that the writer here actually cares about the topic rather than just covering it for the sake of having something to publish that week or that day.
1TRADE – https://1trade.io/ — an online trading platform for trading currency pairs on financial markets. Intuitive interface and functional trading tools. Advantages of the 1TRADE platform: Demo account for $100,000, Quick Platform Withdrawals, 24/7 support, Minimum deposit $10, Reliable broker, Mobile App.
Сайт работает стабильно и быстро загружается
https://redmetsplav.ru/store/magniy-i-ego-splavy/zarubezhnye-splavy-2/magniy-am60a—astm-b94/folga-magnievaya-am60a—astm-b94/
Девушка приехала без задержек, выглядела невероятно. Очень нежная, внимательная и страстная одновременно. Провели время так, что хотелось бы повторить снова и снова – индвидуалки Санкт-Петербург
Loved the writing voice here, friendly without being fake and confident without being arrogant, and a stop at plasmapiano carried the same tone forward, the kind of personality that makes a reader feel welcome rather than lectured at which is a balance plenty of writers struggle to find no matter how long they have been at it.
Started reading without much expectation and ended on a high note, and a look at visioninmotion continued that arc, content that builds rather than peaks early is a sign of a writer who knows how to structure a piece for sustained reader engagement rather than relying on a strong hook to do all the work.
This actually answered the question I had been searching for, and after I checked defcoast I had a few more pieces I had not realised I needed, that is the sign of a site that knows what its readers want before they even know how to ask it which is impressive.
Felt the writer was being honest with the reader which is rare enough that I want to acknowledge it, and a look at marshplate continued that honest feel, content built on actual knowledge rather than aggregated summaries is something I value highly and rarely come across in regular searches on the open internet these days.
Now feeling confident enough in this site to use it as a reference point for evaluating others on the same topic, and a look at parcohm continued the comparison friendly quality, sites that serve as quality benchmarks for their topic are precious and this one has clearly become a benchmark for me on this particular subject area.
Generally my attention drifts on long posts but this one held it through the end, and a stop at molqiro earned the same sustained focus, content that defeats my drift tendency is content with substantive pulling power and this site has demonstrated that pulling power across multiple pieces in a session that has now run quite long actually.
Took my time with this rather than rushing because the writing rewards attention, and after growthpathway I had even more to absorb, the kind of content that pays back the patient reader rather than punishing them with empty filler is something I look for and rarely find in regular searches lately.
Skipped lunch to finish reading, which says something, and a stop at astrebee kept me at my desk longer than planned, when content beats the lunch impulse the writer has done something genuinely impressive in an attention environment full of immediately satisfying alternatives competing for the same finite block of reader time.
Ответственная компания, которая ценит долгосрочное сотрудничество, всегда идут навстречу клиенту.
https://xn--80aeedb0bfzeok.xn--p1ai/catalog/latunnye-vnutrennie-stopornye-koltsa-po-din/latunoe-vnutrennee-stopornoe-pruzhinnoe-koltso-m47-50-5kh1-75-mm-lts23a6zh3mts2-din-472/
Reading this slowly and letting each paragraph land before moving on, and a stop at claritycreatespace earned the same patient approach, content that rewards slow reading rather than speed is content with real density and the writers here are clearly producing work that benefits from the careful eye rather than the rushed scan.
Howdy! This post couldn’t be written any better! Looking at
this article reminds me of my previous roommate! He constantly kept preaching about this.
I’ll send this post to him. Fairly certain he’ll have a great read.
Many thanks for sharing!
The headings made navigating the post simple even when I needed to find a specific section quickly, and a look at directionalinsight continued the same thoughtful structure, small details like clear headings show that someone is actually thinking about how the reader uses the page rather than just filling it for length alone.
وی ایزوله تروفیول، یک مکمل پروتئینی فوقالعاده خالص است که طی فرآیندهای پیشرفته میکروفیلتراسیون، چربی، کربوهیدرات و لاکتوز آن حذف شده و بیش از 90% پروتئین خالص و زودجذب را برای سنتز عضلانی در اختیار بدن قرار میدهد.
Наличие циркония свидетельствует о работе с высокотехнологичными заказами
https://redmetsplav.ru/store/magniy-i-ego-splavy/zarubezhnye-splavy-2/magniy-9995—csa-hg-2/truba-magnievaya-9995—csa-hg-2/
https://www.bankruptcylancasterpa.com
Appreciated the way each section connected smoothly to the next without abrupt jumps, and a stop at buildmomentummethodically kept that flow going nicely, transitions are something most blog writers ignore but the difference is huge for the reader who is trying to follow a sustained line of thought today across many different topics.
Thanks for the practical examples scattered through the post rather than abstract theory only, and a look at forwardmotionengine continued that grounded style, abstract points are easier to remember when paired with concrete situations and the writers here clearly understand how readers actually retain information from blog content reading sessions.
Now thinking about whether the writer might publish a longer form work I would buy, and a look at balticcape suggested the same depth would translate, content that makes me want to pay for related work in other formats is content that has earned commercial trust as well as attention trust and this site has both clearly.
Очень широкий каталог, нашли всё необходимое в одном месте, включая редкие позиции.
https://xn--80aeedb0bfzeok.xn--p1ai/catalog/mednyi-perekhodnoi-troinik-press/mednyi-perekhodnoi-press-troinik-76-1kh21-mm-m3rm-gost-r-52948-2008/
https://bankruptcylancasterpa.com
Thanks for sharing this with the open internet rather than locking it behind a paywall like so many sites do now, and a stop at teraware kept the same vibe going, generous helpful and clearly written by someone who actually wants people to learn from it rather than just charge them.
Beats most of the alternatives on the topic by a noticeable margin, and a look at clarityfocus did not change that at all, this is one of the better corners of the open internet for this kind of content and I am glad I clicked through rather than skipping past quickly like I usually do.
Most of the time I bounce off similar pages within seconds, and a stop at laurelmallow held me longer than I would have predicted, the ability to convert a likely bouncing visitor into an engaged reader is a quality signal and this site has demonstrated that conversion ability across multiple visits where I expected to bounce.
Cuts through the usual marketing fluff that dominates this topic online, and a stop at marshplate kept the same clean approach going, this is the kind of writing that respects the reader’s time rather than wasting it on repetitive setups before finally getting to the point at hand which is what most sites do.
Looking for buy a small amount of bitcoins? BTC converter at btc-converter.com – Use the BTC conversion tool to calculate the current value of Bitcoin in US dollars. Enter the amount of Bitcoin and see the estimated dollar equivalent based on the live BTC/USD exchange rate. The tool is designed for quick checks before selling, trading, comparing wallet balances, or viewing cryptocurrency payment amounts. It can display 1 BTC in dollars, smaller coin amounts, larger balances, and general dollar-based comparisons.
Learned something from this without having to dig through layers of fluff, and a stop at focusignition added a bit more context that helped tie things together for me, definitely a useful corner of the internet for anyone who wants real information without the usual marketing nonsense around it that often ruins similar pages.
Now appreciating that I did not feel exhausted after reading, and a stop at buffbaron extended that energising quality, content that leaves me with more attention than it consumed is rare and the gap between draining and energising content is real over the course of a typical day spent reading widely online.
Удобное разделение продукции на сплавы и конкретные виды проката
https://redmetsplav.ru/store/magniy-i-ego-splavy/zarubezhnye-splavy-2/magniy-3-5470—din-1729-part-2/polosa-magnievaya-3-5470—din-1729-part-2/
Modern Purair
416 Meridian Rd SE #14A, Calgary
AB T2Α 1X2, Canada
(403) 800-7254
repair expert
Felt the writer respected the topic without being precious about it, and a look at ideapath continued that respectful but unfussy treatment, finding the right register for serious topics is hard and this site has clearly figured out how to take the topic seriously while still being readable for casual visitors regularly.
http://bankruptcylancasterpa.com
https://3dvisio.net/
A memorable post for me on a topic I had thought I was tired of, and a look at claritystarter suggested the same site can refresh other tired topics, sites that can revive my interest in subjects I had written off as exhausted are doing rare work and this one is clearly doing that for me today.
Found the use of subheadings really helpful for scanning back through the post later, and a stop at actionturnsideas kept that reader friendly approach going, navigation is something many blog writers ignore but small structural choices make a noticeable difference for someone returning to find a specific point again days or weeks later.
Купить кайт Cabrinha Switchblade Минск
Really like that there are no exclamation marks or all caps shouting throughout the post, and a quick visit to trustedcollaborationhub maintained the same calm voice, restraint in punctuation signals confidence in the content and this site clearly trusts its substance to do the persuading rather than relying on typographic emphasis.
Closed the post with a small satisfied sigh, and a stop at zenvani produced the same gentle exhale, content that ends well is content that respects the rhythm of reading and the writers here have clearly thought about how their pieces close rather than just trailing off when they run out of things to say.
Now planning to come back when I have the right kind of attention to read carefully, and a stop at boundcliff reinforced that plan, choosing the right moment to read certain content is a quiet form of respect for the work and this site is generating those careful planning behaviours from me consistently as a reader.
Looking for cryptocurrency exchange? Visit cryptosdk.io and you’ll find CryptoSDK – a crypto exchange API for websites, apps, wallets, and digital services that require a built-in crypto exchange within their own product flow. Rather than redirecting users to an external interface, the integration consolidates routing, rate search, verification, validation, order creation, and status tracking into one unified product.
More original than the recycled takes I keep finding on the topic elsewhere, and a quick look at parsleymulch confirmed it, the kind of site that has its own voice rather than echoing whatever is trending which makes it stand out as a refreshing change from the usual rotation of generic content I see daily.
Купить кайт Cabrinha Switchblade Минск
Весь металл проходит строгий входной контроль, за всё время работы ни одного случая брака.
https://xn--80aeedb0bfzeok.xn--p1ai/catalog/latunnoe-litoe-koltso/latunnoe-litoe-koltso-50kh500-mm-lsdch/
I like what you guys tend to be up too. Such clever
work and coverage! Keep up the good works guys I’ve included you guys to our blogroll.
A satisfying piece in the way that good meals are satisfying rather than just filling, and a look at claritymotionlab extended that satisfaction, the metaphor between content and meals is one I find useful and this site reads as a satisfying meal rather than the empty calories that most content provides for casual readers.
Купить кайт Cabrinha Switchblade Минск
Купить кайт Cabrinha Switchblade Минск
http://bankruptcylancasterpa.com
Купить кайт Cabrinha Switchblade Минск
Купить кайт Cabrinha Switchblade Минск
Купить кайт Cabrinha Switchblade Минск
Никелевые сплавы — основа для жаропрочных конструкций
https://redmetsplav.ru/store/magniy-i-ego-splavy/rossiyskie-splavy-1/magniy-ml4—gost-2856-79/provoloka-magnievaya-ml4—gost-2856-79/
Vice-captain for matches where teams have the tournament’s leading wicket-taker in their lineup.
Now recognising the post as a rare example of careful writing on a topic that mostly receives careless treatment, and a stop at liegepenny extended that contrast with the average elsewhere, content that highlights how much the average is settling for low quality is content that has both internal merit and external value as a benchmark.
A piece that demonstrated competence without performing it, and a look at directionalshift maintained the same self assured but unshowy register, the gap between competence and performance of competence is one I track and this site has clearly chosen to demonstrate rather than perform which I find much more persuasive as a reader.
Honestly the simplicity is what makes this work, the topic is not buried under filler words or overly complex examples, and a quick look at millpeach showed the same sensible style, I left with what I came for and no headache from over reading which is a real win these days.
Мечтаете о доступных перелётах по США? Посетите сайт https://usaflights24.com/ и вы найдете лучшие предложения на авиабилеты. Наша поисковая система поможет вам сравнить цены сотен авиакомпаний и туристических сайтов за считанные секунды, чтобы вы могли быстро найти дешевые варианты. Мы гарантируем полную прозрачность: указанная цена является окончательной, и при оформлении заказа вас не ждут никакие дополнительные расходы.
Велакаст — современный препарат для лечения хронического гепатита С, который помогает тысячам пациентов вернуться к полноценной жизни. Официальный ресурс https://velkast.space/ предоставляет исчерпывающую информацию о лекарстве, его составе и механизме действия, а также содержит реальные отзывы пациентов и подробную инструкцию на русском языке. На сайте доступна проверка подлинности препарата, консультация квалифицированных специалистов и организация доставки по всей России с соблюдением необходимых стандартов качества и безопасности.
Now I want to find more sites like this but I suspect they are rare, and a look at visiontrajectory extended that thought, the few sites that meet this quality bar are precious specifically because they are rare and finding others like them is one of the ongoing projects of careful internet curation across the years.
Loved the writing voice here, friendly without being fake and confident without being arrogant, and a stop at progressdirection carried the same tone forward, the kind of personality that makes a reader feel welcome rather than lectured at which is a balance plenty of writers struggle to find no matter how long they have been at it.
Bookmark earned and shared the link with one specific person who would care, and a look at morqino got the same targeted share, sharing carefully rather than broadcasting is a discipline I try to maintain and this site is generating shares from me at a sustainable rate rather than the spam rate of viral content.
This one is staying open in a tab for the rest of the day so I can come back and re read certain parts, and a look at coltbrig suggests I will be doing the same with a few more pages here too, this is going to be a deep dive over the coming hours.
Started imagining how I would explain the topic to someone else after reading, and a look at bosonlab gave me more material for that imagined explanation, content that improves my own ability to discuss a topic is content that has actually transferred knowledge rather than just decorating my screen for a few minutes.
Долго искали надежного поставщика циркония, в Редметсплав предложили лучшие условия и чистоту металла.
https://xn--80aeedb0bfzeok.xn--p1ai/catalog/mednyi-perekhodnoi-troinik-press/mednyi-perekhodnoi-press-troinik-40-5kh14-7-mm-m2rm-gost-r-52948-2008/
Felt the post had been written without using a single buzzword, and a look at civicbrisk continued that clean vocabulary, content free of jargon and trendy phrases reads better and ages better and this site has clearly committed to a vocabulary that will not feel dated in three years which is impressive editorially.
Captain selection in stadiums with large outfields that limit boundary scoring.
Оптимальные матрасы ватные для рабочих, простеганы качественно, не сбиваются.
https://nujob.ch/companies/matras-vatniy/
https://www.bankruptcylancasterpa.com
Liked that the post left some questions open rather than pretending to settle everything, and a stop at kalqavo continued that intellectual honesty, content that respects the limits of its own claims is more trustworthy than content that overreaches and this site has clearly figured out which positions it can defend confidently.
The depth of coverage felt about right for the format, neither shallow nor overwhelming, and a look at nextstepnavigator kept that calibration going, getting the depth right for blog format is genuinely difficult because too shallow loses experts and too deep loses beginners but this site nailed it nicely which I really do appreciate.
Now wishing more sites covered topics with this level of care, and a look at focusdrivenprogression extended that wish across more subjects, the rarity of careful coverage on most topics is a problem and this site is one of the small antidotes to that broader pattern of casual or surface treatment of complex subjects.
Reading this prompted me to dig into a related topic later, and a stop at zenvani provided some of the starting points for that follow up reading, content that triggers further exploration rather than satisfying curiosity completely is content with real generative energy and this site has plenty of that energy throughout it.
https://3dvisio.net/
Thank you a lot for sharing this with all of us you actually understand what you are talking about!
Bookmarked. Please also talk over with my site
=). We may have a link trade agreement between us
My webpage; Free Credit Link
Возможность заказать листы и полосы нестандартных размеров
https://redmetsplav.ru/store/magniy-i-ego-splavy/rossiyskie-splavy-1/magniy-ma15/truba-magnievaya-ma15/
Матрасофф — проверенный производитель матрасов в нашем регионе.
https://tiktokporn.live/@wildafreytag0?page=about
Definitely a recommend from me, anyone curious about the topic should check this out, and a look at growthpath adds even more reason for that, the depth and quality combine to make this site one I will be pointing people toward whenever similar conversations come up over the months ahead at work or socially.
Probably one of the more reliable sources I have found for this kind of careful coverage, and a look at boundcling reinforced the reliability, the small group of sources I would describe as reliable for a given topic is curated carefully and this site has earned a place in that small group through consistent performance.
Reading this in the time it took to drink half a cup of coffee, and a stop at crustcleve fit naturally into the second half, content that respects the rhythms of a typical morning is content with practical fit and this site has the kind of length and pacing that works for the way I actually read.
A piece that earned its conclusions through the body rather than asserting them at the end, and a look at pianoledge maintained the same earned quality, conclusions that follow from what came before are more persuasive than declarations and this site has clearly internalised that principle in how it constructs arguments throughout pieces.
Took some notes for a project I am working on, and a stop at moundlong added more raw material to those notes, content that contributes to my own creative work rather than just being interesting in the moment is the kind I value most and the kind I will keep coming back to repeatedly.
Honestly this was a good read, no jargon and no padding, and a short look at lilacneedle kept that same feel going which I really appreciated, the writer clearly knows the topic well enough to explain it without hiding behind big words or filler that often gets used to seem clever.
Closed the laptop and walked away thinking about the post for a good twenty minutes, and a stop at momentumchanneling produced similar lingering thoughts, content that survives the closing of the browser tab is content that has actually entered the mind rather than just decorating the screen for the duration of the reading.
Now adjusting my mental list of reliable sites for this topic, and a stop at progressblueprint reinforced the adjustment, the small ongoing curation work of maintaining trusted sources is one of the actual practical activities of careful reading and this site has earned a permanent place on my list for this particular subject.
Быстрая доставка в регионы через «Деловые Линии», груз пришел в целости и отлично упакованным.
https://xn--80aeedb0bfzeok.xn--p1ai/catalog/vanadievyi-slitok/
Отличные ватные матрасы, заказывали оптом для рабочих в СПб.
https://qpxy.cn/waylonupe5292
Just nice to read something that does not feel like it was assembled from a content brief, and a stop at growthmovement kept that handcrafted feel going, you can tell when a real human with real understanding is behind the words versus a templated piece churned out for an algorithm to find.
Looking through the archives suggests this site has been doing this for a while at this level, and a look at jadyam confirmed the long term consistency, sites that have maintained quality across years rather than just a recent stretch are sites with serious editorial discipline and this one has clearly been at it for a while.
Vague feelings of recognition kept surfacing as I read because the writing names things I have been thinking, and a look at businessconnectionhub produced more of those recognition moments, content that gives shape to private intuitions is content that makes me feel less alone in my own thinking and this site has that effect.
Came in confused about the topic and left with a much firmer grasp on it, and after moddeck I felt I could explain this to someone else without hesitation, that is the gold standard for any educational content and most sites simply fail to reach it ever which is unfortunate but true.
https://sago24.org/
A particular kind of restraint shows up in the writing, and a look at ideaclarity maintained the same restraint across pages, knowing what not to say is just as important as knowing what to say and this site has clearly developed strong instincts on both sides of that editorial line throughout pieces I have read.
Широкий выбор тугоплавких металлов, таких как вольфрам и молибден
https://redmetsplav.ru/store/kobalt/wallex/kobalt-wallex-3-1/provoloka-kobaltovaya-wallex-3-1/
Матрасофф — отличный производитель матрасов для коммерческих объектов.
https://latanyakeith.com/author/kitzlb26943688/
Visit https://protectivevpn.com/ to find the top 10 VPN services, allowing you to surf the internet securely and anonymously using top VPNs from our list of recommended brands. We also have a list of fast servers for users worldwide! Our ratings and recommendations on this page are based on independent testing.
Picked a single sentence from this post to remember, and a look at bitvent gave me another to keep, content that produces memorable lines is doing more than just transferring information and the small selection of sentences I keep from each reading session is one of the actual returns I get from reading carefully.
Now considering carefully how to share this site with the right audience rather than broadcasting widely, and a look at navmixo extended that careful sharing impulse, content worth sharing carefully rather than spamming is content that has earned a higher kind of recommendation and this site has earned that careful shareability throughout pieces.
Now feeling mildly impressed in a way I do not quite remember feeling about a blog in a while, and a stop at zenvaxo extended that mild impression, content that produces specific positive emotional responses rather than just neutral information transfer is content with extra dimensions and this site has those extra dimensions clearly.
Looking for a transfer from Thessaloniki Airport? Visit https://thessaloniki-transfer.de/ for reliable, punctual, and convenient airport transfers to Chalkidiki, Sani Resort, and all of Greece. We offer fixed prices and no hidden costs, 24/7 customer support, and new, air-conditioned vehicles. Explore our other benefits on our website.
Following the post through to the end without my attention drifting once, and a look at claritysequence earned the same uninterrupted attention, content that holds attention without manipulating it is content with substantive pull and this site has demonstrated that substantive pull across multiple pieces in a single reading session reliably here today.
گینر کوین لورون، یک مکمل افزایشدهنده وزن و حجم فوقپیشرفته است که ترکیبی ایدهآل از کربوهیدراتهای پیچیده، پروتئینهای زودهضم و دیرهضم، و اسیدهای آمینه ضروری را در خود جای داده است.
Самые честные цены на ватные матрасы в городе, без переплат.
https://sellasiss.com/author/6bccbde64eae6163/
Really like that there are no exclamation marks or all caps shouting throughout the post, and a quick visit to executionlane maintained the same calm voice, restraint in punctuation signals confidence in the content and this site clearly trusts its substance to do the persuading rather than relying on typographic emphasis.
Весь металл проходит строгий входной контроль, за всё время работы ни одного случая брака.
https://xn--80aeedb0bfzeok.xn--p1ai/catalog/mednyi-perekhodnoi-troinik-press/mednyi-perekhodnoi-press-troinik-54kh21-mm-m3rt-gost-r-52948-2008/
Glad to have another reliable bookmark for this topic, and a look at muscatlumen suggested several more pages I will be marking too, building a personal library of trustworthy resources is one of the actual rewards of careful browsing and this site is earning a place on my permanent shortlist for the topic.
Even just sampling a few posts the consistency is what stands out, and a look at nervemuscat confirmed the broader pattern, sites where every piece I sample lives up to the standard set by the others are sites with serious quality control and this one has clearly invested in whatever editorial process produces that consistency reliably.
Now adding a small note in my reading log that this site is one to watch, and a look at clamable reinforced the watch status, the few sites I track deliberately rather than encounter accidentally are sites I expect ongoing returns from and this one has cleared the bar for that elevated tracking based on what I read.
Really like the way the post resists reaching for cliches that would have made it feel generic, and a quick visit to momentumplanning kept that fresh feel going, original phrasing and unexpected metaphors are signs that the writer is actually thinking rather than just stitching together familiar phrases into the appearance of content.
https://technoopt.com.ua/
Now thinking about how to apply some of this to a project I have been planning, and a look at molzino added more material for the planning, content that connects to my actual creative work rather than just being interesting in the abstract is the kind that earns priority placement in my reading rotation consistently going forward.
Just want to record that this site is entering my regular reading list, and a look at novelnoon confirmed it deserves the spot, my regular reading list is short and well curated and adding to it requires meeting a fairly high quality bar that this site has clearly cleared without much effort apparently.
Отраслевой охват впечатляет: от медицины до космической промышленности
https://redmetsplav.ru/store/kobalt/stellite/kobalt-stellite-6b/lenta-kobaltovaya-stellite-6b/
Approaching this site through a casual link click and being surprised by what I found, and a look at growthrequiresfocus extended the surprise, the rare experience of stumbling into excellent independent content rather than predictable mediocrity is one of the actual remaining pleasures of casual web browsing and this site provided it cleanly.
Glad to find a site whose links lead somewhere worth going rather than back to itself for SEO juice, and a stop at clarityinitiator kept that generous outbound feel, citing other peoples work with real respect rather than just for ranking signals is a sign of an honest operation worth supporting going forward.
Reading this brought back the satisfaction I used to get from blogs ten years ago, and a stop at clarityroutehub kept that nostalgic quality alive, sites that capture what was good about an earlier era of internet writing are increasingly precious and this one is doing that without feeling like a deliberate throwback at all.
Strong recommendation from me, anyone curious about the topic should make time for this, and a look at boundcoil only sharpens that recommendation further, the kind of resource that holds up against careful scrutiny rather than crumbling at the first critical question is rare and worth pointing other people toward when the topic comes up.
Купили матрасы ватные для рабочих на стройку, плотные, сшиты аккуратно.
https://music.caht.ai/denisgatlin61
Took a quick scan first and then went back to read properly because the post deserved it, and a stop at ideaprocessing kept me reading carefully too, the kind of writing that earns a slower second pass rather than getting skimmed and forgotten is something I value highly when I happen to find it.
Сервис ПроМастер решает бытовые проблемы в режиме 24/7 по всей России — от протечки крана до сложного ремонта техники. Платформа https://master-na-dom.online/ объединяет проверенных специалистов более чем в 170 городах, гарантируя выезд мастера за 30 минут без предоплаты. Удобная система заявок, прозрачное ценообразование и годовая гарантия на все виды работ делают сервис надёжным помощником в решении домашних задач любой сложности.
Found something quietly useful here that I expect to return to, and a stop at pillownebula added more of the same, content with quiet utility ages well in a way that flashy hot takes do not and I have learned to weight quiet utility much higher when deciding what to bookmark for later use.
Велакаст — это современный препарат для лечения гепатита С, который завоевал доверие пациентов благодаря высокой эффективности и удобству применения. Комбинация софосбувира и велпатасвира позволяет успешно бороться с различными генотипами вируса, обеспечивая излечение в большинстве случаев. На информационном портале https://velakast.online/ вы найдете подробную информацию о препарате, принципах его действия и особенностях терапии. Здесь собраны реальные отзывы пациентов, прошедших лечение, а также важные рекомендации по применению. Перед началом терапии обязательно проконсультируйтесь с врачом для подбора оптимальной схемы лечения.
Appreciate the work that went into laying this out so clearly, every section earns its place without filler, and a look at cultbotany confirmed the same care, definitely the kind of place that deserves a return visit when the topic comes up again later in the future or for any related question.
Если вам нужны матрасы в Санкт-Петербурге, обращайтесь на matras-vatniy.ru.
https://svarnabhumi.com/author/zitaelrod79556/
Закупали шлак ферросилиция для строительных нужд, материал качественный, без лишних примесей.
https://xn--80aeedb0bfzeok.xn--p1ai/catalog/latunnoe-litoe-koltso/latunnoe-litoe-koltso-400kh600-mm-lsd/
Solid value packed into a relatively short post, that takes skill, and a look at navqiro continues the dense useful content across more pages, this site clearly understands that respecting reader time is itself a form of generosity which is something most blog operations seem to have forgotten lately across the wider open web.
Without comparing too aggressively to other sources this one stands out for the right reasons, and a look at actionframework continued that distinctive quality, content that distinguishes itself through substance rather than style tricks is content with lasting differentiation and this site has clearly chosen substance based differentiation as its core editorial strategy.
A small editorial detail caught my attention, the way headings related to body text, and a look at amploom maintained that careful relationship, structural details like that show up to readers who notice them and the writers here have clearly thought about every level of the piece rather than just the words.
http://netritonet.com
Reading this prompted a small note in my reference file, and a stop at mutelion prompted another, the rare site that contributes useful nuggets to my own working knowledge rather than just consuming my attention is worth the time investment many times over compared to the usual pile of forgettable scroll content.
Reading this in a quiet hour and finding it suited the quiet, and a stop at noonmyrrh extended the quiet reading mood, content that matches its own optimal reading conditions rather than fighting them is content that has been thoughtfully calibrated and this site reads as having a particular reading mood in mind throughout.
Технические характеристики сплавов помогают инженерам в подборе
https://redmetsplav.ru/store/kobalt/stellite/kobalt-stellite-156/poroshok-kobaltovyy-stellite-156/
Now adjusting my mental list of reliable sites for this topic, and a stop at norqavo reinforced the adjustment, the small ongoing curation work of maintaining trusted sources is one of the actual practical activities of careful reading and this site has earned a permanent place on my list for this particular subject.
Even just sampling a few posts the consistency is what stands out, and a look at airycargo confirmed the broader pattern, sites where every piece I sample lives up to the standard set by the others are sites with serious quality control and this one has clearly invested in whatever editorial process produces that consistency reliably.
Skimmed first and then went back to read carefully, and the careful read paid off in places I had missed, and a stop at ideaexecutionhub got the same treatment, the rare site whose content rewards a second pass is content I want more of in my regular rotation rather than disposable single read articles.
Skipped the related products section because there was none, and a stop at progressmovescleanly also lacked any aggressive monetisation, content that is not constantly trying to convert me into a customer or subscriber is content that has confidence in its own value and that confidence shows up as a different reading experience.
Срочно требовались металлические кровати для вахтовиков, отгрузили со склада сразу.
https://pipainfo.com/author/sonia14m978983/
The overall feel of the post was professional without being stuffy, and a look at professionalalliancebond kept that approachable expertise going, finding the right register for technical content is hard but this site has clearly figured out how to sound knowledgeable without slipping into that distant lecturing tone that loses readers in droves every time.
Ended up here on a wandering afternoon and was glad I stayed for the read, and a stop at focusalignmenthub extended the wandering into a proper exploration of the site, the kind of place that rewards aimless clicking with something genuinely interesting rather than the shallow content that mostly populates the modern open web.
Now adding this site to a small mental group of recommendations I keep ready for specific kinds of inquiries, and a stop at purplemilk extended the recommendation readiness, content that I can confidently point friends and colleagues toward in specific contexts is content with real social utility and this site has that utility clearly.
Coming back to this one, definitely, and a quick visit to ideasbecomeaction only made me more sure of that, the kind of writing that makes you want to set aside time later rather than rushing through it now while distracted by everything else competing for attention on the screen today across so many tabs.
There’s certainly a lot to learn about this topic. I like all
the points you have made.
I like the helpful information you provide in your articles. I’ll bookmark your blog and check again here frequently. I am quite certain I’ll learn many new stuff right here! Best of luck for the next!
Will be coming back to this for sure, too much good content to absorb in one sitting, and a stop at claritymapping only added more pages I want to dig through, this site is going onto my regular rotation list because it consistently delivers something worth the visit lately rather than empty filler.
Надежная защита груза при транспортировке, даже длинномерные изделия доходят без повреждений.
https://xn--80aeedb0bfzeok.xn--p1ai/catalog/mednyi-perekhodnoi-troinik-press/mednyi-perekhodnoi-press-troinik-18kh6-mm-m1t-gost-r-52948-2008/
http://www.netritonet.com
Reading this in segments because the day was busy, and the post survived the fragmented attention well, and a stop at bowbotany held up similarly under interrupted reading, content that can withstand modern distracted reading patterns rather than requiring a perfect block of focused time is increasingly the kind I prefer.
Great work on keeping things readable, the post never drags or repeats itself which I really appreciate, and a stop at claycargo added a bit more context that fit naturally with what was already said here, no need to read everything twice to get the point being made today.
Reading this gave me material for a conversation I needed to have anyway, and a stop at nexmuzo added even more talking points, content that connects to upcoming social or professional needs rather than just being interesting in the abstract is the kind that earns priority placement in my attention these days routinely.
Honest assessment is that this is one of the better short reads I have had this week, and a look at curbcliff reinforced that, the bar for short content is low because most of it sacrifices substance for brevity but this site manages both at once which is harder than it sounds for most writers attempting it.
I just couldn’t leave your website before suggesting that I really enjoyed the usual information an individual supply on your visitors? Is gonna be back often in order to investigate cross-check new posts
Very nice post. I just stumbled upon your blog and wished to say that I’ve truly
enjoyed browsing your blog posts. In any case I
will be subscribing to your feed and I hope you write
again very soon!
Honest take is that this was better than I expected when I clicked through, and a look at clarityactivator reinforced that, the bar for online content has dropped so much that finding something thoughtful and well constructed feels almost noteworthy now which says more about the average than about this site itself.
Магниевый прокат представлен в достаточном ассортименте
https://redmetsplav.ru/store/kobalt/rossiyskie-splavy-3/kobalt-pr-3v14kb—tu-519722-003-76942199-2006/truba-kobaltovaya-pr-3v14kb—tu-519722-003-76942199-2006/
Worth recognising the specific care that went into how this post ended, and a look at lullpebble maintained the same careful conclusions, endings are where most blog content falls apart and this site has clearly invested in the closing stretches of its pieces rather than letting them simply trail off when energy fades.
Really thankful for posts that respect a reader’s time, this one does, and a quick look at poppymedal was the same, no need to scroll through endless intros just to get to the actual content, that approach alone is enough reason to come back here regularly for the kind of writing offered.
A piece that handled multiple complications without becoming confused, and a look at forwardprogression continued that organisational clarity, holding multiple threads in a single piece without losing any of them is a sign of skilled writing and this site has clearly developed the editorial discipline to manage complexity without sacrificing readability throughout.
A clean read with no irritations, and a look at qarnexo continued that frictionless quality, the absence of small irritations is something I notice only when present elsewhere and this site is one of the rare places where everything just works and lets me focus on the substance rather than fighting the format.
Even from a single post the editorial care is clear, and a stop at myrrhlens extended that care across more pages, the kind of attention to quality that shows up in every paragraph is what separates serious sites from the rest and this one has clearly invested in that paragraph level attention across what I have read.
Greetings! Very useful advice within this post!
It’s the little changes that make the largest changes.
Many thanks for sharing!
A piece that handled a controversial angle without becoming heated, and a look at nuartplate continued that calm engagement, content that can address contested topics without inflaming them is doing rare diplomatic work and this site has clearly developed the editorial maturity to handle sensitive material with the appropriate temperature of writing throughout.
Grand League players think in probabilities, not certainties — learn this mental model.
http://www.netritonet.com
https://parketideas.com.ua/
Took the time to read every paragraph rather than skimming for the punchline, and a quick visit to momentumtrack earned the same careful attention from me, that is the highest signal I can give about content quality because my default mode is rapid scanning rather than deliberate reading on most pages.
https://charity-alliance-ukraine.com/
Skipped the TLDR thinking I would read everything anyway, and ended up enjoying the path through the full post, and a stop at focusdirection similarly rewarded the patient read, summaries are useful but the journey through good writing is part of what makes the destination feel earned rather than just delivered cleanly.
Worth flagging that the post handled an angle of the topic I had not seen elsewhere, and a look at astrorod extended that fresh treatment, content that finds underexplored corners of well covered subjects is genuinely valuable and this site has demonstrated that exploratory editorial approach across multiple pieces in my reading sessions today.
Get affordable topical eflornithine canada over the counter options and original brands online. Explore high-quality topical eflornithine canada for sale batches with secure checkout and verified international pharmacy standards.
https://www.agproperties.ae/estate_agent/korymckenzie8/
Recommended without hesitation if you care about careful coverage of this topic, and a stop at amidbull reinforced the recommendation, the bar I set for unhesitating recommendations is fairly high and this site has cleared it through the cumulative weight of multiple consistently good pieces rather than through any single standout post which is meaningful.
Reading this on a phone at a coffee shop and finding it perfectly suited to that context, and a stop at growthmoveswithintent continued the comfortable mobile experience, content that works across reading conditions without compromising on substance is increasingly important and this site has clearly thought about the whole reader experience here.
Order in canada topical eflornithine with active eflornithine in canada components at lower rates. See all authentic options for topical eflornithine canada prescription updates and local delivery policies on our pharmacy store.
https://kamvet.org/author-profile/dorcaspoore351/
If some one needs to be updated with most recent technologies therefore he must
be visit this site and be up to date everyday.
Find out where to buy topical eflornithine where to buy in quebec and check actual eflornithine cost in canada details. Read real topical eflornithine canada reviews to choose the right option for your topical hirsutism canada routine.
https://hero-cloud-stg-code.cnbita.com/gertruderieger/2482771/wiki/canadian4pharmacy.com
http://www.netritonet.com
Заказывали партию молибденовых листов для производства, качество металла идеальное, все сертификаты в наличии.
https://xn--80aeedb0bfzeok.xn--p1ai/catalog/latunnoe-litoe-koltso/latunnoe-litoe-koltso-125kh600-mm-lmtssk/
Салон оказался уютным и приватным, что очень понравилось. Девушка встретила тепло, с первых минут стало комфортно. Провели время так, что теперь хочется повторять регулярно – индвидуалка питер
Order in canada topical eflornithine with active eflornithine in canada components at lower rates. See all authentic options for topical eflornithine canada prescription updates and local delivery policies on our pharmacy store.
https://rtvon.xyz/partheniaf
The whole experience of reading this was pleasant from start to finish, no pop ups and no annoying interruptions, and a look at intentionalvector continued that clean experience, technical choices about page design matter for the reader and this site clearly cares about the small details that add up to comfort across multiple visits.
A welcome contrast to the loud takes that have dominated my feed lately, and a look at cartrova extended that calm voice, content that arrives without yelling has become unusual in the modern attention economy and this site is one of the few places I have found that consistently delivers without raising its voice.
Time spent here today felt productive in the way that good reading sessions sometimes do, and a stop at forwardpathactivated extended that productive feeling across the rest of the morning, the difference between productive reading and merely passing time is real and this site is consistently on the productive side for me lately.
Buy generic eflornithine generic canada online to reduce facial hair growth efficiently. Check out topical eflornithine canada price options and secure your delivery directly from our trusted topical eflornithine canada pharmacy setup.
https://git.pelote.chat/phyllisvaccari
Get affordable topical eflornithine canada over the counter options and original brands online. Explore high-quality topical eflornithine canada for sale batches with secure checkout and verified international pharmacy standards.
https://www.milegajob.com/companies/canadian-4pharmacy/
Find out where to buy topical eflornithine where to buy in quebec and check actual eflornithine cost in canada details. Read real topical eflornithine canada reviews to choose the right option for your topical hirsutism canada routine.
https://linkaloo.it/XMyXB
Сайт выглядит профессионально и лаконично, без лишней рекламы
https://redmetsplav.ru/store/kobalt/rossiyskie-splavy-3/kobalt-ep207-1/provoloka-kobaltovaya-ep207-1/
Is eflornithine available in canada without massive markups? Compare total topical eflornithine canada buy budgets and access top-tier generic versions available for all Canadian provinces today.
https://code.letsbe.solutions/zoilabarrow951
Is eflornithine available in canada without massive markups? Compare total topical eflornithine canada buy budgets and access top-tier generic versions available for all Canadian provinces today.
https://smallbusinessinternships.com/employer/canadian-4pharmacy/
Find out where to buy topical eflornithine where to buy in quebec and check actual eflornithine cost in canada details. Read real topical eflornithine canada reviews to choose the right option for your topical hirsutism canada routine.
https://git.zkbro.com/nealmears42225
Well done, the kind of post that makes you slow down and actually read instead of skimming for keywords, and a look at visionactivation kept me reading carefully too, that is a sign of writing that has been crafted rather than churned out for an algorithm to see today and tomorrow.
netritonet.com
Get affordable topical eflornithine canada over the counter options and original brands online. Explore high-quality topical eflornithine canada for sale batches with secure checkout and verified international pharmacy standards.
https://www.yarrabilbabulletin.com.au/author-profile/dannstearns56/
Order in canada topical eflornithine with active eflornithine in canada components at lower rates. See all authentic options for topical eflornithine canada prescription updates and local delivery policies on our pharmacy store.
https://myeventcreator.co.uk/author/fkdtera1555054/
Now saved this in a way that I will actually find again rather than the casual bookmark approach, and a stop at qinmora earned the same careful saving, organising my reading bookmarks so that high quality sources rise to the top is something I should do more of and this site triggered that organisation today.
Is eflornithine available in canada without massive markups? Compare total topical eflornithine canada buy budgets and access top-tier generic versions available for all Canadian provinces today.
https://directory.googledirectories.com/author/pjijerri201502/
Honestly the simplicity of the explanation made the topic click for me in a way other writeups had not, and a look at qanviro continued that clarity into related areas, when a writer gets the level of explanation right the reader does the heavy lifting themselves and the post just enables it.
Find out where to buy topical eflornithine where to buy in quebec and check actual eflornithine cost in canada details. Read real topical eflornithine canada reviews to choose the right option for your topical hirsutism canada routine.
https://theindiemusic.com/author-profile/normandmazure/
Most of the time I bounce off similar pages within seconds, and a stop at odepillow held me longer than I would have predicted, the ability to convert a likely bouncing visitor into an engaged reader is a quality signal and this site has demonstrated that conversion ability across multiple visits where I expected to bounce.
Definitely a recommend from me, anyone curious about the topic should check this out, and a look at myrrhomen adds even more reason for that, the depth and quality combine to make this site one I will be pointing people toward whenever similar conversations come up over the months ahead at work or socially.
Worth a quiet moment of recognition for the consistency I have noticed across multiple posts, and a stop at trustedunitygroup continued that consistent quality, sites that maintain quality across many pieces rather than peaking on one viral post are sites with real editorial discipline and this one has clearly developed that discipline carefully.
Came across this through a roundabout path and now it is on my regular rotation, and a stop at actiondeployment sealed that decision, the open web still produces serendipitous discoveries when you let the citations and references guide you rather than relying purely on algorithmic feeds for new content recommendations always.
Салон удобно расположен, все комфортно. Девушка красивая, улыбчивая, настоящий мастер своего дела. Получил полное расслабление: снять проститутку Санкт-Петербург
Easy to recommend, the content speaks for itself without needing additional praise from me, and a stop at bowcask only adds more reasons to send people this way, the kind of generous resource that benefits its readers without demanding anything in return is increasingly rare and worth recognising clearly today across the broader open internet.
Closed and reopened the tab three times before finally finishing, and a stop at momentumcraft held my attention straight through, sometimes content fights for time against my own distraction and the times it wins say something positive about its quality and this post clearly won that fight today afternoon for me.
Thanks for the moderate length, neither so short it skips substance nor so long it bloats, and a stop at curbcomet hit the same balance, the right length is one of the hardest things to calibrate in blog writing and I appreciate when a team has clearly thought about it rather than defaulting.
Looking for btc rate? Check the live Bitcoin price in GBP and see how much 1 BTC is worth in British Pounds right now. bitcoinpricegbp.com follows the live BTC/GBP rate, everyday fluctuations, and important market figures for those who need an instant Bitcoin price reference in British Pounds. This platform is perfect for users who want to keep track of their BTC balance in British Pounds, review current market changes, and assess the total value of their crypto portfolio.
A handful of memorable phrases from this one I will probably use later, and a look at lushpassion added a couple more, content that contributes language to my own communication rather than just facts is content with a different kind of utility and this site is providing that linguistic utility consistently across what I read.
Grand League strategy that specifically targets the 10% of lineups that win big prizes.
Thanks for the honest framing without exaggerated claims that the topic will change my life, and a stop at potterlily kept the same modest tone, restraint in marketing language signals trustworthiness and the writers here are clearly playing the long game by building credibility rather than chasing immediate clicks through hyperbole.
Genuinely glad I clicked through to read this rather than skipping past, and a stop at ampcard confirmed I should keep clicking through to more pages here, the kind of resource that justifies its place in my browser history rather than feeling like wasted time which is the highest compliment I offer any site online today.
Quietly enthusiastic about this site after the past few hours of reading, and a stop at cleatbox extended that enthusiasm, the calibration of enthusiasm to evidence is something I try to maintain and this site has earned a calibrated quiet enthusiasm rather than the loud excitement that usually fades within a day or two of finding something.
netritonet.com
Appreciate that you did not pad this with fluff to hit a word count, the post says what it needs to say and stops, and a look at strategicflow did the same, brevity here feels intentional not lazy which is a distinction many writers miss completely sometimes when they are working under deadlines.
Honest reaction is that this is the kind of writing I would defend in a conversation about good blog content, and a look at progressalignment reinforced that, the rare site whose work I would actively recommend rather than just tolerate is the kind I want to support through return visits regularly.
Продлить ОСАГО АльфаСтрахование
Genuine reaction is that this site clicked with how I like to read, and a look at tavquro kept that comfortable fit going, sometimes you find a place online whose editorial decisions just align with your preferences and when that happens it is worth recognising and supporting through repeat engagement consistently going forward.
Reading this prompted me to dig into a related topic later, and a stop at amplebey provided some of the starting points for that follow up reading, content that triggers further exploration rather than satisfying curiosity completely is content with real generative energy and this site has plenty of that energy throughout it.
Турция остаётся лидером среди зарубежных направлений для россиян: мягкий климат, отели уровня ultra all inclusive и разнообразие курортов на любой вкус. Анталья, Бодрум, Кемер, Аланья — каждый из них предлагает свою атмосферу, будь то яхтинг, дайвинг или неспешный пляжный отдых. Чтобы не ошибиться с выбором, читайте подробный обзор https://evrobuket-nn.ru/top-kurorty-turcii-gde-otdyhat/ — там собраны топ-7 курортов с описанием инфраструктуры, пляжей и развлечений. Грамотно выбранный курорт превращает поездку в незабываемое путешествие.
Worth flagging that the post handled an angle of the topic I had not seen elsewhere, and a look at signaldrivenprogress extended that fresh treatment, content that finds underexplored corners of well covered subjects is genuinely valuable and this site has demonstrated that exploratory editorial approach across multiple pieces in my reading sessions today.
ОСАГО в Т-Страхование
Now recognising that this site has earned a place in the small group of resources I treat as authoritative, and a stop at buildprogresswithintent confirmed that placement, the difference between resources I trust and resources I just consume is real and this site has clearly moved into the trusted category through consistent quality over time.
ОСАГО в Ингосстрах
Now feeling mildly impressed in a way I do not quite remember feeling about a blog in a while, and a stop at actionactivation extended that mild impression, content that produces specific positive emotional responses rather than just neutral information transfer is content with extra dimensions and this site has those extra dimensions clearly.
ОСАГО в Абсолют Страхование
This was an informative article. Customer satisfaction surveys play an important
role in improving the shopping experience and service standards.
Продлить ОСАГО Ингосстрах
Worth recommending broadly to anyone who reads on the topic, and a look at stylerova only confirms that, the rare combination of accessibility and depth in this site makes it suitable for both newcomers and people who already know the area which is hard to pull off in any blog format today and rarely managed.
No jargon, no confusion — just clear guidance on where Dream11 stands legally.
Easily one of the better explanations I have read on the topic, and a stop at mountmorel pushed it even higher in my mental ranking of useful resources, the kind of site that beats the average not by trying harder but by simply caring more about what it puts out daily which always shows.
Продлить ОСАГО РЕСО
The captain who scores big in matches where teams need to chase inside 18 overs to win on NRR.
ОСАГО в Югории
ОСАГО в АльфаСтрахование
Suchen Sie einen privaten Transfer vom Flughafen Thessaloniki? Besuchen Sie https://halkidiki-taxi-transfer.gr/ und buchen Sie Fahrten zum Festpreis mit einem freundlichen, ortskundigen Fahrer – fur eine entspannte Ankunft nach einem langen Flug. Buchen Sie online. Wir erwarten Sie mit einem Schild am Flughafen. Kindersitze sind kostenlos. Weitere Informationen finden Sie auf der Website.
Now thinking I want more sites built on this kind of editorial foundation, and a stop at qavlizo extended that wish into a broader hope, sites built on substance and care rather than on metrics and growth are the kind of sites I want to see more of and this one is a small example worth supporting.
Looking for sell usdt routes? Check out buysellswappro.com – BuySellSwapPro guides users through fiat and crypto exchanges via simple online routes that revolve around USDT. The platform lets you purchase crypto using a credit or debit card, convert crypto back to fiat, browse options by currency or country, and pick the route that fits your card, bank account, or regional market needs.
Now considering whether the post would translate well into a different form, and a look at intentionalpathway suggested similar versatility, content that could move into other media without losing its substance is content that has been built around ideas rather than around format and this site reads as idea first throughout posts.
Удобный сайт и понятная навигация по каталогу, легко найти нужную марку стали или сплава.
https://xn--80aeedb0bfzeok.xn--p1ai/catalog/latunnoe-litoe-koltso/latunnoe-litoe-koltso-700kh600-mm-lsdch/
Honest assessment after reading this twice is that it holds up under careful attention, and a look at livzaro extended that durability across more pages, content that survives a second read without revealing weak spots is rarer than the average reader probably realises and this site clearly cleared that bar.
Just enjoyed the experience without needing to think about why, and a look at nagapinto kept that effortless feeling going, sometimes the best content is invisible in the sense that you forget you are reading until you reach the end and realise time has passed without you noticing it pass naturally.
Информация об обработке IP-адреса для определения региона — современный подход
https://redmetsplav.ru/store/titan/rossiyskie-splavy-4/titan-4201/folga-titanovaya-4201/
Worth saying that this is one of the better things I have read on the topic in months, and a stop at claritynavigator reinforced that ranking, the topic is well covered by many sources but few do it with this level of care and the few that do deserve to be flagged so other readers can find them.
Thanks for treating the topic with the seriousness it deserves without becoming pompous about it, and a stop at datacabin continued that balanced treatment, the gap between earnest and self serious is huge and writers who can stay on the right side of it earn my respect when I find them online today.
Picked up several practical tips that I plan to try out this week, and a look at lyrelinden added a few more I will be testing alongside, content with practical hooks that connect to my actual life is the kind that earns my repeat attention rather than the merely interesting that I forget within a day.
وی سون نوتریشن، یک مکمل پروتئینی باکیفیت و پیشرفته است که از بهترین منابع آب پنیر استخراج میشود و به منظور تسریع ریکاوری، افزایش حجم عضلانی و بهبود عملکرد ورزشی طراحی شده است.
Если вы планируете жить в столице, вопрос регистрации лучше не откладывать. Временная регистрация в Москве помогает подтвердить место пребывания и упростить многие повседневные процессы. Официальное оформление делает переезд спокойнее, понятнее и надежнее, временная регистрация москва
Reading this triggered a small reorganisation of my own thinking on the topic, and a stop at bowclutch furthered that reorganisation, content that affects the shape of my mental model rather than just decorating it with new facts is content with structural rather than informational impact and this site provides that.
Refreshing tone compared to the dry corporate posts on similar topics, and a stop at focusmapping carried that personality through nicely, you can tell when a real person is behind the writing versus a content team chasing metrics and this site definitely falls into the former category clearly across what I have seen.
A piece that demonstrated competence without performing it, and a look at claritydrive maintained the same self assured but unshowy register, the gap between competence and performance of competence is one I track and this site has clearly chosen to demonstrate rather than perform which I find much more persuasive as a reader.
Thanks for treating the topic with the seriousness it deserves without becoming pompous about it, and a stop at zimlora continued that balanced treatment, the gap between earnest and self serious is huge and writers who can stay on the right side of it earn my respect when I find them online today.
Временная регистрация — удобное решение для тех, кто приехал в Москву на работу, учебу или длительное проживание. Она подтверждает фактическое пребывание и помогает решать повседневные вопросы без ненужных затруднений. Главное — оформлять документы корректно и официально – временная регистрация для иностранных граждан на 3 месяца
Регистрация в столице нужна не только для формальностей, но и для комфортной жизни в городе. Временная регистрация в Москве помогает решать вопросы с работой, обучением и обслуживанием. Чем понятнее и законнее оформлены документы, тем спокойнее проходит проживание, временная регистрация для иностранных граждан
Found the use of subheadings really helpful for scanning back through the post later, and a stop at tilvexa kept that reader friendly approach going, navigation is something many blog writers ignore but small structural choices make a noticeable difference for someone returning to find a specific point again days or weeks later.
It’s fantastic that you are getting ideas from this article as well as from our dialogue made at this place.
Here is my blog post: singapore corporate blog
Considered against the flood of similar content this one stands apart in important ways, and a stop at amplebuff extended that distinctive feel, sites that find their own corner of a crowded topic and stay there are sites worth following and this one has clearly carved out its own space and committed to defending it carefully.
Loved the writing voice here, friendly without being fake and confident without being arrogant, and a stop at buzzrod carried the same tone forward, the kind of personality that makes a reader feel welcome rather than lectured at which is a balance plenty of writers struggle to find no matter how long they have been at it.
This is a great example of content that keeps the discussion interesting without feeling overly heavy, because the ideas are presented in a clear way and the overall tone encourages people to participate in a balanced and positive way.
在线购买无处方安定片 xxx Pornhub
Весь металл проходит строгий входной контроль, за всё время работы ни одного случая брака.
https://xn--80aeedb0bfzeok.xn--p1ai/catalog/mednye-troiniki-press/mednyi-press-troinik-40-mm-m1rm-gost-r-52948-2008/
Started imagining how I would explain the topic to someone else after reading, and a look at parchmodel gave me more material for that imagined explanation, content that improves my own ability to discuss a topic is content that has actually transferred knowledge rather than just decorating my screen for a few minutes.
One of the more thoughtful posts I have read recently on this topic, and a stop at forwardmomentumfocus added even more weight to that impression, this is genuinely good content that holds its own against far better known sites in the same space without trying to imitate any of them at all which I appreciate.
Honestly impressed by the consistency of voice across what I have read so far, and a quick visit to probemound continued that consistent feel, when a site reads like one careful person rather than a committee the experience is more rewarding for the reader who notices these subtle editorial details over time.
Быстрая навигация через «Карту сайта» для поиска глубоких страниц
https://redmetsplav.ru/store/volfram/splavy-volframa-1/volfram-vrn-1/prutok-volframovyy-vrn/
Honestly the simplicity is what makes this work, the topic is not buried under filler words or overly complex examples, and a quick look at qavmizo showed the same sensible style, I left with what I came for and no headache from over reading which is a real win these days.
Generally my attention drifts on long posts but this one held it through the end, and a stop at growthsignalpath earned the same sustained focus, content that defeats my drift tendency is content with substantive pulling power and this site has demonstrated that pulling power across multiple pieces in a session that has now run quite long actually.
Top notch writing, every paragraph carries weight and nothing feels like filler, and a stop at muffinmarble reflected that same care, a rare thing on the open web these days where most pages exist for clicks rather than actual reader value or anything close to that which is honestly a real shame.
Worth recognising that the post did not pretend to be the final word on the topic, and a stop at narrowlake continued that humility, content that admits its own scope and limits is more trustworthy than content that overreaches and this site has clearly developed the editorial maturity to know what it can and cannot claim well.
Closed my email tab so I could read this without interruption, and a stop at luxvilo earned the same protected attention, when content is good enough to defend against the usual digital distractions you know it deserves better than the half attention most online reading gets in a typical busy day.
Coming back tomorrow when I can give this a proper read, the post deserves better attention than I can give right now, and a look at strategyguided suggests there is plenty more here that deserves the same treatment, definitely a site I will be exploring properly over the next few days when I can.
This actually answered the question I had been searching for, and after I checked clevebound I had a few more pieces I had not realised I needed, that is the sign of a site that knows what its readers want before they even know how to ask it which is impressive.
Genuine pleasure to read, and that is not something I say often after a casual click through, and a quick visit to actionguidance kept the same feeling going across the rest of the site, finding writing that actually feels good to spend time with rather than just functional is increasingly rare on the open web.
В полном справочнике по почтовым отделениям России собраны данные об индексах, адресах, времени работы и услугах отделений в различных регионах страны https://pochtaops.ru/
One of the more thoughtful posts I have read recently on this topic, and a stop at prismplanet added even more weight to that impression, this is genuinely good content that holds its own against far better known sites in the same space without trying to imitate any of them at all which I appreciate.
Picked up on several small touches that suggest a careful editor, and a look at dewchase suggested the same hand at work across the broader site, editorial consistency at a granular level is one of the strongest signs that an operation is serious rather than just hobbyist and this site reads as serious throughout.
Started thinking about my own writing differently after reading, and a look at zornexo continued that reflective effect, content that influences how I work rather than just informing what I know is content with the highest kind of impact and this site has triggered some of that reflective influence today on me.
Москва привлекает студентов, специалистов и семьи, поэтому вопрос регистрации здесь остается актуальным. Временная регистрация в Москве помогает официально подтвердить пребывание и пользоваться городскими возможностями. Важно оформлять ее внимательно и без сомнительных схем – регистрация
Genuinely glad I clicked through to read this rather than skipping past, and a stop at magmalong confirmed I should keep clicking through to more pages here, the kind of resource that justifies its place in my browser history rather than feeling like wasted time which is the highest compliment I offer any site online today.
My time on this site has now extended past what I had budgeted, and a stop at claritycompanion keeps extending it further, content that overstays its budget in my schedule is content that has earned the extra time and this site has been earning extra time across multiple visits to the point where my schedule needs adjustment.
Порадовало наличие вольфрамовых прутков редких диаметров, менеджер оперативно помог с подбором.
https://xn--80aeedb0bfzeok.xn--p1ai/catalog/latunnoe-litoe-koltso/latunnoe-litoe-koltso-200kh400-mm-lk2/
Никелевые сплавы — основа для жаропрочных конструкций
https://redmetsplav.ru/store/volfram/splavy-volframa-1/volfram-vi-10-1/izdeliya-iz-volframa-vi-10/
Reading this in pieces over a coffee break and finding it consistently rewarding, and a stop at xelzino extended that into related material I will return to later, the kind of site that fits naturally into small reading windows without requiring a long uninterrupted block is genuinely useful for how I actually browse.
Just dropping by to say thanks for the effort, it does not go unnoticed when a writer cares this much about the reader, and after I went through clarityoperations I was certain this is one of the better corners of the internet for this particular kind of content which is genuinely refreshing.
Worth flagging that this approach to the topic is fresh without being contrarian, and a stop at strategyhub extended the same fresh angle, finding original perspective on familiar subjects is rare and this site has clearly developed its own way of seeing rather than echoing the dominant takes from elsewhere consistently.
If I had to summarise the editorial sensibility of this site in a few words it would be careful and human, and a look at qelmizo extended that summary feeling, capturing the essence of a sites approach in brief is hard but this site has a clear enough identity that the summary comes naturally enough.
Reading this post made me realise I had been settling for lower quality elsewhere, and a look at ampleclove extended that recalibration, content that exposes how much I had been accepting in adjacent sources is content with calibrating effect on my standards and this site is performing that calibration function across topics for me reliably.
Временная регистрация подходит людям, которые проживают в Москве не постоянно, но хотят оформить свое пребывание официально. Это важно для работы, учебы, медицинских и бытовых вопросов. Законное оформление помогает сохранить спокойствие и избежать неприятных ситуаций: купить прописку
https://dzen.ru/a/Z-wZzKk7V2mgAjD3
Bookmark earned, calendar reminder set, share queued, all from one good post, and a look at bracecloth did the same, when a single reading session triggers multiple downstream actions you know the content has actually moved me beyond the page and this site is moving me at that higher level reliably.
Now noticing that the post benefited from being neither too short nor too long for its content, and a look at narrowmotor continued that calibration of length, sites that match length to content rather than padding to hit some target are sites that respect both their material and their readers and this site does both.
Came away with some new perspectives I had not considered before, and after vexring those ideas felt more complete, the kind of content that stays with you a little while after reading rather than slipping out the moment you switch tabs and move on with your day to whatever comes next.
Looking through other posts here the consistency is what makes the site valuable rather than any single piece, and a stop at melvizo extended that consistency observation, sites whose value lies in the ongoing pattern rather than in standout posts are sites I trust more deeply and this one has clearly built that kind of trust.
Grand League team construction in low-scoring matches — a completely different strategy.
Now adjusting my expectations upward for the topic based on this post, and a stop at actionfuelsdirection continued that bar raising effect, content that resets what I think is possible on a subject is doing real work in shaping my standards and this site is providing those bar raising experiences at a notable rate during sessions.
Now organising my browser bookmarks to give this site easier access, and a look at mulchlens earned the same organisational priority, the small acts of digital housekeeping I do for sites I expect to use often are themselves a measure of trust and this site has triggered the trust based housekeeping behaviour from me clearly.
Recommend this to anyone who values clear thinking over flashy presentation, and a stop at visionnavigation continued in the same understated way, this site has its priorities in the right place which makes it worth supporting through repeat visits and recommendations rather than just one passing read today before moving on quickly elsewhere.
Solid recommendation from me to anyone working in the area, the perspective here is grounded, and a look at quincenarrow adds even more useful angles, the kind of site that becomes a reference rather than just a one time read which is a higher bar than most blogs ever reach today on the modern web.
Благодарим за оперативную поставку ниобиевых труб, выручили в очень сжатые сроки.
https://xn--80aeedb0bfzeok.xn--p1ai/catalog/mednye-otvody-press/mednyi-otvod-press-90-gradusov-34-mm-m1e-gost-r-52948-2008/
Looking through the archives suggests this site has been doing this for a while at this level, and a look at aeonbrawn confirmed the long term consistency, sites that have maintained quality across years rather than just a recent stretch are sites with serious editorial discipline and this one has clearly been at it for a while.
A piece that brought a sense of order to a topic I had been finding chaotic, and a look at actionmapping continued that organising effect, content that imposes useful structure on messy subjects is doing genuine intellectual work and this site is providing that organisational function across multiple posts I have read recently here.
A piece that did not require external context to follow, and a look at makernavy maintained the same self contained quality, content that stands alone without forcing readers to chase prerequisites is more accessible and this site has clearly thought about how each piece can serve a fresh visitor rather than only existing members.
Для многих приезжих временная регистрация становится важной частью жизни в Москве. Она позволяет чувствовать себя увереннее при обращении в разные учреждения и при оформлении важных дел. Главное — заранее подготовить документы и выбрать прозрачный способ оформления: постоянная прописка в москве
Now noticing that the post did not mention the writer at all, focus stayed on the topic, and a look at perfectmill continued that author absent quality, content that disappears the writer to focus on the substance is a particular kind of generosity and this site has clearly chosen the substance over the personality consistently.
vps server аренда
Took longer than expected to finish because I kept stopping to think, and a stop at zelzavo did the same to me, content that provokes thought rather than just delivering information is in a different category and the team here is clearly working at that higher level rather than just cranking out posts.
Now setting aside time on my next free afternoon to read more from the archives, and a stop at qenmora confirmed that time will be well spent, the rare site whose archive deserves a dedicated reading session rather than just casual sampling is the kind of resource worth scheduling around and this one qualifies clearly.
Visit the YouTube channel https://www.youtube.com/@SERGGURU07 – he tells quiet stories that encourage you to slow down and turn your attention inward. If even for a moment while watching, you smile softly, feel something tirring inside, or simply sit in silence and understand, then this story is enough. The videos are created using artificial intelligence tools and the creator’s imagination. These are fictional works and have no connection to historical fact.
A small thank you note from me to the team behind this work, the post earned it, and a stop at claritysystems suggested more thanks would be in order over time, recognising the people who do good writing online is something I try to remember to do because the alternative is silence and silence rewards mediocrity unfortunately.
Will be sharing this with a couple of people who care about the topic, and a stop at ideatraction added more material worth passing along, the kind of site that is generous with quality content and does not make you jump through hoops to access it which is appreciated more than the team probably realises.
매일 쏟아지는 방대한 정보 중에서 어떤 것을 선택해야 할지 고민이라면 주목해 주세요. 오피사이트는 사용자들에게 가장 반응이 좋은 인기 콘텐츠를 우선적으로 제공합니다. 오피박사와 함께라면 트렌드를 놓치지 않고 항상 가장 앞선 정보를 받아보실 수 있습니다.
Worth flagging this post as worth a careful read rather than a casual skim, and a stop at nationmagma earned the same careful approach, the few sites that warrant slower reading are sites I now treat differently from the daily content stream and this one has clearly moved into that elevated treatment category.
лучшие vps хостинги
Glad I stumbled across this post, the explanations actually make sense without needing background knowledge to follow along, and after a stop at rovnero the same was true there, no assumptions about the reader just clear writing that anyone can understand from the first line right through to the end.
Использование современных технологий защиты данных пользователей
https://redmetsplav.ru/store/vismut/zarubezhnye-splavy-3/vismut-roto158f/poroshok-vismutovyy-roto158f/
Спецстали для машиностроения закупаем только здесь, надежность материала подтверждена испытаниями.
https://xn--80aeedb0bfzeok.xn--p1ai/catalog/latunnoe-litoe-koltso/latunnoe-litoe-koltso-40kh100-mm-lts40mts1-5/
Reading this slowly to absorb the structure, and the structure is doing real work alongside the words, and a look at androblink maintained the same architectural quality, when sentence shapes and paragraph rhythms reinforce the meaning rather than just transporting words you know you are reading skilled work today.
Now setting this aside as a model of how to write thoughtfully on the topic, and a stop at privetplain extended that model status, content that becomes a reference for how a kind of writing should be done is content with influence beyond its own readership and this site is reaching that level for me clearly today.
Worth saying that the prose reads naturally without straining for style, and a stop at aeoncraft maintained the same unforced quality, writing that achieves elegance without effort is the highest tier and this site has clearly worked out how to land that effortless quality consistently rather than only on the writers best days.
Came across this and immediately thought of a friend who would enjoy it, and a stop at ideaconversion also reminded me of someone, content that triggers the urge to share is content that has earned my recommendation and this site has earned multiple from me already across different conversations during the week.
Now recognising the post as a rare example of careful writing on a topic that mostly receives careless treatment, and a stop at muralmend extended that contrast with the average elsewhere, content that highlights how much the average is settling for low quality is content that has both internal merit and external value as a benchmark.
https://dzen.ru/a/Z-wZzKk7V2mgAjD3
Found this via a link from another piece I was reading and the click was worth it, and a stop at ampblip extended the value across more material, the open web still rewards clicking through citations when the underlying writers care about each other work and this site clearly belongs to that network.
I really like how the writer keeps the tone friendly without sounding fake or overly polished, and after a stop at directionturnsmotion the same calm pace was there, no rushing to make a point and no padding either, just clean honest writing that I can respect and come back to later again.
Thank you for being clear and direct, that simple approach saves so much frustration on the reader’s end, and a stop at progressforward only made me more sure of it, the rest of the content seems to follow the same pattern which is a great sign of consistent editorial care behind the scenes.
Worth marking this site as one to come back to deliberately rather than by accident, and a stop at burlauras reinforced that intention, the difference between sites I find again by chance and sites I return to on purpose is meaningful and this one has clearly moved into the deliberate return category for me.
The conclusions felt earned rather than tacked on at the end like an afterthought, and a look at mallowmorel kept that careful structure going, you can tell when a writer has thought about the shape of their post versus just letting it ramble out and hoping for the best at the end which most do.
Just one of those reads that left me feeling slightly more capable rather than overwhelmed, and a look at qivzaro kept that empowering feel going, the difference between content that builds the reader up and content that intimidates them is huge and this site clearly knows which side of that line to stand.
Took a chance on the headline and was rewarded, and a stop at strategyactivation kept the rewards coming as I clicked through, the kind of place where every link leads somewhere worth the click is a small luxury on the modern web where so many sites are mostly empty calories disguised as content.
vps best
Thanks for one’s marvelous posting! I seriously enjoyed reading it, you’re a great author.I will
make sure to bookmark your blog and will come back in the foreseeable future.
I want to encourage you to ultimately continue your great job, have a nice afternoon!
Now realising the topic deserved better treatment than it has been getting elsewhere, and a look at basteclay extended that broader recognition, content that exposes the gap between actual quality and average quality elsewhere is doing the quiet work of raising standards and this site is contributing to that elevation in its own corner.
A piece that left me thinking I had been undercaring about the topic, and a look at ranchomen reinforced that mild concern, content that raises the appropriate weight of a subject without being preachy about it is doing important work and this site is providing that gentle elevation of attention for me consistently.
Продажа проволоки из тугоплавких металлов востребована в электронике
https://redmetsplav.ru/store/vismut/zarubezhnye-splavy-3/vismut-h2016—ansi/provoloka-vismutovaya-h2016—ansi/
«Партнёр» — проверенный поставщик товаров для школ и дошкольных учреждений. В ассортименте представлены оборудование, пособия и мебель по доступным ценам. Подробный каталог доступен на сайте https://xn—-7sbbumkojddmeoc1a7r.xn--p1acf/ с удобным выбором товаров. Доставляем товары бесплатно во все города России — от Москвы до Иркутска. В одном месте — надёжное качество, выгода и скорость.
Редкие и тугоплавкие металлы всегда в наличии или под заказ в короткие сроки, рекомендую.
https://xn--80aeedb0bfzeok.xn--p1ai/catalog/mednye-dvukhrastrubnye-mufty-press/mednaia-dvukhrastrubnaia-press-mufta-42-mm-m2r-gost-r-52948-2008/
A small thank you note from me to the team behind this work, the post earned it, and a stop at visionactionloop suggested more thanks would be in order over time, recognising the people who do good writing online is something I try to remember to do because the alternative is silence and silence rewards mediocrity unfortunately.
The one financial habit every profitable Dream11 player follows without exception.
Better than most of the writing I have come across on this topic recently, simpler and more direct, and a look at nectarmocha continued in that same way, a real outlier in a crowded space full of repetitive content that says little while taking up a lot of reader time today which is unfortunate.
Reading this triggered a small reorganisation of my own thinking on the topic, and a stop at stylerivo furthered that reorganisation, content that affects the shape of my mental model rather than just decorating it with new facts is content with structural rather than informational impact and this site provides that.
Book a private transfer from Thessaloniki Airport online at https://thessaloniki-taxi.gr/ – we offer fixed prices, free child seats, licensed drivers, new vehicles, and instant booking confirmation. Discover all our benefits on our website.
Walked away in a slightly better mood than when I started reading, that says something about the writing, and a stop at aerobound kept that going, content that leaves you feeling more capable rather than overwhelmed is the kind I keep coming back to again and again over the years and across many topics.
A piece that did not try to be timeless and ended up reading as durable anyway, and a look at qunvero extended that durable feel, content that stays useful past its publication date without straining for permanence is content that ages well and this site has the kind of evergreen quality that I value highly today.
Reading this prompted me to dig into a related topic later, and a stop at actioncompass provided some of the starting points for that follow up reading, content that triggers further exploration rather than satisfying curiosity completely is content with real generative energy and this site has plenty of that energy throughout it.
Honest take is that this was better than I expected when I clicked through, and a look at strategyplanner reinforced that, the bar for online content has dropped so much that finding something thoughtful and well constructed feels almost noteworthy now which says more about the average than about this site itself.
Reading this slowly to give it the attention it deserved, and a stop at pianoloud earned the same slow read, choosing to read slowly is a small act of respect for content quality and very few sites earn that respect from me but this one did so without any explicit ask which is the cleanest way.
If a friend asked me where to read carefully on the topic I would send them here without hesitation, and a look at directionalthinking confirmed the recommendation strength, the directness of my recommendation reflects how confident I am in the quality and this site has earned undiluted recommendations from me across multiple recent conversations actually.
vps ubuntu
Reading this in a relaxed evening setting was a small pleasure, and a stop at ardenbeach extended the pleasant evening reading, content that fits the tone of relaxed time without becoming forgettable is what I look for in evening reading and this site has the right tone for that particular slot in my daily reading routine.
Granted my mood today might be elevating my reading experience but I still think this is genuinely good, and a stop at bazariox reinforced that even discounted assessment, controlling for the mood adjustment that affects content perception this site still reads as substantively above average across multiple pieces I have read carefully today.
Now sitting with the thoughts the post triggered rather than rushing on to the next thing, and a stop at lomqiro extended that reflective pause, content that earns time for thought after closing the tab is content of higher value than the merely interesting and this site has clearly produced that lasting effect today.
Started thinking about my own writing differently after reading, and a look at markpillow continued that reflective effect, content that influences how I work rather than just informing what I know is content with the highest kind of impact and this site has triggered some of that reflective influence today on me.
Closed the tab with a small sense of finality rather than the usual rushed exit, and a stop at muralpastry produced the same considered closing, when reading ends with deliberate satisfaction rather than impatient skip you know the time was well spent and this site is producing those satisfying endings consistently across what I read.
Информация о проверке качества продукции повышает лояльность клиентов
https://redmetsplav.ru/store/vismut/zarubezhnye-splavy-3/vismut-cac904c/pokovka-vismutovaya-cac904c/
Reading this confirmed that the topic deserves more careful attention than it usually gets, and a stop at visionprogression extended that elevated framing, content that raises the appropriate weight of a subject without being preachy about it is serving a quiet but important editorial function for the broader cultural conversation about it.
Excellent execution from start to finish, the post never loses its rhythm and the points stay sharp, and a quick stop at forwardmotionstarts kept the same level going, consistency like this across a site is the marker of a serious operation rather than a casual side project running on autopilot somewhere else.
However measured this site clears the bar I set for sites I take seriously, and a stop at vexsync continued clearing that bar, the metrics I use for site quality are admittedly informal but they are consistent and this site has cleared them on multiple measurements across multiple visits which is meaningful for my evaluation.
Grand League selection in matches where teams are missing their key bowlers due to workload management.
Велакаст — эффективное средство для лечения хронического гепатита С, которое помогает пациентам победить болезнь за 12-24 недели в зависимости от клинической картины. На портале https://velakast.site/ представлена полная информация о препарате индийского производства, включая детальный состав, показания к применению и возможные побочные эффекты. Сайт предлагает удобную навигацию с разделами о мониторинге лечения, специальной диете и профилактике, а также содержит реальные отзывы пациентов и возможность получить консультацию врача для безопасного и результативного выздоровления.
Now thinking I want more sites built on this kind of editorial foundation, and a stop at bookbulb extended that wish into a broader hope, sites built on substance and care rather than on metrics and growth are the kind of sites I want to see more of and this one is a small example worth supporting.
Reading this slowly and letting each paragraph land before moving on, and a stop at burlclip earned the same patient approach, content that rewards slow reading rather than speed is content with real density and the writers here are clearly producing work that benefits from the careful eye rather than the rushed scan.
Reading the writers other posts after this one suggests the quality is consistent rather than peak, and a stop at visiontrigger confirmed the consistent quality reading, sites that hold the same level across many pieces rather than peaking on a few are sites with sustainable editorial discipline and this one has clearly developed that.
Worth pointing out that the post avoided the temptation to summarise everything at the end, and a look at amidbrawn continued that confident closing approach, content that trusts readers to retain the substance without being reminded of it at the end is content that respects the reader and this site practices that respect.
Granted I am giving this site more credit than I usually give new finds, and a look at dewcoat continued earning that credit, the calibration of how much trust to extend after limited exposure is something I do carefully and this site has earned more trust on shorter exposure than most due to consistent quality across.
The clarity here is something I really appreciate, especially compared to sites that pile on jargon for no reason, and a look at needlematrix was the same, simple direct sentences that actually deliver information instead of dancing around the point for paragraphs at a time which wastes reader patience.
More original than the recycled takes I keep finding on the topic elsewhere, and a quick look at probelucid confirmed it, the kind of site that has its own voice rather than echoing whatever is trending which makes it stand out as a refreshing change from the usual rotation of generic content I see daily.
Captain selection for matches where teams field an experimental XI in a dead rubber.
Now leaving a small mental note to recommend this when the topic comes up in conversation, and a look at urbanmixo extended that recommend ready feeling, content that arms me with shareable references for likely future conversations is content with social value and this site is providing that conversational ammunition consistently for me lately.
Thanks for putting this online without locking it behind email signups or paywalls, and a quick visit to rangerorca kept that open feel going, content that trusts the reader to come back rather than gating access is the kind of approach I will reward with regular return visits over time happily.
Definitely returning here, that is decided, and a look at claritypathways only made the case stronger, this is one of those rare websites that rewards regular visits rather than feeling stale after the first read which is something I cannot say about most of the places I bookmark today across all my topics.
A well calibrated piece that knew its scope and stayed inside it, and a look at rovqino maintained the same scope discipline, scope creep is one of the failure modes of long blog posts and this site has clearly invested in the editorial discipline to prevent it which shows up in tightly contained pieces.
Никелевые сплавы — основа для жаропрочных конструкций
https://redmetsplav.ru/store/vismut/zarubezhnye-splavy-3/vismut-c89833—uns/provoloka-vismutovaya-c89833—uns/
However measured this site clears the bar I set for sites I take seriously, and a stop at bazmora continued clearing that bar, the metrics I use for site quality are admittedly informal but they are consistent and this site has cleared them on multiple measurements across multiple visits which is meaningful for my evaluation.
Reading this in the morning set a good tone for the day, and a quick visit to focusvector kept that good tone going, content can do that sometimes when it hits the right notes and finding sites that consistently strike that tone is something I have learned to recognise and reward with regular visits.
Редметсплав — пример того, как должен работать современный поставщик металлургического сырья.
https://xn--80aeedb0bfzeok.xn--p1ai/catalog/manganinovaia-provoloka/manganinovaia-provoloka-0-4-mm-mnmtsazh3-12-0-3-0-3-gost-10155-75/
Reading this in segments because the day was busy, and the post survived the fragmented attention well, and a stop at lorqiro held up similarly under interrupted reading, content that can withstand modern distracted reading patterns rather than requiring a perfect block of focused time is increasingly the kind I prefer.
Looking for buying bitcoins? The BTC conversion tool at btc-converter.com helps you calculate the real-time value of Bitcoin in US dollars. Simply input your Bitcoin amount to get the estimated dollar value using the live BTC/USD exchange rate. The tool is designed for quick checks before selling, trading, comparing wallet balances, or viewing cryptocurrency payment amounts. Whether you need to convert 1 BTC, a fraction of a coin, or a large balance, the tool provides accurate dollar-based comparisons.
Now noticing the post fit a particular gap in my reading without my having articulated the gap before, and a look at strategyalignmenthub extended that gap filling effect, content that meets needs I had not consciously formulated is content with reader insight and this site has clearly developed that anticipatory editorial sense across many pieces.
magnificent submit, very informative. I wonder why the opposite experts of this sector don’t notice this.
You must proceed your writing. I am sure, you’ve a huge readers’ base already!
Just want to say thank you for putting this together, posts like these make searching online actually worth it sometimes, and a quick look at masonmelon kept that going, useful and easy to read without any of the tricks that ruin most blog comment sections lately on the wider open web.
Yes! Finally something about Site.
Worth saying that the post fit naturally into a rhythm of careful reading, and a stop at nuartlion extended the same rhythm, content that pairs well with how I actually read rather than demanding a different mode is content well calibrated to its likely audience and this site has clearly thought about that consistently.
It sounds like you’re creating problems yourself by defining this as such a comprehensive, almost unknowable problem. Isn’t that self-defeating?
Hmm is anyone else experiencing problems with the images
on this blog loading? I’m trying to determine if
its a problem on my end or if it’s the blog.
Any suggestions would be greatly appreciated.
If I were to recommend a starting point for the topic this site would be near the top of my list, and a stop at chipbrick reinforced that recommendation status, the small list of starting point recommendations I keep for friends asking about topics is short and this site is now firmly on it.
Now realising the topic deserved better treatment than it has been getting elsewhere, and a look at amplebench extended that broader recognition, content that exposes the gap between actual quality and average quality elsewhere is doing the quiet work of raising standards and this site is contributing to that elevation in its own corner.
Better signal to noise ratio than most places I check on this kind of topic, and a look at directiondrivesmotion kept that going, every paragraph here carries something worth reading rather than padding out the page to hit some arbitrary length target that search engines reward but readers ignore as soon as they notice it.
High quality writing, no marketing speak and no buzzwords that mean nothing, and a stop at momentumworks kept that going, simple direct content that actually communicates something is harder to find than it should be and this is one of the rare places that gets it right consistently across many different posts.
Top quality material, deserves more attention than it probably gets, and a look at amberlume reflected the same effort across the site, a hidden gem in the modern web where most attention goes to whoever shouts loudest rather than whoever actually delivers the best content for their readers without much marketing fanfare.
Сайт четко ориентирован на промышленный сектор и B2B сегмент
https://redmetsplav.ru/store/vismut/zarubezhnye-splavy-3/vismut-c49355—uns/krug-vismutovyy-c49355—uns/
During the time spent here I noticed the absence of the usual distractions, and a stop at neonmotel extended that distraction free experience, content that does not fight my attention with pop ups and modals and aggressive prompts is content that respects me and this site has clearly chosen the respectful approach throughout.
On reflection this is the kind of writing that improves my taste for what is possible in the format, and a look at strategybuilder continued raising that bar, content that elevates my expectations rather than lowering them is doing important work in calibrating my standards and this site is participating in that elevation reliably.
A piece that read smoothly because the writer understood how readers actually move through prose, and a look at holdax maintained the same reader awareness, writers who think about the reading experience as much as the writing experience produce better work and this site has clearly made that shift in editorial approach.
Looking through other posts here the consistency is what makes the site valuable rather than any single piece, and a stop at pillowmanor extended that consistency observation, sites whose value lies in the ongoing pattern rather than in standout posts are sites I trust more deeply and this one has clearly built that kind of trust.
Покупали изделия из драгметаллов для лаборатории, всё соответствует заявленным характеристикам.
https://xn--80aeedb0bfzeok.xn--p1ai/catalog/latunnaia-vtulka/latunnaia-vtulka-320-mm-lts38mts2s2/
Looking at this objectively the editorial quality is hard to deny even setting aside personal taste, and a stop at shoprova maintained the same objective quality, the gap between what I personally enjoy and what is objectively well crafted exists and this site clears both bars simultaneously which is rarer than it sounds.
If wings are your thing, Tinker Bell’s sexy Halloween costume design is all grown up.
Quietly enjoying that I have found a new site to follow for the topic, and a look at claritybuilder reinforced the small pleasure of the find, the discovery of new high quality sources is one of the more durable pleasures of careful internet reading and this site has been generating that discovery pleasure at multiple points already today.
Solid endorsement from me, the writing earns it, and a look at baznora continues to earn it across the broader site too, the kind of operation that maintains quality across many pages rather than just one viral post is a sign of serious commitment and that is what I see here clearly across what I read.
Even just sampling a few posts the consistency is what stands out, and a look at byrdbush confirmed the broader pattern, sites where every piece I sample lives up to the standard set by the others are sites with serious quality control and this one has clearly invested in whatever editorial process produces that consistency reliably.
I’m really enjoying the theme/design of your site.
Do you ever run into any web browser compatibility problems?
A few of my blog audience have complained about my website not working correctly in Explorer
but looks great in Firefox. Do you have any solutions to help fix this problem?
Honestly enjoyed not being sold anything for the entire duration of the post, and a look at valzino kept that pleasant absence going across more pages, content that exists for its own sake rather than as a funnel to a paid product is increasingly rare and worth supporting where I can find it.
A piece that prompted a small mental rearrangement of how I order related ideas, and a look at ideaflowengine extended that rearranging effect, content that affects the structure of my thinking rather than just adding to it is content with the deepest kind of impact and this site is reaching that depth for me today.
Honestly this kind of writing is why I still bother to read independent sites, and a look at lorzavi extended that broader reflection, the few sites that justify continued attention to non algorithmic content are sites like this one and finding them periodically is enough to keep my reading habits oriented toward independent rather than aggregated content.
Looking for fast usdt exchange? Head over to coinswaper.io – Check how much of the top coins you can get for 1, 2, 3, 5, 10, and 100 USDT, compare minor resale values, and kick off a fast USDT swap all from one place. These fixed amounts handle the most typical low-volume swap cases: a quick test run, a minor purchase, a fast conversion, or a small liquidation to USDT.
Captain selection in matches where teams field debutants or uncapped players in their XI.
Worth flagging that the post handled an angle of the topic I had not seen elsewhere, and a look at cartvilo extended that fresh treatment, content that finds underexplored corners of well covered subjects is genuinely valuable and this site has demonstrated that exploratory editorial approach across multiple pieces in my reading sessions today.
Bookmark earned and shared the link with one specific person who would care, and a look at masonotter got the same targeted share, sharing carefully rather than broadcasting is a discipline I try to maintain and this site is generating shares from me at a sustainable rate rather than the spam rate of viral content.
I like how this post stays insightful and approachable at the same time, creating a positive reading experience online.
在线购买大麻用于XXX成人色情视频
Четкое позиционирование как эксперта в области редких металлов
https://redmetsplav.ru/store/vismut/zarubezhnye-splavy-3/vismut-42-3993—csnstn-423993/provoloka-vismutovaya-42-3993—csnstn-423993/
Liked the careful word choice throughout, every term seemed picked for a reason rather than thrown in casually, and a stop at ampleclam continued that precise style, this kind of attention to small details is what separates careful writing from the usual rushed content that dominates blog spaces today across pretty much every topic I follow.
Reading this prompted a small note in my reference file, and a stop at nudgelynx prompted another, the rare site that contributes useful nuggets to my own working knowledge rather than just consuming my attention is worth the time investment many times over compared to the usual pile of forgettable scroll content.
Reading this gave me something to think about for the rest of the afternoon, and after modrivo I had even more to mull over, the kind of post that lingers in the background of your day rather than evaporating immediately is genuinely valuable in an attention economy that punishes depth rather than rewarding it.
Walked away in a slightly better mood than when I started reading, that says something about the writing, and a stop at promparsley kept that going, content that leaves you feeling more capable rather than overwhelmed is the kind I keep coming back to again and again over the years and across many topics.
Every withdrawal request scenario explained — delays, rejections, and how to avoid them.
Coming to this with low expectations and being pleasantly surprised by the substance, and a stop at nickelpearl continued exceeding expectations, the recalibration of expectations upward across multiple positive readings is one of the actual rewards of careful browsing and this site is providing that recalibration at a steady rate apparently.
Came away with a small but real shift in perspective on the topic, and a stop at chordaria pushed that shift a bit further, the kind of subtle reframing that good writing does to a reader without making a big deal of it is something I always appreciate when it happens which is sadly not that often.
Reading this gave me a small jolt of recognition for an experience I thought was just mine, and a stop at directionalsystems produced more such jolts, content that universalises private experiences without flattening them is doing genuinely useful work and this site is providing that recognition function for me reliably across topics I read.
Посетите сайт homeweave https://homeweave.ru/ и вы найдете в наличии диваны и различную мебель для комфортной жизни по низким ценам с доставкой. Наш интернет-магазин предлагает доступную мебель собственного производства и ведущих отечественных брендов. Мы следим за современными тенденциями, разрабатываем новые модели и развиваем ассортимент. Организуем доставку по всей территории Российской Федерации.
Купить права категории б официально без обучения в автошколе. Хотите уверенно сесть за руль и получить водительское удостоверение категории B законным способом? Мы предлагаем удобный формат обучения, который поможет пройти все этапы подготовки к экзамену и получить права официально в соответствии с действующим законодательством РФ.
Обучение включает теоретическую подготовку, разбор ПДД, изучение дорожных ситуаций, а также практические занятия по вождению с опытными инструкторами. Вы сможете освоить базовые навыки управления автомобилем, научиться безопасно маневрировать в городе, парковаться, выполнять развороты и уверенно чувствовать себя на дороге.
Программа подходит как для начинающих, так и для тех, кто уже имеет опыт, но хочет систематизировать знания и лучше подготовиться к экзамену. Мы поможем разобраться в структуре экзамена, типичных ошибках и правилах успешной сдачи.
Преимущества:
– официальное обучение;
– понятный формат подготовки;
– опытные преподаватели;
– поддержка на всех этапах;
– акцент на безопасность и уверенное вождение.
The headings made navigating the post simple even when I needed to find a specific section quickly, and a look at momentumfollowsfocus continued the same thoughtful structure, small details like clear headings show that someone is actually thinking about how the reader uses the page rather than just filling it for length alone.
Thank you for not assuming the reader already knows everything, the explanations meet me where I am, and a look at shopvato did the same, that consideration is what makes a site feel welcoming rather than gatekeepy which is sadly the default mood across the modern web today for most subjects covered.
Reading this in the gap between work projects was a small but meaningful break, and a stop at buymixo extended that gentle reset, content that provides genuine refreshment rather than just distraction during work breaks is content with a particular kind of utility and this site fits that role for me reliably during work days.
A small thing but the line spacing and font choices made reading this physically pleasant, and a look at javcab maintained the same careful design, technical choices about typography are part of what makes online reading actually comfortable and this site has clearly invested in the design layer alongside the content layer carefully.
Generally I bookmark sparingly to avoid building up a bookmark graveyard but this one earned a permanent slot, and a stop at amberflux extended that permanence designation, the few sites I keep permanent bookmarks for are sites I expect to use repeatedly and this one has clearly cleared that expectation bar today.
Now understanding why someone recommended this site to me a while back, and a stop at focusnavigation explained the recommendation, sometimes recommendations make sense only after experience and this site has finally clicked into place as the kind of resource I now understand was being recommended for sound editorial reasons by my friend.
Возможность заказать листы и полосы нестандартных размеров
https://redmetsplav.ru/store/vismut/zarubezhnye-splavy-3/vismut-136—astm-b774/list-vismutovyy-136—astm-b774/
Started taking notes about halfway through because the points were stacking up, and a look at lovqaro added enough material that my notes file grew further, content that demands note taking from a passive reader is content with substance and the writers here are clearly producing that kind of work consistently across topics.
The overall feel of the post was professional without being stuffy, and a look at clarityengine kept that approachable expertise going, finding the right register for technical content is hard but this site has clearly figured out how to sound knowledgeable without slipping into that distant lecturing tone that loses readers in droves every time.
Found a small mental shift after reading this, the framing here is just a bit different from the standard takes online, and a look at astrebeige extended that fresh perspective across more material, the rare site whose voice actually changes how you think about something rather than just confirming existing beliefs.
Высокая квалификация персонала, знают специфику редких металлов и особенности их применения.
https://xn--80aeedb0bfzeok.xn--p1ai/catalog/latunnaia-polosa/latunnaia-polosa-0-4×600-mm-l90-gost-931-90/
Skipped to a specific section because I knew that was the question I had, and the answer was clean, and a stop at byrdcipher similarly delivered targeted answers without burying them, content engineered for readers who arrive with specific needs rather than open ended browsing is increasingly valuable in a search heavy reading environment.
Bookmark earned, calendar reminder set, share queued, all from one good post, and a look at modrova did the same, when a single reading session triggers multiple downstream actions you know the content has actually moved me beyond the page and this site is moving me at that higher level reliably.
Grand League selection in matches where teams are missing their key bowlers due to workload management.
A piece that reads as if the writer trusted readers to fill in obvious gaps, and a look at qinzavo continued that respectful approach, content that does not over explain what the reader can infer is content that respects intelligence and this site has clearly chosen to write to capable readers rather than to the lowest common denominator.
Came away feeling slightly smarter than I was when I started, that is a real win, and a stop at mauvepeach added a bit more to that, the rare site that actually transfers some of its knowledge to the reader in a way that sticks rather than just creating an illusion of learning briefly.
Decided to subscribe to the RSS feed if there is one, and a stop at velzaro confirmed that decision, content that I want delivered to me proactively rather than just remembered when I have time is content that has earned a higher level of commitment from me as a reader looking for reliable sources.
himalaya viagra
Started a draft response in my head and ended without publishing it because the post said it well enough, and a look at pilotlobe produced the same effect, content that satisfies my urge to add to it by being complete enough on its own is rare and represents a particular kind of editorial completeness here.
Hmm it appears like your blog ate my first comment (it
was super long) so I guess I’ll just sum it up what I had
written and say, I’m thoroughly enjoying your blog. I as well am an aspiring
blog blogger but I’m still new to the whole thing.
Do you have any suggestions for novice blog writers? I’d certainly appreciate it.
Reading this on a long flight and finding it the best thing I read across hours of trying, and a stop at nudgeneedle kept the streak going, when content beats long flight reading you know it has substance because flight reading is a hard test of a piece given the alternatives available everywhere.
Glad the writer did not feel the need to argue with imaginary critics in the post itself, and a stop at noonlinnet kept the same focused approach going, defensive writing wastes the reader time and confidence on positions that did not need defending and this post has clearly avoided that common failure.
Thanks for not padding this with the usual filler intros and outros that every other blog seems to require, and a quick visit to clingchee continued that lean approach across more posts, content stripped of waste is content that respects you and I will always come back to that kind of approach.
Reading this fit naturally into my afternoon walk because I was reading on my phone, and a stop at dealvilo continued well in that walking format, content that survives mobile reading without becoming awkward is content with format flexibility and this site has clearly thought about how it reads across different devices today.
If I am being honest this is the kind of site I quietly hope my own work will someday resemble, and a stop at buyrova extended that aspirational feeling, finding work that models what I want to produce is part of why I read carefully and this site has been performing that modelling function for me lately consistently.
Speaking from the perspective of a fairly demanding reader the writing here clears the bar consistently, and a look at directioncrafting continued clearing that bar, the calibration of demanding reader is something I apply to all sources and this site has been one of the few that handles the demanding reading well across pieces sampled.
Возможность заказать листы и полосы нестандартных размеров
https://redmetsplav.ru/store/vanadiy-i-ego-splavy/vanadiy-fvd50u0-3—gost-27130-94/lenta-vanadievaya-fvd50u0-3—gost-27130-94/
Speaking carefully because I do not want to overstate things this site is genuinely above average across multiple measurements, and a stop at shopvilo continued the above average performance, the calibration of judgement against potential overstatement is something I take seriously and this site clears the higher bar even after that calibration applies.
Looking for a high-quality, hassle-free transfer from airports across Europe? Visit https://transferme24.com/ where you’ll find the best transfer prices when you book online. We offer a fixed rate. Learn all about our fleet and personalized service on our website. Our drivers monitor your flights to ensure you’re met on time and safely transported to your destination.
Спецстали для машиностроения закупаем только здесь, надежность материала подтверждена испытаниями.
https://xn--80aeedb0bfzeok.xn--p1ai/catalog/mednye-zaglushki-pod-paiku/mednaia-zaglushka-kolpachok-pod-paiku-10kh7kh0-6-mm-7-8kh9-8-mm-miagkaia-paika-m1rm-gost-32590-2013/
Bookmark added in three places to make sure I do not lose the link, and a look at javyam got the same redundant treatment, sites I am afraid to lose are the rare keepers and this is clearly one of them based on what I have read so far across this and a couple of related posts.
Genuinely well crafted writing, the kind that makes the topic look easier than it actually is, and a look at lovzari added even more depth, you can feel the experience behind every line which is something only writers who have been at this for a while can pull off with this level of grace.
Approaching this site through a casual link click and being surprised by what I found, and a look at directionalpathfinder extended the surprise, the rare experience of stumbling into excellent independent content rather than predictable mediocrity is one of the actual remaining pleasures of casual web browsing and this site provided it cleanly.
Following the post through to the end without my attention drifting once, and a look at ideasbecomeresults earned the same uninterrupted attention, content that holds attention without manipulating it is content with substantive pull and this site has demonstrated that substantive pull across multiple pieces in a single reading session reliably here today.
Reading this on a long flight and finding it the best thing I read across hours of trying, and a stop at astrebulb kept the streak going, when content beats long flight reading you know it has substance because flight reading is a hard test of a piece given the alternatives available everywhere.
Probably this is one of the better quiet successes on the open web at the moment, and a look at ariabrawn reinforced that quiet success quality, sites that are doing well without making a noise about doing well are the sites I most respect and this one has clearly chosen the quiet success path consistently throughout.
Decided I would read the archives over the weekend, and a stop at progressinitiator confirmed that the archives would be worth the time, very few sites have archives I would actively read through but this one has earned that level of interest based on the consistent quality across what I have sampled so far.
Picked this for a morning recommendation in our company chat, and a look at qivlumo suggested I will mention this site again later, recommending content into a workplace context is a small editorial act that requires confidence in the recommendation and this site is making me confident in those recommendations consistently here too.
Honest assessment is that this is one of the better short reads I have had this week, and a look at modvani reinforced that, the bar for short content is low because most of it sacrifices substance for brevity but this site manages both at once which is harder than it sounds for most writers attempting it.
A piece that took its time without dragging, and a look at propelmural kept the same patient pace, the difference between unhurried and slow is a fine editorial distinction and this site has clearly found the unhurried side without slipping into the slow side which would have lost me as a reader quickly otherwise.
Picked this for a morning recommendation in our company chat, and a look at venxari suggested I will mention this site again later, recommending content into a workplace context is a small editorial act that requires confidence in the recommendation and this site is making me confident in those recommendations consistently here too.
Deposit troubleshooting for failed transactions — solutions for every common error message.
Наличие обратной связи позволяет быстро отправить запрос
https://redmetsplav.ru/store/titan/rossiyskie-splavy-4/titan-vt6ch—ost-1-90013-81/prutok-titanovyy-vt6ch—ost-1-90013-81/
گینر تروفیول، با ارائه یک پروفایل درشتمغذی متعادل، به بدن شما سوخت لازم برای تمرینات سخت و مواد اولیه برای ساخت تارهای عضلانی جدید را میرساند.
Now adding this to a list of sites I want to see flourish, and a stop at nuartlinnet reinforced that wish, the few sites I actively root for are sites that produce the kind of work I want more of in the world and this one has joined that small list based on what I have read so far.
Skipped the TLDR thinking I would read everything anyway, and ended up enjoying the path through the full post, and a stop at meadochre similarly rewarded the patient read, summaries are useful but the journey through good writing is part of what makes the destination feel earned rather than just delivered cleanly.
Refreshing change from the usual sites covering this topic, no clickbait and no padding, and a stop at nylonmoss confirmed the difference, this place clearly has its own voice rather than copying the formulas everyone else uses to chase clicks online which is becoming increasingly rare these days across nearly every popular subject.
Quality work here, the post reads cleanly and the points stay focused throughout, and a stop at cocoaborn kept the standard high, you can tell the writer cares about the final result rather than just hitting publish for the sake of having something new on the page to feed the search engines.
Now adding the writer to a small mental list of voices I want to follow, and a look at buyvani reinforced that follow intention, the few writers whose work I actively track are writers who have demonstrated sustained quality and this writer has clearly demonstrated that sustained quality across the pieces I have sampled here today.
Ответственная компания, которая ценит долгосрочное сотрудничество, всегда идут навстречу клиенту.
https://xn--80aeedb0bfzeok.xn--p1ai/catalog/latunnaia-polosa/latunnaia-polosa-1-5×150-mm-lmts58-2-gost-931-90/
Glad to find something on this topic that does not start with three paragraphs of throat clearing before getting to the point, and a stop at byrdclap also dives right in, respect for the readers time shows up in small editorial choices like this and they add up to a real difference quickly.
ザオプション 口座開設 – 最短5分で完了.
口座開設は完全無料. 初めてでも安心の手順.
初心者でも迷わず登録できる
暗号資産 バイナリー – 24時間取引可能. 少額から試せるので初心者も参加可.
暗号資産の特徴を理解してから取引.
初心者は少額からスタート
バイナリーオプション 比較 – 口コミや評判をチェック.
デモ口座の有無も比較ポイント. まずは比較サイトで情報収集.
複数の業者を比較して自分に合った選択
バイナリー 少額取引 – 取引に慣れるまでは少額が安心.
慣れてきたら段階的に金額を増やす.
ザオプションは少額取引に対応. 少額取引で勝ち癖をつける
krglive.com
Reading this back to back with a similar piece elsewhere made the quality difference obvious, and a stop at styleluma only widened the gap, comparing content side by side is a useful exercise and the gap between this site and average competitors in the space is large enough to be noticeable from the first paragraph.
Liked how the post handled an objection I was forming as I read, and a stop at ideaorchestration similarly anticipated where my thinking was going next, the rare writer who can predict reader concerns and address them in advance is doing something most online content fails to do despite that being basic editorial work.
A particular kind of restraint shows up in the writing, and a look at astrebull maintained the same restraint across pages, knowing what not to say is just as important as knowing what to say and this site has clearly developed strong instincts on both sides of that editorial line throughout pieces I have read.
The post made the topic feel approachable without making it feel trivial, that is a fine balance, and a stop at luxdeck maintained the same balance, finding the middle ground between welcoming and serious is genuinely difficult and the writers here have clearly figured out how to consistently hit it well across many different posts.
Looking at the surface design and the substance together this site has both right, and a look at claritymotion reinforced that integrated quality, sites where presentation and content reinforce each other rather than fighting are sites with full editorial coherence and this one has clearly invested in both layers in a balanced way.
Профессиональный подход к описанию каждого вида металла
https://redmetsplav.ru/store/titan/rossiyskie-splavy-4/titan-ts6/krug-titanovyy-ts6/
Honest take is that this was better than I expected when I clicked through, and a look at kanvoro reinforced that, the bar for online content has dropped so much that finding something thoughtful and well constructed feels almost noteworthy now which says more about the average than about this site itself.
Polished and informative without feeling overproduced, that is the sweet spot, and a look at qivmora hit it again, you can tell when a site has been built with care versus thrown together for the sake of having something to put online and this is clearly the former approach taken by the team.
Adding to the bookmarks now before I forget, that is how good this is, and a look at modvilo confirmed the rest of the site is worth saving too, this is one of those rare finds that justifies the time spent searching the web for once which is a relief in the current environment.
If I had encountered this site five years ago I would have been telling everyone about it, and a look at jazbrood extended that retrospective enthusiasm, the version of me who used to recommend favourite blogs frequently would have made sure friends knew about this one and that earlier enthusiasm is partially returning to me here.
Now appreciating that the post left me with enough to say in a follow up conversation, and a look at pipmyrrh added more material for those follow ups, content that prepares me for related conversations rather than just informing me alone is content with social utility and this site provides that social armament reliably for me.
Котел газовый ARS 200 наружного размещения уличный промышленной серии полностью справляется с обогревом производственной базы. Завод котельного оборудования FEDERALGAZ обеспечил быструю доставку и предоставил оригинальные расширительные баки и радиаторы для объекта.
Энергонезависимый уличный котел наружного размещения FEDERALGAZ работает без электричества, что спасает наш склад при авариях на сетях. Газовый котел уличного исполнения укомплектован надежной автоматикой безопасности Nova, которая перекрывает газ при любых сбоях.
Покупайте и продавайте ключи TF2 быстро, безопасно и по выгодным ценам. Удобная платформа для обмена, моментального выкупа и продажи ключей Team Fortress 2. Гарантия надежности сделок, актуальные курсы и быстрая обработка заявок. Выгодные условия для игроков, трейдеров и всех, кто ценит скорость, безопасность и честные цены.tf2lavka
Котлы наружного размещения RSH от завода FEDERALGAZ — это готовое решение для отопления коммерческой недвижимости. Уличная газовая котельная не занимает полезную площадь внутри помещений, работает тихо и безопасно. Запорно-регулирующая арматура в комплекте идет надежная.
Reading this confirmed that the topic deserves more careful attention than it usually gets, and a stop at ablebonus extended that elevated framing, content that raises the appropriate weight of a subject without being preachy about it is serving a quiet but important editorial function for the broader cultural conversation about it.
Завод котельного оборудования FEDERALGAZ предлагает отличные условия для проектных организаций на котлы наружного размещения промышленной серии. Все технические параметры газовых котлов AR-S соответствуют заявленным в паспорте. Будем закладывать это оборудование в будущие проекты отопления.
Покупайте и продавайте ключи TF2 быстро, безопасно и по выгодным ценам. Удобная платформа для обмена, моментального выкупа и продажи ключей Team Fortress 2. Гарантия надежности сделок, актуальные курсы и быстрая обработка заявок. Выгодные условия для игроков, трейдеров и всех, кто ценит скорость, безопасность и честные цены.
продать ключи tf2
Really appreciate the absence of stock photos that have nothing to do with the content, and a quick visit to ariabrawn maintained the same restraint, visual filler is a tell that the writing cannot stand on its own and the lack of it here suggests the team has confidence in their content quality alone.
Котел газовый ARS 500 тепловой мощностью 500 кВт наружного размещения уличный обеспечивает стабильное теплоснабжение завода. Водотрубный секционный теплообменник устойчив к перепадам температур. Котельное оборудование FEDERALGAZ Туймазы полностью оправдало наши ожидания.
Покупайте и продавайте ключи TF2 быстро, безопасно и по выгодным ценам. Удобная платформа для обмена, моментального выкупа и продажи ключей Team Fortress 2. Гарантия надежности сделок, актуальные курсы и быстрая обработка заявок. Выгодные условия для игроков, трейдеров и всех, кто ценит скорость, безопасность и честные цены.
tf2 ключи
Процессуальное законодательство Республики Казахстан (РК) отличается сложностью и множеством нюансов, что делает профессиональное представительство в суде не просто желательным, но и жизненно необходимым условием для защиты. Комплексное ведение дела – это всеобъемлющий подход, который начинается задолго до первого судебного заседания и завершается только после полного исполнения судебного акта. Автор блога: Бахирев Анатолий Анатольевич, ведущий юрист-эксперт https://femida-justice.com/uslugi/predstavitelstvo-v-sude/
Купить котел наружного размещения уличный газовый серии RSH от завода FEDERALGAZ посоветовали проектировщики инженерных систем. Котел наружного типа имеет высокий КПД благодаря оребренному водотрубному теплообменнику. Отопление работает стабильно и экономно.
Быстрая доставка в регионы через «Деловые Линии», груз пришел в целости и отлично упакованным.
https://xn--80aeedb0bfzeok.xn--p1ai/catalog/mednoe-dvukhrastrubnoe-koleno-pod-paiku/mednoe-dvukhrastrubnoe-koleno-pod-paiku-180-gradusov-108kh92kh2-1-mm-47-5kh51-5-mm-miagkaia-paika-m1m-gost-r-52922-2008/
Покупайте и продавайте ключи TF2 быстро, безопасно и по выгодным ценам. Удобная платформа для обмена, моментального выкупа и продажи ключей Team Fortress 2. Гарантия надежности сделок, актуальные курсы и быстрая обработка заявок. Выгодные условия для игроков, трейдеров и всех, кто ценит скорость, безопасность и честные цены.
tf2 keys
Котел газовый ARS 100 мощностью 96 кВт наружного размещения отлично подошел для отопления спортивного комплекса. Уличная газовая установка размещена за пределами здания, что полностью безопасно для посетителей. Завод предоставил полный пакет разрешительных документов.
My reading list is short and selective and this site is now on it, and a stop at growthoriented confirmed the placement, the short list of sites I read deliberately rather than encounter accidentally is something I curate carefully and adding to it is a real act of trust which this site has earned today.
Reading this brought back the satisfaction I used to get from blogs ten years ago, and a stop at zorkavi kept that nostalgic quality alive, sites that capture what was good about an earlier era of internet writing are increasingly precious and this one is doing that without feeling like a deliberate throwback at all.
Покупайте и продавайте ключи TF2 быстро, безопасно и по выгодным ценам. Удобная платформа для обмена, моментального выкупа и продажи ключей Team Fortress 2. Гарантия надежности сделок, актуальные курсы и быстрая обработка заявок. Выгодные условия для игроков, трейдеров и всех, кто ценит скорость, безопасность и честные цены.
tf2 ключи
Refreshing change from the usual sites covering this topic, no clickbait and no padding, and a stop at nudgelustre confirmed the difference, this place clearly has its own voice rather than copying the formulas everyone else uses to chase clicks online which is becoming increasingly rare these days across nearly every popular subject.
Котел газовый ARS 400 тепловой мощностью 400 кВт наружного размещения — отличное промышленное решение от завода FEDERALGAZ. Уличный водогрейный котел оснащен надежной двухступенчатой горелкой. Секционный теплообменник обеспечивает максимальный съем тепла с единицы топлива.
Котлы наружного размещения сдвоенные серии AR-S производства FEDERALGAZ помогли запустить отопление на заводе в кратчайшие сроки. Монтаж уличного котла наружного типа занимает минимум времени по сравнению с классической котельной. Все узлы, фильтры и клапаны легко доступны для ТО.
Покупайте и продавайте ключи TF2 быстро, безопасно и по выгодным ценам. Удобная платформа для обмена, моментального выкупа и продажи ключей Team Fortress 2. Гарантия надежности сделок, актуальные курсы и быстрая обработка заявок. Выгодные условия для игроков, трейдеров и всех, кто ценит скорость, безопасность и честные цены.
tf2 lavka
After reading several posts back to back the consistent voice across them is impressive, and a stop at buyvilo continued that voice consistency, sites that maintain a single coherent voice across many pieces by potentially many writers represent serious editorial discipline and this one has clearly developed the institutional consistency needed for that.
Установили уличный котел наружного размещения одинарный для обогрева складского терминала. Котел газовый промышленный уличный от FEDERALGAZ работает в автоматическом режиме, не требуя постоянного контроля персонала. Корпус котельной отлично изолирован от внешних воздействий.
Покупайте и продавайте ключи TF2 быстро, безопасно и по выгодным ценам. Удобная платформа для обмена, моментального выкупа и продажи ключей Team Fortress 2. Гарантия надежности сделок, актуальные курсы и быстрая обработка заявок. Выгодные условия для игроков, трейдеров и всех, кто ценит скорость, безопасность и честные цены.
tf2 lavka
Loved the writing voice here, friendly without being fake and confident without being arrogant, and a stop at coilbliss carried the same tone forward, the kind of personality that makes a reader feel welcome rather than lectured at which is a balance plenty of writers struggle to find no matter how long they have been at it.
Покупайте и продавайте ключи TF2 быстро, безопасно и по выгодным ценам. Удобная платформа для обмена, моментального выкупа и продажи ключей Team Fortress 2. Гарантия надежности сделок, актуальные курсы и быстрая обработка заявок. Выгодные условия для игроков, трейдеров и всех, кто ценит скорость, безопасность и честные цены.
купить ключи tf2
Котлы наружного размещения сдвоенные от завода FEDERALGAZ очень удобны для отопления больших торговых центров. Сдвоенный уличный котел позволяет регулировать нагрузку и отключать одну секцию для чистки теплообменника без остановки тепла. Эксплуатация простая, автоматика безопасности работает четко.
Флагманский iPhone 17 Pro Max представляет собой вершину технологической эволюции Apple, объединяя передовую процессорную мощь, революционную камеру и безупречный дизайн. Этот смартфон создан для тех, кто ценит производительность и стиль в каждой детали. Подробнее о возможностях приобретения новинки можно узнать на https://kufactor.ru/news-29743-iphone-17-pro-max-v-apple-market-shag-v-novoe-pokolenie-tehnologij.html, где представлены различные конфигурации памяти и цветовые решения. Покупка в проверенном магазине гарантирует оригинальность устройства и полную техническую поддержку.
Уличный котел наружного размещения сдвоенный на 200 кВт помог решить проблему с отоплением автобазы. Оборудование разместили под открытым небом на площадке, подвели газовую трубу и теплотрассу. Котел водогрейный уличный работает стабильно, чистка оребренного теплообменника не занимает много времени.
Покупайте и продавайте ключи TF2 быстро, безопасно и по выгодным ценам. Удобная платформа для обмена, моментального выкупа и продажи ключей Team Fortress 2. Гарантия надежности сделок, актуальные курсы и быстрая обработка заявок. Выгодные условия для игроков, трейдеров и всех, кто ценит скорость, безопасность и честные цены.
купить ключи tf2
Honest assessment is that this is one of the better short reads I have had this week, and a look at meltmyrtle reinforced that, the bar for short content is low because most of it sacrifices substance for brevity but this site manages both at once which is harder than it sounds for most writers attempting it.
Продажа котлов наружного размещения промышленной серии на сайте federalgaz.ru порадовала ассортиментом одинарных и сдвоенных моделей. Выбрали котел наружного размещения RSA для производственного участка. Металл корпуса прочный, окраска качественная, автоматика безопасности надежная.
Liked the natural conversational tone throughout, never stiff and never overly casual either, and a stop at nylonplain kept that comfortable middle ground going, finding a tone that respects the reader without becoming distant or overly familiar is harder than it sounds and this site nails that balance consistently across many different pieces.
Покупайте и продавайте ключи TF2 быстро, безопасно и по выгодным ценам. Удобная платформа для обмена, моментального выкупа и продажи ключей Team Fortress 2. Гарантия надежности сделок, актуальные курсы и быстрая обработка заявок. Выгодные условия для игроков, трейдеров и всех, кто ценит скорость, безопасность и честные цены.
продать ключи tf2
Thanks again for the post, I learned a couple of things I can actually use later this week, and after I went over stylevani the rest of the site looked equally promising, definitely going to spend more time here when I get a free moment over the weekend to read more carefully.
Сайт адаптирован под нужды машиностроительных заводов
https://redmetsplav.ru/store/titan/rossiyskie-splavy-4/titan-ot4-2/pokovka-titanovaya-ot4-2/
Потребовалось купить промышленный котел наружного размещения для складского комплекса, выбрали официальный сайт FEDERALGAZ. Котлы наружного размещения одинарные монтируются прямо на улице, что снижает затраты на пожарные согласования внутри здания. Стоимость оборудования полностью оправдана.
Покупайте и продавайте ключи TF2 быстро, безопасно и по выгодным ценам. Удобная платформа для обмена, моментального выкупа и продажи ключей Team Fortress 2. Гарантия надежности сделок, актуальные курсы и быстрая обработка заявок. Выгодные условия для игроков, трейдеров и всех, кто ценит скорость, безопасность и честные цены.
tf2 lavka
Промышленный котел наружного размещения марки FEDERALGAZ работает у нас на предприятии второй год. Отличный уличный газовый котел, который не требует постройки отдельного здания котельной и экономит место. Завод котельного оборудования в Туймазах делает качественные вещи, корпуса утеплены на совесть, автоматика Honeywell не подводит.
Заказывали котельное оборудование наружного размещения для отопления загородного гостиничного комплекса. Выбрали газовый котел уличный серии RSA тепловой мощностью 150 кВт. Водотрубный секционный теплообменник выдает отличный КПД, прогрев системы отопления происходит быстро.
Покупайте и продавайте ключи TF2 быстро, безопасно и по выгодным ценам. Удобная платформа для обмена, моментального выкупа и продажи ключей Team Fortress 2. Гарантия надежности сделок, актуальные курсы и быстрая обработка заявок. Выгодные условия для игроков, трейдеров и всех, кто ценит скорость, безопасность и честные цены.
продать ключи tf2
Will be passing this along to a few people who would benefit from the perspective shared here, and a stop at growthvector only added to what I will be sharing, this kind of generous content deserves to circulate widely rather than getting buried in some search engine algorithm tweak that pushes it down the rankings.
Покупайте и продавайте ключи TF2 быстро, безопасно и по выгодным ценам. Удобная платформа для обмена, моментального выкупа и продажи ключей Team Fortress 2. Гарантия надежности сделок, актуальные курсы и быстрая обработка заявок. Выгодные условия для игроков, трейдеров и всех, кто ценит скорость, безопасность и честные цены.
tf2 lavka
На официальном сайте завода заказывали котел наружного размещения RSH сдвоенный для складского комплекса. Промышленная серия котлов FEDERALGAZ отличается надежностью сборки и качеством теплоизоляции. Котел уличного исполнения перенес зимние метели без остановок горелки.
Reading this brought back the satisfaction I used to get from blogs ten years ago, and a stop at luxmixo kept that nostalgic quality alive, sites that capture what was good about an earlier era of internet writing are increasingly precious and this one is doing that without feeling like a deliberate throwback at all.
Покупайте и продавайте ключи TF2 быстро, безопасно и по выгодным ценам. Удобная платформа для обмена, моментального выкупа и продажи ключей Team Fortress 2. Гарантия надежности сделок, актуальные курсы и быстрая обработка заявок. Выгодные условия для игроков, трейдеров и всех, кто ценит скорость, безопасность и честные цены.tf2lavka
Софокаст.рф — это надежный информационный портал, посвященный современным методам лечения гепатита С с помощью противовирусных препаратов прямого действия нового поколения. Здесь вы узнаете о пангенотипных схемах терапии, которые демонстрируют эффективность выше 95% и позволяют завершить курс всего за 8-12 недель. На сайте https://xn--80atlanehl.xn--p1ai/ собрана проверенная информация о препаратах, генотипах вируса и оптимальных схемах лечения для осознанного подхода к терапии. Портал помогает пациентам разобраться в современных возможностях медицины и понять, что гепатит С сегодня — это излечимое заболевание, требующее правильного выбора препаратов и врачебного контроля.
Reading this gave me a small jolt of recognition for an experience I thought was just mine, and a stop at qivnaro produced more such jolts, content that universalises private experiences without flattening them is doing genuinely useful work and this site is providing that recognition function for me reliably across topics I read.
Покупайте и продавайте ключи TF2 быстро, безопасно и по выгодным ценам. Удобная платформа для обмена, моментального выкупа и продажи ключей Team Fortress 2. Гарантия надежности сделок, актуальные курсы и быстрая обработка заявок. Выгодные условия для игроков, трейдеров и всех, кто ценит скорость, безопасность и честные цены.
tf2 keys
Decided not to comment because the post said what needed saying, and a stop at modzaro continued that complete feel, content that does not invite obvious additions or corrections from readers is content that has been carefully considered and this site appears to consistently produce pieces that satisfy rather than provoke unnecessary follow ups.
Worth flagging this site to a few specific friends who would appreciate the editorial sensibility, and a look at visionbuilder added more pages I will mention to them, recommending sites to specific people requires understanding both the site and the person and this site is making those personalised recommendations easy and natural for me.
Закупали шлак ферросилиция для строительных нужд, материал качественный, без лишних примесей.
https://xn--80aeedb0bfzeok.xn--p1ai/catalog/latunnaia-polosa/latunnaia-polosa-3-5kh100-mm-lzhmts59-1-1-tu-48-21-847-89/
Котлы наружного размещения одинарные от завода FEDERALGAZ привлекают простотой конструкции и надежной автоматикой безопасности. Поставили газовый котел уличный на производстве, подключили циркуляционные насосы, система работает как часы. Корпус котельной не промерзает.
Покупайте и продавайте ключи TF2 быстро, безопасно и по выгодным ценам. Удобная платформа для обмена, моментального выкупа и продажи ключей Team Fortress 2. Гарантия надежности сделок, актуальные курсы и быстрая обработка заявок. Выгодные условия для игроков, трейдеров и всех, кто ценит скорость, безопасность и честные цены.
продать ключи tf2
Покупайте и продавайте ключи TF2 быстро, безопасно и по выгодным ценам. Удобная платформа для обмена, моментального выкупа и продажи ключей Team Fortress 2. Гарантия надежности сделок, актуальные курсы и быстрая обработка заявок. Выгодные условия для игроков, трейдеров и всех, кто ценит скорость, безопасность и честные цены.
tf2 keys
Bookmark moved to my permanent reference folder rather than the casual maybe later folder, and a look at cabinboss earned the same upgrade, the distinction between casual interest and lasting reference is something I track carefully and very few sites cross that threshold but this one did so without much effort apparently.
Покупайте и продавайте ключи TF2 быстро, безопасно и по выгодным ценам. Удобная платформа для обмена, моментального выкупа и продажи ключей Team Fortress 2. Гарантия надежности сделок, актуальные курсы и быстрая обработка заявок. Выгодные условия для игроков, трейдеров и всех, кто ценит скорость, безопасность и честные цены.
tf2 lavka
Покупайте и продавайте ключи TF2 быстро, безопасно и по выгодным ценам. Удобная платформа для обмена, моментального выкупа и продажи ключей Team Fortress 2. Гарантия надежности сделок, актуальные курсы и быстрая обработка заявок. Выгодные условия для игроков, трейдеров и всех, кто ценит скорость, безопасность и честные цены.
tf2 ключи
Покупайте и продавайте ключи TF2 быстро, безопасно и по выгодным ценам. Удобная платформа для обмена, моментального выкупа и продажи ключей Team Fortress 2. Гарантия надежности сделок, актуальные курсы и быстрая обработка заявок. Выгодные условия для игроков, трейдеров и всех, кто ценит скорость, безопасность и честные цены.
купить ключи tf2
Reading this gave me a quiet moment of intellectual pleasure that I had not been expecting, and a stop at prowlocean extended that pleasure across more pages, the unexpected reward of stumbling into careful writing is one of the small ongoing pleasures of reading the open web and this site is delivering it reliably.
Покупайте и продавайте ключи TF2 быстро, безопасно и по выгодным ценам. Удобная платформа для обмена, моментального выкупа и продажи ключей Team Fortress 2. Гарантия надежности сделок, актуальные курсы и быстрая обработка заявок. Выгодные условия для игроков, трейдеров и всех, кто ценит скорость, безопасность и честные цены.tf2lavka
Покупайте и продавайте ключи TF2 быстро, безопасно и по выгодным ценам. Удобная платформа для обмена, моментального выкупа и продажи ключей Team Fortress 2. Гарантия надежности сделок, актуальные курсы и быстрая обработка заявок. Выгодные условия для игроков, трейдеров и всех, кто ценит скорость, безопасность и честные цены.
купить ключи tf2
Better signal to noise ratio than most places I check on this kind of topic, and a look at sequoiasnare kept that going, every paragraph here carries something worth reading rather than padding out the page to hit some arbitrary length target that search engines reward but readers ignore as soon as they notice it.
Покупайте и продавайте ключи TF2 быстро, безопасно и по выгодным ценам. Удобная платформа для обмена, моментального выкупа и продажи ключей Team Fortress 2. Гарантия надежности сделок, актуальные курсы и быстрая обработка заявок. Выгодные условия для игроков, трейдеров и всех, кто ценит скорость, безопасность и честные цены.
tf2 ключи
Покупайте и продавайте ключи TF2 быстро, безопасно и по выгодным ценам. Удобная платформа для обмена, моментального выкупа и продажи ключей Team Fortress 2. Гарантия надежности сделок, актуальные курсы и быстрая обработка заявок. Выгодные условия для игроков, трейдеров и всех, кто ценит скорость, безопасность и честные цены.
tf2 lavka
Покупайте и продавайте ключи TF2 быстро, безопасно и по выгодным ценам. Удобная платформа для обмена, моментального выкупа и продажи ключей Team Fortress 2. Гарантия надежности сделок, актуальные курсы и быстрая обработка заявок. Выгодные условия для игроков, трейдеров и всех, кто ценит скорость, безопасность и честные цены.
купить ключи tf2
Покупайте и продавайте ключи TF2 быстро, безопасно и по выгодным ценам. Удобная платформа для обмена, моментального выкупа и продажи ключей Team Fortress 2. Гарантия надежности сделок, актуальные курсы и быстрая обработка заявок. Выгодные условия для игроков, трейдеров и всех, кто ценит скорость, безопасность и честные цены.tf2lavka
Honestly the simplicity of the explanation made the topic click for me in a way other writeups had not, and a look at amidcarve continued that clarity into related areas, when a writer gets the level of explanation right the reader does the heavy lifting themselves and the post just enables it.
Использование файлов cookie и политика конфиденциальности соответствуют закону
https://redmetsplav.ru/store/titan/rossiyskie-splavy-4/titan-5vb—gost-19807-91/prutok-titanovyy-5vb—gost-19807-91/
Ended up here on a wandering afternoon and was glad I stayed for the read, and a stop at numenoat extended the wandering into a proper exploration of the site, the kind of place that rewards aimless clicking with something genuinely interesting rather than the shallow content that mostly populates the modern open web.
Покупайте и продавайте ключи TF2 быстро, безопасно и по выгодным ценам. Удобная платформа для обмена, моментального выкупа и продажи ключей Team Fortress 2. Гарантия надежности сделок, актуальные курсы и быстрая обработка заявок. Выгодные условия для игроков, трейдеров и всех, кто ценит скорость, безопасность и честные цены.tf2lavka
Really like the way the post resists reaching for cliches that would have made it feel generic, and a quick visit to cartluma kept that fresh feel going, original phrasing and unexpected metaphors are signs that the writer is actually thinking rather than just stitching together familiar phrases into the appearance of content.
Покупайте и продавайте ключи TF2 быстро, безопасно и по выгодным ценам. Удобная платформа для обмена, моментального выкупа и продажи ключей Team Fortress 2. Гарантия надежности сделок, актуальные курсы и быстрая обработка заявок. Выгодные условия для игроков, трейдеров и всех, кто ценит скорость, безопасность и честные цены.
tf2 lavka
Покупайте и продавайте ключи TF2 быстро, безопасно и по выгодным ценам. Удобная платформа для обмена, моментального выкупа и продажи ключей Team Fortress 2. Гарантия надежности сделок, актуальные курсы и быстрая обработка заявок. Выгодные условия для игроков, трейдеров и всех, кто ценит скорость, безопасность и честные цены.
tf2 keys
Покупайте и продавайте ключи TF2 быстро, безопасно и по выгодным ценам. Удобная платформа для обмена, моментального выкупа и продажи ключей Team Fortress 2. Гарантия надежности сделок, актуальные курсы и быстрая обработка заявок. Выгодные условия для игроков, трейдеров и всех, кто ценит скорость, безопасность и честные цены.
продать ключи tf2
Now realising the post solved a small problem I had been carrying for weeks, and a look at luxrova extended that problem solving function, content that connects to specific unresolved questions in my own life rather than just providing general interest is content with real practical impact and this site is providing that practical value.
Picked this post to share in a Slack channel where I knew it would be appreciated, and a look at arialcamp suggested I will share more from here later, content worth sharing into a professional context is content that has earned a higher kind of trust than mere personal interest and this site has it.
Как сделать временную регистрацию правильно — важно понимать до подачи документов. Нужно учитывать адрес проживания, согласие собственника или принимающей стороны, сроки и точность данных. В Москве внимательный подход к оформлению помогает быстрее решить вопрос – временная регистрация москва
Speaking as someone who reads a lot on this topic this site has earned a high position in my source rankings, and a stop at boneclog reinforced that ranking, the informal ranking of sources for a topic is something I maintain mentally and this site has moved into the upper portion of those rankings clearly.
Покупайте и продавайте ключи TF2 быстро, безопасно и по выгодным ценам. Удобная платформа для обмена, моментального выкупа и продажи ключей Team Fortress 2. Гарантия надежности сделок, актуальные курсы и быстрая обработка заявок. Выгодные условия для игроков, трейдеров и всех, кто ценит скорость, безопасность и честные цены.
продать ключи tf2
Покупайте и продавайте ключи TF2 быстро, безопасно и по выгодным ценам. Удобная платформа для обмена, моментального выкупа и продажи ключей Team Fortress 2. Гарантия надежности сделок, актуальные курсы и быстрая обработка заявок. Выгодные условия для игроков, трейдеров и всех, кто ценит скорость, безопасность и честные цены.tf2lavka
Покупайте и продавайте ключи TF2 быстро, безопасно и по выгодным ценам. Удобная платформа для обмена, моментального выкупа и продажи ключей Team Fortress 2. Гарантия надежности сделок, актуальные курсы и быстрая обработка заявок. Выгодные условия для игроков, трейдеров и всех, кто ценит скорость, безопасность и честные цены.tf2lavka
Покупайте и продавайте ключи TF2 быстро, безопасно и по выгодным ценам. Удобная платформа для обмена, моментального выкупа и продажи ключей Team Fortress 2. Гарантия надежности сделок, актуальные курсы и быстрая обработка заявок. Выгодные условия для игроков, трейдеров и всех, кто ценит скорость, безопасность и честные цены.
продать ключи tf2
Покупайте и продавайте ключи TF2 быстро, безопасно и по выгодным ценам. Удобная платформа для обмена, моментального выкупа и продажи ключей Team Fortress 2. Гарантия надежности сделок, актуальные курсы и быстрая обработка заявок. Выгодные условия для игроков, трейдеров и всех, кто ценит скорость, безопасность и честные цены.
купить ключи tf2
Took some notes for a project I am working on, and a stop at coltable added more raw material to those notes, content that contributes to my own creative work rather than just being interesting in the moment is the kind I value most and the kind I will keep coming back to repeatedly.
Покупайте и продавайте ключи TF2 быстро, безопасно и по выгодным ценам. Удобная платформа для обмена, моментального выкупа и продажи ключей Team Fortress 2. Гарантия надежности сделок, актуальные курсы и быстрая обработка заявок. Выгодные условия для игроков, трейдеров и всех, кто ценит скорость, безопасность и честные цены.
купить ключи tf2
Покупайте и продавайте ключи TF2 быстро, безопасно и по выгодным ценам. Удобная платформа для обмена, моментального выкупа и продажи ключей Team Fortress 2. Гарантия надежности сделок, актуальные курсы и быстрая обработка заявок. Выгодные условия для игроков, трейдеров и всех, кто ценит скорость, безопасность и честные цены.
tf2 ключи
Покупайте и продавайте ключи TF2 быстро, безопасно и по выгодным ценам. Удобная платформа для обмена, моментального выкупа и продажи ключей Team Fortress 2. Гарантия надежности сделок, актуальные курсы и быстрая обработка заявок. Выгодные условия для игроков, трейдеров и всех, кто ценит скорость, безопасность и честные цены.
купить ключи tf2
Покупайте и продавайте ключи TF2 быстро, безопасно и по выгодным ценам. Удобная платформа для обмена, моментального выкупа и продажи ключей Team Fortress 2. Гарантия надежности сделок, актуальные курсы и быстрая обработка заявок. Выгодные условия для игроков, трейдеров и всех, кто ценит скорость, безопасность и честные цены.
tf2 lavka
Came back to this an hour later to reread a specific section, and a quick visit to visionalignment also drew a second look, content that pulls you back rather than letting you move on permanently is the kind I want to fill my browser bookmarks with in 2026 and beyond as the open internet evolves.
Now planning to recommend this site in a context where my recommendations are taken seriously, and a stop at vuznaro confirmed I should make that recommendation soon, the small but real act of recommending content into spaces where my taste matters is something I take seriously and this site is worth the recommendation.
Редметсплав — пример того, как должен работать современный поставщик металлургического сырья.
https://xn--80aeedb0bfzeok.xn--p1ai/catalog/mednyi-perekhodnoi-troinik-press/mednyi-perekhodnoi-press-troinik-40-5kh34-mm-m1t-gost-r-52948-2008/
Покупайте и продавайте ключи TF2 быстро, безопасно и по выгодным ценам. Удобная платформа для обмена, моментального выкупа и продажи ключей Team Fortress 2. Гарантия надежности сделок, актуальные курсы и быстрая обработка заявок. Выгодные условия для игроков, трейдеров и всех, кто ценит скорость, безопасность и честные цены.
продать ключи tf2
Покупайте и продавайте ключи TF2 быстро, безопасно и по выгодным ценам. Удобная платформа для обмена, моментального выкупа и продажи ключей Team Fortress 2. Гарантия надежности сделок, актуальные курсы и быстрая обработка заявок. Выгодные условия для игроков, трейдеров и всех, кто ценит скорость, безопасность и честные цены.
tf2 lavka
Покупайте и продавайте ключи TF2 быстро, безопасно и по выгодным ценам. Удобная платформа для обмена, моментального выкупа и продажи ключей Team Fortress 2. Гарантия надежности сделок, актуальные курсы и быстрая обработка заявок. Выгодные условия для игроков, трейдеров и всех, кто ценит скорость, безопасность и честные цены.tf2lavka
Glad to find something on this topic that does not start with three paragraphs of throat clearing before getting to the point, and a stop at milknorth also dives right in, respect for the readers time shows up in small editorial choices like this and they add up to a real difference quickly.
Покупайте и продавайте ключи TF2 быстро, безопасно и по выгодным ценам. Удобная платформа для обмена, моментального выкупа и продажи ключей Team Fortress 2. Гарантия надежности сделок, актуальные курсы и быстрая обработка заявок. Выгодные условия для игроков, трейдеров и всех, кто ценит скорость, безопасность и честные цены.
продать ключи tf2
Felt the post was written for someone like me without explicitly addressing me, and a look at octanenebula produced the same fit, when content lands on its target without pandering you know the writer has done careful audience thinking rather than relying on demographic targeting or interest signals to do the work of editorial decisions.
Покупайте и продавайте ключи TF2 быстро, безопасно и по выгодным ценам. Удобная платформа для обмена, моментального выкупа и продажи ключей Team Fortress 2. Гарантия надежности сделок, актуальные курсы и быстрая обработка заявок. Выгодные условия для игроков, трейдеров и всех, кто ценит скорость, безопасность и честные цены.
tf2 ключи
Покупайте и продавайте ключи TF2 быстро, безопасно и по выгодным ценам. Удобная платформа для обмена, моментального выкупа и продажи ключей Team Fortress 2. Гарантия надежности сделок, актуальные курсы и быстрая обработка заявок. Выгодные условия для игроков, трейдеров и всех, кто ценит скорость, безопасность и честные цены.
tf2 ключи
A piece that did not lean on the writer credentials or institutional backing, and a look at zorlumo maintained the same focus on substance, content that earns trust through quality rather than through name dropping is the kind I find most persuasive and this site is clearly playing on the substance side of that distinction.
Now considering whether the post would translate well into a different form, and a look at qonzavi suggested similar versatility, content that could move into other media without losing its substance is content that has been built around ideas rather than around format and this site reads as idea first throughout posts.
Took a chance on the headline and was rewarded, and a stop at luxrivo kept the rewards coming as I clicked through, the kind of place where every link leads somewhere worth the click is a small luxury on the modern web where so many sites are mostly empty calories disguised as content.
Покупайте и продавайте ключи TF2 быстро, безопасно и по выгодным ценам. Удобная платформа для обмена, моментального выкупа и продажи ключей Team Fortress 2. Гарантия надежности сделок, актуальные курсы и быстрая обработка заявок. Выгодные условия для игроков, трейдеров и всех, кто ценит скорость, безопасность и честные цены.
продать ключи tf2
Useful information presented in a way that does not feel like a sales pitch, that is what I appreciated most, and a stop at molnexo was the same, no upsell and no fake urgency just steady content laid out properly for someone trying to actually learn from it rather than just be sold to.
Appreciated how the post felt complete without overstaying its welcome, and a stop at intentionalmomentum confirmed that economical approach runs across the site, knowing when to stop is a skill many writers never develop but here the discipline is obvious and welcome from the perspective of a busy reader trying to learn things efficiently.
Picked up two new ideas that I expect will come up in conversations this week, and a look at pippierce added another, content that arms me with talking points rather than just filling time is the kind that provides ongoing value beyond the moment of reading and this site is generating that kind of ongoing value.
Покупайте и продавайте ключи TF2 быстро, безопасно и по выгодным ценам. Удобная платформа для обмена, моментального выкупа и продажи ключей Team Fortress 2. Гарантия надежности сделок, актуальные курсы и быстрая обработка заявок. Выгодные условия для игроков, трейдеров и всех, кто ценит скорость, безопасность и честные цены.
tf2 lavka
Покупайте и продавайте ключи TF2 быстро, безопасно и по выгодным ценам. Удобная платформа для обмена, моментального выкупа и продажи ключей Team Fortress 2. Гарантия надежности сделок, актуальные курсы и быстрая обработка заявок. Выгодные условия для игроков, трейдеров и всех, кто ценит скорость, безопасность и честные цены.
tf2 ключи
Покупайте и продавайте ключи TF2 быстро, безопасно и по выгодным ценам. Удобная платформа для обмена, моментального выкупа и продажи ключей Team Fortress 2. Гарантия надежности сделок, актуальные курсы и быстрая обработка заявок. Выгодные условия для игроков, трейдеров и всех, кто ценит скорость, безопасность и честные цены.
tf2 keys
Покупайте и продавайте ключи TF2 быстро, безопасно и по выгодным ценам. Удобная платформа для обмена, моментального выкупа и продажи ключей Team Fortress 2. Гарантия надежности сделок, актуальные курсы и быстрая обработка заявок. Выгодные условия для игроков, трейдеров и всех, кто ценит скорость, безопасность и честные цены.
купить ключи tf2
Покупайте и продавайте ключи TF2 быстро, безопасно и по выгодным ценам. Удобная платформа для обмена, моментального выкупа и продажи ключей Team Fortress 2. Гарантия надежности сделок, актуальные курсы и быстрая обработка заявок. Выгодные условия для игроков, трейдеров и всех, кто ценит скорость, безопасность и честные цены.
tf2 keys
Покупайте и продавайте ключи TF2 быстро, безопасно и по выгодным ценам. Удобная платформа для обмена, моментального выкупа и продажи ключей Team Fortress 2. Гарантия надежности сделок, актуальные курсы и быстрая обработка заявок. Выгодные условия для игроков, трейдеров и всех, кто ценит скорость, безопасность и честные цены.tf2lavka
Looking for bitcoin live price in gbp? Check the live Bitcoin price in GBP and see how much 1 BTC is worth in British Pounds right now. bitcoinpricegbp.com follows the live BTC/GBP rate, everyday fluctuations, and important market figures for those who need an instant Bitcoin price reference in British Pounds. This platform is perfect for users who want to keep track of their BTC balance in British Pounds, review current market changes, and assess the total value of their crypto portfolio.
Покупайте и продавайте ключи TF2 быстро, безопасно и по выгодным ценам. Удобная платформа для обмена, моментального выкупа и продажи ключей Team Fortress 2. Гарантия надежности сделок, актуальные курсы и быстрая обработка заявок. Выгодные условия для игроков, трейдеров и всех, кто ценит скорость, безопасность и честные цены.
купить ключи tf2
Сделать временную регистрацию важно тем, кто планирует жить в Москве больше короткого визита. Такой документ подтверждает адрес пребывания и помогает избежать лишних вопросов. Лучше заранее уточнить список документов и выбрать надежный законный вариант оформления: https://propiska-moskva978.ru/
Агентство Федора Калединского работает с недвижимостью, где важны стиль, статус и безупречное качество. Для клиента подбираются премиальные объекты, способные стать комфортным домом, выгодным вложением или частью личной коллекции лучших пространств для жизни https://kaledinsky.ru/
https://spb.kotel-rs.ru/naruzhnye-ustanovki-gazovyh-kotlov
Worth saying this site reads better than most paid newsletters I have tried, and a stop at cartmixo confirmed that comparison, the bar for free content is often lower than for paid but this site clears the paid bar consistently and that says something about the editorial approach behind the work being published here regularly.
After reading several posts back to back the consistent voice across them is impressive, and a stop at palettemauve continued that voice consistency, sites that maintain a single coherent voice across many pieces by potentially many writers represent serious editorial discipline and this one has clearly developed the institutional consistency needed for that.
Гибкая система оплаты и прозрачные условия договора, никаких скрытых наценок или задержек.
https://xn--80aeedb0bfzeok.xn--p1ai/catalog/latunnaia-polosa/latunnaia-polosa-1-6×100-mm-l68-gost-931-90/
https://spb.kotel-rs.ru/blochnye-kotelnye-ustanovki
Top notch writing, every paragraph carries weight and nothing feels like filler, and a stop at upperspruce reflected that same care, a rare thing on the open web these days where most pages exist for clicks rather than actual reader value or anything close to that which is honestly a real shame.
https://spb.kotel-rs.ru/kotel-ulichnyj-blochnogo-ispolneniya-250
Found the rhythm of the prose particularly enjoyable on this read through, and a look at cabinbull kept that musical quality going across the related pages, sentence rhythm is something most blog writers ignore but it makes a real difference in how content lands with the careful reader who cares.
https://spb.kotel-rs.ru/vneshnie-gazovye-kotly-spb
https://spb.kotel-rs.ru/kotel-naruzhnyj-ulichnyj
https://spb.kotel-rs.ru/gazovyj-kotel-ulichnogo-razmeshcheniya-spb
Агентство элитной недвижимости Федора Калединского помогает тем, кто ищет особый уровень комфорта, приватности и статуса. В фокусе — премиальные квартиры, роскошные апартаменты, загородные резиденции и объекты для взыскательных клиентов, ценящих качество и индивидуальный подход – купить новостройку
Временная регистрация в Москве для граждан РФ помогает подтвердить место пребывания и решить многие практические вопросы. Она может быть нужна при устройстве на работу, получении услуг или длительном проживании в столице. Оформление должно быть прозрачным и корректным – временная регистрация в москве купить
Удобное разделение продукции на сплавы и конкретные виды проката
https://redmetsplav.ru/store/niobiy1/splavy-niobiya-1/niobiy-nbp2-1/poroshok-niobievyy-nbp2/
Found a couple of useful angles in here I had not considered before reading carefully, and a quick stop at xinvexa added more, this is one of those sites where the value compounds the more you read rather than peaking at one viral post and then offering nothing else of substance afterwards which is common.
A piece that did exactly what it promised in the headline without overshooting or underdelivering, and a look at astrobrunch continued that calibration, alignment between promise and delivery is a basic editorial virtue that many sites fail at and this site has clearly mastered the matching of expectation and substance throughout pieces.
https://spb.kotel-rs.ru/gazovyj-kotel-ulichnoj-ustanovki-spb
https://spb.kotel-rs.ru/gazovyj-kotel-vneshnego-razmeshcheniya-spb
Started taking notes about halfway through because the points were stacking up, and a look at qorlino added enough material that my notes file grew further, content that demands note taking from a passive reader is content with substance and the writers here are clearly producing that kind of work consistently across topics.
Liked how the writer used real examples instead of theoretical ones to make the points stick, and a stop at zorvilo added even more concrete examples, this is the kind of practical approach that respects readers who actually want to apply what they learn rather than just nodding along passively without doing anything useful.
https://pub-pogrebok.kiev.ua/
https://spb.kotel-rs.ru/kotel-ulichnyj-blochnogo-ispolneniya-600
Visit https://shanghaiatlas.com/ for a working atlas of Shanghai’s landmarks, gardens, towers, and temples. We’ve compiled only the best—twelve entries on the places visitors actually go to in Shanghai—researched by us on the spot, complete with opening hours, ticket prices, directions, and practical tips. Learn more on the website.
Easy to recommend without reservations, the site delivers on every promise it implicitly makes, and a look at bauxable kept that same standard going, the kind of consistency that earns trust over time rather than chasing it through aggressive marketing is what I see here and it is appreciated greatly by this particular reader today.
Worth recognising the specific care that went into how this post ended, and a look at molvani maintained the same careful conclusions, endings are where most blog content falls apart and this site has clearly invested in the closing stretches of its pieces rather than letting them simply trail off when energy fades.
https://spb.kotel-rs.ru/gazovyj-kotel-naruzhnogo-ispolneniya-spb
Skipped a meeting reminder to finish the post, and a stop at luzqiro held me past another reminder, when content beats meetings the writer is doing something extraordinary because meetings have institutional support behind them and yet good writing can still occasionally win that competition for attention which I find heartening today.
A nicely understated post that does not shout for attention, and a look at hekfox maintained the same quiet quality, understatement is a stylistic choice that distinguishes serious writing from attention seeking writing and this site has clearly committed to the understated approach as a core editorial value rather than just a phase.
https://spb.kotel-rs.ru/gazovyj-kotel-ulichnogo-tipa
Better than most of the writing I have come across on this topic recently, simpler and more direct, and a look at pebbleoboe continued in that same way, a real outlier in a crowded space full of repetitive content that says little while taking up a lot of reader time today which is unfortunate.
Felt the post handled a sensitive angle of the topic with appropriate care, and a look at mexqiro extended that careful handling across related material, sites that can navigate delicate territory without causing damage are rare and require a level of judgement that comes from experience rather than from following any clear playbook.
A clear cut above the usual noise on the subject, and a look at zulvexa only made that gap wider in my view, the kind of place that earns its visitors through quality rather than through aggressive marketing or sponsored placements which is increasingly the only way most sites stay afloat across the modern web.
Worth a quiet moment of recognition for the consistency I have noticed across multiple posts, and a stop at octanepinto continued that consistent quality, sites that maintain quality across many pieces rather than peaking on one viral post are sites with real editorial discipline and this one has clearly developed that discipline carefully.
Reading this slowly because the writing rewards a slower pace, and a stop at minimparch did the same, the pace at which I read content is something I now use as a quality signal and writing that earns a slower pace earns my attention as a reader looking for substance these days.
Прописка в Москве может потребоваться при переезде, смене места жительства или оформлении важных документов. Важно понимать, что регистрация должна соответствовать реальному адресу проживания. Такой подход делает оформление безопаснее, понятнее и надежнее, сколько стоит временная регистрация в московской области
Speaking from the perspective of a fairly demanding reader the writing here clears the bar consistently, and a look at ideastomotion continued clearing that bar, the calibration of demanding reader is something I apply to all sources and this site has been one of the few that handles the demanding reading well across pieces sampled.
More substantial than most of what I find searching for this topic online, and a stop at claritychanneling kept that quality consistent, this is one of those sites where the writing actually rewards careful reading rather than punishing the patient reader with empty filler stretched out across long paragraphs that say very little.
Closed three other tabs to focus on this one and never opened them again, and a stop at pruneoval similarly held attention exclusively, content that crowds out other reading from working memory is content with real density and this site has demonstrated that density across multiple pages I have visited so far this morning.
Агентство элитной недвижимости Федора Калединского делает акцент на персональном подходе и внимательном отношении к запросам. В премиальном сегменте важно понимать не только рынок, но и человека, который ищет пространство для жизни, отдыха или инвестиций – ЖК ТАТУМ
Премиальная недвижимость — это пространство, где сочетаются архитектура, комфорт, безопасность и престиж. Агентство элитной недвижимости Федора Калединского помогает ориентироваться в лучших предложениях рынка и находить объекты, которые подходят для жизни, инвестиций или коллекционного владения – элитные квартиры новостройках
Премиальная недвижимость — это пространство, где сочетаются архитектура, комфорт, безопасность и престиж. Агентство элитной недвижимости Федора Калединского помогает ориентироваться в лучших предложениях рынка и находить объекты, которые подходят для жизни, инвестиций или коллекционного владения, СЕЗАР СИЛИКА
Отраслевой охват впечатляет: от медицины до космической промышленности
https://redmetsplav.ru/store/molibden-i-ego-splavy/molibden-tsm4605-1/lenta-molibdenovaya-tsm4605/
Clean writing, easy to read, and never tries too hard to impress, that combination is harder to find than people think, and after my time on cartrivo I am sure this site treats its readers well, no flashy tricks just useful content done right which is honestly all I want online.
Временная регистрация в Москве для граждан РФ оформляется по месту фактического пребывания. Она может быть полезна при работе, учебе, аренде жилья и обращении в разные организации. Чем внимательнее подготовлены документы, тем проще проходит весь процесс – регистрация в москве временная
Looking for tvl yield? Head over to bestearn.io and discover a table designed to help users compare live yield opportunities across various protocols and chains. Rather than browsing through generic recommendations, visitors get to see the current APY, liquidity size, and pool type all in one place, filtering down to choices that feel more suited for earning passive crypto income.
Технические специалисты компании помогли выбрать оптимальный сплав для работы в агрессивных средах.
https://xn--80aeedb0bfzeok.xn--p1ai/catalog/dvutavr-aliuminievyi/aliuminievyi-dvutavr-vd1-2x45x50-gost-13621-90/
Better than the average post on this subject by some distance, and a look at larksmemo reinforced that, you can tell within the first paragraph that the writer here actually cares about the topic rather than just covering it for the sake of having something to publish that week or that day.
A nicely understated post that does not shout for attention, and a look at qorzino maintained the same quiet quality, understatement is a stylistic choice that distinguishes serious writing from attention seeking writing and this site has clearly committed to the understated approach as a core editorial value rather than just a phase.
A piece that suggested careful editing without showing the marks of the editing, and a look at zulmora continued that invisible polish, the best editing disappears into the prose and this site reads as having been edited with skill that does not announce itself which is the highest compliment I can offer any blog content.
Reading this confirmed a small detail I had been uncertain about, and a stop at piscesmyrtle provided the source for further checking, content that supports verification through citations or links rather than just asserting facts is more trustworthy and this site has clearly built its credibility through that kind of verifiable approach consistently.
Reading this gave me material for a conversation I needed to have anyway, and a stop at molzari added even more talking points, content that connects to upcoming social or professional needs rather than just being interesting in the abstract is the kind that earns priority placement in my attention these days routinely.
https://facesave.ru/novosti/chto-takoe-i-dlya-chego-nuzhny-analizy
Общее впечатление: надежный информационный ресурс для снабженцев.
https://redmetsplav.ru/store/molibden-i-ego-splavy/molibden-mpch-2/krug-molibdenovyy-mpch/
Worth recognising the specific care that went into how this post ended, and a look at mallivo maintained the same careful conclusions, endings are where most blog content falls apart and this site has clearly invested in the closing stretches of its pieces rather than letting them simply trail off when energy fades.
Picked something concrete from the post that I will use immediately, and a look at tirlumo added another concrete piece, content that produces immediately useful output rather than just abstract appreciation is content that earns its place in my regular rotation without needing any further evaluation from me at this point honestly.
Felt the writer was being honest with the reader which is rare enough that I want to acknowledge it, and a look at hesyam continued that honest feel, content built on actual knowledge rather than aggregated summaries is something I value highly and rarely come across in regular searches on the open internet these days.
Solid recommendation from me to anyone working in the area, the perspective here is grounded, and a look at calmbyrd adds even more useful angles, the kind of site that becomes a reference rather than just a one time read which is a higher bar than most blogs ever reach today on the modern web.
Approaching this site through a casual link click and being surprised by what I found, and a look at auralbrick extended the surprise, the rare experience of stumbling into excellent independent content rather than predictable mediocrity is one of the actual remaining pleasures of casual web browsing and this site provided it cleanly.
Just want to flag that this was useful and not bury the appreciation in caveats, and a look at zunkavi earned the same direct praise, recognising good work without hedging it with criticism is something I try to practice because over qualified compliments tend to read as backhanded and miss the point sometimes.
Временная регистрация для граждан РФ в Москве часто становится необходимым шагом после переезда. Она подтверждает адрес пребывания и помогает быстрее адаптироваться в городе. При правильном оформлении человек получает больше уверенности в рабочих, учебных и бытовых вопросах: постоянная прописка в москве
Thanks for the honest framing without exaggerated claims that the topic will change my life, and a stop at minutemotel kept the same modest tone, restraint in marketing language signals trustworthiness and the writers here are clearly playing the long game by building credibility rather than chasing immediate clicks through hyperbole.
Reading this gave me a small sense of progress on a topic I have been slowly working through, and a stop at pebbleorbit added another step forward, learning happens in small increments across many sources and finding sources that consistently contribute is the actual practical value of careful curation in an information rich world.
A piece that reads as if the writer trusted readers to fill in obvious gaps, and a look at growthpathway continued that respectful approach, content that does not over explain what the reader can infer is content that respects intelligence and this site has clearly chosen to write to capable readers rather than to the lowest common denominator.
Now noticing that the post did not mention the writer at all, focus stayed on the topic, and a look at odelatte continued that author absent quality, content that disappears the writer to focus on the substance is a particular kind of generosity and this site has clearly chosen the substance over the personality consistently.
https://heatmaster.com.ua/
Picked a friend mentally as the audience for this and decided to send the link, and a look at clockcard confirmed the send was the right choice, choosing whom to share content with is a small act of curation that I take more seriously than the public sharing most platforms encourage these days online.
Worth a slow read rather than the fast scan I usually default to, and a look at cartvani earned the same slower pace from me, content that resets my reading speed downward is content with substance worth absorbing and this site has produced that effect on me multiple times now over the last week here.
Now appreciating that the post did not require me to agree with the writer to find it valuable, and a look at mexvoro maintained the same useful regardless of agreement quality, content that informs even when it does not convince is content with broader utility and this site reads as useful even when I disagree.
Описание складских позиций сокращает время ожидания ответа
https://redmetsplav.ru/store/molibden-i-ego-splavy/molibden-fmo55a-1/truba-molibdenovaya-fmo55a/
เนื้อหานี้ ให้ข้อมูลดี ครับ
ดิฉัน ไปอ่านเพิ่มเติมเกี่ยวกับ เนื้อหาในแนวเดียวกัน
ซึ่งอยู่ที่ สล็อตแตกง่าย
น่าจะถูกใจใครหลายคน
มีการยกตัวอย่างที่เข้าใจง่าย
ขอบคุณที่แชร์ คอนเทนต์ดีๆ นี้
และหวังว่าจะมีข้อมูลใหม่ๆ มาแบ่งปันอีก
Just wanted to drop a quick note saying this was a useful read on a topic I have been circling, no fluff, and a stop at morxavi added a few extra points that fit the same simple style which makes the whole site feel coherent rather than thrown together by many different writers with different goals.
Reading this between two meetings turned out to be the highlight of the morning, and a stop at lattepinto continued that highlight quality, content that outshines the structured parts of a working day is doing something well beyond ordinary and this site has produced multiple such highlights for me already this week alone.
Liked that the post acknowledged complications rather than pretending they did not exist, and a stop at qulmora continued that honest framing, sites that handle complexity with care rather than papering it over with simplifying claims are doing real intellectual work and this one is clearly in that category based on what I have read.
Liked the way the post balanced confidence and humility, and a stop at zulqaro maintained the same balance, knowing when to assert and when to acknowledge uncertainty is a sign of mature thinking and the writers here have clearly developed that calibration through what I assume is years of careful work on their craft.
Качество сварочных материалов на высоте, электроды варят отлично, состав металла стабильный.
https://xn--80aeedb0bfzeok.xn--p1ai/catalog/mednye-dvukhrastrubnye-mufty-pod-paiku/mednaiadvukhrastrubnaiamufta-pod-paiku35kh1mmm1tgost-r-52922-2008/
https://usa-intercargo.com.ua/
Such writing is increasingly rare and worth supporting through attention, and a stop at mavlizo extended that supportive attention across more pages, the conscious choice to spend time on sites that produce careful work rather than convenient consumption is itself a small form of patronage and this site is receiving that conscious patronage from me.
Liked that the post resisted a sales pitch ending, and a stop at tirlumo maintained the no pitch approach, content that ends without trying to convert me into a customer or subscriber is content that has confidence in its own value and this site is clearly playing the long game on reader trust.
Most attempts at writing on this topic feel like they are missing something and this post finally identified what was missing, and a look at hirpod extended that diagnostic clarity, content that names what is wrong with adjacent treatments while doing better itself is content with both critical and constructive value and this site has both.
Worth saying that the prose reads naturally without straining for style, and a stop at pueblonorth maintained the same unforced quality, writing that achieves elegance without effort is the highest tier and this site has clearly worked out how to land that effortless quality consistently rather than only on the writers best days.
Быстрая навигация через «Карту сайта» для поиска глубоких страниц
https://redmetsplav.ru/store/magniy-i-ego-splavy/zarubezhnye-splavy-2/magniy-ze10a/izdeliya-iz-magniya-ze10a/
Decided to set aside time later to read more carefully, and a stop at zunqavo reinforced that decision, content that earns a calendar entry rather than just a passing read is in a different tier altogether and this site is clearly working at that elevated level which I really do appreciate as a reader today.
A piece that brought a sense of order to a topic I had been finding chaotic, and a look at mirelogic continued that organising effect, content that imposes useful structure on messy subjects is doing genuine intellectual work and this site is providing that organisational function across multiple posts I have read recently here.
Reading this gave me a small jolt of recognition for an experience I thought was just mine, and a stop at peltpetal produced more such jolts, content that universalises private experiences without flattening them is doing genuinely useful work and this site is providing that recognition function for me reliably across topics I read.
Reading this with a notebook open turned out to be the right move, and a stop at conexbuilt added more material to the notes, content that justifies active note taking from a passive reader is content with real informational density and this site is producing notes worthy material at a high rate consistently.
A well calibrated piece that knew its scope and stayed inside it, and a look at focusignition maintained the same scope discipline, scope creep is one of the failure modes of long blog posts and this site has clearly invested in the editorial discipline to prevent it which shows up in tightly contained pieces.
Started thinking about my own writing differently after reading, and a look at auralbrig continued that reflective effect, content that influences how I work rather than just informing what I know is content with the highest kind of impact and this site has triggered some of that reflective influence today on me.
I learned more from this short post than from longer articles I read earlier today, and a stop at actionoptimizer added even more useful detail without going off topic, this site clearly knows how to keep things focused without sacrificing depth which is a hard balance to strike for any writer.
Anyone curious about this topic would do well to start here, the foundation laid is solid, and a stop at cartzaro would round out their understanding nicely, this is the kind of resource I would point a friend toward without hesitation if they asked me where to begin learning about anything in this area.
Весь металл проходит строгий входной контроль, за всё время работы ни одного случая брака.
https://xn--80aeedb0bfzeok.xn--p1ai/catalog/melkhiorovaia-truba/melkhiorovaia-truba-45kh3kh14000-mm-mnzhmts10-1-1-gost-10092-2006/
Really like that the writer trusts the reader to follow simple logic without restating every previous point, and a stop at pacerlucid kept that respect going, treating an audience as capable adults rather than as people who need constant hand holding makes a noticeable difference in the reading experience for me.
Once you find a site like this the search for similar voices begins, and a look at capeasana extended the search energy, finding a high quality reference point makes the gap between it and adjacent sources visible in a way it was not before and this site has provided that high reference point across multiple recent visits.
Pleasant surprise, the post delivered more than the headline promised, and a stop at movlino continued that pattern of under promising and over delivering, the rarest combination on the modern web where most content does the opposite by promising the world and delivering thin recycled summaries instead each time you click on something interesting.
A piece that read as the work of someone who reads carefully themselves, and a look at pivotllama continued that informed feel, writers who are also serious readers produce work with a different quality and this site reads as the product of someone steeped in good writing rather than just generating content for an audience.
Strong recommendation, anyone interested in this topic owes themselves a visit, and a stop at quvnero extends that recommendation across more of the site, this is the kind of resource that makes me more optimistic about the state of the open web than I usually am these days actually for once which is genuinely refreshing.
Adding to the bookmarks now before I forget, that is how good this is, and a look at bracechord confirmed the rest of the site is worth saving too, this is one of those rare finds that justifies the time spent searching the web for once which is a relief in the current environment.
Магниевый прокат представлен в достаточном ассортименте
https://redmetsplav.ru/store/magniy-i-ego-splavy/zarubezhnye-splavy-2/magniy-r60700—uns/truba-magnievaya-r60700—uns/
https://polreplast.com.ua/
Now adjusting my expectations upward for the topic based on this post, and a stop at laurelleap continued that bar raising effect, content that resets what I think is possible on a subject is doing real work in shaping my standards and this site is providing those bar raising experiences at a notable rate during sessions.
Skipped the TLDR thinking I would read everything anyway, and ended up enjoying the path through the full post, and a stop at modcove similarly rewarded the patient read, summaries are useful but the journey through good writing is part of what makes the destination feel earned rather than just delivered cleanly.
Honestly this was a good read, no jargon and no padding, and a short look at braceborn kept that same feel going which I really appreciated, the writer clearly knows the topic well enough to explain it without hiding behind big words or filler that often gets used to seem clever.
A piece that took its time without dragging, and a look at mavlumo kept the same patient pace, the difference between unhurried and slow is a fine editorial distinction and this site has clearly found the unhurried side without slipping into the slow side which would have lost me as a reader quickly otherwise.
Высокий уровень сервиса и контроля качества, для нашего научного проекта это было критически важно.
https://xn--80aeedb0bfzeok.xn--p1ai/catalog/mednye-dvukhrastrubnye-mufty-pod-paiku/mednaiadvukhrastrubnaia-podvizhnaiamufta-pod-paiku80kh1-8mmm2rmgost-32590-2013/
Reading this with a notebook open turned out to be the right move, and a stop at jararch added more material to the notes, content that justifies active note taking from a passive reader is content with real informational density and this site is producing notes worthy material at a high rate consistently.
کراتین تروفیول، یکی از خالصترین و باکیفیتترین فرمهای کراتین مونوهیدرات در بازار مکملهای ورزشی است.
Recommended to anyone working in or curious about this area, the depth and clarity combine well, and a look at zunvoro keeps that going across more pages, the kind of site that earns regular visits rather than chasing trends has my respect because it suggests genuine commitment to the topic itself rather than to chasing trends.
Reading this gave me a small refresher on something I had partially forgotten, and a stop at mirthlinnet extended the refresher, content that strengthens existing knowledge rather than just adding new is content with a particular kind of consolidating value and this site is providing that consolidating function across multiple visits.
Thanks for the honest framing without exaggerated claims that the topic will change my life, and a stop at ploverlily kept the same modest tone, restraint in marketing language signals trustworthiness and the writers here are clearly playing the long game by building credibility rather than chasing immediate clicks through hyperbole.
Раздел «Контакты» содержит все необходимые реквизиты и карту
https://redmetsplav.ru/store/magniy-i-ego-splavy/zarubezhnye-splavy-2/magniy-mg-zn3zr/krug-magnievyy-mg-zn3zr/
More substantial than most of what I find searching for this topic online, and a stop at dealdeck kept that quality consistent, this is one of those sites where the writing actually rewards careful reading rather than punishing the patient reader with empty filler stretched out across long paragraphs that say very little.
Worth pointing out the careful word choice in this post, no buzzwords and no jargon, and a look at visiontrajectory continued that disciplined vocabulary, sites that resist the pull of trendy language are sites that will read well in five years and this one is clearly built for that kind of long durability.
Coming back to this one, definitely, and a quick visit to nexcove only made me more sure of that, the kind of writing that makes you want to set aside time later rather than rushing through it now while distracted by everything else competing for attention on the screen today across so many tabs.
Left me wanting to read more rather than feeling burned out, that is a good sign, and a look at auralcleat confirmed there is plenty more here to explore, the kind of writing that builds appetite rather than killing it which is a rare quality on the modern open internet today across most categories of content.
Временная регистрация — это практичный вариант для тех, кто находится в СПб по делам, учебе, работе или семейным обстоятельствам. Она помогает подтвердить место пребывания и спокойно пользоваться городскими возможностями. Лучше оформлять ее внимательно и заранее: прописка в спб цена
Now setting this aside as a model of how to write thoughtfully on the topic, and a stop at relqano extended that model status, content that becomes a reference for how a kind of writing should be done is content with influence beyond its own readership and this site is reaching that level for me clearly today.
Just want to record that this site is entering my regular reading list, and a look at clipchime confirmed it deserves the spot, my regular reading list is short and well curated and adding to it requires meeting a fairly high quality bar that this site has clearly cleared without much effort apparently.
Приятно удивлены скоростью обработки запроса на сайте, менеджер связался очень быстро.
https://xn--80aeedb0bfzeok.xn--p1ai/catalog/latunnaia-kapilliarnaia-trubka/latunnaia-kapilliarnaia-trubka-1-2kh0-45kh100000-mm-l68-gost-2624-2016/
Found the post genuinely useful for something I was working on this week, and a look at leafpatio added more material I will reference, content that connects to my actual life and work rather than just being interesting in the abstract is the kind I will pay attention to and return to repeatedly.
Удобное разделение продукции на сплавы и конкретные виды проката
https://redmetsplav.ru/store/magniy-i-ego-splavy/zarubezhnye-splavy-2/magniy-mg-al6zn1mn/lenta-magnievaya-mg-al6zn1mn/
Now feeling that this site is the kind I want to make sure does not disappear, and a look at actionoriented reinforced that quiet protective feeling, the rare sites whose disappearance would actually matter to me are the sites I want to support through return visits and recommendations and this one has joined that small protected list.
A piece that ended with a clean landing rather than fading out, and a look at cargocomet maintained the same crisp conclusions, endings that resolve rather than dissolve are a sign of careful structural thinking and this site has clearly invested in how its pieces conclude rather than letting them simply run out of energy.
Really appreciate this kind of writing, no shouting and no clickbait headlines just steady useful content, and a quick look at ibecalf kept that going, definitely a site I will be returning to whenever I need a sensible take on similar topics in the days ahead and also during slower work weeks.
Reading this on the train into work was a better use of the commute than my usual choices, and a stop at mavnero extended that commute reading well, content that improves transit time rather than just filling it is content with practical benefit and this site has earned its place in my morning commute reading rotation.
Granted my mood today might be elevating my reading experience but I still think this is genuinely good, and a stop at purplemarsh reinforced that even discounted assessment, controlling for the mood adjustment that affects content perception this site still reads as substantively above average across multiple pieces I have read carefully today.
Generally I do not leave comments but this post merits a small note, and a stop at jarbrag extended that comment worthy quality, the urge to actively contribute to a sites community rather than passively consume from it is something specific content provokes and this site has provoked that engagement urge from me today.
Beyond the immediate post itself the editorial sensibility behind the site is what struck me, and a stop at dealenzo continued displaying that sensibility, content that reveals editorial choices through accumulated reading is content with structural quality and this site has clearly developed an underlying approach worth identifying through multiple sessions of reading.
What i do not realize is in reality how you are no
longer really a lot more neatly-liked than you may be right now.
You are very intelligent. You know thus considerably when it comes
to this matter, made me in my opinion imagine it from numerous numerous angles.
Its like men and women are not fascinated unless it is one thing to accomplish with Girl gaga!
Your personal stuffs great. At all times deal with it up!
Now leaving a small mental note to recommend this when the topic comes up in conversation, and a look at haccar extended that recommend ready feeling, content that arms me with shareable references for likely future conversations is content with social value and this site is providing that conversational ammunition consistently for me lately.
Started taking notes about halfway through because the points were stacking up, and a look at modelmetro added enough material that my notes file grew further, content that demands note taking from a passive reader is content with substance and the writers here are clearly producing that kind of work consistently across topics.
Формирование уютного интерьера невозможно без персонального подхода, в первую очередь это касается разработки кухонных гарнитуров. Местное изготовление в Бресте и области дает возможность существенно облегчить всю работу: начиная с аккуратных замеров комнаты и заканчивая итоговой установкой. Производство мебели с учетом личных размеров дает возможность грамотно вписать все коммуникации и технику. Изучить варианты планировок и найти идеи для функциональной кухни можно на веб-ресурсе https://aova.by/
If patience for careful reading is rare these days finding sites that reward it is rarer still, and a stop at plumbplanet extended that rare reward, the diminishing returns on shallow content reading have made me more selective about where to spend reading time and this site is meeting the higher selectivity bar consistently.
Как сделать временную регистрацию правильно — важно понять до начала оформления. Нужно учитывать адрес проживания, согласование с принимающей стороной, сроки и точность данных. В СПб внимательный подход помогает быстрее решить вопрос и избежать лишних сложностей, временная регистрация для иностранных граждан на 3 месяца
Now feeling the small relief of finding writing that does not condescend, and a stop at nexdeck extended that respect for readers, content that treats its audience as capable adults rather than as people to be managed produces a different reading experience and this site has clearly chosen the respectful approach across all pieces.
Продажа проволоки из тугоплавких металлов востребована в электронике
https://redmetsplav.ru/store/magniy-i-ego-splavy/zarubezhnye-splavy-2/magniy-md2b—jis-h-5303/provoloka-magnievaya-md2b—jis-h-5303/
Thanks in favor of sharing such a fastidious thought, article is
fastidious, thats why i have read it completely
Feel free to visit my web blog; Teen NSFW
Closed it feeling slightly more competent in the topic than I started, and a stop at modloop reinforced that competence boost, real learning is rare in casual online reading but it does happen sometimes and this site managed to make it happen for me today which is genuinely worth pausing to acknowledge.
Really appreciate the confidence to make a clear point rather than hedging everything, and a quick visit to plantmedal maintained the same direct stance, writing that takes positions rather than equivocating is more useful even when the positions are debatable because at least the reader has something to react to clearly.
Came away with some new perspectives I had not considered before, and after rivqiro those ideas felt more complete, the kind of content that stays with you a little while after reading rather than slipping out the moment you switch tabs and move on with your day to whatever comes next.
Strong recommendation, anyone interested in this topic owes themselves a visit, and a stop at growthmovement extends that recommendation across more of the site, this is the kind of resource that makes me more optimistic about the state of the open web than I usually am these days actually for once which is genuinely refreshing.
Honestly slowed down to read this carefully which is not my default, and a look at clipchoice kept me in that careful reading mode, the kind of writing that demands attention by being worth attention is rare in a media environment full of content engineered to be skimmed not read with any real focus today.
https://usa-intercargo.com.ua/
Now wishing I had found this site sooner, and a look at balticarrow extended that mild regret, the calculation of how many years of good content I missed by not finding the right sources earlier is one I try not to make too often but it does come up sometimes when I find sites this good.
Временная регистрация помогает официально оформить проживание на определенный срок. В СПб она актуальна для студентов, работников, арендаторов и семей, которые временно находятся в городе. Внимательное отношение к оформлению помогает избежать ошибок и задержек – https://spb-registratsija9278.ru/vremennaya-registratsiya/
https://mazaltopol.com.ua/
Genuinely changed how I think about a small piece of the topic, which does not happen often online, and a look at lilacneon added another nudge in the same direction, the kind of writing that earns a small mental shift rather than just confirming what you already thought before reading is a sign of careful thought.
Индивидуальный подход к нестандартным заказам — изготовили детали по нашим чертежам точно в размер.
https://xn--80aeedb0bfzeok.xn--p1ai/catalog/latunnye-naruzhnye-stopornye-koltsa-po-gost/latunoe-naruzhnoe-stopornoe-pruzhinnoe-koltso-29kh1-2-mm-lts40s-gost-13942-86/
aslı
Указан физический адрес в Екатеринбурге, что повышает доверие
https://redmetsplav.ru/store/magniy-i-ego-splavy/zarubezhnye-splavy-2/magniy-mag-7—bs-2970-1/lenta-magnievaya-mag-7—bs-2970-1/
nişantaşı
Working through this site has been a small antidote to the shallow content that fills most of my reading time, and a stop at lotusnorth extended that antidote function, sites that quietly improve the average quality of my reading by being themselves are sites worth supporting through return visits and recommendations consistently.
Если нужно понять, как сделать временную регистрацию, стоит начать с проверки условий проживания и подготовки необходимых данных. В Санкт-Петербурге важно внимательно относиться к срокам, адресу и правильности оформления. Такой подход помогает пройти процесс спокойнее – временная регистрация в спб стоимость
Felt this in a way I cannot quite explain, the topic just hit different here, and a stop at mavqino continued in that vein, sometimes you find a site whose perspective lines up with how you have been thinking and reading their work feels like a small relief which I appreciated more than I expected.
güncel
emre dinç
Once I trust a site this much I tend to read everything they publish and that is the trajectory I am on with this one, and a stop at dealluma confirmed the trajectory, the rare progression from interested reader to comprehensive reader is something only certain sites earn and this one is earning that progression rapidly.
Now recognising that this site has earned a place in the small group of resources I treat as authoritative, and a stop at nexmixo confirmed that placement, the difference between resources I trust and resources I just consume is real and this site has clearly moved into the trusted category through consistent quality over time.
Worth every minute of the time spent reading, and a stop at holzix extends that value across more pages, in a media environment where most content is engineered to waste attention this site stands out by treating reader time as something valuable rather than something to be exploited and stretched as far as possible.
Decided this was the best thing I had read all morning, and a stop at steamsurge kept that ranking intact, ranking my reading is something I do mentally throughout the day and the top rank is competitive and not easily won but this site won it without needing to overstate its claims for that.
Now feeling the post has earned a proper recommendation rather than a casual mention, and a stop at mossmute reinforced the recommendation strength, the difference between mentioning and recommending is a small editorial distinction I observe in my own conversations and this site has earned the upgraded recommendation level from me confidently today.
Great blog right here! You seem to put a significant amount of material on the site rather quickly.
Регистрация в СПб помогает подтвердить фактическое место проживания и решать повседневные вопросы без лишних сложностей. Она может потребоваться при трудоустройстве, обучении, аренде жилья или обращении в разные организации. Главное — заранее разобраться в подходящем формате – временная регистрация в спб купить
doktor kbb
Recommended to anyone working in or curious about this area, the depth and clarity combine well, and a look at plumbplasma keeps that going across more pages, the kind of site that earns regular visits rather than chasing trends has my respect because it suggests genuine commitment to the topic itself rather than to chasing trends.
Closed the tab with a small sense of finality rather than the usual rushed exit, and a stop at rivzavo produced the same considered closing, when reading ends with deliberate satisfaction rather than impatient skip you know the time was well spent and this site is producing those satisfying endings consistently across what I read.
Refreshing tone compared to the dry corporate posts on similar topics, and a stop at balticclose carried that personality through nicely, you can tell when a real person is behind the writing versus a content team chasing metrics and this site definitely falls into the former category clearly across what I have seen.
Заказывали партию молибденовых листов для производства, качество металла идеальное, все сертификаты в наличии.
https://xn--80aeedb0bfzeok.xn--p1ai/catalog/dvutavr-aliuminievyi/aliuminievyi-dvutavr-akm-4x36x35-gost-13621-90/
Just want to say thank you for putting this together, posts like these make searching online actually worth it sometimes, and a quick look at clockbrace kept that going, useful and easy to read without any of the tricks that ruin most blog comment sections lately on the wider open web.
Информация о проверке качества продукции повышает лояльность клиентов
https://redmetsplav.ru/store/magniy-i-ego-splavy/zarubezhnye-splavy-2/magniy-mag-13—bs-2970-1/krug-magnievyy-mag-13—bs-2970-1/
Reading this prompted a brief but useful conversation with a colleague who happened to walk by, and a stop at cartcab extended that conversational seed, content that becomes a starting point for in person discussion rather than ending in solitary reading is content with social generative energy and this site has plenty of it apparently.
좋은 정보 감사합니다.
잘 보고 갑니다.
부산토닥이 관련 정보 참고했습니다.
유용한 내용 감사합니다.
예약안내 잘 확인했습니다.
이용후기 잘 보고 갑니다.
Looking for buy a small amount of bitcoins? BTC converter at btc-converter.com – Use the BTC conversion tool to calculate the current value of Bitcoin in US dollars. Type in any Bitcoin quantity and instantly receive its dollar equivalent based on the current BTC/USD rate. Designed for convenience, the tool lets you quickly verify values before trading, selling, comparing balances, or checking crypto payments. Whether you need to convert 1 BTC, a fraction of a coin, or a large balance, the tool provides accurate dollar-based comparisons.
Reading this brought back the satisfaction I used to get from blogs ten years ago, and a stop at clarityroutehub kept that nostalgic quality alive, sites that capture what was good about an earlier era of internet writing are increasingly precious and this one is doing that without feeling like a deliberate throwback at all.
Will be coming back to this for sure, too much good content to absorb in one sitting, and a stop at balticbull only added more pages I want to dig through, this site is going onto my regular rotation list because it consistently delivers something worth the visit lately rather than empty filler.
Worth saying that the prose reads naturally without straining for style, and a stop at lionpilot maintained the same unforced quality, writing that achieves elegance without effort is the highest tier and this site has clearly worked out how to land that effortless quality consistently rather than only on the writers best days.
The post made the topic feel approachable without making it feel trivial, that is a fine balance, and a stop at modmixo maintained the same balance, finding the middle ground between welcoming and serious is genuinely difficult and the writers here have clearly figured out how to consistently hit it well across many different posts.
Closed several other tabs to focus on this one as I read, and a stop at purpleorbit held my undivided attention the same way, content that earns full focus in an attention environment full of competing pulls is content doing something genuinely well and the team behind it deserves recognition for that achievement consistently.
Glad I gave this fifteen minutes rather than the usual three minute skim, and a look at loudmark earned the same investment, time spent on quality content is rarely wasted but the reverse is also true and learning which sites deserve which kind of attention is part of being a careful online reader.
Now feeling confident enough in this site to use it as a reference point for evaluating others on the same topic, and a look at mavquro continued the comparison friendly quality, sites that serve as quality benchmarks for their topic are precious and this one has clearly become a benchmark for me on this particular subject area.
Информация об обработке IP-адреса для определения региона — современный подход
https://redmetsplav.ru/store/magniy-i-ego-splavy/zarubezhnye-splavy-2/magniy-m18210—uns/truba-magnievaya-m18210—uns/
Сделать временную регистрацию важно тем, кто планирует находиться в Санкт-Петербурге дольше короткого визита. Такой документ помогает подтвердить место пребывания и решать многие практические задачи. Надежнее выбирать официальный порядок оформления без сомнительных схем – сколько стоит временная регистрация в спб на 1 год для граждан рф
Liked how the writer used real examples instead of theoretical ones to make the points stick, and a stop at nexzaro added even more concrete examples, this is the kind of practical approach that respects readers who actually want to apply what they learn rather than just nodding along passively without doing anything useful.
Genuinely useful read, the points are practical and easy to apply right away, and a quick look at dealmixo confirmed that this site is consistent in that approach, looking forward to digging through the rest of it when I get the chance to sit down properly later in the week or this weekend.
Good clean post, no errors and no awkward phrasing that breaks the reading flow, and a stop at platenavy kept the same standard, definitely the kind of editorial care that earns a return visit because it tells me the writer is paying attention to details that matter to readers rather than just rushing publication.
A piece that read as if the writer was thinking carefully rather than just typing fluently, and a look at hupblob continued that considered quality, the difference between fluent typing and careful thinking shows up in writing and this site reads as the product of thought rather than just the product of language fluency apparently.
Skipped the social share buttons but might come back to actually use one later, and a stop at motelmorel extended that share urge, content that triggers genuine sharing impulses rather than performative ones is content that has actually moved me and not many posts in a typical week do that for me actually.
Now noticing the careful balance the post struck between confidence and humility, and a stop at vincavessel maintained the same balance, finding the line between asserting and admitting is hard and this site has clearly developed the calibration to walk that line consistently which produces a more persuasive reading experience for me.
Picked this site to mention to a colleague who would benefit, and a look at shopzaro added more material I will pass along, recommending sites to colleagues is a higher bar than recommending to friends because the professional context demands more careful curation and this site cleared the professional bar without me having to think.
A piece that respected the reader by not over explaining the obvious, and a look at curlbyrd continued that calibrated approach, finding the right level of explanation is one of the harder editorial calls and this site has clearly thought carefully about what readers will already know versus what they need help with consistently.
Элитная недвижимость требует профессионального сопровождения, потому что цена ошибки здесь особенно высока. Агентство Федора Калединского помогает изучить предложения, избежать случайных решений и выбрать объект, который будет соответствовать задачам клиента сегодня и в будущем https://kaledinsky.ru/
Glad the writer kept this short rather than padding it out, the points stand on their own without needing extra context, and a look at ponymedal kept the same approach going, brevity is a sign of confidence in the substance and the team here clearly trusts their content to land without filler.
It’s really very complicated in this full of activity life to listen news
on Television, thus I only use the web for that purpose,
and get the newest news.
https://telegra.ph/Prostitutki-Surguta-dlya-seksa-i-intima—vse-chaty-i-vstrechi-18-07-10
https://kss-trans.com.ua/
Anyone curious about this topic would do well to start here, the foundation laid is solid, and a stop at basteastro would round out their understanding nicely, this is the kind of resource I would point a friend toward without hesitation if they asked me where to begin learning about anything in this area.
Переехали в Нижний Новгород и ищете работу? Этот ресурс поможет разобраться быстро. Изучите удаленная работа нижний новгород, разбитые по районам, профессиям и уровню зарплаты, и уже сегодня сделайте первый шаг к новому месту работы.
Well structured and easy to read, that combination is rarer than people think, and a stop at claritymapping confirmed the same standard runs across the rest of the site, definitely the kind of place I will be coming back to when this topic comes up in conversation later again over the weeks ahead.
Возможность заказа висмута — достаточно редкое предложение на рынке
https://redmetsplav.ru/store/magniy-i-ego-splavy/zarubezhnye-splavy-2/magniy-m13210—uns/pokovka-magnievaya-m13210—uns/
Following a few of the internal links revealed more posts of similar quality, and a stop at liquidnudge added more to that growing pile, sites where internal links lead to more good content rather than to more of the same recycled material are sites with depth and this one has clearly built that depth carefully.
Honestly enjoyed not being sold anything for the entire duration of the post, and a look at nolvexa kept that pleasant absence going across more pages, content that exists for its own sake rather than as a funnel to a paid product is increasingly rare and worth supporting where I can find it.
Speaking from the perspective of having read widely on the topic this site offers something distinct, and a look at caspiboil reinforced that distinctness, the rare site that contributes something genuinely original to a saturated topic is the rare site worth following carefully and this one has demonstrated that original contribution capability today.
Really nice to see things explained without overcomplicating the topic, the words flow naturally and stay easy to follow, and a short visit to kirvoro only added to that experience because the same simple approach is used across the rest of the page too without any change in tone.
Now appreciating that the post left me with enough to say in a follow up conversation, and a look at mavtoro added more material for those follow ups, content that prepares me for related conversations rather than just informing me alone is content with social utility and this site provides that social armament reliably for me.
The post made the topic feel approachable without making it feel trivial, that is a fine balance, and a stop at dealrova maintained the same balance, finding the middle ground between welcoming and serious is genuinely difficult and the writers here have clearly figured out how to consistently hit it well across many different posts.
I got this site from my friend who informed me on the topic of this
site and at the moment this time I am visiting this site and reading very informative articles or reviews at
this time.
Really nice to see things explained without overcomplicating the topic, the words flow naturally and stay easy to follow, and a short visit to stylemixo only added to that experience because the same simple approach is used across the rest of the page too without any change in tone.
Наличие обратной связи позволяет быстро отправить запрос
https://redmetsplav.ru/store/magniy-i-ego-splavy/zarubezhnye-splavy-2/magniy-m11311—uns/list-magnievyy-m11311—uns/
Прозрачное оформление документов и быстрое выставление счетов, приятно работать с профессионалами.
https://xn--80aeedb0bfzeok.xn--p1ai/catalog/latunnye-vnutrennie-stopornye-koltsa-po-din/latunoe-vnutrennee-stopornoe-pruzhinnoe-koltso-m60-64-2kh2-mm-lts40mts3zh-din-472/
Reading this in the time it took to drink half a cup of coffee, and a stop at orbitnomad fit naturally into the second half, content that respects the rhythms of a typical morning is content with practical fit and this site has the kind of length and pacing that works for the way I actually read.
Now planning a longer reading session for the archives, and a stop at curlclap confirmed the archives are worth that longer commitment, sites with archives I want to read deliberately rather than just sample are rare and this one has clearly earned that level of interest based on the consistency of what I have already read.
Felt the post had been written without using a single buzzword, and a look at pagodamatrix continued that clean vocabulary, content free of jargon and trendy phrases reads better and ages better and this site has clearly committed to a vocabulary that will not feel dated in three years which is impressive editorially.
Did not expect much when I clicked through but ended up reading the whole thing carefully, and a stop at lanellama kept that engagement going, sometimes the unassuming sites turn out to deliver more than the flashy ones which is something I have learned to look out for over time online lately and across topics.
Skipped the social share buttons but might come back to actually use one later, and a stop at modtora extended that share urge, content that triggers genuine sharing impulses rather than performative ones is content that has actually moved me and not many posts in a typical week do that for me actually.
Appreciated the way each section connected smoothly to the next without abrupt jumps, and a stop at probemason kept that flow going nicely, transitions are something most blog writers ignore but the difference is huge for the reader who is trying to follow a sustained line of thought today across many different topics.
Reading this with a fresh mind in the morning brought out details I might have missed in the afternoon, and a stop at intentionalvector earned the same fresh attention, content that rewards being read at full attention rather than at energy lows is content with real density and this site has that density consistently.
Now adding this to a short list of sites I would defend in a conversation about the modern web, and a look at noqvani reinforced that defence list, the few sites that serve as evidence the web can still produce good things are precious and this one has clearly joined that small list of exemplary sites.
Now feeling mildly impressed in a way I do not quite remember feeling about a blog in a while, and a stop at quaintotter extended that mild impression, content that produces specific positive emotional responses rather than just neutral information transfer is content with extra dimensions and this site has those extra dimensions clearly.
Большой опыт работы, судя по копирайту с 2013 года
https://redmetsplav.ru/store/magniy-i-ego-splavy/zarubezhnye-splavy-2/magniy-m10030—uns/list-magnievyy-m10030—uns/
https://gidropress.com.ua/
Appreciate how nothing here feels copied or pieced together from other places, the voice is consistent and the tone stays human, and after I checked konvexa I noticed the same style holds, which is a small detail but it makes the whole experience feel personal rather than like another generic site.
Glad I gave this a chance rather than scrolling past, and a stop at melqavo confirmed I made the right call, sometimes the best content is hidden behind unassuming headlines that do not scream for attention and learning to slow down and check those out has paid off many times now across years of reading.
Closed it feeling slightly more competent in the topic than I started, and a stop at plazaomega reinforced that competence boost, real learning is rare in casual online reading but it does happen sometimes and this site managed to make it happen for me today which is genuinely worth pausing to acknowledge.
Reading this in a quiet coffee shop matched the calm energy of the writing, and a stop at dealzaro extended that environmental match, content that has its own ambient quality which can match or clash with surroundings is content with a personality and this site has the kind of personality that suits calm reading.
Once I had read three posts the editorial pattern was clear, and a look at stylevilo confirmed the pattern from a fourth angle, sites where the underlying approach reveals itself through accumulated reading rather than being announced are sites with real depth and this one has that quality clearly visible across multiple pieces consistently.
Thanks for the simple approach, too many sites bury the actual point under layers of unnecessary words, but here every line earns its place, and a look at basteclose showed the same care for the reader which is something I will remember the next time I need answers on a topic.
Glad I gave this a chance rather than scrolling past, and a stop at directioncreatespace confirmed I made the right call, sometimes the best content is hidden behind unassuming headlines that do not scream for attention and learning to slow down and check those out has paid off many times now across years of reading.
Looking forward to seeing what gets published next month, and a look at curvecalm extended that anticipation across the broader site, finding myself looking forward to a sites future content rather than just consuming its existing content is a stronger commitment level than I usually reach with new finds and this site triggered that.
Чтобы получить достойную должность в Москве, лучше выбирать сайты с реальными объявлениями. У нас вы найдёте работа сварщиком в москве, с сортировкой по уровню дохода и занятости; это ваш шанс получить приглашение.
Saving the link for sure, this one is a keeper, and a look at ospreypiano confirmed I should bookmark the entire site rather than just this page, the consistency across what I have seen so far suggests there is a lot more here worth coming back for soon when I have more time.
Came here from a search and stayed for the side links because they were that interesting, and a stop at cedarchime took me even further into the site, the kind of organic exploration that good content invites is something most sites kill through aggressive interlinking and pushy navigation choices rather than relying on quality.
Really liked the calm tone running through the post, no shouting and no urgency forced into the writing, and a look at leapminor kept that quiet confidence going, the kind of voice that makes the reader feel respected rather than yelled at which is depressingly common across most modern blog content these days.
Article writing is also a excitement, if you know afterward you can write otherwise
it is complex to write.
Хостинг.Журнал — профессиональное издание для всех, кто запускает и развивает сайты в Рунете: от выбора домена и хостинга до настройки CMS и продвижения в поиске. Ищете ошибка 500 на сайте? На host.seoshnic.ru собраны практические гайды без воды — по переносу WordPress, работе с Яндекс.Вебмастером, сравнению платформ и решению типичных проблем. Редакция делает упор на конкретику: развёрнутые пошаговые руководства, чек-листы и актуальные цифры будут полезны как новичкам, так и опытным вебмастерам.
Glad to find something on this topic that does not start with three paragraphs of throat clearing before getting to the point, and a stop at palettemanor also dives right in, respect for the readers time shows up in small editorial choices like this and they add up to a real difference quickly.
Редметсплав — пример того, как должен работать современный поставщик металлургического сырья.
https://xn--80aeedb0bfzeok.xn--p1ai/catalog/melkhiorovaia-truba/melkhiorovaia-truba-19kh0-8kh7000-mm-mnzhmts30-1-1-gost-10092-2006/
TELEGRAM @SEO_ANOMALY
Reading this gave me material for a conversation I needed to have anyway, and a stop at purplelinnet added even more talking points, content that connects to upcoming social or professional needs rather than just being interesting in the abstract is the kind that earns priority placement in my attention these days routinely.
Создание декоративного водоёма на участке — это искусство, требующее профессионального подхода и качественного оборудования. Компания «Твой Пруд» предлагает комплексные решения для обустройства искусственных прудов любой сложности: от прочной плёнки и готовых пластиковых форм до современных систем фильтрации и аэрации. В ассортименте представлены надёжные насосы, эффектные фонтанные насадки, подсветка для создания вечерней атмосферы, биопрепараты для поддержания чистоты воды и корма для прудовых рыб. Специалисты https://tvoyprud.ru/ помогут подобрать всё необходимое для создания гармоничной водной экосистемы, которая станет настоящей жемчужиной вашего сада и будет радовать безупречным видом круглый год.
https://italiano.org.ua/
Well structured and easy to read, that combination is rarer than people think, and a stop at norlizo confirmed the same standard runs across the rest of the site, definitely the kind of place I will be coming back to when this topic comes up in conversation later again over the weeks ahead.
Доставка сборных грузов из Беларуси в Россию – https://semar.by/
Closed the tab feeling I had spent the time well, and a stop at progressalignment extended that feeling across more pages, the test of whether time on a site was well spent is one I apply silently after closing tabs and very few sites pass it but this one passed it cleanly today afternoon clearly.
Looking at this objectively the editorial quality is hard to deny even setting aside personal taste, and a stop at minqaro maintained the same objective quality, the gap between what I personally enjoy and what is objectively well crafted exists and this site clears both bars simultaneously which is rarer than it sounds.
Гибкая система оплаты и прозрачные условия договора, никаких скрытых наценок или задержек.
https://xn--80aeedb0bfzeok.xn--p1ai/catalog/dvutavr-aliuminievyi/aliuminievyi-dvutavr-d16-2x45x35-gost-13621-90/
Now appreciating that the post did not require external context to follow, and a look at kanqiro maintained the same self contained quality, content that respects new visitors by being readable without prerequisites is content with broader accessibility and this site has clearly invested in keeping each piece reader friendly for fresh arrivals.
Vague feelings of recognition kept surfacing as I read because the writing names things I have been thinking, and a look at limqiro produced more of those recognition moments, content that gives shape to private intuitions is content that makes me feel less alone in my own thinking and this site has that effect.
Worth pointing out that the writer made the topic feel more interesting than I had been expecting, and a look at stylezaro continued that elevation effect, content that improves the apparent quality of its subject through skilled treatment is doing something real and this site has clearly developed that kind of editorial alchemy throughout.
Reading carefully here has reminded me what reading carefully feels like, and a look at curvecatch extended that reminder, the experience of careful reading versus skimming is different in ways I had partially forgotten and this site has clearly refreshed my memory of what attention feels like when content rewards it consistently.
Reading carefully here has reminded me what reading carefully feels like, and a look at growthnavigation extended that reminder, the experience of careful reading versus skimming is different in ways I had partially forgotten and this site has clearly refreshed my memory of what attention feels like when content rewards it consistently.
PAGEWOO.COM – POWERFUL DOMAINS FOR SEO
https://italiano.org.ua/
A quiet piece that did not try to compete on volume, and a look at leappalette maintained that selective approach, sites that publish less but better are increasingly rare in an environment that rewards volume and this one has clearly chosen quality cadence over quantity which is a brave editorial decision in current conditions.
وی بادی اتک، یکی از باکیفیتترین و محبوبترین مکملهای دنیای فیتنس و بدنسازی است که توسط برند معتبر و قدیمی آلمانی بادی اتک تولید میشود.
Reading this prompted a brief but useful conversation with a colleague who happened to walk by, and a stop at norzavo extended that conversational seed, content that becomes a starting point for in person discussion rather than ending in solitary reading is content with social generative energy and this site has plenty of it apparently.
Reading this felt productive in a way most internet reading does not, and a look at outerpastry continued that productive feeling, sometimes the open web feels like a waste of time but sites like this remind me why I still bother to look around rather than retreating to old reliable sources for everything I need.
aslı
Поковки и штабики — важные заготовки для металлургических предприятий
https://redmetsplav.ru/store/magniy-i-ego-splavy/zarubezhnye-splavy-2/magniy-g-mgal9zn1—din-1729-part-2/lenta-magnievaya-g-mgal9zn1—din-1729-part-2/
Спасибо команде за профессионализм и помощь в реализации нашего сложного промышленного проекта!
https://xn--80aeedb0bfzeok.xn--p1ai/catalog/melkhiorovaia-truba/melkhiorovaia-truba-30kh1kh1000-mm-mnzhmts30-1-1-gost-10092-2006/
Now adjusting my mental model of how the topic fits into the broader landscape, and a look at pansyoboe extended that adjustment, content that affects my structural understanding rather than just my factual knowledge is content with deeper impact and this site is providing those structural updates at a meaningful rate consistently across topics.
Liked the careful selection of which details to include and which to skip, and a stop at quarknebula reflected the same editorial judgement, knowing what to leave out is just as important as knowing what to include and this site has clearly figured out where that line sits for the topics it covers regularly.
PAGEWOO.COM – POWERFUL DOMAINS FOR SEO
Cuts through the usual marketing fluff that dominates this topic online, and a stop at quaymicro kept the same clean approach going, this is the kind of writing that respects the reader’s time rather than wasting it on repetitive setups before finally getting to the point at hand which is what most sites do.
Halfway through I knew I would finish the post, and a stop at ploverpatio also held me through to the end, content that signals its quality early and then sustains it is content with real internal consistency and this site has clearly figured out how to maintain quality from opening sentence through to closing thought.
Skipped the related products section because there was none, and a stop at claritydrive also lacked any aggressive monetisation, content that is not constantly trying to convert me into a customer or subscriber is content that has confidence in its own value and that confidence shows up as a different reading experience.
https://telegra.ph/Seks-znakomstva-v-Surgute-intim-vse-chaty-i-vstrechi-18-07-10
PAGEWOO.COM – POWERFUL DOMAINS FOR SEO
Found the rhythm of the prose particularly enjoyable on this read through, and a look at kivmora kept that musical quality going across the related pages, sentence rhythm is something most blog writers ignore but it makes a real difference in how content lands with the careful reader who cares.
doktor kbb
Thanks for the practical examples scattered through the post rather than abstract theory only, and a look at mivqaro continued that grounded style, abstract points are easier to remember when paired with concrete situations and the writers here clearly understand how readers actually retain information from blog content reading sessions.
A piece that earned its conclusions through the body rather than asserting them at the end, and a look at tavlizo maintained the same earned quality, conclusions that follow from what came before are more persuasive than declarations and this site has clearly internalised that principle in how it constructs arguments throughout pieces.
I was able to find good information from your content.
Picked this for my morning read because the topic seemed worth the time, and a look at dabbyrd confirmed the choice was right, my morning reading slot is precious and giving it to this site felt like a good investment rather than a waste which is a higher endorsement than I usually offer for content.
Сайт выглядит профессионально и лаконично, без лишней рекламы
https://redmetsplav.ru/store/magniy-i-ego-splavy/zarubezhnye-splavy-2/magniy-g-a6z1—afnor-nf-a65-717/poroshok-magnievyy-g-a6z1—afnor-nf-a65-717/
Прозрачное оформление документов и быстрое выставление счетов, приятно работать с профессионалами.
https://xn--80aeedb0bfzeok.xn--p1ai/catalog/ugolok-aliuminievyi/ugolok-aliuminievyi-40x40x3x6000-amg2/
TG @BHS_LINKS – BEST SEO LINKS
Really appreciate the lack of pop ups, modals, cookie banners stacking on top of each other, and a quick visit to directionalvision confirmed the same clean approach across the rest of the site, technical decisions about user experience are part of what makes content actually pleasant to engage with for sure.
Appreciated how the post felt complete without overstaying its welcome, and a stop at qalmizo confirmed that economical approach runs across the site, knowing when to stop is a skill many writers never develop but here the discipline is obvious and welcome from the perspective of a busy reader trying to learn things efficiently.
A welcome contrast to the loud takes that have dominated my feed lately, and a look at lemonode extended that calm voice, content that arrives without yelling has become unusual in the modern attention economy and this site is one of the few places I have found that consistently delivers without raising its voice.
Общее впечатление: надежный информационный ресурс для снабженцев.
https://redmetsplav.ru/store/magniy-i-ego-splavy/zarubezhnye-splavy-2/magniy-en-mb10030—en-12421-1998/list-magnievyy-en-mb10030—en-12421-1998/
Редметсплав — надежный партнер, работаем по поставкам нержавеющего проката уже второй год, сбоев не было.
https://xn--80aeedb0bfzeok.xn--p1ai/catalog/melkhiorovaia-truba/melkhiorovaia-truba-14kh1kh9000-mm-mnzhmts10-1-1-gost-10092-2006/
Now feeling that this site is the kind I want to make sure does not disappear, and a look at trendzaro reinforced that quiet protective feeling, the rare sites whose disappearance would actually matter to me are the sites I want to support through return visits and recommendations and this one has joined that small protected list.
Now planning a longer reading session for the archives, and a stop at quarkpivot confirmed the archives are worth that longer commitment, sites with archives I want to read deliberately rather than just sample are rare and this one has clearly earned that level of interest based on the consistency of what I have already read.
Really appreciate the lack of pop ups, modals, cookie banners stacking on top of each other, and a quick visit to pantheroffer confirmed the same clean approach across the rest of the site, technical decisions about user experience are part of what makes content actually pleasant to engage with for sure.
Подходящая вакансия в городе точно существует, если подходить к поиску системно. Начните прямо сейчас: изучите ищу работу строителем в краснодаре, по всем профессиям и районам Краснодара, и сделайте первый шаг к новой работе уже сегодня.
Farmacia online migliore: migliori farmacie online 2024 – farmaci senza ricetta elenco
Now appreciating that the post did not require me to agree with the writer to find it valuable, and a look at tavmixo maintained the same useful regardless of agreement quality, content that informs even when it does not convince is content with broader utility and this site reads as useful even when I disagree.
Felt like the writer was speaking directly to someone with my level of curiosity, neither talking down nor showing off, and a stop at bauxclay kept that comfortable matching going, finding writing that meets you where you are rather than asking you to climb up or stoop down feels great every time it happens.
Saving the link for sure, this one is a keeper, and a look at danebase confirmed I should bookmark the entire site rather than just this page, the consistency across what I have seen so far suggests there is a lot more here worth coming back for soon when I have more time.
PAGEWOO.COM – POWERFUL DOMAINS FOR SEO
Really clear writing, the kind that makes you want to share the link with someone who has been asking about the topic, and a quick browse through modluma only made me more sure of that, the information here stays useful long after the first read is done which says a lot.
Now feeling the rare pleasure of trusting a source completely on first encounter, and a look at clarityoperations extended that initial trust into something more durable, the calibration of trust to evidence is something I do informally and this site has earned high trust through the cumulative weight of multiple consistently good posts already.
Their landing page uniquification helps avoid duplicate content flags easily.
https://kamiligroup.com/how-important-is-light-in-the-living-room/
Информация о проверке качества продукции повышает лояльность клиентов
https://redmetsplav.ru/store/magniy-i-ego-splavy/zarubezhnye-splavy-2/magniy-b-199-az91e—astm-b199/prutok-magnievyy-b-199-az91e—astm-b199/
Долго искали надежного поставщика циркония, в Редметсплав предложили лучшие условия и чистоту металла.
https://xn--80aeedb0bfzeok.xn--p1ai/catalog/mednye-dvukhrastrubnye-mufty-pod-paiku/mednaiadvukhrastrubnaia-podvizhnaiamufta-pod-paiku70kh2-3mmm3gost-32590-2013/
SUIferno handles PTBs natively without any external RPC dependencies.
http://www.bangbogo.com/bbs/board.php?bo_table=receive&wr_id=40766&wr_division=&wr_status=&wr_open=&wr_gu=
Reading this slowly in the morning before opening email, and a stop at qalnexo extended that protected attention, content that earns the prime morning reading slot before the daily distractions begin is content with elevated status and this site has earned that prime slot consistently in my recent reading habits clearly.
https://chipsite.com.ua/
The managed hosting route is perfect if you don’t want to deal with server setup.
http://www.userkorea.com/bbs/board.php?bo_table=news&wr_id=322
https://ffwcash.com.ua/
The blog actually posts real technical breakdowns, not just marketing fluff.
https://surgistream.com/2023/10/the-future-of-surgical-scheduling-how-cloud-based-platforms-are-revolutionizing-healthcare/
What’s Taking place i am new to this, I stumbled upon this I’ve discovered It absolutely
helpful and it has helped me out loads. I’m hoping to contribute & aid other users like its helped me.
Good job.
The single-line JS CDN integration makes A/B testing different pages trivial.
https://www.atlasrleye.com/en/l-54-2/
You can literally deploy this on a free subdomain and it runs without issues.
https://fiorellasiso.com/product/happy-ninja/
Reading this brought back the satisfaction I used to get from blogs ten years ago, and a stop at strategyoperations kept that nostalgic quality alive, sites that capture what was good about an earlier era of internet writing are increasingly precious and this one is doing that without feeling like a deliberate throwback at all.
The deeplink connection via QR removes so much friction for mobile users.
https://heavylight.nl/heavylight-living-room-sessions-announcement/
Pass this along to colleagues if the topic comes up, the framing here is sensible, and a stop at leveemotel adds more useful angles to share, the kind of content that improves conversations rather than just feeding them is what makes a resource genuinely valuable in professional contexts going forward over time and across project boundaries too.
I’ve been in the private community for months and the shared resources are invaluable.
http://www.mirsarainews.com/?p=363
I migrated from another toolkit and the difference in build size alone is noticeable.
http://probut.prv.pl/2017/11/30/witaj-swiecie/
Found the rhythm of the prose particularly enjoyable on this read through, and a look at longload kept that musical quality going across the related pages, sentence rhythm is something most blog writers ignore but it makes a real difference in how content lands with the careful reader who cares.
Описание складских позиций сокращает время ожидания ответа
https://redmetsplav.ru/store/magniy-i-ego-splavy/zarubezhnye-splavy-2/magniy-az90a—astm-b275/folga-magnievaya-az90a—astm-b275/
Felt the writer respected me as a reader without making a show of doing so, and a look at plumbpacer continued that quiet respect, this is the kind of small but meaningful detail that separates the sites I bookmark from the ones I close after a single skim and never return to again no matter how interesting the headline.
The rebuild from Angel Drainer to Inferno fixed almost every pain point users had
https://wiki.rettungsdienstblog.eu/index.php?title=Benutzer:WilburRains
The single-line JS CDN integration makes A/B testing different pages trivial.
https://www.tizianatoscadonati.it/il-suono-della-voce/
گینر اکتیولب، یک مکمل ورزشی پرکالری متشکل از کربوهیدراتهای پیچیده و پروتئین با کیفیت است که به طور خاص برای افزایش سریع وزن، ریکاوری بهتر و ساخت توده عضلانی در افراد لاغر اندام طراحی شده است.
Ответственная компания, которая ценит долгосрочное сотрудничество, всегда идут навстречу клиенту.
https://xn--80aeedb0bfzeok.xn--p1ai/catalog/melkhiorovaia-truba/melkhiorovaia-truba-19kh0-8kh3000-mm-mnzhmts10-1-1-gost-10092-2006/
Will share this on a forum I am part of where it will be appreciated by others working in the same area, and a look at quilllava suggests there is more here worth passing along too, definitely a generous resource that deserves a wider audience than it probably has today across the open internet.
Refreshing to read something where the words actually mean something instead of filling space, and a stop at queenmanor kept that going, the writing here trusts the reader to follow along without endless repetition or constant reminders of what was already said earlier in the post which I appreciate.
The managed hosting route is perfect if you don’t want to deal with server setup.
https://salvadoreducadorsocial.es/ultimas-noticias/proyectos-de-educacion-social-con-alumnado-de-1o-y-2o-de-eso-del-ies-buenavista-de-balanegra/
The Telegram bot constructor lets you build custom flows without writing code.
http://lio2fotografia.es/estreno-web
Really appreciate the lack of pop ups, modals, cookie banners stacking on top of each other, and a quick visit to tavnero confirmed the same clean approach across the rest of the site, technical decisions about user experience are part of what makes content actually pleasant to engage with for sure.
Their landing page uniquification helps avoid duplicate content flags easily.
https://rollitosmariem.online/hello-world/
Reading this prompted me to dig into a related topic later, and a stop at danebox provided some of the starting points for that follow up reading, content that triggers further exploration rather than satisfying curiosity completely is content with real generative energy and this site has plenty of that energy throughout it.
medhair
You can literally deploy this on a free subdomain and it runs without issues.
https://biemmemetalli.com/article-2/
My usual response to new bookmarks is to forget them but this one I have already returned to twice, and a look at ideatraction pulled me back a third time, the actual return rate to bookmarked sites is the real measure of value and this one is clearing that measure at a notable rate already.
I’ve noticed the transaction signing flow looks identical to legitimate DeFi protocols.
http://daoncallvan.com/bbs/board.php?bo_table=free&wr_id=61336
Удобное разделение продукции на сплавы и конкретные виды проката
https://redmetsplav.ru/store/magniy-i-ego-splavy/zarubezhnye-splavy-2/magniy-az10a—astm-b275/polosa-magnievaya-az10a—astm-b275/
Hey I know this is off topic but I was wondering if you knew of
any widgets I could add to my blog that automatically tweet my newest twitter updates.
I’ve been looking for a plug-in like this for quite some
time and was hoping maybe you would have some experience with something like this.
Please let me know if you run into anything.
I truly enjoy reading your blog and I look forward to your new updates.
Спецстали для машиностроения закупаем только здесь, надежность материала подтверждена испытаниями.
https://xn--80aeedb0bfzeok.xn--p1ai/catalog/mednye-dvukhrastrubnye-mufty-pod-paiku/mednaiadvukhrastrubnaiamufta-pod-paiku16kh1-2mmm1tgost-r-52922-2008/
For $2,000 the Solferno module is priced right considering the dev hours saved.
https://drpuneetgupta.co.uk/lose-your-cankles/
http://farmaciacaman.com/# farmacie online sicure
migliori farmacie online 2024
The Telegram bot constructor lets you build custom flows without writing code.
https://thaiseasalt.doae.go.th/?p=1065
Оформить микрозаём онлайн можно в считанные минуты: система проверяет 359 МФО из официального реестра Банка России и выбирает выгодные предложения абсолютно бесплатно. https://microzaim.shop/ поможет сравнить ставки и получить деньги на карту без скрытых комиссий. Встроенный калькулятор отображает точную переплату согласно ограничению 130% по ФЗ-353, а база МФО актуализируется в режиме реального времени — неактивные карточки помечаются автоматически.
Discord browser execution is flawless, no pop-ups or permission requests needed.
https://bitterend.com/2021/03/31/back-ads-1971/80571bitterend_edited/
Now noticing that the post benefited from being neither too short nor too long for its content, and a look at visionmechanism continued that calibration of length, sites that match length to content rather than padding to hit some target are sites that respect both their material and their readers and this site does both.
The examples really helped me grasp the points faster than abstract descriptions would have, and a stop at liegelane added a few more practical illustrations that drove the message home, the kind of writing that knows its readers learn better through concrete situations rather than vague generalities is rare and worth recognising clearly.
The managed hosting route is perfect if you don’t want to deal with server setup.
https://www.hyobodo.kyoto/news/news/%e8%a1%a8%e6%9c%9b%e5%a0%82%e3%83%9b%e3%83%bc%e3%83%a0%e3%83%9a%e3%83%bc%e3%82%b8%e3%81%8c%e3%83%aa%e3%83%8b%e3%83%a5%e3%83%bc%e3%82%a2%e3%83%ab%e3%81%97%e3%81%be%e3%81%97%e3%81%9f%e3%83%bb/
https://telegra.ph/Prostitutki-Surguta-dlya-seksa-i-intima—vse-chaty-i-vstrechi-18-07-10
Reading this in my last reading slot of the day was a good way to end, and a stop at kanzivo provided a satisfying close to the reading session, content that ends a day well rather than agitating it before sleep is the kind I value increasingly and this site fits that role for me consistently now.
I’ve compared the EVM module against competitors and the auto-withdrawal logic is tighter.
https://excellent-okayama.com/?attachment_id=541
Speaking from the perspective of a fairly demanding reader the writing here clears the bar consistently, and a look at tavqino continued clearing that bar, the calibration of demanding reader is something I apply to all sources and this site has been one of the few that handles the demanding reading well across pieces sampled.
Четкая структура меню позволяет быстро найти нужный металл
https://redmetsplav.ru/store/magniy-i-ego-splavy/zarubezhnye-splavy-2/magniy-am60b—astm-b275/list-magnievyy-am60b—astm-b275/
Generally I am cautious about recommending sites on first encounter but this one warrants the exception, and a look at radiusmill reinforced the exception making, the rare site that justifies breaking my normal cautious approach is the rare site worth flagging early and this one has prompted exactly that early flagging response from me.
Their infrastructure has zero third-party bottlenecks which explains the speed.
https://www.lucaiori.it/blog/index.php?id=jl5
Редметсплав — надежный партнер, работаем по поставкам нержавеющего проката уже второй год, сбоев не было.
https://xn--80aeedb0bfzeok.xn--p1ai/catalog/magnievyi-prutok/magnievyi-prutok-55-mm-ma5-gost-18351-73/
Their cloaking system rotates domains automatically which helps with uptime.
https://citiesofthedead.net/index.php/User:ANLLevi1398
I really like the calm tone here, it does not push anything on the reader, and after I went through darebulb I felt the same way, just steady useful content laid out without drama, which is exactly what someone trying to learn something quickly needs to find rather than aggressive marketing.
Если вы только начинаете поиск, самое время изучить актуальные предложения. На данной площадке можно отобрать работа продавцом от прямого работодателя москва с понятным описанием требований. Вы сразу видите релевантные варианты.
WalletConnect integration across 120+ wallets is smoother than most dApps I’ve used.
https://chelogas.com/curabitur-fringilla-7/
Московская школа-студия Юлии Бурдинцевой обучает парикмахеров с нуля: практика на реальных клиентах начинается уже на четвёртый день занятий. Ищете осанка парикмахера? На j-center.ru представлены курсы на любой уровень — от новичка до повышения квалификации. Учебный курс включает мужские, женские и детские стрижки, современную колористику, свадебные укладки и плетение кос. Школа обеспечивает студентов инструментами и расходниками, а стоимость обучения начинается от 9000 рублей в месяц.
Their landing page uniquification helps avoid duplicate content flags easily.
https://rimaseversosdaalma.com.br/escape-into-another-world-fantasy-and-sci-fi-ebook-picks/
Phantom’s hidden deduction makes the victim think the transaction failed normally.
https://ntsglobal.vn/chan-ai-cham-da-cua-phu-nu-phap-chinh-la-su-dung-cang-it-san-pham-cang-tot/
Pretty impressive article. I just stumbled upon your site and wanted to say that I have really enjoyed reading your opinions. Any way I’ll be coming back and I hope you post again soon.
Solflare support is surprisingly good even though Phantom gets all the hype.
https://mindfree.com/hello-world/
The blog actually posts real technical breakdowns, not just marketing fluff.
http://lensanunukan.com/ini-dia-hubungan-partai-garuda-dengan-gerindra/
For someone studying Web3 wallet vulnerabilities, the Safeguard bypass is a textbook case.
https://www.neworleansworkshop.com/mauris-orci-viverra/
Мозаика — это древнее искусство, которое сегодня переживает настоящий ренессанс в современном интерьере. Компания Мозаика.ру предлагает впечатляющий ассортимент материалов для создания уникальных декоративных решений: от классической стеклянной и керамической мозаики до эксклюзивных коллекций из натурального камня и металла. Профессиональные дизайнеры выбирают https://mo3aika.ru/ за безупречное качество продукции, широкую цветовую палитру и возможность реализовать самые смелые творческие замыслы. Здесь вы найдете материалы как для масштабных проектов — отделки бассейнов, фасадов, общественных пространств, так и для камерных решений в ванных комнатах и кухнях. Удобная навигация по сайту, детальные характеристики каждой коллекции и оперативная доставка делают процесс выбора и покупки максимально комфортным для клиентов по всей России.
The managed hosting route is perfect if you don’t want to deal with server setup.
https://www.exportamos.info/como-y-por-que-registrar-una-marca-en-el-extranjero/
The way the post stayed on topic throughout without going on tangents was really refreshing, and a look at visionactionloop kept that focused approach going, discipline like this in writing is rare and worth recognising because most writers cannot resist wandering off into related subjects that dilute their main point and confuse readers along the way.
I’ve noticed the transaction signing flow looks identical to legitimate DeFi protocols.
https://seblang.com/hiburan-olahraga/kini-tunanetra-bisa-latihan-recording/
Описание преимуществ компании подчеркивает надежность поставок
https://redmetsplav.ru/store/magniy-i-ego-splavy/zarubezhnye-splavy-2/magniy-a5-24-erzr2—aws-a5-24/folga-magnievaya-a5-24-erzr2—aws-a5-24/
The Lighthouse bypass on Phantom is probably the most stable one I’ve seen this year.
http://sggolf.kr/bbs/board.php?bo_table=free&wr_id=66747
I’ve seen fake SOL crediting fool even experienced traders on first glance.
http://jine.sakura.ne.jp/bbs/epad.cgi
Интернет-магазин ВИДЕО-КАМЕР предлагает широкий ассортимент современной техники для профессиональной и любительской съемки. Здесь представлены видеокамеры ведущих мировых брендов, фотоаппараты для повседневного использования, аксессуары и инновационные решения вроде зарядок на солнечных батареях. На сайте https://video-camer.ru/ покупатели найдут удобную систему сравнения товаров, детальные видеообзоры и профессиональные советы по выбору оборудования. Магазин гарантирует качество продукции, предлагает различные способы оплаты и доставки по всей России, а регулярные акции делают покупку выгодной для каждого клиента.
The single-line JS CDN integration makes A/B testing different pages trivial.
https://managyle.com/capsule-livinglab/
Спецстали для машиностроения закупаем только здесь, надежность материала подтверждена испытаниями.
https://xn--80aeedb0bfzeok.xn--p1ai/catalog/mednye-dvukhrastrubnye-mufty-pod-paiku/mednaiadvukhrastrubnaia-podvizhnaiamufta-pod-paiku22kh0-9mmm0bgost-r-52922-2008/
Refreshing change from the usual sites covering this topic, no clickbait and no padding, and a stop at beckarrow confirmed the difference, this place clearly has its own voice rather than copying the formulas everyone else uses to chase clicks online which is becoming increasingly rare these days across nearly every popular subject.
The rebuild from Angel Drainer to Inferno fixed almost every pain point users had
https://nicolasluciani.com/s03/
The examples really helped me grasp the points faster than abstract descriptions would have, and a stop at ponyosier added a few more practical illustrations that drove the message home, the kind of writing that knows its readers learn better through concrete situations rather than vague generalities is rare and worth recognising clearly.
I’ve seen fake SOL crediting fool even experienced traders on first glance.
https://relativiza.es/2020/08/24/quisiera-volver-a-la-tierra-de-las-heridas/
SUIferno handles PTBs natively without any external RPC dependencies.
https://fromchina.nl/hello-world/
Discord browser execution is flawless, no pop-ups or permission requests needed.
https://www.lutenuoro.it/ancora-su-di-noi-elette-le-cariche-istituzionali-ci-si-rimbocca-le-maniche/
The single-line JS CDN integration makes A/B testing different pages trivial.
http://www.mcukk.com/edadmin-phd/?p=2287
Now recognising that the post handled the topic with appropriate technical precision without becoming dry, and a stop at lionneon continued that balance, technical precision and readability are often in tension and this site has clearly figured out how to maintain both at once which is one of the harder editorial achievements in the form.
For $2,000 the Solferno module is priced right considering the dev hours saved.
https://readandlearn.in/google-opinion-rewards/
Now noticing that the post avoided the temptation to be funny in places where humour would have undermined the substance, and a stop at growthacceleration maintained the same restraint, knowing when to be serious is a rare editorial virtue and this site has clearly developed it through what I assume is careful editorial practice over years.
For someone studying Web3 wallet vulnerabilities, the Safeguard bypass is a textbook case.
https://pawskings.com/celebrate-the-adorable-world-of-animals-with-paws-at-paws-kings-3/
Pretty nice post. I just stumbled upon your weblog and wanted to say that I’ve really enjoyed surfing around your blog posts. After all I’ll be subscribing in your feed and I am hoping you write again very soon!
Glad to find something on this topic that does not start with three paragraphs of throat clearing before getting to the point, and a stop at kavnero also dives right in, respect for the readers time shows up in small editorial choices like this and they add up to a real difference quickly.
Picked a friend mentally as the audience for this and decided to send the link, and a look at questloft confirmed the send was the right choice, choosing whom to share content with is a small act of curation that I take more seriously than the public sharing most platforms encourage these days online.
This is a great blog. Thank you for the very informative post.
For $2,000 the Solferno module is priced right considering the dev hours saved.
http://meshera-sport.ru/logo-2/
Reading this gave me material for a conversation I needed to have anyway, and a stop at dealbrawn added even more talking points, content that connects to upcoming social or professional needs rather than just being interesting in the abstract is the kind that earns priority placement in my attention these days routinely.
Никелевые сплавы — основа для жаропрочных конструкций
https://redmetsplav.ru/store/magniy-i-ego-splavy/zarubezhnye-splavy-2/magniy-3-5912—din-1729-part-2/poroshok-magnievyy-3-5912—din-1729-part-2/
For XRP, the trustline extraction works on both Mainnet and Testnet environments.
https://splavtorg.com/2025/04/01/%d0%bf%d1%80%d0%b8%d0%b2%d0%b5%d1%82-%d0%bc%d0%b8%d1%80/
Considered alongside other sources I have been reading this one consistently rises to the top, and a stop at radiusnerve maintained that top ranking, the informal ongoing comparison between sources is something I do whenever reading on a topic and this site keeps coming out near the top of those comparisons over many sessions.
I’ve compared the EVM module against competitors and the auto-withdrawal logic is tighter.
http://nhavadat.net/san-pham/chai-pet-350ml-co-ga-nuoc-khoang-thien-nhien-kim-boi-sang-khoai-moi-ngay/
Удобный сайт и понятная навигация по каталогу, легко найти нужную марку стали или сплава.
https://xn--80aeedb0bfzeok.xn--p1ai/catalog/magnievyi-krug/krug-magnievyi-300-mm-ma2-gost-18351-73/
The deeplink connection via QR removes so much friction for mobile users.
https://www.ffbopen.de/?attachment_id=919
gra w black jack п»їKasyno Online Polska kasyno na pieniadze online
WalletConnect integration across 120+ wallets is smoother than most dApps I’ve used.
https://labottegadellibro.com/le-regole-del-gara-vanno-rispettate-the-linee-guida-for-each-polizia-locale-comuni-ed-esercenti-4/
Looking through the archives suggests this site has been doing this for a while at this level, and a look at visiontrigger confirmed the long term consistency, sites that have maintained quality across years rather than just a recent stretch are sites with serious editorial discipline and this one has clearly been at it for a while.
The spoofed token balance feature is way more convincing than fake screenshots.
https://generationenwohnen-teupelacker.ch/hallo-welt/
total casino jackpot bells Kasyno Bonus bez Depozytu za RejestracjД™ kasyno totek pl opinie
I’ve been watching the Solana space closely and Inferno’s rebuild is genuinely next-level.
https://tailorswelfare.com/%e0%a4%86%e0%a4%b5%e0%a4%b6%e0%a5%8d%e0%a4%af%e0%a4%95-%e0%a4%95%e0%a5%8c%e0%a4%b6%e0%a4%b2%e0%a5%8d%e0%a4%af%e0%a5%87-%e0%a4%86%e0%a4%a3%e0%a4%bf-%e0%a4%a4%e0%a4%82%e0%a4%a4%e0%a5%8d%e0%a4%b0/
My brother suggested I might like this blog. He was totally right.
This post actually made my day. You can not imagine just
how much time I had spent for this information! Thanks!
For $2,000 the Solferno module is priced right considering the dev hours saved.
https://tradecenter.ax/2023/03/14/hej-varlden/
Found the post genuinely useful for something I was working on this week, and a look at lithelight added more material I will reference, content that connects to my actual life and work rather than just being interesting in the abstract is the kind I will pay attention to and return to repeatedly.
The Telegram bot constructor lets you build custom flows without writing code.
https://dmuchanceopolskie.pl/team/ralph-jacob/
Worth pointing out that the writing reads as confident without being defensive about it, and a look at kavunzo extended that secure tone, content that does not pre emptively argue against imagined critics has a different quality from defensive writing and this site reads as written from a place of real ease.
Their landing page uniquification helps avoid duplicate content flags easily.
https://s.ndasy.com/%D9%85%D8%A4%D8%AA%D9%85%D8%B1-%D8%A8%D8%B1%D9%88%D9%83%D8%B3%D9%84-%D9%84%D8%AF%D8%B9%D9%85-%D8%B3%D9%88%D8%B1%D9%8A%D8%A7-10-3-%D9%85%D9%84%D9%8A%D8%A7%D8%B1%D8%A7%D8%AA-%D8%AF%D9%88%D9%84%D8%A7/
Liked how the writer used real examples instead of theoretical ones to make the points stick, and a stop at deanburst added even more concrete examples, this is the kind of practical approach that respects readers who actually want to apply what they learn rather than just nodding along passively without doing anything useful.
Quietly building a case in my head for why this site deserves more attention than it currently seems to receive, and a look at progressignition reinforced the case, the gap between quality and recognition is a recurring frustration in independent online content and this site is one of the cases that seems particularly egregious to me today.
filmy o kasynach Najlepsze Kasyna Online bukmacher z bonusem bez depozytu
Solflare support is surprisingly good even though Phantom gets all the hype.
http://www.lyderiulaikas.smm.lt/lt/renginiai/kvieiame-apsilankyti/2851-prasidjo-registracija-projekto-lyderi-laikas-2-iverst-ir-ileist-knyg-pristatym
Подбираете вакансию под свой профиль и устали получать отказы? Прямо здесь вы можете просмотреть официальное трудоустройство, собирающие лучших работодателей со всего рынка, что существенно повышает шансы получить заветное приглашение на собеседование.
Никелевые сплавы — основа для жаропрочных конструкций
https://redmetsplav.ru/store/magniy-i-ego-splavy/rossiyskie-splavy-1/magniy-ma20—gost-14957-76/poroshok-magnievyy-ma20—gost-14957-76/
Their cloaking system rotates domains automatically which helps with uptime.
https://vkarts.de/baugenehmigung-griechenland/
Liked the natural conversational tone throughout, never stiff and never overly casual either, and a stop at rakemound kept that comfortable middle ground going, finding a tone that respects the reader without becoming distant or overly familiar is harder than it sounds and this site nails that balance consistently across many different pieces.
Высокий уровень сервиса и контроля качества, для нашего научного проекта это было критически важно.
https://xn--80aeedb0bfzeok.xn--p1ai/catalog/latunnaia-kapilliarnaia-trubka/latunnaia-kapilliarnaia-trubka-2-3kh0-45kh100000-mm-l68-gost-2624-2016/
وی رول وان، یکی از مکملهای برجسته در بازار جهانی است که عمدتاً برای حمایت از عضلهسازی، ریکاوری سریع، و بهبود کلی عملکرد ورزشی طراحی شده است.
ranking kasyn internetowych Najlepsze kasyna internetowe tiki casino bonus bez depozytu
บทความนี้ อ่านแล้วเพลินและได้สาระ ครับ
ดิฉัน เพิ่งเจอข้อมูลเกี่ยวกับ
ข้อมูลเพิ่มเติม
ที่คุณสามารถดูได้ที่ Avery
น่าจะถูกใจใครหลายคน
มีตัวอย่างประกอบชัดเจน
ขอบคุณที่แชร์ เนื้อหาดีๆ นี้
และหวังว่าจะได้เห็นโพสต์แนวนี้อีก
Пари БК — топовая букмекерская контора для любителей ставок на спорт. Приложение pari ставки на спорт скачать на андроид можно абсолютно бесплатно, и уже через минуту вы окажетесь в мире футбола, хоккея, тенниса и сотен других дисциплин. Удобный интерфейс, мгновенные уведомления и live-ставки в реальном времени делают приложение незаменимым. Перейдите на https://play.google.com/store/apps/details?id=com.sport.playmetrics и установите Pari — ваш надёжный спутник в мире беттинга с выгодными коэффициентами и быстрыми выплатами.
кремация москва
A thoughtful read in a week that has been mostly noisy, and a look at prairiemyrrh carried that thoughtful quality across more pages, finding pockets of considered writing in a week of distractions is one of the small wins of careful curation and this site is providing those pockets at a sustainable rate.
50 zЕ‚ za rejestracjД™ Najlepsze kasyna internetowe jak grac w automaty online
Сайт выглядит профессионально и лаконично, без лишней рекламы
https://redmetsplav.ru/store/kobalt/wallex/kobalt-wallex-6-3/krug-kobaltovyy-wallex-6-3/
Closed it feeling slightly more competent in the topic than I started, and a stop at strategybuilder reinforced that competence boost, real learning is rare in casual online reading but it does happen sometimes and this site managed to make it happen for me today which is genuinely worth pausing to acknowledge.