Easy and inexpensive 5-minute light fixture makeover
Updating a light fixture for next to nothing!
Since buying our 300-year-old farmhouse 5 years ago we have been slowly renovating each room. We do all of our renovations ourselves in our spare time and when we have some extra money. Check out our journey to the farm here!
Sometimes days, months, or even years after we’ve finished a room in our home it doesn’t quite feel right. Like maybe I choose the wrong wall color or maybe I need to add a pop of color somewhere in the space. Sometimes it’s an easy fix and other times it’s not so cost-effective.
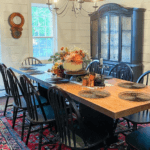
Well, Lately I’ve been second-guessing my light fixture choices in a few rooms and have been wanting to trade them in but they’re perfectly good condition! They’re newish and in perfect condition. AND I don’t hate them… I just wish they were solid black and didn’t have white candlesticks.
The simplest and most inexpensive solution is to give them a makeover with a little spray paint. The best part is that this DIY only takes about 5-minutes and only costs about $5! What can’t we solve with a little paint and DIY power?

Step 1: Choose the light fixture to makeover and remove the pieces you want to spray paint.
I have one light fixture in my dining room that whenever I see it I think… “I wish the candlesticks weren’t white!”… then it hit me one day! How easy would it be if I popped them off and spray painted them? So easy! So I made sure the lights were off and the bulbs were cooled off and unscrewed each bulb. I put my bulb pile somewhere safely and took my plastic candlesticks to the barn and put them on some scrap material so I could prep and spray paint.

Step 2: Get to spray painting!
First, I grabbed the spray paint I’ll be using. I’ll be sure to link it at the bottom of the post. I love spray paint because it’s cheap. A can usually runs under $5 and works with just about any material! I’m using black flat paint and primer because I want good coverage and I want it to look like my metal light fixture and metal usually doesn’t have a high gloss. I gave it a thin coat – waited for them to dry, and then rolled them over and spray painted the other side once they were all good and dry. Then I gave them all a second coat. Make sure everything is nice and dry before moving on.

Step 3: Reassemble!
After everything dry I put my candlesticks back on my light fixture. Next, I screwed my light bulbs back in and voila! Done!


Want to shop the supplies from this post? Click on an image below!

Thanks so much for reading along, pals!
Much Love,
Kori ~ at The Farmhouse Life
Can you be more specific about the content of your article? After reading it, I still have some doubts. Hope you can help me.
Can you be more specific about the content of your article? After reading it, I still have some doubts. Hope you can help me.