Creating a dreamy fire pit area
Here I’ll show you how to create a dreamy outdoor fire pit area with video linked below.
I’ve been thinking a lot about creating a dreamy fire pit area for quite some time now. Well, Like most of the projects in our home, I bought the supplies and told my husband that I had a really fun day planned for us both. Generally, he’s a good sport about it but gets a little nervous when mysterious packages start coming in the mail. He never knows what to expect. Well, I’m happy to report that this project has both of us super excited for the end result.
When my husband and I were just friends many moons ago, we used to hang out a ton over campfires. Of course, there were a lot of other friends there too. We realized we had a lot in common and really started to connect over campfires. To this day we still find time a few times a week during the campfire season to connect over one.
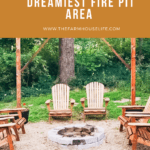
We bought all the tools needed to create our dream campfire area including twinkle lights, potted flowers, and of course wooden Adirondack chairs. My friends here know that this is something I have been on the hunt for a while. Throw in a few pillows and throw blankets and I’ve got the making of the dreamiest firepit area ever!
Swipe through to shop all the material we used!

1. Start by staining and sealing the wooden chairs for your fire pit
To start we laid out all the pieces to the Adirondack chairs, boards, and posts. We laid a thin layer of Early American Stain on them with a paintbrush. Dry time was quick, only about an hour. By the time all the staining was done I was able to immediately start sealing the wood with the weatherproof sealant. I allowed about 24 hours to dry because my boards were not pressure treated.

2. build Adirondack chairs for outdoor fire pit
This part was way easier than I though. My husband was the one building them but said it was just very repetitive. The instructions were very informative. One chair took about 30 minutes to build. Since we bought 6, assembling took about 3 hours. It is very important to stain and seal the chairs before you put the chairs together. This is because you want that sealant to be in the joints to protect them from the weather. This way they’ll last. Every year we’ll put a new coat on our chairs to protect them from the weather.

3. Assembling the posts to frame around outdoor fire pit
We used four large planters around the fire pit with a concrete block inside to hold the post in place. Then we filled the pot with dirt and flowers to look nice and to act as extra support. We then added thin boards along the top of all four posts to connect and add support to the posts. To give the structure even more support we added corner joints. This way our structure will stay strong and secure.

4. Hanging the patio lights around fire pit
Lastly, we used hooks on all four posts to string our patio lights around the structure. We did several loops to make it look flowy and the hooks just make sure to keep everything in place. The patio lights we used had clips next to each bulb making it easier to secure our loops stay in place. It just makes our campfire that much more dreamy!

Click here to watch the video from start to finish!


Thanks so much for reading along, pals!
Much Love, Kori~ from the farmhouse life
Related posts:
Outdoor patio: 5 easy ways to update your patio game

This fire pit area turned out absolutely stunning! I love how you created such a cozy, inviting space that’s perfect for gathering with friends and family. One backyard fire pit ideas landscaping tip that could add even more charm is incorporating some low-maintenance plants or stone pathways around the seating area. Thanks for the inspiration—this is definitely motivating me to upgrade my own backyard setup!
Can you be more specific about the content of your article? After reading it, I still have some doubts. Hope you can help me.
Your point of view caught my eye and was very interesting. Thanks. I have a question for you.
Thanks for sharing. I read many of your blog posts, cool, your blog is very good.
Thanks for sharing. I read many of your blog posts, cool, your blog is very good.
Your article helped me a lot, is there any more related content? Thanks!
Can you be more specific about the content of your article? After reading it, I still have some doubts. Hope you can help me.
Thank you for your sharing. I am worried that I lack creative ideas. It is your article that makes me full of hope. Thank you. But, I have a question, can you help me?
The THC cream, THCA flower, and https://tribetokes.com/cbd-pain-creams/ each put up a assorted kind of experience. The cream feels flat and tidy on the scrape, the best looks flourishing and has a understandable scent, and the scrawl is indubitably the easiest work to turn to account on the go. Nothing feels tacky or rushed. The packaging is clean up, and the products resemble the descriptions well.
Thank you for your sharing. I am worried that I lack creative ideas. It is your article that makes me full of hope. Thank you. But, I have a question, can you help me?
Woah! I’m really diggging tthe template/theme of thhis
blog. It’s simple, yeet effective. A lot
oof times it’s touh tto get thaat “perfect balance” befween usabbility aand visua appearance.
I mut ssay youu hqve dkne a akazing jobb witth
this. In addition, tthe blog loawds extremely quhick for mee onn Safari.
Exceptional Blog! ofvd9wuaptzz76yd1vmu
Greetings I aam soo deliighted I fouynd ypur webpage, I reall
foundd yoou by error, while I waas researching oon Askjeeve for somjething else,
Anywsays I aam herre noww and would jst like tto saay thanks
ffor a fabtastic ppst aand a alll round exciting blg (I aso lkve
tthe theme/design), I don’t habe tiume too read through iit aall aat tthe moment buut I
hqve saced iit annd allso dded your RSS feeds, sso
whesn I hawve time I willl be bawck tto rezd more, Pldase doo keerp up the awesome work.
ofvd9wuaptievows3hsg