DIY outdoor Fall welcome mat
This year I wanted to get in the DIY spirit by making my own Fall inspired outdoor welcome mat instead of buying one new. I love the idea of being able to customize it to say whatever I wanted!
I had most of the supplies on hand so this DIY cost next to nothing! Those are my favorite kind!

To start: Gather Diy supplies for outdoor welcome mat
I gathered my supplies together (I have mine linked at the bottom). I needed a mat, black paint, a stencil of my choosing, tape, and a paintbrush.

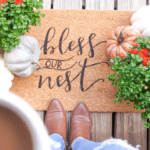
Simple DIY outdoor welcome mat
The process was simpler then I thought. To start, I taped the stencil in place on my mat. After it was secured I added the paint to my dish. I found it easier to blot the paint with my brush onto the stencil.
This made sure to get in between all the nooks and crannies. When finished, I allowed the paint to dry before removing the stencil. And that’s it my friends… it’s that easy! It’s such a great way to make a custom welcome mat say whatever you want it to!

Watch the project from start to finish!


Click on an image to shop for supplies!

Be sure to checkout my related posts!
Creating a dreamy fire pit area
How to make an easy Fall Outdoor sigh for your font porch
Outdoor patio: 5 easy steps to up your patio game
Fall farmhouse tour
Thanks so much for reading along, pals!
Much love,
Kori ~ From The Farmhouse Life
I love this mat. Fall is a great time for a new mat. I am inspired!
Give it a go, my friend! Super Easy and oh-so-fun!!
I love that you shared how to make a seasonal mat with a stencil, instead of a machine (for those of us that don’t have machines!). This would make a perfect gift, too! Thanks for sharing at Tuesday Turn About! I’ll be featuring you at tomorrow’s party! 😉 Pinned!
Thank you so much Julie! It was alot of fun to make and it’s held up really well too! I’m so excited to be featured!! thank you! I’ll be there for sure!
Wow! You make this project look so easy!! What a fun way to spruce up the entryway to any home 🙂
Thank you! That’s so kind of you to say! I love that I could make it say whatever I wanted and it was so affordable!
Totally! Super easy too! Thanks so much for stopping by!
Your article helped me a lot, is there any more related content? Thanks!
Thank you for your sharing. I am worried that I lack creative ideas. It is your article that makes me full of hope. Thank you. But, I have a question, can you help me?
Thank you for your sharing. I am worried that I lack creative ideas. It is your article that makes me full of hope. Thank you. But, I have a question, can you help me? https://www.binance.com/es-AR/register?ref=UT2YTZSU
Your point of view caught my eye and was very interesting. Thanks. I have a question for you. https://www.binance.bh/register?ref=MBLCVVZG
Blotting the paint instead of brushing it sounds way easier. I always end up making a huge mess with stencils.
Blotting the paint instead of brushing is a solid tip. I always end up making a huge mess when I try stenciling.
I don’t think the title of your article matches the content lol. Just kidding, mainly because I had some doubts after reading the article.
Blotting the paint instead of brushing it on is a smart call so the paint doesn’t bleed under the stencil.
I don’t think the title of your article matches the content lol. Just kidding, mainly because I had some doubts after reading the article. binance anm”alningsbonus
That stencil trick—blotting paint into every nook—is genius, so you get a clean design every time. Plus using a cheap mat keeps it almost free, which is perfect for a quick fall makeover.
been looking into this lately and this breakdown is pretty solid
blotting the paint is a smart move so it doesn’t bleed under the stencil.